根据具体需求, 在自定义一个View的时候,我们可能有如下做法:
1. 实现独立的控件, 完全自己实现,或者继承现有系统控件,如TextView或Button, 重写某些方法, 达到自定义目的
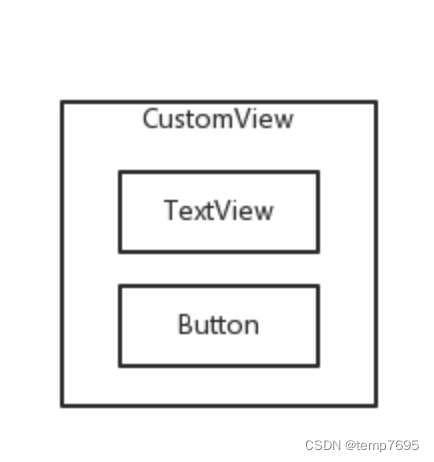
2. 实现较为复杂结构的控件, 使用现有的系统控件进行组合, 如:
针对第二种形式,一般有两种做法
例1) 在初始化时, java动态创建TextView、Button实例,然后addView到CustomView上,如:
public class CustomView extends LinearLayout {

	public CustomView(Context context, AttributeSet attrs) {
		super(context, attrs);

		TextView tvView = new TextView(context);
		Button button = new Button(context);

		addView(tvView);
		addView(button);
	}
}
例2) 在layout文件中以静态方式进行布局, 如:
-- custom_layout.xml --
<com.joy.androidtest.CustomView xmlns:android="http://schemas.android.com/apk/res/android"
    android:layout_width="match_parent"
    android:layout_height="match_parent"
    android:orientation="vertical" >

    <TextView
        android:id="tv"
        android:layout_width="wrap_content"
        android:layout_height="wrap_content"/>

    <Button
        android:id="button"
        android:layout_width="wrap_content"
        android:layout_height="wrap_content"/>

</com.joy.androidtest.CustomView>
然后再在类中引用:
public CustomView(Context context, AttributeSet attrs) {
	super(context, attrs);

	TextView tv = (TextView)findViewById(R.id.tv);
	Button btton = (Button) findViewById(R.id.button);
}
针对第二种写法, 如果使用的时候, 这个CustomView直接通过Infate的形式构建,是可以的,但是如果在另一个layout中进行引用则会有问题:
-- other_layout.xml --
<?xml version="1.0" encoding="utf-8"?>
<LinearLayout xmlns:android="http://schemas.android.com/apk/res/android"
    android:layout_width="match_parent"
    android:layout_height="match_parent"
    android:orientation="vertical" >

    <TextView
        android:layout_width="wrap_content"
        android:layout_height="wrap_content"/>

    <com.joyc.androidtest.CustomView
        android:layout_width="wrap_content"
        android:layout_height="wrap_content">

    </com.joyc.androidtest.CustomView>

</LinearLayout>
在上面的使用中, CustomView在初始化的时候, TextView tv = (TextView)findViewById(R.id.tv);得到的将是null, 如果此时对tv进行操作, 则会报出空指针。
具体原因, 跟自定义View 的创建过程有关, 其实自定义View和系统View的构建过程是一样的。当我们在Acitvity中通过setContentView方式创建布局的时候, 其过程如下
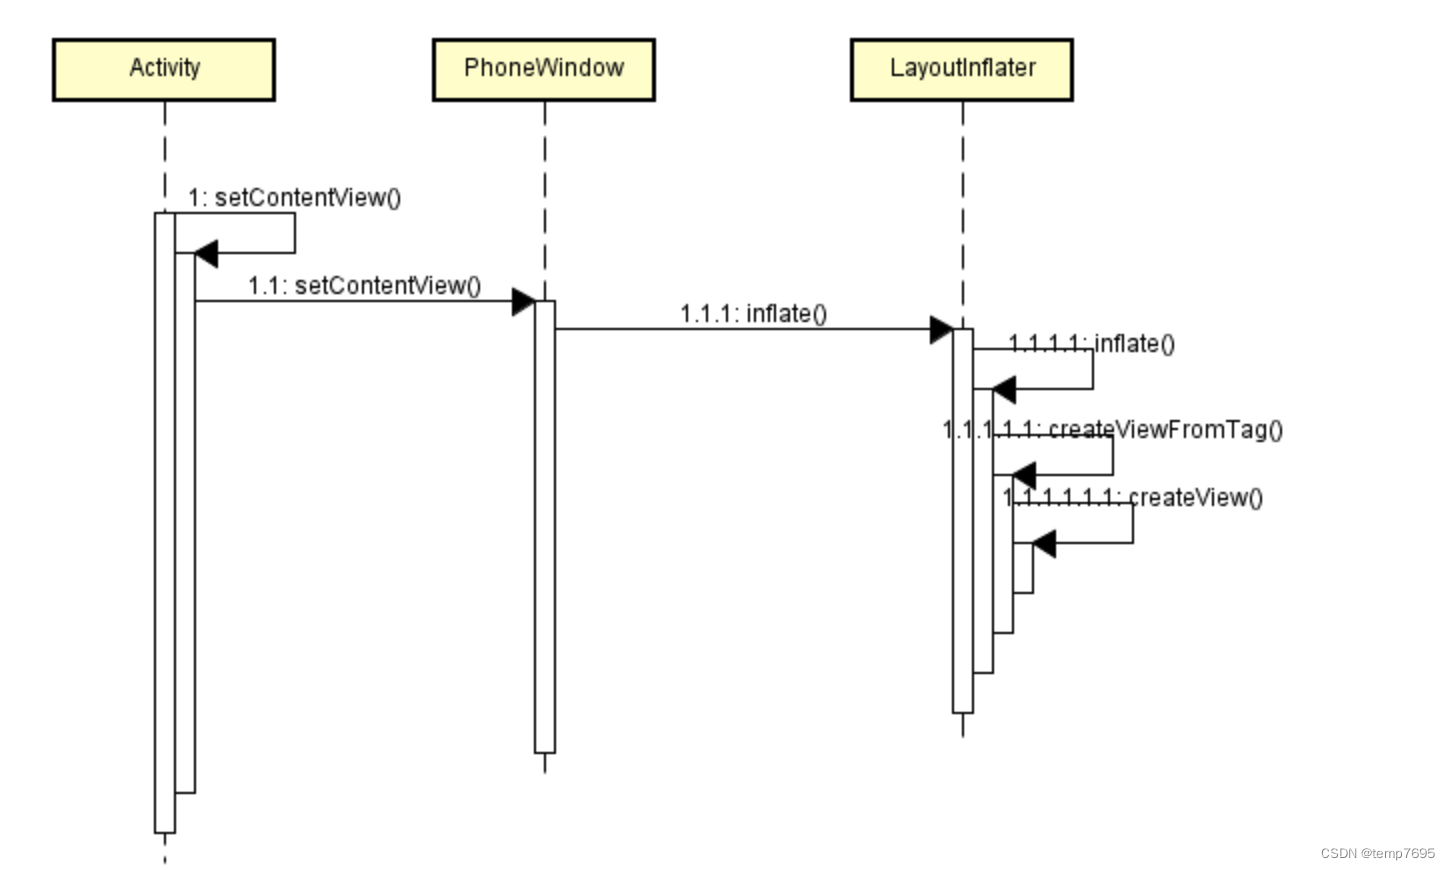
LayoutInflater的执行过程:
public View inflate(int resource, ViewGroup root, boolean attachToRoot) {
        if (DEBUG) System.out.println("INFLATING from resource: " + resource);
        XmlResourceParser parser = getContext().getResources().getLayout(resource);
        try {
            return inflate(parser, root, attachToRoot);
        } finally {
            parser.close();
        }
    }
将layout解析为parser对象, 然后调用inflate(XmlPullParser parser, ViewGroup root, boolean attachToRoot), 这个方法的主要代码如下:
public View inflate(XmlPullParser parser, ViewGroup root, boolean attachToRoot) {
        ...

	final String name = parser.getName();

        ...

	temp = createViewFromTag(root, name, attrs);

	// Inflate all children under temp
	rInflate(parser, temp, attrs, true);

	...

	// We are supposed to attach all the views we found (int temp)
	// to root. Do that now.
	if (root != null && attachToRoot) {
	root.addView(temp, params);
	}

	// Decide whether to return the root that was passed in or the
	// top view found in xml.
	if (root == null || !attachToRoot) {
	result = temp;
	}
}
final String name = parser.getName(); 获得标签名, 如LinearLayout或者com.test.CustomView, 然后调用createViewFromTag,
View createViewFromTag(View parent, String name, AttributeSet attrs) {
	...
	if (view == null) {
		if (-1 == name.indexOf('.')) {
			view = onCreateView(parent, name, attrs);
		} else {
			view = createView(name, null, attrs);
		}
	}
	...
}
这里看到如果是自定义view, 及带包名的xx.xx.xx格式的标签名, 会直接调用,createView,否则即为系统view, 会调用onCreateView,实际上调用到PhoneLayout的onCreateView方法,在加上系统包名的前缀后再调回createView方法
createView方法里根据标签名,及View的类名, 通过反射方式创建View
 public final View createView(String name, String prefix, AttributeSet attrs)
            throws ClassNotFoundException, InflateException {
	...
	// Class not found in the cache, see if it's real, and try to add it
	clazz = mContext.getClassLoader().loadClass(
	prefix != null ? (prefix + name) : name).asSubclass(View.class);
	...
	Object[] args = mConstructorArgs;
	args[1] = attrs;

	final View view = constructor.newInstance(args);
}
这一步完成后,就获得了View的实例, 再回到inflate, 继续往下调用rInflate()方法。
void rInflate(XmlPullParser parser, View parent, final AttributeSet attrs,
            boolean finishInflate) throws XmlPullParserException, IOException {

        final int depth = parser.getDepth();
        int type;

        while (((type = parser.next()) != XmlPullParser.END_TAG ||
                parser.getDepth() > depth) && type != XmlPullParser.END_DOCUMENT) {

            if (type != XmlPullParser.START_TAG) {
                continue;
            }

            final String name = parser.getName();

            ...

	    final View view = createViewFromTag(parent, name, attrs);
	    final ViewGroup viewGroup = (ViewGroup) parent;
	    final ViewGroup.LayoutParams params = viewGroup.generateLayoutParams(attrs);
	    rInflate(parser, view, attrs, true);
	    viewGroup.addView(view, params);

        }

        if (finishInflate) parent.onFinishInflate();
}
可以看到这是个递归过程, 不断寻找当前节点的所有子节点View标签,然后调用createViewFromTag进行实例化,随后调用viewGroup.addView(view, params);加到父view上,最终将所有view标签实例化之后,回到inflate, 调用root.addView(temp, params);将最外层标签加到inflate时传进来的父view上(如果非null的话)。整个过程如下:
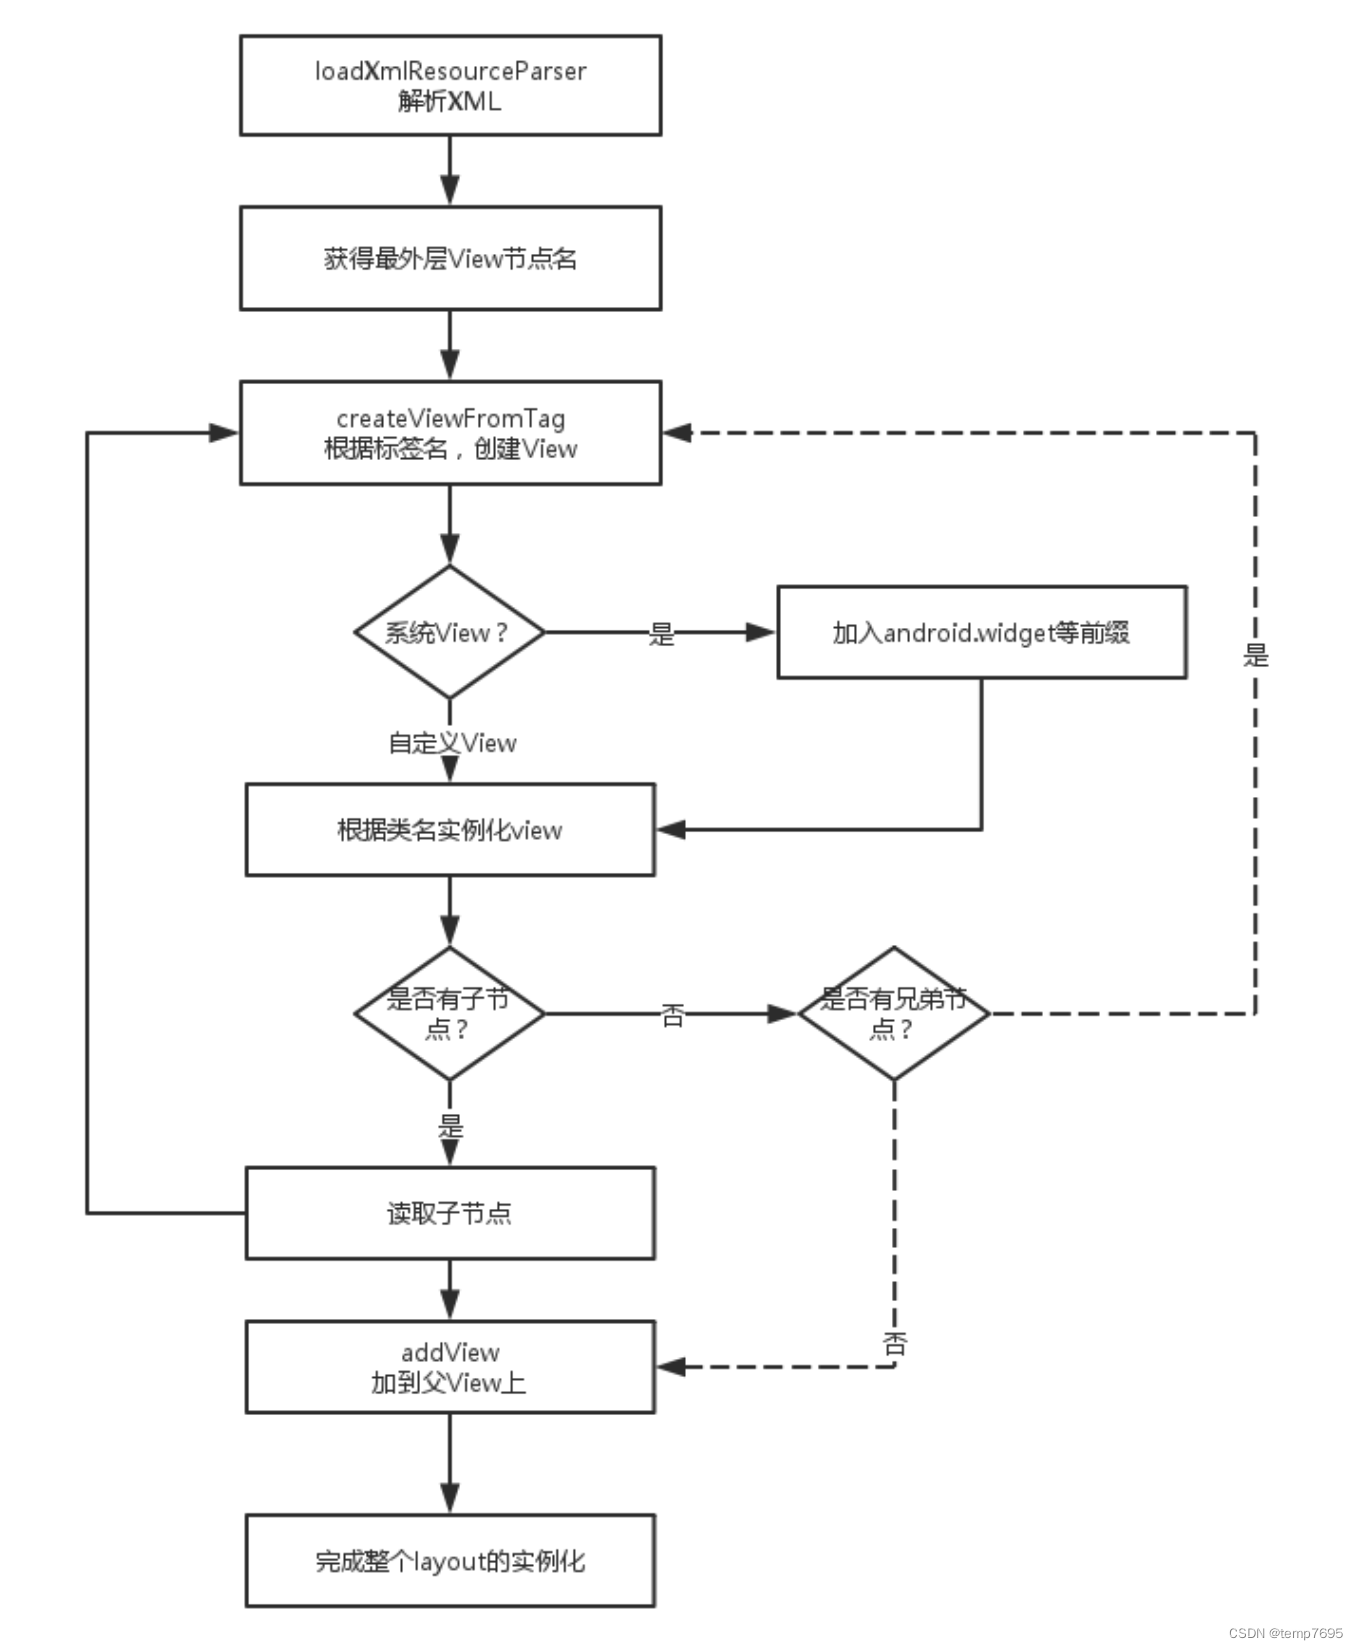
从如上过程可以了解到, layout的解析过程是将所有标签标明的View进行有外层到内层逐个实例化后,添加到父的过程。所以上面的例2)中, 将CustomView标签放在另一个layout(other_layout.xml)里,却企图能够实例化custom_layout.xml里包含的TextView和Button是无法做到的,因为other_layout.xml解析过程中只会实例化CustomView本身, 跟custom_layout是没有关系的, 这样,构造方法CustomView(Context context, AttributeSet attrs)里,因为没有初始化TextView和Button, 所以findViewById是找不到的。
上面的例子可以改为:
<?xml version="1.0" encoding="utf-8"?>
<LinearLayout xmlns:android="http://schemas.android.com/apk/res/android"
    android:layout_width="match_parent"
    android:layout_height="match_parent"
    android:orientation="vertical" >

    <TextView
        android:layout_width="wrap_content"
        android:layout_height="wrap_content"/>

    <Button
        android:layout_width="wrap_content"
        android:layout_height="wrap_content"/>

</LinearLayout>
public CustomView(Context context, AttributeSet attrs) {
super(context, attrs);
LayoutInflater.from(context).inflate(R.layout.custom_layout, this);
findViewById(R.id.tv);
}这样,无论使用inflate的方式构建View,还是嵌入到其他layout里使用,就不会有问题了。
但是上面的实现,会多出一个无用的层级来, 因为layout里最外层的标签是LinearLayout,解析完毕后,会加到CustomView本身的这个Linearlayout上来,其中一个LinearLayout是没有必要的。 所以,如果不是FrameLayout这样可以用<merge>标签替换从而避免多出一个无用Layout层级的情况, 直接在构造方法里new 一个子view动态添加会好一些。
最后
以上就是威武斑马最近收集整理的关于如何正确使用Android自定义View的全部内容,更多相关如何正确使用Android自定义View内容请搜索靠谱客的其他文章。


发表评论 取消回复