1.线性布局LinearLayout
LinearLayout是最常用的布局。顾名思义,LinearLayout下面的子视图就像用一根线串了起来,所以LinearLayout内部视图的排序是有顺序的,要么从上到下依次垂直排序,要么从左到右依次水平排列。LinearLayout除了继承View/ViewGroup类的所有属性和方法外,还有其特有的XML属性。
- orientation:指定线性布局的方向。horizontal表示水平布局,vertical表示垂直布局。如果不指定该属性,默认为水平布局。
- gravity:指定布局内部视图与本地线性布局的对齐方式。
- layout_weight:指定当前视图的宽或高占上线线性布局的权重。这里要注意,layout_weight属性并非在当前LinearLayout节点中设置,而是在下级视图的节点中设置。如果layout_weight指定的是当前视图在宽度上占的权重,layout_width就要同时设置为0dp,高度的设置亦然。
下面就是控件设置一比一的大小分布的:
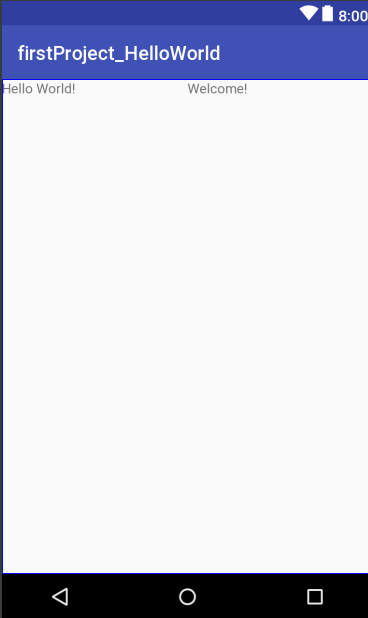
具体的代码如下:
<?xml version="1.0" encoding="utf-8"?>
<LinearLayout xmlns:android="http://schemas.android.com/apk/res/android"
    android:layout_width="match_parent"
    android:layout_height="match_parent"
    android:orientation="horizontal">

    <TextView
        android:layout_width="0dp"
        android:layout_weight="1"
        android:layout_height="wrap_content"
        android:text="Hello World!" />

    <TextView
        android:text="Welcome!"
        android:layout_width="0dp"
        android:layout_weight="1"
        android:layout_height="wrap_content" />

</LinearLayout>
2.相对布局RelativeLayout
RelativeLayout下级视图的位置是相对位置,得有具体的参照物才能确定最终为位置。如果不设定下级视图的参照物,那么下级视图默认显示在RelativeLayout内部的左上角。用于确定视图位置的参照物分两种,一种是与该视图自身平级的视图,另一种是该视图的上级视图。相对位置的一些属性与类型如下:
- layout_toLeftOf:当前视图在指定视图的左边。RelativeLayout类的相对位置为LEFT_OF。
- layout_alignLeft:当前视图与指定视图的左侧对齐。RelativeLayout类的相对位置为ALIGN_LEFT。
- layout_centerInParent:当前视图在上级视图中间。RelativeLayout类的相对位置为CENTER_IN_PARENT。
- layout_alignParentLeft:当前视图与上级视图的左侧对齐。RelativeLayout类的相对位置为ALIGN_PARENT_LEFT。
以上便是相对布局的大概特点,至于右侧、下方等都与上面的属性类似,得到的视图大致如下:
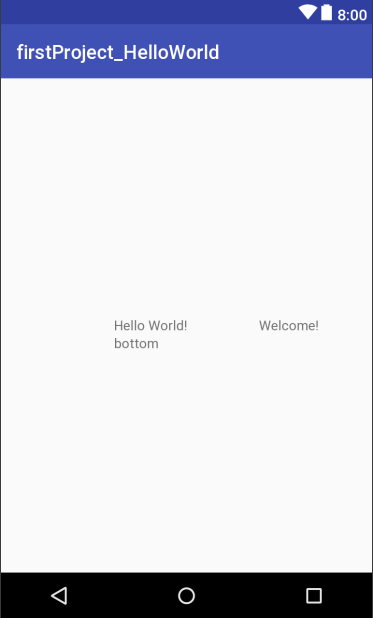
具体的代码如下:
<RelativeLayout xmlns:android="http://schemas.android.com/apk/res/android"
    android:layout_width="match_parent"
    android:layout_height="match_parent">

    <TextView
        android:id="@+id/tv_center"
        android:layout_width="150dp"
        android:layout_centerInParent="true"
        android:layout_height="wrap_content"
        android:text="Hello World!" />

    <TextView
        android:id="@+id/tv_right"
        android:layout_width="150dp"
        android:layout_toRightOf="@+id/tv_center"
        android:layout_centerVertical="true"
        android:text="Welcome!"
        android:layout_height="wrap_content" />

    <TextView
        android:id="@+id/tv_buttom"
        android:layout_centerHorizontal="true"
        android:layout_below="@+id/tv_center"
        android:layout_width="150dp"
        android:layout_height="wrap_content"
        android:text="bottom" />

</RelativeLayout>
3.框架布局FrameLayout
FrameLayout也是比较常用的布局,其下级视图无法指定所处的位置,只能统统从上级FrameLayout的左上角开始添加,并且后面添加的子视图会把之前的子视图覆盖掉。框架布局一般用于需要重叠显示的场合,比如绘图、游戏界面等。常见的属性说明如下:
- foreground:指定框架布局的前景图像。该图像在框架内部永远处于最顶层,不会被框架内的其他视图覆盖。
- foregroundGravity:指定前景图像的对齐方式,该属性的取值说明同gravity。
框架布局(帧布局)的特点大致就是这样,布局完也差不多是这样:
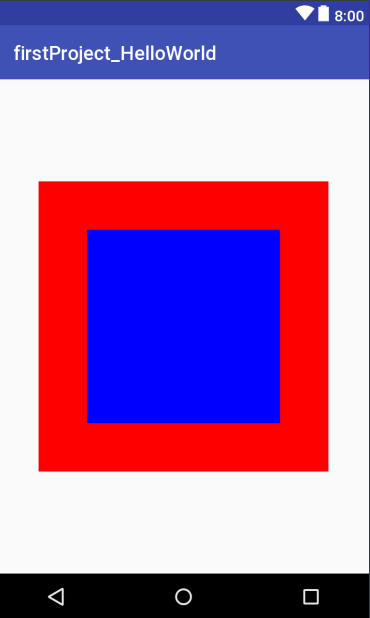
具体的代码如下:
<?xml version="1.0" encoding="utf-8"?>
<FrameLayout xmlns:android="http://schemas.android.com/apk/res/android"
    android:layout_width="match_parent"
    android:layout_height="match_parent">

    <TextView
        android:layout_gravity="center"
        android:background="@color/colorRed"
        android:layout_width="300dp"
        android:layout_height="300dp" />

    <TextView
        android:layout_gravity="center"
        android:background="@color/colorBlue"
        android:layout_width="200dp"
        android:layout_height="200dp" />
</FrameLayout>
其实还有更多的布局,但这些都是比较使实用的,知识都是从一点一点累积起来的!
最后
以上就是冷酷鸵鸟最近收集整理的关于Android的几种常用布局——LinearLayout,RelativeLayout和FrameLayout的全部内容,更多相关Android内容请搜索靠谱客的其他文章。


发表评论 取消回复