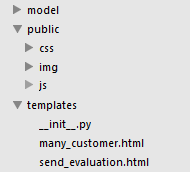
最近在推进项目使用grunt。具体各步骤操作的原理网上很多详细的,但尝试的过程中还是遇到了不少坑。现在写一写自己的安装使用过程
安装
nodejs。sudo apt-get install nodejs安装命令行的
grunt(grunt-cli) sudo npm install -g grunt-cli(现在的nodejs版本已经自带npm了)建立一个
grunt文件夹(mkdir grunt),进入此文件夹,运行npm init,生成package.json文件,(注意:此时配置的name值不能和文件夹同名)加载插件
npm install grunt --save-dev,npm install grunt-contrib-concat grunt-contrib-clean grunt-contrib-copy grunt-contrib-cssmin grunt-contrib-imagemin grunt-contrib-uglify grunt-rev grunt-usemin --save-dev(分别对应:合并,清除文件,拷贝文件,css压缩,图片压缩,js压缩,修改文件名,修改html页面引用路径)新建
Gruntfile.js,写好配置js即可运行了。
下面,结合我自己的项目说说Gruntfile.js的写法。
我的项目结构:public 文件夹 + templates

首先,将public和templates复制到grunt的安装目录下
我的需求是:将公用的几个css合并成一个build.css,几个公用的js合并成一个build.js,然后对public下所有的文件压缩,然后修改文件md5名称,并在html页面及CSS和js里修改相对应的引用,最后在dist目录下生成执行完操作后的public和templates文件夹,这样,直接将服务器上的这两个文件夹直接替换掉就可以了,本地的开发环境下依然是开发的文件
Gruntfile.js:
module.exports = function(grunt) {

    grunt.config.init({
        // 清空"生产环境"文件夹的文件
        clean: {
            html: {
                src: "dist/"
            },
            js: { // 清除复制过来js文件里已合并的js
                src: [
                    'dist/public/js/zepto.min.js',
                    'dist/public/js/des3.js',
                    'dist/public/js/pako.js',
                    'dist/public/js/public.js'
                ]
            },
            css: {
                src: [
                    'dist/public/css/WebApp_reset.css',
                    'dist/public/css/public.css',
                    'dist/public/css/main_msg.css'
                ]
            }
        },
        // 合并js和css
        concat: {
            options: {
                separator: ';',
            },
            js: {
                src: [
                    'public/js/zepto.min.js',
                    'public/js/des3.js',
                    'public/js/pako.js',
                    'public/js/public.js'
                ],
                dest: 'dist/public/js/build.js'
            },
            css: {
                src: [
                    'public/css/WebApp_reset.css',
                    'public/css/public.css',
                    'public/css/main_msg.css'
                ],
                dest: 'dist/public/css/build.css'
            }
        },
        // 准备替换
        useminPrepare: {
            html: 'templates/*.html',
            options: {
                dest: 'dist/templates'
            }
        },
        // 替换所有MD5文件名,并合并资源标签
        usemin: {
            css: 'dist/public/css/*.css',
            js: 'dist/public/js/*.js',
            html: 'dist/templates/*.html',
            options: {
                assetsDirs: ['dist/public/**'],
                patterns: {
                    js: [
                       //  [/(/images/[/w-]+.png)/, 'replace image in js']
                       // 网上大部分都是这个,其实并不能替换js里的img路径

                       [/(img/[^'"']*?.(?:gif|jpeg|jpg|png|webp|svg|ico))/gm, 'replace image in js']
                       // 替换img目录下的监控到的图片变化
                    ]
                },
                blockReplacements: { // 重新书写link标签,加 "/"结束符
                    css: function(block) {
                        return '<link rel="stylesheet" href="' + block.dest + '"/>';
                    }
                }
            }
        },
        // 压缩js
        uglify: {
            generated: {
                expand: true,
                //相对路径
                cwd: 'dist/public/js',
                src: '*.js',
                dest: 'dist/public/js/'
            }
        },
        // 复制js和html文件去"生产环境"
        copy: {
            html: {
                flatten: true,
                expand: true,
                src: 'templates/*.html',
                dest: 'dist/templates'
            },
            js: {
                flatten: true,
                expand: true,
                src: 'public/js/*.js',
                dest: 'dist/public/js/'
            },
            css: {
                flatten: true,
                expand: true,
                src: 'public/css/*.css',
                dest: 'dist/public/css/'
            }
        },
        // 压缩css
        cssmin: {
            generated: {
                expand: true,
                //相对路径
                cwd: 'dist/public/css/',
                src: '*.css',
                dest: 'dist/public/css/'
            }
        },
        // 图片压缩
        imagemin: {
            start: {
                options: {
                    optimizationLevel: 3 //定义 PNG 图片优化水平
                },
                files: [{
                    expand: true,
                    cwd: 'public/img/',
                    src: ['**/*.{png,jpg,jpeg}'], // 优化 img 目录下所有 png/jpg/jpeg 图片
                    dest: 'dist/public/img/' // 优化后的图片保存位置,覆盖旧图片,并且不作提示
                }]
            }
        },
        // 更改本地资源文件名 + MD5
        rev: {
            options: {
                encoding: 'utf8',
                algorithm: 'md5',
                length: 8
            },
            assets: {
                files: [{
                    src: [
                        'dist/public/img/*.{jpg,jpeg,gif,png}',
                        'dist/public/css/*.css',
                        'dist/public/js/**/*.js'
                    ]
                }]
            }
        },
    });
    grunt.loadNpmTasks('grunt-contrib-clean');
    grunt.loadNpmTasks('grunt-contrib-copy');
    grunt.loadNpmTasks('grunt-contrib-uglify');
    grunt.loadNpmTasks('grunt-contrib-concat');
    grunt.loadNpmTasks('grunt-contrib-cssmin');
    grunt.loadNpmTasks('grunt-contrib-imagemin');
    grunt.loadNpmTasks('grunt-usemin');
    grunt.loadNpmTasks('grunt-rev');
    grunt.registerTask('default', [
        'clean:html',// 清除dist下所有目录
        'concat', // 合并css,js到dist目录
        'copy', // 复制所有的html,js,css到dist下
        'useminPrepare',
        'uglify', // 压缩所有的js
        'cssmin', // 压缩所有的css
        'imagemin', // 压缩所有的image到dist下
        'clean:js', // 清除已合并的js
        'clean:css', // 清除已合并的css
        'rev', // 给dist下所有的js、css、image加MD5
        'usemin' // 替换html上的引用地址
    ]);
}

`grunt.registerTask()`里的加载顺序就是我项目的打包执行顺序。
最后,在当前的命令行下输入 `grunt` 回车就开始执行`gruntfile`里的配置。
遇到的一些问题:
如果键入
grunt没有反应,可能是nodejs的问题,ubuntu下有一个node的npm包,和nodejs是完全没有关系的,可能安装node安装了这个没有关系的包,这会导致grunt运行不起来,只要将这个包删除就好sudo spt-get remove node。usemin生成的link标签是不带/结束标签的,需要手动写标签生成规则,详见gruntfile.js里的usemin配置html页面的替换资源书写规则:


需要多个合并的文件都需要按grungfile里配置的顺序书写,其他的单个的文件需要改md5或者压缩的都需要些一个build,上面第二条的配置里面的block参数就是build区域
最后
以上就是等待便当最近收集整理的关于 ubuntu下安装使用grunt的全部内容,更多相关内容请搜索靠谱客的其他文章。


发表评论 取消回复