Qcom_Sensor(九)--- 之 aDSP端Sensor Driver流程
- MAIN
- SMGR INIT
- 1. HAL层数据处理
- 2. aDSP层数据处理
- Sensor Probe过程:
- push配置文件
- 获取init log
- 方法一
- 方法二
- 命令行获取sensor数据
- config 文件解析代码
- bug --- sleep 模式下capsensor无效
- bug --- SSI auto detect下允许初始化的sensor个数
- bug --- auto detect every boottime
- bug --- add product keyword to match different sensor configurations
Sensor在最初的时候都是直接挂在处理器上处理的, 其驱动都是和linux或android标准的驱动一样,都是生成对应的设备节点给上层提供数据。
但是,由于sensor可能需要一直处于工作状态,产生了功耗的问题,故而各个芯片厂商才推出了自己的解决方案。
而高通则将sensor的处理放到了application digital signal processor(aDSP)中,这样待机时主处理器休眠以降低功耗,
由这个aDSP在处理音频数据的间隙捎带着就能把sensor的数据处理了,
真是高明。
今天我们就开始窥探一下高通是怎样具体实现的,先看一下高通给出的架构图。

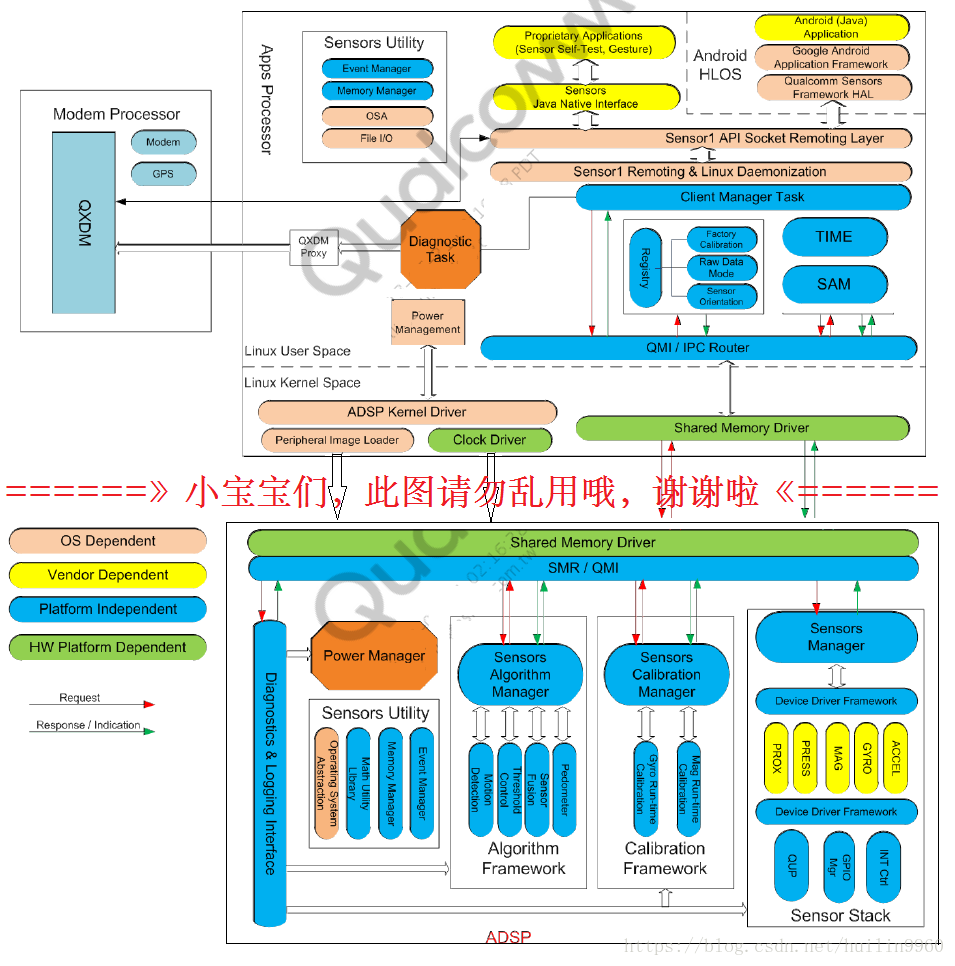
上面两张图完整的展示了高通SSC的架构,其中上半部分为AP,下半部分则是aDSP,
下半部分图我们在之前的dsps架构分析中已经列举了各个组成模块以及相应的功能特点。
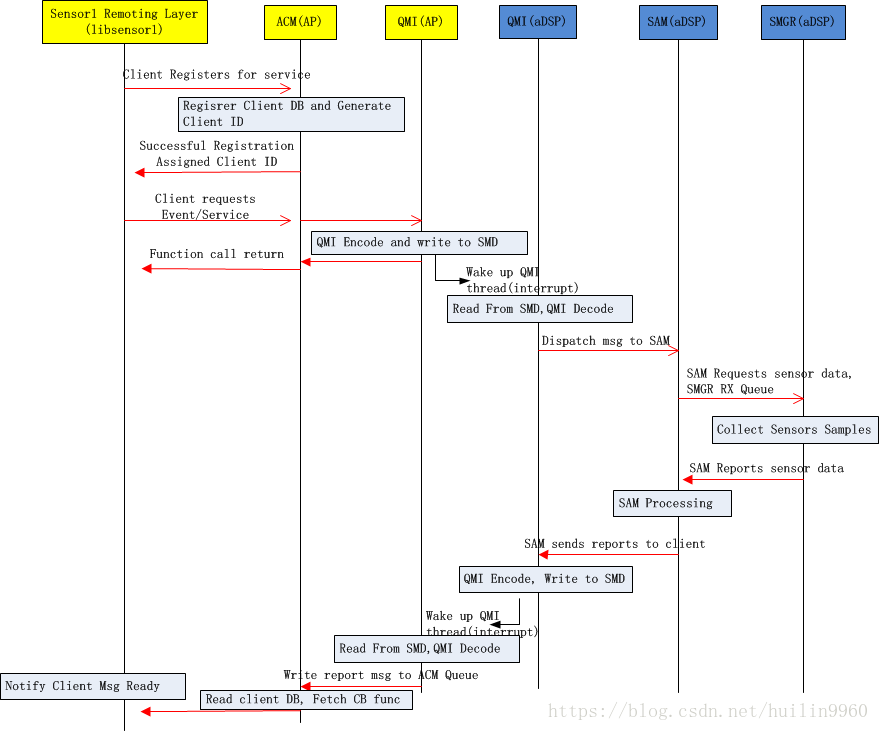
我们之前的文章已经分析到SMR/QMI发送消息的流程,接下来我们就要进入Sensor Manager(SMGR),深入驱动程序了。
MAIN
aDSP模块的启动从main函数开始执行,该函数定义在sns_pd.c中,路径为adsp_proc/Sensors/dsps/src/common/。
int main (void)
{
    /* Core Init for user PD */
    coremain_main();
    printf("Core Init for sensors image donen");

    /* Sensors Initialization */
    sns_init();

    return 0; /* never reaches, no user exit handling yet */
}
这里的coremain_main方法是定义在modem端的,在modem_proc/中,我们暂不关注,
而sns_init则是对sensor的初始化过程,其方法主体就是调用sns_init_once方法执行one-time的初始化过程,它会调用各个模块的初始化方法。
static void sns_init_once( void )
{
  int      i;
  INT8U    err;
  OS_FLAGS flags = 0;

  const sns_init_fcn init_ptrs[] = SNS_INIT_FUNCTIONS;

  if ( SNS_SUCCESS != sns_heap_init()) {
      MSG(MSG_SSID_SNS, DBG_ERROR_PRIO, "Sensors Heap Init failed, using Default heap ID");
      sns_heap_id = QURT_ELITE_HEAP_DEFAULT;
  }

  sns_init_flag_grp = sns_os_sigs_create( SNS_INIT_FLAG_DONE, &err );

  SNS_ASSERT(NULL != sns_init_flag_grp);

  for( i = 0; NULL != init_ptrs[i]; i++ ) {
    //MSG_1(MSG_SSID_QDSP6, DBG_HIGH_PRIO, "Sensors Init : %d", i);
    if( SNS_SUCCESS != init_ptrs[i]() ) {
      /* Handle error */
      //MSG_1(MSG_SSID_QDSP6, DBG_HIGH_PRIO, "Sensors Init FAIL: %d", i);
      sns_init_done();
    }

    while( !(SNS_INIT_FLAG_DONE & flags) ) {
      /* Continue polling for the flag until module init is done */
      flags = sns_os_sigs_pend( sns_init_flag_grp,
                                SNS_INIT_FLAG_DONE,
                                OS_FLAG_WAIT_SET_ANY,
                                0,
                                &err );
      MSG_1(MSG_SSID_QDSP6, DBG_HIGH_PRIO, "Sensors Init : waiting(%x)", flags);
    }
    flags = 0;
  }

  MSG(MSG_SSID_QDSP6, DBG_HIGH_PRIO, "Sensors Init : ///init once completed///");
}
我们又看到了类似的场景了,通过定义的全局SNS_INIT_FUNCTIONS函数指针,依次进行调用。当所有init方法执行完成,发送init done的信号。
我们这里以MSM8960板子的初始化函数定义列表为例,来分析aDSP的初始化流程,如下:
#ifdef FEATURE_MSM8960
#  define SNS_INIT_FUNCTIONS
  {   sns_memmgr_init,           // 内存管理器
      sns_init_dsps,             // 各种dsps服务的初始化
      sns_em_init,               // 事件管理器
      sns_smr_init,              // Message Router用于传递消息(resp/ind)
      sns_dl_init,               // Dynamic Loading service
      sns_smgr_init,             // Sensor Manager(核心部分)
      sns_scm_init,              // 检验管理器
      sns_sam_init,              // 算法管理器
      sns_pm_test_task_init,     //
      dog_init,
      NULL }
其中最重要的当属SMGR的初始化了。
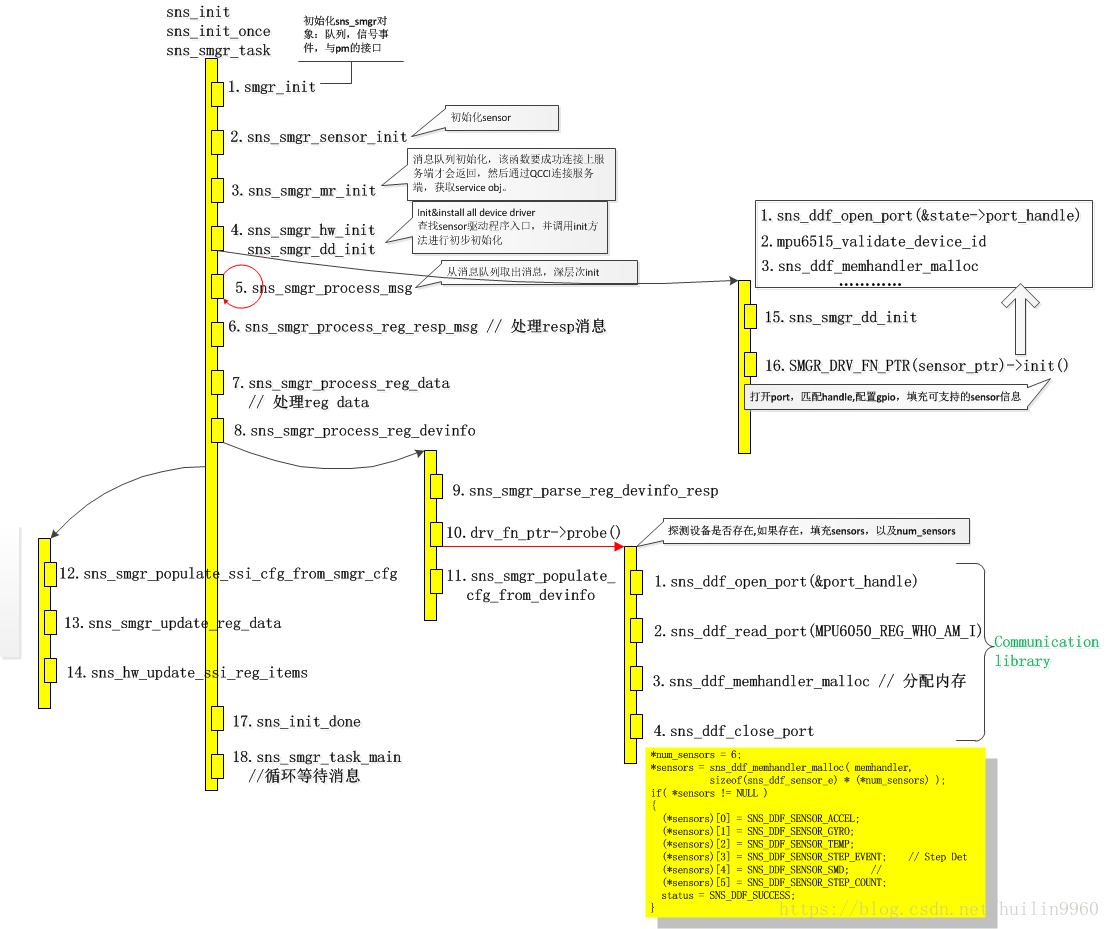
SMGR INIT
SMGR的init方法是直接启动了一个sns_smgr_task,所有的任务都放在task中完成的。
SNS_SMGR_UIMAGE_CODE sns_err_code_e sns_smgr_init(void)
{
  sns_os_task_create_ext(sns_smgr_task, NULL,
                         (OS_STK *)&sns_smgr_task_stack[SNS_MODULE_STK_SIZE_DSPS_SMGR-1],
                         SNS_MODULE_PRI_DSPS_SMGR,
                         SNS_MODULE_PRI_DSPS_SMGR,
                         (OS_STK *)&sns_smgr_task_stack[0],
                         SNS_MODULE_STK_SIZE_DSPS_SMGR,
                         (void *)0,
                         OS_TASK_OPT_STK_CHK | OS_TASK_OPT_STK_CLR |
                         OS_TASK_OPT_ISLAND,
                         (uint8_t *)"SNS_SMGR");
  return SNS_SUCCESS;
}
这里我直接给出大致的流程图:
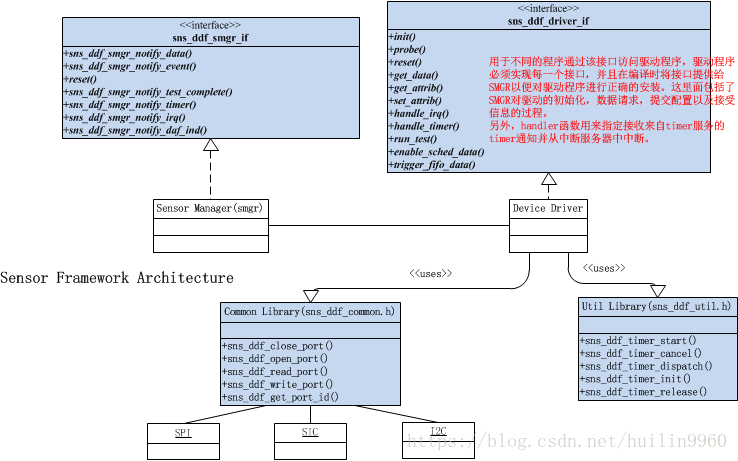
上图中,Communication Library通过I2C以及GPIO,SPI等,直接和sensor device通信了,通过下面的图可以了解这个流程:
I2C挂载图:
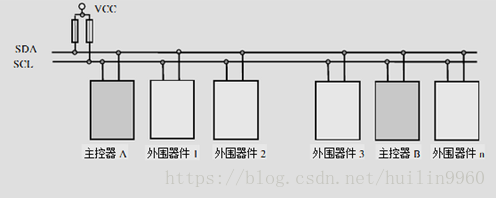
图中,外围期间1,2等便可以是我们的sensor设备或其他可使用I2C通信的电子器件了。
ddf打开的过程如下:
sns_ddf_status_e sns_ddf_open_port( sns_ddf_handle_t* handle,  const sns_ddf_port_config_s*  cfg )
{
  sns_ddf_status_e status = SNS_DDF_SUCCESS;

  if ( cfg == NULL || handle == NULL )
  {
    return SNS_DDF_EINVALID_PARAM;
  }

  *handle = NULL;
  status  = sns_ddf_comm_malloc( (void **)handle, sizeof(sns_ddf_sensor_info_s) );
  if ( SNS_DDF_SUCCESS != status )
  {
    SNS_PRINTF_STRING_ERROR_1( SNS_DBG_MOD_DSPS_DDF, "Malloc fail, size = %d",
                               sizeof(sns_ddf_sensor_info_s) );
    return status;
  }

  switch( cfg->bus )
  {
    // 根据设备配置的config bus,如果是I2C,则调用sns_ddf_comm_bus_i2c_open,如果是SPI,则调用sns_ddf_comm_bus_spi_open
    case SNS_DDF_BUS_I2C:
      status = sns_ddf_comm_bus_i2c_open( *handle, cfg );
      break;
    case SNS_DDF_BUS_SPI:
      status = sns_ddf_comm_bus_spi_open( *handle, cfg );
      break;
    default:
      status = SNS_DDF_EINVALID_PARAM;
  }

  if ( SNS_DDF_SUCCESS != status )
  {
    SNS_PRINTF_STRING_ERROR_1(SNS_DBG_MOD_DSPS_DDF, "open_port, result = %d", status);
    sns_ddf_comm_mfree( *handle );
    *handle = NULL;
    return SNS_DDF_EBUS;
  }

  return status;
}
// initializes and configures SPI communication bus.
static sns_ddf_status_e sns_ddf_comm_bus_spi_open
(
    sns_ddf_handle_t              handle,
    const sns_ddf_port_config_s*  cfg
)
{
#if SNS_DDF_COMM_BUS_SPI_ENABLE_DRIVER
  static const spi_device_id_t spi_bus_instances[] =
  {
    0,
    SPI_DEVICE_1,
    SPI_DEVICE_2,
    SPI_DEVICE_3,
    SPI_DEVICE_4,
    SPI_DEVICE_5,
    SPI_DEVICE_6,
    SPI_DEVICE_7,
    SPI_DEVICE_8,
    SPI_DEVICE_9,
    SPI_DEVICE_10,
    SPI_DEVICE_11,
    SPI_DEVICE_12,
  };
  SPI_RESULT              result; //spi_errors.h
  sns_ddf_sensor_info_s*  sns_info = (sns_ddf_sensor_info_s*)handle;

  if ( cfg->bus_instance >= ARR_SIZE(spi_bus_instances) )
  {
    return SNS_DDF_EINVALID_PARAM;
  }

  /* Initialize member params */
  sns_info->bus          = SNS_DDF_BUS_SPI;
  sns_info->spi_s.dev_id = spi_bus_instances[cfg->bus_instance];
  sns_info->spi_s.cfg    = cfg->bus_config.spi;

  if ( EnableSPI == false )
  {
    return SNS_DDF_SUCCESS;
  }

  /* Open SPI port*/
  result = spi_open(sns_info->spi_s.dev_id);
  if ( result != SPI_SUCCESS )
  {
    SNS_PRINTF_STRING_ERROR_1( SNS_DBG_MOD_DSPS_DDF, "spi_open fail result=%d", result );
    return SNS_DDF_EBUS;
  }

  //TODO: fake write switching sensor to SPI mode? ------------------------

  /* Close device - this only turns the clocks off */
  result = spi_close(sns_info->spi_s.dev_id);
  if ( result != SPI_SUCCESS )
  {
    SNS_PRINTF_STRING_ERROR_1( SNS_DBG_MOD_DSPS_DDF, "spi_close fail result=%d", result );
    return SNS_DDF_EBUS;
  }
#endif

  return SNS_DDF_SUCCESS;
}
// Initializes and configures I2C communication bus.
static sns_ddf_status_e sns_ddf_comm_bus_i2c_open
(
    sns_ddf_handle_t              handle,
    const sns_ddf_port_config_s*  cfg
)
{
  //TODO: table declared twice! Check sns_smgr_hw.c I2cDrv_I2cBusId sns_i2c_bus_table[]
  static const I2cDrv_I2cBusId i2c_bus_instances[] =
  {
    0,
    I2CDRV_I2C_1,
    I2CDRV_I2C_2,
    I2CDRV_I2C_3,
    I2CDRV_I2C_4,
    I2CDRV_I2C_5,
    I2CDRV_I2C_6,
    I2CDRV_I2C_7,
    I2CDRV_I2C_8,
    I2CDRV_I2C_9,
    I2CDRV_I2C_10,
    I2CDRV_I2C_11,
    I2CDRV_I2C_12
  };
  int32                   result;
  sns_ddf_sensor_info_s*  sns_info = (sns_ddf_sensor_info_s*)handle;

  if ( cfg->bus_instance >= ARR_SIZE(i2c_bus_instances) )
  {
    return SNS_DDF_EINVALID_PARAM;
  }

  /* Initialize member params */
  sns_info->bus = SNS_DDF_BUS_I2C;
  sns_info->i2c_s.reg_addr_type               = cfg->bus_config.i2c->reg_addr_type;
  sns_info->i2c_s.i2c_bus.clntCfg.uSlaveAddr  = cfg->bus_config.i2c->slave_addr;
  sns_info->i2c_s.i2c_bus.clntCfg.uBusFreqKhz = SNS_DDF_DEFAULT_I2C_BUS_FREQ;
  sns_info->i2c_s.i2c_bus.clntCfg.uByteTransferTimeoutUs = SNS_DDF_DEFAULT_BYTE_XFER_TMO;

  if ( EnableI2C == false )
  {
    return SNS_DDF_SUCCESS;
  }

if (i2c_bus_instances[cfg->bus_instance] == I2CDRV_I2C_5)
    sns_info->i2c_s.i2c_bus.clntCfg.uBusFreqKhz = 100;

  /* Obtain the handle for the port. */
  result = I2cDrv_Open(i2c_bus_instances[cfg->bus_instance], &sns_info->i2c_s.i2c_bus, 0);
  if ( I2C_RES_SUCCESS != result )
  {
    SNS_PRINTF_STRING_ERROR_1( SNS_DBG_MOD_DSPS_DDF, "I2cDrv_Open, result = %d", result );
    return SNS_DDF_EBUS;
  }

  return SNS_DDF_SUCCESS;
}
由此可见,挂载SPI上的设备终会调用spi_open打开设备,而I2C上的则用I2cDrv_Open来进行处理。
以上便是整个aDSP的流程了,结合代码,相信你会很快掌握这个过程,RTFSC,Go!
App processor 与aDSP端数据流图
AP侧从libsensor1开始的数据流走向如下图所示,其中上层到libsensor1的调用逻辑已经在之前的文章中理清了。无非是通过SensorContext的poll从Queue中读取数据,请自行查找回顾,这里只贴出HAL层的框架图及相关的API供参考。
1. HAL层数据处理
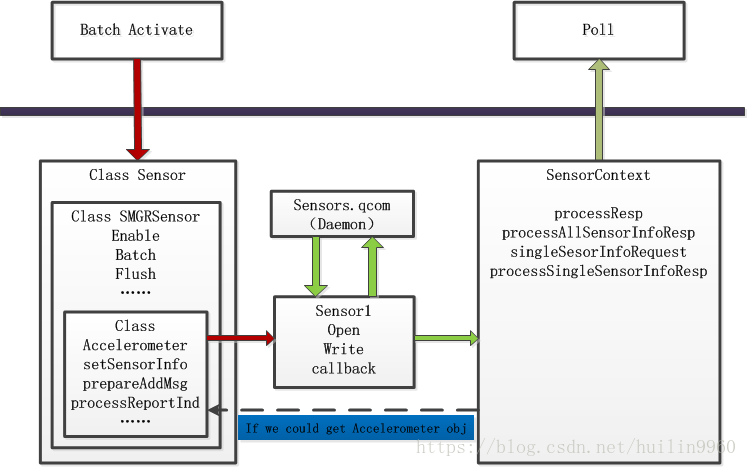
2. aDSP层数据处理
Sensor数据获取方式
Sensor上报数据的三种方式:
-
(Polling)0x00
调用一次get_data后启动timer,等到timer到时间后调用sns_ddf_driver_if_s中指定的handle_timer()函数上报一组传感器数据 -
(DRI)0x80
调用enable_sched_data()启用DRI(Data ReadyInterrupt,数据完成中断),按照set_cycle_time指定的ODR(Output Data Rate,数据输出速率)进行数据采集,采集完成后调用sns_ddf_driver_if_s中指定的handle_irq()函数上报传感器数据。 -
(FIFO)0xD0
调用trigger_fifo_data()函数启动FIFO模式,当数据量到达指定的阈值,触发sns_ddf_smgr_data_notify()函数上报一批数据。
Sensor Probe过程:
// sns_smgr_reg.c

SMGR_STATIC void sns_smgr_parse_reg_devinfo_resp( uint16_t   Id,  const sns_reg_ssi_devinfo_group_s* devinfo)
{
...
	SNS_SMGR_PRINTF2(HIGH, "ssi: probing devinfo_idx[i]: %u[%u]", devinfo_idx, i);
	SNS_SMGR_PRINTF3(HIGH, "ssi: bus_instance:%u gpio1:%u slave_addr:0x%x",
                       devinfo->uuid_cfg[i].i2c_bus, devinfo->uuid_cfg[i].gpio1,
                       devinfo->uuid_cfg[i].i2c_address );
// 调用dd sensor驱动的probe函数
	status = drv_fn_ptr->probe( &dev_access, &memhandler,&num_sensors, &sensor_list );

    if( status == SNS_DDF_SUCCESS  && num_sensors != 0 )
      {
        SNS_SMGR_PRINTF2(HIGH, "zch---ssi: devinfo_idx[i]: %u[%u] probe success", devinfo_idx, i);
        return;
      }
    else
      SNS_SMGR_PRINTF3(HIGH, "ssi: devinfo_idx[i]: %u[%u] probe failed error=%d",     devinfo_idx, i, status);
...
}
push配置文件
For MSM8974, MSM8x26, APQ8084 – /etc/sensor_def_.conf
For MSM8994/MSM8992, MSM8952, MSM8996 – /etc/sensors/sensor_def_.conf
adb root
adb remount
adb shell rm /system/etc/sensors/sensor_def_qcomdev.conf
adb push sensor_def_qcomdev.conf /system/etc/sensors/sensor_def_qcomdev.conf
adb shell chmod 644 /system/etc/sensors/sensor_def_qcomdev.conf
adb shell rm /persist/sensor/sns.reg
adb shell sync
adb reboot
生成的 sns.reg 文件地址
For MSM8974, MSM8x26, APQ8084 – /data/misc/sensors/sns.reg
For MSM8994/92, MSM8952, MSM8996 – /persist/sensors/sns.reg
获取init log
方法一
adb root
adb wait-for-device
adb remount
adb shell rm /persist/sensors/sns.reg
adb shell sync
adb shell stop sensors
adb shell "echo 'related' > /sys/bus/msm_subsys/devices/subsys2/restart_level"
adb shell "echo 'restart' > /sys/kernel/debug/msm_subsys/adsp";
adb shell start sensors'
方法二
adb root
adb wait-for-device
adb remount
adb shell rm /persist/sensors/sns.reg
adb shell sync
adb shell stop sensors
adb shell "echo 'related' > /sys/bus/msm_subsys/devices/subsys2/restart_level"
QXDM 中 send_data 75 37 03 48 00
send_data 75 37 03 48 00
3) adb shell start sensors
命令行获取sensor数据
-r : rate
-d: duration in secound
-s: Sensor ID
-t data_type   // 几个数据
      sns_cm_test -r 20 -d 1 -s 40 -t 1 测试prox
      sns_cm_test -r 20 -d 1 -s 0  -t 0 测试G-sensor
      sns_cm_test -r 20 -d 1 -s 10 -t 0测试GYRO
      sns_cm_test -r 20 -d 1 -s 20 -t 0测试MAG


#check sensor registry configure:
sns_regedit_ssi -r

#check which sensor init success:
sns_dsps_tc0001
config 文件解析代码
vendor/qcom/proprietary/sensors/dsps/sensordaemon/reg/src/sns_reg_conf_la.c

sns_reg_write_conf_item
bug — sleep 模式下capsensor无效
—— 将数据上传模式改为wakeup

--- a/vendor/qcom/proprietary/sensors/dsps/libhalsensors/src/SAR.cpp
+++ b/vendor/qcom/proprietary/sensors/dsps/libhalsensors/src/SAR.cpp
@@ -18,6 +18,7 @@ SAR::SAR(int handle)
     :SMGRSensor(handle)
 {
     trigger_mode = SENSOR_MODE_EVENT;
+       bWakeUp = true;
 }

 /*============================================================================
@@ -38,7 +39,8 @@ void SAR::setSensorInfo(sns_smgr_sensor_datatype_info_s_v01* sensor_datatype)
 {
     HAL_LOG_DEBUG("%s: SAR DTy: %d", __FUNCTION__, sensor_datatype->DataType);
     setType(SENSOR_TYPE_SAR);
-    setFlags(SENSOR_FLAG_ON_CHANGE_MODE);
+       setFlags(SENSOR_FLAG_ON_CHANGE_MODE|SENSOR_FLAG_WAKE_UP);
+    strlcat(name," -Wakeup",SNS_MAX_SENSOR_NAME_SIZE);
     setResolution((float)((float)sensor_datatype->Resolution *
                 UNIT_CONVERT_Q16));
     setMaxRange((float)((float)sensor_datatype->MaxRange *
bug — SSI auto detect下允许初始化的sensor个数
#adsp_proc/Sensors/smgr/src/sns_smgr_sensor_config.h
SNS_SMGR_NUM_SENSORS_DEFINED
bug — auto detect every boottime
diff --git a/Sensors/smgr/src/sns_smgr_reg.c b/Sensors/smgr/src/sns_smgr_reg.c
index ed725ec..65aedf6 100755
--- a/Sensors/smgr/src/sns_smgr_reg.c
+++ b/Sensors/smgr/src/sns_smgr_reg.c
@@ -1733,7 +1733,7 @@
                 0,
                 sizeof(sns_reg_ssi_smgr_cfg_group_s));

-  ssi_cfg_ptr->maj_ver_no = 1;
+  ssi_cfg_ptr->maj_ver_no = 0;
   ssi_cfg_ptr->min_ver_no = 1;
   ssi_cfg_ptr->reserved1 = 0;
   ssi_cfg_ptr->reserved2 = 0;
@@ -1990,7 +1990,7 @@
       sns_smgr.all_init_state = SENSOR_ALL_INIT_CONFIGURED;
     }
   }
-  else if ( (cfg_group_ptr->maj_ver_no != 1) && !valid_cfg )
+  else if ( !valid_cfg )
   {
     /* Only use the configuration if the major version is 1.
     Otherwise autodetect sensors */
bug — add product keyword to match different sensor configurations
add product keyword to match different sensor configurations

Change-Id: I1afbb2b23e0758bc32378330ffba3dafe27e4130
---

diff --git a/dsps/sensordaemon/reg/src/sns_reg_conf_la.c b/dsps/sensordaemon/reg/src/sns_reg_conf_la.c
old mode 100644
new mode 100755
index 831a2d9..71ac549
--- a/dsps/sensordaemon/reg/src/sns_reg_conf_la.c
+++ b/dsps/sensordaemon/reg/src/sns_reg_conf_la.c
@@ -295,6 +295,7 @@
   @param item_id[i]: Item ID
   @param item_val[i]: Discovered item val, if any
   @param hw_conf[i]: Hardware string selected in the conf file
+  @param product_conf[i]: Product string selected in the conf file
   @param platform_conf[i]: Platform string selected in the conf file
   @param soc_id_conf[i]: SOC ID string selected in the conf file
   @param subtype_conf[i]: Platform subtype string selected in the conf file
@@ -307,6 +308,7 @@
 void sns_reg_write_conf_item( int32_t item_id,
                               uint64_t item_val,
                               char (*hw_conf)[META_VAL_LEN],
+                              char (*product_conf)[META_VAL_LEN],
                               char (*platform_conf)[META_VAL_LEN],
                               char (*version_conf)[META_VAL_LEN],
                               char (*soc_id_conf)[META_VAL_LEN],
@@ -318,6 +320,7 @@
 {
   int index;
   static char hw_string[PROPERTY_VALUE_MAX] = "";
+  static char product_string[20] = "";
   static char platform_string[20] = "";
   static char platform_subtype_string[20] = "";
   static char platform_subtype_id_string[20] = "";
@@ -333,6 +336,25 @@

     /* get the hw string from property */
     property_get("ro.board.platform", hw_string, "");
+
+    /* check the motorola product */
+    fp = sns_fsa_open("/sys/devices/soc0/motorola_product", "r" );
+    if( fp == NULL )
+    {
+      SNS_PRINTF_STRING_ERROR_1( SNS_MODULE_APPS_REG,
+                                 "motorola_product fopen failed %i", errno );
+      strlcpy(product_string, invalid_str, sizeof(product_string));
+    }
+    else if( fgets(product_string, sizeof(product_string), fp) == NULL )
+    {
+      SNS_PRINTF_STRING_ERROR_1( SNS_MODULE_APPS_REG,
+                                 "product_string fgets failed %i: %i", errno );
+      strlcpy(product_string, invalid_str, sizeof(product_string));
+    }
+    if( fp != NULL )
+    {
+      sns_fsa_close( fp );
+    }

     fp = sns_fsa_open("/sys/devices/soc0/hw_platform", "r" );
     if( fp == NULL )
@@ -452,6 +474,12 @@
     /* Configuration file set a hardware string, and it doesn't match
        this hardware. Abort */
     return;
+  }
+  if( ( product_conf[0][0] != 0 ) &&
+      sns_reg_match_conf_item( product_string, product_conf ) ) {
+      /* Configuration file set a product string, and it doesn't match
+         the product string. Abort */
+      return;
   }
   if( ( platform_conf[0][0] != 0 ) &&
       sns_reg_match_conf_item( platform_string, platform_conf ) ) {
@@ -581,6 +609,7 @@
   char *buf = malloc(sz);
   uint32_t file_version = 0;
   char hw_conf[META_MAX_KEY][META_VAL_LEN];
+  char product_conf[META_MAX_KEY][META_VAL_LEN];
   char platform_conf[META_MAX_KEY][META_VAL_LEN];
   char soc_id_conf[META_MAX_KEY][META_VAL_LEN];
   char subtype_conf[META_MAX_KEY][META_VAL_LEN];
@@ -592,6 +621,7 @@

   for( key_var = 0; key_var < META_MAX_KEY; key_var++ ) {
     hw_conf[key_var][0]       = 0x00;
+    product_conf[key_var][0] = 0x00;
     platform_conf[key_var][0] = 0x00;
     soc_id_conf[key_var][0]   = 0x00;
     subtype_conf[key_var][0]  = 0x00;
@@ -629,7 +659,7 @@
       /* Check for an item */
       if( true == sns_reg_parse_conf_item( buf, &item_id, &item_val, &item_ver ) ) {
         if( item_ver > conf_info->version) {
-          sns_reg_write_conf_item( item_id, item_val, hw_conf,
+          sns_reg_write_conf_item( item_id, item_val, hw_conf, product_conf,
                                    platform_conf, version_conf, soc_id_conf,
                                    subtype_conf, subtype_id_conf, soc_rev_conf, &property_conf );
         }
@@ -642,6 +672,8 @@
         if( sscanf_result > 0 ) {
           if( 0 == strncmp( key_meta, "hardware", META_KEY_LEN ) ) {
             sns_reg_get_conf_key(buf, hw_conf);
+          } else if( 0 == strncmp( key_meta, "product", META_KEY_LEN ) ) {
+            sns_reg_get_conf_key(buf, product_conf);
           } else if( 0 == strncmp( key_meta, "platform", META_KEY_LEN ) ) {
             sns_reg_get_conf_key(buf, platform_conf);
           } else if( 0 == strncmp( key_meta, "soc_id", META_KEY_LEN ) ) {
最后
以上就是狂野大山最近收集整理的关于Qcom_Sensor(九)--- 之 aDSP端Sensor Driver流程的全部内容,更多相关Qcom_Sensor(九)---内容请搜索靠谱客的其他文章。


发表评论 取消回复