转载请标明出处:【顾林海的博客】
想要了解插件化,首先得知道如何加载外部的dex文件,这里的插件APK会存放在主APP的assets目录中,用于模拟服务器下载插件。
第一步:创建主项目和插件项目
先创建我们的主项目,并在项目中创建一个插件依赖库,取名为pluginlibrary,主项目依赖pluginlibrary。
主项目创建完毕后,接着创建插件项目,将项目中的app模块复制到主项目并重命名为plugin,同时也依赖pluginlibrary。
修改settings.gradle文件,如下:
include ':app',':plugin', ':pluginlibrary'
重新编译一下。
第二步:编译插件APK
将pluginlibrary依赖库编译成jar包,并放在插件项目plugin的lib目录下,不是libs目录,通过compileOnly引用pluginlibrary的jar包,compileOnly只会在编译时用到相应的jar,打包成APK后不会存在于APK中。
pluginlibrary编译jar包,在pluginlibrary的build.gradle的配置如下:
apply plugin: 'com.android.library'

android {
    compileSdkVersion 28

    defaultConfig {
        minSdkVersion 17
        targetSdkVersion 28
        versionCode 1
        versionName "1.0"

        testInstrumentationRunner "android.support.test.runner.AndroidJUnitRunner"

    }

    buildTypes {
        release {
            minifyEnabled false
            proguardFiles getDefaultProguardFile('proguard-android.txt'), 'proguard-rules.pro'
        }
    }

}

dependencies {
    implementation fileTree(dir: 'libs', include: ['*.jar'])
}

task clearJar(type: Delete){
    delete 'build/outputs/pluginlibray.jar'
}

task makePluginLibraryJar(type: Copy){
    from ('build/intermediates/packaged-classes/release/')
    into ('build/outputs/')
    include ('classes.jar')
    rename ('classes.jar', 'pluginlibrary.jar')
}

makePluginLibraryJar.dependsOn(clearJar,build)
编译完成后可以从右侧的Gradle面板的other分组中找到makePluginLibraryJar命令:
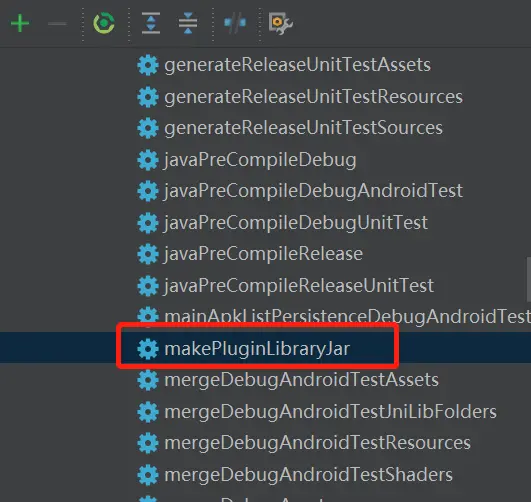
双击makePluginLibraryJar命令进行编译,可以看到底部输出编译成功:
BUILD SUCCESSFUL in 4s
50 actionable tasks: 2 executed, 48 up-to-date
10:04:10: Task execution finished 'makePluginLibraryJar'.
在pluginlibrary/build/outputs/下看到pluginlibrary.jar:
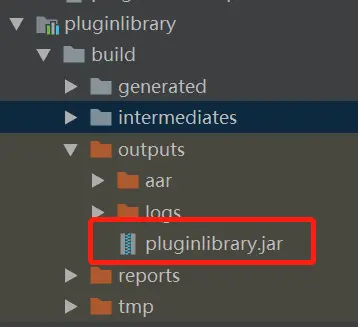
在plugin项目中创建lib文件夹并将pluginlibrary.jar复制到lib目录下:
plugin项目的build.gradle修改如下:
compileOnly files("lib/pluginlibrary.jar")
第三步:加载外部dex
在编译pluginlibrary.jar之前在项目中创建一个接口:
package com.plugin.administrator.pluginlibrary;

public interface IPluginBean {
    void setUserName(String name);
    String getUserName();
}
在插件plugin项目中就创建一个类:
package com.plugin.administrator.myapplication;

import com.plugin.administrator.pluginlibrary.IPluginBean;

public class UserInfo implements IPluginBean {

    private String name="billgu";

    @Override
    public void setUserName(String s) {
        this.name=s;
    }

    @Override
    public String getUserName() {
        return name;
    }
}
编译插件plugin项目,将生成的apk复制到主项目的assets目录下。
接下来就是主项目编写加载外部DEX文件了,需要把assets目录下的plugin-debug.apk复制到/data/data/files目录下,这步操作放在Activity的attachBaseContext方法中:
private String apkName = "plugin-debug.apk";    //apk名称
    @Override
    protected void attachBaseContext(Context newBase) {
        super.attachBaseContext(newBase);
        try {
            extractAssets(newBase, apkName);
        } catch (Throwable e) {
            e.printStackTrace();
        }
    }
    public static void extractAssets(Context context, String sourceName) {
        AssetManager am = context.getAssets();
        InputStream is = null;
        FileOutputStream fos = null;
        try {
            is = am.open(sourceName);
            File extractFile = context.getFileStreamPath(sourceName);
            fos = new FileOutputStream(extractFile);
            byte[] buffer = new byte[1024];
            int count = 0;
            while ((count = is.read(buffer)) > 0) {
                fos.write(buffer, 0, count);
            }
            fos.flush();
        } catch (IOException e) {
            e.printStackTrace();
        } finally {
            closeSilently(is);
            closeSilently(fos);
        }

    }

    private static void closeSilently(Closeable closeable) {
        if (closeable == null) {
            return;
        }
        try {
            closeable.close();
        } catch (Throwable e) {
        }
    }
如何从APK中读取dex文件,需要借助于DexClassLoader ,声明如下:
   DexClassLoader (String dexPath,
              String optimizedDirectory,
             String libraryPath,
              ClassLoader parent)
-
dexPath: 指目标类所在的jar/apk文件路径, 多个路径使用 File.pathSeparator分隔, Android里面默认为 “:”
-
optimizedDirectory: 解压出的dex文件的存放路径,以免被注入攻击,不可存放在外置存储。
-
libraryPath :目标类中的C/C++库存放路径。
-
parent: 父类装载器
在onCreate方法中进行初始化DexClassLoader:
     private String mDexPath = null;    //apk文件地址
    private File mFileRelease = null;  //释放目录
    private DexClassLoader mClassLoader = null;

    private void initDexClassLoader(){
        File extractFile = this.getFileStreamPath(apkName);
        mDexPath = extractFile.getPath();
        mFileRelease = getDir("dex", 0); //0 表示Context.MODE_PRIVATE
        mClassLoader = new DexClassLoader(mDexPath,
                mFileRelease.getAbsolutePath(), null, getClassLoader());
    }
生成插件APK的classLoader后就可以加载插件plugin-debug.apk中的任何类了。
点击按钮事件如下:
buttonGet.setOnClickListener(new View.OnClickListener() {
            @Override
            public void onClick(View arg0) {
                Class mLoadClassBean;
                try {
                    mLoadClassBean = mClassLoader.loadClass("com.plugin.administrator.myapplication.UserInfo");
                    Object beanObject = mLoadClassBean.newInstance();

                    IPluginBean pluginBean= (IPluginBean) beanObject;
                    pluginBean.setUserName("顾林海");
                    Toast.makeText(getApplicationContext(), pluginBean.getUserName(), Toast.LENGTH_LONG).show();

                } catch (Exception e) {

                }
            }
        });
加载插件plugin中的UserInfo类,调用setUserName和getUserName方法,点击按钮Toast显示“顾林海”。至此加载外部dex文件中的类就结束了。

搜索微信“顾林海”公众号,定期推送优质文章。
最后
以上就是饱满芒果最近收集整理的关于Android之加载外部dex的全部内容,更多相关Android之加载外部dex内容请搜索靠谱客的其他文章。


发表评论 取消回复