opencv学习日记——对多个轮廓进行多边形逼近
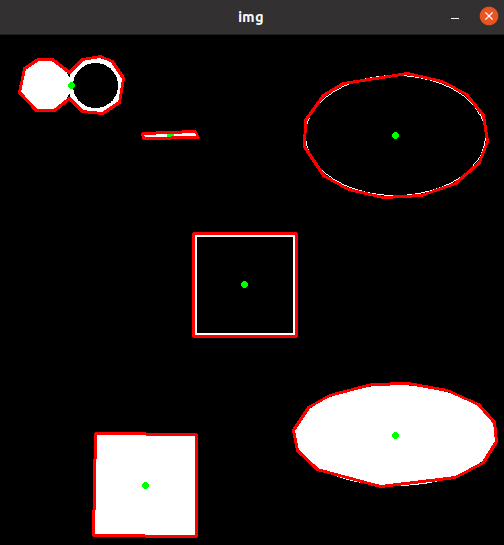
图像处理结果
代码部分
#include <iostream>
#include <opencv2/opencv.hpp>

using namespace std;
using namespace cv;

//绘制轮廓的函数
void drawapp(Mat result, Mat img)
{
    for (int i = 0; i < result.rows; i++)
    {
        if (i == result.rows - 1)
        {
            //提取出两个坐标
            Vec2i point1 = result.at<Vec2i>(i);
            Vec2i point2 = result.at<Vec2i>(0);
            //连接两个线段
            //line(原图, 点,点, 颜色, 粗细, 线类型, 小数点移位数)
            line (img, point1, point2, Scalar(0, 0, 255), 2, 8, 0);
            //这个一定要有,不然图很乱
            break;
        }
        Vec2i point1 = result.at<Vec2i>(i);
        Vec2i point2 = result.at<Vec2i>(i + 1);
        //line(原图, 点,点, 颜色, 粗细, 线类型, 小数点移位数)
        line (img, point1, point2, Scalar(0, 0, 255), 2, 8, 0);
    }
}

int main()
{
    Mat img = imread("自定义.png");
    if (img.empty())
    {
        cout << "输入为空";
        return -1;
    }
    //边缘检测
    Mat canny;
    Canny(img, canny, 150, 300);
    //膨胀运算
    Mat kernel = getStructuringElement(0, Size(3, 3));
    dilate(canny, canny, kernel);
    //发现轮廓
    vector<vector<Point>> contours;
    vector<Vec4i> hierachy;
    findContours(canny, contours, hierachy, 0, 2, Point());
    //绘制多边形
    for (int t = 0; t < contours.size(); t++)
    {
        //提取最小旋转矩形(就不是正的那种)
        //输出轮廓坐标以及中心坐标
        RotatedRect rrect = minAreaRect(contours[t]);
        //绘制圆心
        Point2f center = rrect.center;
        //circle(原图, 圆心, 半径, 颜色, 粗细, 样式, 小数点移位数)
        circle(img, center, 2, Scalar(0, 255, 0), 2, 8, 0);
        //绘制多边形
        Mat result;
        //发现轮廓上的点的坐标
        //approxPolyDp(轮廓像素点,以坐标形式给出, 逼近精度, 是否闭合 )
        approxPolyDP(contours[t], result, 4, true);
        //画图
        drawapp(result, img);
        //输出坐标个数
        cout << "corners: " << result.rows << endl;
    }

    imshow("img", img);
    waitKey(0);
    return 0;
}
最后
以上就是老实大山最近收集整理的关于opencv学习日记——对多个轮廓进行多边形逼近opencv学习日记——对多个轮廓进行多边形逼近图像处理结果代码部分的全部内容,更多相关opencv学习日记——对多个轮廓进行多边形逼近opencv学习日记——对多个轮廓进行多边形逼近图像处理结果代码部分内容请搜索靠谱客的其他文章。
本图文内容来源于网友提供,作为学习参考使用,或来自网络收集整理,版权属于原作者所有。


发表评论 取消回复