系列文章目录
经过之前对于MOOSapp类各个成员函数的学习,我可以进一步继续此次实验了。这篇文章主要是接MOOS编程入门(1)这篇文章的续写部分
提示:写完文章后,目录可以自动生成,如何生成可参考右边的帮助文档
文章目录
- 系列文章目录
- 四、写自己的moosapp
- 1.完成初步内容
- 2.对程序进行编译
- 3.查看程序效果
- 五、修改moosapp
- 总结
四、写自己的moosapp
不多逼逼,直接跳到续写部分~
1.完成初步内容
(3)编辑Odometry.cpp来订阅变量NAV_X 和 NAV_Y
void Odometry::RegisterVariables()
{
  // m_Comms.Register("FOOBAR", 0);

    Register("NAV_X", 0);
    Register("NAV_Y", 0);

}
(4)给当前x,y和前一时刻x,y赋值
bool Odometry::OnNewMail(MOOSMSG_LIST &NewMail)
{
  MOOSMSG_LIST::iterator p;

  for(p=NewMail.begin(); p!=NewMail.end(); p++)
  {
    CMOOSMsg &msg = *p;

#if 0 // Keep these around just for template
    string key   = msg.GetKey();
    string comm  = msg.GetCommunity();
    double dval  = msg.GetDouble();
    string sval  = msg.GetString();
    string msrc  = msg.GetSource();
    double mtime = msg.GetTime();
    bool   mdbl  = msg.IsDouble();
    bool   mstr  = msg.IsString();
#endif
    string key = msg.GetKey();
    if(key == "NAV_X")
    {
   	 m_previous_x = m_current_x;
   	 m_current_x = msg.GetDouble();
    }

    if(key == "NAV_Y")
	{
    	m_previous_y = m_current_y;
    	m_current_y = msg.GetDouble();
	}
   return(true);
}
}
(4)发布计算的总里程数ODOMETRY DIST
bool Odometry::Iterate()
{
  m_iterations++;
  if(m_first_reading == 1)
  {
    m_total_distance =sqrt(m_current_x*m_current_x+m_current_y*m_current_y);
    Notify( "ODOMETRY_DIST",m_total_distance);
    m_first_reading=0;
  }
  else
  {
    m_total_distance =sqrt((m_current_x-m_previous_x)*(m_current_x-m_previous_x)+(m_current_y-m_previous_y)*(m_current_y-m_previous_y))+m_total_distance;
    Notify( "ODOMETRY_DIST",m_total_distance);
  }

  return(true);
}
(5)总体程序
/************************************************************/
/*    NAME: Jane Doe                                              */
/*    ORGN: MIT                                             */
/*    FILE: Odometry.cpp                                        */
/*    DATE:                                                 */
/************************************************************/

#include <iterator>
#include "MBUtils.h"
#include "Odometry.h"
#include <math.h>
using namespace std;

//---------------------------------------------------------
// Constructor

Odometry::Odometry()
{
  m_iterations = 0;
  m_timewarp   = 0;
  m_first_reading= 1;
  m_current_x = 0 ;
  m_current_y = 0;
  m_previous_x = 0;
  m_previous_y = 0;
  m_total_distance = 0;
}

//---------------------------------------------------------
// Destructor

Odometry::~Odometry()
{
}

//---------------------------------------------------------
// Procedure: OnNewMail

bool Odometry::OnNewMail(MOOSMSG_LIST &NewMail)
{
  MOOSMSG_LIST::iterator p;

  for(p=NewMail.begin(); p!=NewMail.end(); p++)
  {
    CMOOSMsg &msg = *p;

#if 0 // Keep these around just for template
    string key   = msg.GetKey();
    string comm  = msg.GetCommunity();
    double dval  = msg.GetDouble();
    string sval  = msg.GetString();
    string msrc  = msg.GetSource();
    double mtime = msg.GetTime();
    bool   mdbl  = msg.IsDouble();
    bool   mstr  = msg.IsString();
#endif
    string key = msg.GetKey();
    if(key == "NAV_X")
    {
   	 m_previous_x = m_current_x;
   	 m_current_x = msg.GetDouble();
    }

    if(key == "NAV_Y")
	{
    	m_previous_y = m_current_y;
    	m_current_y = msg.GetDouble();
	}
   return(true);
}
}
//---------------------------------------------------------
// Procedure: OnConnectToServer

bool Odometry::OnConnectToServer()
{
   // register for variables here
   // possibly look at the mission file?
   // m_MissionReader.GetConfigurationParam("Name", <string>);
   // m_Comms.Register("VARNAME", 0);

   RegisterVariables();
   return(true);
}

//---------------------------------------------------------
// Procedure: Iterate()
//            happens AppTick times per second

bool Odometry::Iterate()
{
  m_iterations++;
  if(m_first_reading == 1)
  {
    m_total_distance =sqrt(m_current_x*m_current_x+m_current_y*m_current_y);
    Notify( "ODOMETRY_DIST",m_total_distance);
    m_first_reading=0;
  }
  else
  {
    m_total_distance =sqrt((m_current_x-m_previous_x)*(m_current_x-m_previous_x)+(m_current_y-m_previous_y)*(m_current_y-m_previous_y))+m_total_distance;
    Notify( "ODOMETRY_DIST",m_total_distance);
  }

  return(true);
}

//---------------------------------------------------------
// Procedure: OnStartUp()
//            happens before connection is open

bool Odometry::OnStartUp()
{
  list<string> sParams;
  m_MissionReader.EnableVerbatimQuoting(false);
  if(m_MissionReader.GetConfiguration(GetAppName(), sParams)) {
    list<string>::iterator p;
    for(p=sParams.begin(); p!=sParams.end(); p++) {
      string original_line = *p;
      string param = stripBlankEnds(toupper(biteString(*p, '=')));
      string value = stripBlankEnds(*p);

      if(param == "FOO") {
        //handled
      }
      else if(param == "BAR") {
        //handled
      }
    }
  }

  m_timewarp = GetMOOSTimeWarp();

  RegisterVariables();
  return(true);
}

//---------------------------------------------------------
// Procedure: RegisterVariables

void Odometry::RegisterVariables()
{
  // m_Comms.Register("FOOBAR", 0);

    Register("NAV_X", 0);
    Register("NAV_Y", 0);

}
2.对程序进行编译
程序的整体架构都是采用的cmake格式,这里对源代码进行编译时也需要使用cmake来进行编译。CMake是一种跨平台编译工具,CMake主要是编写CMakeLists.txt文件。通过cmake命令将CMakeLists.txt文件转化为make所需的Makefile文件,再用make命令编译源代码,生成可执行程序或库文件。具体使用方法我主要参考如下网站:CMake方式编译
(1)项目结构
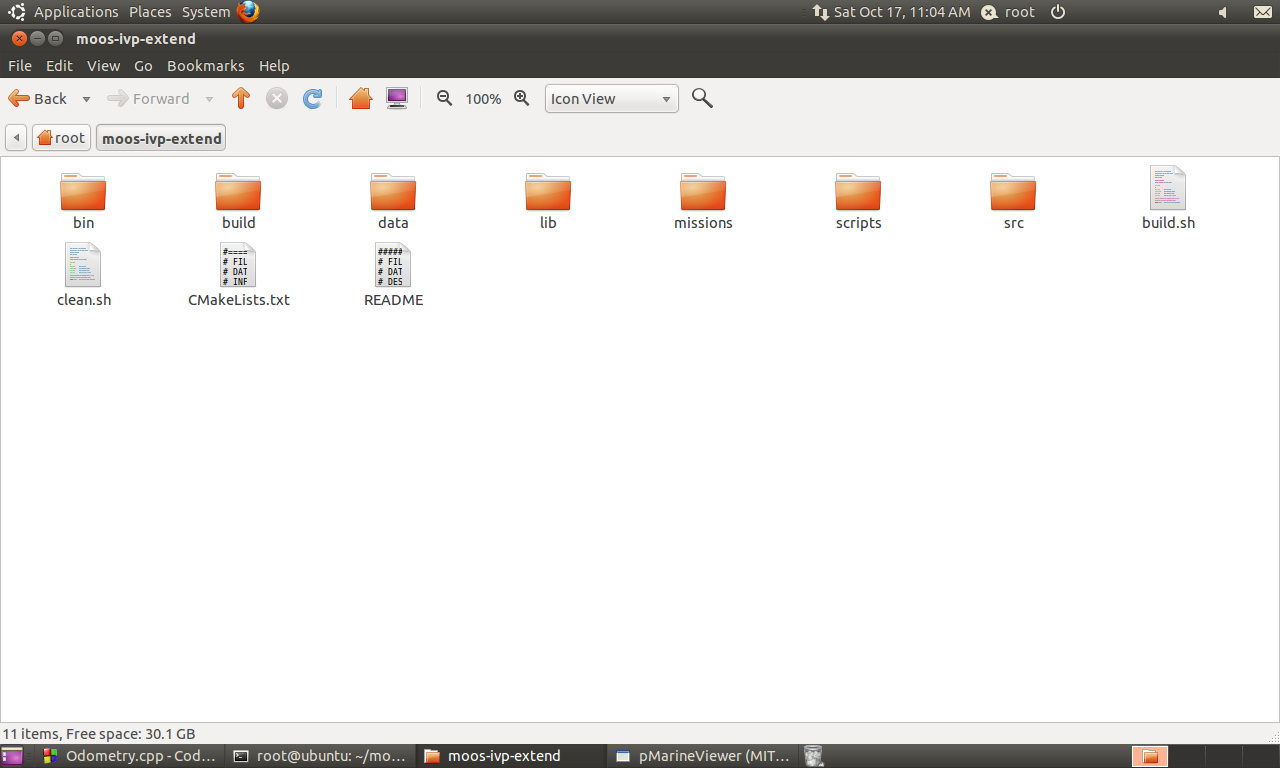
build目录 用来构建项目(编译构建中间文件等)
include目录 放置头文件。
src目录 放置源代码实现文件。
(2)CMake方式编译生成库文件
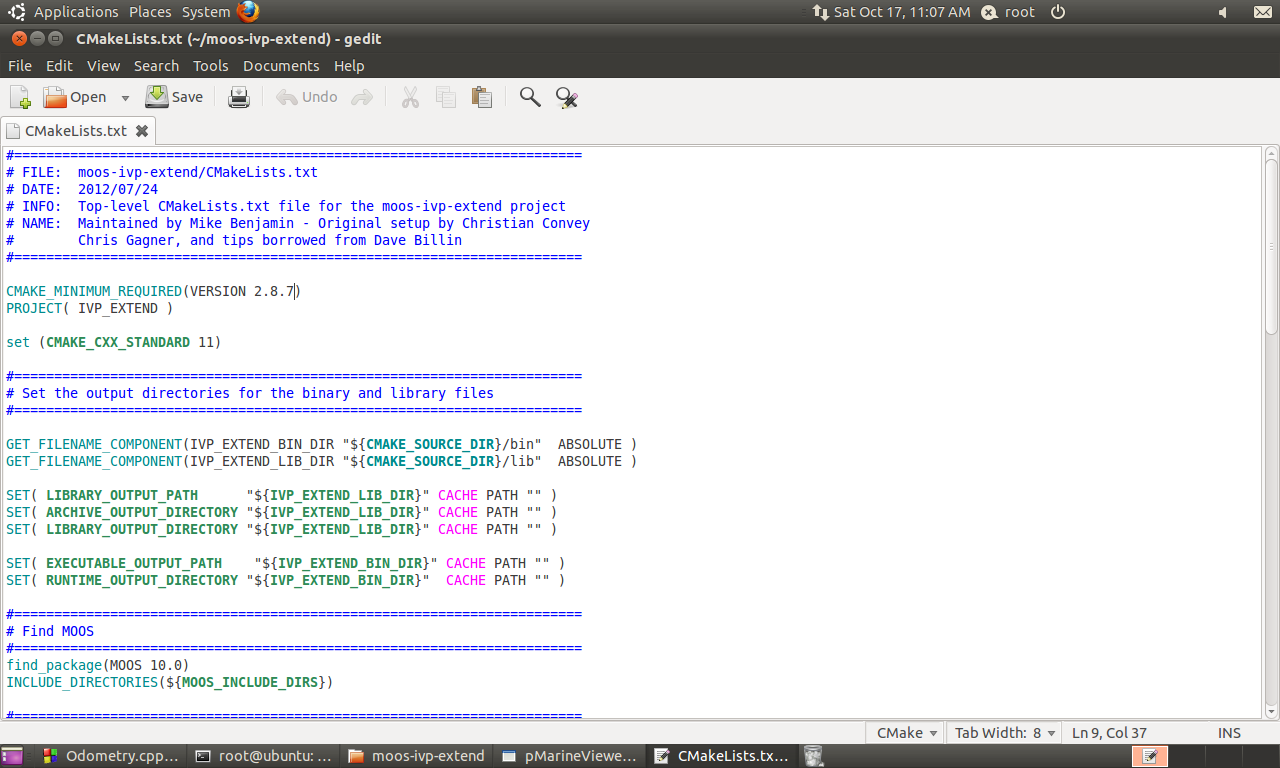
这是cmakelist文件,第一行标注的是使用的cmake版本号,可以使用
cmake-vesion
来对版本号进行查看,如果版本不一致,可以在cmakelist中进行修改或者升级cmake版本。
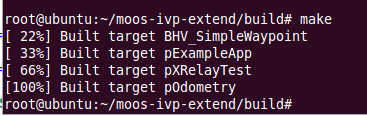
(3)编译文件
进入到build目录中,先输入cmake进行编译,在输入make进行编译
cd build
cmake
make
如下图显示则编译完成。
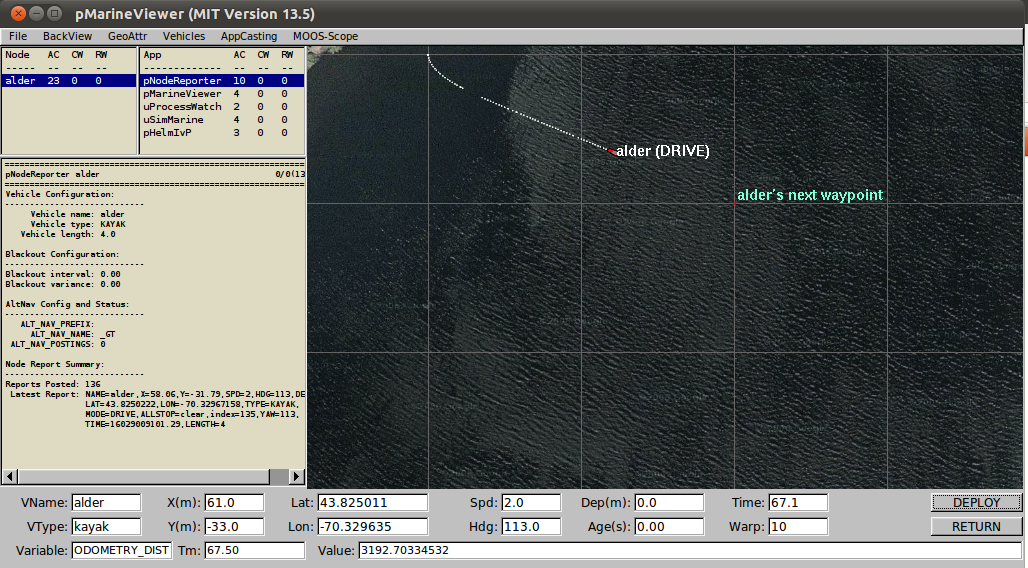
3.查看程序效果
输入
cd moos-ivp-extend/missions/alder
pAntler --MOOSTimeWarp=10 alder.moos
可以看到计算的里程数已经在界面上显示了
这里有一个小问题,由于NAV_X、NAV_Y两个变量是由uSimMarine这个app来进行发布的,而且发布的频率是10hz,而我们写的app默认运行频率在4hz,那么这就可能导致我们计算的里程数只有真实里程数的一半,因为中间很多消息没有订阅到。为了修改这个问题我们可以通过对moos文件进行修改。打开以下目录:

对alder.moos文件进行编辑:
//------------------------------------------
// pOdometry config block

ProcessConfig = pOdometry
{
  AppTick   = 10
  CommsTick = 10

}
添加一个配置块,将我们app的运行频率改到10hz即可。AppTick和CommsTick决定的就是app的运行频率。
五、修改moosapp
接下来要做的任务就是对moosapp进行修改,使其航行到50m的里程的时候就返回。这个操作需要我们对Helm进行配置。有关Helm的具体设置将在后面的学习中学到,现在就是初步学习一下。
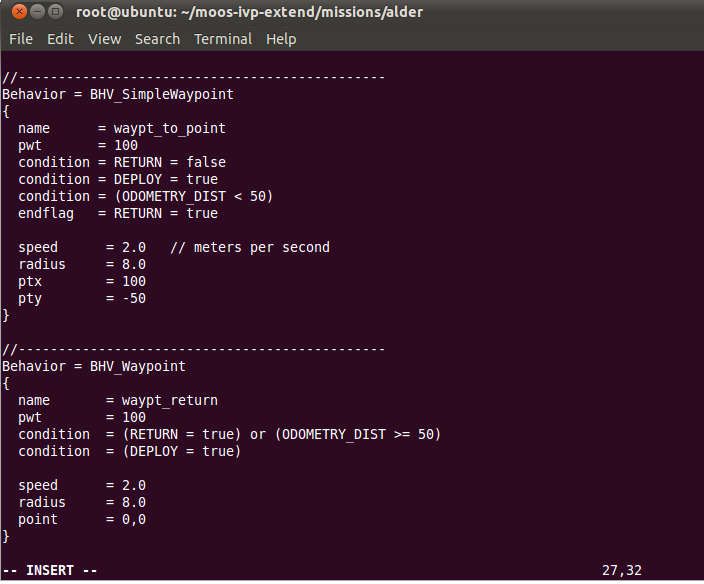
就上面的写的那个目录,打开文件 alder.bhv。对其进行编辑添加代码。加了一个condition条件:
//----------------------------------------------
Behavior = BHV_SimpleWaypoint
{
name  = waypt_to_point
pwt  = 100
condition = RETURN = false
condition = DEPLOY = true
condition = (ODOMETRY_DIST < 50)  // <-- Add this line
endflag  = RETURN = true
speed  = 2.0  // meters per second
radius  = 8.0
ptx  = 100
pty  = -50
}
把下面的代码也进行修改,增加条件:
condition = (RETURN = true) or (ODOMETRY_DIST >= 50)
condition = DEPLOY = true
如图所示:
再次执行程序可以发现,AUV的航程被我们修改了:

总结
对第四个实验的讲解到这里就完成了,主要完成了如何创建一个自己的app以及实现变量的订阅、发布和程序编译。
最后
以上就是高挑苗条最近收集整理的关于MOOS-ivp 实验四 MOOS编程入门(3)系列文章目录四、写自己的moosapp五、修改moosapp总结的全部内容,更多相关MOOS-ivp内容请搜索靠谱客的其他文章。


发表评论 取消回复