目录
一、引入依赖
二、各个功能点介绍
1、创建一个Excel文件
2、创建一个工作表sheet,一个Excel可以创建多个sheet
3、有了Excel文件和工作表,下面就是对样式进行设置了,正文样式,标题样式等等
3.1、文字设置--WritableFont
3.2、设置标题样式--WritableCellFormat
3.3、设置正文内容样式--WritableCellFormat
3.4、窗口冻结指定行、列
3.5、设置行高
3.6、设置列宽
3.7、对数据进行分组
4、构建表头数据
4.1、创建表数据
4.2、合并的单元格
5、构建数据
三、案例代码
本篇文章将介绍用Java技术jxl方式生成Excel表格。我会先拆分成一个一个功能介绍到最后一个案例带你了解jxl生成Excel的方式。
一、引入依赖
生成的Excel是依赖jxl包
   <!--jxl-->
    <dependency>
        <groupId>net.sourceforge.jexcelapi</groupId>
        <artifactId>jxl</artifactId>
        <version>2.6.12</version>
    </dependency>
二、各个功能点介绍
1、创建一个Excel文件
//创建关联磁盘文件
File excel = new File("D:/testIO/" + "表文档.xls");
//创建一个excel
WritableWorkbook workbook = Workbook.createWorkbook(excel);2、创建一个工作表sheet,一个Excel可以创建多个sheet
参数解释:(名称,工作表索引);下面代码这里0指第一个工作表,后面可以建立1,2,3...
//创建一个Excel的工作表sheet
WritableSheet sheet = workbook.createSheet("数据库表", 0);3、有了Excel文件和工作表,下面就是对样式进行设置了,正文样式,标题样式等等
3.1、文字设置--WritableFont
// 一种为bold加粗,一种为noBold不加粗。具体要设置其他样式可以点开WritableFont类参考
WritableFont bold = new WritableFont(WritableFont.createFont("微软雅黑"), 12, WritableFont.BOLD);
WritableFont noBold = new WritableFont(WritableFont.createFont("微软雅黑"), 12, WritableFont.NO_BOLD);3.2、设置标题样式--WritableCellFormat
// 设置一级标题,单元格样式控制对象
WritableCellFormat titleFormate = new WritableCellFormat(bold);
// 设置单元格中的内容水平方向居中、垂直方向居中、背景填充天蓝色、设置边框
titleFormate.setAlignment(jxl.format.Alignment.CENTRE);
titleFormate.setVerticalAlignment(jxl.format.VerticalAlignment.CENTRE);
titleFormate.setBackground(Colour.SKY_BLUE);
titleFormate.setBorder(Border.ALL, BorderLineStyle.THIN);
3.3、设置正文内容样式--WritableCellFormat
// 设置正文,单元格样式控制对象
WritableCellFormat textFormat = new WritableCellFormat(noBold);
// 单元格中的内容水平方向居中、垂直方向居中、设置边框
textFormat.setAlignment(Alignment.CENTRE);
textFormat.setVerticalAlignment(jxl.format.VerticalAlignment.CENTRE);
textFormat.setBorder(Border.ALL,BorderLineStyle.THIN);3.4、窗口冻结指定行、列
//冻结sheet工作表的第一行;可以冻结2.3.4...行
sheet.getSettings().setVerticalFreeze(1);
//冻结第二列
sheet.getSettings().setHorizontalFreeze(2);3.5、设置行高
// 设置行高,第一行,设置500高度;想要针对哪一行都可以设置
sheet.setRowView(0,500);3.6、设置列宽
// 设置列宽
sheet.setColumnView(0,24);
sheet.setColumnView(1,20);
sheet.setColumnView(2,20);
sheet.setColumnView(3,20);
sheet.setColumnView(4,20);
sheet.setColumnView(5,20);
sheet.setColumnView(6,20);
sheet.setColumnView(7,20);
sheet.setColumnView(8,20);3.7、对数据进行分组
//进行分组,1-3、4-6、7-9各为一组,并且默认是折叠true方式生成
sheet.setRowGroup(0, 2, true);
sheet.setRowGroup(3, 5, true);
sheet.setRowGroup(6, 8, true);4、构建表头数据
4.1、创建表数据
//参数依次表示:(0列,0行,填充数据:”表名称“,以titleFormate定义的样式创建)并加入工作表中
Label label_00 = new Label(0,0, "表名称", titleFormate);
sheet.addCell(label_00);

//参数依次表示:(1列,0行,填充数据:”表名称“,以titleFormate定义的样式创建)并加入工作表中
Label label_00 = new Label(0,0, "表名称", titleFormate);
sheet.addCell(label_00);
4.2、合并的单元格
// 添加合并单元格,第一个参数是起始列,第二个参数是起始行,第三个参数是终止列,第四个参数是终止行
//合并第一列和第二列的单元格
sheet.mergeCells(0,0,1,0);5、构建数据
此时一般是for循环构造
//for遍历数据量,依次填入相应的行数和列数
for (int i = 0; i < 9; i++, startRow++) {
        Label label_02 = new Label(0, startRow, "属性名称", textFormat);
        sheet.addCell(label_02);
}
其实,对自己制造好的excel标题、行头等样式进行读入,然后对数据进行填充是一种快捷的方式,本文没有采取这种方式。
三、案例代码
样例
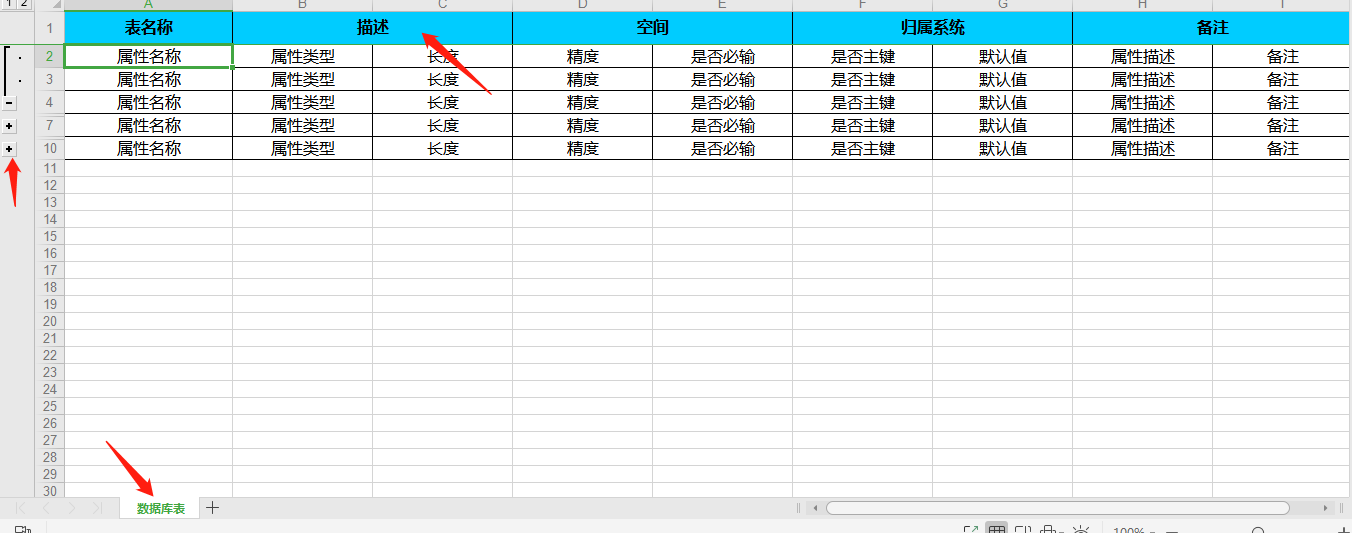
代码
package com.hisun.test;

import com.hisun.kont.common.exception.KontException;
import com.hisun.kont.meta.contants.MsgCdEnum;
import jxl.Workbook;
import jxl.format.Alignment;
import jxl.format.Border;
import jxl.format.Colour;
import jxl.write.*;
import org.junit.Test;

import java.io.File;

/**
 * excel表格生成测试类
 *
 * @author :HUANG ZHI XUE
 * @date :Create in 2020-09-17
 */
public class ExcelTest {

    @Test
    public void exTest() {
        try {

            //  1、创建关联磁盘文件
            File excel = new File("D:/testIO/" + "表文档.xls");
            //创建一个excel
            WritableWorkbook workbook = Workbook.createWorkbook(excel);

            //  2、创建一个Excel的工作表sheet
            WritableSheet sheet = workbook.createSheet("数据库表", 0);

            //  3、样式设置
            //  3.1、文字设置
            //  一种为bold加粗,一种为noBold不加粗。具体要设置其他样式可以点开WritableFont类参考
            WritableFont bold = new WritableFont(WritableFont.createFont("微软雅黑"), 12, WritableFont.BOLD);
            WritableFont noBold = new WritableFont(WritableFont.createFont("微软雅黑"), 12, WritableFont.NO_BOLD);

            //  3.2、设置标题样式
            WritableCellFormat titleFormate = new WritableCellFormat(bold);
            // 设置单元格中的内容水平方向居中、垂直方向居中、背景填充天蓝色、设置边框
            titleFormate.setAlignment(jxl.format.Alignment.CENTRE);
            titleFormate.setVerticalAlignment(jxl.format.VerticalAlignment.CENTRE);
            titleFormate.setBackground(Colour.SKY_BLUE);
            titleFormate.setBorder(Border.ALL, BorderLineStyle.THIN);


            //  3.3设置正文内容样式,单元格样式控制对象
            WritableCellFormat textFormat = new WritableCellFormat(noBold);
            //  单元格中的内容水平方向居中、垂直方向居中、设置边框
            textFormat.setAlignment(Alignment.CENTRE);
            textFormat.setVerticalAlignment(jxl.format.VerticalAlignment.CENTRE);
            textFormat.setBorder(Border.ALL,BorderLineStyle.THIN);

            //  3.4、窗口冻结第一行
            sheet.getSettings().setVerticalFreeze(1);
            //sheet.getSettings().setHorizontalFreeze(2);//冻结 2列两行

            //  3.5、设置行高--第一行标题行
            sheet.setRowView(0,500);

            //  3.6、设置列宽
            sheet.setColumnView(0,24);
            sheet.setColumnView(1,20);
            sheet.setColumnView(2,20);
            sheet.setColumnView(3,20);
            sheet.setColumnView(4,20);
            sheet.setColumnView(5,20);
            sheet.setColumnView(6,20);
            sheet.setColumnView(7,20);
            sheet.setColumnView(8,20);

            //  3.7、对数据进行分组
            //  进行分组,2-3、5-6、8-9各为一组,并且默认是折叠true方式生成
            sheet.setRowGroup(1, 2, true);
            sheet.setRowGroup(4, 5, true);
            sheet.setRowGroup(7, 8, true);

            //  4、构造表头
            this.setSheetHeader(sheet, titleFormate);

            //  5、填充数据
            this.setSheetData(sheet, textFormat, 1);
            workbook.write();
            workbook.close();
        }catch (Exception e){
            KontException.throwKontException(MsgCdEnum.GENERATE_API_EXCEL_FAIL);
        }
    }

    /**
     *
     * 设置sheet的第一行标题样式和内容
     * @param sheet 工作表
     * @param titleFormate 填充样式
     * @throws WriteException 异常
     */
    private void setSheetHeader(WritableSheet sheet, WritableCellFormat titleFormate) throws WriteException {
        // 构造表头
        //mergeCells(0, 0, 0, 0) 表示不合并; sheet.mergeCells(1,0,2,0)表示第2列和第3列合并成一列
        //Label label_20 = new Label(2, 0, "描述", cellFormat); 前面的数字表示第几列,第几行
        //4.1、创建表数据
        Label label_00 = new Label(0,0, "表名称", titleFormate);
        sheet.addCell(label_00);
        //4.2、合并单元格
        sheet.mergeCells(1,0,2,0);
        Label label_20 = new Label(1,0, "描述", titleFormate);
        sheet.addCell(label_20);
        sheet.mergeCells(3,0,4,0);
        Label label_60 = new Label(3,0, "空间", titleFormate);
        sheet.addCell(label_60);
        sheet.mergeCells(5,0,6,0);
        Label label_80 = new Label(5,0, "归属系统", titleFormate);
        sheet.addCell(label_80);
        sheet.mergeCells(7,0,8,0);
        Label label_90 = new Label(7,0, "备注", titleFormate);
        sheet.addCell(label_90);
    }

    /**
     *
     *  填充数据到excel
     * @param sheet 工作表
     * @param textFormat 填充样式
     * @param startRow 填充行数索引
     * @throws WriteException 异常
     */
    private void setSheetData(WritableSheet sheet, WritableCellFormat textFormat, int startRow) throws WriteException {
        // 填充第正文内容;假设只填充9条,其实是按照数据量决定,应该遍历数据依次填入
        for (int i = 0; i < 9; i++, startRow++) {
            Label label_02 = new Label(0, startRow, "属性名称", textFormat);
            sheet.addCell(label_02);
            Label label_12 = new Label(1, startRow, "属性类型", textFormat);
            sheet.addCell(label_12);
            Label label_22 = new Label(2, startRow, "长度", textFormat);
            sheet.addCell(label_22);
            Label label_32 = new Label(3, startRow, "精度", textFormat);
            sheet.addCell(label_32);
            Label label_42 = new Label(4, startRow, "是否必输", textFormat);
            sheet.addCell(label_42);
            Label label_52 = new Label(5, startRow, "是否主键", textFormat);
            sheet.addCell(label_52);
            Label label_62 = new Label(6, startRow, "默认值", textFormat);
            sheet.addCell(label_62);
            Label label_72 = new Label(7, startRow, "属性描述", textFormat);
            sheet.addCell(label_72);
            Label label_82 = new Label(8, startRow, "备注", textFormat);
            sheet.addCell(label_82);
        }
    }
}
最后
以上就是拉长热狗最近收集整理的关于带你用Java jxl方式生成Excel一、引入依赖二、各个功能点介绍三、案例代码的全部内容,更多相关带你用Java内容请搜索靠谱客的其他文章。
本图文内容来源于网友提供,作为学习参考使用,或来自网络收集整理,版权属于原作者所有。


发表评论 取消回复