在学会对图像文件中的人脸进行识别后,还要使用摄像头进行人脸识别,需要先读取摄像头所获取的画面,并将画面进行存储,之后在对存储图像进行人脸识别,并将识别出的人脸存储。
OpenCV学习——图像脸部识别_笨小古的博客-CSDN博客
先学一下脸部储存,需要借助Pillow库
import cv2
from PIL import Image

pictPath = r'dataopencvsourcesdatahaarcascadeshaarcascade_frontalface_default.xml'
face_cascade = cv2.CascadeClassifier(pictPath)  # 建立识别文件对象
img = cv2.imread('datag5.jpg')
faces = face_cascade.detectMultiScale(img, scaleFactor=1.1,
                                      minNeighbors=3, minSize=(20, 20))

# 标注右下角底色是黄色
cv2.rectangle(img, (img.shape[1] - 140, img.shape[0] - 20), (img.shape[1], img.shape[0]), (0, 255, 255), -1)

# 标注找到多少人脸
cv2.putText(img, "Finding " + str(len(faces)) + " face", (img.shape[1] - 135, img.shape[0] - 5),
            cv2.FONT_HERSHEY_PLAIN, 1, (255, 0, 0), 1)
# 将人脸框起来,由于有可能找到好几张脸所以用循环绘制出来
num = 1
for (x, y, w, h) in faces:
    cv2.rectangle(img, (x, y), (x + w, y + h), (255, 0, 0), 2)  # 蓝色框住人脸
    filename = "face" + str(num) + ".jpg"  # 建立文件名
    image = Image.open("datag5.jpg")  # PIL模块开启
    imageCrop = image.crop((x, y, x + w, y + h))  # 裁切
    imageResize = imageCrop.resize((150, 150), Image.ANTIALIAS)  # 高质量重制大小
    imageResize.save(filename)  # 存储文件
    num += 1
cv2.namedWindow("Face", cv2.WINDOW_NORMAL)  # 建立图像对象
cv2.imshow("Face", img)
cv2.waitKey(0)
cv2.destroyAllWindows()
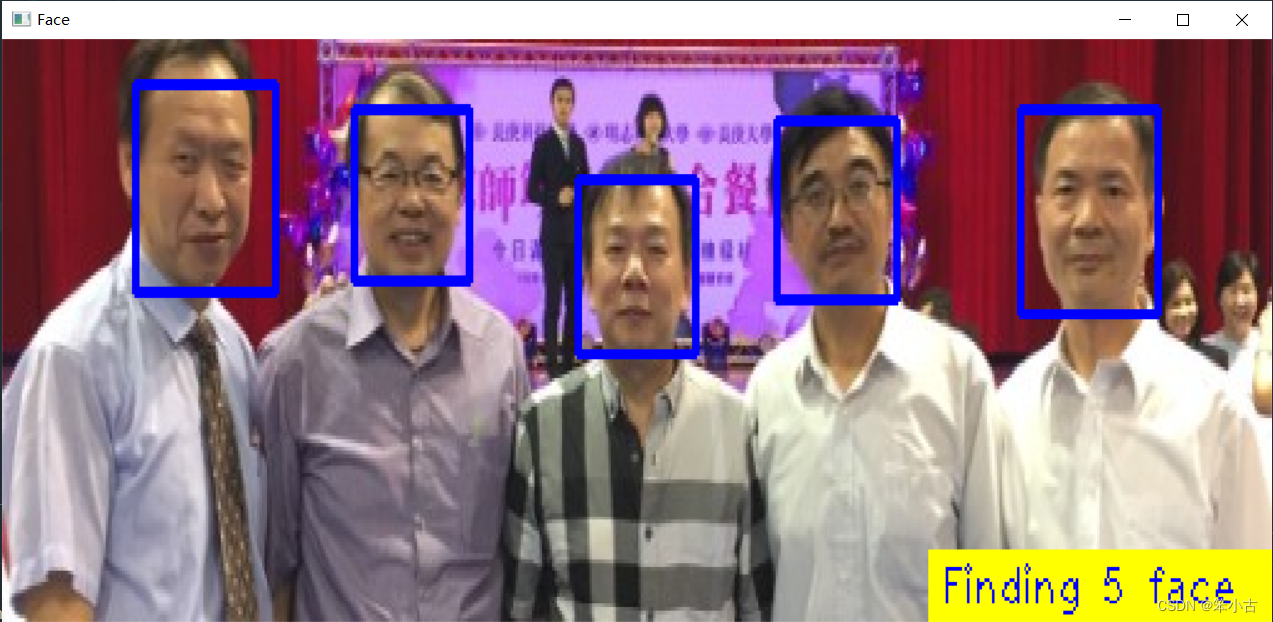


(左边第二位是中国台湾著名计算机专家,IT图书知名作者洪锦魁,曾出版了多部Python学习书籍)
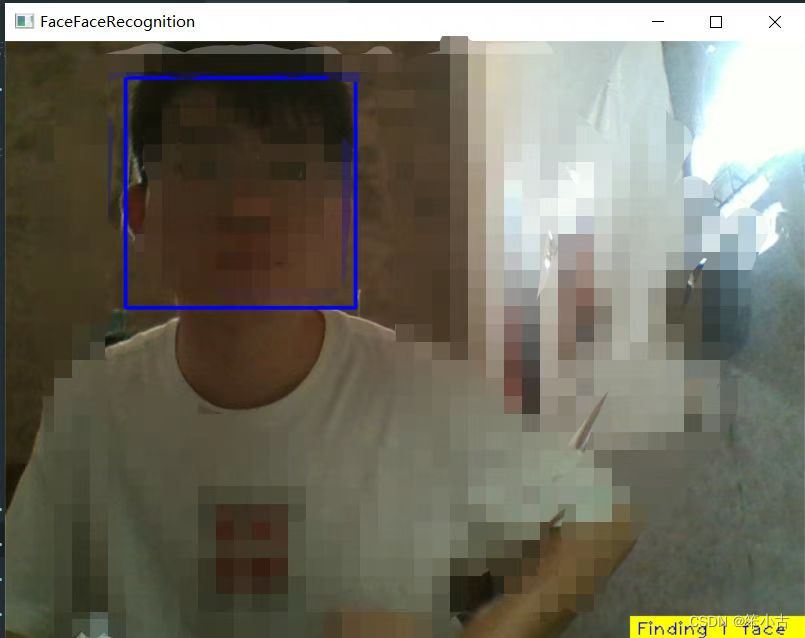
下面使用笔记本电脑摄像头进行人脸识别
cap = VideoCapture(n) # 笔记本电脑上内置摄像头,n是0import cv2
from PIL import Image
pictPath = r'dataopencvsourcesdatahaarcascadeshaarcascade_frontalface_default.xml'
face_cascade = cv2.CascadeClassifier(pictPath) # 建立识别文件对象
cv2.namedWindow("Photo")
cap = cv2.VideoCapture(0) # 开启摄像头
while (cap.isOpened()): # 摄像头开启后执行
ret, img = cap.read() # 读取图像;ret是布尔值,摄像头拍摄成功便返回True,img是摄像头所拍的图像对象
cv2.imshow("Photo", img) # 显示图像在OpenCV窗口
if ret == True: # 如果图像读取成功
key = cv2.waitKey(200) # 每0.2秒检查一次
if key == ord("a") or key == ord("A"):
cv2.imwrite("photo.jpg", img) # 将图像写入photo.jpg
break
cap.release() # 关闭摄像头
faces = face_cascade.detectMultiScale(img, scaleFactor=1.1,
minNeighbors=3, minSize=(20, 20))
# 标注右下角底色是黄色
cv2.rectangle(img, (img.shape[1] - 140, img.shape[0] - 20), (img.shape[1], img.shape[0]), (0, 255, 255), -1)
# 标注找到多少人脸
cv2.putText(img, "Finding " + str(len(faces)) + " face", (img.shape[1] - 135, img.shape[0] - 5),
cv2.FONT_HERSHEY_PLAIN, 1, (255, 0, 0), 1)
# 将人脸框起来,由于有可能找到好几张脸所以用循环绘制出来
for (x, y, w, h) in faces:
cv2.rectangle(img, (x, y), (x + w, y + h), (255, 0, 0), 2) # 蓝色框住人脸
image = Image.open("photo.jpg") # PIL模块开启
imageCrop = image.crop((x, y, x + w, y + h)) # 裁切
imageResize = imageCrop.resize((150, 150), Image.ANTIALIAS) # 高质量重制大小
imageResize.save("faceout.jpg") # 存储文件
cv2.namedWindow("FaceRecognition", cv2.WINDOW_NORMAL) # 建立图像对象
cv2.imshow("FaceRecognition", img)
cv2.waitKey(0)
cv2.destroyAllWindows()

最后
以上就是虚拟白云最近收集整理的关于OpenCV学习——摄像头人脸识别的全部内容,更多相关OpenCV学习——摄像头人脸识别内容请搜索靠谱客的其他文章。
本图文内容来源于网友提供,作为学习参考使用,或来自网络收集整理,版权属于原作者所有。


发表评论 取消回复