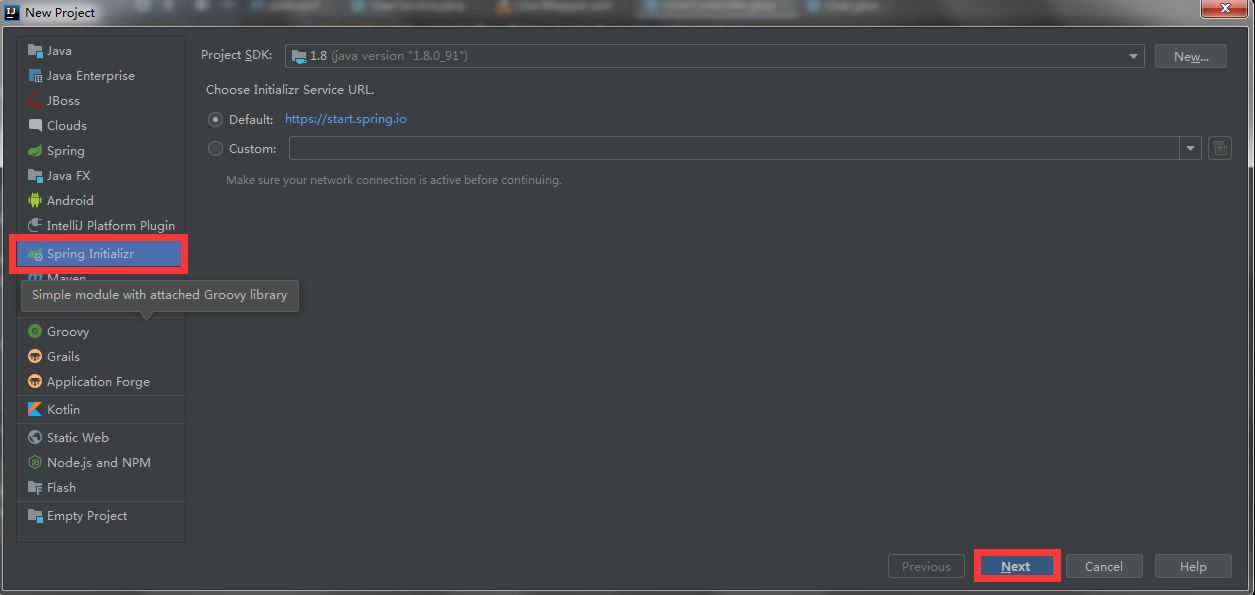
1.新建一个project
新建项目时选择Spring Initializer。
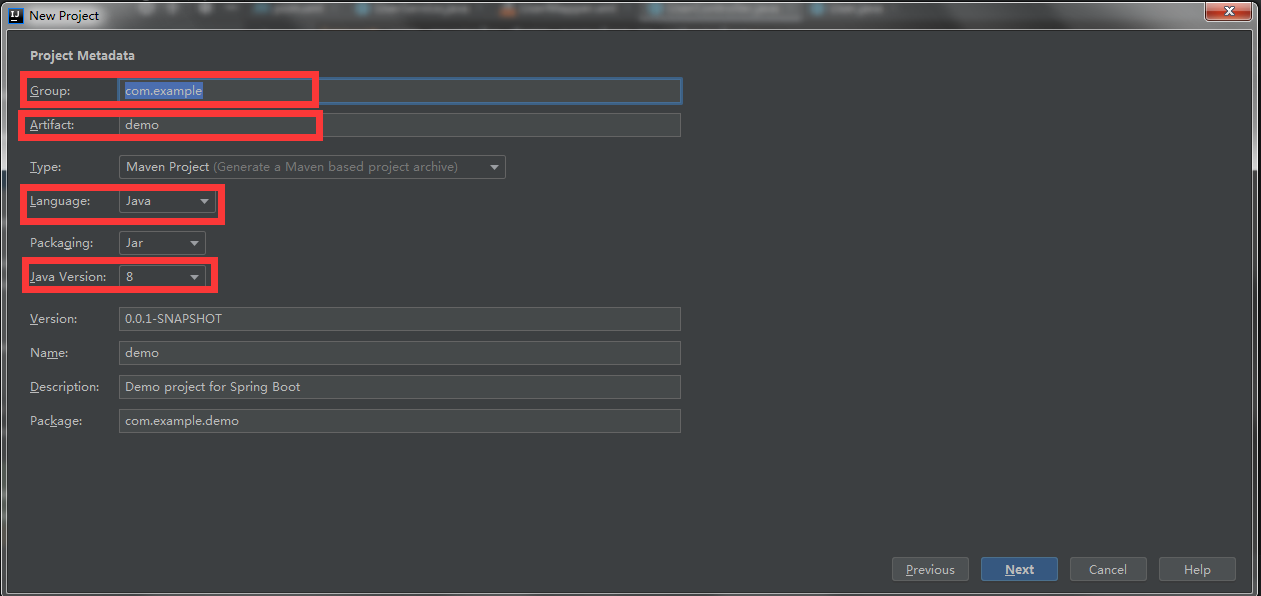
2.创建项目文件结构、选择jdk版本
一般选择Java version8
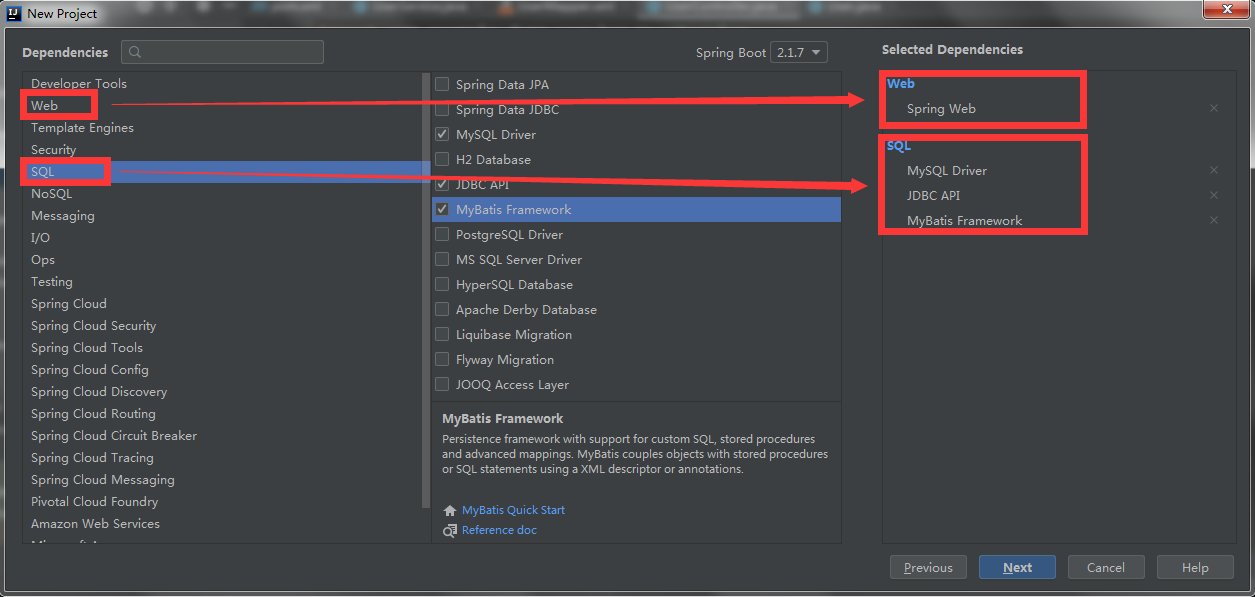
3.选择项目需要的依赖
首先点击web选择spring web,再点击SQL选择MySQL driver 等,然后再一路next到新建完成。
4.查看项目新建完成后的pom文件
<?xml version="1.0" encoding="UTF-8"?>
<project xmlns="http://maven.apache.org/POM/4.0.0" xmlns:xsi="http://www.w3.org/2001/XMLSchema-instance"
         xsi:schemaLocation="http://maven.apache.org/POM/4.0.0 https://maven.apache.org/xsd/maven-4.0.0.xsd">
    <modelVersion>4.0.0</modelVersion>
    <parent>
        <groupId>org.springframework.boot</groupId>
        <artifactId>spring-boot-starter-parent</artifactId>
        <version>2.1.7.RELEASE</version>
        <relativePath/> <!-- lookup parent from repository -->
    </parent>
    <groupId>com.example</groupId>
    <artifactId>demo</artifactId>
    <version>0.0.1-SNAPSHOT</version>
    <name>demo</name>
    <description>Demo project for Spring Boot</description>

    <properties>
        <project.build.sourceEncoding>UTF-8</project.build.sourceEncoding>
        <project.reporting.outputEncoding>UTF-8</project.reporting.outputEncoding>
        <java.version>1.8</java.version>
    </properties>

    <dependencies>
        <dependency>
            <groupId>org.springframework.boot</groupId>
            <artifactId>spring-boot-starter-jdbc</artifactId>
        </dependency>
        <!--web相关-->
        <dependency>
            <groupId>org.springframework.boot</groupId>
            <artifactId>spring-boot-starter-web</artifactId>
        </dependency>
        <!--mybatis相关-->
        <dependency>
            <groupId>org.mybatis.spring.boot</groupId>
            <artifactId>mybatis-spring-boot-starter</artifactId>
            <version>2.1.0</version>
        </dependency>
        <!--mysql相关-->
        <dependency>
            <groupId>mysql</groupId>
            <artifactId>mysql-connector-java</artifactId>
            <scope>runtime</scope>
        </dependency>
        <dependency>
            <groupId>org.springframework.boot</groupId>
            <artifactId>spring-boot-starter-test</artifactId>
            <scope>test</scope>
        </dependency>
    </dependencies>

    <build>
        <resources>
            <resource>
                <directory>src/main/resources</directory>
                <includes>
                    <include>**/*.properties</include>
                    <include>**/*.xml</include>
                    <include>**/*.yml</include>
                </includes>
                <filtering>true</filtering>
            </resource>

        </resources>
        <plugins>
            <plugin>
                <groupId>org.springframework.boot</groupId>
                <artifactId>spring-boot-maven-plugin</artifactId>
            </plugin>
        </plugins>

    </build>

</project>
pom文件为默认生成,只需要在其中的build下添加以下代码,改代码表示在编译时囊括src/main/resources文件下的
- .properties
- .xml
- .yml文件
防止编译出错。
<resources>
            <resource>
                <directory>src/main/resources</directory>
                <includes>
                    <include>**/*.properties</include>
                    <include>**/*.xml</include>
                    <include>**/*.yml</include>
                </includes>
                <filtering>true</filtering>
            </resource>

        </resources>
5.修改相关配置文件src/main/resources
5.1删除application.properties文件
5.2创建application.yml配置文件,该配置文件用于加载application-dev(后文创建)
spring:
  profiles:
    active: dev
5.3创建application-dev.yml配置文件
server:
  port: 8080

spring:
  datasource:
    username: root
    password: 123456
    #url中database为对应的数据库名称
    url: jdbc:mysql://localhost:3306/database?useUnicode=true&characterEncoding=utf-8&useSSL=true&serverTimezone=UTC
    driver-class-name: com.mysql.cj.jdbc.Driver

mybatis:
  mapper-locations: classpath:mapping/*.xml
  type-aliases-package: com.example.demo.entity

#showSql
logging:
  level:
    com.example.demo.mapper: debug
对以上两个文件的解释:
一个项目有很多环境:开发环境,测试环境,准生产环境,生产环境。
每个环境的参数不同,我们就可以把每个环境的参数配置到yml文件中,这样在想用哪个环境的时候只需要在主配置文件中将用的配置文件写上就行如application.yml
在Spring Boot中多环境配置文件名需要满足application-{profile}.yml的格式,其中{profile}对应环境标识,比如:
application-dev.yml:开发环境
application-test.yml:测试环境
application-prod.yml:生产环境
至于哪个具体的配置文件会被加载,需要在application.yml文件中通过spring.profiles.active属性来设置,其值对应{profile}值
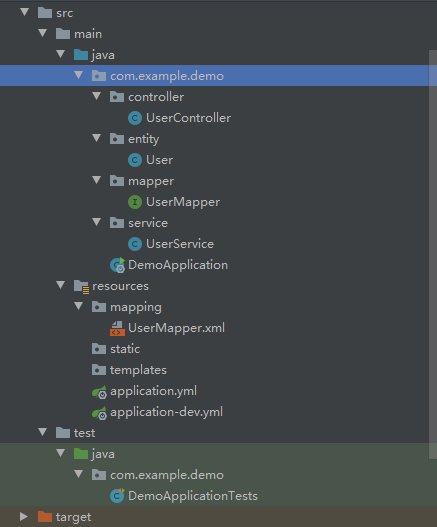
6.该项目的文件结构
在com.example.demo包下分别创建包controller、entity、mapper、service。在resources下创建mapping文件夹。具体的代码结构如下图所示:
7.开始编码操作
7.1新建数据库database,并在该数据库下建表user,包含id(int),userName(varchar),passWord(varchar),realName(varchar),插入几组数据。
CREATE TABLE `user` (
  `id` int(32) NOT NULL AUTO_INCREMENT,
  `userName` varchar(32) NOT NULL,
  `passWord` varchar(50) NOT NULL,
  `realName` varchar(32) DEFAULT NULL,
  PRIMARY KEY (`id`)
) ENGINE=InnoDB AUTO_INCREMENT=3 DEFAULT CHARSET=utf8;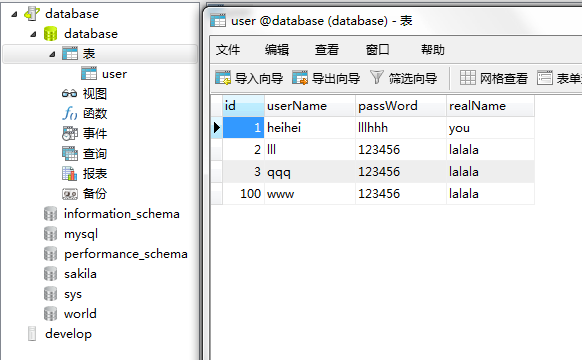
7.2在entity包中新建User.java,使之与数据库中的字段一一对应
package com.example.demo.entity;

public class User {
    private Integer id;
    private String userName;
    private String passWord;
    private String realName;

    public Integer getId() {
        return id;
    }

    public void setId(Integer id) {
        this.id = id;
    }

    public String getUserName() {
        return userName;
    }

    public void setUserName(String userName) {
        this.userName = userName;
    }

    public String getPassWord() {
        return passWord;
    }

    public void setPassWord(String passWord) {
        this.passWord = passWord;
    }

    public String getRealName() {
        return realName;
    }

    public void setRealName(String realName) {
        this.realName = realName;
    }

    @Override
    public String toString() {
        return "User{" +
                "id=" + id +
                ", userName='" + userName + ''' +
                ", passWord='" + passWord + ''' +
                ", realName='" + realName + ''' +
                '}';
    }
}
7.3在mapper包中新建UserMapper接口
package com.example.demo.mapper;

import com.example.demo.entity.User;
import org.springframework.stereotype.Repository;

import java.util.List;

@Repository
public interface UserMapper {
    /**
     * 根据id查询用户信息
     * @param id
     * @return
     */
    User getUserInfo(int id);
    /**
     * 新增用户
     * @param user
     * @return
     */
    int save (User user);

    /**
     * 更新用户信息
     * @param user
     * @return
     */
    int update (User user);

    /**
     * 根据id删除
     * @param id
     * @return
     */
    int deleteById (int id);

    /**
     * 查询所有用户信息
     * @return
     */
    List<User> selectAll ();
}
7.4在service包中新建实现类UserService.java
package com.example.demo.service;

import com.example.demo.entity.User;
import com.example.demo.mapper.UserMapper;
import org.springframework.beans.factory.annotation.Autowired;
import org.springframework.stereotype.Service;

import java.util.List;

@Service
public class UserService {
    @Autowired
    private UserMapper userMapper;

    public User getUserInfo(int id) {
        return userMapper.getUserInfo(id);
    }


    public int deleteById(int id) {
        return userMapper.deleteById(id);
    }

    public int Update(User user) {
        return userMapper.update(user);
    }

    public User save(User user) {
        int save = userMapper.save(user);
        return user;
    }

    public List<User> selectAll() {
        return userMapper.selectAll();
    }
}
7.5在controller包中新建访问类UserController.java
package com.example.demo.controller;

import com.example.demo.entity.User;
import com.example.demo.service.UserService;
import org.springframework.beans.factory.annotation.Autowired;
import org.springframework.web.bind.annotation.*;

import java.util.List;

@RestController
@RequestMapping("/testBoot")
public class UserController {

    @Autowired
    private UserService userService;

    //通过用户id获取用户所有信息
    //    http://localhost:8080/testBoot/getUser/1(此处1为要获取的id)
    @RequestMapping(value = "getUser/{id}", method = RequestMethod.GET)
    //    http://localhost:8080/testBoot/getUser?id=1(此处1为要获取的id)
    //    @RequestMapping(value = "/getUser", method = RequestMethod.GET)
    public String GetUser(@PathVariable int id) {
        return userService.getUserInfo(id).toString();
    }

    //通过用户id删除用户
    //    http://localhost:8080/testBoot/delete?id=1(此处1为要删除的id)
    @RequestMapping(value = "/delete", method = RequestMethod.GET)
    public String delete(int id) {
        int result = userService.deleteById(id);
        if (result >= 1) {
            return "删除成功";
        } else {
            return "删除失败";
        }
    }
    //根据用户id更新用户信息
    //http://localhost:8080/testBoot/update?id=2&userName=波波&passWord=123456&realName=lalala
    @RequestMapping(value = "/update", method = RequestMethod.POST)
    public String update(User user) {
        int result = userService.Update(user);
        if (result >= 1) {
            return "修改成功";
        } else {
            return "修改失败";
        }
    }
    //插入新用户
    //    http://localhost:8080/testBoot/insert?id=100&userName=波波&passWord=123456&realName=lalala
    @RequestMapping(value = "/insert", method = RequestMethod.POST)
    public User insert(User user) {
        return userService.save(user);
    }
    //打印所有用户信息
    //    http://localhost:8080/testBoot/selectAll
    @RequestMapping("/selectAll")
    @ResponseBody
    public List<User> ListUser() {
        return userService.selectAll();
    }

}
7.6在src/main/resources/mapping文件夹下新建UserMapper的映射文件UserMapper.xml
<?xml version="1.0" encoding="UTF-8"?>
<!DOCTYPE mapper PUBLIC "-//mybatis.org//DTD Mapper 3.0//EN" "http://mybatis.org/dtd/mybatis-3-mapper.dtd">
<mapper namespace="com.example.demo.mapper.UserMapper">

    <resultMap id="BaseResultMap" type="com.example.demo.entity.User">
        <result column="id" jdbcType="INTEGER" property="id" />
        <result column="userName" jdbcType="VARCHAR" property="userName" />
        <result column="passWord" jdbcType="VARCHAR" property="passWord" />
        <result column="realName" jdbcType="VARCHAR" property="realName" />
    </resultMap>
<!--查询用户信息-->
    <select id="getUserInfo" resultType="com.example.demo.entity.User">
        select * from user where id = #{id}
    </select>
<!--删除用户信息-->
    <delete id="deleteById" parameterType="int">
        delete from user where id=#{id}
    </delete>
<!--返回所有用户信息-->
    <select id="selectAll"  resultType="com.example.demo.entity.User">
        select * from user
    </select>

<!--增加用户信息-->
    <insert id="save" parameterType="com.example.demo.entity.User" >
        insert into user
        <trim prefix="(" suffix=")" suffixOverrides="," >
            <if test="id != null" >
                id,
            </if>
            <if test="userName != null" >
                userName,
            </if>
            <if test="passWord != null" >
                passWord,
            </if>

            <if test="realName != null" >
                realName,
            </if>
        </trim>
        <trim prefix="values (" suffix=")" suffixOverrides="," >
            <if test="id != null" >
                #{id,jdbcType=INTEGER},
            </if>
            <if test="userName != null" >
                #{userName,jdbcType=VARCHAR},
            </if>
            <if test="passWord != null" >
                #{passWord,jdbcType=VARCHAR},
            </if>
            <if test="realName != null" >
                #{realName,jdbcType=VARCHAR},
            </if>
        </trim>
    </insert>

<!--根据id更改用户信息-->
    <update id="update" parameterType="com.example.demo.entity.User">
        update user
        <set >
            <if test="userName != null" >
                userName = #{userName,jdbcType=VARCHAR},
            </if>
            <if test="passWord != null" >
                passWord = #{passWord,jdbcType=VARCHAR},
            </if>
            <if test="realName != null" >
                realName = #{realName,jdbcType=VARCHAR},
            </if>
        </set>
        where id = #{id,jdbcType=INTEGER}
    </update>
</mapper>
7.7修改程序的启动入口类DemoApplication
package com.example.demo;

import org.mybatis.spring.annotation.MapperScan;
import org.springframework.boot.SpringApplication;
import org.springframework.boot.autoconfigure.SpringBootApplication;

@MapperScan("com.example.demo.mapper") //扫描的mapper
@SpringBootApplication
public class DemoApplication {

    public static void main(String[] args) {
        SpringApplication.run(DemoApplication.class, args);
    }
}
8.验证
到这里就完成了增删改查操作,接下来我们对上面的代码在Postman中进行验证
8.1通过用户id获取用户信息:
http://localhost:8080/testBoot/getUser/1
(此处1为要获取的id)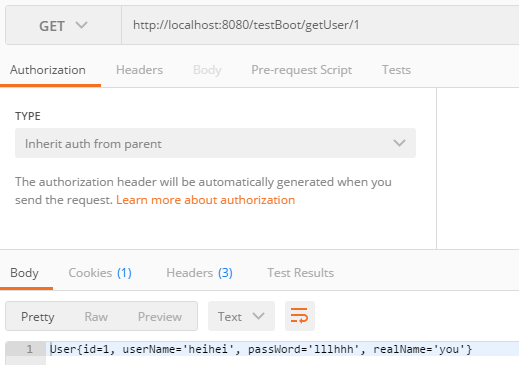
8.2通过用户id删除用户
http://localhost:8080/testBoot/delete?id=1
(此处1为要删除的id)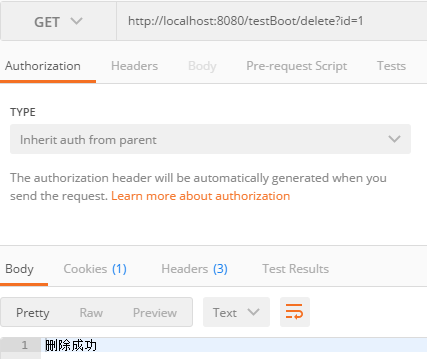
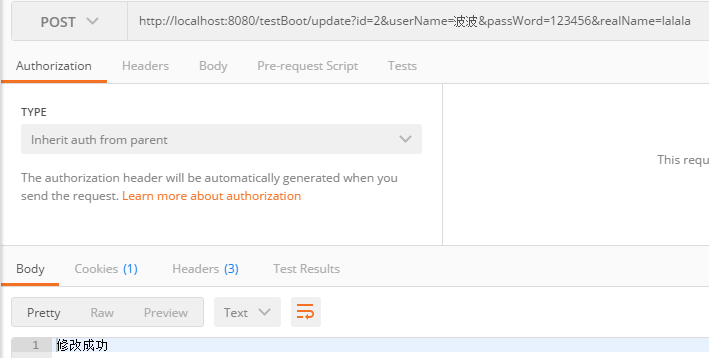
8.3根据用户id更新用户信息
http://localhost:8080/testBoot/update?id=2&userName=波波&passWord=123456&realName=lalala
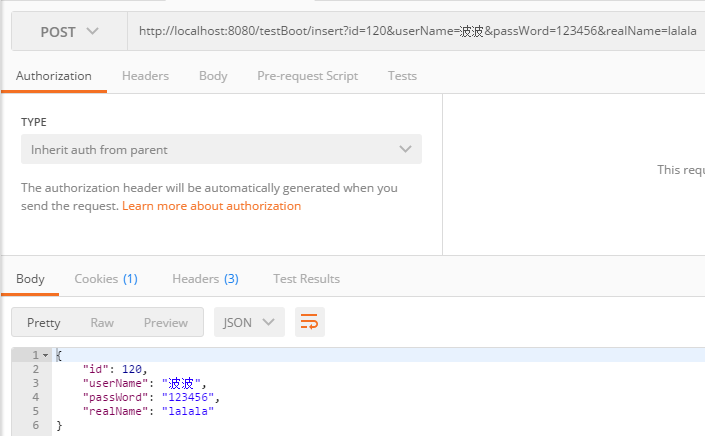
8.4插入新用户
http://localhost:8080/testBoot/insert?id=120&userName=波波&passWord=123456&realName=lalala
8.5打印所有用户信息
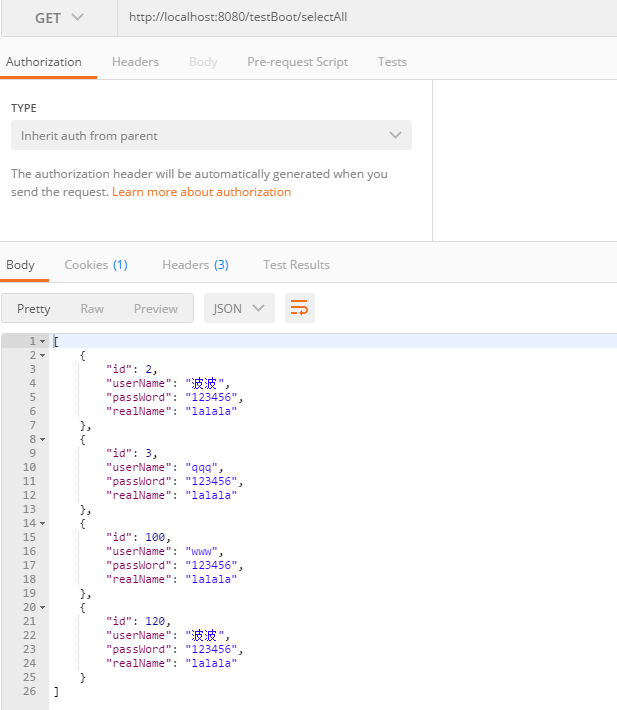
http://localhost:8080/testBoot/selectAll
最后
以上就是爱听歌铃铛最近收集整理的关于IDEA SpringBoot整合Mybatis实现增删改查操作1.新建一个project2.创建项目文件结构、选择jdk版本3.选择项目需要的依赖4.查看项目新建完成后的pom文件5.修改相关配置文件src/main/resources6.该项目的文件结构7.开始编码操作8.验证 的全部内容,更多相关IDEA内容请搜索靠谱客的其他文章。


发表评论 取消回复