1.之前的SSM 框架与bootstrap整合
1.在webapp(而不是WEB-INF)下拖入bootstrap jar包
2.为了在jsp中使用jstl标签库导入jstl jar包
 <dependency>
      <groupId>org.glassfish.web</groupId>
      <artifactId>javax.servlet.jsp.jstl</artifactId>
      <version>1.2.2</version>
    </dependency>
2.MySql查询
1.select * from student_t
2.
<?xml version="1.0" encoding="UTF-8" ?>
<!DOCTYPE mapper PUBLIC "-//mybatis.org//DTD Mapper 3.0//EN"
        "http://mybatis.org/dtd/mybatis-3-mapper.dtd">
<!-- namespace用来找唯一的Mapper文件 一般是domain的全路径名+Mapper -->
<mapper namespace="zxl.web.mapper.StudentMapper">

    <select id="queryAll"  resultMap="studentMap">
 		select u.id,u.name,u.pwd,u.stunum,u.imgUrl,u.sex,d.id did,d.class_name dname from t_student u,t_class d where u.classid=d.id
 	</select>
    <resultMap id="studentMap" type="student">
        <id column="id" property="id"/>
        <result column="name" property="name"/>
        <result column="pwd" property="pwd"/>
        <result column="stunum" property="stunum"/>
        <result column="imgUrl" property="imgUrl"/>
        <result column="sex" property="sex"/>

        <association property="classes" javaType="Classes">
            <id column="did" property="id"/>
            <id column="dname" property="class_name"/>
        </association>
    </resultMap>
</mapper>
3.在webapp下新建uploadFile文件夹
在数据库中我们将头像地址设置为/uploadFile/1.png。将uploadFile文件夹添加到webapp下面。运行项目,在网页上出现图片

4.实现删除功能
1.在StudentMapper.xml里面添加删除功能
 <!--删除方法-->
    <delete id="delete" parameterType="Student">
        delete from t_student where id=#{id}
    </delete>
在Studentmapper.java中添加
 //删除方法
    public void delete(Student stu);
2.添加到service层
IStudentService
public void delete(Student stu);在StudentServiceImpl中实现
 @Override
    public void delete(Student stu) {
        mapper.delete(stu);
    }
3.完成StudentController里面的代码
    @RequestMapping("/delete")
    public String delete(Student stu){

        studentService.delete(stu);
        //调用service层的删除方法把数据删除
        return "redirect:/student/index";
   }
5.实现上传功能
1.点击“新增”跳转到上传页面
看新增页面
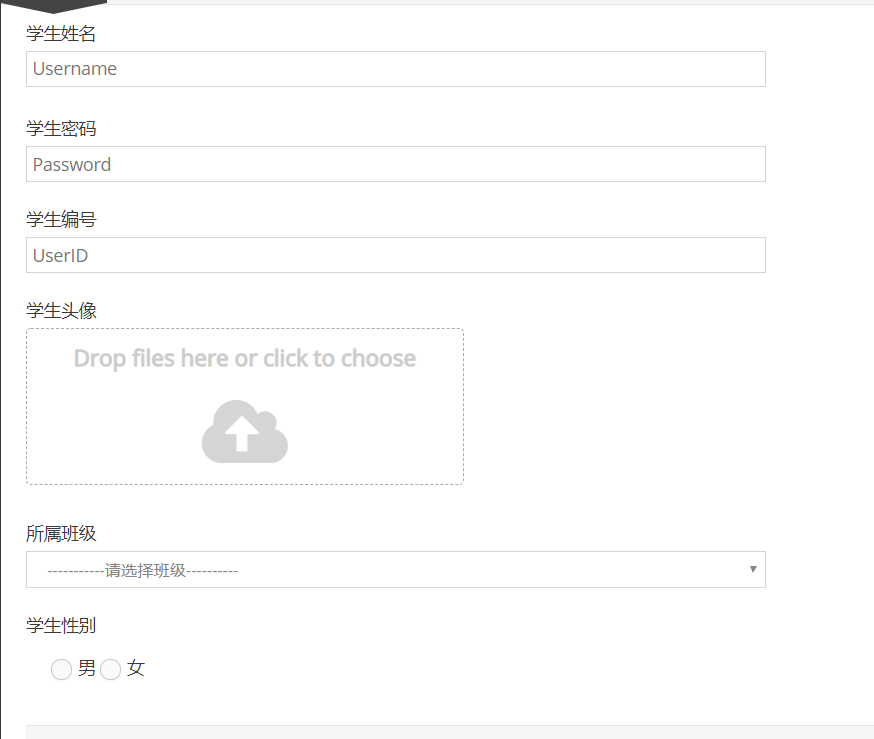
看到在这个页面上需要上传所有的班级内容在所属班级选项框中。因此在studentcontroller中要使用查询方法查询出所有的class内容,放到lists中,并将lists放到model中的“classes"中,这样在新增页面即可呈现。(这里的classes来源与Jsp页面中定义的内容)
<div class="form-group">
	<label class="col-sm-3 control-label no-padding-right" for="form-field-1">所属班级</label>
	<div class="col-sm-9">
	   <select class="col-xs-10 col-sm-5" id="selectpicker" name="classes.id" >
			<option value="-1">-----------请选择班级----------</option>
			<c:forEach items="${classes}" var="cls">
			<option value="${cls.id}"  >${cls.class_name}</option>
			</c:forEach>
		</select>
	</div>
</div>
StudentController中
   //新增跳转方法--保存数据
   @RequestMapping("/add")
    public String add(Model model){
        List<Classes>lists=classesService.queryAll();
        model.addAttribute("classes",lists);
        return "student/student_input";
   }
2.保存数据
在StudentMapper.xml中进行插入操作
<!--保存方法-->
    <insert id="save" parameterType="Student" useGeneratedKeys="true" keyColumn="id" keyProperty="id"><!--keycolumn对应的就是id-->
        insert into t_student (name,pwd,stunum,imgUrl,classid,sex) values(#{name},#{pwd},#{stunum},#{imgUrl},#{classes.id},#{sex});
    </insert>
可以看出难点在于获取imgUrl
在studentControler中进行如下处理
public String save(Student student, MultipartFile imgFile, HttpServletRequest req,Model model) throws IOException//imgFile要与Student_list上的Imgfile对上
    {
        //完成上传功能
        if(imgFile !=null){
            //获取文件夹路径
           //String path=req.getSession().getServletContext().getRealPath("/uploadFile");
            String path="F:/计算机/大四/毕业设计项目/代码/LabWeb_SSM/src/main/webapp/uploadFile";
            //文件名称UID解决文件名称问题
            String filename=imgFile.getOriginalFilename();
            String newFileName=UUID.randomUUID().toString()+"."+ StringUtils.getFilenameExtension(filename);
            //先构造一个文件出来
            File file=new File(path,newFileName);
            //把imgFile写到file里
            org.apache.commons.io.IOUtils.copy(imgFile.getInputStream(),new FileOutputStream(file));
            //存放图片地址
            student.setImgUrl("/uploadFile/"+newFileName);
        }

            //把数据保存到数据
            studentService.save(student);
        return "redirect:/student/index";
    }
通过String path=req.getSession().getServletContext().getRealPath("/uploadFile");这个方法得到的文件路径为绝对路径,在Intellij idea中我们选择了war exploded部署,所以它获得的绝对路径是在target目录下,而我们无法获取target目录下的东西进行上传。因此我们直接写绝对路径。
关于war部署和war exploded部署的区别
https://blog.csdn.net/xlgen157387/article/details/56498938
我在实现Insert语句的时候出现了传入中文乱码问题。在web.xml里面已经写入了post提交中文乱码的过滤器,使用断点调试发现参数从前台传入到后台以及后台获取的参数值是正确的,但是存入数据库的时候显示为”???“,修改jdbc.properties
将
jdbc.url=jdbc:mysql:///labweb改为
jdbc.url=jdbc:mysql:///labweb?useUnicode=true&characterEncoding=utf8插入中文成功。
6.实现修改功能
修改和上传都跳转到同一个页面,那么在点击保存的时候需要考虑到底是进行insert还是update。如果是insert的话此时save方法的student为空,所以我们可以用一个If语句进行判断。代码如下
 @RequestMapping("/save")
   public String save(Student student, MultipartFile imgFile, HttpServletRequest req,Model model) throws IOException//imgFile要与Student_list上的Imgfile对上
    {
        System.out.println("成功进入save");
        //完成上传功能
        if(imgFile !=null){
            //获取文件夹路径
           //String path=req.getSession().getServletContext().getRealPath("/uploadFile");
            String path="F:/计算机/大四/毕业设计项目/代码/LabWeb_SSM/src/main/webapp/uploadFile";
            //System.out.println(path);
            //文件名称UID解决文件名称问题
            String filename=imgFile.getOriginalFilename();
            //System.out.println(filename);
            String newFileName=UUID.randomUUID().toString()+"."+ StringUtils.getFilenameExtension(filename);
            //System.out.println(newFileName);
            //先构造一个文件出来
            File file=new File(path,newFileName);
            //把imgFile写到file里
            org.apache.commons.io.IOUtils.copy(imgFile.getInputStream(),new FileOutputStream(file));
            //存放图片地址
            student.setImgUrl("/uploadFile/"+newFileName);
        }
        if(student!=null && student.getId()!=null&&!"".equals(student.getId())){
            studentService.update(student);
        }else{
            //把数据保存到数据
            studentService.save(student);
        }
        return "redirect:/student/index";
    }
进入修改页面之前需要将所选择的数据原始信息放到相应的位置上
在jsp页面中传入所选择的用户id
//编辑功能
$('#editBtn').click( function () {
	var id = 0;
	var nTrs = stuTable.fnGetNodes();//fnGetNodes获取表格所有行,nTrs[i]表示第i行tr对象
		for(var i = 0; i < nTrs.length; i++){
			 if($(nTrs[i]).hasClass('selected')){
				var row = stuTable.fnGetData(nTrs[i]);//fnGetData获取一行的数据
				 id = row[1];
				 }
			 }
	if(id == 0){
		alert("请选中一行数据");
			}else{
				location.href="/student/edit?id="+id;
			}
		} );
在StudentMapper.xml中写查询方法
<!--查询方法-->
    <select id="queryOne"  resultMap="studentMap" parameterType="Student"><!--返回类型为parameterType-->
 		select u.id,u.name,u.pwd,u.stunum,u.imgUrl,u.sex,d.id did,d.class_name dname from t_student u,t_class d where u.classid=d.id and u.id=#{id}
 	</select>
返回的Student值和classname传到页面上,在StudentController中
 //修改数据方法---跳转方法---把修改数据显示到页面
    @RequestMapping("/edit")
    public String edit(Student student,Model model){
        //根据stu里面的id 查询数据 放到页面进行回显操作
        Student student1=studentService.queryOne(student);
        //查询班级
        model.addAttribute("classes",classesService.queryAll());
        model.addAttribute("student",student1);//在script,JQuery中已经通过student取出,var selectVal = "${student.classes.id}";,所以命名为student
        return "student/student_input";
    }
在student_input页面中添加一个隐藏域
<!--新增点击过来,没有id,修改点过来有id-->
<input type="hidden" name="id" value="${student.id}"/>
更新的代码
    <!--更新方法-->
    <update id="update" parameterType="Student">
        update t_student set name=#{name},pwd=#{pwd},stunum=#{stunum},imgUrl=#{imgUrl},classid=#{classes.id},sex=#{sex} where id=#{id}
    </update>
最后
以上就是整齐小蜜蜂最近收集整理的关于Intellij idea集成bootstrap框架并且实现增删改查功能1.之前的SSM 框架与bootstrap整合2.MySql查询的全部内容,更多相关Intellij内容请搜索靠谱客的其他文章。


发表评论 取消回复