1.UIKit框架提供了非常多的UI控件,但并不是每一个都很常用,有些控件可能1年内都用不上,有些控件天天用,比如UIButton、UILabel、UIImageView、UITableView等等,现在就先来学习非常重要且比较基一个UI控件---UIButton,俗称“按钮”,一般情况下,点击某个控件后,会做出相应反应的都是按钮,按钮的功能比较多,既能显示文字,又能显示图片,还能随时调整内部图片和文字的位置
2.
按钮是有多种状态的:
normal(普通状态):默认情况, 对应的枚举常量:UIControlStateNormal
highlighted(高亮状态):按钮被按下去的时候(手指还未松开), 对应枚举常量: UIControlStateHighlighted
normal(普通状态):默认情况, 对应的枚举常量:UIControlStateNormal
highlighted(高亮状态):按钮被按下去的时候(手指还未松开), 对应枚举常量: UIControlStateHighlighted
disabled(失效状态,不可用状态)
如果enabled属性为NO,就是处于disable状态,代表按钮不可以被点击
对应的枚举常量:UIControlStateDisabled
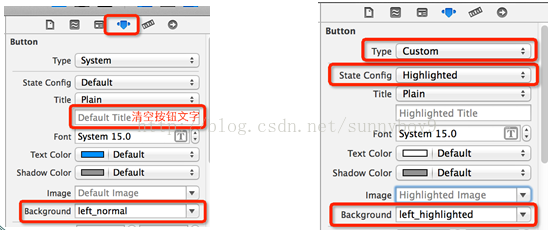
设置按钮在不同状态下的背景图片(为了保证高亮的图片正常显示,必须设置按钮的type为custom)
设置按钮在不同状态下的背景图片(为了保证高亮的图片正常显示,必须设置按钮的type为custom)
3.
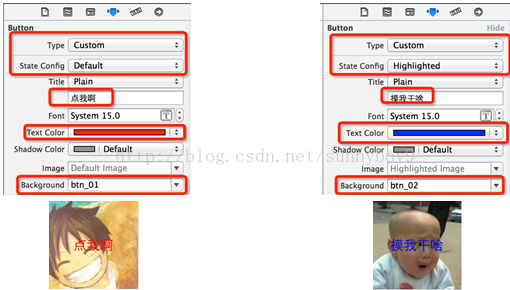
普通状态:红色文字“点我啊”
高亮状态:蓝色文字“摸我干嘛”
高亮状态:蓝色文字“摸我干嘛”
代码:<pre name="code" class="objc">#import "MJViewController.h"
@interface MJViewController ()
- (IBAction)moveAndBig;
- (IBAction)move:(UIButton *)btn;
- (IBAction)big;
- (IBAction)small;
// 头像
@property (nonatomic, weak) IBOutlet UIButton *head;
@end
@implementation MJViewController
- (IBAction)moveAndBig
{
// 1.开启动画(下面两行代码是让下面坐标和图片大小慢慢的改变:见第7讲截屏:31~33)
[UIView beginAnimations:nil context:nil];
//让这个动画持续2秒(慢慢变化)
[UIView setAnimationDuration:2.0];
// 2.修改属性
CGRect tempF = self.head.frame;
tempF.origin.x += 50;
tempF.origin.y += 100;
tempF.size.width += 50;
tempF.size.height += 50;
self.head.frame = tempF;
// 3.提交动画
[UIView commitAnimations];
}
#pragma mark 移动(上下左右)
- (IBAction)move:(UIButton *)btn
{
// 1.取出原来的属性
CGRect tempF = self.head.frame;
// 2.修改临时属性
CGFloat delta = 10;
switch (btn.tag) {
case 10: // 上
tempF.origin.y -= delta;
break;
case 20: // 下
tempF.origin.y += delta;
break;
case 30: // 左
tempF.origin.x -= delta;
break;
case 40: // 右
tempF.origin.x += delta;
break;
}
// 3.重新赋值
self.head.frame = tempF;
}
#pragma mark 放大
- (IBAction)big;
{
// 1.取出原来的属性
CGRect tempFrame = self.head.frame;
// 2.改变临时属性
tempFrame.size.width += 20;
tempFrame.size.height += 20;
// 3.用临时属性覆盖原来的属性
self.head.frame = tempFrame;
}
#pragma mark 缩小
- (IBAction)small
{
// 1.取出原来的属性
CGRect tempFrame = self.head.frame;
// 2.改变临时属性
tempFrame.size.width -= 20;
tempFrame.size.height -= 20;
// 3.用临时属性覆盖原来的属性
self.head.frame = tempFrame;
}
@end
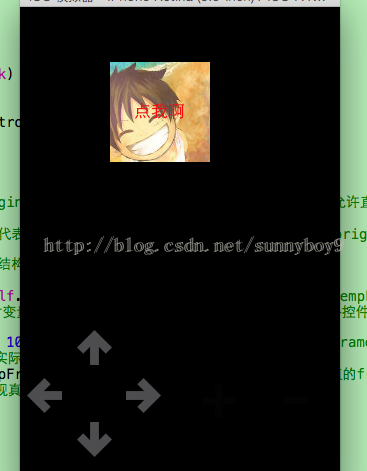
运行结果:
最后
以上就是负责荔枝最近收集整理的关于UIButton-按钮——实现图片的缩放的全部内容,更多相关UIButton-按钮——实现图片内容请搜索靠谱客的其他文章。
本图文内容来源于网友提供,作为学习参考使用,或来自网络收集整理,版权属于原作者所有。


发表评论 取消回复