我是靠谱客的博主 曾经心锁,这篇文章主要介绍学习【OpenCV入门教程之十二】OpenCV边缘检测:Canny算子,Sobel算子,Laplace算子,Scharr滤波器合辑---思维导图笔记,现在分享给大家,希望可以做个参考。
本文由@浅墨_毛星云 出品, 文章链接: http://blog.csdn.net/poem_qianmo/article/details/25560901
今天跟他学习OpenCV中边缘检测的各种算子和滤波器——Canny算子,Sobel算子,Laplace算子以及Scharr滤波器。
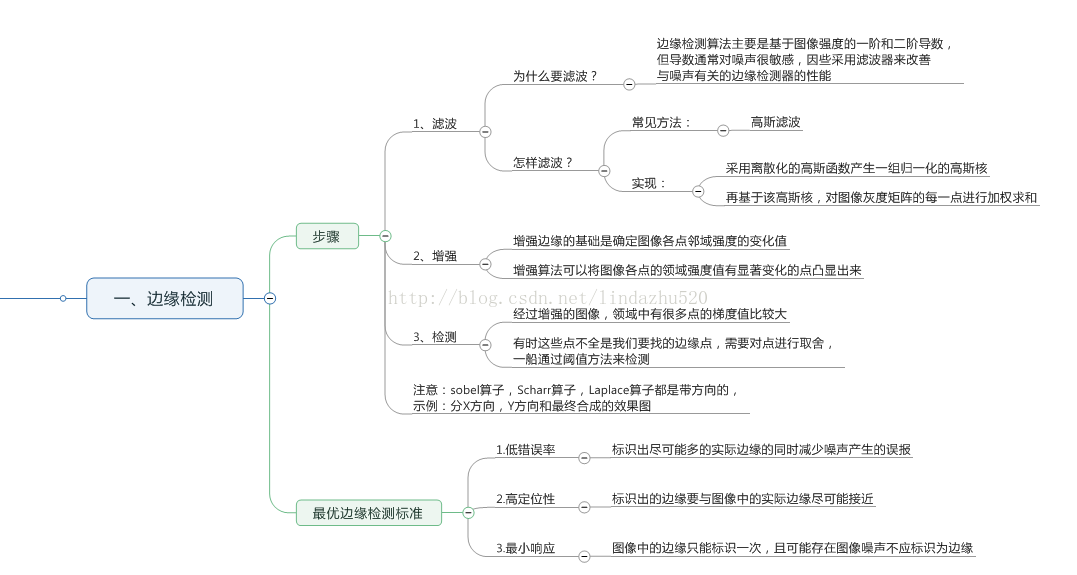
理论知识如下思维导图:
一、关于边缘检测的基础知识:
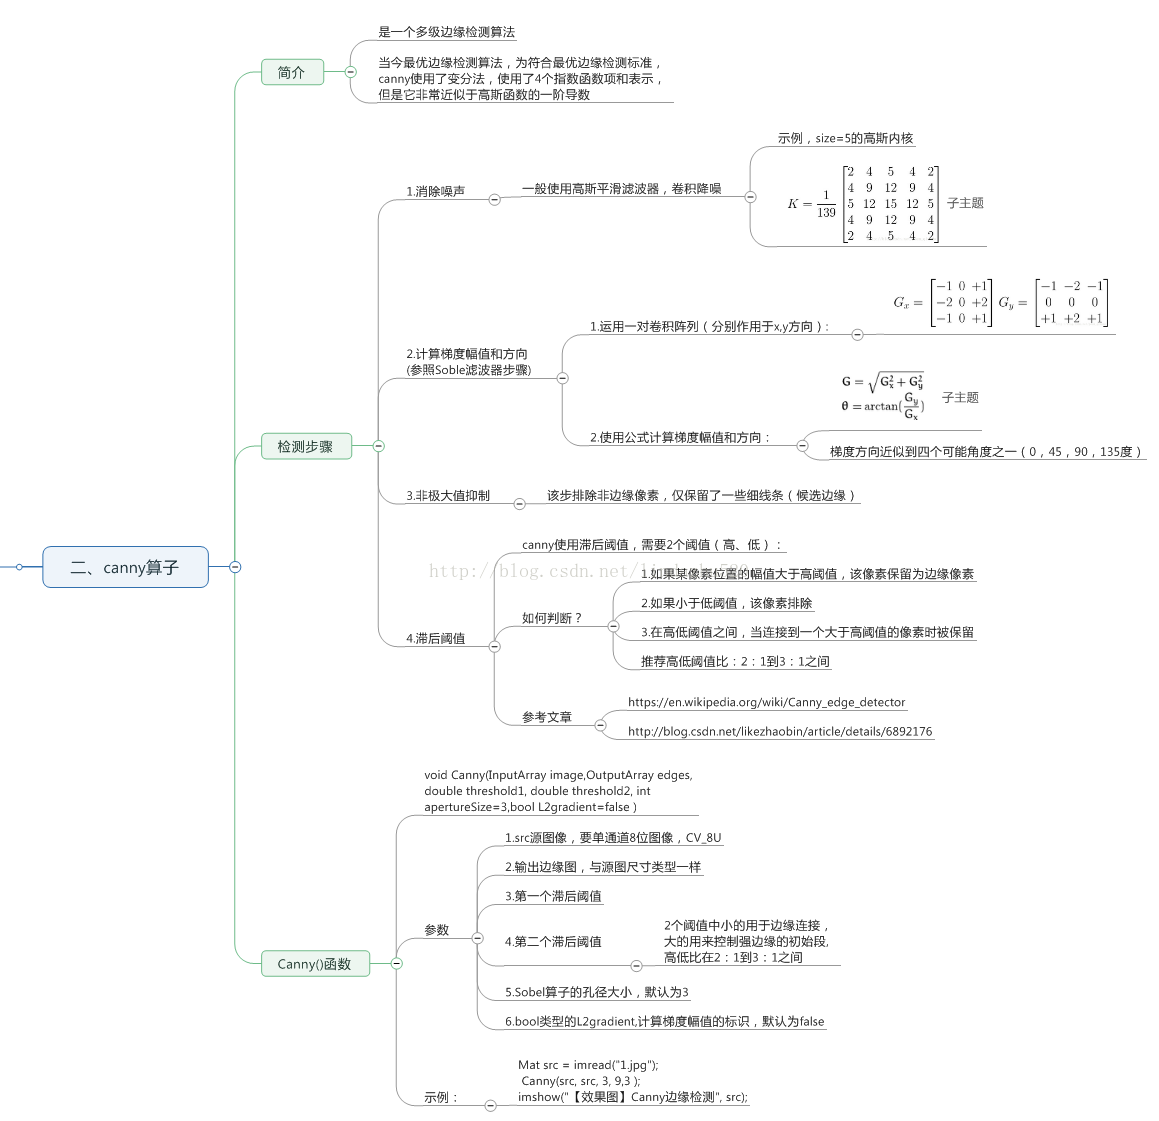
二、canny算子篇
canny函数的示例代码如下:
#include<opencv2corecore.hpp>
#include<opencv2highguihighgui.hpp>
#include<opencv2imgprocimgproc.hpp>
using namespace cv;
using namespace std;
Mat src,dst1,dst2;
//执行canny检测方法1
void canny_do1()
{
dst1=src.clone();
//拿到原图后直接执行canny函数
Canny(src,dst1,200,100,3);
if(!dst1.empty())
{
imshow("canny边缘检测1",dst1);
}
}
//执行高阶canny检测
void canny_do2()
{
Mat gray,edge;
//高阶canny用法,转成灰度图,降噪,用canny,最后将得到的边缘掩码,
//拷贝原图到效果图上,得到彩色边缘图
//1.创建与src尺寸大小一样的矩阵,并初始化为0
dst2=Mat::zeros(src.size(),src.type());
//2.将图像转换为灰度图像
cvtColor(src,gray,CV_BGR2GRAY);
//3.先用3*3内核降噪
blur(gray,edge,Size(3,3));
//4.运行canny算子
Canny(edge,edge,3,9,3);
//5.直接输出canny边缘检测的边缘图edge
imshow("canny边缘检测2",edge);
//6.用canny检测后的边缘图做为掩码,将原图拷贝到目标图上,得到彩色边缘图dst2
src.copyTo(dst2,edge);
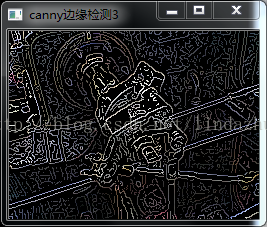
imshow("canny边缘检测3",dst2);
}
int main()
{
src=imread("img/canny.png");
imshow("原图",src);
//namedWindow("canny边缘检测1");可以省略不写imshow()直接展示
//namedWindow("canny边缘检测2");
canny_do1();
canny_do2();
waitKey(0);
return 0;
}对应原图:
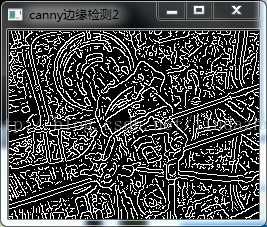
函数canny_do1()直接检测的边缘效果图:

函数canny_do2()检测的边缘效果图和对应的彩色边缘效果图:
三、Sobel算子篇
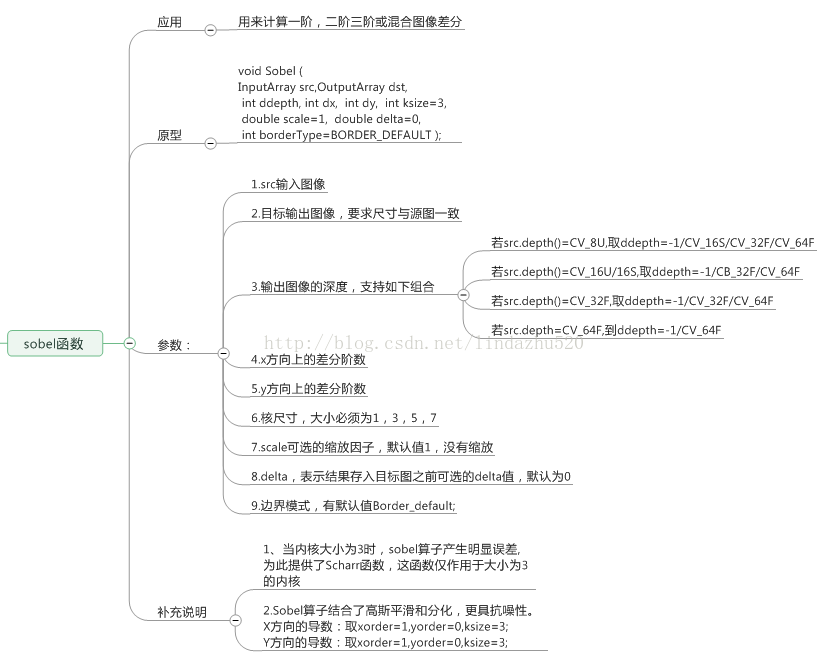
Sobel函数代码示例如下:
#include<opencv2corecore.hpp>
#include<opencv2highguihighgui.hpp>
#include<opencv2imgprocimgproc.hpp>
using namespace cv;
using namespace std;
int main()
{
Mat src,dst_x,dst_y,dst;
src=imread("img/canny.png",1);
imshow("原图",src);
//x方向梯度求导
Sobel(src,dst_x,-1,1,0,3,1,1,BORDER_DEFAULT);
//求|Gx|
convertScaleAbs(dst_x,dst_x);
imshow("X方向-Sobel检测",dst_x);
//y方向梯度求导
Sobel(src,dst_y,-1,0,1,3,1,1,BORDER_DEFAULT);
//求|Gy|
convertScaleAbs(dst_y,dst_y);
imshow("Y方向-Sobel检测",dst_y);
//合并X,Y方向梯度(近似)G=|Gx|+|Gy|
addWeighted(dst_x,0.5,dst_y,0.5,0,dst);
imshow("整体方向Sobel检测",dst);
waitKey();
return 0;
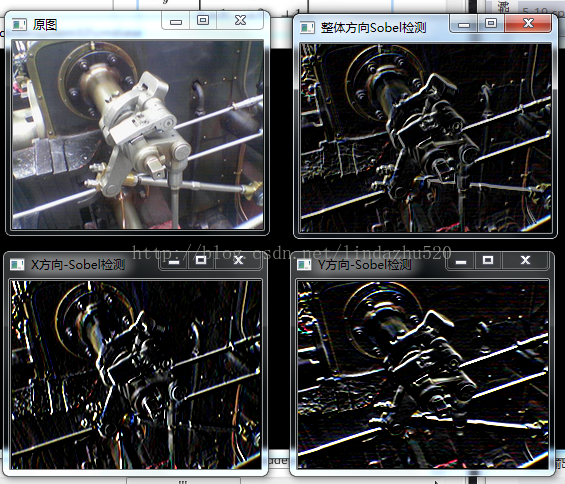
}原图及各方向,整体效果图如下:
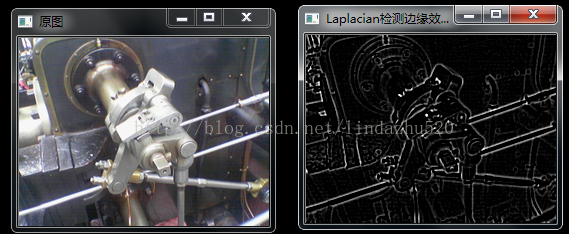
四、Laplacian算子篇
理论知识如下图:
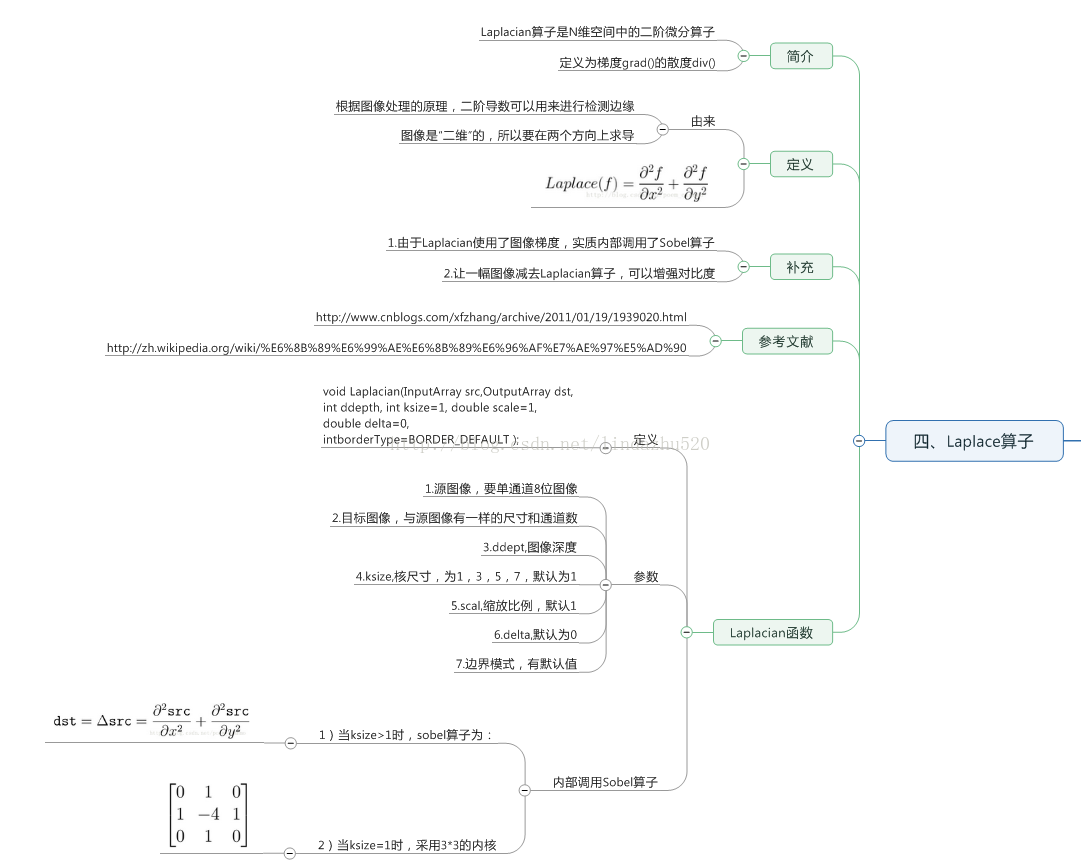
Laplacian算子示例代码如下:
#include<opencv2corecore.hpp>
#include<opencv2highguihighgui.hpp>
#include<opencv2imgprocimgproc.hpp>

using namespace cv;
using namespace std;

int main()
{
	Mat src,dst,gray;
	src=imread("img/canny.png",1);
	imshow("原图",src);
	//1.先消除噪声
	GaussianBlur(src,src,Size(3,3),0,0,BORDER_DEFAULT);

	//2.转换为灰度图
	cvtColor(src,gray,CV_BGR2GRAY);

	//3.使用laplacian函数
	Laplacian(gray,dst,-1,3,1,0,BORDER_DEFAULT);

	//4.计算绝对值,将结果转换成8位(使用线性变换转换输入元素成8位无符号整型)
	convertScaleAbs(dst,dst);

	imshow("Laplacian检测边缘效果图",dst);
	waitKey();
	return 0;

}
原图及效果图如下:
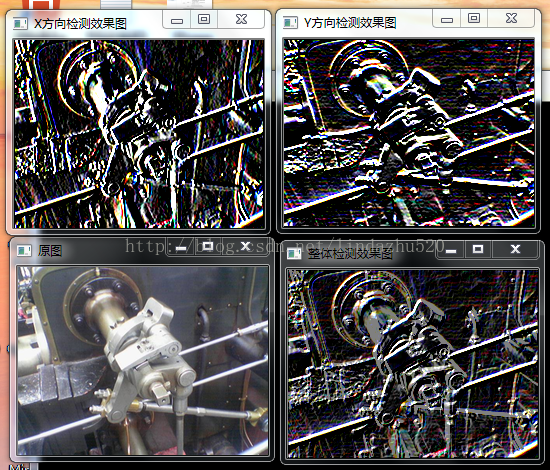
五、Scharr滤波器(非算子)
理论知识如下图所示:
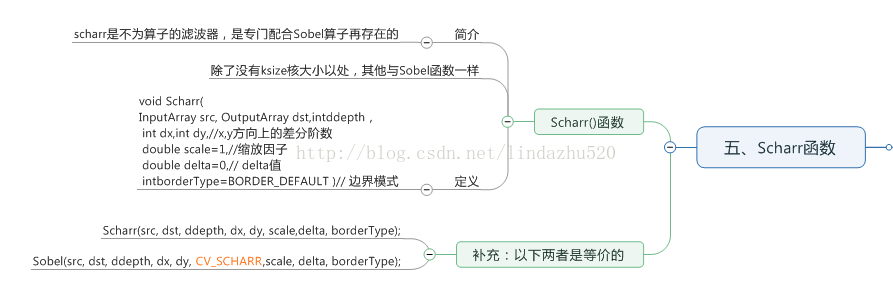
Scharr函数示例代码如下:
#include<opencv2corecore.hpp>
#include<opencv2highguihighgui.hpp>
#include<opencv2imgprocimgproc.hpp>

using namespace cv;
using namespace std;

int main()
{
	Mat src,gray,dst,dst_x,dst_y;
	src=imread("img/canny.png");
	imshow("原图",src);
	//Scharr跟Sobel一样,自带平滑效果,所以无须过滤,直接转成灰度就行

	//转成灰度图
	cvtColor(src,gray,CV_BGR2BGRA);

	//scharr求X方向梯度
	Scharr(gray,dst_x,CV_16U,1,0,1,0,BORDER_DEFAULT);
	//求该方向梯度绝对值
	convertScaleAbs(dst_x,dst_x);
	imshow("X方向检测效果图",dst_x);


	//求Y方向梯度
	Scharr(gray,dst_y,CV_16U,0,1,1,0,BORDER_DEFAULT);
	//求该方向梯度绝对值
	convertScaleAbs(dst_y,dst_y);
	imshow("Y方向检测效果图",dst_y);

	//合并两个方向求整体效果图
	addWeighted(dst_x,0.5,dst_y,0.5,0,dst);
	imshow("整体检测效果图",dst);
	waitKey();
	return 0;
}
原图及效果图如下:
六,综合示例,利用轨迹条,将canny算子,sobel算子,scharr滤波器,Laplacian算子的效果动态的展示出来:
整体代码如下:
#include<opencv2corecore.hpp>
#include<opencv2highguihighgui.hpp>
#include<opencv2imgprocimgproc.hpp>
using namespace cv;
using namespace std;
Mat src,gray,dst;
//canny检测相关变量
int canny_kernel_value=1;
Mat canny_edege,canny_dst,canny_gray;
//sobel检测相关变量
int sobel_kernel_value=1;
Mat sobel_x,sobel_y;
//Laplace检测相关变量
int laplacian_kernel_value=1;
Mat laplacian_dst;
//scharr滤波器相关变量,无
//canny检测回调函数
void canny_on(int,void*)
{
//去除噪声
blur(gray,canny_edege,Size(3,3));
//canny检测得出边缘
Canny(canny_edege,canny_edege,canny_kernel_value,canny_kernel_value*3,3);
//每次清空dst
dst=Scalar::all(0);
//利用边缘与掩模得出彩色边缘图
src.copyTo(dst,canny_edege);
imshow("效果图",dst);
}
//sobel检测回调函数
void sobel_on(int, void*)
{
//sobel无须滤波,自带平滑
//清空dst
dst=Scalar::all(0);
//x方向梯度
Sobel(src,sobel_x,CV_16S,1,0,2*sobel_kernel_value+1,1,0,BORDER_DEFAULT);
convertScaleAbs(sobel_x,sobel_x);
//y方向梯度
Sobel(src,sobel_y,CV_16S,0,1,2*sobel_kernel_value+1,1,0,BORDER_DEFAULT);
convertScaleAbs(sobel_y,sobel_y);
//整体两个方向,进行加权
addWeighted(sobel_x,0.5,sobel_y,0.5,0,dst);
imshow("效果图",dst);
}
//scharr滤波器回调函数
void scharr_on()
{
//Scharr无须滤波,自带平滑
//清空dst
//dst=Scalar::all(0);
//x方向梯度
Scharr(src,sobel_x,CV_16S,1,0,1,0,BORDER_DEFAULT);
convertScaleAbs(sobel_x,sobel_x);
//y方向梯度
Scharr(src,sobel_y,CV_16S,1,0,1,0,BORDER_DEFAULT);
convertScaleAbs(sobel_y,sobel_y);
//整体两个方向,进行加权
addWeighted(sobel_x,0.5,sobel_y,0.5,0,dst);
imshow("scharr效果图",dst);
}
void laplacian_on(int,void*)
{
//去噪
GaussianBlur(gray,laplacian_dst,Size(3,3),0,0,BORDER_DEFAULT);
//Laplacian检测
//1.先清空dst
dst=Scalar::all(0);
//2.再检测
Laplacian(gray,dst,CV_16S,2*laplacian_kernel_value+1,1,0,BORDER_DEFAULT);
//3.再求绝对值
convertScaleAbs(dst,dst);
imshow("效果图",dst);
}
int main()
{
src=imread("img/canny.png",1);
imshow("原图",src);
namedWindow("效果图",1);
dst=Mat::zeros(src.size(),src.type());
//转灰度图
cvtColor(src,gray,CV_BGR2GRAY);
//canny控制
createTrackbar("canny阈值","效果图",&canny_kernel_value,120,canny_on);
canny_on(0,0);
//sobel控制
createTrackbar("sobel核","效果图",&sobel_kernel_value,3,sobel_on);
sobel_on(0,0);
//laplacian控制
createTrackbar("laplacian核","效果图",&laplacian_kernel_value,3,laplacian_on);
laplacian_on(0,0);
//scharr滤波器
scharr_on();
waitKey();
return 0;
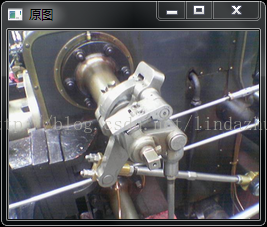
}原图如下:
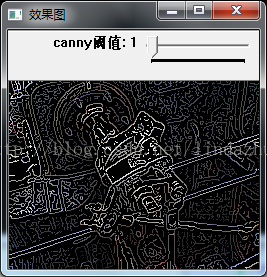
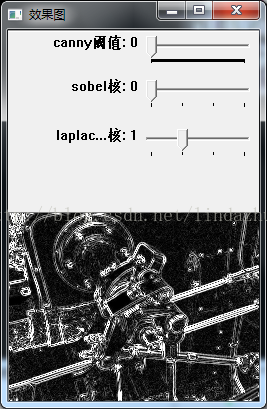
canny检测效果图:

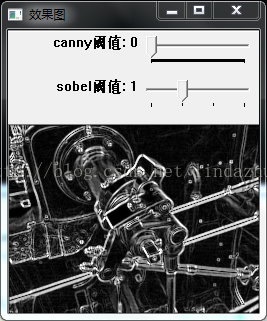
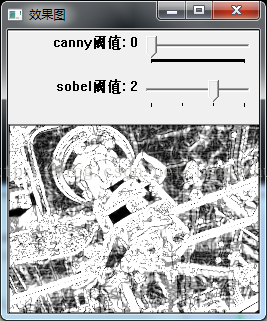
sobel检测效果图:
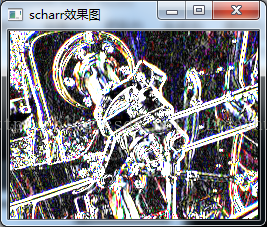
scharr滤波器效果:
laplacian效果图:

最后
以上就是曾经心锁最近收集整理的关于学习【OpenCV入门教程之十二】OpenCV边缘检测:Canny算子,Sobel算子,Laplace算子,Scharr滤波器合辑---思维导图笔记的全部内容,更多相关学习【OpenCV入门教程之十二】OpenCV边缘检测:Canny算子内容请搜索靠谱客的其他文章。
本图文内容来源于网友提供,作为学习参考使用,或来自网络收集整理,版权属于原作者所有。


发表评论 取消回复