文章目录
- 简介
- 组件化
- 类型检测
- 技术栈
- 学习方法
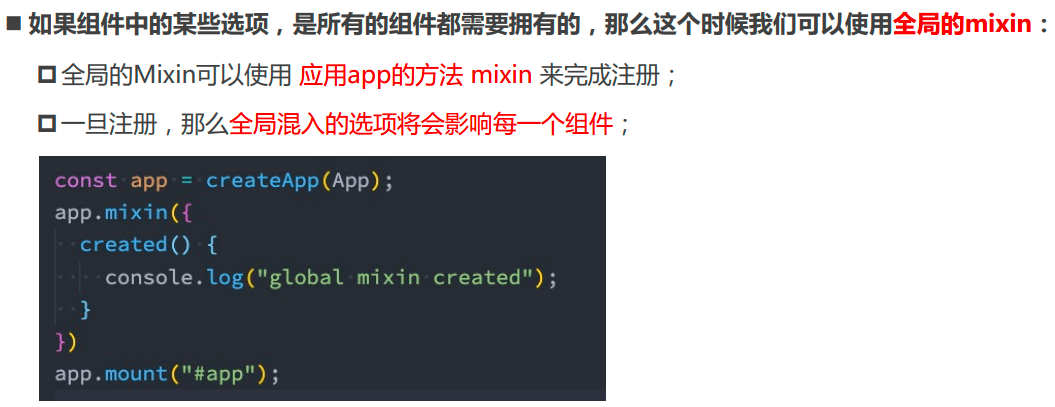
- 什么是渐进式框架
- vue的本质
- 基本思路
- 链式调用
- 调试工具
- 环境搭建
- CDN方式引入
- 什么是CDN?
- 引入
- 通过vue.js文件引入
- 下载
- 引入
- 计数器案例
- 原生JS实现
- VUE实现计数器
- 命令式和声明式编程
- 声明式编程
- 理解
- 命令式编程和声明式编程的区别
- MVVM模型
- MVC模型
- MVVM模型
- template属性
- 挂载
- 分离式写法_script标签
- 分离式写法_template标签
- template标签的特点
- template中的根元素
- data属性
- vue2和vue3中的区别
- methods属性
- this的指向
- 普通函数
- 箭头函数
- 为什么vue的methods不要使用箭头函数?
- 总结
- VSCode代码片段
- Musache语法
- 正确用法
- 错误用法
- 基本指令
- v-once
- v-text
- v-html
- v-pre
- v-cloak
- cloak单词的意思
- 重要指令
- v-bind
- 属性绑定
- 属性绑定_对象形式
- 多值情况
- 对象放到一个单独的属性中
- 将对象放到methods中返回
- 属性绑定_数组形式
- 样式绑定_对象形式
- 样式绑定_数组形式
- 属性名称绑定
- 属性名和属性值绑定
- v-bind(same)
- v-on
- 基本使用
- 绑定一个对象
- 传递参数
- 修饰符
- stop修饰符
- [按键]修饰符
- v-if
- 渲染原理
- 基本使用
- 多个条件
- template和v-if的结合使用
- 为什么需要和v-if结合使用
- v-if结合使用例子
- v-show
- 基本使用
- v-show和v-if的区别
- v-show和v-if如何选择
- v-for
- 基本使用
- v-for和template搭配使用
- 搭配绑定key
- 数组更新检测
- push()方法
- VNode
- 计算属性-computed
- 为什么会有计算属性?
- 基本使用
- 使用methods实现的数据二次封装和计算属性的区别
- 修改计算属性
- Watch
- 基本使用
- 深度监听
- 反例_语法糖形式
- 反例_全写形式
- 正例
- 立即执行
- 针对对象中某个属性的监听
- create()创建监听器
- 综合案例_书籍购物车
- 按钮禁用
- 问题_多个tbody标签
- 问题
- 解决
- 问题_有时能完全删除,有时不能
- 问题
- 答案
- 最终
- v-model
- 原始方法实现v-model
- v-model语法糖实现
- 绑定基本组件
- 绑定textarea
- 绑定单选框
- 绑定多选框
- 绑定单选按钮
- 绑定下拉框
- 修饰符
- lazy修饰符
- number修饰符
- trim修饰符
- 组件化开发
- 全局组件
- 多个组件
- 组件的命名
- 局部组件
- 基于Vue CLI组件化开发
- 使用Vue CLI创建项目
- 创建一个总的组件
- 组件拆分
- 进一步组件拆分
- 组件的CSS作用域
- 总结
- 组件通信
- 父传子
- 属性形式_字符串数组
- 属性形式_对象
- required属性
- default属性
- 其他写法
- 为什么对象的默认值必须通过一个工厂函数获取?
- 非Prop的Attribute
- 单根结点
- 传递一个没有定义的属性怎么样
- 如何把属性绑定到目标的标签上面
- 如何去掉这个子组件根元素的属性
- 多根结点
- 子传父
- 注册事件_数组形式
- 计数器案例_无参数传递
- 计数器案例_传递参数
- 注册事件_对象形式
- 组件通信案例
- 非父子组件之间的通信
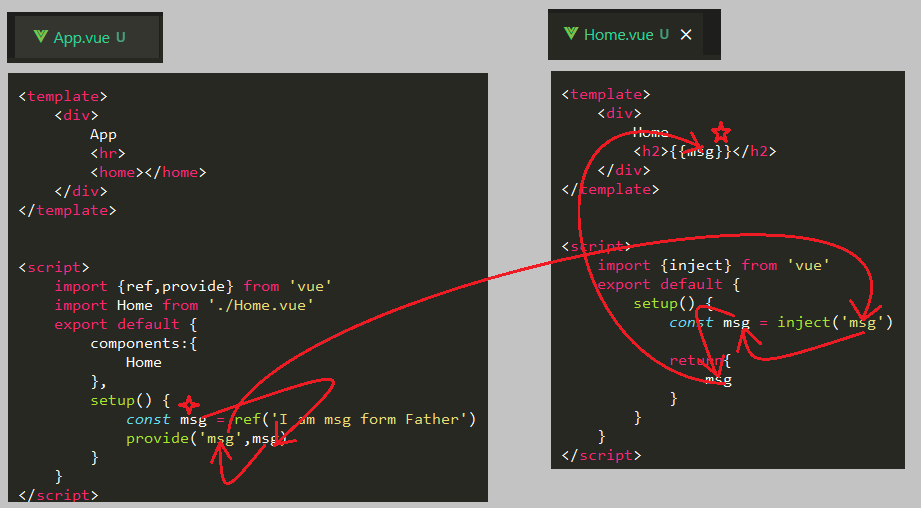
- Provide/Inject
- 背景
- 通信
- 问题_长辈组件在自己中是否使用provide中的数据
- 问题_长辈组件如何拿到自己data中的数据信息然后传给子孙组件
- 问题背景
- 原因分析
- 解决方案
- 问题_长辈组件传给子孙组件的是动态数据吗
- 解决方案_动态传递数据
- Mitt全局事件总线
- 安装mitt库
- 背景
- 多事件监听
- 事件取消
- 插槽
- 插槽的基本使用
- 多个插槽
- 具名插槽
- 动态具名插槽
- 具名插槽的缩写
- 渲染作用域
- 作用域插槽
- 总结
- 动态组件
- 按钮切换案例
- 按钮切换案例-动态组件
- 动态组件传递参数&发送事件
- 参数传递
- 如何传递的参数由默认的字符串类型转换成数字类型
- 监听事件
- keep-alive(缓存组件)
- 背景案例
- 基本使用案例
- keep-alive的属性
- include
- Webpack的代码分包&异步组件
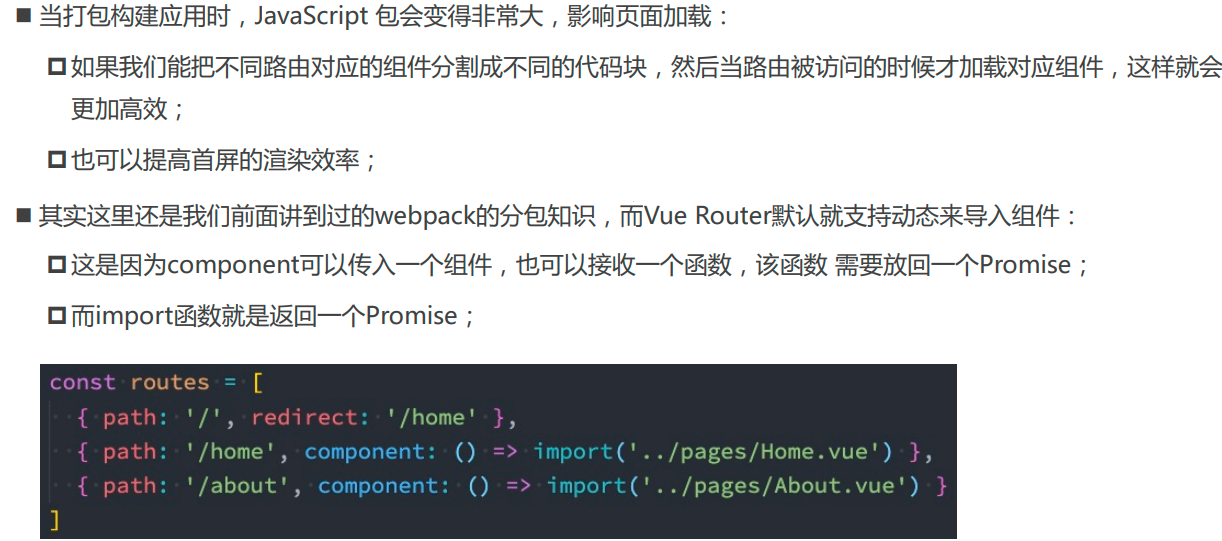
- 为什么需要分包
- 如何分包
- JS中的代码分包
- Vue组件中实现异步组件(代码分包)
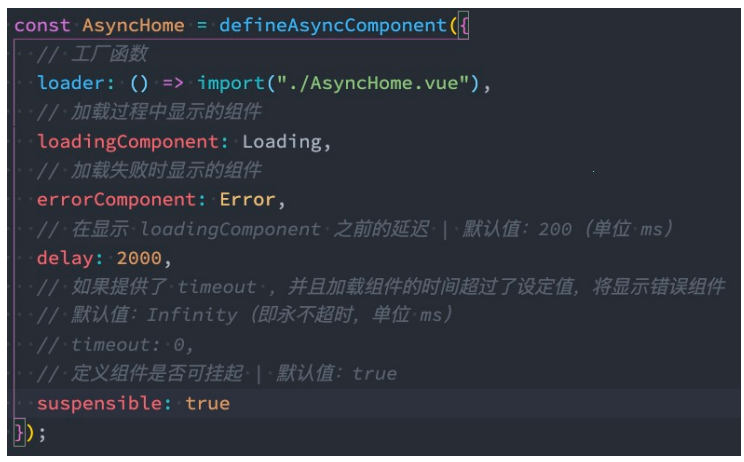
- 工厂函数形式
- 对象形式
- 对象形式中常用的属性
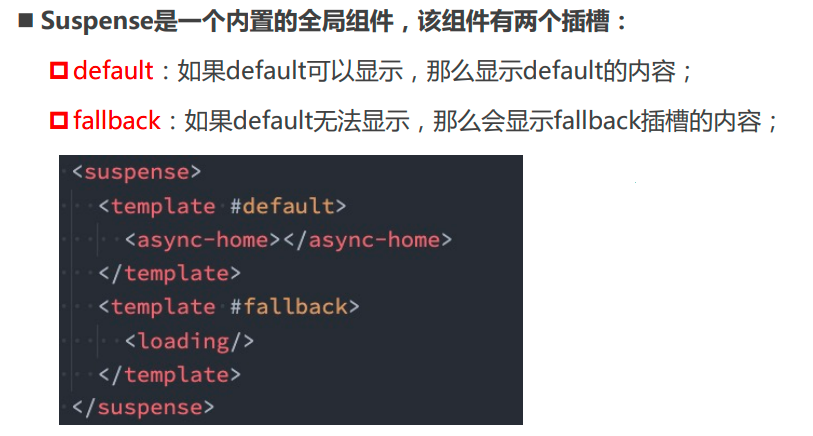
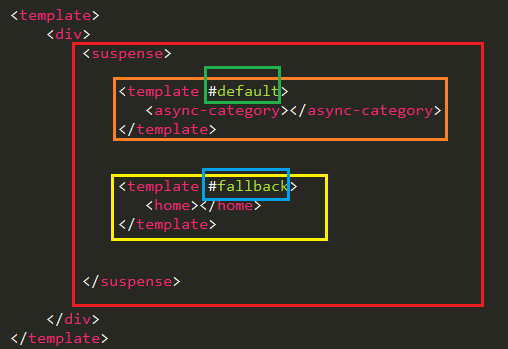
- 异步组件和suspense
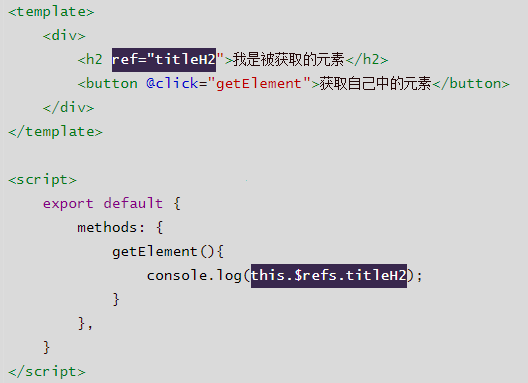
- $refs的使用
- vue中的DOM操作
- 获取元素
- 获取组件
- `$parent`和`$root`
- 生命周期
- 生命周期流程
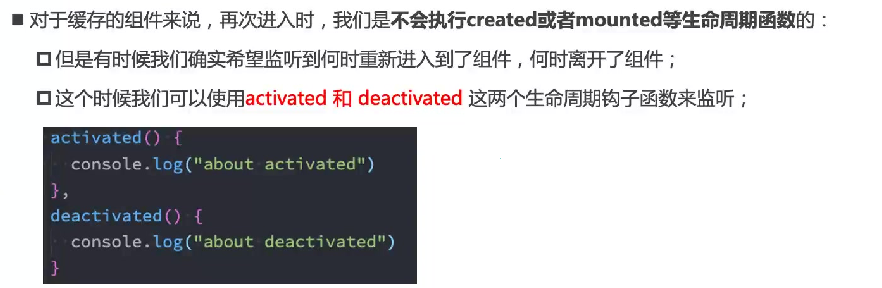
- 缓存组件的生命周期
- 组件的v-model
- 基本使用
- 优化
- 绑定多个v-model
- Vue3过渡&动画实现
- 认识动画
- 案例_hello world的显示和隐藏
- 没有动画效果
- 加入动画效果
- transition组件的原理
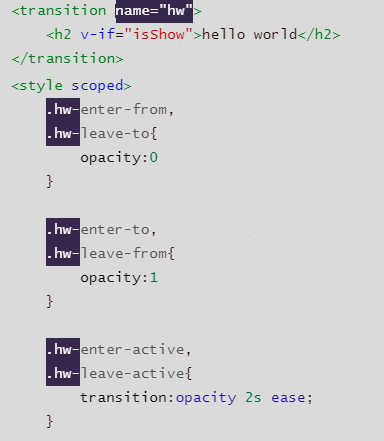
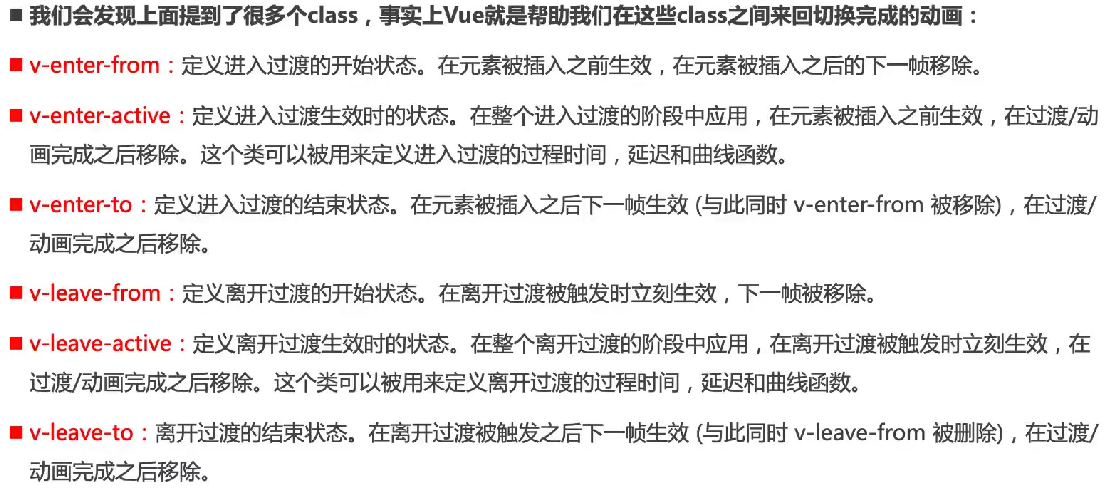
- 过渡动画class
- class的添加或删除的时机
- class的name命名规则
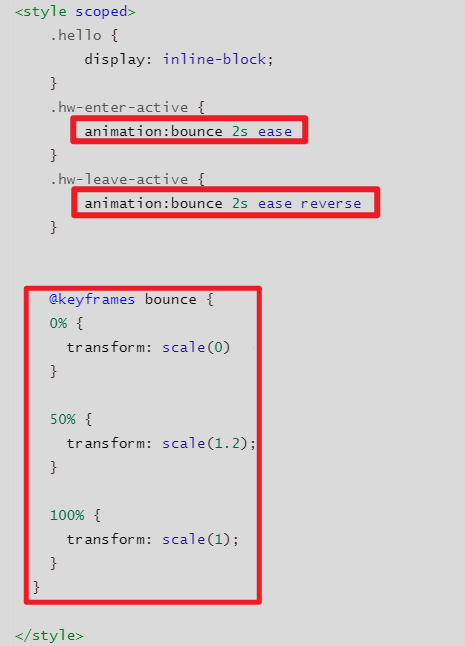
- animation动画
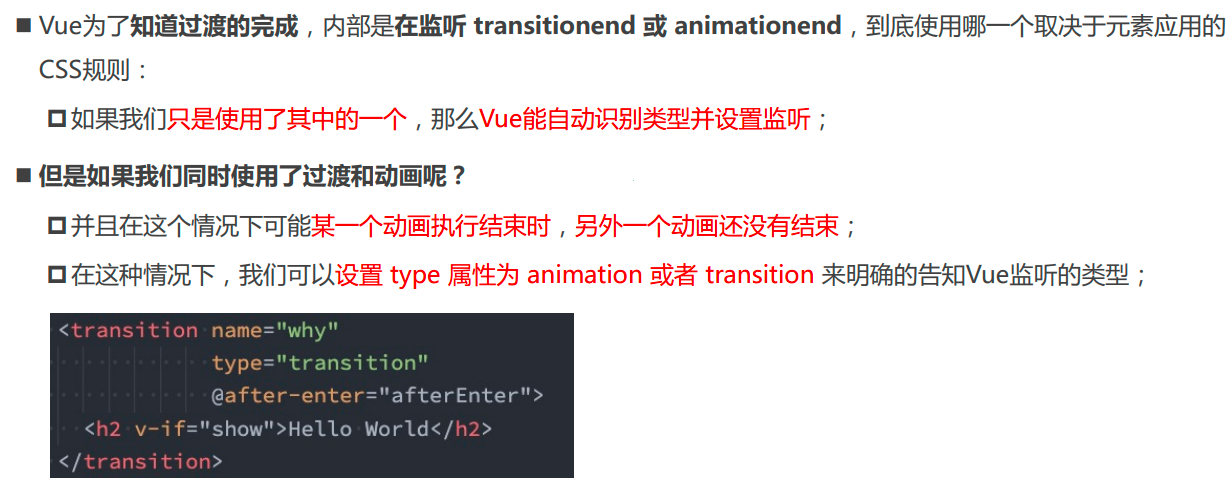
- transition的属性
- type属性
- duration属性
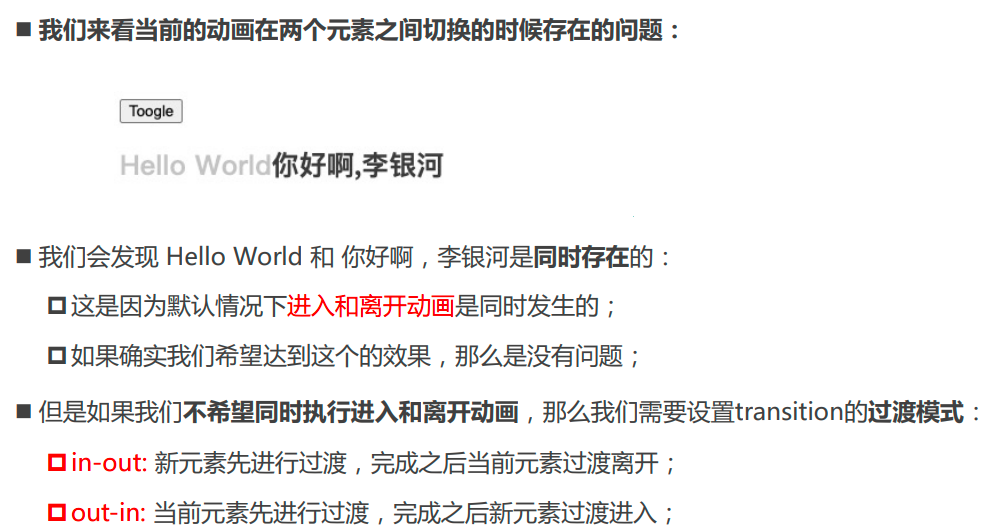
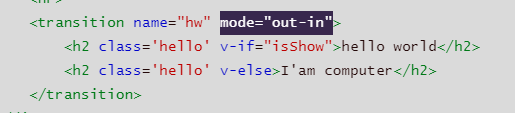
- mode属性(常用多个元素切换)
- appear属性
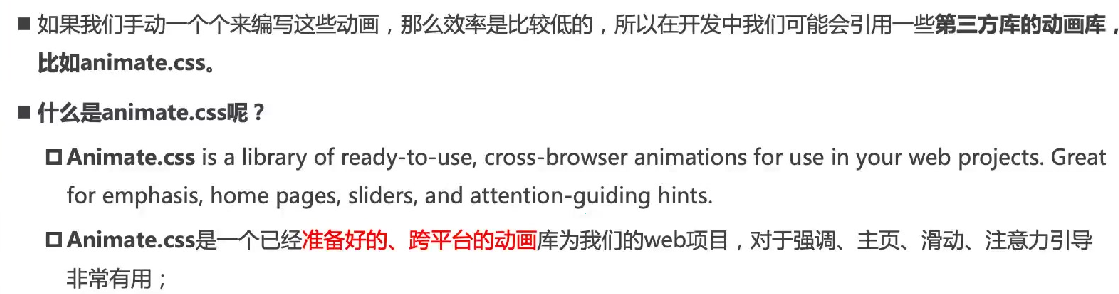
- animate.css动画
- 介绍
- 如何使用
- 安装animate.css
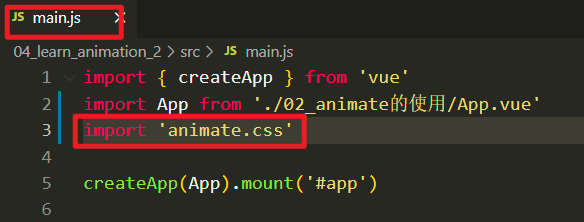
- 导入animate.css
- 基本使用
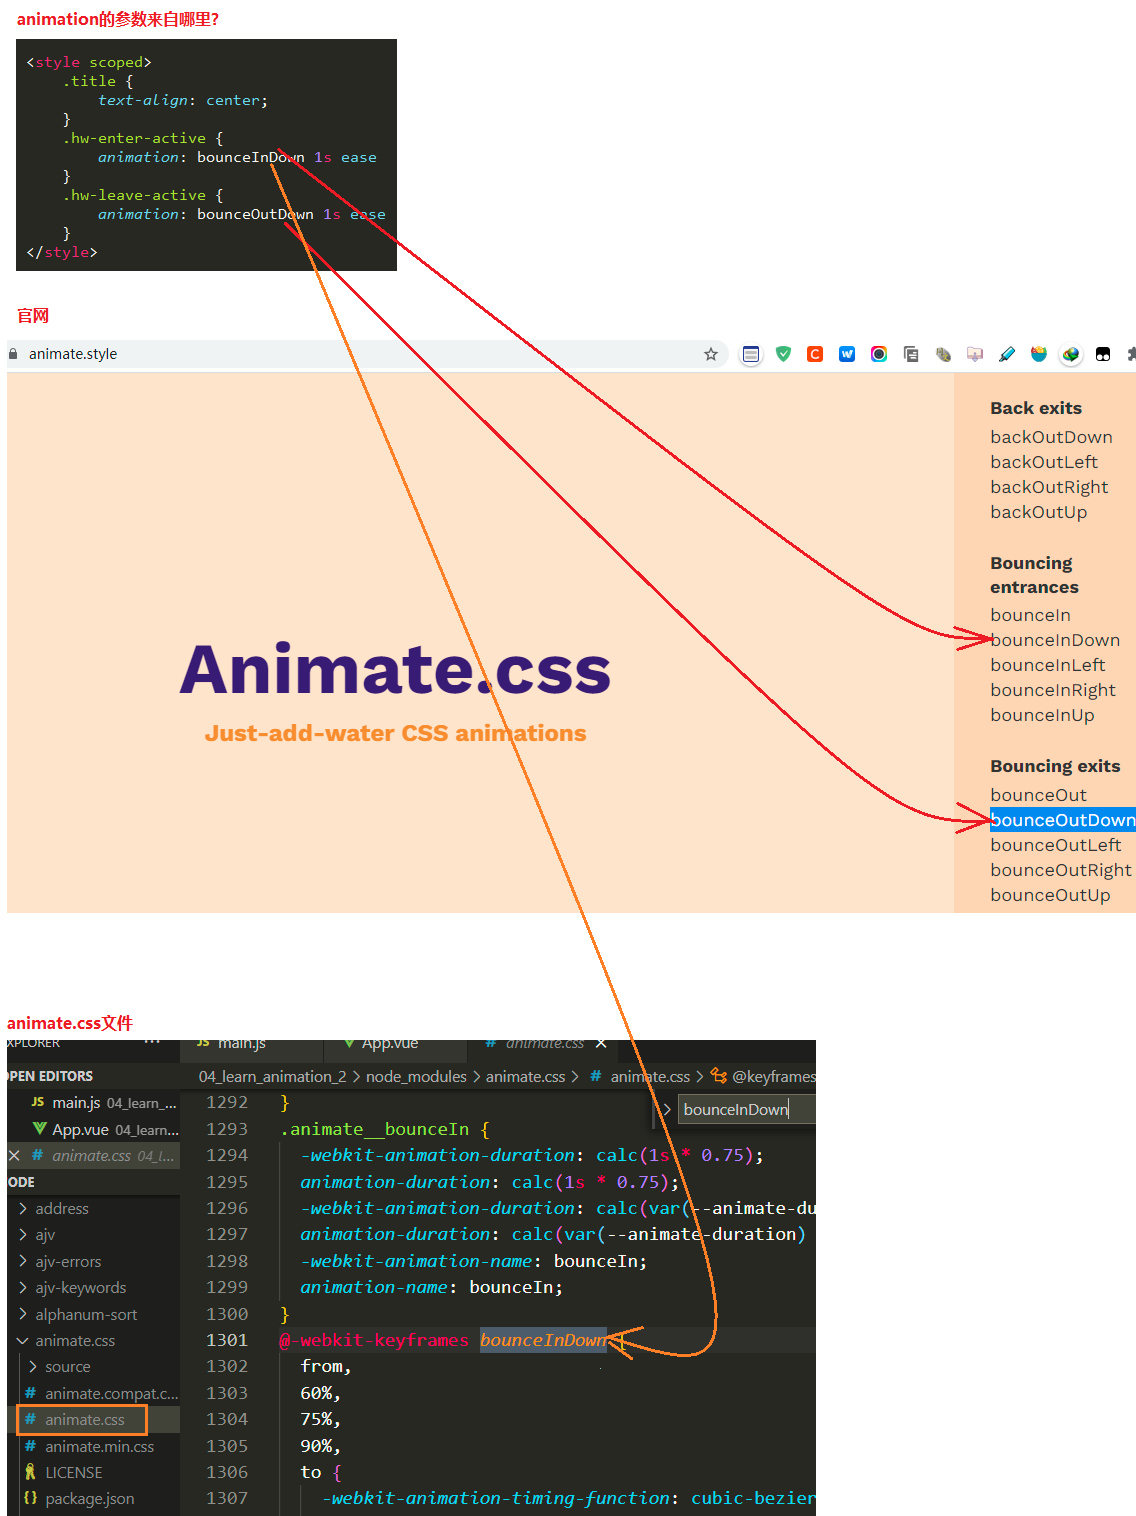
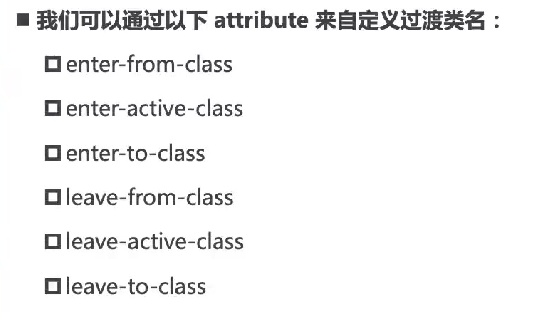
- 自定义过渡class_使用animate中的类
- 小修改
- 自定义过渡class_使用自己定义的类
- gsap库
- 介绍
- 如何使用
- 安装gsap库
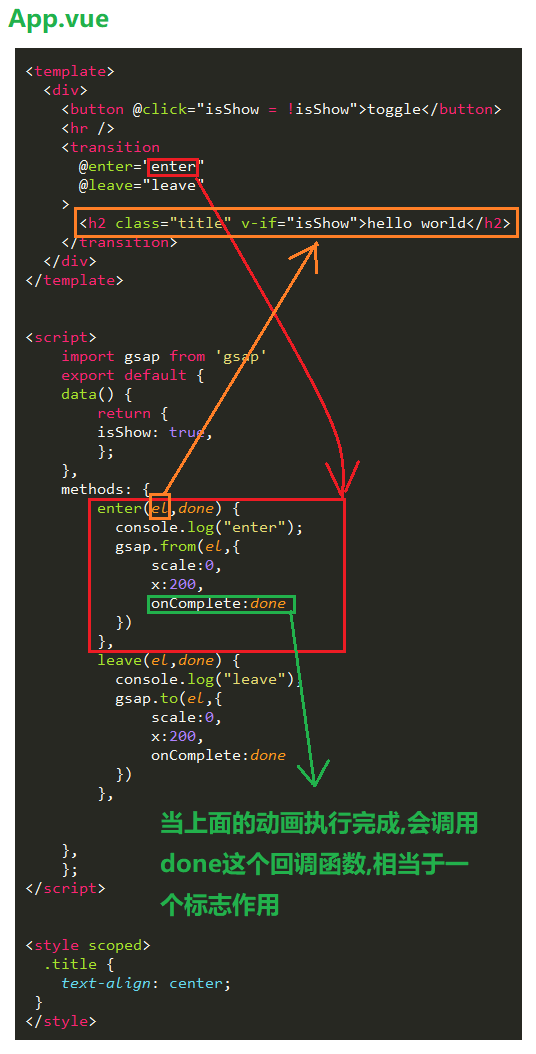
- JavaScript钩子
- 基本使用gsap
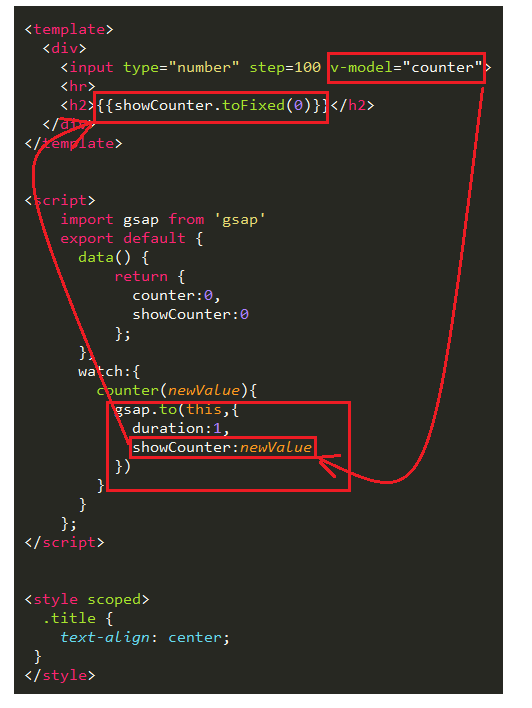
- gsap实现数字增长效果
- 列表的过渡
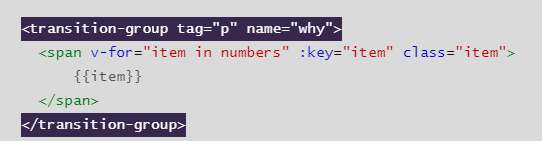
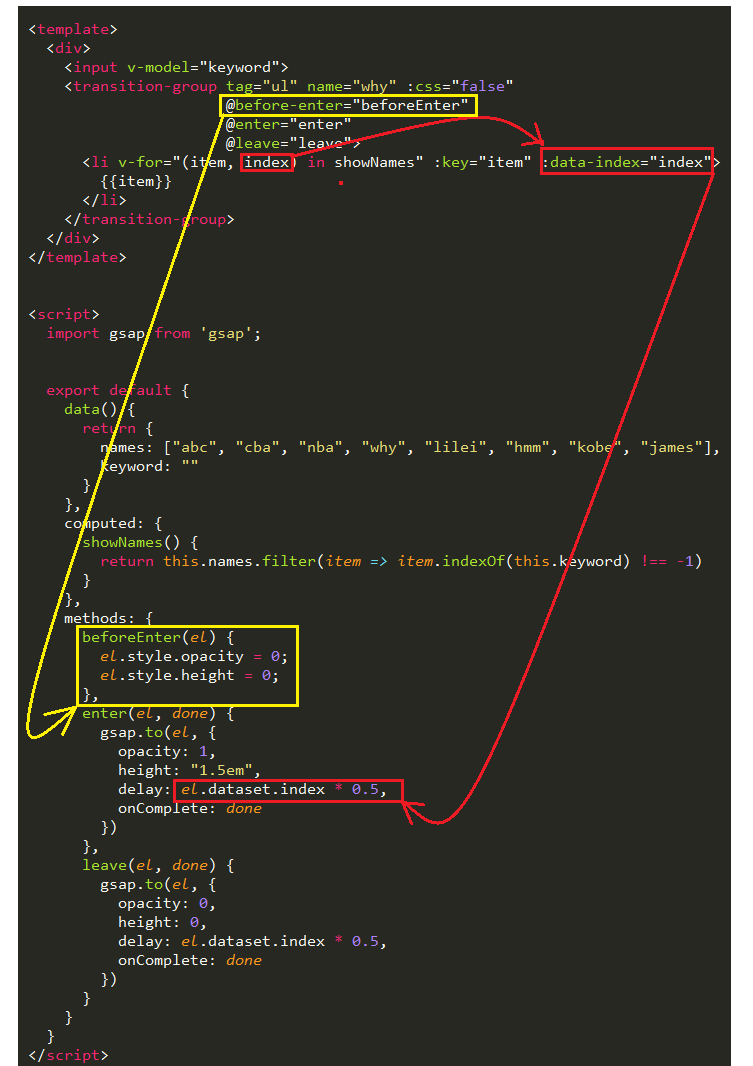
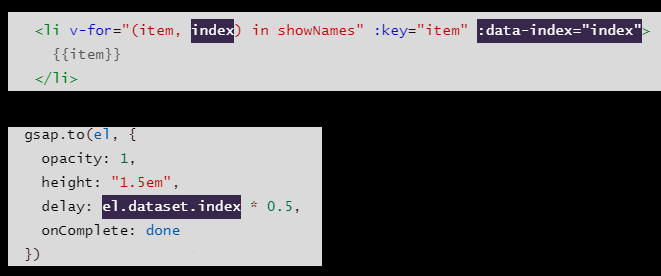
- 列表的交错过渡
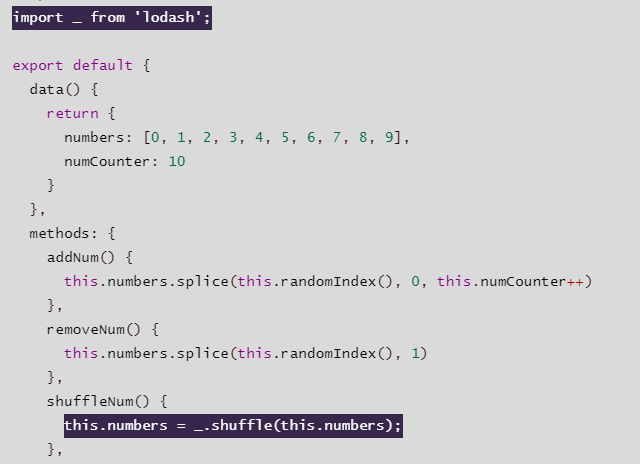
- 数字洗牌
- Mixin
- 认识Mixin
- Mixin的基本使用
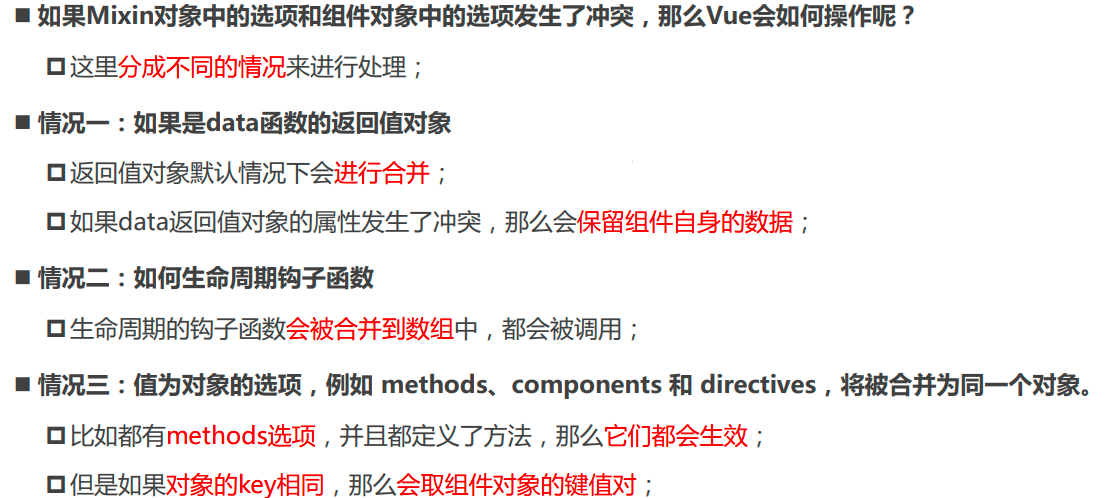
- Mixin的合并规则
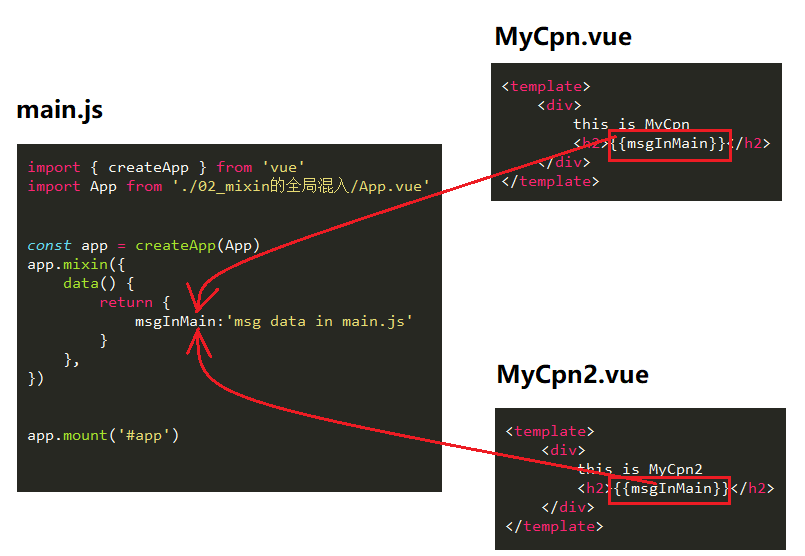
- 全局混入Mixin
- extends
- Options API的弊端
- Composition API
- setup函数的参数
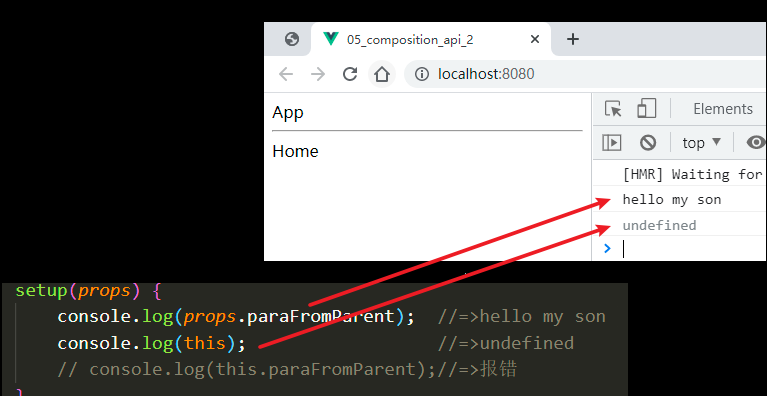
- props
- 通过props拿到父组件传递过来的数据
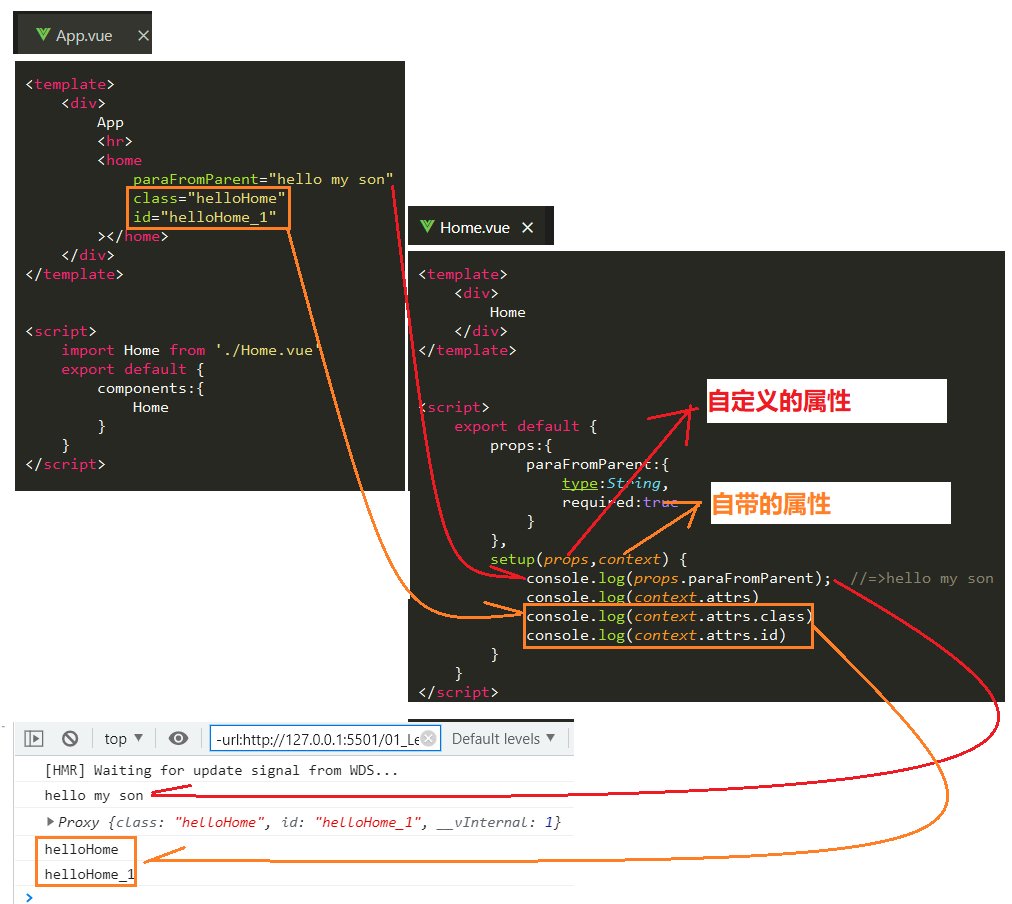
- context
- 非prop的attribute
- setup函数的返回值
- Reactive API_动态绑定数据
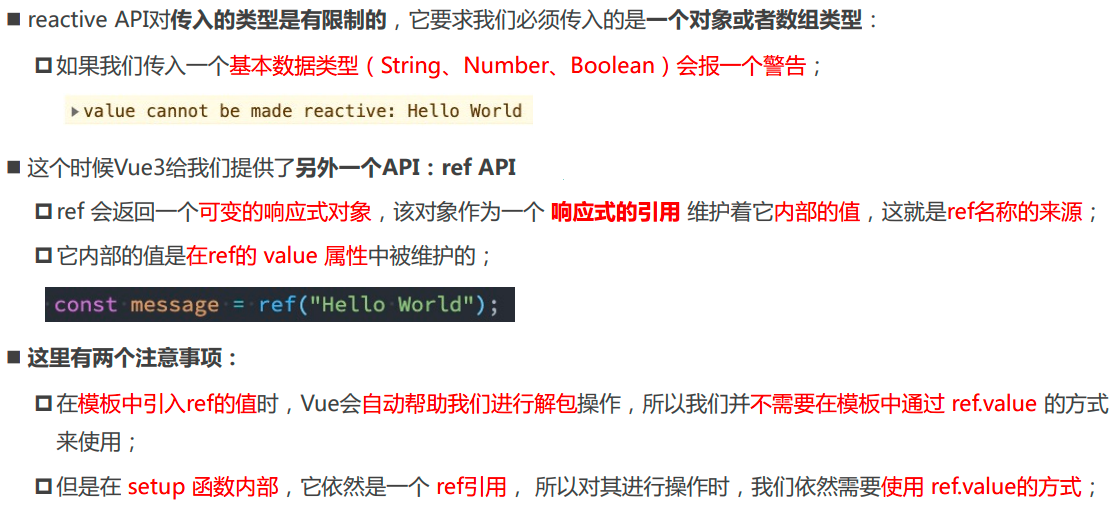
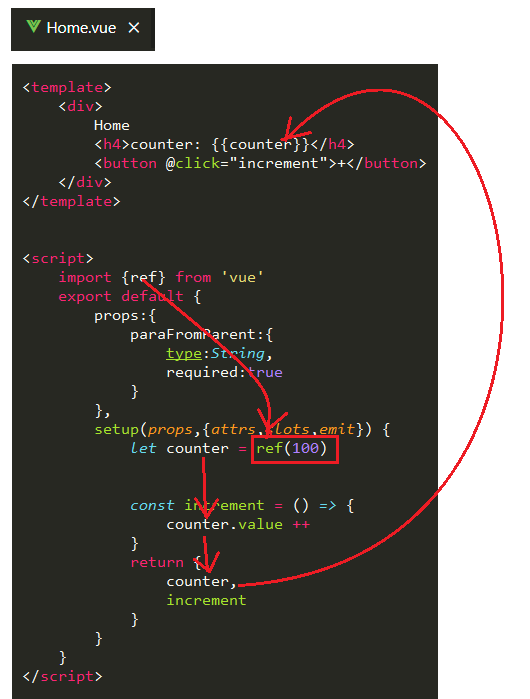
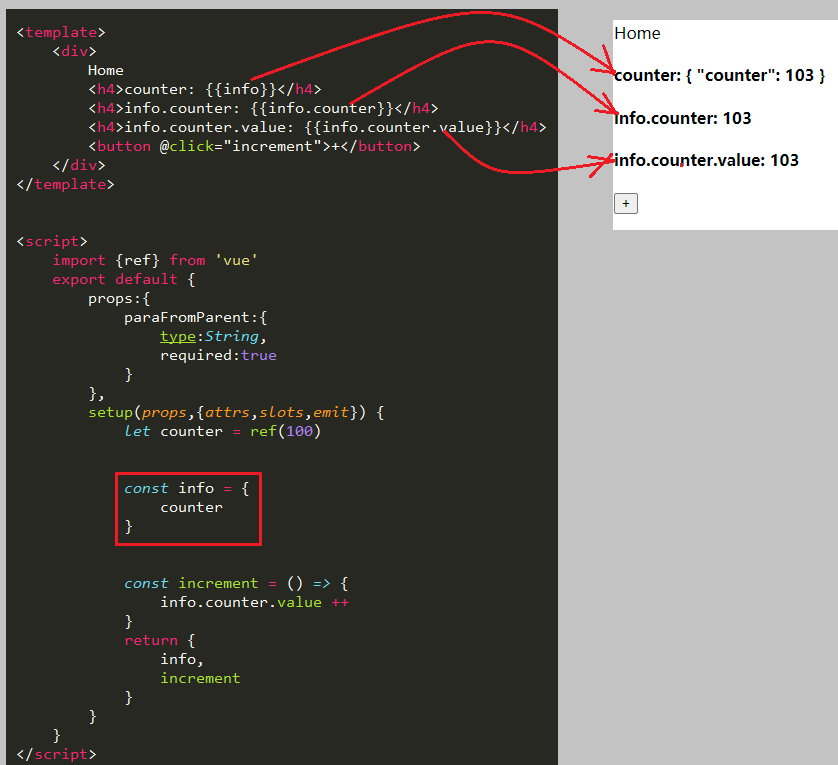
- Ref API
- 自动解包的层数
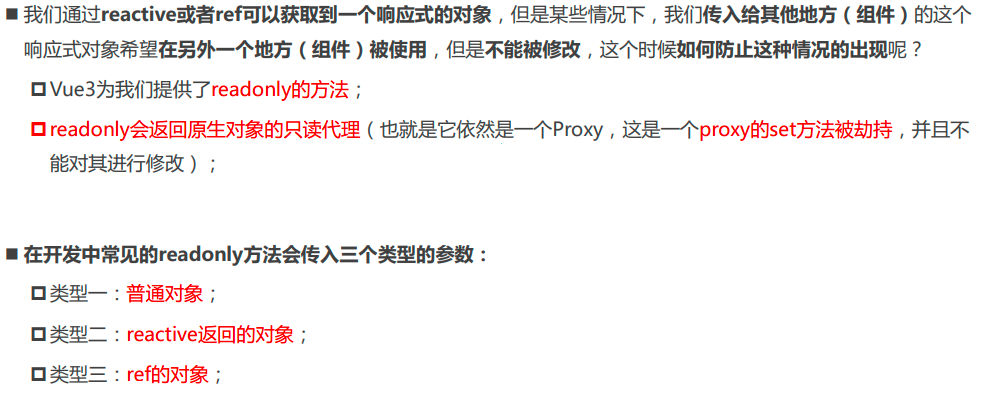
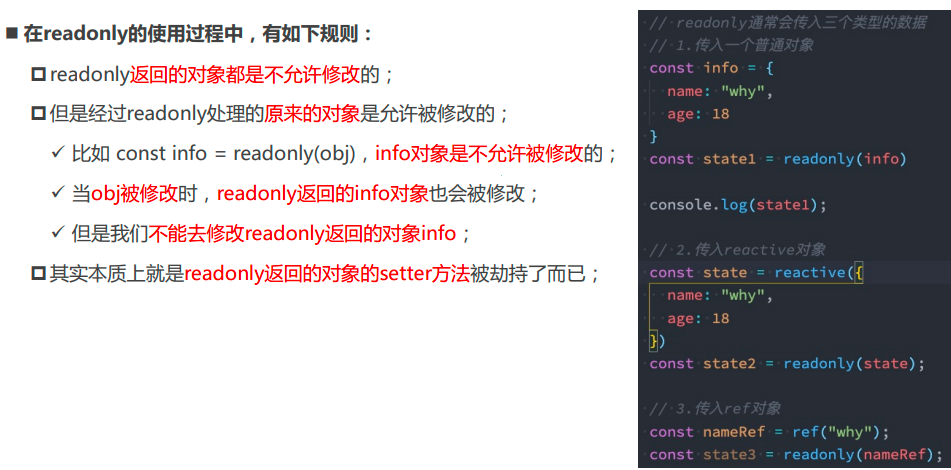
- readonly
- Reactive判断的API
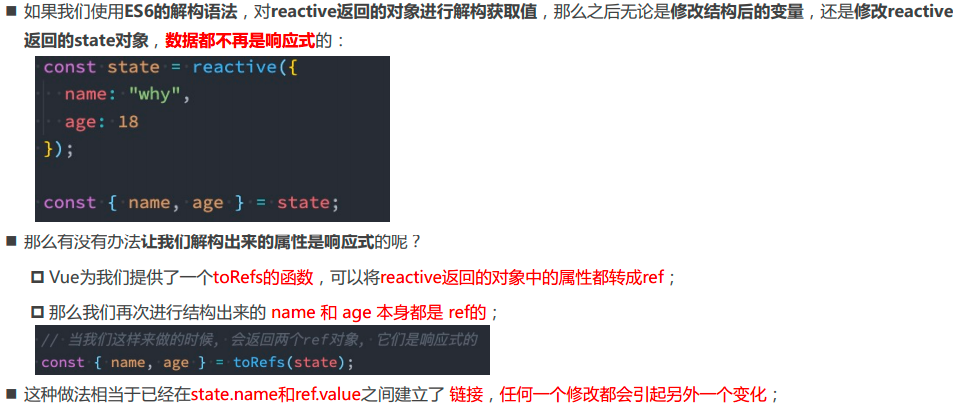
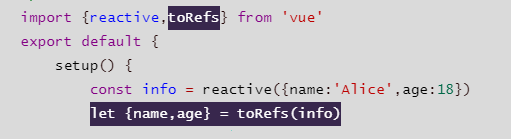
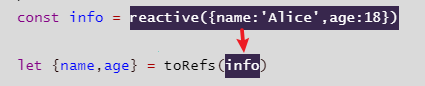
- toRefs
- 使用结构赋值存在的问题
- 使用toRefs解决解构赋值的问题
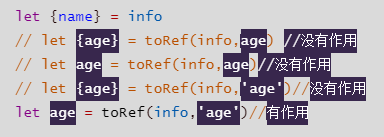
- toRef
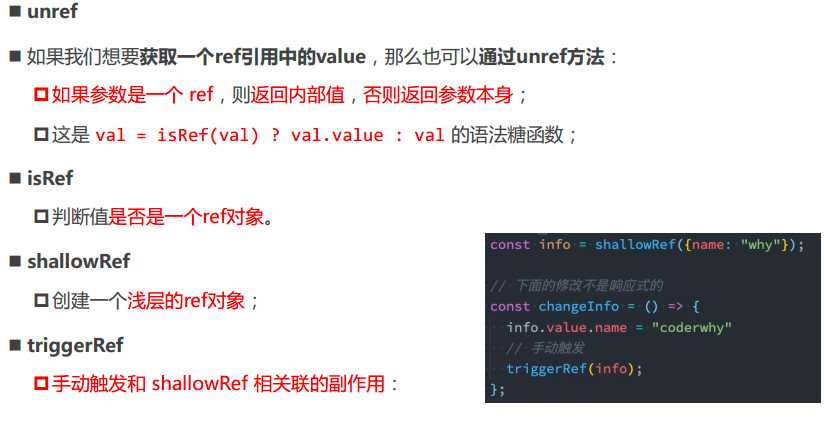
- ref其他的API
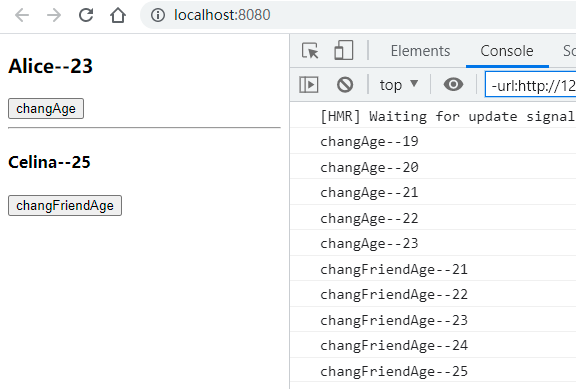
- shallowRef&triggerRef
- 问题背景
- 目标需求
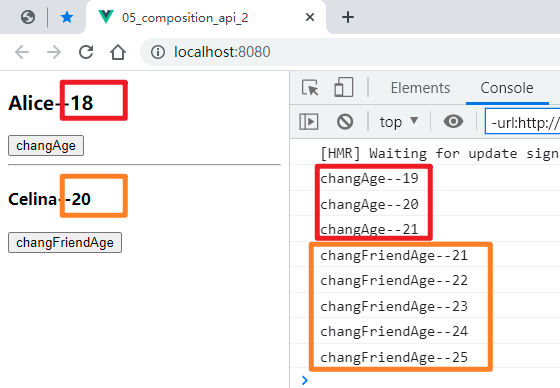
- 使用shallowRef后没有反应的代码
- shallowRef需要搭配triggerRef
- customRef
- computed
- 基本使用_传入一个getter函数
- 传入一个对象,包含getter和setter
- 侦听数据的变化_watchEffect
- watchEffect
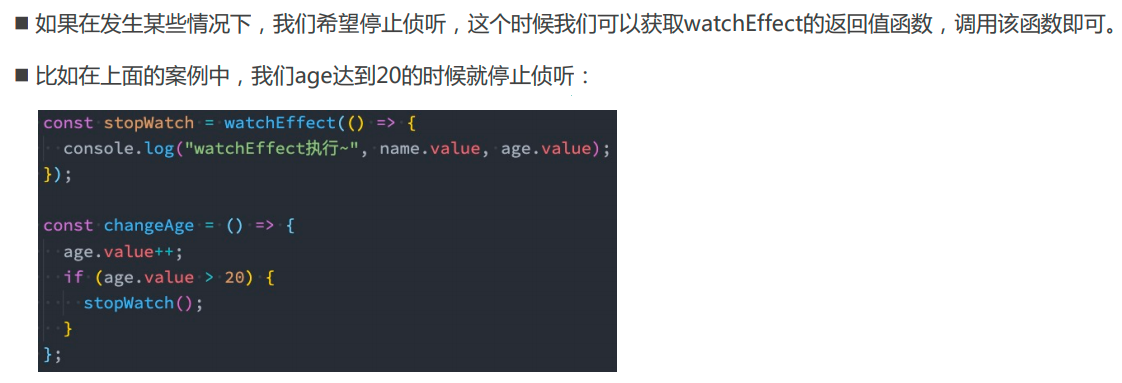
- watchEffect的停止侦听
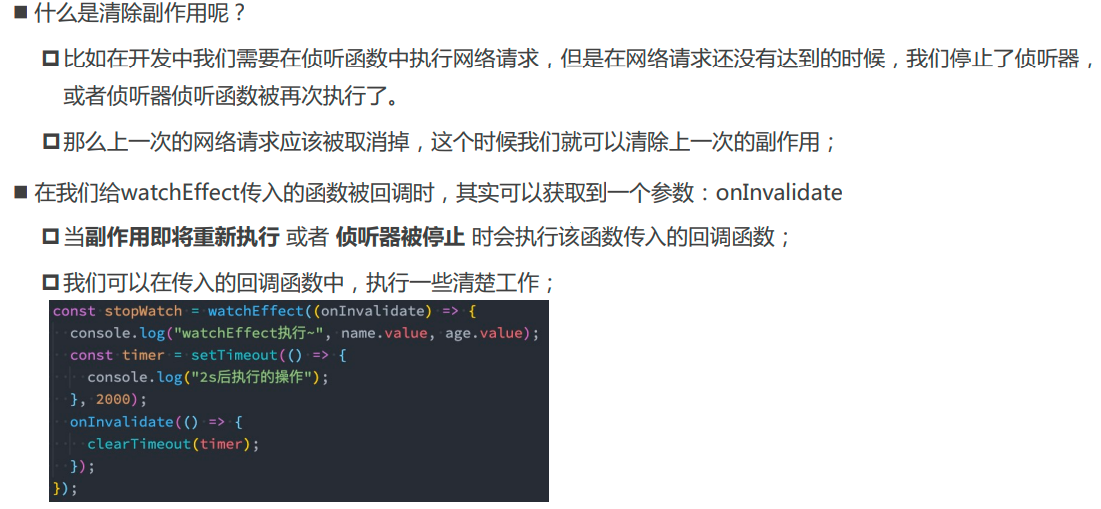
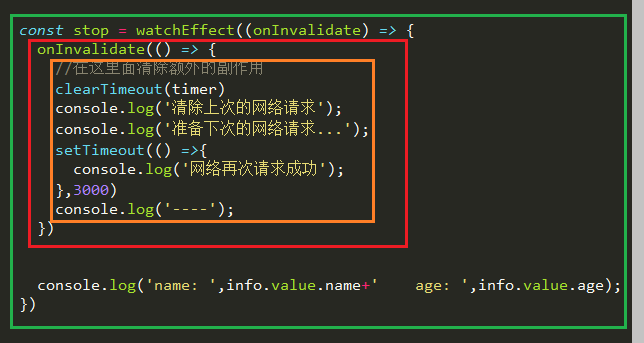
- watchEffect清除副作用
- setup中使用ref
- 侦听数据的变化_watch
- 侦听reactive对象
- 第一种传入方式''
- 第二种传入方式''
- 结构赋值
- 侦听ref对象
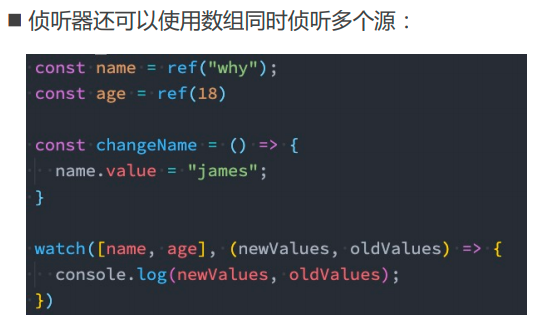
- 侦听多个数据
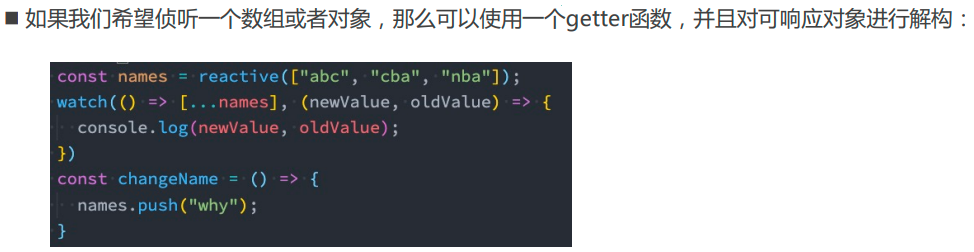
- 侦听数组
- 深层侦听
- 生命周期钩子
- Provide和Inject
- 基本使用_父组件向子组件传递数据
- 基本使用_动态数据传递
- 改进_数据单向流
- Composition API练习
- 计数器案例
- useTitle案例
- 综合案例
- 代码整合优化
- jsx
- 基本使用
- 计数器案例
- 引入子组件
- 基本使用
- 使用插槽
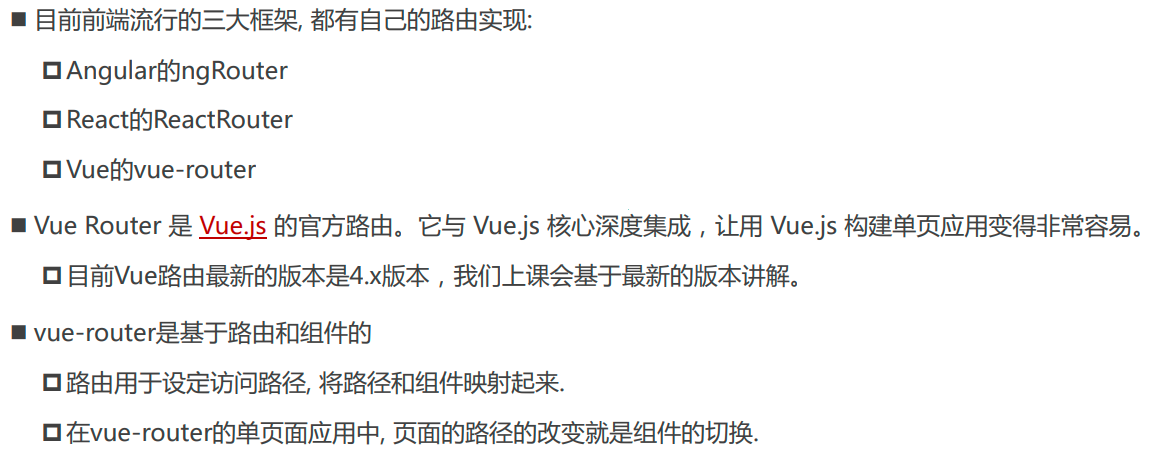
- VueRouter
- 概念
- 路由器
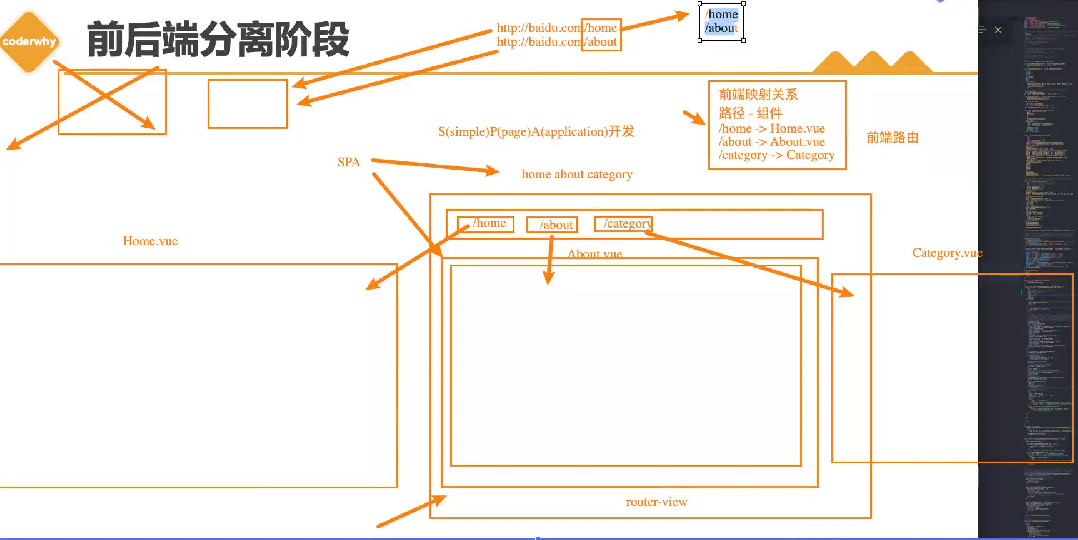
- 前后端分离阶段
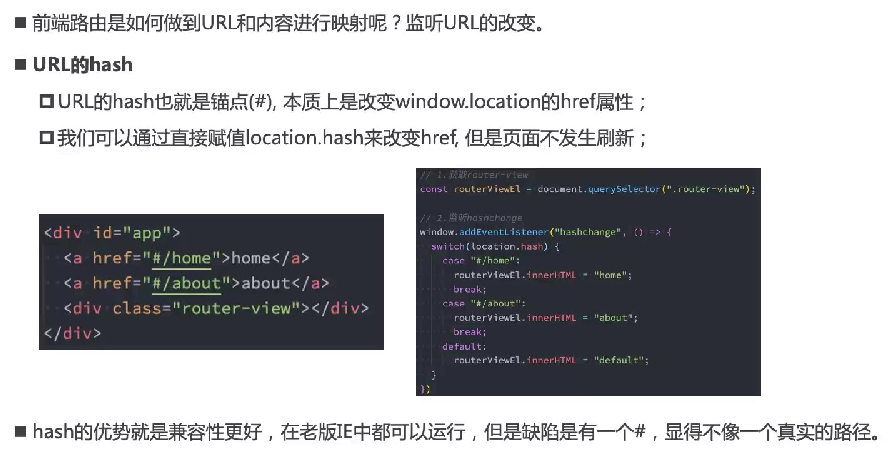
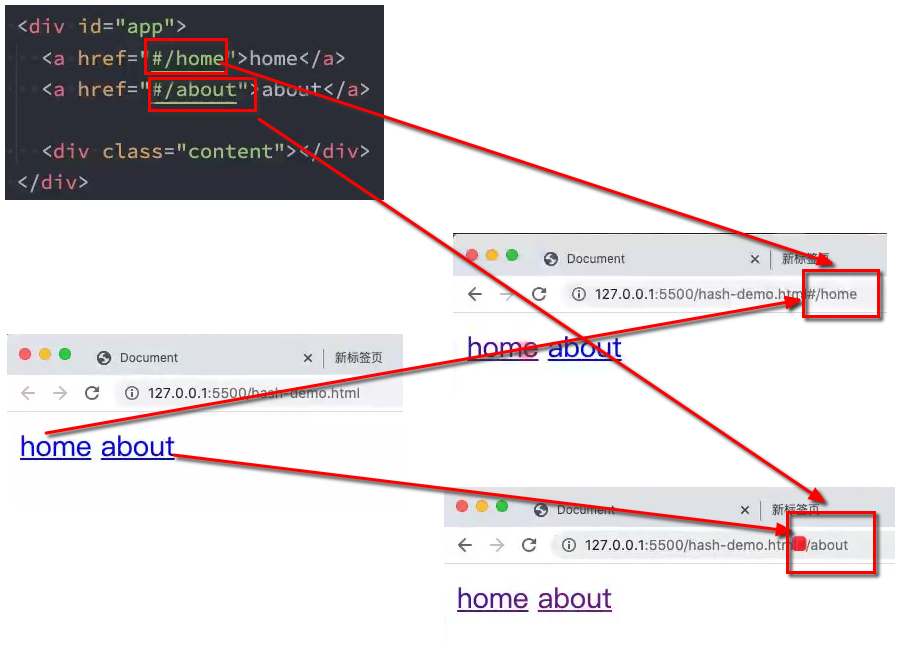
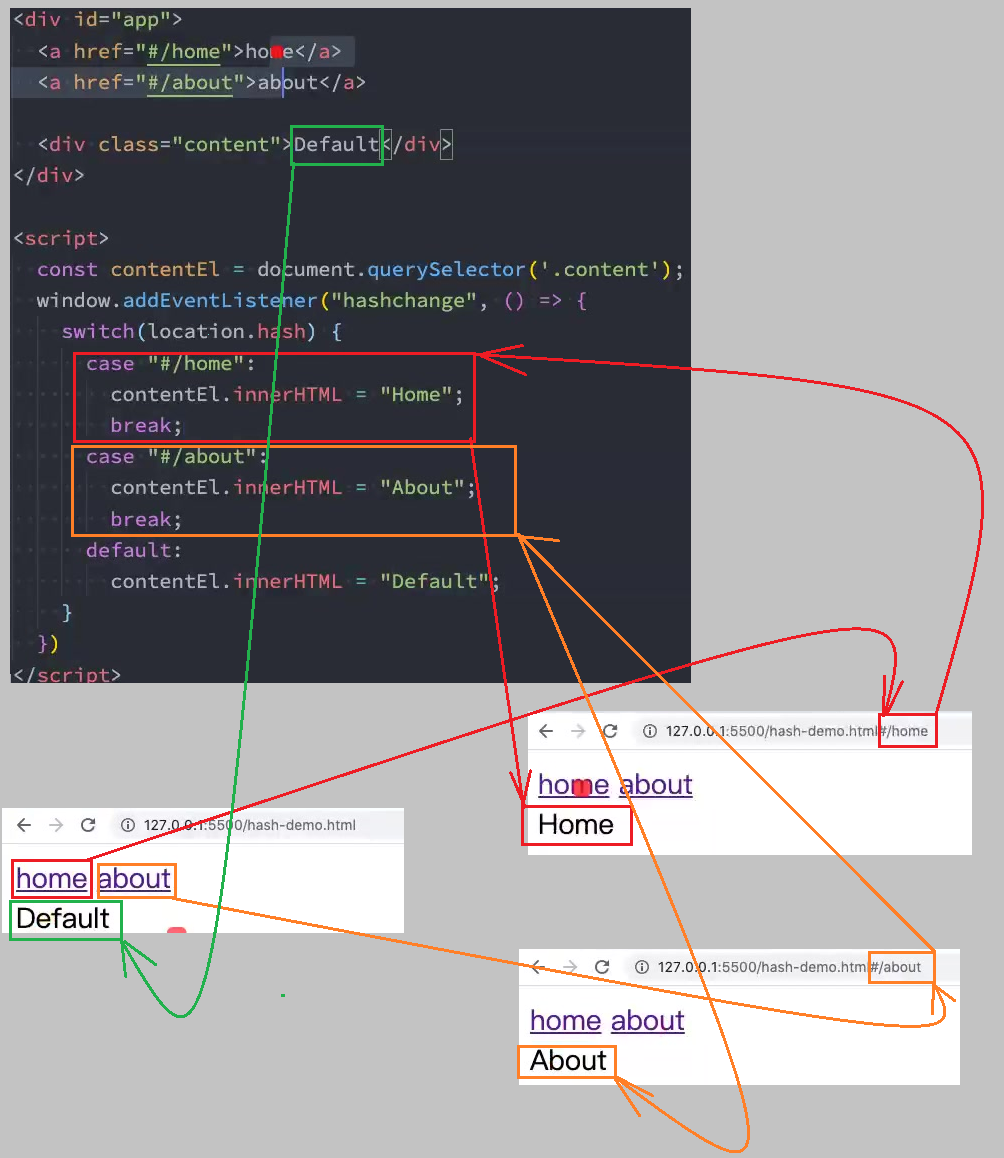
- URL的hash
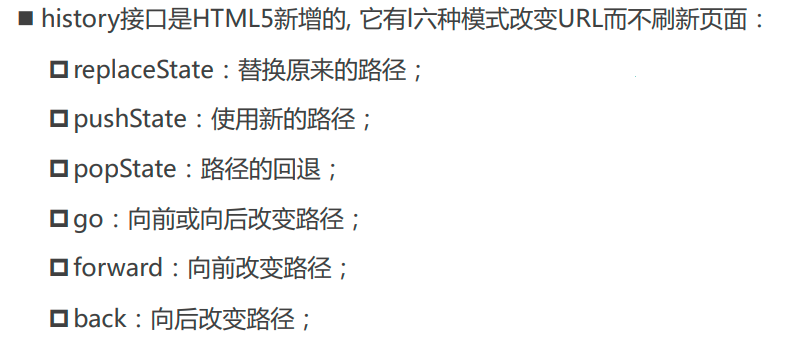
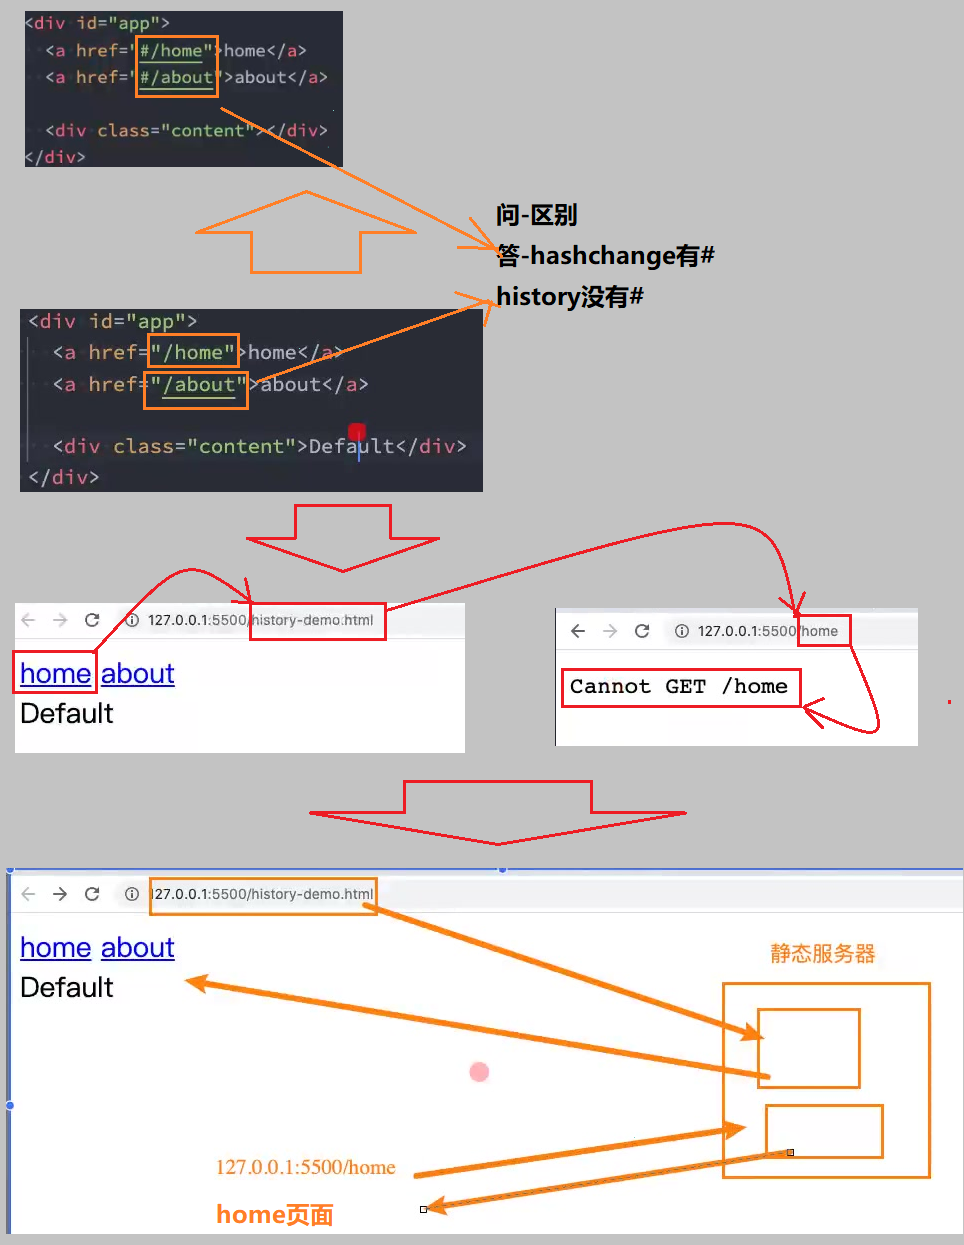
- HTML5的History
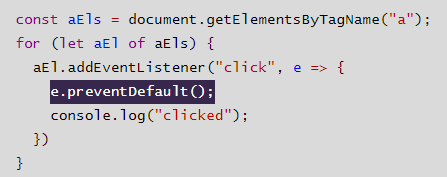
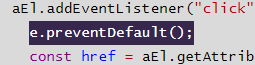
- e.preventDefault()
- history.pushState({}, "", href);
- history.replaceState({},'',href)
- 认识vue-router
- 安装vue-router
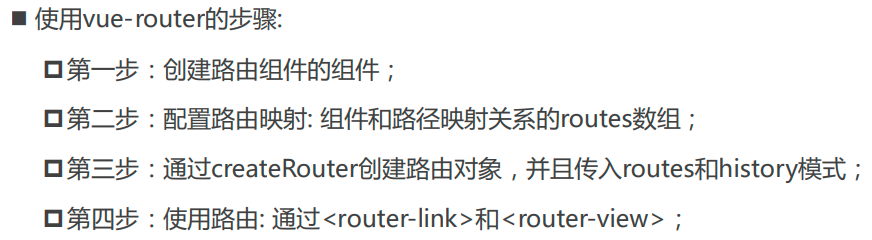
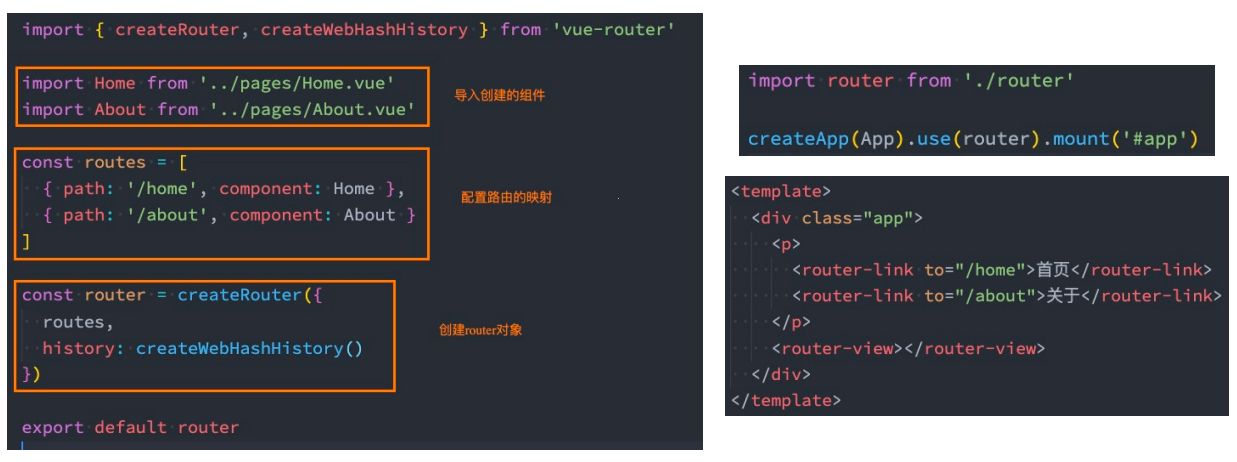
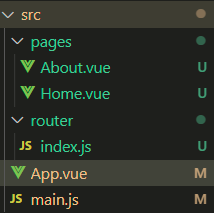
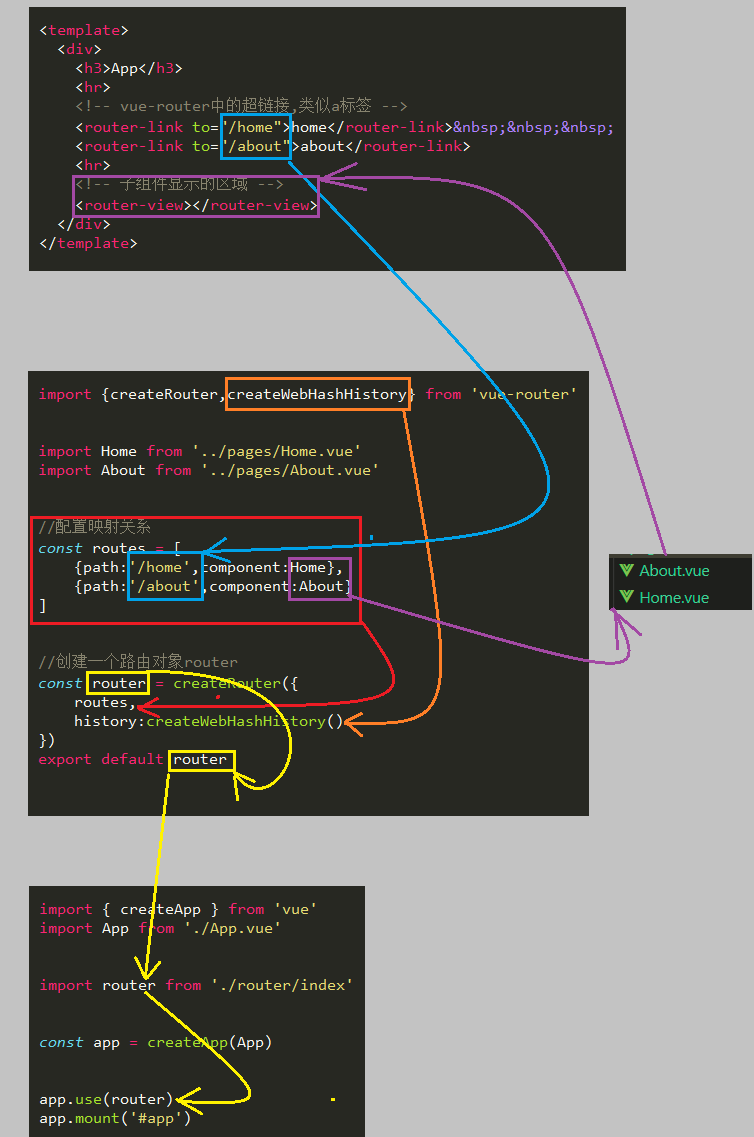
- 路由的使用步骤
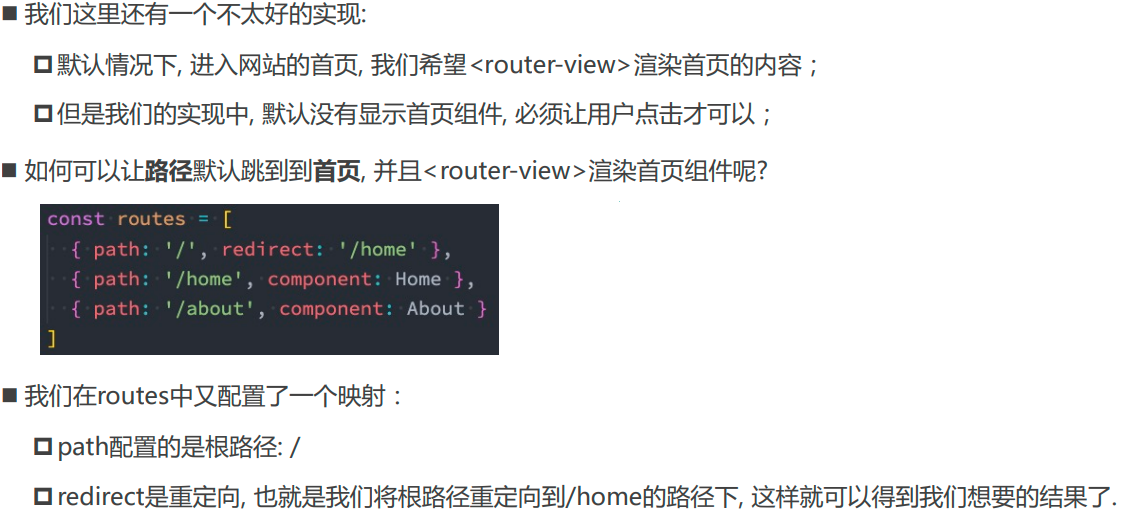
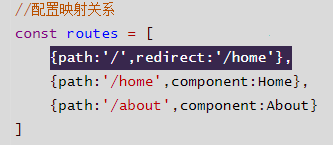
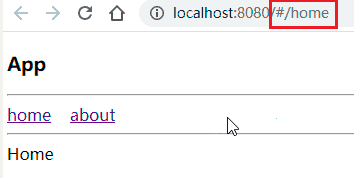
- 路由的默认路径
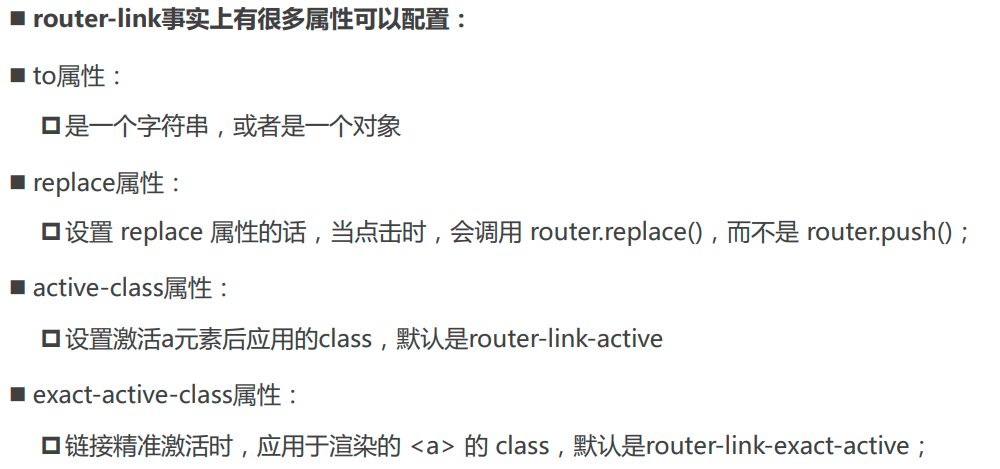
- router-linker
- active-class&exact-active-class属性
- 路由懒加载
- 分包_魔法注释
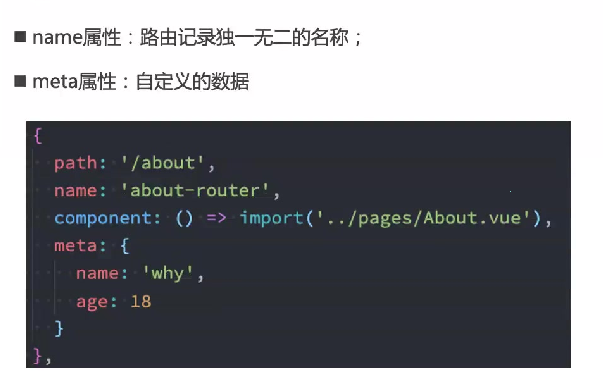
- 路由的其他属性
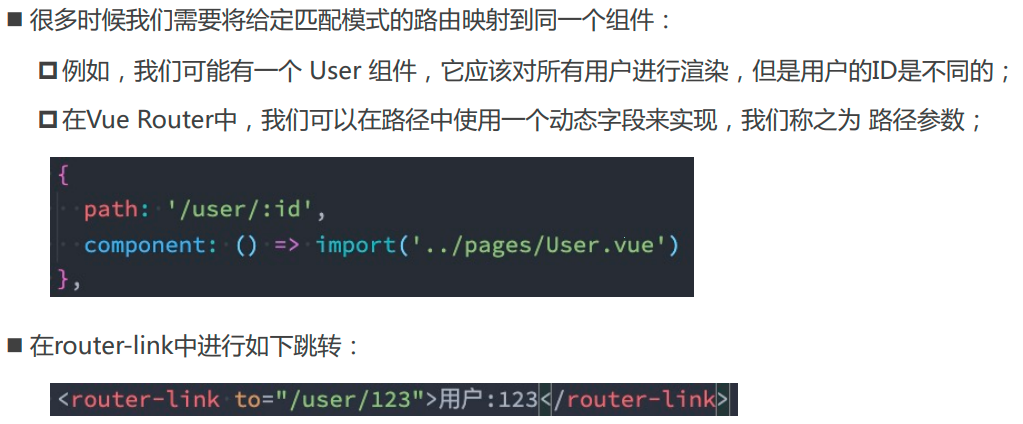
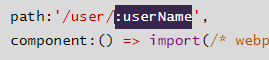
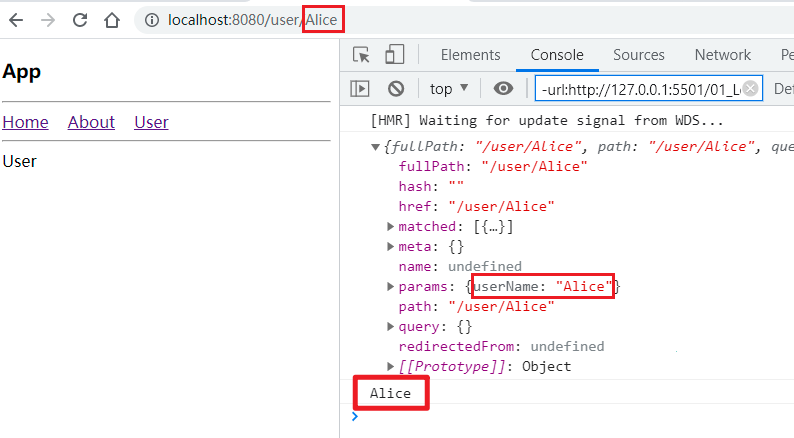
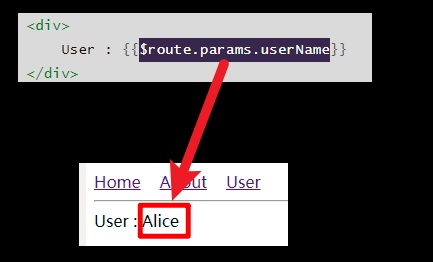
- 动态路由_参数传递
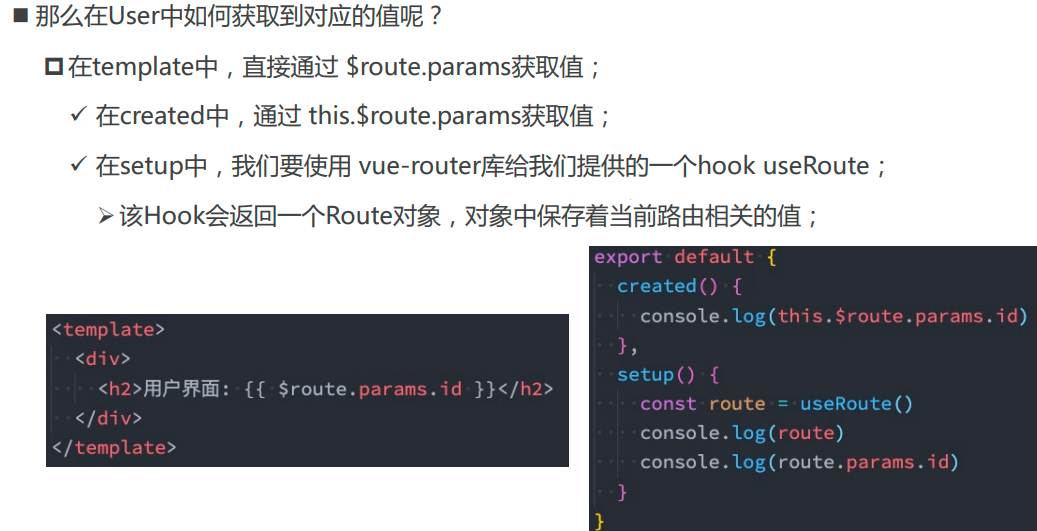
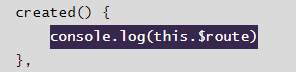
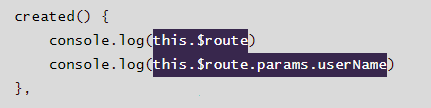
- 如何在setup()中的拿到动态路由传递的参数
- 多参数传递
- NotFound
- $route.params.pathMatch
- 匹配规则加*
- 路由的嵌套
- 编程式控制路由
- router-link的v-slot
- v-slot的基本使用
- custom的作用和如何通过插槽给内部传值
- navigate导航函数
- isActive
- router-view的v-slot
- 动态添加路由
- 添加一级路由
- 添加二级路由
- 动态删除路由
- 路由导航守卫
- 登录守卫功能
- Vuex的状态管理
- 批量引入Vuex中的数据_mapState
- setup中如何使用mapState
- setup中使用mapState的封装
- Vuex的计算属性_getters
- 使用state中的数据
- 使用getters中的数据
- getters返回一个函数
- 批量拿到getters中的数据
- 封装批量拿到getters中的数据
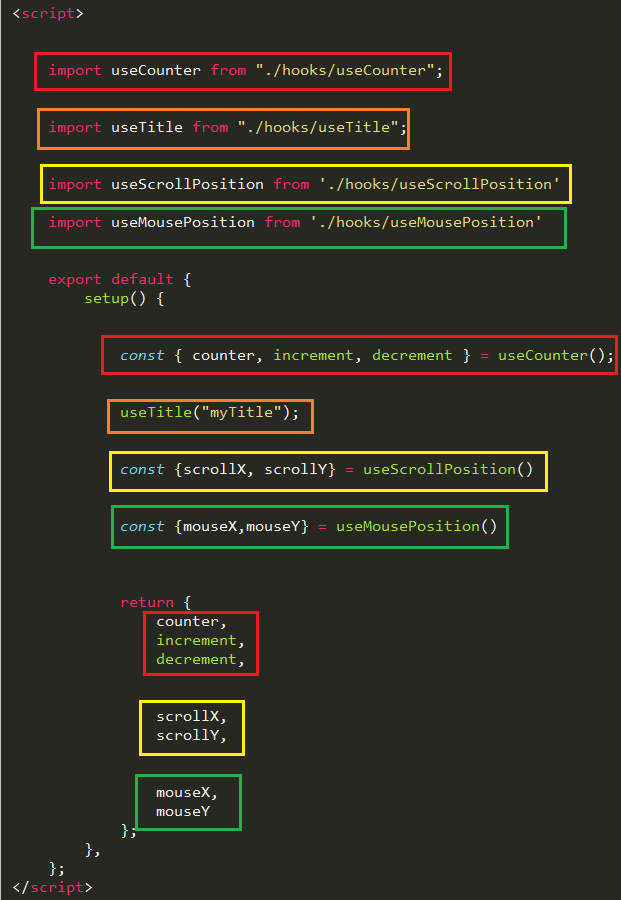
- hooks>useGetters.js
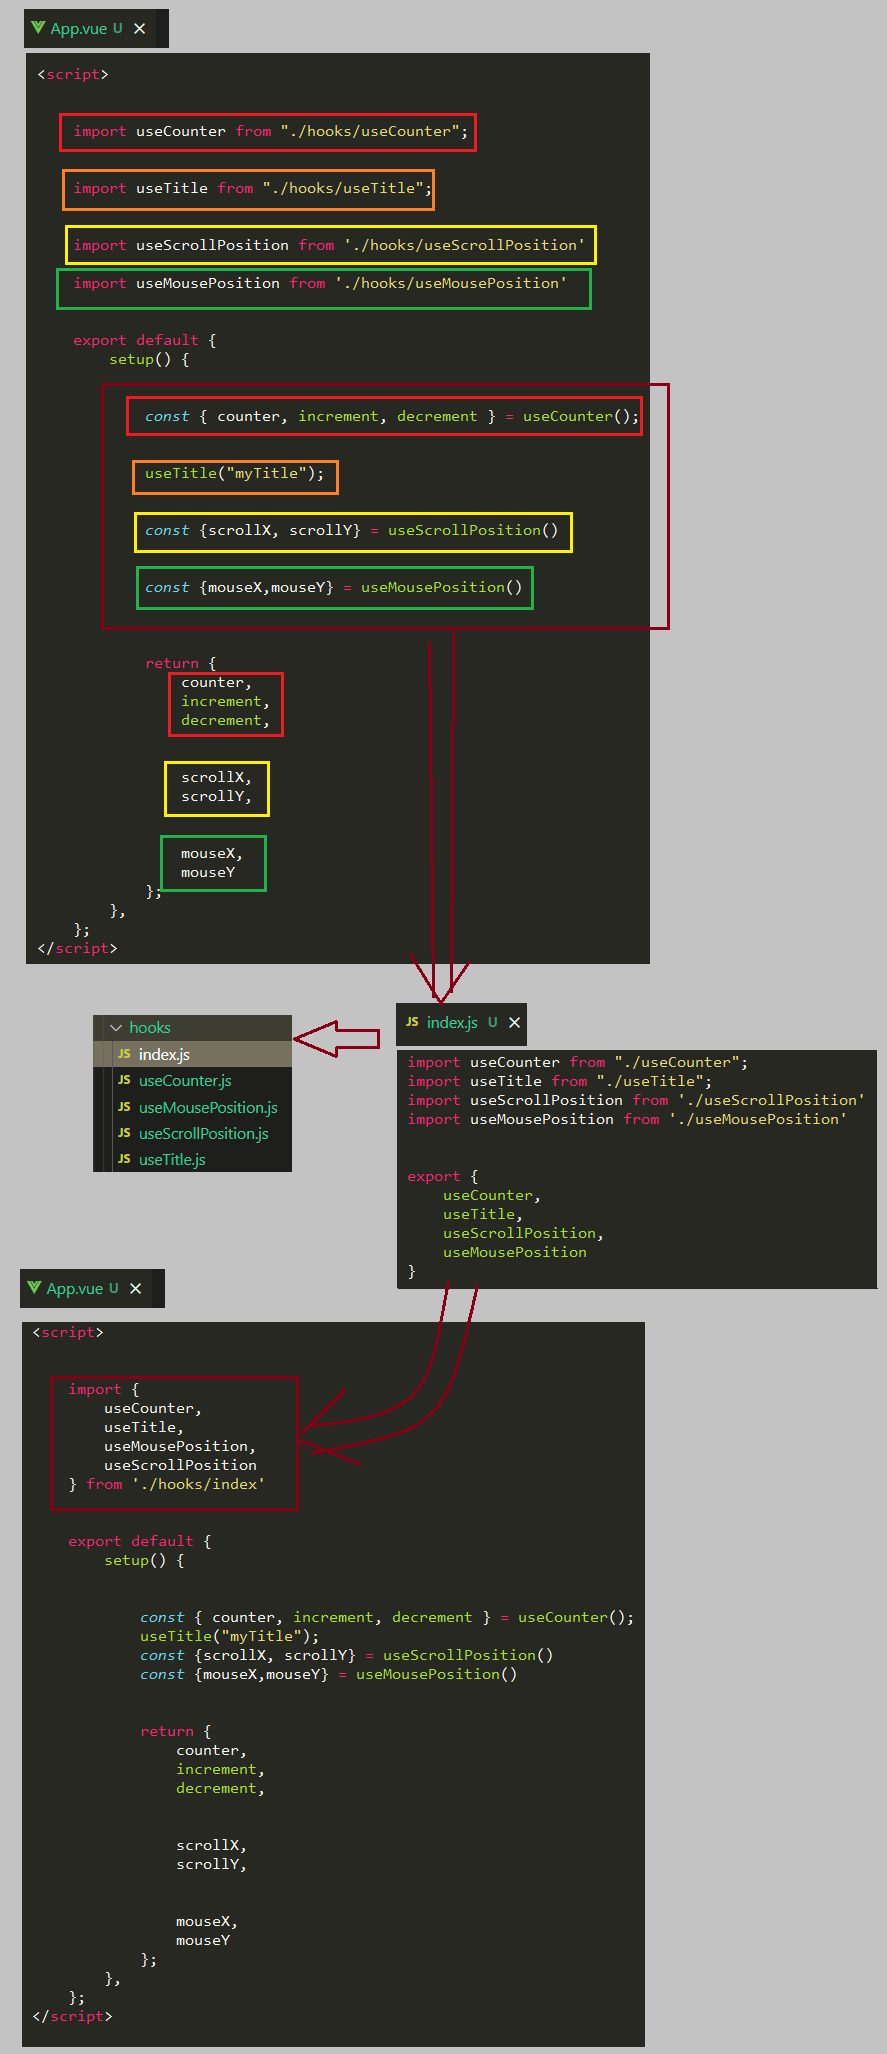
- mapState 和mapGetters的综合封装
- 图解
- hooks>useMapper.js
- hooks>useState.js
- hooks>useGetters.js
- hooks>index.js
- 引用useGetters的文件:Home.vue
- Mutation
- 无参数传递_计数器
- App.vue
- 有参数传递_计数器
- 图解
- 传递普通参数
- 传递对象类型参数
- 两种提交风格
- App.vue
- store>index.js
- 常量类型
- 图解
- store>index.js
- store>mutation-types.js
- App.vue
- mapMutation
- 图解
- App.vue
- actions
- 基本使用
- 基本使用-异步请求-一秒后加一的计数器
- 图解
- App.vue
- store>index.js
简介
组件化
组件化开发最最重要的一点,就是复用.
类型检测
为什么一定要有类型检测呢?
简而言之,就是错误发现越早越好.
- JavaScript的类型错误只有在运行阶段才能发现
技术栈
vue项目需要掌握的技术栈
学习方法

什么是渐进式框架
一点点引入和使用

vue的本质
本质就是一个JavaScript库,就当做一个JS文件引入就好了
基本思路

传入一个对象,返回一个对象,将返回的对象挂在到dom元素上面

链式调用
链式调用更简单,更常用.

调试工具
[shell-chrome.rar - 快捷方式.lnk](…ae_文本文件shell-chrome.rar - 快捷方式.lnk)
环境搭建

CDN方式引入
什么是CDN?
个人理解,有点像P2P的下载模式,有点就近转发的意思.

引入
<script src="https://unpkg.com/vue@next"></script>

通过vue.js文件引入
下载
登录网址, https://unpkg.com/browse/vue@3.1.5/dist/ ,如下图所示下载vue.global.js文件,这个文件并不是源码文件,而是经过打包之后的文件.
引入
如下图引入:

计数器案例
原生JS实现
原生JS实现计数器-增加事件监听.html
==增加事件监听=
<!DOCTYPE html>
<html lang="en">
<head>
    <meta charset="UTF-8">
    <meta http-equiv="X-UA-Compatible" content="IE=edge">
    <meta name="viewport" content="width=device-width, initial-scale=1.0">
    <title>Document</title>
</head>
<body>
    <div id="counter"></div>
    <button id="increase" >+</button>
    <button id="decrease">-</button>
    <script>
        //aa-get the counter and button elements
        let counter = document.querySelector('#counter')
        let increase = document.querySelector('#increase')
        let decrease = document.querySelector('#decrease')
        //bb-display number in the counter div
        let num = 100
        counter.innerHTML = num
        //cc-bind the button click event
        increase.addEventListener('click',()=>{
            num++
            counter.innerHTML = num
        })
        decrease.addEventListener('click',()=>{
            num--
            counter.innerHTML = num
        })
    </script>
</body>
</html>
原生JS实现计数器-在元素中绑定onclick属性和script标签中增加onclick属性.html
方式一
方式二


<!DOCTYPE html>
<html lang="en">
<head>
    <meta charset="UTF-8">
    <meta http-equiv="X-UA-Compatible" content="IE=edge">
    <meta name="viewport" content="width=device-width, initial-scale=1.0">
    <title>Document</title>
</head>
<body>
    <div id="counter"></div>
    <button id="increase" onclick="increase()" >+</button>
    <button id="decrease">-</button>
    <script>
        //aa-get the counter and button elements
        let counter = document.querySelector('#counter')
        let increase = document.querySelector('#increase')
        let decrease = document.querySelector('#decrease')
        //bb-display number in the counter div
        let num = 100
        counter.innerHTML = num
        //cc-bind the button click event
        //ca-bind onclick in the button div
        function increase(){
            num++
            counter.innerHTML = num
        }
        //cb-bind onclick in the script query
        decrease.onclick = function(){
            num --
            counter.innerHTML = num
        }
    </script>
</body>
</html>
VUE实现计数器
vue实现计数器.html
基本结构
数据绑定mustache语句
事件绑定
data的value为啥是个函数


<!DOCTYPE html>
<html lang="zh">
<head>
</head>
<body>
    <div id="app"></div>
    <script src="./vue/vue.js"></script>
    <script>
        Vue.createApp({
            template:`
                <h2>{{counter}}</h2>
                <button @click='increase'>+1</button>
                <button @click='decrease'>-1</button>
            `,
            data:function(){
                return{
                    counter: 10
                }
            },
            methods: {
                increase(){
                    this.counter++
                },
                decrease(){
                    this.counter--
                }
            },
        }).mount('#app')
    </script>
</body>
</html>
vue实现计数器 and es5的写法 and 箭头函数的写法.html
es5和es6的写法的对比
箭头函数的写法


<!DOCTYPE html>
<html lang="zh">
<head>
</head>
<body>
    <div id="app"></div>
    <script src="./vue/vue.js"></script>
    <script>
        Vue.createApp({
            template:`
                <h2>{{counter}}</h2>
                <button @click='increase'>+1</button>
                <button @click='decrease'>-1</button>
            `,
            data:function(){
                return{
                    counter: 10
                }
            },
            methods: {
                //es6的写法
                //increase(){
                //    this.counter++
                //},
                //es5的写法--OK
                increase:function(){
                    this.counter++
                }
                ,
                //箭头函数--Not OK!!!
                decrease:()=>{
                    this.counter--
                }
            },
        }).mount('#app')
    </script>
</body>
</html>
命令式和声明式编程
声明式编程
理解

命令式编程和声明式编程的区别
不恰当的比喻:一个是手把手的教,一个是发个命令就好了.

MVVM模型
MVC模型


MVVM模型

vue的模式类似MVVM模型
template属性
挂载
template中的内容会被挂载到对应的元素下面,并且其中的内容会被覆盖掉

分离式写法_script标签

分离式写法.html
关键代码
<!DOCTYPE html>
<html lang="zh">
<head>
</head>
<body>
    <div id="app"></div>
    <script type='x-template' id='main'>
        <h2>{{counter}}</h2>
        <button @click='increase'>+1</button>
        <button @click='decrease'>-1</button>
    </script>
    <script src="./vue/vue.js"></script>
    <script>
        Vue.createApp({
            template:`#main`,
            data:function(){
                return{
                    counter: 10
                }
            },
            methods: {
                increase(){
                    this.counter++
                },
                decrease(){
                    this.counter--
                }
            },
        }).mount('#app')
    </script>
</body>
</html>
分离式写法_template标签
template中的内容分离式写法_使用template标签.html
核心代码

<!DOCTYPE html>
<html lang="zh">
<head>
</head>
<body>
    <div id="app"></div>
    <template id='main'>
        <div>
            <h2>{{counter}}</h2>
            <button @click='increase'>+1</button>
            <button @click='decrease'>-1</button>
        </div>
    </template>

    <script src="./vue/vue.js"></script>
    <script>
        Vue.createApp({
            template:`#main`,
            data:function(){
                return{
                    counter: 10
                }
            },
            methods: {
                increase(){
                    this.counter++
                },
                decrease(){
                    this.counter--
                }
            },
        }).mount('#app')
    </script>
</body>
</html>
template标签的特点
https://developer.mozilla.org/zh-CN/docs/Web/HTML/Element/template

普通div其实也是可以实现挂载的,vue也会将其挂载上去,只不过div会被浏览器解析器渲染上去,显示出来,从而导致内容重复多出来.
template中的根元素
vue2和vue3中template中根元素个数的区别.html
vue3中可以有多个根元素
vue2中只能有一个根元素


  <!-- vue3 是允许template中有多个根元素 -->
  <template id="my-app">
    <a v-bind:href="link">百度一下</a>
    <a :href="link">百度一下</a>
  </template>

  <!-- vue2 template模板中只能有一个根元素 -->
  <template id="my-app">
    <div>
      <a v-bind:href="link">百度一下</a>
      <a :href="link">百度一下</a>
    </div>
  </template>
data属性
vue2和vue3中的区别

methods属性
this的指向
普通函数
普通函数的this指向.html
this的指向
this永远指向的是调用他的那个对象
fun7()其实是window.fun7()的省略写法

<!DOCTYPE html>
<html lang="zh">
<head>
</head>
<body>
    <script>
       /**
         * this的指向
         * 1-函数调用的时候,this就是指向这个window对象
         * 2-对象进行调用的时候,就是指向这个对象。
         */
        function fun7(){
            console.log(this);
            console.log(this.name);
            console.log("I'm fun7");
        }
        fun7();

        console.log('----------------');

        var obj2 = {
            name:"Bruce",
            age:12,
            say:function(){
                console.log(this);
                console.log(this.name);
                console.log("I'm fun8");
            }
        }
        obj2.say();
    </script>
</body>
</html>
强制改变普通函数函数定义时候的this.html
强制改变普通函数定义时候的this
<!DOCTYPE html>
<html lang="zh">

<head>
</head>

<body>
    <script>

        function Timer() {
            this.s1 = 0;
            this.s2 = 0;
            // 箭头函数
            setInterval(() => this.s1++, 1000);
            // 普通函数
            _this = this
            setInterval(function () {
                _this.s2++;
            }, 1000);
        }

        var timer = new Timer();

        setTimeout(() => console.log('s1: ', timer.s1), 3100);//=>3
        setTimeout(() => console.log('s2: ', timer.s2), 3100);//=>3


    </script>
</body>

</html>
箭头函数
箭头函数中this的指向.html
普通函数this永远指向调用他的对象
箭头函数this的指向定义时候的this
箭头函数没有自己的this,他会从里头向外头寻找,直到找到有this为止,这里的this是windows对象.
<!DOCTYPE html>
<html lang="zh">

<head>
</head>

<body>
    <script>
    var obj2 = {
            name:"Bruce",
            age:12,
            say:function(){
                console.log(this);
                //=>{name: "Bruce", age: 12, say: ƒ, run: ƒ}
            },
            run:()=>{
                console.log(this);
                //=>Window {window: Window, self: Window, document: document, name: "", location: Location, …}
            },
        }
     obj2.say();
     obj2.run()
    </script>
</body>

</html>
为什么vue的methods不要使用箭头函数?
计数器.html
我们想要操作的对象是什么?
我想要操作的对象是什么,我们想要通过这个this.counter对象拿到这个data中的counter,但是如果传入的this是Windows对象,我们通过这个windows对象是拿不到这个counter的.所以不推荐使用箭头函数.
箭头函数没有自己this,一般在定义的时候,会到自己的上级作用域寻找this,这里的上级作用域就是windows所在的作用域,一般来说都是这个windows作用域.
普通函数和箭头函数中的this

<!DOCTYPE html>
<html lang="zh">
<head>
</head>
<body>
    <div id="app"></div>
    <script src="./vue/vue.js"></script>
    <script>
        Vue.createApp({
            template:`
                <h2>{{counter}}</h2>
                <button @click='increase'>+1</button>
                <button @click='decrease'>-1</button>
            `,
            data:function(){
                return{
                    counter: 10
                }
            },
            methods: {
                increase(){
                    console.log(this);
                    //=>Proxy {increase: ƒ, decrease: ƒ, …}
                    this.counter++
                },
                decrease:()=>{
                    console.log(this);
                    //=>Window {window: Window, self: Window, document: document, name: "", location: Location, …}
                    this.counter--
                }
            }
        }).mount('#app')
    </script>
</body>
</html>
总结
使用function定义的函数,this的指向随着调用环境的变化而变化的,而箭头函数中的this指向是固定不变的,一直指向的是定义函数的环境。
使用function定义的函数中this指向是随着调用环境的变化而变化的
//使用function定义的函数
function foo(){
	console.log(this);
}
var obj = { aa: foo };
foo(); //Window
obj.aa() //obj { aa: foo }
明显使用箭头函数的时候,this的指向是没有发生变化的。
//使用箭头函数定义函数
var foo = () => { console.log(this) };
var obj = { aa:foo };
foo(); //Window
obj.aa(); //Window
VSCode代码片段
- 赋值自己需要的代码
<!DOCTYPE html>
<html lang="zh">
<head>
    <meta charset="UTF-8">
    <meta http-equiv="X-UA-Compatible" content="IE=edge">
    <meta name="viewport" content="width=device-width, initial-scale=1.0">
    <title>Document</title>
</head>
<body>
    <div id="app">
        {{msg}}
    </div>
    <script src="vue/vue.js"></script>
    <script>
        Vue.createApp({
            data:function(){
                return{
                    msg: 'hello vue'
                }
            }
        }).mount('#app')
    </script>
</body>
</html>
- 登录这个网站
https://snippet-generator.app/

- 将生成的代码片段拷贝下来
"create vue app": {
  "prefix": "vueapp",
  "body": [
    "<!DOCTYPE html>",
    "<html lang="zh">",
    "<head>",
    "    <meta charset="UTF-8">",
    "    <meta http-equiv="X-UA-Compatible" content="IE=edge">",
    "    <meta name="viewport" content="width=device-width, initial-scale=1.0">",
    "    <title>Document</title>",
    "</head>",
    "<body>",
    "    <div id="app">",
    "        {{msg}}",
    "    </div>",
    "    <script src="vue/vue.js"></script>",
    "    <script>",
    "        Vue.createApp({",
    "            data:function(){",
    "                return{",
    "                    msg: 'hello vue'",
    "                }",
    "            }",
    "        }).mount('#app')",
    "    </script>",
    "</body>",
    "</html>"
  ],
  "description": "create vue app"
}
- 打开vscode


Musache语法
正确用法
mustache语法.html
基本使用
简单的表达式
也可以是methods中的函数
既然可以是表达式,当然也可以是三元表达式了


<!DOCTYPE html>
<html lang="zh">
<body>
  <div id="app"></div>
  <template id="my-app">
    <!-- 1.mustache的基本使用 -->
    <h2>{{message}}</h2>
    <!-- 2.是一个表达式 -->
    <h2>{{counter * 10}}</h2>
    <h2>{{ message.split(" ").reverse().join(" ") }}</h2>
    <!-- 3.也可以调用函数 -->
    <!-- 可以使用computed(计算属性) -->
    <h2>{{getReverseMessage()}}</h2>
    <!-- 4.三元运算符 -->
    <h2>{{ isShow ? "哈哈哈": "" }}</h2>
    <button @click="toggle">切换</button>
  </template>
  <script src="../js/vue.js"></script>
  <script>
    const App = {
      template: '#my-app',
      data() {
        return {
          message: "Hello World",
          counter: 100,
          isShow: true
        }
      },
      methods: {
        getReverseMessage() {
          return this.message.split(" ").reverse().join(" ");
        },
        toggle() {
          this.isShow = !this.isShow;
        }
      }
    }
    Vue.createApp(App).mount('#app');
  </script>
</body>
</html>
错误用法
musache错误用法.html
两者都是赋值语句,不是表达式

<!-- 错误用法 -->
<!-- var name = "abc" -> 赋值语句 -->

<h2>{{var name = "abc"}}</h2>
<h2>{{ if(isShow) {  return "哈哈哈" } }}</h2>
基本指令
v-once
v-once修饰的html元素,只渲染一次,以后都是不变,相当于一个原始的参照系.
v-once.html
代码理解

<!DOCTYPE html>
<html lang="en">
<head>
</head>
<body>

  <div id="app"></div>

  <template id="my-app">
    <div v-once>
      <h2>原始数值:{{counter}}</h2>
    </div>
    <h2>当前数值{{counter}}</h2>
    <button @click="increment">+1</button>
  </template>

  <script src="../js/vue.js"></script>
  <script>
    const App = {
      template: '#my-app',
      data() {
        return {
          counter: 100,
        }
      },
      methods: {
        increment() {
          this.counter++;
        }
      }
    }

    Vue.createApp(App).mount('#app');
  </script>
</body>
</html>
输出
v-text
v-text就是其修饰的html元素中添加内容,作用和mustache类似,不过没有mustache语法灵活.
v-text.html
关键代码

<!DOCTYPE html>
<html lang="en">
<body>

  <div id="app"></div>

  <template id="my-app">
    <h2 v-text="message"></h2>
    <h2>{{message}}</h2>
  </template>

  <script src="../js/vue.js"></script>
  <script>
    const App = {
      template: '#my-app',
      data() {
        return {
          message: "Hello World"
        }
      }
    }

    Vue.createApp(App).mount('#app');
  </script>
</body>
</html>
v-html
v-html.html
关键代码

<!DOCTYPE html>
<html lang="en">
<body>
  <div id="app"></div>
  <template id="my-app">
    <div>{{msg}}</div>
    <div v-html="msg"></div>
  </template>
  <script src="../js/vue.js"></script>
  <script>
    const App = {
      template: '#my-app',
      data() {
        return {
          msg: '<span style="color:red; background: blue;">哈哈哈</span>'
        }
      }
    }
    Vue.createApp(App).mount('#app');
  </script>
</body>
</html>
输出

v-pre
v-pre.html
关键代码

<!DOCTYPE html>
<html lang="zh">
<body>
  <div id="app"></div>
  <template id="my-app">
    <h2 v-pre>{{message}}</h2>
  </template>
  <script src="../js/vue.js"></script>
  <script>
    const App = {
      template: '#my-app',
      data() {
        return {
          message: "Hello World"
        }
      }
    }
    Vue.createApp(App).mount('#app');
  </script>
</body>
</html>
输出

v-cloak
cloak就是斗篷,遮盖的的意思,这个指令的作用是什么,主要为了显示效果,比如说网络很卡,浏览器很卡,这个{{message}}中的内容还没有渲染进来,网页页面会显示mustache语法的原始内容,我们加上这个遮盖之后,就是什么都不显示,然后等到这个里面的message内容渲染完成之后,才将其显示,目的是为了更好的用户体验.
v-cloak.html
<!DOCTYPE html>
<html lang="en">
<body>
  <div id="app"></div>

  <template id="my-app">
    <h2 v-cloak>{{message}}</h2>
  </template>

  <script src="../js/vue.js"></script>
  <script>
    const App = {
      template: '#my-app',
      data() {
        return {
          message: "Hello World"
        }
      }
    }

    Vue.createApp(App).mount('#app');
  </script>
</body>
</html>
cloak单词的意思
重要指令
v-bind
属性绑定
v-bind是用来绑定属性,实现动态属性.mustache是用来绑定内容,实现动态内容.
v-bind的基本使用.html
v-bind的基本使用
v-bind的语法糖

<!DOCTYPE html>
<html lang="zh">
<body>
  <div id="app"></div>

  <template id="my-app">
    <!-- 1.v-bind的基本使用 -->
    <a v-bind:href="link">百度一下</a>
    <!-- 2.v-bind提供一个语法糖 : -->
    <a :href="link">百度一下</a>
  </template>

  <script src="../js/vue.js"></script>
  <script>
    const App = {
      template: '#my-app',
      data() {
        return {
          link: "https://www.baidu.com"
        }
      }
    }
    Vue.createApp(App).mount('#app');
  </script>
</body>
</html>
属性绑定_对象形式
属性绑定_对象形式.html
key-value结构
错误写法
key可以加上引号,也可以不加引号.但是value一定不能加引号,因为value加上引号,就变成了字符串.
<!DOCTYPE html>
<html lang="en">
  <head>
    <style>
      .active {
        color: red;
      }
    </style>
  </head>
  <body>
    <div id="app"></div>

    <template id="my-app">
      <!-- 正确写法:key-value结构 -->
      <!-- 对象语法: {key: value} -->
      <h2 :class="{'active': isActive}">呵呵呵呵</h2>
      <h2 :class="{active: isActive}">呵呵呵呵</h2>
      <!-- 错误写法 -->
      <h2 :class="{active: 'isActive'}">呵呵呵呵</h2>
      <button @click="toggle">切换</button>
    </template>

    <script src="../js/vue.js"></script>
    <script>
      const App = {
        template: "#my-app",
        data() {
          return {
            isActive: true,
          };
        },
        methods: {
          toggle() {
            this.isActive = !this.isActive;
          },
        },
      };

      Vue.createApp(App).mount("#app");
    </script>
  </body>
</html>
输出

多值情况
属性绑定_多值情况.html
多个键值对
默认class和动态的class结合

<!DOCTYPE html>
<html lang="en">
  <head>
    <style>
      .active {
        color: red;
      }
      .title {
        background-color: yellowgreen;
      }
    </style>
  </head>
  <body>
    <div id="app"></div>

    <template id="my-app">
      <button @click="toggle">切换</button>

      <!-- 也可以有多个键值对 -->
      <div :class="{active: isActive, title: true}">多个键值对</div>

      <!-- 默认的class和动态的class结合 -->
      <div class="abc cba" :class="{active: isActive, title: true}">
        默认的class和动态的class结合
      </div>

    </template>

    <script src="../js/vue.js"></script>
    <script>
      const App = {
        template: "#my-app",
        data() {
          return {
            isActive: true,
          };
        },
        methods: {
          toggle() {
            this.isActive = !this.isActive;
          }
        },
      };

      Vue.createApp(App).mount("#app");
    </script>
  </body>
</html>
对象放到一个单独的属性中
将对象放到一个单独的属性中.html
将对象放到一个单独的属性中

<!DOCTYPE html>
<html lang="zh">

<head>
  <style>
    .active {
      color: red;
    }
  </style>
</head>

<body>
  <div id="app"></div>

  <template id="my-app">
    <!-- 将对象放到一个单独的属性中 -->
    <h2 class="abc cba" :class="classObj">将对象放到一个单独的属性中</h2>
  </template>

  <script src="../js/vue.js"></script>
  <script>
    const App = {
      template: "#my-app",
      data() {
        return {
          classObj: {
            active: true,
            title: true
          }
        };
      }
    };

    Vue.createApp(App).mount("#app");
  </script>
</body>

</html>
将对象放到methods中返回
将返回的对象放到一个methods(computed)方法中.html
将对象放到一个methods返回

<!DOCTYPE html>
<html lang="zh">

<head>
  <style>
    .active {
      color: red;
    }
  </style>
</head>

<body>
  <div id="app"></div>

  <template id="my-app">
    <!-- 将返回的对象放到一个methods(computed)方法中 -->
    <h2 class="abc cba" :class="getClassObj()">将对象放到一个methods(computed)方法中返回</h2>
  </template>

  <script src="../js/vue.js"></script>
  <script>
    const App = {
      template: "#my-app",
      methods: {
        getClassObj() {
          return {
            active: true,
            title: true
          }
        }
      },
    };

    Vue.createApp(App).mount("#app");
  </script>
</body>

</html>
属性绑定_数组形式
数组形式绑定属性.html
基本用法
嵌入三元表达式
嵌入对象


<!DOCTYPE html>
<html lang="zh">
<body>

  <div id="app"></div>

  <template id="my-app">
    <!-- 基本用法 -->
    <div :class="['abc', title]">哈哈哈哈</div>
    <!-- 数组中可以嵌入三元表达式 -->
    <div :class="['abc', title, isActive ? 'active': '']">哈哈哈哈</div>
    <!-- 数组中可以嵌入对象 -->
    <div :class="['abc', title, {active: isActive}]">哈哈哈哈</div>
  </template>

  <script src="../js/vue.js"></script>
  <script>
    const App = {
      template: '#my-app',
      data() {
        return {
          message: "Hello World",
          title: "cba",
          isActive: true
        }
      }
    }

    Vue.createApp(App).mount('#app');
  </script>
</body>
</html>
样式绑定_对象形式
v-bind绑定样式.html
基本使用
基本使用_简单拼接
绑定data属性中的object对象
方法中返回的一个对象
短横线需要加引号,驼峰不需要加引号


<!DOCTYPE html>
<html lang="zh">
<head>
</head>
<body>

  <div id="app"></div>

  <template id="my-app">
    <!-- :style="{cssPropertyName: cssPropertyValue}" -->
    <div :style="{color: finalColor, 'font-size': '30px'}">'font-size'加了引号</div>
    <div :style="{color: finalColor, fontSize: '30px'}">fontSize不加引号</div>
    <div :style="{color: finalColor, fontSize: finalFontSize + 'px'}">finalFontSize是data中的值,和后面的'px'拼起来</div>

    <!-- 绑定一个data中的属性值, 并且是一个对象 -->
    <div :style="finalStyleObj">绑定一个data中的属性</div>
    <!-- 方法中返回的一个对象 -->
    <div :style="getFinalStyleObj()">methods中返回的一个对象</div>
  </template>

  <script src="../js/vue.js"></script>
  <script>
    const App = {
      template: '#my-app',
      data() {
        return {
          message: "Hello World",
          finalColor: 'red',
          finalFontSize: 50,
          finalStyleObj: {
            'font-size': '50px',
            fontWeight: 700,
            backgroundColor: 'red'
          }
        }
      },
      methods: {
        getFinalStyleObj() {
          return {
            'font-size': '50px',
            fontWeight: 700,
            backgroundColor: 'red'
          }
        }
      }
    }

    Vue.createApp(App).mount('#app');
  </script>
</body>
</html>
样式绑定_数组形式
样式绑定_数组形式.html
数组中嵌套对象

<!DOCTYPE html>
<html lang="en">
<body>

  <div id="app"></div>

  <template id="my-app">
    <div :style="[style1Obj, style2Obj]">哈哈哈</div>
  </template>

  <script src="../js/vue.js"></script>
  <script>
    const App = {
      template: '#my-app',
      data() {
        return {
          style1Obj: {
            color: 'red',
            fontSize: '30px'
          },
          style2Obj: {
            textDecoration: "underline"
          }
        }
      }
    }

    Vue.createApp(App).mount('#app');
  </script>
</body>
</html>
属性名称绑定
属性名称绑定.html
属性名称的绑定

<!DOCTYPE html>
<html lang="en">
<body>

  <div id="app"></div>

  <template id="my-app">
    <div :[name]="value">哈哈哈</div>
  </template>

  <script src="../js/vue.js"></script>
  <script>
    const App = {
      template: '#my-app',
      data() {
        return {
          name: "classs",
          value: "content"
        }
      }
    }

    Vue.createApp(App).mount('#app');
  </script>
</body>
</html>
属性名和属性值绑定
属性名和属性值绑定.html
和属性值绑定的区别
没有冒号:
多个属性名和属性值的键值对的绑定

<!DOCTYPE html>
<html lang="zh">
<body>

  <div id="app"></div>

  <template id="my-app">
    <h2 v-bind="info">同时绑定多个属性名和属性值</h2>
  </template>

  <script src="../js/vue.js"></script>
  <script>
    const App = {
      template: '#my-app',
      data() {
        return {
          info: {
            name: "zhuo",
            age: 18,
            height: 1.88
          }
        }
      }
    }

    Vue.createApp(App).mount('#app');
  </script>
</body>
</html>
v-bind(same)
-
缩写:
: -
预期:
any (with argument) | Object (without argument) -
参数:
attrOrProp (optional) -
修饰符:
.camel- 将 kebab-case attribute 名转换为 camelCase。
-
用法:
动态地绑定一个或多个 attribute,或一个组件 prop 到表达式。
在绑定
class或styleattribute 时,支持其它类型的值,如数组或对象。可以通过下面的教程链接查看详情。在绑定 prop 时,prop 必须在子组件中声明。可以用修饰符指定不同的绑定类型。
没有参数时,可以绑定到一个包含键值对的对象。注意此时
class和style绑定不支持数组和对象。 -
示例:
<!-- 绑定 attribute --> <img v-bind:src="imageSrc" /> <!-- 动态 attribute 名 --> <button v-bind:[key]="value"></button> <!-- 缩写 --> <img :src="imageSrc" /> <!-- 动态 attribute 名缩写 --> <button :[key]="value"></button> <!-- 内联字符串拼接 --> <img :src="'/path/to/images/' + fileName" /> <!-- class 绑定 --> <div :class="{ red: isRed }"></div> <div :class="[classA, classB]"></div> <div :class="[classA, { classB: isB, classC: isC }]"> <!-- style 绑定 --> <div :style="{ fontSize: size + 'px' }"></div> <div :style="[styleObjectA, styleObjectB]"></div> <!-- 绑定一个全是 attribute 的对象 --> <div v-bind="{ id: someProp, 'other-attr': otherProp }"></div> <!-- prop 绑定。"prop" 必须在 my-component 声明 --> <my-component :prop="someThing"></my-component> <!-- 通过 $props 将父组件的 props 一起传给子组件 --> <child-component v-bind="$props"></child-component> <!-- XLink --> <svg><a :xlink:special="foo"></a></svg> </div>.camel修饰符允许在使用 DOM 模板时将v-bindproperty 名称驼峰化,例如 SVG 的
viewBoxproperty:<svg :view-box.camel="viewBox"></svg>在使用字符串模板或通过
vue-loader/vueify编译时,无需使用.camel。
v-on
基本使用
v-on的基本使用.html
click事件
mousemove事件
<!DOCTYPE html>
<html lang="zh">
<head>
  <style>
    .area {
      width: 200px;
      height: 200px;
      background: red;
    }
  </style>
</head>
<body>

  <div id="app"></div>

  <template id="my-app">
    <!-- 完整写法: v-on:监听的事件="methods中方法" -->
    <button v-on:click="btn1Click">按钮1</button>
    <div class="area" v-on:mousemove="mouseMove">div</div>
    <!-- 语法糖 -->
    <button @click="btn1Click">按钮1</button>

  </template>

  <script src="../js/vue.js"></script>
  <script>
    const App = {
      template: '#my-app',
      methods: {
        btn1Click() {
          console.log("按钮1发生了点击");
        },
        mouseMove() {
          console.log("鼠标移动");
        }
      }
    }

    Vue.createApp(App).mount('#app');
  </script>
</body>
</html>
绑定一个对象
v-on通过绑定一个对象从而实现绑定多个事件.html
v-on绑定一个对象实现绑定多个事件

<!DOCTYPE html>
<html lang="en">
<head>
  <style>
    .area {
      width: 200px;
      height: 200px;
      background: red;
    }
  </style>
</head>
<body>

  <div id="app"></div>

  <template id="my-app">
    <!-- 绑定一个对象 -->
    <div class="area" v-on="{click: btn1Click, mousemove: mouseMove}"></div>
  </template>

  <script src="../js/vue.js"></script>
  <script>
    const App = {
      template: '#my-app',
      methods: {
        btn1Click() {
          console.log("按钮1发生了点击");
        },
        mouseMove() {
          console.log("鼠标移动");
        }
      }
    }

    Vue.createApp(App).mount('#app');
  </script>
</body>
</html>
传递参数
v-on如何向vue的methods中传递参数.html
默认传入event事件
传入其他参数的同时传入event参数


<!DOCTYPE html>
<html lang="zh">
<body>

  <div id="app"></div>

  <template id="my-app">
    <!-- 默认传入event对象, 可以在方法中获取 -->
    <button @click="btn1Click">按钮1</button>
    <!-- $event可以获取到事件发生时的事件对象 -->
    <button @click="btn2Click($event, 'zhuo', 18)">按钮2</button>
  </template>

  <script src="../js/vue.js"></script>
  <script>
    const App = {
      template: '#my-app',
      data() {
        return {
          message: "Hello World"
        }
      },
      methods: {
        btn1Click(event) {
          console.log(event);
        },
        btn2Click(event, name, age) {
          console.log(name, age, event);
        }
      }
    }

    Vue.createApp(App).mount('#app');
  </script>
</body>
</html>
修饰符

stop修饰符
阻止事件冒泡的按钮.html
关键代码

<!DOCTYPE html>
<html lang="zh">
<body>

  <div id="app"></div>

  <template id="my-app">
    <div @click="divClick">
      <button @click='btnClick'>没有阻止冒泡的按钮</button><br>
      <button @click.stop="btnClick">阻止冒泡按钮</button>
    </div>
  </template>

  <script src="../js/vue.js"></script>
  <script>
    const App = {
      template: '#my-app',
      methods: {
        divClick() {
          console.log("divClick");
        },
        btnClick() {
          console.log('btnClick');
        },
      }
    }

    Vue.createApp(App).mount('#app');
  </script>
</body>
</html>
输出效果

[按键]修饰符
输入框实现enter键上屏的效果.html
关键代码
<!DOCTYPE html>
<html lang="zh">
<body>

  <div id="app"></div>

  <template id="my-app">
    <input type="text" @keyup.enter="enterKeyup">
    <h2>{{content}}</h2>
  </template>

  <script src="../js/vue.js"></script>
  <script>
    const App = {
      template: '#my-app',
      data() {
        return {
          content:''
        }
      },
      methods: {
        enterKeyup(event) {
          this.content = event.target.value
        }
      }
    }

    Vue.createApp(App).mount('#app');
  </script>
</body>
</html>
输出效果

v-if
渲染原理
怎么理解这个惰性?当条件为false时,在dom的元素就会完全的删除掉,而不是display:none.
基本使用
v-if的基本使用.html
基本使用

<!DOCTYPE html>
<html lang="zn">
<body>

  <div id="app"></div>

  <template id="my-app">
    <h2 v-if="isShow">哈哈哈哈</h2>
    <button @click="toggle">切换</button>
  </template>

  <script src="../js/vue.js"></script>
  <script>
    const App = {
      template: '#my-app',
      data() {
        return {
          isShow: true
        }
      },
      methods: {
        toggle() {
          this.isShow = !this.isShow;
        }
      }
    }
    Vue.createApp(App).mount('#app');
  </script>
</body>
</html>
输出

多个条件
v-if多个条件的使用.html
关键代码

<!DOCTYPE html>
<html lang="en">
<body>

  <div id="app"></div>

  <template id="my-app">
    <input type="text" v-model="score">
    <h2 v-if="score > 90">优秀</h2>
    <h2 v-else-if="score > 60">良好</h2>
    <h2 v-else>不及格</h2>
  </template>

  <script src="../js/vue.js"></script>
  <script>
    const App = {
      template: '#my-app',
      data() {
        return {
          score: 95
        }
      }
    }

    Vue.createApp(App).mount('#app');
  </script>
</body>
</html>
输出

template和v-if的结合使用
为什么需要和v-if结合使用
v-if不结合使用.html
关键代码和输出效果
多了一个外层的div,现在就是不想要这个div

<!DOCTYPE html>
<html lang="en">
<body>

  <div id="app"></div>

  <template id="my-app">
    <!-- 和div结合使用 -->
    <div v-if="isShowHa">
      <h2>哈哈哈哈</h2>
      <h2>哈哈哈哈</h2>
      <h2>哈哈哈哈</h2>
    </div>
    <!-- 和template结合使用 -->
    <template v-else>
      <h2>呵呵呵呵</h2>
      <h2>呵呵呵呵</h2>
      <h2>呵呵呵呵</h2>
    </template>
    <button @click='toggle'>toggle</button>
  </template>

  <script src="../js/vue.js"></script>
  <script>
    const App = {
      template: '#my-app',
      data() {
        return {
          isShowHa: true
        }
      },
      methods: {
        toggle(){
          this.isShowHa = !this.isShowHa
        }
      },
    }

    Vue.createApp(App).mount('#app');
  </script>
</body>
</html>
v-if结合使用例子
template和v-if的结合使用.html
关键代码

<!DOCTYPE html>
<html lang="en">
<body>

  <div id="app"></div>

  <template id="my-app">
    <template v-if="isShowHa">
      <h2>哈哈哈哈</h2>
      <h2>哈哈哈哈</h2>
      <h2>哈哈哈哈</h2>
    </template>

    <template v-else>
      <h2>呵呵呵呵</h2>
      <h2>呵呵呵呵</h2>
      <h2>呵呵呵呵</h2>
    </template>
    <button @click='toggle'>toggle</button>
  </template>

  <script src="../js/vue.js"></script>
  <script>
    const App = {
      template: '#my-app',
      data() {
        return {
          isShowHa: true
        }
      },
      methods: {
        toggle(){
          this.isShowHa = !this.isShowHa
        }
      },
    }

    Vue.createApp(App).mount('#app');
  </script>
</body>
</html>
输出效果
v-show
基本使用
v-show的基本使用.html
关键代码
<!DOCTYPE html>
<html lang="en">
<body>

  <div id="app"></div>

  <template id="my-app">
    <h2 v-show="isShow">哈哈哈哈</h2>
  </template>

  <script src="../js/vue.js"></script>
  <script>
    const App = {
      template: '#my-app',
      data() {
        return {
          isShow: true
        }
      }
    }

    Vue.createApp(App).mount('#app');
  </script>
</body>
</html>
v-show和v-if的区别
2,3,4都是很好理解,第1个怎么理解?首先要理解一点就是v-show是通过display:none来控制显示不显示的,而template这个标签一旦被渲染,这个标签就是不存在了,我在对这个标签使用css修饰已经没有任何意义了.

v-show和v-if的区别.html
关键代码
重要区别
v-show通过修改css属性来实现隐藏显示,而v-if直接就是干掉整个元素.


<!DOCTYPE html>
<html lang="en">
<body>

  <div id="app"></div>

  <template id="my-app">
    <h2 v-if="isShow">哈哈哈哈</h2>
    <h2 v-show="isShow">呵呵呵呵</h2>
    <button @click='toggle'>toggle</button>
  </template>

  <script src="../js/vue.js"></script>
  <script>
    const App = {
      template: '#my-app',
      data() {
        return {
          isShow: true
        }
      },methods: {
        toggle(){
          this.isShow = !this.isShow
        }
      },
    }

    Vue.createApp(App).mount('#app');
  </script>
</body>
</html>
v-show和v-if如何选择
v-for
基本使用
v-for的使用.html
遍历数组
括号的中两个参数分别是value和index
v-for中传递参数的括号可以不加,但是建议加上去
v-for的in也可以使用of
遍历对象
遍历对象的时候,括号中的参数分别是value,key和index
遍历数字
遍历数字的时候,括号中的参数分别是num和index


<!DOCTYPE html>
<html lang="en">
<body>

  <div id="app"></div>

  <template id="my-app">
    <h2>遍历数组</h2>
    <ul>
      <!-- 遍历数组 -->
      <li v-for="(movie, index) in movies">{{index+1}}.{{movie}}</li>
    </ul>
    <h2>遍历对象</h2>
    <ul>
      <!-- 遍历对象 -->
      <li v-for="(value, key, index) in info">{{value}}-{{key}}-{{index}}</li>
    </ul>
    <h2>遍历数字</h2>
    <ul>
       <!-- 遍历数字 -->
      <li v-for="(num, index) in 10">{{num}}-{{index}}</li>
    </ul>
  </template>

  <script src="../js/vue.js"></script>
  <script>
    const App = {
      template: '#my-app',
      data() {
        return {
          movies: [
            "星际穿越",
            "盗梦空间",
            "大话西游",
            "教父",
            "少年派"
          ],
          info: {
            name: "zhuo",
            age: 18,
            height: 1.88
          }
        }
      }
    }

    Vue.createApp(App).mount('#app');
  </script>
</body>
</html>
v-for和template搭配使用
v-for和template搭配使用.html
v-for和template搭配使用
<!DOCTYPE html>
<html lang="en">
<body>

  <div id="app"></div>

  <template id="my-app">
    <ul>
      <template v-for="(value, key) in info">
        <li>{{key}}</li>
        <li>{{value}}</li>
        <li class="divider"></li>
      </template>
    </ul>
  </template>

  <script src="../js/vue.js"></script>
  <script>
    const App = {
      template: '#my-app',
      data() {
        return {
          info: {
            name: "why",
            age: 18,
            height: 1.88
          }
        }
      }
    }

    Vue.createApp(App).mount('#app');
  </script>
</body>
</html>
搭配绑定key
数组更新检测
vue已经自动帮我们侦听了数组,所以数组的改变就会触发新的视图.实际上可以这样理解,vue已经自动帮我们把这个数组进行了数据的双向绑定.
push()方法
数组的更新检测.html
<!DOCTYPE html>
<html lang="zh">
<body>

  <div id="app"></div>

  <template id="my-app">
    <h2>电影列表</h2>
    <ul>
      <li v-for="(movie, index) in movies">{{index+1}}.{{movie}}</li>
    </ul>
    <input type="text" v-model="newMovie">
    <button @click="addMovie">添加电影</button>
  </template>

  <script src="../js/vue.js"></script>
  <script>
    const App = {
      template: '#my-app',
      data() {
        return {
          newMovie: "",
          movies: [
            "星际穿越",
            "盗梦空间",
            "大话西游",
            "教父",
            "少年派"
          ]
        }
      },
      methods: {
        addMovie() {
          this.movies.push(this.newMovie);
          this.newMovie = "";
        }
      }
    }

    Vue.createApp(App).mount('#app');
  </script>
</body>
</html>
输出效果
VNode
计算属性-computed
为什么会有计算属性?
有些数据通过mustache语法显示在界面上面,但是在mustache中又进行了简单的表达式计算.这个用来写单独的项目是可以的.但是现在我们想要写出通用的组件,就必须让这个mustache中的数据更加纯粹,于是就必须对这些数据进行解耦,那么感觉我就是对原来的数据进行一下二次封装,然后就这些二次封装后的数据在渲染到界面上面.这个二次封装的数据就是计算属性.
基本使用
计算属性.html
计算属性的来源和目的地
- 来源:计算属性数据的来源肯定是来自data中的元数据,
- 目的地:mustache展示界面.
<!DOCTYPE html>
<html lang="en">
<body>

  <div id="app"></div>

  <template id="my-app">
    <h2>{{fullName}}</h2>
    <h2>{{result}}</h2>
    <h2>{{reverseMessage}}</h2>
  </template>

  <script src="../js/vue.js"></script>
  <script>
    const App = {
      template: '#my-app',
      data() {
        return {
          firstName: "Kobe",
          lastName: "Bryant",
          score: 80,
          message: "Hello World"
        }
      },
      computed: {
        fullName() {
          return this.firstName + " " + this.lastName;
        },
        result() {
          return this.score >= 60 ? "及格": "不及格";
        },
        reverseMessage() {
          return this.message.split(" ").reverse().join(" ");
        }
      }
    }

    Vue.createApp(App).mount('#app');
  </script>
</body>
</html>
使用methods实现的数据二次封装和计算属性的区别
methods和计算属性的区别.html
计算属性
methods实现类似计算属性的功能
区别

<!DOCTYPE html>
<html lang="zh">
<body>

  <div id="app"></div>

  <template id="my-app">
    <h1>计算属性</h1>
    <h2>{{fullName}}</h2>
    <h2>{{fullName}}</h2>
    <h2>{{fullName}}</h2>

    <h1>使用methods实现</h1>
    <h2>{{getFullName()}}</h2>
    <h2>{{getFullName()}}</h2>
    <h2>{{getFullName()}}</h2>
  </template>

  <script src="../js/vue.js"></script>
  <script>
    const App = {
      template: '#my-app',
      data() {
        return {
          firstName: "Kobe",
          lastName: "Bryant"
        }
      },
      computed: {
        // 计算属性是有缓存的, 当我们多次使用计算属性时, 计算属性中的运算只会执行一次.
        // 计算属性会随着依赖的数据(firstName)的改变, 而进行重新计算.
        fullName() {
          console.log("computed的fullName中的计算");
          return this.firstName + " " + this.lastName;
        }
      },
      methods: {
        getFullName() {
          console.log("methods的getFullName中的计算");
          return this.firstName + " " + this.lastName;
        }
      }
    }

    Vue.createApp(App).mount('#app');
  </script>
</body>
</html>
methods和计算属性的区别_修改元数据.html
<!DOCTYPE html>
<html lang="zh">
<body>

  <div id="app"></div>

  <template id="my-app">
    <button @click="changeFirstName">修改firstName</button>

    <h2>{{fullName}}</h2>
    <h2>{{fullName}}</h2>

    <h2>{{getFullName()}}</h2>
    <h2>{{getFullName()}}</h2>
  </template>

  <script src="../js/vue.js"></script>
  <script>
    const App = {
      template: '#my-app',
      data() {
        return {
          firstName: "Kobe",
          lastName: "Bryant"
        }
      },
      computed: {
        fullName() {
          console.log("computed的fullName中的计算");
          return this.firstName + " " + this.lastName;
        }
      },
      methods: {
        getFullName() {
          console.log("methods的getFullName中的计算");
          return this.firstName + " " + this.lastName;
        },
        changeFirstName() {
          this.firstName = "Coder"
        }
      }
    }

    Vue.createApp(App).mount('#app');
  </script>
</body>
</html>
输出效果
描述
methods修改了三次,计算属性只是修改了一次.所以计算属性的更省.
修改计算属性
修改计算属性_没有效果的例子.html
修改流程
按钮绑定click事件去修改,通过methods方法去修改计算属性中的计算属性.

<!DOCTYPE html>
<html lang="zh">
<body>

  <div id="app"></div>

  <template id="my-app">
    <button @click="changeFullName">修改fullName</button>
    <h2>{{fullName}}</h2>
  </template>

  <script src="../js/vue.js"></script>
  <script>
    const App = {
      template: '#my-app',
      data() {
        return {
          firstName: "Kobe",
          lastName: "Bryant"
        }
      },
      computed: {
        // fullName 的 getter方法
        fullName() {
          return this.firstName + " " + this.lastName;
        },

      },
      methods: {
        changeFullName() {
          this.fullName = "Coder Why";
        }
      }
    }

    Vue.createApp(App).mount('#app');
  </script>
</body>
</html>
输出效果
描述
没有丝毫效果

修改计算属性_成功例子.html
计算属性的全写形式
语法糖和全写形式


<!DOCTYPE html>
<html lang="zh">
<body>

  <div id="app"></div>

  <template id="my-app">
    <button @click="changeFullName">修改fullName</button>
    <h2>{{fullName}}</h2>
  </template>

  <script src="../js/vue.js"></script>
  <script>
    const App = {
      template: '#my-app',
      data() {
        return {
          firstName: "Kobe",
          lastName: "Bryant"
        }
      },
      computed: {
        // fullName的getter和setter方法
        fullName: {
          get: function() {
            console.log('计算属性被__获取了');
            return this.firstName + " " + this.lastName;
          },
          set: function(newValue) {
            console.log('计算属性被__修改了');
            let names = newValue.split(" ");
            this.firstName = names[0];
            this.lastName = names[1];
          }
        }
      },
      methods: {
        changeFullName() {
          this.fullName = "Coder Why";
        }
      }
    }

    Vue.createApp(App).mount('#app');
  </script>
</body>
</html>
输出效果
描述
getter方法用上展示,没有getter方法,无法在mustache中渲染显示出来.
setter方法用于修改,没有setter方法,无法修改计算属性
Watch
基本使用
监听输入的内容.html
监听器的内容

<!DOCTYPE html>
<html lang="zh">
<body>

  <div id="app"></div>

  <template id="my-app">
    <h2>监听输入的内容</h2>
    <input type="text" v-model="question">
  </template>

  <script src="../js/vue.js"></script>
  <script>
    const App = {
      template: '#my-app',
      data() {
        return {
          // 侦听question的变化时, 去进行一些逻辑的处理(JavaScript, 网络请求)
          question: "Hello World",
        }
      },
      watch: {
        // question侦听的data中的属性的名称
        // newValue变化后的新值
        // oldValue变化前的旧值
        question: function(newValue, oldValue) {
          console.log("新值: ", newValue, "旧值", oldValue);
          this.displayInput();
        }
      },
      methods: {
        displayInput() {
          console.log(`你输入的内容是:${this.question}`);
        }
      }
    }

    Vue.createApp(App).mount('#app');
  </script>
</body>
</html>
输出效果

深度监听
反例_语法糖形式
无法深度监听的一个例子.html
info对象
监听的部分代码


<!DOCTYPE html>
<html lang="zh">
<body>
<div id="app"></div>
<template id="my-app">
<h2>{{info.name}}</h2>
<button @click="changeInfo">改变info</button>
<button @click="changeInfoName">改变info.name</button>
<button @click="changeInfoNbaName">改变info.nba.name</button>
</template>
<script src="../js/vue.js"></script>
<script>
const App = {
template: '#my-app',
data() {
return {
info: { name: "why", age: 18, nba: {name: 'kobe'} }
}
},
watch: {
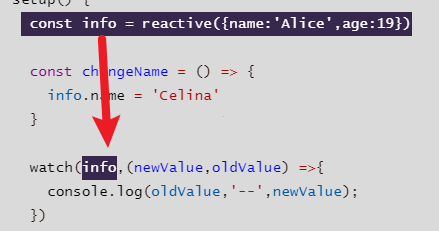
// 默认情况下我们的侦听器只会针对监听的数据本身的改变(内部发生的改变是不能侦听)
info(newInfo, oldInfo) {
console.log("newValue=", newInfo);
console.log("oldValue=", oldInfo);
}
},
methods: {
changeInfo() {
this.info = {name: "kobe"};
},
changeInfoName() {
this.info.name = "kobe";
},
changeInfoNbaName() {
this.info.nba.name = "james";
}
}
}
Vue.createApp(App).mount('#app');
</script>
</body>
</html>
输出效果
描述
改变整个info对象是能够监听到的,
改变info.name无法监听到,
改变info.nba.name无法监听到.

反例_全写形式
无法深度监听的例子2.html
监听部分的代码

<!DOCTYPE html>
<html lang="zh">
<body>

  <div id="app"></div>

  <template id="my-app">
    <h2>{{info.name}}</h2>
    <button @click="changeInfo">改变info</button>
    <button @click="changeInfoName">改变info.name</button>
    <button @click="changeInfoNbaName">改变info.nba.name</button>
  </template>

  <script src="../js/vue.js"></script>
  <script>
    const App = {
      template: '#my-app',
      data() {
        return {
          info: { name: "why", age: 18, nba: {age: 18} }
        }
      },
      watch: {
        info: {
          handler: function(newInfo, oldInfo) {
            console.log(newInfo);
            console.log(oldInfo);
          },
        }
      },
      methods: {
        changeInfo() {
          this.info = {name: "kobe"};
        },
        changeInfoName() {
          this.info.name = "kobe";
        },
        changeInfoNbaName() {
          this.info.nba.age = 20;
        }
      }
    }

    Vue.createApp(App).mount('#app');
  </script>
</body>
</html>
正例
能够深度监听的例子.html
关键代码:开启深度监听

<!DOCTYPE html>
<html lang="zh">
<body>

  <div id="app"></div>

  <template id="my-app">
    <h2>{{info.name}}</h2>
    <button @click="changeInfo">改变info</button>
    <button @click="changeInfoName">改变info.name</button>
    <button @click="changeInfoNbaName">改变info.nba.name</button>
  </template>

  <script src="../js/vue.js"></script>
  <script>
    const App = {
      template: '#my-app',
      data() {
        return {
          info: { name: "why", age: 18, nba: {age: 18} }
        }
      },
      watch: {
        info: {
          handler: function(newInfo, oldInfo) {
            console.log('newInfo VVV');
            console.log(newInfo);
            console.log('oldInfor VVV');
            console.log(oldInfo);
          },
          deep:true
        }
      },
      methods: {
        changeInfo() {
          this.info = {name: "kobe"};
        },
        changeInfoName() {
          this.info.name = "kobe";
        },
        changeInfoNbaName() {
          this.info.nba.age = 20;
        }
      }
    }

    Vue.createApp(App).mount('#app');
  </script>
</body>
</html>
输出效果
改变info.nba.Age的效果
现在的情况是可以监听到这个info里面对象的变化,但是监听不到里面具体内容的变化,只能检测到改变之后的内容.
改变info.name
虽然info.name被改变了,mustache中的内容也改变了,但是这个watch只能检测到info.name的变化,无法检测到内容的变化,无法知道以前的info.name的值
改吗info
改变info可以检测到变化,也可以检测其新旧的内容,只有当整个对象发生变化的时候,才能够检测到其内容.


立即执行
有时候我们希望这个watch在启动的时候就是自动监听一次.
立即监听的例子.html
核心代码

<!DOCTYPE html>
<html lang="zh">
<body>
  <div id="app"></div>
  <template id="my-app">
    <h2>{{info.name}}</h2>
    <button @click="changeInfo">改变info</button>
  </template>
  <script src="../js/vue.js"></script>
  <script>
    const App = {
      template: '#my-app',
      data() {
        return {
          info: { name: "why", age: 18, nba: {name: 'kobe'} }
        }
      },
      watch: {
        // 深度侦听/立即执行(一定会执行一次)
        info: {
          handler: function(newInfo, oldInfo) {
            console.log('newInfo VVV');
            console.log(newInfo);
            console.log('oldInfo VVV');
            console.log(oldInfo);
          },
          deep: true, // 深度侦听
          immediate: true // 立即执行
        }
      },
      methods: {
        changeInfo() {
          this.info = {name: "kobe"};
        }
      }
    }
    Vue.createApp(App).mount('#app');
  </script>
</body>
</html>
输出效果
描述
刷新一下立马执行一次,也就是相当于有个初始化执行.

针对对象中某个属性的监听
针对info.name的监听.html
针对info.name的监听
<!DOCTYPE html>
<html lang="zh">
<body>

  <div id="app"></div>

  <template id="my-app">
    <h2>{{info}}</h2>
    <button @click="changeInfo">改变info</button>
    <button @click="changeInfoName">改变info.name</button>
    <button @click="changeInfoNbaAge">改变info.age</button>
  </template>

  <script src="../js/vue.js"></script>
  <script>
    const App = {
      template: '#my-app',
      data() {
        return {
          info: { name: "why", age: 18 }
        }
      },
      watch: {
        "info.name": function(newName, oldName) {
          console.log('newName='+newName,' oldName='+oldName);
        },
      },
      methods: {
        changeInfo() {
          this.info = {name: "kobe"};
        },
        changeInfoName() {
          this.info.name = "kobe";
        },
        changeInfoNbaAge() {
          this.info.age = 100
        },
      }
    }

    Vue.createApp(App).mount('#app');
  </script>
</body>
</html>
输出效果
描述
- 改变info: 有效果,因为整个对象都发生了变化,所以里面的name属性当然也发生了变化,所以能够检测到
- 改变info.name:很显然有效果
- 改变info.age: 发现虽然年龄由18–>100发生了变化,但是没有检测到

create()创建监听器
在create声明周期函数里面创建监听器.html
关键代码
this.$watch()的三个参数


<!DOCTYPE html>
<html lang="zh">
<body>

  <div id="app"></div>

  <template id="my-app">
    <h2>{{info.name}}</h2>
    <button @click="changeInfo">改变info</button>
    <button @click="changeInfoName">改变info.name</button>
  </template>

  <script src="../js/vue.js"></script>
  <script>
    const App = {
      template: '#my-app',
      data() {
        return {
          info: { name: "why", age: 18 },
        }
      },
      methods: {
        changeInfo() {
          this.info = {name: "kobe" , age:100};
        },
        changeInfoName() {
          this.info.name = "james";
        },
      },
      created() {
        this.$watch("info", function(newInfo, oldInfo) {
          console.log('newInfo VVV');
          console.log(newInfo);
          console.log('oldInfo VVV');
          console.log(oldInfo);
        }, {
          deep: true,
          immediate: true
        })
      }
    }

    Vue.createApp(App).mount('#app');
  </script>
</body>
</html>
综合案例_书籍购物车

按钮禁用
按钮禁用
<button v-bind:disabled='book.count<=1'>-</button>

问题_多个tbody标签
问题
多个tbody标签

没有tr标签

v-for直接写在tbody里面了

解决
增加tr标签,v-for写在tr标签里面

问题_有时能完全删除,有时不能
问题
问题_有时能够完全删除,有时不能删除
问题_代码部分问题
__因为我传递的是数组中的book的id,而当我删除这个id的时候,这个id是固定不变的,比如说当我删除最后一个的时候,id=4,然后现在数组中只有一个元素,我传递过来的id等于4,即使id-1=3,也没有下标从三开始的元素,所以无法删除.

答案
解决_传递变化的index来解决问题

输出效果

最终
index.html
增加数量
减少数量
移出书籍
总价格


<!DOCTYPE html>
<html lang="zh">
<head>
    <meta charset="UTF-8">
    <meta http-equiv="X-UA-Compatible" content="IE=edge">
    <meta name="viewport" content="width=device-width, initial-scale=1.0">
    <link rel="stylesheet" href="style.css">
    <title>书籍购物车</title>
</head>
<body>
    <div id="app"></div>
    <template id="my-app">
        <table>
            <thead>
                <th></th>
                <th>书籍名称</th>
                <th>出版日期</th>
                <th>价格</th>
                <th>购买数量</th>
                <th>操作</th>
            </thead>
            <tbody>
                <tr v-for="(book, index) in books" :key="book.id">
                    <td>{{index+1}}</td>
                <td>{{book.name}}</td>
                <td>{{book.date}}</td>
                <td>{{formatPrice(book.price)}}</td>
                <td>
                    <button
                        @click='decrease($event,book.id)'
                        v-bind:disabled='book.count<=1'>-</button>
                    {{book.count}}
                    <button @click='increase($event,book.id)'>+</button>
                </td>
                <td>
                    <button @click='remove($event,index)'>移除</button>
                </td>
                </tr>
            </tbody>
        </table>
        <h2>总价为:{{formatPrice(totalPrice)}}</h2>
    </template>
    <script src="../js/vue.js"></script>
    <script src="./index.js"></script>

</body>
</html>
index.js
Vue.createApp({
    template:'#my-app',
    data() {
        return {
            books: [
                {
                  id: 1,
                  name: '《算法导论》',
                  date: '2006-9',
                  price: 85.00,
                  count: 1
                },
                {
                  id: 2,
                  name: '《UNIX编程艺术》',
                  date: '2006-2',
                  price: 59.00,
                  count: 1
                },
                {
                  id: 3,
                  name: '《编程珠玑》',
                  date: '2008-10',
                  price: 39.00,
                  count: 1
                },
                {
                  id: 4,
                  name: '《代码大全》',
                  date: '2006-3',
                  price: 128.00,
                  count: 1
                }
            ]
        }
    },
    computed:{
      //总价格使用计算属性
      totalPrice(){
        let totalPrice = 0
        for(let book of this.books){
          totalPrice += book.count*book.price
        }
        return totalPrice
      }
    },
    methods: {
        //增加数量
        increase(event,id){
            this.books[id-1].count++
        },
        //减少数量
        decrease(event,id){
            this.books[id-1].count--
        },
        //移出书籍
        remove(event,id){
            console.log(id);
            this.books.splice(id,1)
        },
        //用来给代码加上rmb符号
        formatPrice(price) {
          return "¥" + price;
        }
    },
}).mount('#app')
index.css
table {
    border: 1px solid #e9e9e9;
    border-collapse: collapse;
    border-spacing: 0;
  }

  th, td {
    padding: 8px 16px;
    border: 1px solid #e9e9e9;
    text-align: left;
  }

  th {
    background-color: #f7f7f7;
    color: #5c6b77;
    font-weight: 600;
  }

  .counter {
    margin: 0 5px;
  }
输出效果
v-model
原始方法实现v-model
原始方法实现v-model.html
h2中的数据和input显示的数据绑定
监听input输入事件


<!DOCTYPE html>
<html lang="zh">
<body>

  <div id="app"></div>

  <template id="my-app">
    <!-- 1.v-bind value的绑定 2.监听input事件, 更新message的值 -->
    <input type="text" :value="message" @input="inputChange">
    <h2>{{message}}</h2>
  </template>

  <script src="../js/vue.js"></script>
  <script>
    const App = {
      template: '#my-app',
      data() {
        return {
          message: "Hello World"
        }
      },
      methods: {
        inputChange(event) {
          this.message = event.target.value;
        }
      }
    }

    Vue.createApp(App).mount('#app');
  </script>
</body>
</html>
输出效果

v-model语法糖实现
v-model本质上是上面方法的语法糖.
v-model语法糖实现数据双向绑定.html
message数据的双向绑定
<!DOCTYPE html>
<html lang="zh">
<body>

  <div id="app"></div>

  <template id="my-app">
    <input type="text" v-model="message">
    <h2>{{message}}</h2>
  </template>

  <script src="../js/vue.js"></script>
  <script>
    const App = {
      template: '#my-app',
      data() {
        return {
          message: "Hello World"
        }
      }
    }

    Vue.createApp(App).mount('#app');
  </script>
</body>
</html>
绑定基本组件
绑定textarea
v-model绑定textarea.html
关键代码
<!DOCTYPE html>
<html lang="zh">
<body>

  <div id="app"></div>

  <template id="my-app">
    <!-- 1.绑定textarea -->
    <label for="intro">
      自我介绍<br>
      <textarea name="intro" id="intro" cols="30" rows="10" v-model="intro"></textarea>
    </label>
    <h2>intro: {{intro}}</h2>
  </template>

  <script src="../js/vue.js"></script>
  <script>
    const App = {
      template: '#my-app',
      data() {
        return {
          intro: "Hello World",
        }
      },
    }

    Vue.createApp(App).mount('#app');
  </script>
</body>
</html>
输出效果

绑定单选框
绑定单选框.html
关键代码

<!DOCTYPE html>
<html lang="zh">
<body>

  <div id="app"></div>

  <template id="my-app">

    <!-- 2.checkbox -->
    <!-- 2.1.单选框 -->
    <label for="agree">
      <input id="agree" type="checkbox" v-model="isAgree"> 同意协议
    </label>
    <h2>isAgree: {{isAgree}}</h2>
  </template>

  <script src="../js/vue.js"></script>
  <script>
    const App = {
      template: '#my-app',
      data() {
        return {
          isAgree: false,
        }
      }
    }

    Vue.createApp(App).mount('#app');
  </script>
</body>
</html>
输出效果

绑定多选框
绑定多选框.html
多选框
<!DOCTYPE html>
<html lang="zh">
<body>

  <div id="app"></div>
  <template id="my-app">
    <!-- 多选框 -->
    <span>你的爱好: </span>
    <label for="basketball">
      <input id="basketball" type="checkbox" v-model="hobbies" value="basketball"> 篮球
    </label>
    <label for="football">
      <input id="football" type="checkbox" v-model="hobbies" value="football"> 足球
    </label>
    <label for="tennis">
      <input id="tennis" type="checkbox" v-model="hobbies" value="tennis"> 网球
    </label>
    <h2>hobbies: {{hobbies}}</h2>
  </template>

  <script src="../js/vue.js"></script>
  <script>
    const App = {
      template: '#my-app',
      data() {
        return {
          hobbies: ["basketball"],
        }
      }
    }

    Vue.createApp(App).mount('#app');
  </script>
</body>
</html>
输出效果
绑定单选按钮
绑定单选按钮.html
绑定单选按钮

<!DOCTYPE html>
<html lang="zh">
<body>

  <div id="app"></div>

  <template id="my-app">
    <!-- radio -->
    <span>你的爱好: </span>
    <label for="male">
      <input id="male" type="radio" v-model="gender" value="male">男
    </label>
    <label for="female">
      <input id="female" type="radio" v-model="gender" value="female">女
    </label>
    <h2>gender: {{gender}}</h2>
  </template>

  <script src="../js/vue.js"></script>
  <script>
    const App = {
      template: '#my-app',
      data() {
        return {
          gender: "",
        }
      },
    }

    Vue.createApp(App).mount('#app');
  </script>
</body>
</html>
输出效果
绑定下拉框
绑定下拉框.html
下拉框

<!DOCTYPE html>
<html lang="zh">
<body>

  <div id="app"></div>

  <template id="my-app">
    <!-- select -->
    <span>喜欢的水果: </span>
    <select v-model="fruit" multiple size="2">
      <option value="apple">苹果</option>
      <option value="orange">橘子</option>
      <option value="banana">香蕉</option>
    </select>
    <h2>fruit: {{fruit}}</h2>
  </template>

  <script src="../js/vue.js"></script>
  <script>
    const App = {
      template: '#my-app',
      data() {
        return {
          fruit: "orange"
        }
      }
    }

    Vue.createApp(App).mount('#app');
  </script>
</body>
</html>
输出效果

修饰符
lazy修饰符
lazy修饰符修饰的输入框.html
lazy模式
普通模式和lazy模式的对比

<!DOCTYPE html>
<html lang="zh">
<body>
  <div id="app"></div>
  <template id="my-app">
    普通模式<input type="text" v-model="message1">
    <h2>{{message1}}</h2>
    <hr>
    lazy模式<input type="text" v-model.lazy="message2">
    <h2>{{message2}}</h2>
  </template>

  <script src="../js/vue.js"></script>
  <script>
    const App = {
      template: '#my-app',
      data() {
        return {
          message1: "Hello World",
          message2: "Hello World"
        }
      },
    }
    Vue.createApp(App).mount('#app');
  </script>

</body>
</html>
输出效果
普通模式
实时输出.
lazy模式
先输入,只有按下enter键后,输入的内容才会显示其上.

number修饰符
number修饰符.html
对比

<!DOCTYPE html>
<html lang="zh">
<body>

  <div id="app"></div>

  <template id="my-app">
     <h2>普通的没有number修饰符</h2>
     <input type="text" v-model="message1">
     <h2>{{message1}}</h2>
     <button @click="showType1">查看类型</button>
<hr>
    <h2>有number修饰符</h2>
    <input type="text" v-model.number="message2">
    <h2>{{message2}}</h2>
    <button @click="showType2">查看类型</button>
  </template>

  <script src="../js/vue.js"></script>
  <script>
    const App = {
      template: '#my-app',
      data() {
        return {
          message1: "",
          message2: ""
        }
      },
      methods: {
        showType1() {
          console.log(this.message1, typeof this.message1);
        },
        showType2() {
          console.log(this.message2, typeof this.message2);
        },
      }
    }
    Vue.createApp(App).mount('#app');
  </script>
</body>
</html>
输出效果
trim修饰符
trim修饰符能够去掉输入字符串前面和后面的空格.
trim修饰符.html
有trim和没有trim的对比
<!DOCTYPE html>
<html lang="zh">
<body>

  <div id="app"></div>

  <template id="my-app">
    <h2>普通模式,没有trim修饰符</h2>
    <input type="text" v-model="message1">
    <button @click="showResult1">查看结果</button>
    <hr>
    <h2>trim模式,有trim修饰符</h2>
    <input type="text" v-model.trim="message2">
    <button @click="showResult2">查看结果</button>
  </template>

  <script src="../js/vue.js"></script>
  <script>
    const App = {
      template: '#my-app',
      data() {
        return {
          message1: "",
          message2: ""
        }
      },
      methods: {
        showResult1() {
          console.log(this.message1);
        },
        showResult2() {
          console.log(this.message2);
        }
      }
    }

    Vue.createApp(App).mount('#app');
  </script>
</body>
</html>
输出
组件化开发
全局组件
注册一个全局组件.html
组件的注册逻辑
从template中拿到id=component-a的组件内容,然后注册名为component-a的组件
自定义组件的使用

<!DOCTYPE html>
<html lang="zh">
  <body>
    <div id="app"></div>

    <template id="my-app">
      <component-a></component-a>
    </template>

    <template id="component-a">
      <h2>{{title}}</h2>
      <button @click="btnClick">按钮点击</button>
    </template>


    <script src="../js/vue.js"></script>
    <script>
      const app = Vue.createApp({
        template: "#my-app",
      });

      // 使用app注册一个全局组件app.component()
      // 全局组件: 意味着注册的这个组件可以在任何的组件模板中使用
      app.component("component-a", {
        template: "#component-a",
        data() {
          return {
            title: "我是标题",
          }
        },
        methods: {
          btnClick() {
            alert('clicked!')
          },
        },
      });

      app.mount("#app");
    </script>
  </body>
</html>
多个组件
多个全局组件注册.html
两个组件的注册逻辑
<!DOCTYPE html>
<html lang="zh">
  <body>
    <div id="app"></div>

    <template id="my-app">
      <component-a></component-a>
      <hr>
      <component-b></component-b>
    </template>

    <template id="component-a">
      <h1>组件一号</h1>
      <h2>{{title}}</h2>
      <p>{{desc}}</p>
      <button @click="btnClick">按钮点击</button>
    </template>

    <template id="component-b">
      <h1>组件二号</h1>
      <input type="text" v-model="message"/>
      <h2>{{message}}</h2>
    </template>


    <script src="../js/vue.js"></script>
    <script>
      const App = {
        template: "#my-app",
      };

      const app = Vue.createApp(App);

      // 使用app注册一个全局组件app.component()
      app.component("component-a", {
        template: "#component-a",
        data() {
          return {
            title: "我是标题",
            desc: "我是内容, 哈哈哈哈哈",
          };
        },
        methods: {
          btnClick() {
            console.log("按钮的点击");
          },
        },
      });

      app.component("component-b", {
        template: "#component-b",
        data() {
          return {
            message: "Hello World",
          };
        },
      });

      app.mount("#app");
    </script>
  </body>
</html>
输出
组件的命名
组件命名方法.html
注册组件大驼峰,引用组件下划线
<!DOCTYPE html>
<html lang="zh">
  <body>
    <div id="app"></div>

    <template id="my-app">
      <component-name></component-name>
    </template>

    <template id="component-c">
      <h2>ComponentC</h2>
    </template>

    <script src="../js/vue.js"></script>
    <script>
      const App = {
        template: "#my-app",
      };
      const app = Vue.createApp(App);

      // 使用app注册一个全局组件app.component()
      app.component('ComponentName', {
        template: "#component-c"
      })

      app.mount("#app");
    </script>
  </body>
</html>
局部组件
局部组件.html
局部组件的注册逻辑
全局组件和局部组件对比
<!DOCTYPE html>
<html lang="zh">
<body>

  <div id="app"></div>

  <template id="my-app">
    <component-a></component-a>
  </template>

  <template id="component-a">
    <h2>我是组件A</h2>
  </template>

  <script src="../js/vue.js"></script>
  <script>
    //组件A的对象内容引入
    const ComponentA = {
      template: "#component-a"
    }

    const App = {
      template: '#my-app',
      components: {
        // key: 组件名称   value: 组件对象
        ComponentA: ComponentA
      },
      data() {
        return {
          message: "Hello World"
        }
      }
    }

    const app = Vue.createApp(App);
    app.mount('#app');
  </script>
</body>
</html>
基于Vue CLI组件化开发
关于Vue CLI的使用,在webpack的学习笔记中有详细的创建过程.
使用Vue CLI创建项目
命令行
vue create 03_learn_component_2
输出
自此一个使用vue脚手架的创建的就是已经创建好了


创建一个总的组件
为了便于学习,不需要每次都是创建一个新的项目,我们现在把这个src文件夹的文件除了main.js,其他的文件都是删除,然后新建一个文件夹,用来存放第一个组件.
安装下面这款插件:

在App.vue中输入vbase之后,会自动生成如下代码:

App.vue
<template>
<div id="app">
    <div class="myheader">
        <h2>Header</h2>
        <h2>Navebar</h2>
    </div>

    <div class="main">
        <h2>Banner</h2>
        <ul>
            <li>product info 1</li>
            <li>product info 2</li>
            <li>product info 3</li>
            <li>product info 4</li>
            <li>product info 5</li>
        </ul>
    </div>

    <div class="footer">
        <h2>Footer</h2>
    </div>
</div>
</template>

<script>
    export default {

    }
</script>

<style scoped>

</style>
main.js
import { createApp } from 'vue'
import App from './01_组件的拆分和嵌套/App.vue'

createApp(App).mount('#app')
输出
组件拆分
在分别创建另外三个组件MyHeader.vue MyMain.vue MyFooter.vue ,然后将App.vue中组件分别拆分到三个组件当中.
拆分过后需要在App.vue中引入其他组件:
App.vue中引入其他组件
三个步骤
导入,注册和使用
<template>
<div id="app">
    <my-header></my-header>
    <my-main></my-main>
    <my-footer></my-footer>
</div>
</template>

<script>
    import MyHeader from './MyHeader.vue'
    import MyMain from './MyMain.vue'
    import MyFooter from './MyFooter.vue'


    export default {
        components:{
            MyHeader,
            MyMain,
            MyFooter
        }

    }
</script>

<style scoped>

</style>
输出
进一步组件拆分
将MyMain.vue进一步拆分成两个组件
MyMain.vue
组件注册错误
<template>
  <div class="main">
    <my-main-banner></my-main-banner>
    <my-main-product-list></my-main-product-list>
  </div>
</template>

<script>
import MyMainBanner from "./MyMainBanner.vue";
import MyMainProductList from "./MyMainProductList.vue";

export default {
  components: {
    MyMainBanner,
    MyMainProductList,
  },
};
</script>

<style lang="scss" scoped>
</style>
输出OK了
组件的CSS作用域
App.vue
<template>
  <div>
    <h2>this is App.vue</h2>
    <hello-vue></hello-vue>
  </div>
</template>

<script>
import HelloVue from "./HelloVue.vue";
export default {
  components: {
    HelloVue,
  },
};
</script>

<style scoped>
 h2{
     color: green;
 }
</style>
HelloVue.vue
<template>
    <h2>this HelloVue.vue</h2>
</template>

<script>
    export default {

    }
</script>

<style  scoped>
    /* h2{
        color:red
    } */
</style>
输出
去掉HelloVue.vue的注释
<template>
    <h2>this HelloVue.vue</h2>
</template>

<script>
    export default {

    }
</script>

<style  scoped>
    h2{
        color:red
    }
</style>
输出
紫色被注释掉了
去掉去掉App.vue的style标签的scoped
<template>
  <div>
    <h2>this is App.vue</h2>
    <hello-vue></hello-vue>
  </div>
</template>

<script>
import HelloVue from "./HelloVue.vue";
export default {
  components: {
    HelloVue,
  },
};
</script>

<style >
 h2{
     color: green;
 }
</style>
输出
达到了期望的效果
总结
上面的实验说命令,这个当这个子组件没有自己的样式时候,父组件的样式会作用于子组件.我们希望这个父组件的样式就是仅仅作用域父组件,而作用域子组件,一般就是:尽量不适用html标签来作用样式,使用类名,实际开发就是使用的类
组件通信
组件通信中使用最为广泛的就是父子组件间的通信:
父传子
简而言之
子组件注册属性,然后父组件使用属性,也就是给这些属性赋值.
属性形式_字符串数组
逻辑图
子组件注册属性:ShowMsg.vue
<template>
    <div>
        <h2>{{name}} : {{age}}</h2>
    </div>
</template>

<script>
    export default {
        props:['name','age']
    }
</script>

<style lang="scss" scoped>

</style>
父组件给属性赋值:App.vue
<template>
    <div>
        <show-msg name="zhuo" age=10></show-msg>
    </div>
</template>

<script>
    import ShowMsg from './ShowMsg.vue'
    export default {
        components:{
            ShowMsg
        }
    }
</script>

<style scoped>

</style>
输出

除了直接赋值的方式也可以使用v-bind动态绑定属性:

属性形式_对象
ShowMsg.vue
<template>
    <div>
        <h2>{{name}} : {{age}}</h2>
    </div>
</template>

<script>
    export default {
        props:{
            name:String,
            age:Number
        }
    }
</script>

<style lang="scss" scoped>

</style>
App.vue
<template>
    <div>
        <show-msg name="zhuo" age=10></show-msg>
        <show-msg :name="name" :age=age></show-msg>
    </div>
</template>
<script>
    import ShowMsg from './ShowMsg.vue'
    export default {
        components:{
            ShowMsg
        },
        data() {
            return {
                name:'bing',
                age:12
            }
        },
    }
</script>

<style scoped>

</style>
输出

required属性
default属性
发现没传给这个age属性赋值,于是就使用默认值.
其他写法

为什么对象的默认值必须通过一个工厂函数获取?
非Prop的Attribute
单根结点
传递一个没有定义的属性怎么样
如何把属性绑定到目标的标签上面

如何去掉这个子组件根元素的属性
多根结点
子传父
注册事件_数组形式
计数器案例_无参数传递
代码逻辑
父组件App.vue
<template>
    <div>
        <h2>current number:{{counter}}</h2>
        <counter-operation @add="addOne" @sub="subOne"></counter-operation>
    </div>
</template>

<script>
    import CounterOperation from './CounterOperation.vue'
    export default {
        components:{
            CounterOperation
        },
        data() {
            return {
                counter:0
            }
        },
        methods: {
            addOne(){
                this.counter++
            },
            subOne(){
                this.counter--
            }
        },
    }
</script>

<style scoped>

</style>
子组件:CounterOperation.vue
<template>
    <div>
        <button @click="addOne">+1</button>
        <button @click="subOne">-1</button>
    </div>
</template>

<script>
    export default {
        emits:['add','sub'],
        methods: {
            addOne(){
                console.log("+1");
                this.$emit('add')
            },
            subOne(){
                console.log("-1");
                this.$emit('sub')
            }
        }
    }
</script>

<style lang="scss" scoped>

</style>
输出
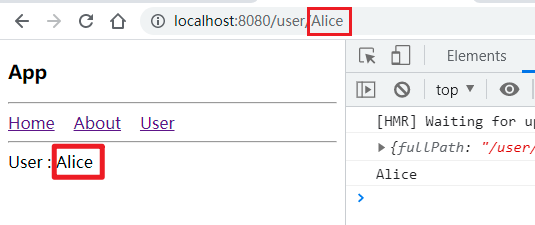
计数器案例_传递参数
代码逻辑
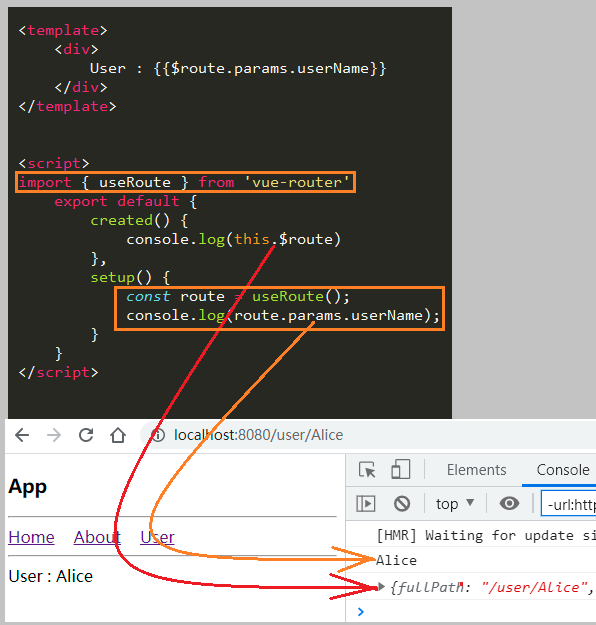
父组件App.vue
<template>
    <div>
        <h2>current number:{{counter}}</h2>
        <counter-operation
                            @add="addOne"
                            @sub="subOne"
                            @addN="addN">
        </counter-operation>

    </div>
</template>

<script>
    import CounterOperation from './CounterOperation.vue'
    export default {
        components:{
            CounterOperation
        },
        data() {
            return {
                counter:0
            }
        },
        methods: {
            addOne(){
                this.counter++
            },
            subOne(){
                this.counter--
            },
            addN(num){
                console.log(num);
                this.counter += num
            }
        },
    }
</script>

<style scoped>

</style>
子组件CounterOperation.vue
<template>
    <div>
        <h2>current number:{{counter}}</h2>
        <counter-operation
                            @add="addOne"
                            @sub="subOne"
                            @addN="addN">
        </counter-operation>

    </div>
</template>

<script>
    import CounterOperation from './CounterOperation.vue'
    export default {
        components:{
            CounterOperation
        },
        data() {
            return {
                counter:0
            }
        },
        methods: {
            addOne(){
                this.counter++
            },
            subOne(){
                this.counter--
            },
            addN(num){
                console.log(num);
                this.counter += num
            }
        },
    }
</script>

<style scoped>

</style>
输出效果
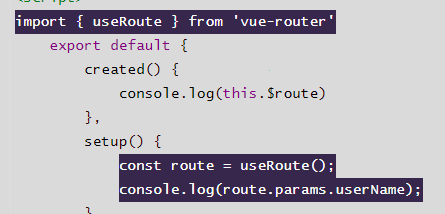
注册事件_对象形式
上面的例子中都是使用数组形式> ,对象的形式常用来进行参数检查.
子组件CounterOperation.vue
对象形式注册事件
主要是为了检查参数
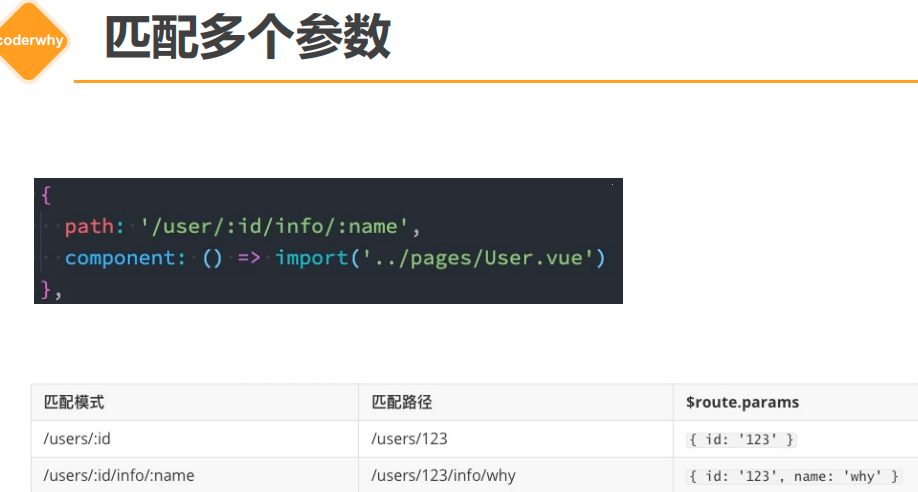
<template>
    <div>
        <button @click="addOne">+1</button>
        <button @click="subOne">-1</button>

        <input type="number" v-model.number="num">
        <button @click="emitAddN">+N</button>
    </div>
</template>

<script>
    export default {
        // emits:['add','sub','addN'],
        emits:{
            add:null,
            sum:null,
            addN:num =>{
                console.log(num);
                if(num > 10){
                    return true
                }else{
                    return false
                }
            }
        },
        data() {
            return {
                num:0
            }
        },
        methods: {
            addOne(){
                console.log("+1");
                this.$emit('add')
            },
            subOne(){
                console.log("-1");
                this.$emit('sub')
            },
            emitAddN(){
                console.log("+n");
                this.$emit('addN',this.num)
            }
        }
    }
</script>

<style lang="scss" scoped>

</style>
输出效果
当我们传递过去的参数小于10的时候就会出现警告,只有大于10的时候,才能够正常运行

组件通信案例
输出效果

代码逻辑
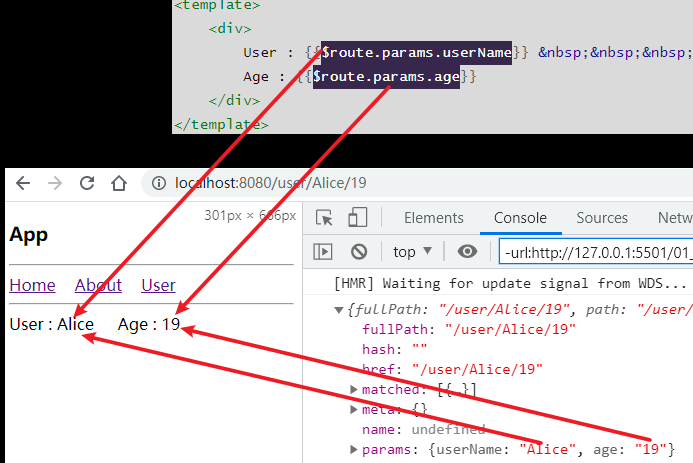
父组件:App.vue
<template>
    <div>
        <tab-control :titles="titles"></tab-control>
    </div>
</template>

<script>
 import TabControl from './TabControl.vue'
    export default {

        components:{
            TabControl
        },
        data() {
            return {
                titles:['衣服','鞋子','帽子']
            }
        }
    }
</script>

<style  scoped>

</style>
子组件:TabControl.vue
<template>
    <div class="tab-control">
        <div class="tab-control-item"
             :class="{active:currentIndex === index}"
             v-for='(title,index) in titles'
             :key="title"
             @click="itemClick(index)">
            <span>{{title}}</span>
        </div>
    </div>
</template>

<script>

    export default {
        data(){
            return{
                currentIndex:0
            }
        },
        props:{
            titles:{
                type:Array,
                default(){
                    return ['title1','title2','title3']
                }
            }
        },
        methods: {
            itemClick(index){
                this.currentIndex = index
            }
        },

    }
</script>

<style scoped>
  .tab-control {
    display: flex;
  }
  .tab-control-item {
      flex: 1;
      text-align: center;
  }
  .tab-control-item.active {
      color: red;
  }
  .tab-control-item.active span {
      border-bottom:5px red solid;
      padding: 5px 10px;
  }

</style>
非父子组件之间的通信
Provide/Inject
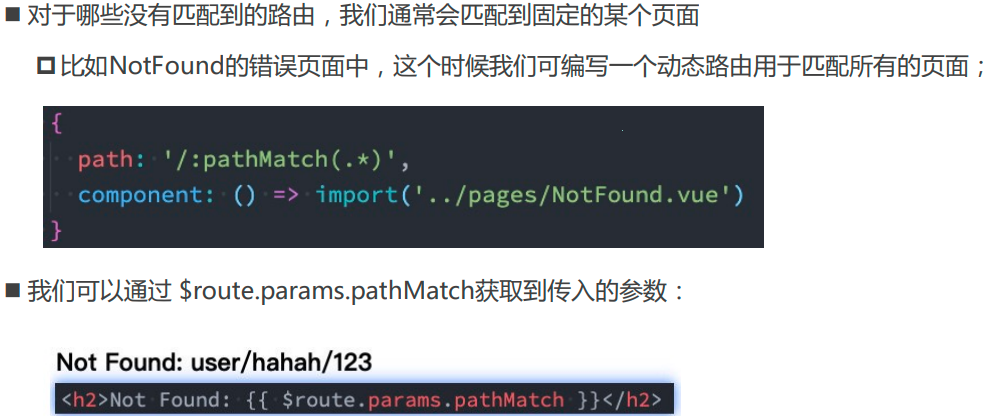

背景
代码逻辑:爷爷和孙子
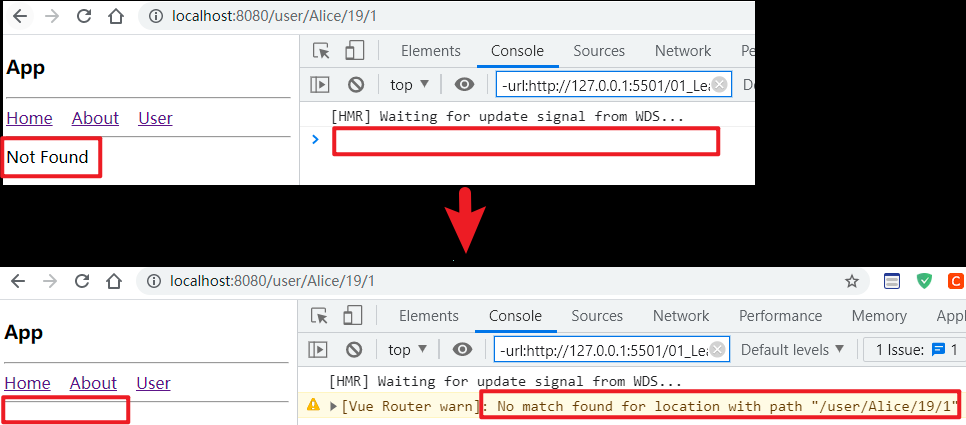
通信
父组件:App.vue
<template>
    <div>
        <home></home>
    </div>
</template>

<script>
    import Home from './Home.vue'
    export default {
        components:{
            Home
        },
        provide:{
            name:'bing',
            age:100
        }
    }
</script>

<style lang="scss" scoped>

</style>
儿子组件:Home.vue
<template>
    <div>
        <home-content></home-content>
    </div>
</template>

<script>
    import HomeContent from "./HomeContent.vue"
    export default {
        components:{
            HomeContent
        }
    }
</script>

<style lang="scss" scoped>

</style>
孙子组件:HomeContent.vue
<template>
    <div>
        this is homeContent--{{name}}--{{age}}
    </div>
</template>

<script>
    export default {
        inject:['name','age']
    }
</script>

<style lang="scss" scoped>

</style>
长辈组件和子孙组件间的通信逻辑图
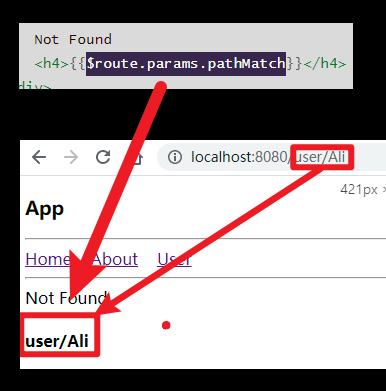
App.vue
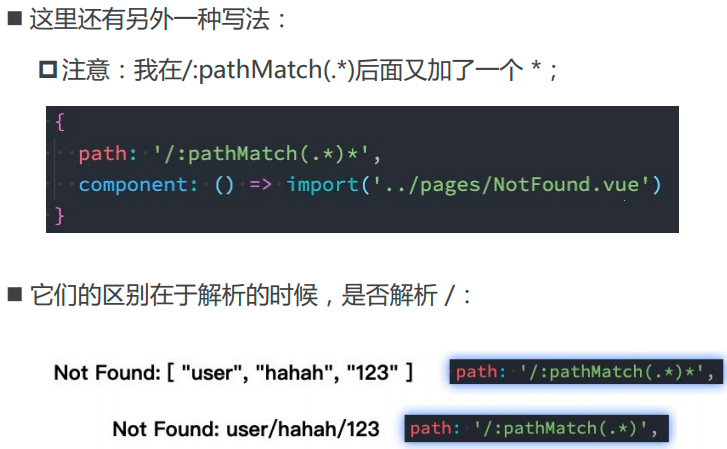
<template>
    <div>
        <home></home>
    </div>
</template>

<script>
    import Home from './Home.vue'
    export default {
        components:{
            Home
        },
        provide:{
            name:'bing',
            age:100
        }
    }
</script>

<style lang="scss" scoped>

</style>
HomeContent.vue
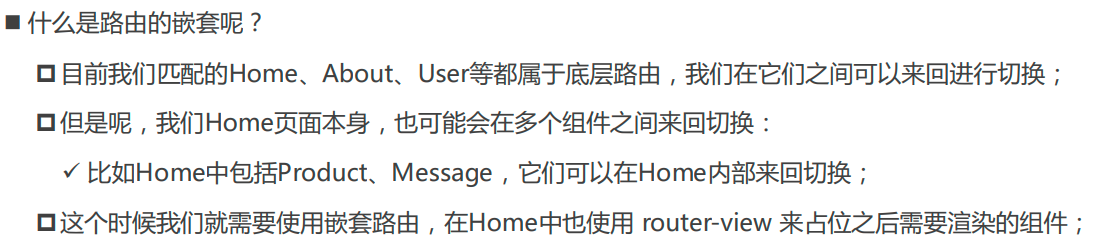
<template>
    <div>
        this is homeContent--{{name}}--{{age}}
    </div>
</template>

<script>
    export default {
        inject:['name','age']
    }
</script>

<style lang="scss" scoped>

</style>
问题_长辈组件在自己中是否使用provide中的数据
很显然是不能使用
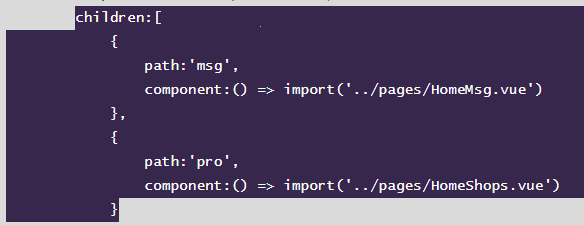
问题_长辈组件如何拿到自己data中的数据信息然后传给子孙组件
问题背景

很显然,没有拿到.
原因分析
this的指向很是关键,我们知道在一个函数中,this的指向就是这个函数作用域, 作用域里面的this.
而 ,所以报错
,所以报错
解决方案
把provide写成函数形式,就是把这个作用域现在这个函数里面.
App.vue
<template>
    <div>
        <home></home>
    </div>
</template>

<script>
    import Home from './Home.vue'
    console.log(this);
    export default {
        components:{
            Home
        },
        // provide:{
        //     name:'bing',
        //     age:100,
        //     namesLength:this.names.length
        // },
        provide(){
            return {
                name:'bing',
                age:100,
                namesLength:this.names.length
            }
        },
        data(){
            return{
                names:['Alice','Bruce','Celina']
            }
        }
    }
</script>

<style lang="scss" scoped>

</style>
子孙组件:HomeContent.vue
<template>
    <div>
        this is homeContent--{{name}}--{{age}}--{{namesLength}}
    </div>
</template>

<script>
    export default {
        inject:['name','age','namesLength']
    }
</script>

<style lang="scss" scoped>

</style>
输出

问题_长辈组件传给子孙组件的是动态数据吗
上面的例子中,尽管我们给这个数组增加了内容,数组的长度发生了变化,但是这个传递被子孙组件的数据依然没有改变,其实很好理解,这个就是在第一次就是当成一个普通的值赋了过去.
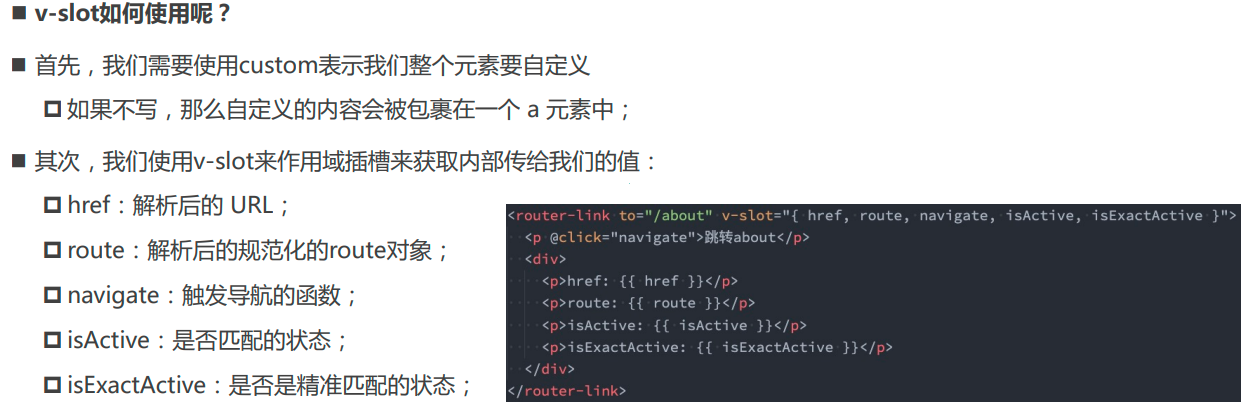
解决方案_动态传递数据
使用计算属性.
输出效果
数组的长度增加,这个传递给子孙组件的数据长度也是增加
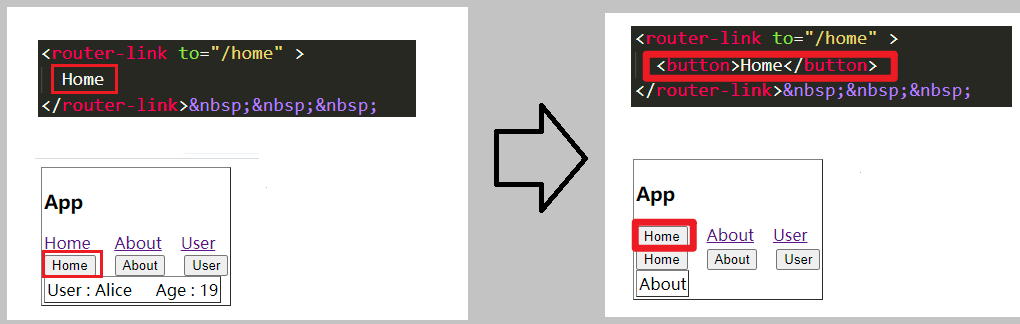
长辈组件:App.vue
关键代码
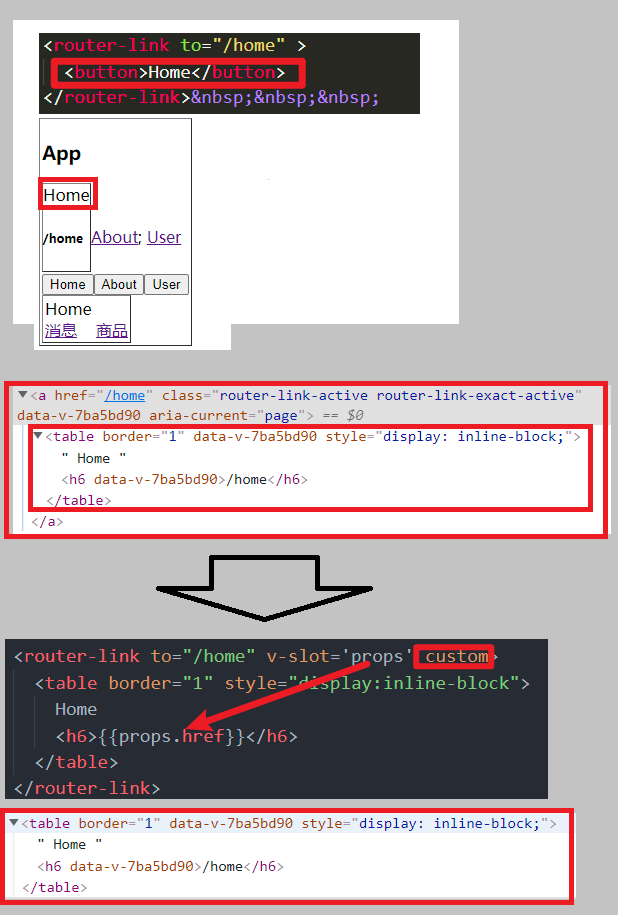
<template>
    <div>
        <home></home>
        <button @click="addName">array push</button>
    </div>
</template>

<script>
    import Home from './Home.vue'
    import {computed} from 'vue'
    export default {
        components:{
            Home
        },
        // provide:{
        //     name:'bing',
        //     age:100,
        //     namesLength:this.names.length
        // },
        provide(){
            return {
                name:'bing',
                age:100,
                namesLength:computed(()=>this.names.length)
            }
        },
        data(){
            return{
                names:['Alice','Bruce','Celina']
            }
        },
        methods: {
            addName(){
                console.log(this.names);
                this.names.push('bing')
            }
        },
    }
</script>

<style lang="scss" scoped>

</style>
警告
injected property "namesLength" is a ref
and will be auto-unwrapped and no longer needs `.value` in the next minor release.

To opt-in to the new behavior now, set `app.config.unwrapInjectedRef = true`
(this config is temporary and will not be needed in the future.)
警告的原因:
子孙组件:HomeContent.vue
<template>
    <div>
        this is homeContent--{{name}}--{{age}}--{{namesLength}} //警告出现,提示会自动解包
      	this is homeContent--{{name}}--{{age}}--{{namesLength.value}}//手动解包
    </div>
</template>

<script>
    export default {
        inject:['name','age','namesLength']
    }
</script>

<style lang="scss" scoped>

</style>
Mitt全局事件总线
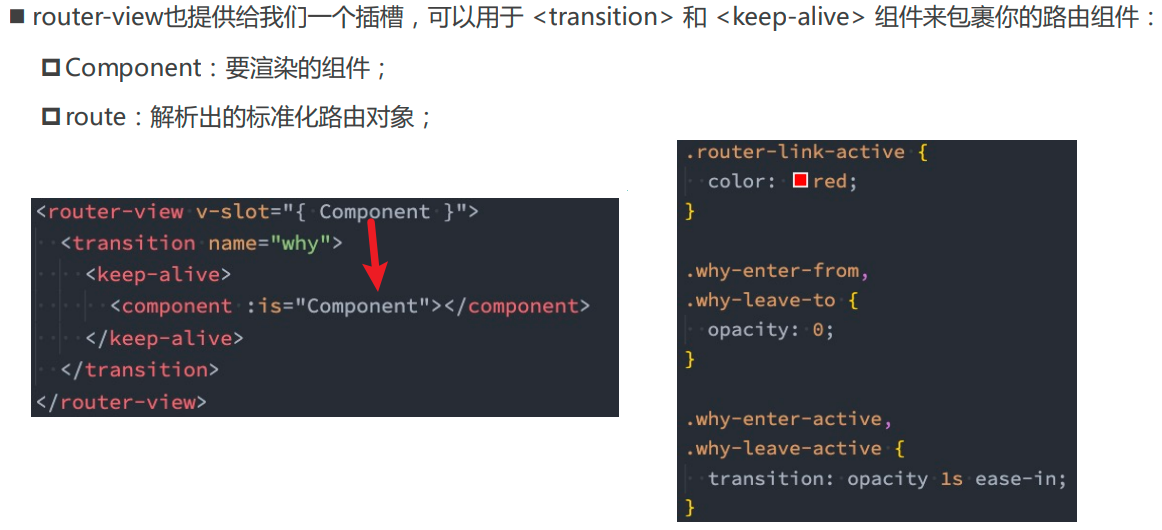
https://github.com/developit/mitt
https://github.com/scottcorgan/tiny-emitter
安装mitt库
npm install mitt -D
背景
现在我想要在[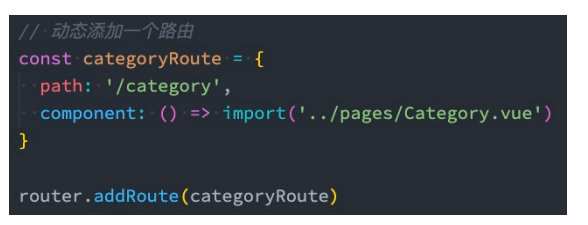 ]的事件
]的事件

代码逻辑
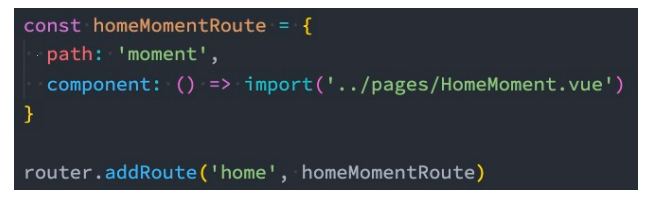
输出效果
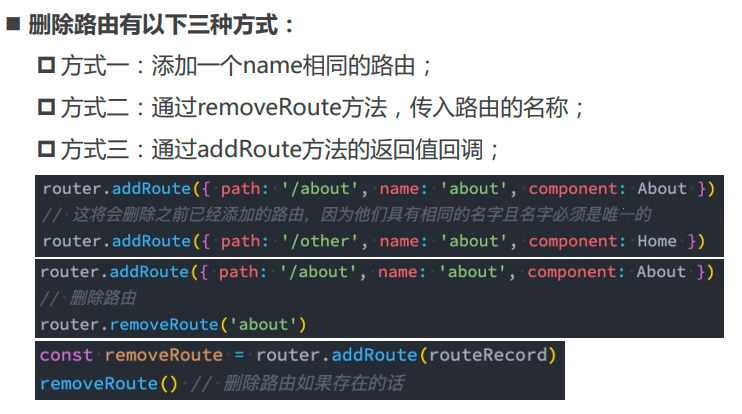
About.vue

<template>
    <div>
        this is about.vue
        <button @click="btnClick">about click</button>
    </div>
</template>

<script>
    import emitter from './utils/eventBus'
    export default {
        methods: {
            btnClick(){
                console.log('About.vue is clicked')
                emitter.emit('aboutClicked',{name:'bing',age:20})
            }
        },
    }
</script>

<style lang="scss" scoped>

</style>
HomeContent.vue
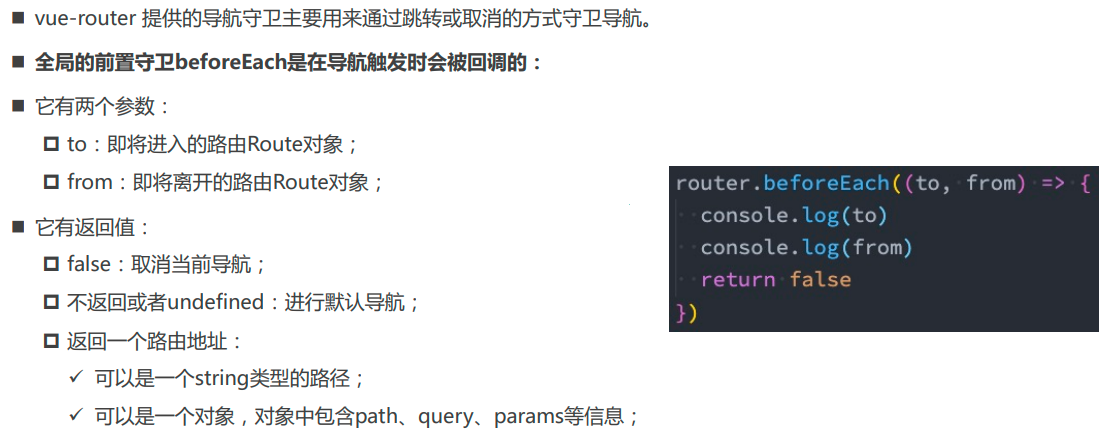
<template>
    <div>
        this is home-content
        <hr>
    </div>
</template>

<script>
    import emitter from './utils/eventBus'
    export default {
        created() {
            emitter.on('aboutClicked',(info)=>{
                console.log(info);
            })
        },
    }
</script>

<style lang="scss" scoped>

</style>
多事件监听
About.vue
发送两个事件
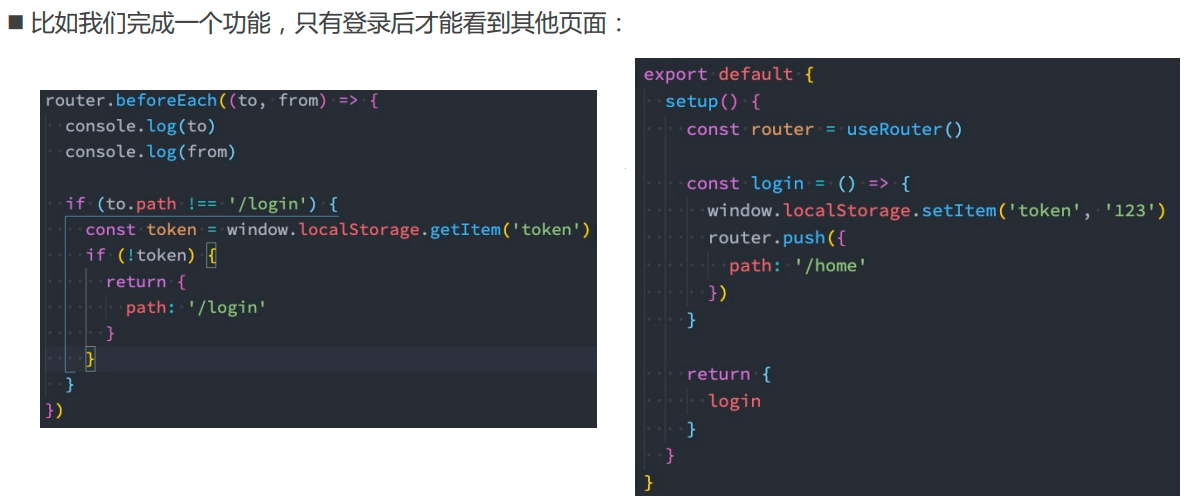
<template>
    <div>
        this is about.vue
        <button @click="btnClick">about click</button>
        <button @click="btnClick1">about click</button>
    </div>
</template>

<script>
    import emitter from './utils/eventBus'
    export default {
        methods: {
            btnClick(){
                emitter.emit('aboutClicked',{name:'bing',age:20})
            },
            btnClick1(){
                emitter.emit('aboutClicked1',{name:'bing1',age:201})
            }
        },
    }
</script>

<style lang="scss" scoped>

</style>
HomeContent.vue
监听所有事件
打印事件名称和传递过来的参数
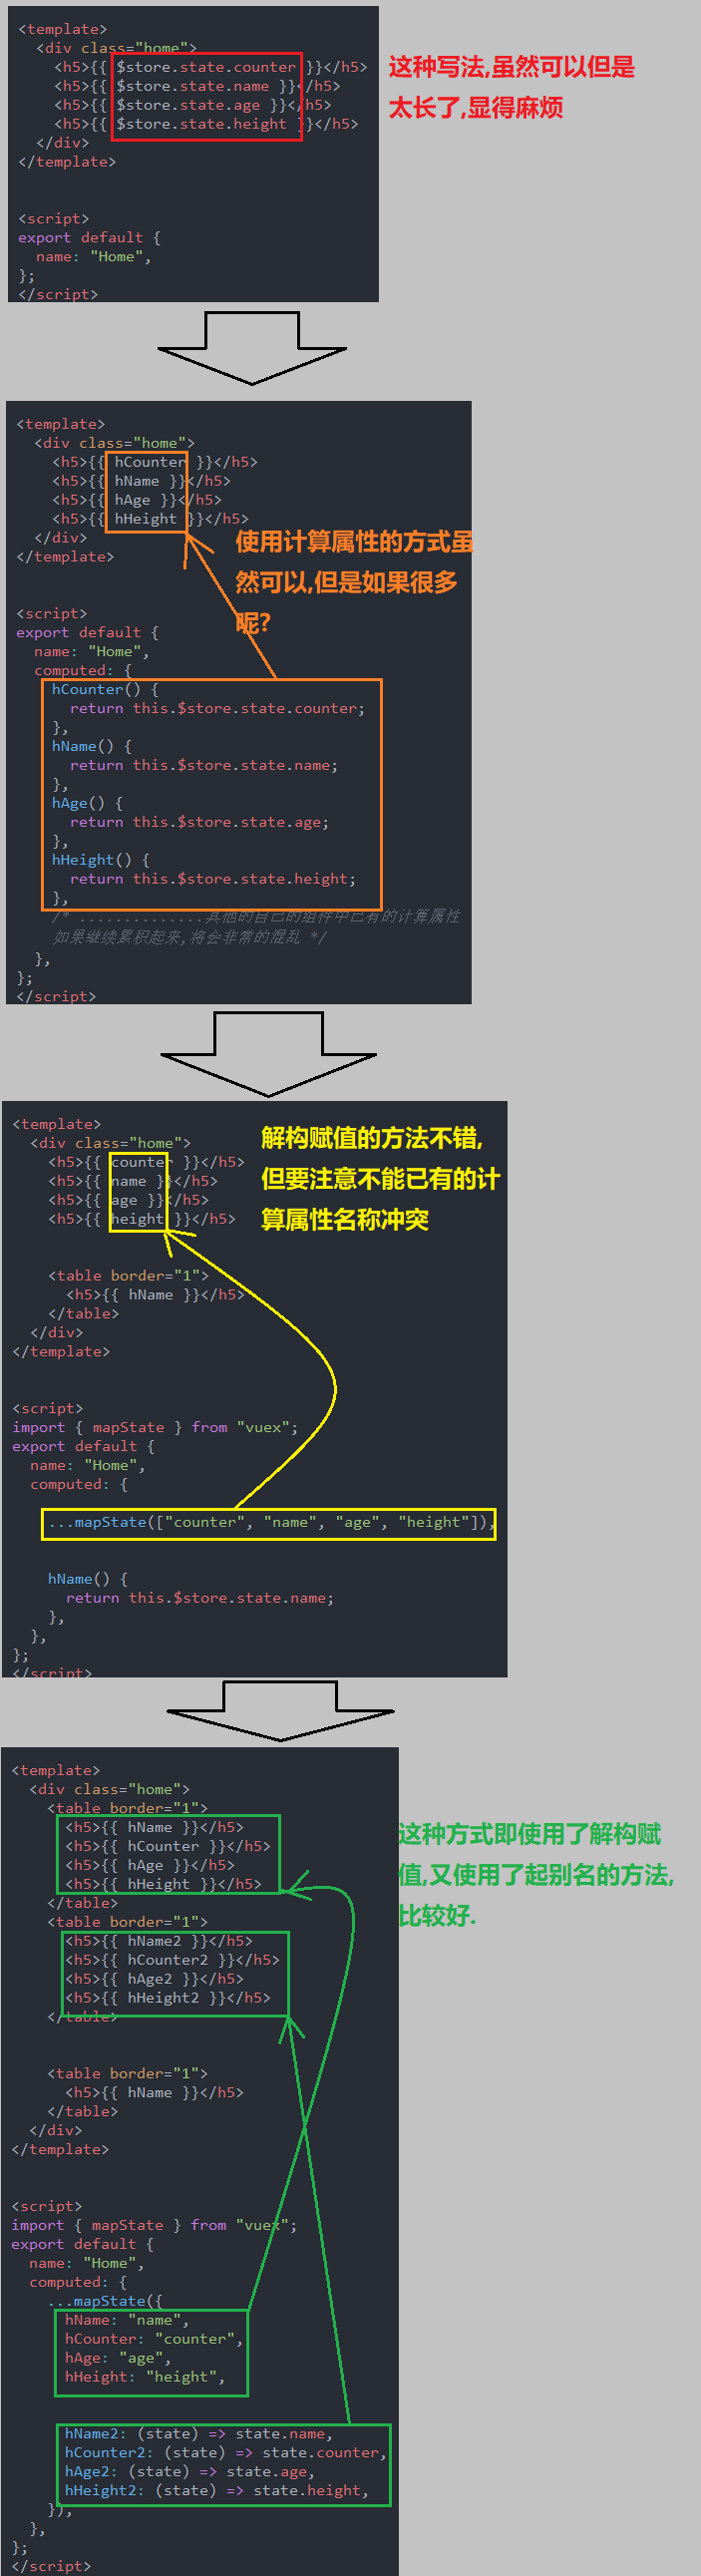
<template>
    <div>
        this is home-content
        <hr>
    </div>
</template>

<script>
    import emitter from './utils/eventBus'
    export default {
        created() {
            // emitter.on('aboutClicked',(info)=>{
            //     console.log(info);
            // })
            emitter.on('*',(eventName,info) => {
                console.log(eventName);
                console.log(info);
            })
        },
    }
</script>

<style lang="scss" scoped>

</style>
输出效果
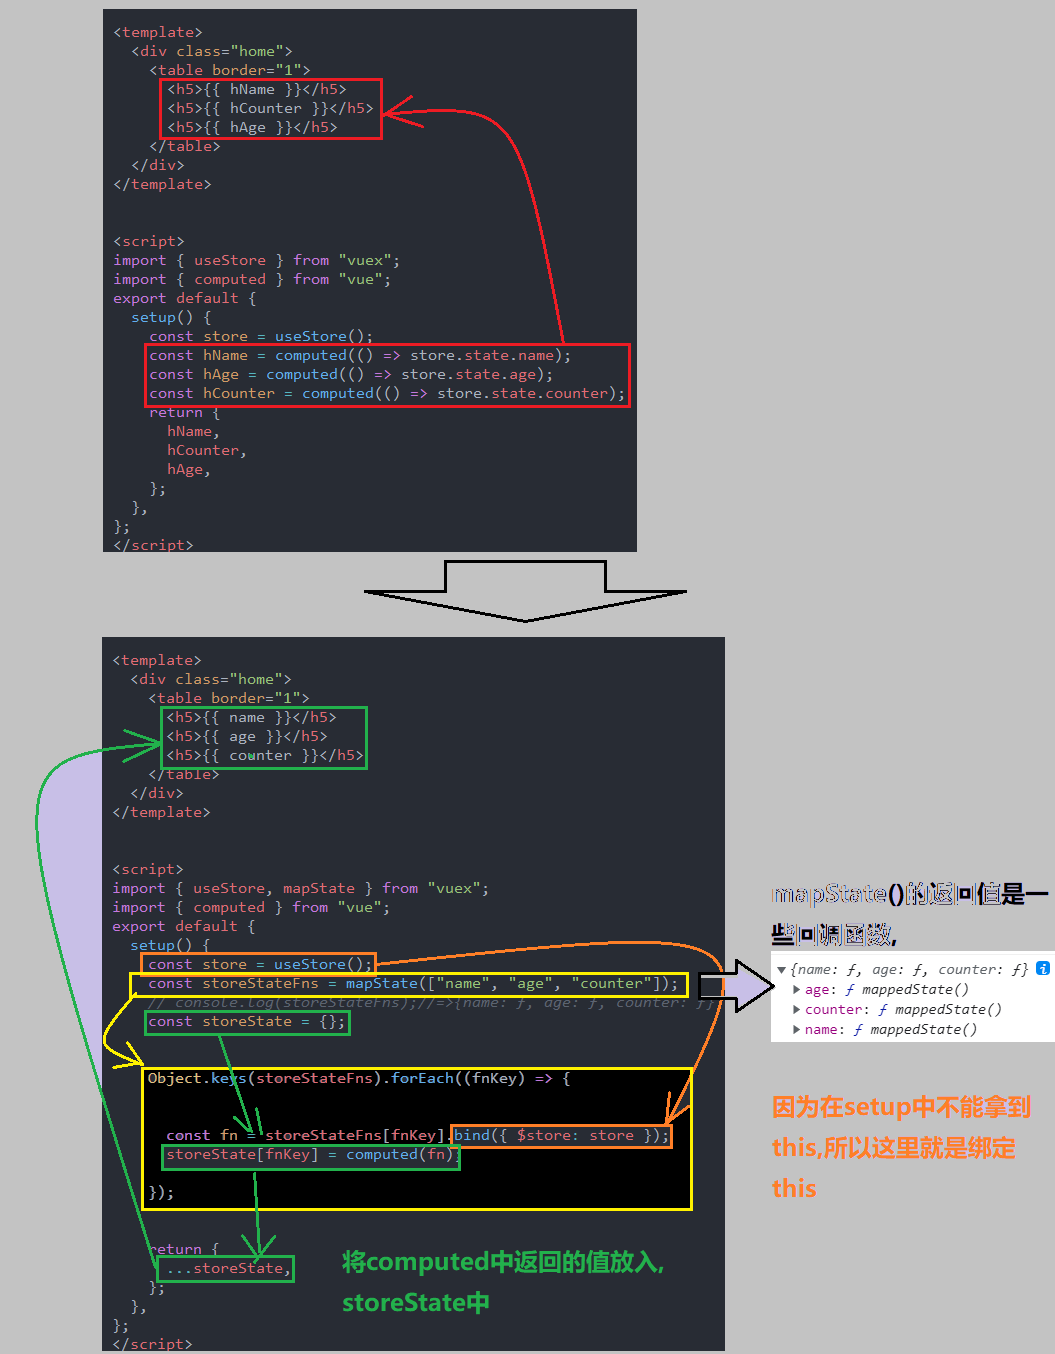
事件取消
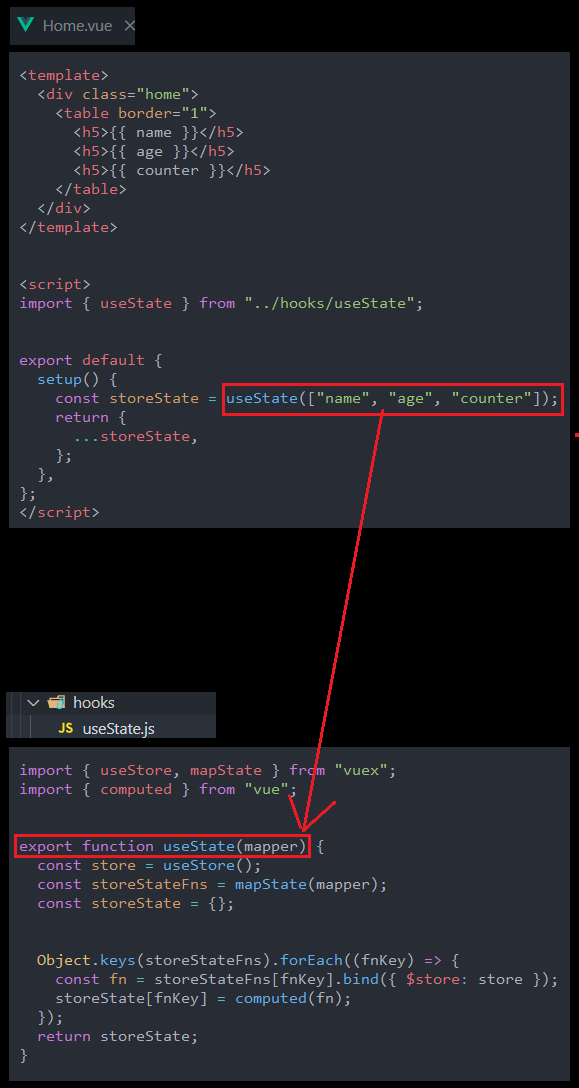
插槽

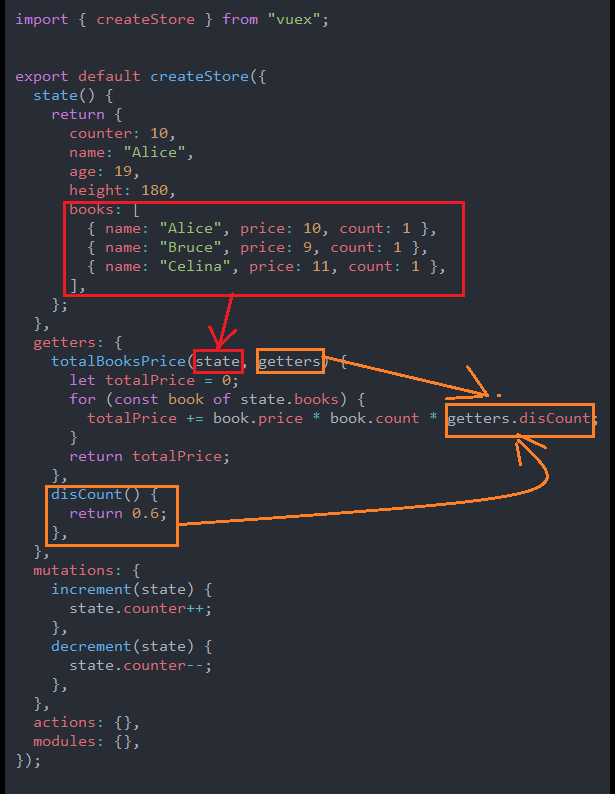
比如说上面的NavBar的共性就是都是具有三个部分,左中右,不同就是左中右三个区域可以显示三个不同的内容.
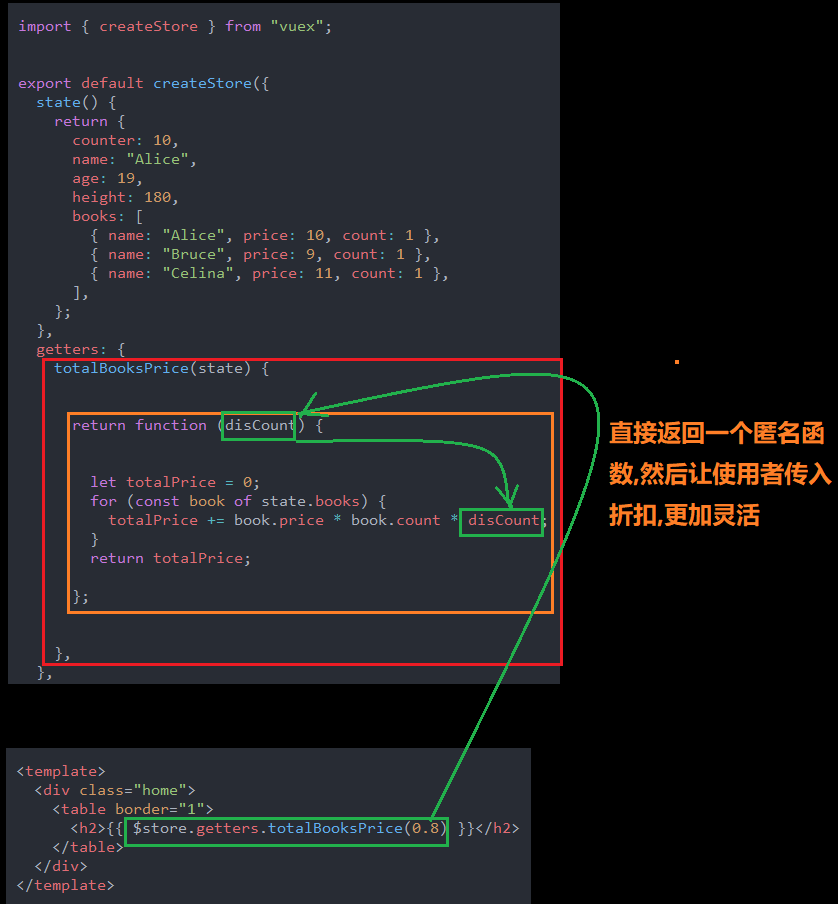
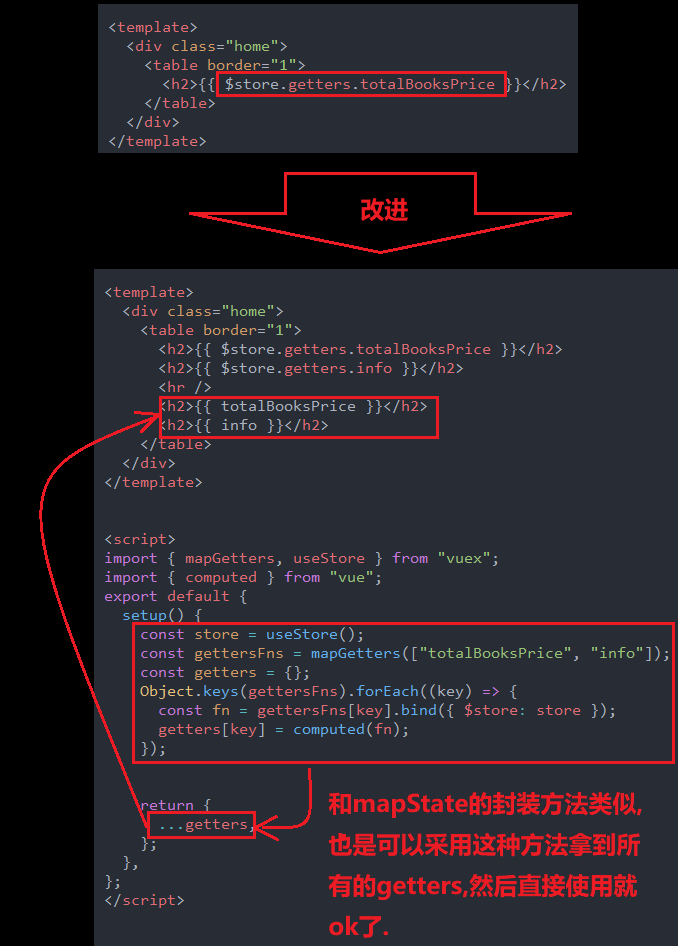
插槽的基本使用
代码逻辑
有插入的内容显示插入的内容,没有插入的内容显示默认的内容
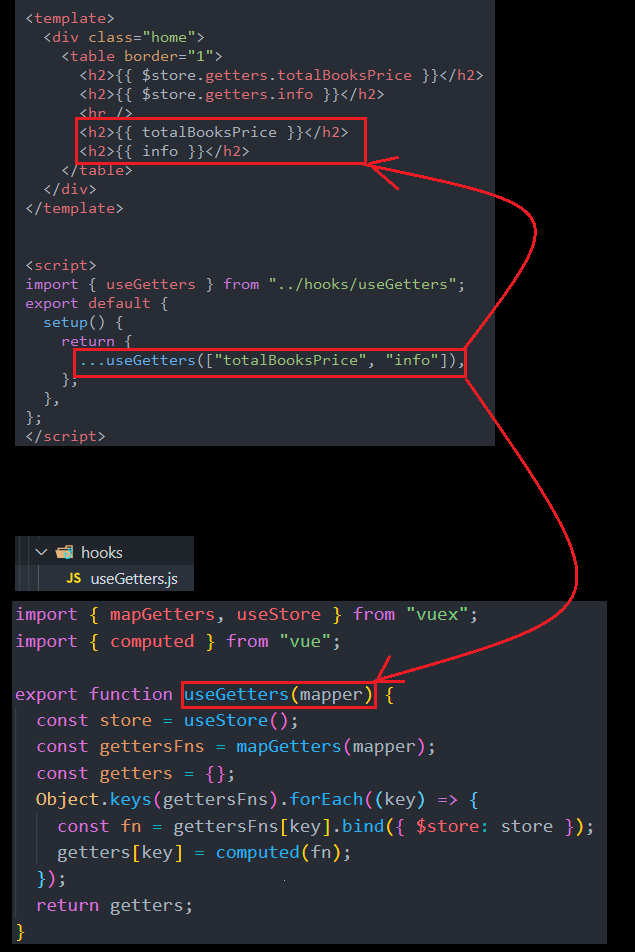
App.vue
<template>
    <div>
        <my-slot-cpn>
            <h4>我是插入插槽中的内容</h4>
        </my-slot-cpn>

        <my-slot-cpn>
            <button>我是插入插槽中的按钮</button>
        </my-slot-cpn>

        <my-slot-cpn></my-slot-cpn>
    </div>
</template>

<script>
    import MySlotCpn from './MySlotCpn.vue'
    export default {
        components:{
            MySlotCpn
        }
    }
</script>

<style lang="scss" scoped>

</style>
MySlotCpn.vue
<template>
    <div>
        <h3>组件开始VVVVVV</h3>
        <slot>我是插槽中的默认内容</slot>
        <h3>组件结束YYYYYY</h3>
        <hr>
    </div>
</template>

<script>
    export default {

    }
</script>

<style lang="scss" scoped>

</style>
多个插槽
一个内容插入多个插槽
我把一个元素插入多个插槽,发现是一个元素每个插槽都会被插入一次.
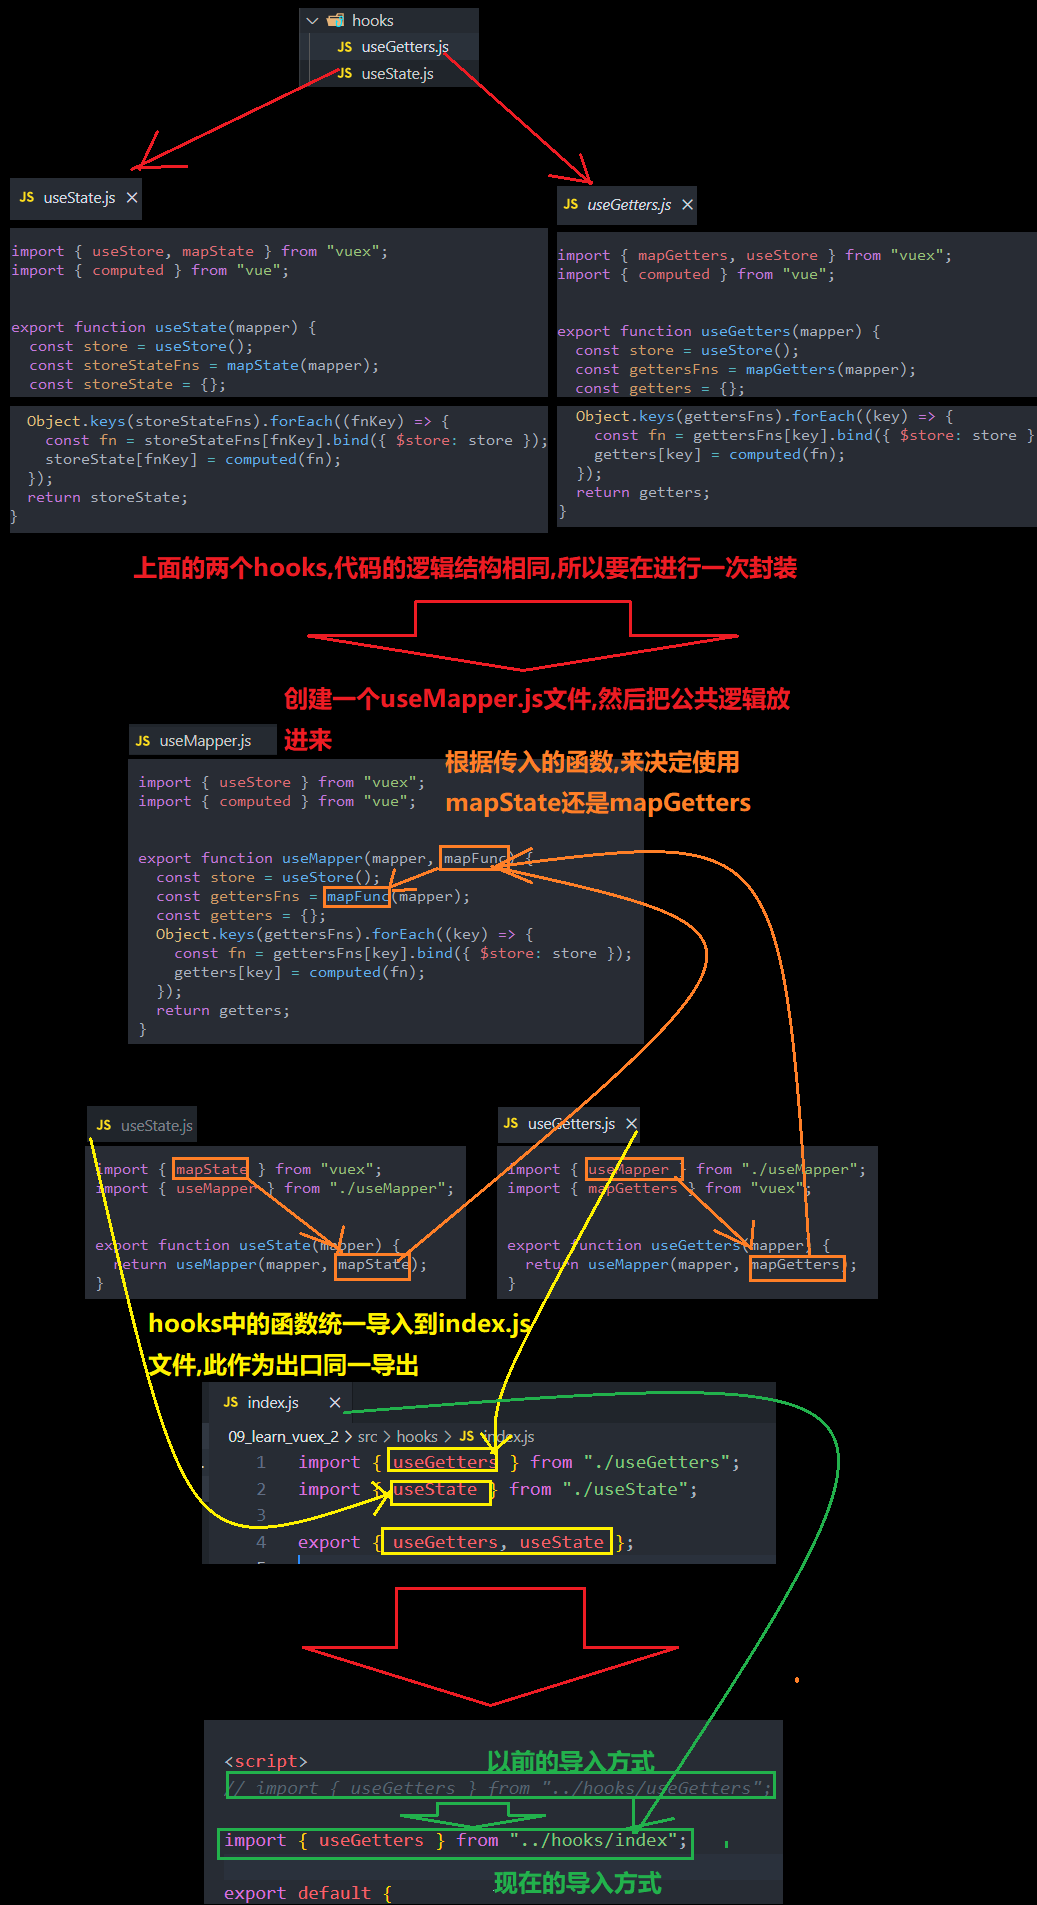
三个元素插入三个插槽
我们三个元素插入三个插槽,是这个三个元素作为一个整体插入三个插槽,因此显示了9个,我们其实有点希望三个分别插入三个插槽,这个需要下面的具名插槽来实现.
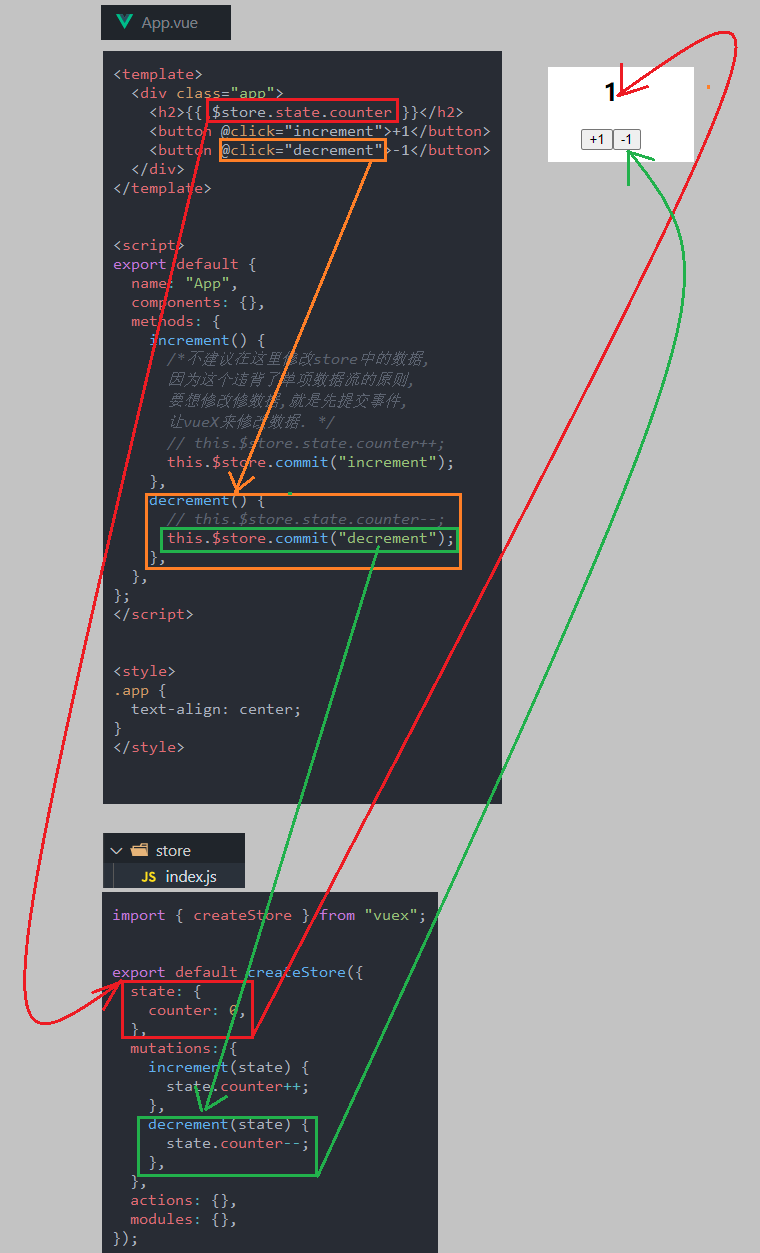
具名插槽
代码逻辑
通过名字来达到分别填入的效果
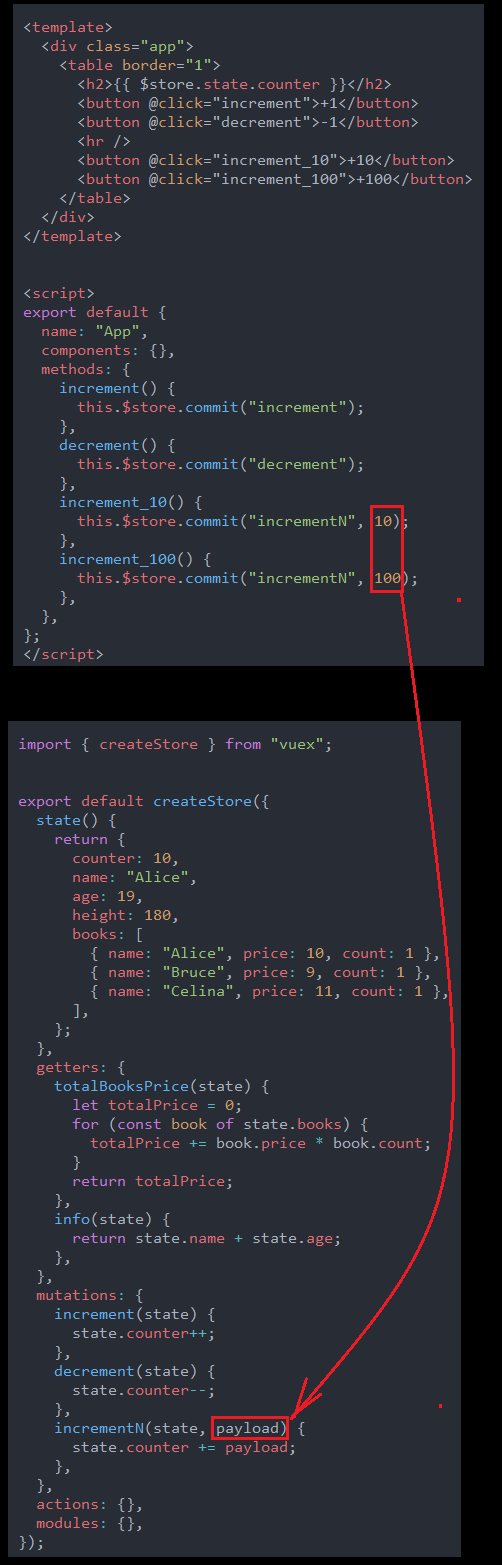
App.vue
<template>
    <div>
        <my-slot-cpn>
            <template v-slot:slot1>
                <h6>我是插入 第一个 插槽中的内容</h6>
            </template>
            <template v-slot:slot2>
                <button>我是想插入 第二个 插槽中的按钮</button>
            </template>
            <template v-slot:slot3>
                <h5>我是想插入 第三个 插槽的内容</h5>
            </template>
        </my-slot-cpn>
        <my-slot-cpn></my-slot-cpn>
    </div>
</template>

<script>
    import MySlotCpn from './MySlotCpn.vue'
    export default {
        components:{
            MySlotCpn
        }
    }
</script>

<style lang="scss" scoped>

</style>
MySlotCpn.vue
<template>
    <div>
        <h3>组件开始VVVVVV</h3>
        <slot name="slot1"><h5>我是插槽中的默认内容1</h5></slot>
        <slot name="slot2"><h5>我是插槽中的默认内容2</h5></slot>
        <slot name="slot3"><h5>我是插槽中的默认内容3</h5></slot>
        <h3>组件结束YYYYYY</h3>
        <hr>
    </div>
</template>

<script>
    export default {

    }
</script>

<style lang="scss" scoped>

</style>
动态具名插槽
代码逻辑
先把三个插槽的名字通过父传子的形式传递过去,然后再使用时候使用其对应的名字就是可以了.
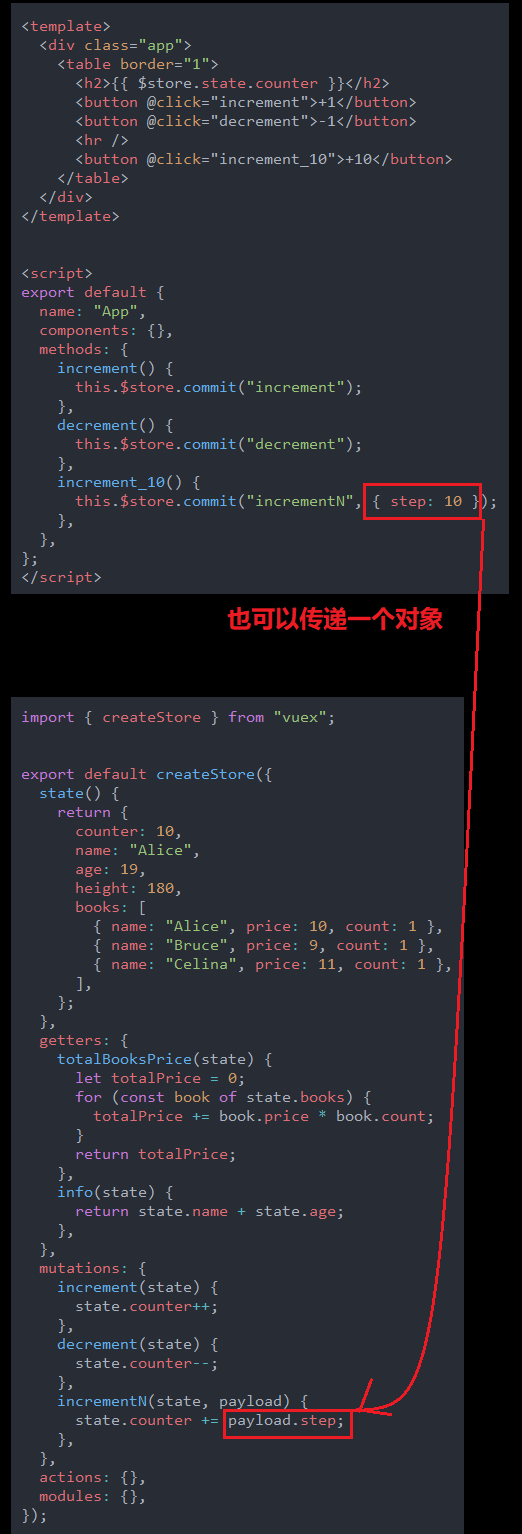
具名插槽的缩写
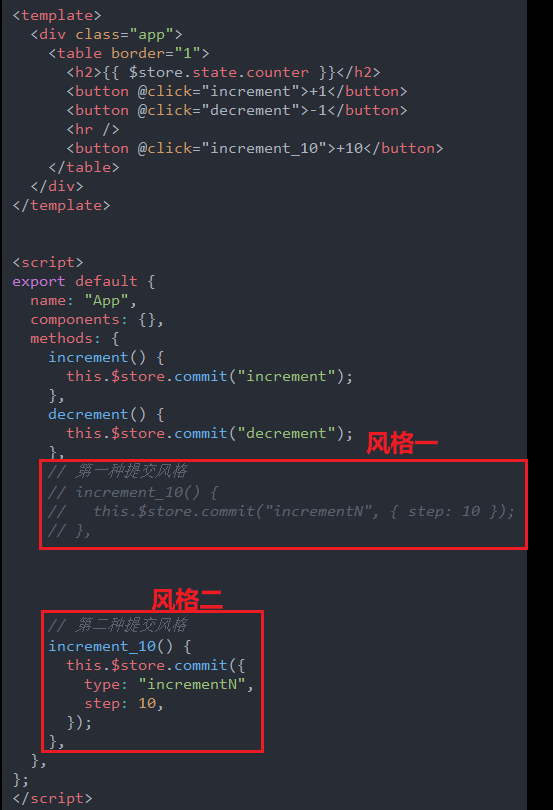
渲染作用域
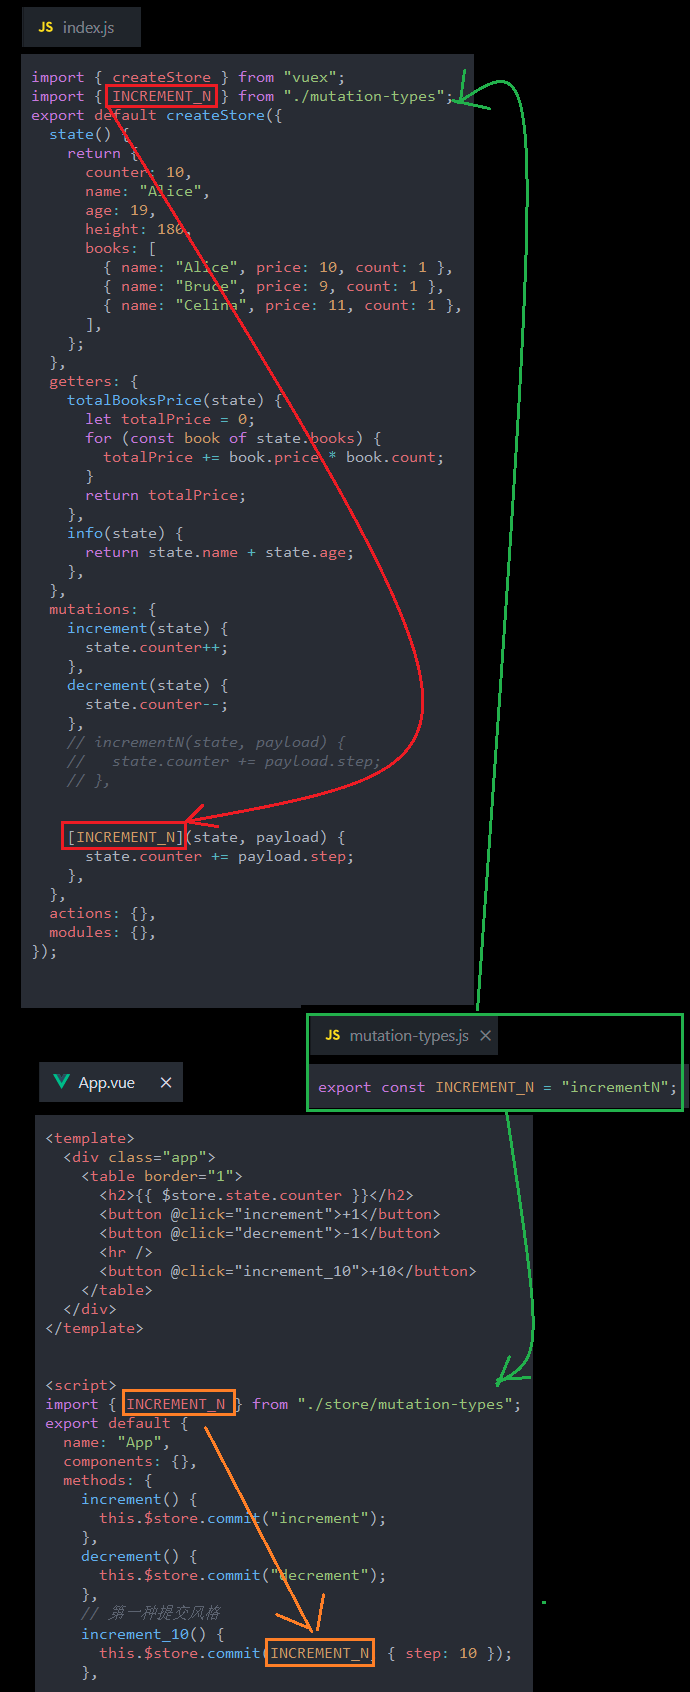
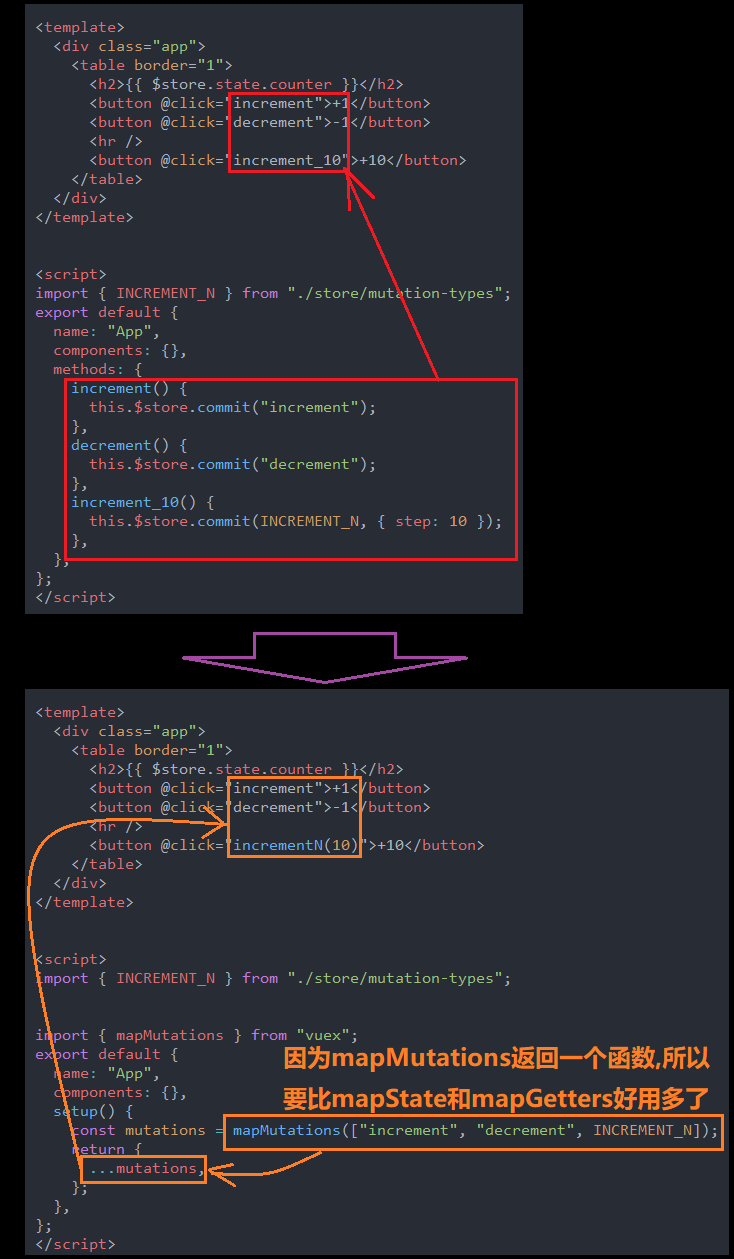
作用域插槽
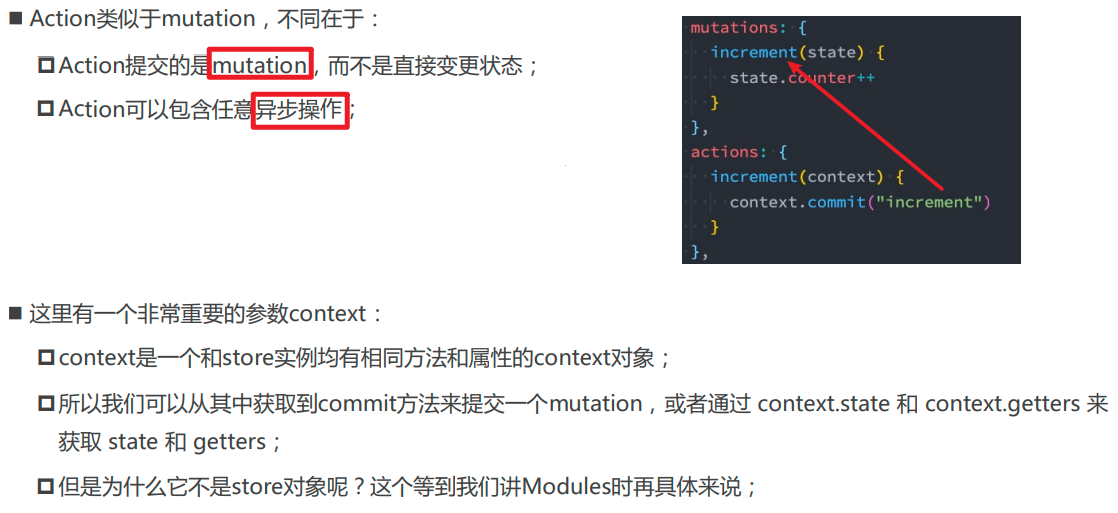
代码逻辑
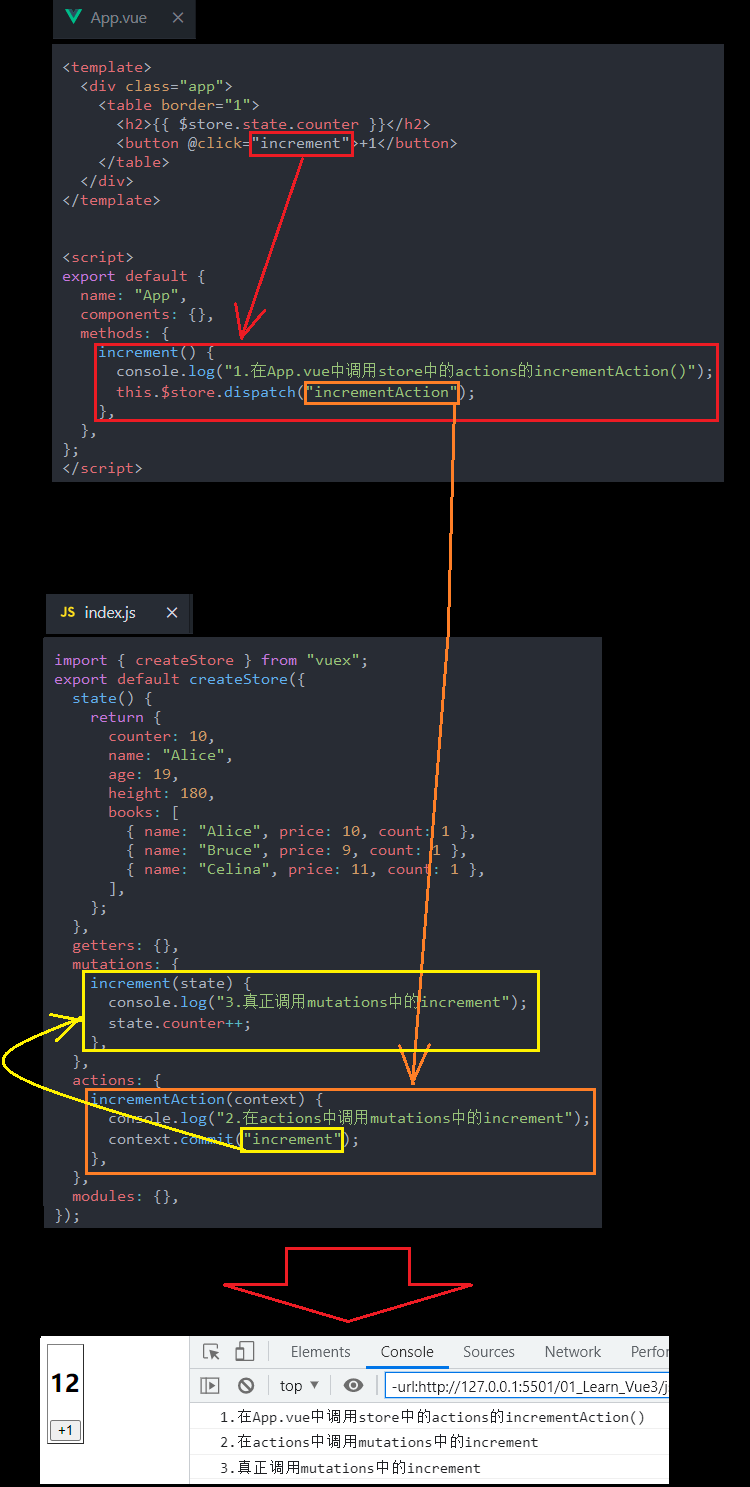
App.vue
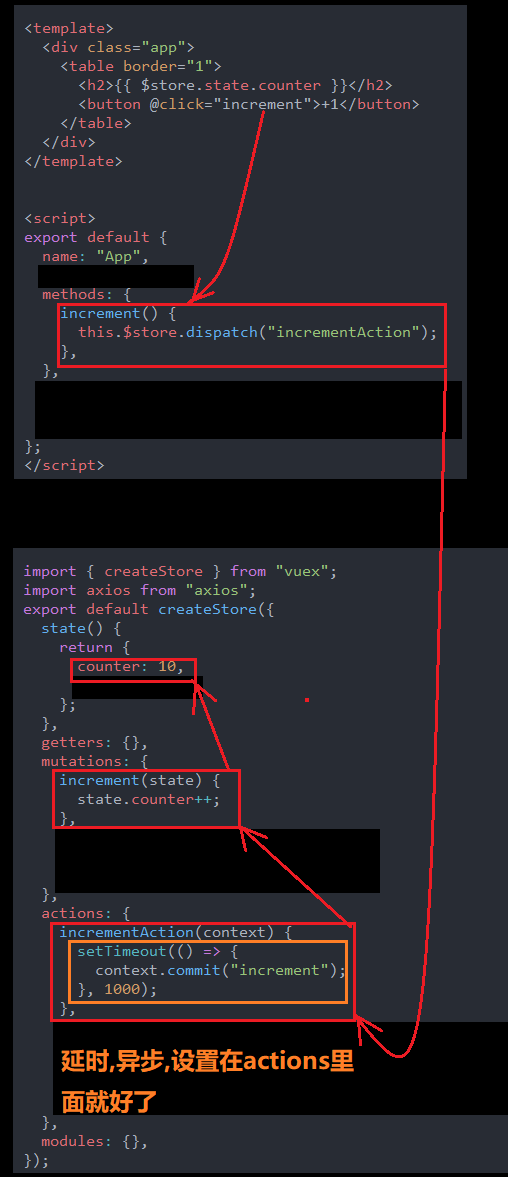
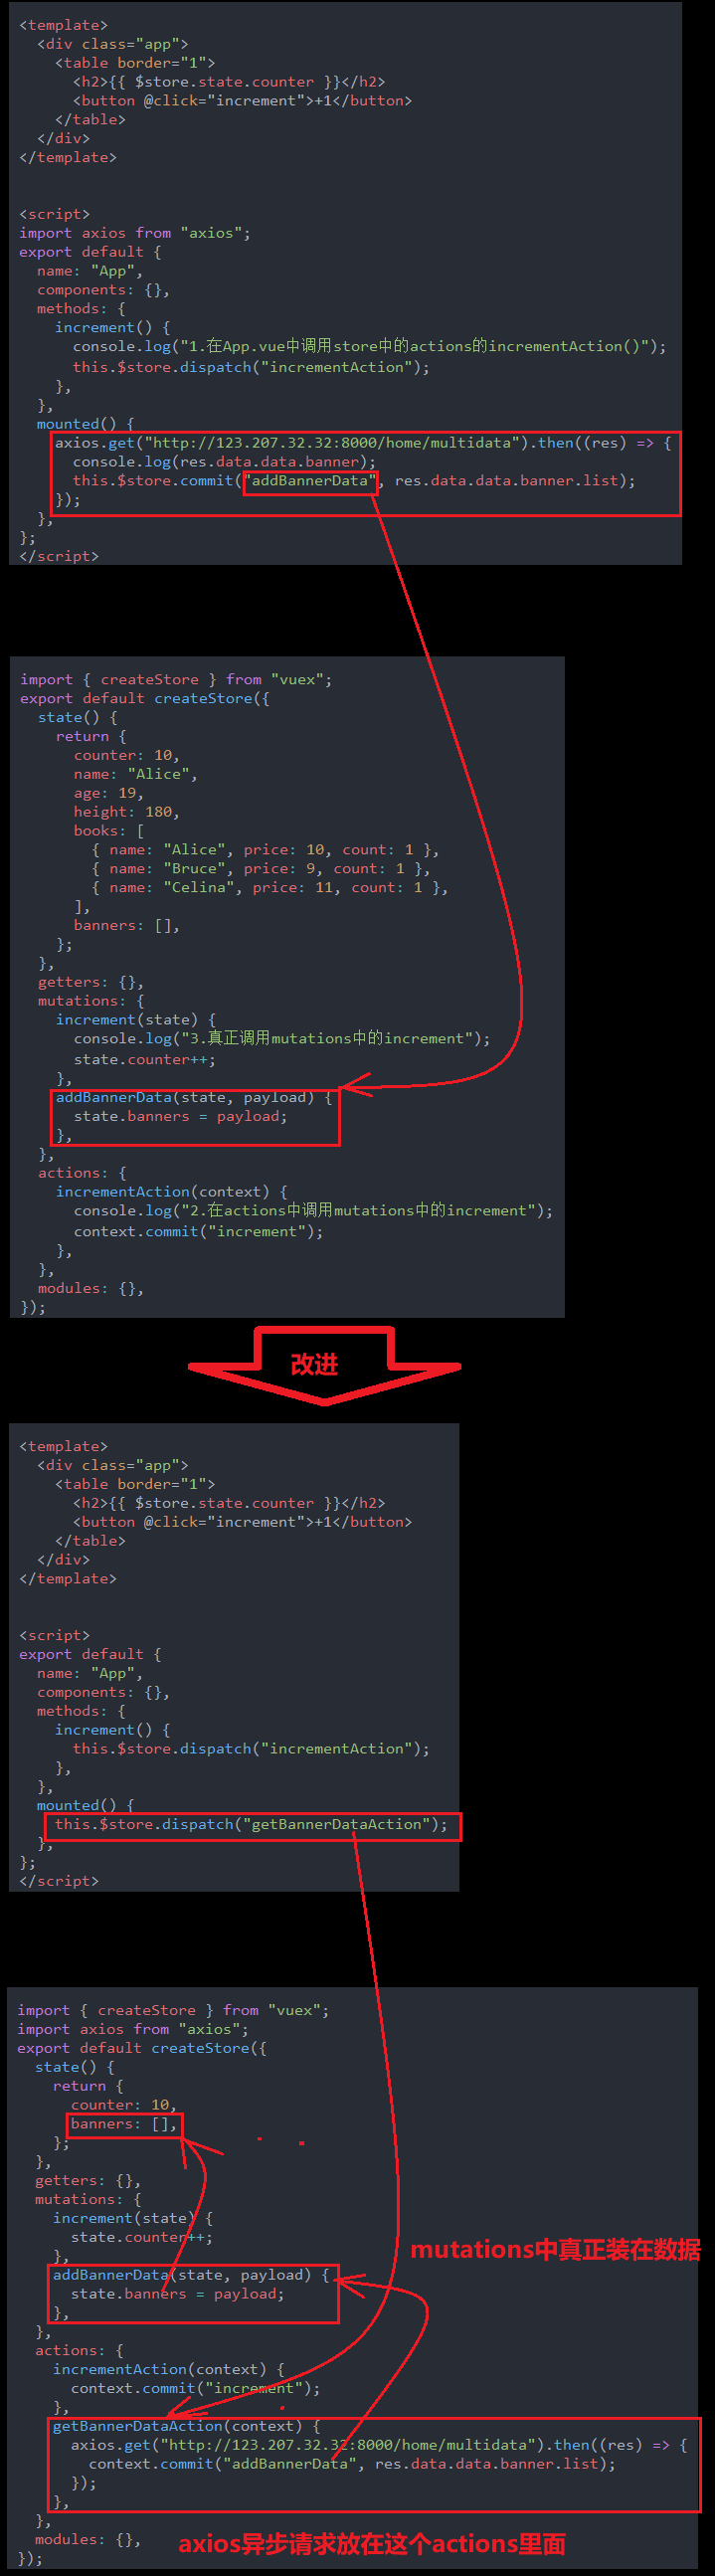
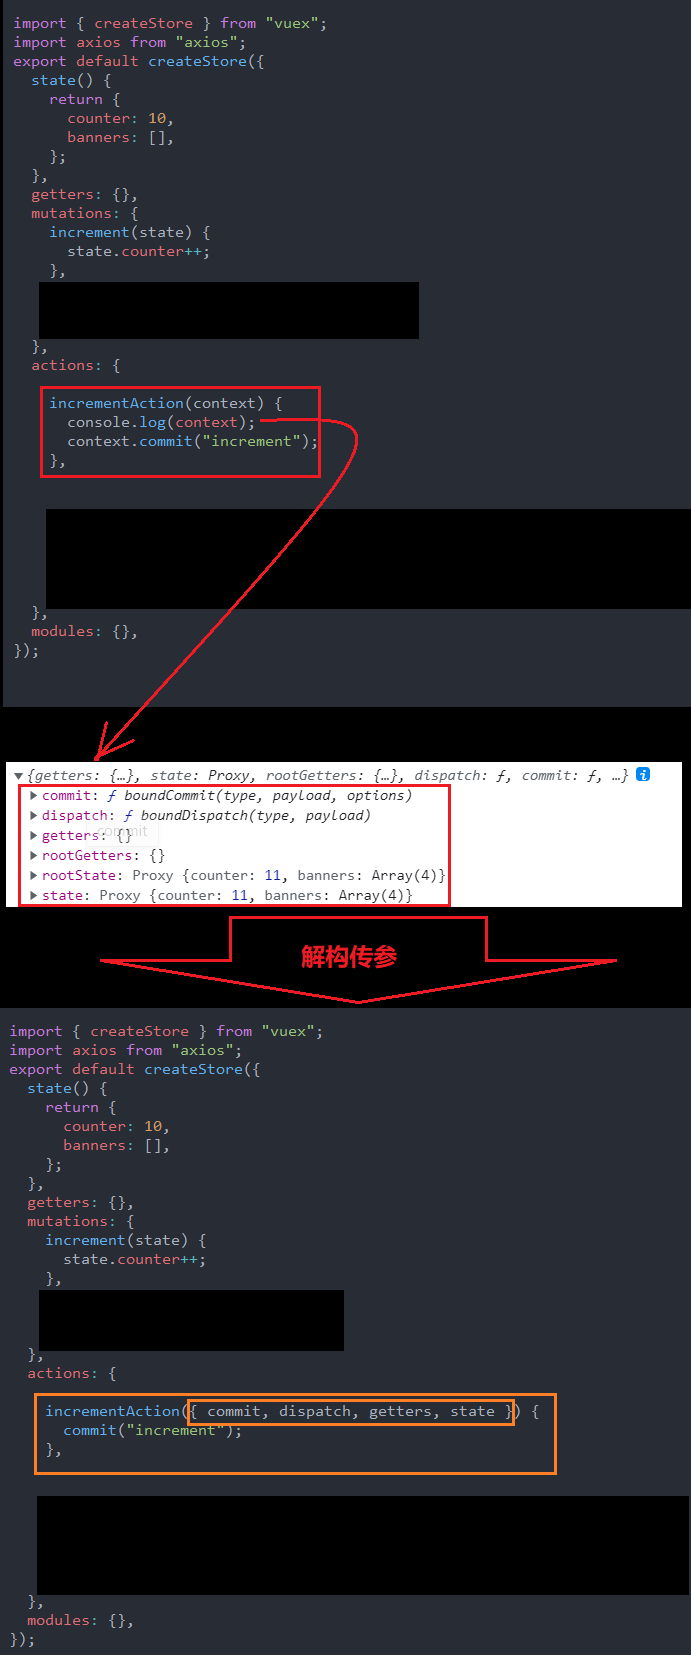
<template>
    <div>
        <show-name :names="names"></show-name>
        <hr>

        **v-slot="slotProps" and 默认插槽的省略写法,省略template**
        <show-name-slot :names="names" v-slot="slotProps">
               <button>{{slotProps.index}}-{{slotProps.item}}</button>
        </show-name-slot>

        <hr>
        **v-slot="slotProps 默认插槽的省略写法"**
        <show-name-slot :names="names" >
            <template v-slot="slotProps">
                <button>{{slotProps.index}}-{{slotProps.item}}</button>
            </template>
        </show-name-slot>
        <hr>
        **v-slot:default="slotProps" 默认插槽的使用**
        <show-name-slot :names="names" >
            <template v-slot:default="slotProps">
                <button>{{slotProps.index}}-{{slotProps.item}}</button>
            </template>
        </show-name-slot>
        <hr>
        **v-slot:juming="slotProps" 具名插槽的使用**
        <show-name-slot :names="names" >
            <template v-slot:juming="slotProps">
                <button>{{slotProps.index}}-{{slotProps.item}}</button>
            </template>
        </show-name-slot>

    </div>
</template>

<script>
    import ShowName from './ShowName.vue'
    import ShowNameSlot from './ShowNameSlot.vue'
    export default {
        components:{
            ShowName,
            ShowNameSlot
        },
        data() {
            return {
                names:['Alice','Bruce','Celina','Dora']
            }
        },
    }
</script>

<style scoped>

</style>
ShowName.vue
<template>
    <div>
        <ul>
            <li
                v-for="(name,index) in names"
                :key="index">
            {{index}}--{{name}}</li>
        </ul>
    </div>
</template>

<script>
    export default {
        props:{
            names:{
                type:Array,
                default:()=>[]
            }
        }
    }
</script>

<style scoped>

</style>
ShowNameSlot.vue
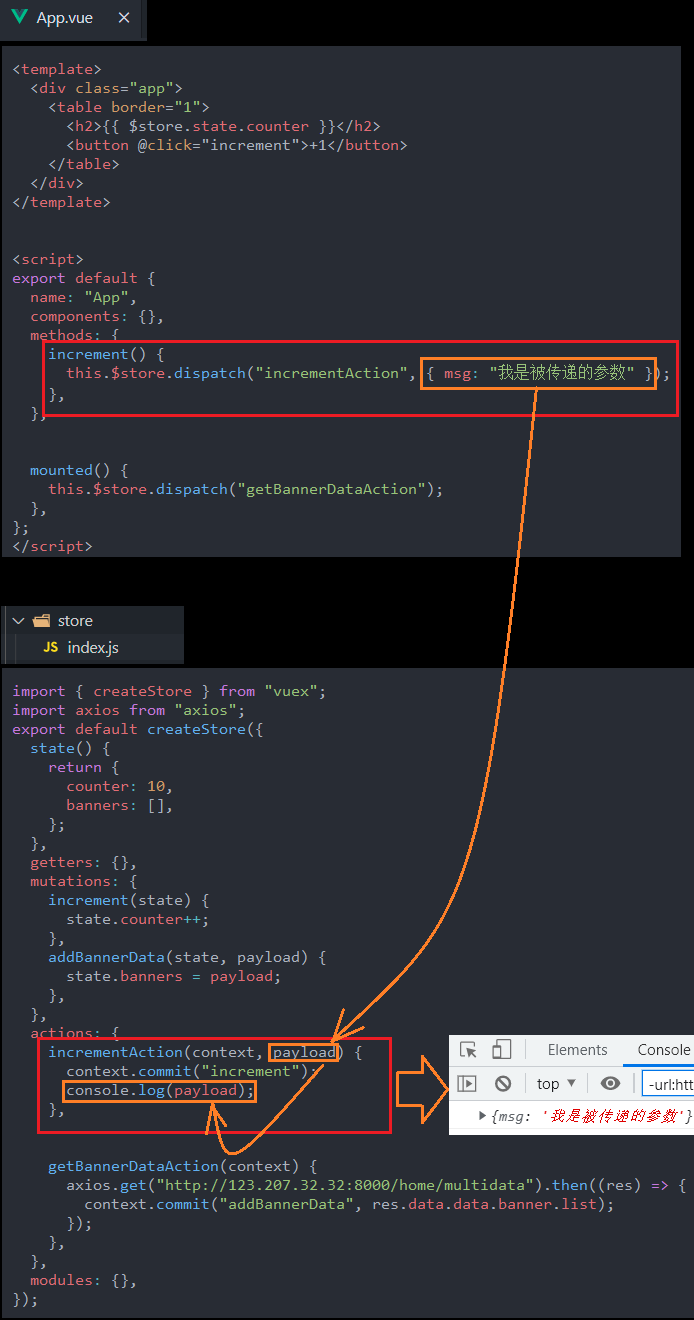
<template>
    <div>
        <template v-for="(item,index) in names">
            <slot :item='item' :index='index'>
            </slot>

            <slot name='juming' :item='item' :index='index'></slot>
        </template>
    </div>
</template>

<script>
    export default {
        props:{
            names:{
                type:Array,
                default:()=>[]
            },
        }
    }
</script>

<style scoped>

</style>
总结
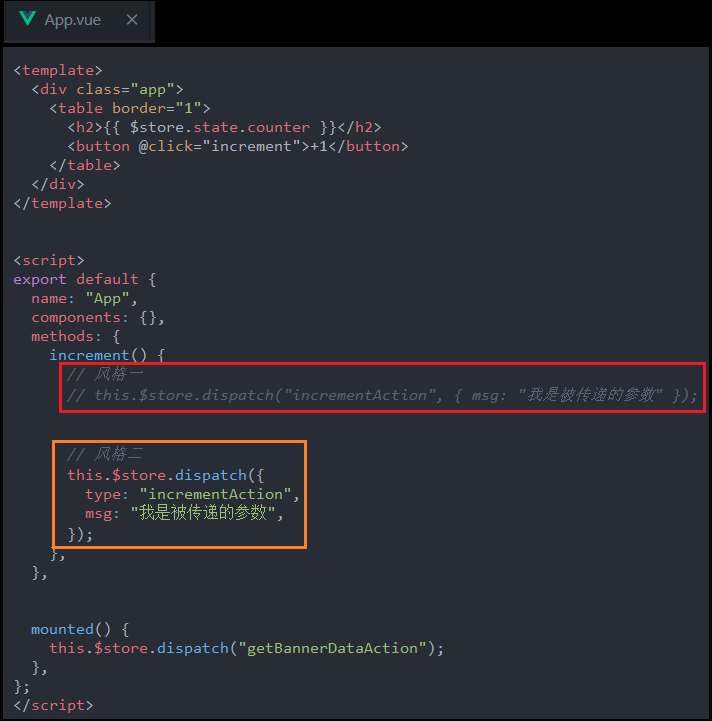
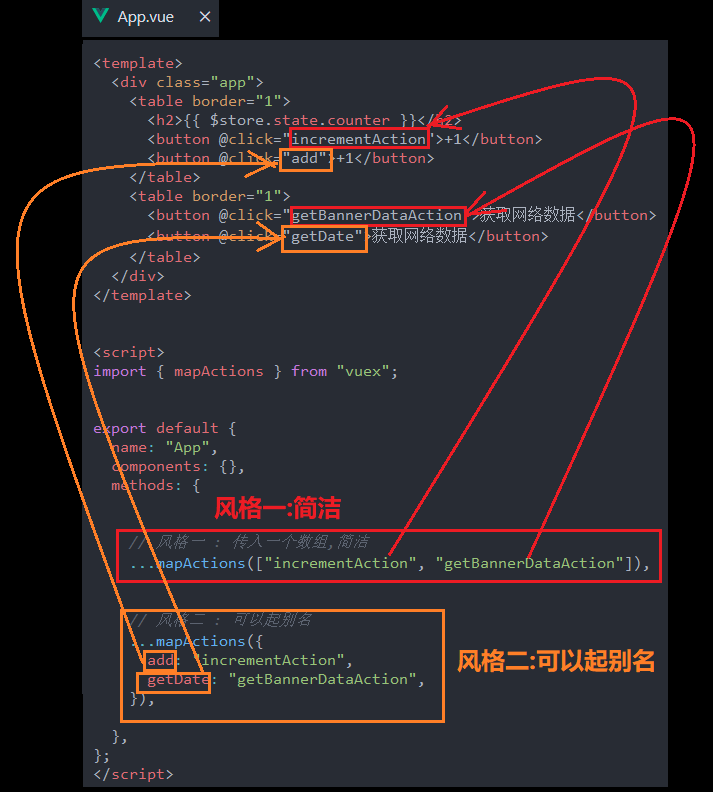
动态组件
按钮切换案例
输出效果
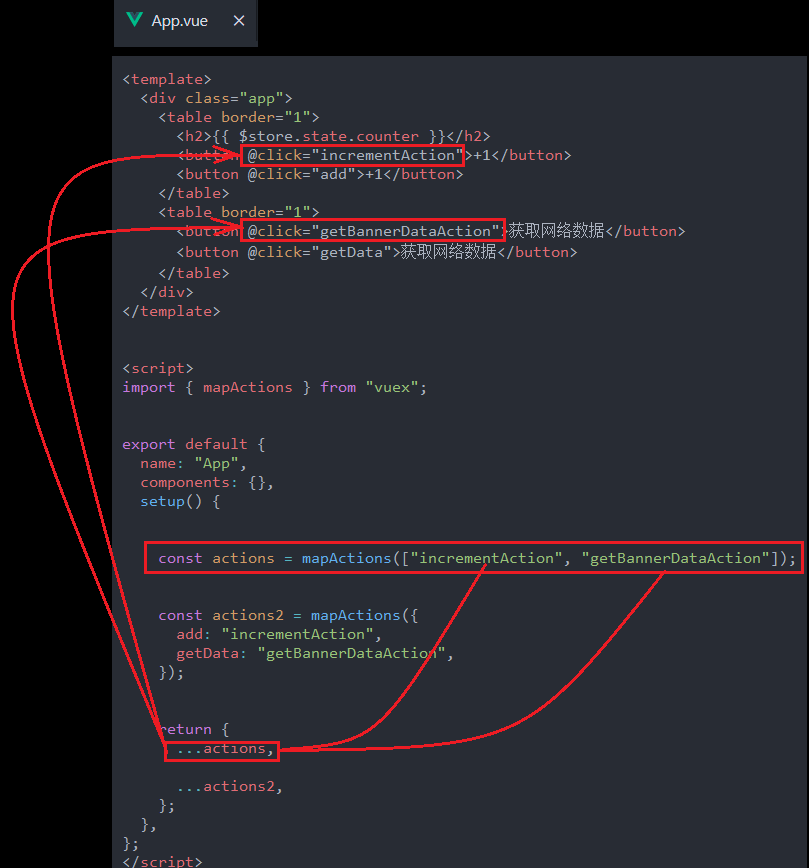
App.vue
<template>
    <div>
        <button
                v-for="tab in tabs"
                :key="tab"
                :class="{active:currentTab === tab}"
                @click="btnClick(tab)">
                {{tab}}
        </button>
    </div>
</template>

<script>
    export default {
        data() {
            return {
                tabs:['home','about','category'],
                currentTab:'home'
            }
        },
        methods: {
            btnClick(tab){
                this.currentTab = tab
            }
        },
    }
</script>

<style scoped>
    .active {
        color: red;
    }
</style>
按钮切换案例-动态组件
输出效果
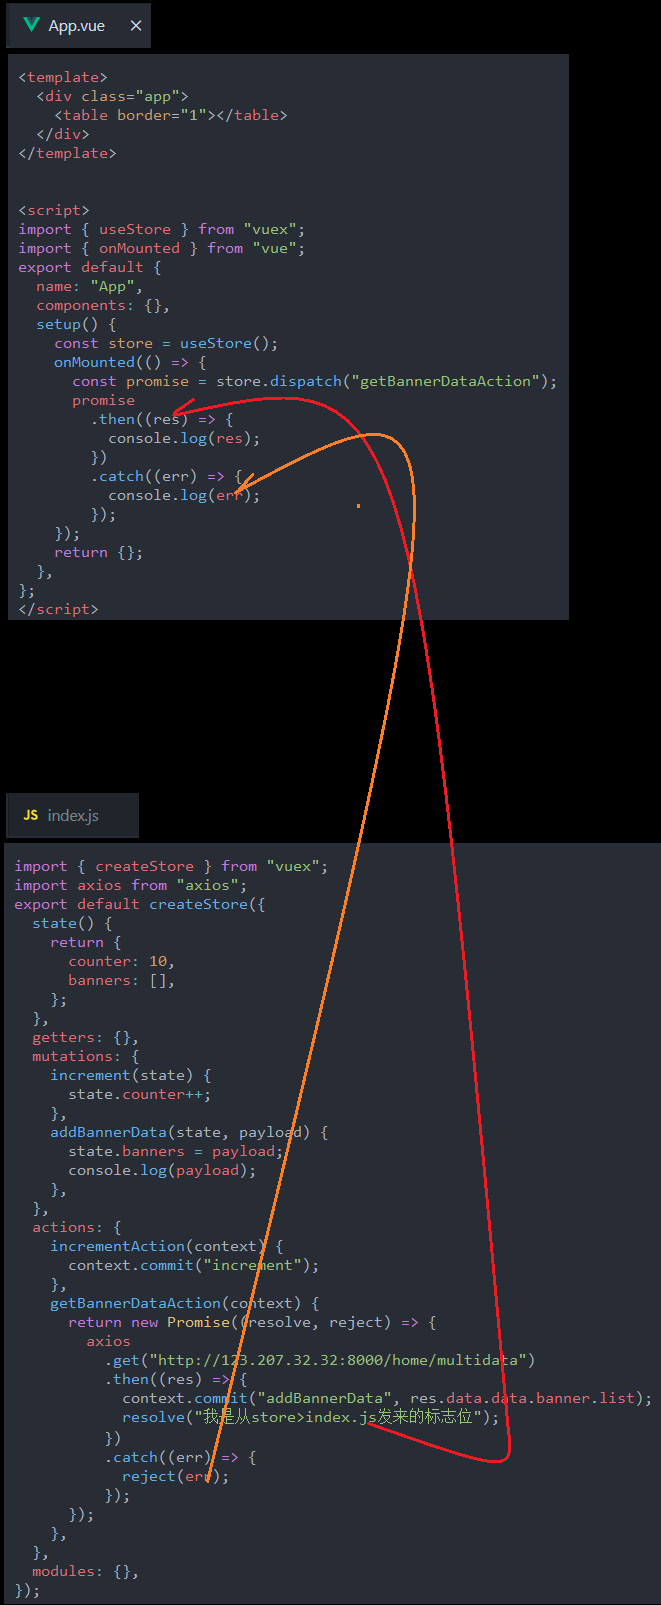
代码逻辑图
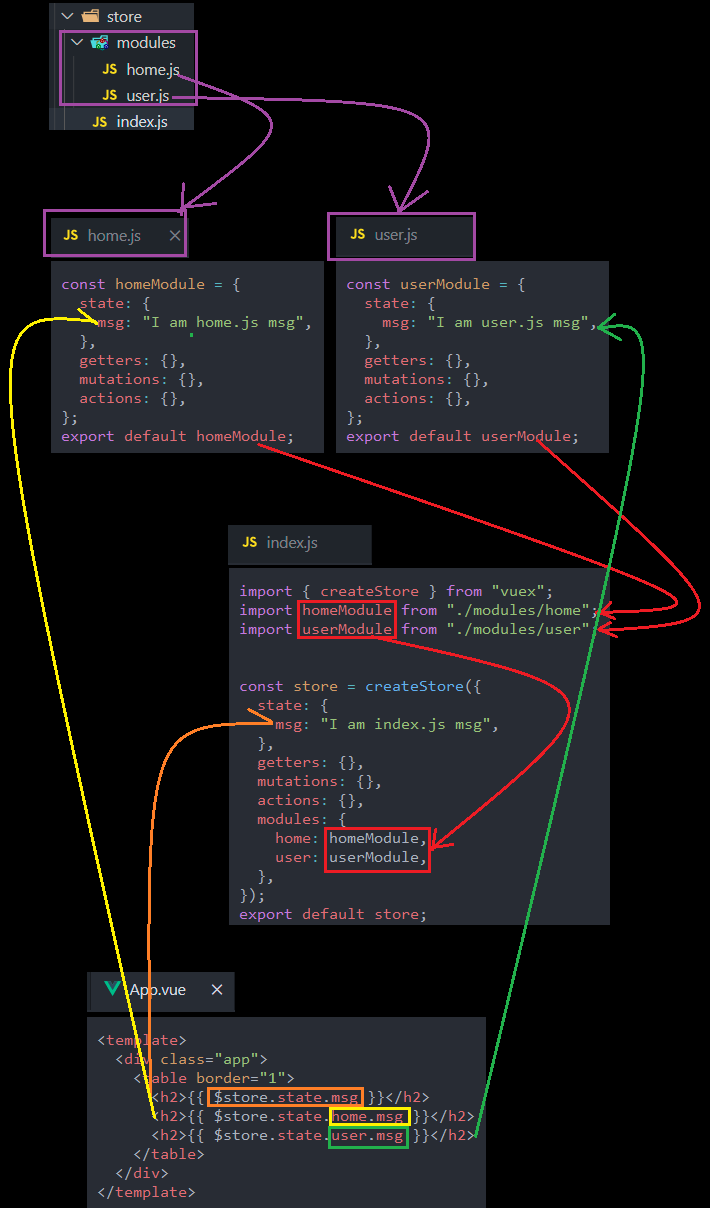
App.vue
关键代码
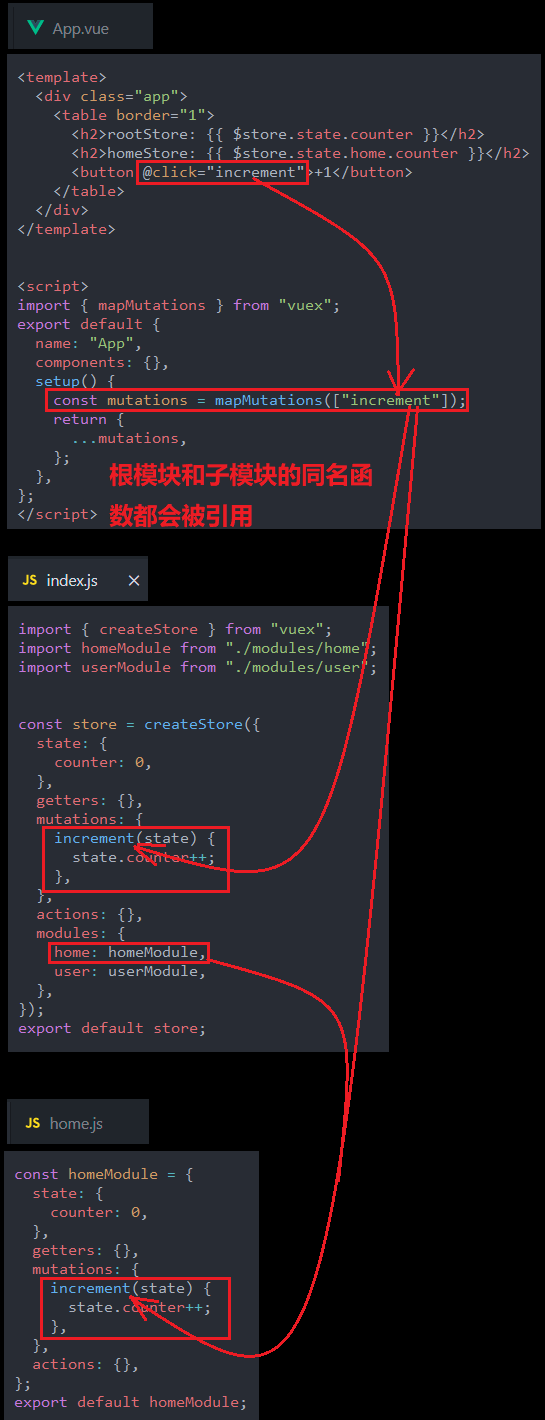
<template>
    <div>
        <button
                v-for="tab in tabs"
                :key="tab"
                :class="{active:currentTab === tab}"
                @click="btnClick(tab)">
                {{tab}}
        </button>
        <component :is="currentTab"></component>
    </div>
</template>

<script>
    import Home from './Home.vue'
    import About from './About.vue'
    import Category from './Category.vue'
    export default {
        components:{
            Home,
            About,
            Category
        },
        data() {
            return {
                tabs:['home','about','category'],
                currentTab:'home'
            }
        },
        methods: {
            btnClick(tab){
                this.currentTab = tab
            }
        },
    }
</script>

<style scoped>
    .active {
        color: red;
    }
</style>
Home.vue
<template>
    <div>
        <h3>Home.vue</h3>
    </div>
</template>

<script>
    export default {
        name:'home'
    }
</script>

<style scoped>

</style>
About.vue
<template>
    <div>
        <h3>About.vue</h3>
    </div>
</template>

<script>
    export default {
        name:'about'
    }
</script>

<style scoped>

</style>
Category.vue
<template>
    <div>
        <h3>Category.vue</h3>
    </div>
</template>

<script>
    export default {
        name:'category'
    }
</script>

<style scoped>

</style>
动态组件传递参数&发送事件
参数传递
输出效果
代码逻辑图
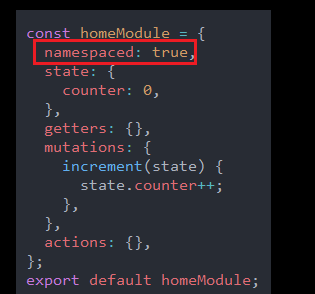
App.vue
<template>
    <div>
        <button
                v-for="tab in tabs"
                :key="tab"
                :class="{active:currentTab === tab}"
                @click="btnClick(tab)">
                {{tab}}
        </button>
        <component :is="currentTab"
                    name='bing'
                    :age='13'>
        </component>
        <hr>
        <home name='bingbing' :age='12'></home>
    </div>
</template>

<script>
    import Home from './Home.vue'
    import About from './About.vue'
    import Category from './Category.vue'
    export default {
        components:{
            Home,
            About,
            Category
        },
        data() {
            return {
                tabs:['home','about','category'],
                currentTab:'home'
            }
        },
        methods: {
            btnClick(tab){
                this.currentTab = tab
            }
        },
    }
</script>

<style scoped>
    .active {
        color: red;
    }
</style>
Home.vue
<template>
    <div>
        <h3>Home.vue</h3>
        <h4>{{name}}--{{age}}</h4>
    </div>
</template>

<script>
    export default {
        name:'home',
        props:{
            name:{
                type:String,
                default:''
            },
            age:{
                type:Number,
                default:0
            }
        }
    }
</script>

<style scoped>

</style>
如何传递的参数由默认的字符串类型转换成数字类型
监听事件
和上面的参数传递一样,都是写在component的属性里面.
App.vue
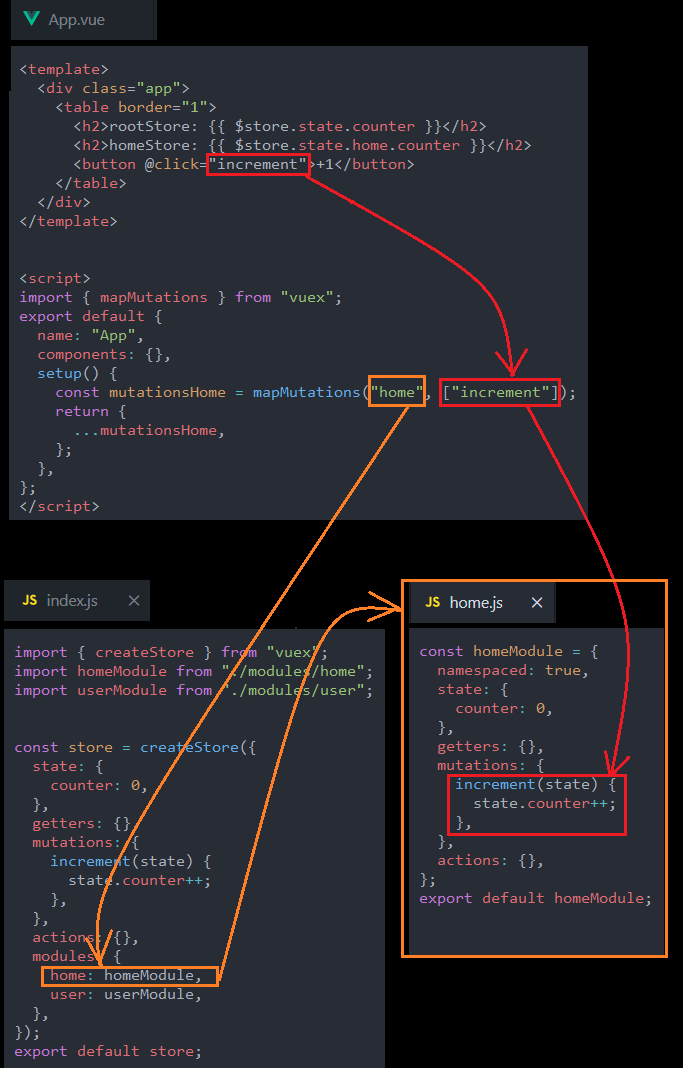
<template>
    <div>
        <button
                v-for="tab in tabs"
                :key="tab"
                :class="{active:currentTab === tab}"
                @click="btnClick(tab)">
                {{tab}}
        </button>
        <component :is="currentTab"
                    name='bing'
                    :age='13'
                    @homeClick='homeClick'>
        </component>
        <hr>
        <home name='bingbing' :age='12'></home>
    </div>
</template>

<script>
    import Home from './Home.vue'
    import About from './About.vue'
    import Category from './Category.vue'
    export default {
        components:{
            Home,
            About,
            Category
        },
        data() {
            return {
                tabs:['home','about','category'],
                currentTab:'home'
            }
        },
        methods: {
            btnClick(tab){
                this.currentTab = tab
            },
            homeClick(){
                console.log('home.vue is clicked');
            }
        },
    }
</script>

<style scoped>
    .active {
        color: red;
    }
</style>
Home.vue
<template>
    <div @click="divClick">
        <h3>Home.vue</h3>
        <h4>{{name}}--{{age}}</h4>
    </div>
</template>

<script>
    export default {
        name:'home',
        props:{
            name:{
                type:String,
                default:''
            },
            age:{
                type:Number,
                default:0
            }
        },
        emits:['homeClick'],
        methods: {
            divClick(){
                this.$emit('homeClick')
            }
        },
    }
</script>

<style scoped>

</style>
keep-alive(缓存组件)
背景案例
在About页面增加一个按钮计数器.
输出效果
现在我们在About页面添加按钮计数器,然后切换页面我们发现这个计数的数值就是清零了.清零的原因是这个当我们切换界面的时候,这个界面实际上被销毁了,也就是生命周期结束了.
我们其实有点希望这个数值就是保存下来.
App.vue
<template>
    <div>
        <button
                v-for="tab in tabs"
                :key="tab"
                :class="{active:currentTab === tab}"
                @click="btnClick(tab)">
                {{tab}}
        </button>
        <component :is="currentTab"
                    name='bing'
                    :age='13'
                    @homeClick='homeClick'>
        </component>
    </div>
</template>

<script>
    import Home from './Home.vue'
    import About from './About.vue'
    import Category from './Category.vue'
    export default {
        components:{
            Home,
            About,
            Category
        },
        data() {
            return {
                tabs:['home','about','category'],
                currentTab:'home'
            }
        },
        methods: {
            btnClick(tab){
                this.currentTab = tab
            },
            homeClick(){
                console.log('home.vue is clicked');
            }
        },
    }
</script>

<style scoped>
    .active {
        color: red;
    }
</style>
About.vue
<template>
    <div>
        <h3>About.vue</h3>
        <button @click="increase">{{counter}}</button>
    </div>
</template>

<script>
    export default {
        name:'about',
        data() {
            return {
                counter:0
            }
        },
        methods: {
            increase(){
                this.counter ++
            }
        },
    }
</script>

<style scoped>

</style>
基本使用案例
输出效果
现在即使是切换界面,这个计数器按钮的数值仍然能够保持不变
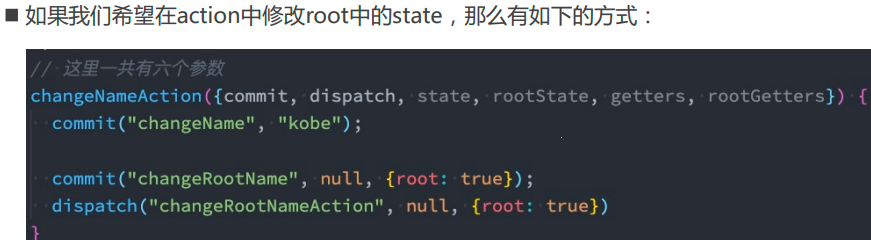
仅仅是增加了一行代码
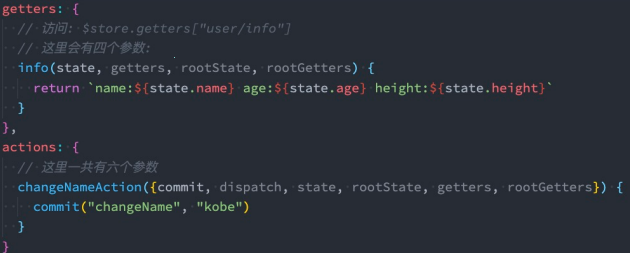
App.vue
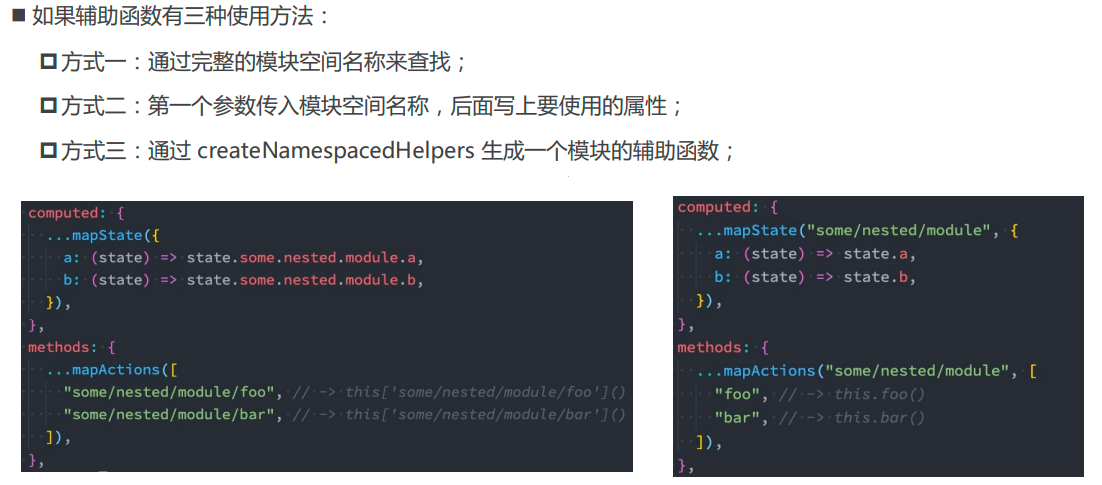
<template>
    <div>
        <button
                v-for="tab in tabs"
                :key="tab"
                :class="{active:currentTab === tab}"
                @click="btnClick(tab)">
                {{tab}}
        </button>
        <keep-alive>
            <component :is="currentTab"
                    name='bing'
                    :age='13'
                    @homeClick='homeClick'>
            </component>
        </keep-alive>
    </div>
</template>

<script>
    import Home from './Home.vue'
    import About from './About.vue'
    import Category from './Category.vue'
    export default {
        components:{
            Home,
            About,
            Category
        },
        data() {
            return {
                tabs:['home','about','category'],
                currentTab:'home'
            }
        },
        methods: {
            btnClick(tab){
                this.currentTab = tab
            },
            homeClick(){
                console.log('home.vue is clicked');
            }
        },
    }
</script>

<style scoped>
    .active {
        color: red;
    }
</style>
keep-alive的属性
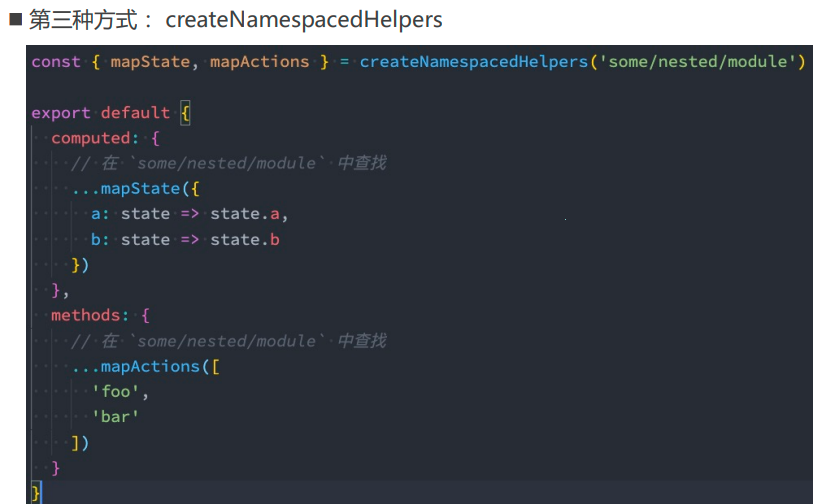
include
输出效果
about界面的计数器是能够保持不变的,category界面的计数器不能
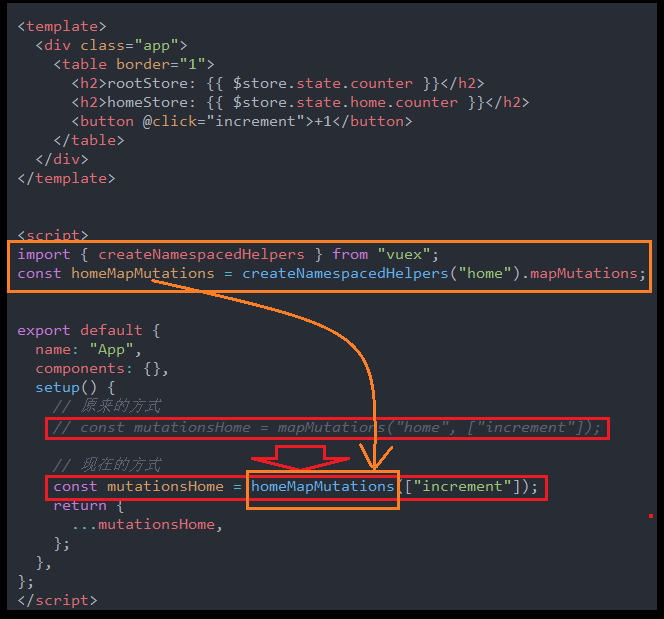
App.vue
关键代码
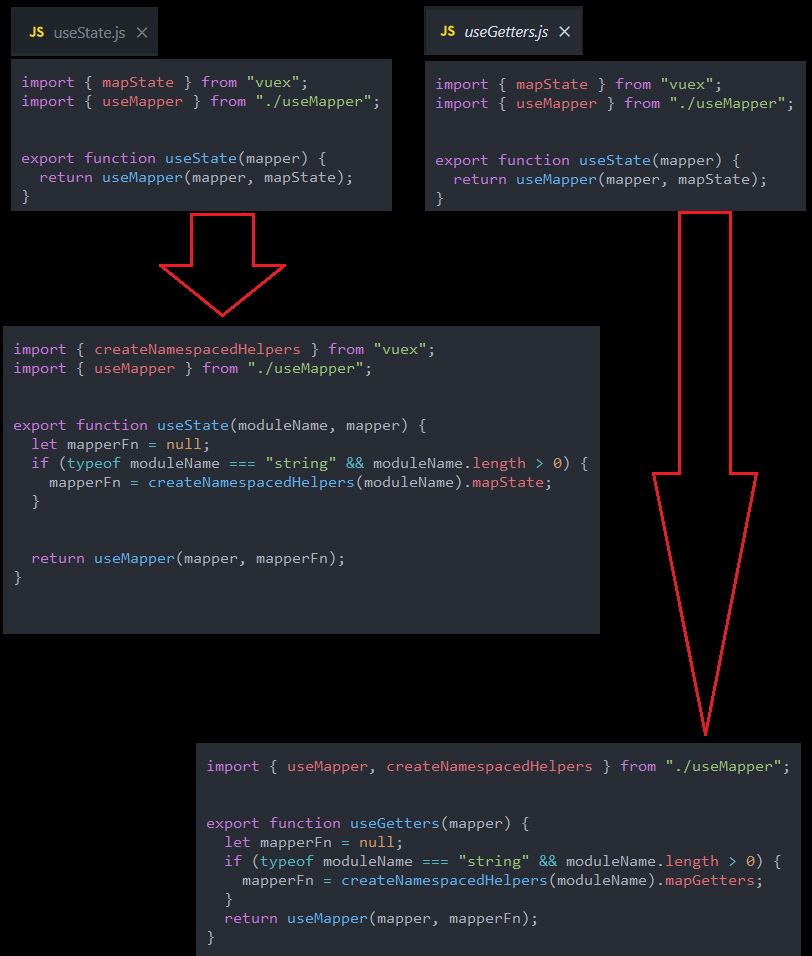
<template>
    <div>
        <button
                v-for="tab in tabs"
                :key="tab"
                :class="{active:currentTab === tab}"
                @click="btnClick(tab)">
                {{tab}}
        </button>
        <keep-alive include="about">
            <component :is="currentTab"
                    name='bing'
                    :age='13'
                    @homeClick='homeClick'>
            </component>
        </keep-alive>
    </div>
</template>

<script>
    import Home from './Home.vue'
    import About from './About.vue'
    import Category from './Category.vue'
    export default {
        components:{
            Home,
            About,
            Category
        },
        data() {
            return {
                tabs:['home','about','category'],
                currentTab:'home'
            }
        },
        methods: {
            btnClick(tab){
                this.currentTab = tab
            },
            homeClick(){
                console.log('home.vue is clicked');
            }
        },
    }
</script>

<style scoped>
    .active {
        color: red;
    }
</style>
Webpack的代码分包&异步组件
为什么需要分包
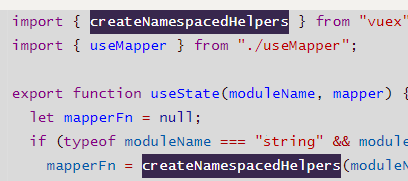
如何分包
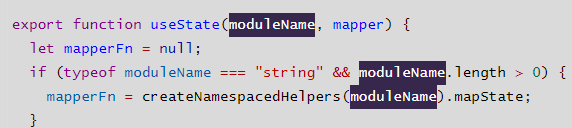
默认的打包情况
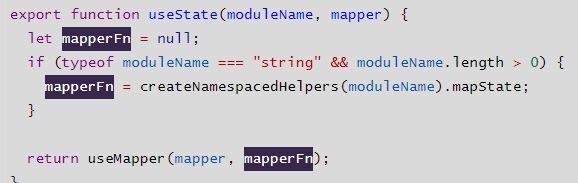
现在我们想要把自己写的某些代码也是单独打包,怎么办呢?
JS中的代码分包
代码逻辑图
代码的引用逻辑

main.js

import { createApp } from 'vue'
import App from './12_异步组件的使用/App.vue'

//以前的引入方式和使用方法
// import {sum} from './12_异步组件的使用/utils/math'
// console.log(sum(100,200));

//现在的引入方式和使用方法
import('./12_异步组件的使用/utils/math').then(res => {
    console.log(res.sum(200,300));
})

createApp(App).mount('#app')
Vue组件中实现异步组件(代码分包)
工厂函数形式
新旧导入组件的对比
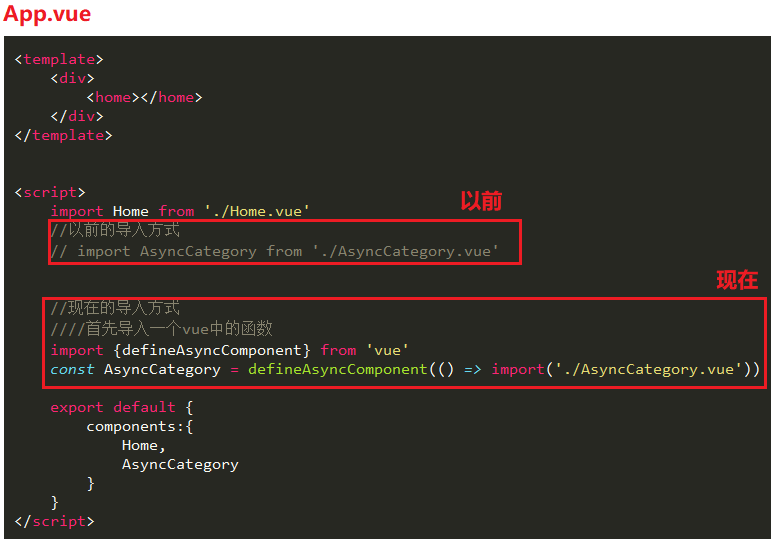
App.vue
关键代码

<template>
    <div>
        <home></home>
    </div>
</template>

<script>
    import Home from './Home.vue'
    //以前的导入方式
    // import AsyncCategory from './AsyncCategory.vue'

    //现在的导入方式
    首先导入一个vue中的函数
    import {defineAsyncComponent} from 'vue'
    const AsyncCategory = defineAsyncComponent(() => import('./AsyncCategory.vue'))

    export default {
        components:{
            Home,
            AsyncCategory
        }
    }
</script>

<style scoped>

</style>
对象形式
其实使用对象形式主要是为了更多的属性.
导入型的对比

对象形式中常用的属性

异步组件和suspense

输出效果

App.vue
关键代码

<template>
    <div>
        <suspense>

            <template #default>
               <async-category></async-category>
            </template>

            <template #fallback>
               <home></home>
            </template>

        </suspense>

    </div>
</template>

<script>
    import Home from './Home.vue'

    //现在的导入方式-工厂函数形式
    首先导入一个vue中的函数
    import {defineAsyncComponent} from 'vue'
    const AsyncCategory = defineAsyncComponent(() => import('./AsyncCategory.vue'))

    export default {
        components:{
            Home,
            AsyncCategory,
        }
    }
</script>

<style scoped>

</style>
$refs的使用
vue中的DOM操作
不推荐使用document.getElement…方法或jQuery等等来操作Vue中的dom元素,因为vue中已经帮我们封装好了操作dom元素的函数,我在使用以前的方法,就是显得很笨拙.

获取元素
输出效果
App.vue
关键代码

<template>
    <div>
        <h2 ref="titleH2">我是被获取的元素</h2>
        <button @click="getElement">获取自己中的元素</button>
    </div>
</template>

<script>
    export default {
        methods: {
            getElement(){
                console.log(this.$refs.titleH2);
            }
        },
    }
</script>

<style scoped>

</style>
获取组件
输出效果
代码的数据流
也就是说通过$ref不仅仅可以或这个组件,还可以获取这个组件里面的东西.
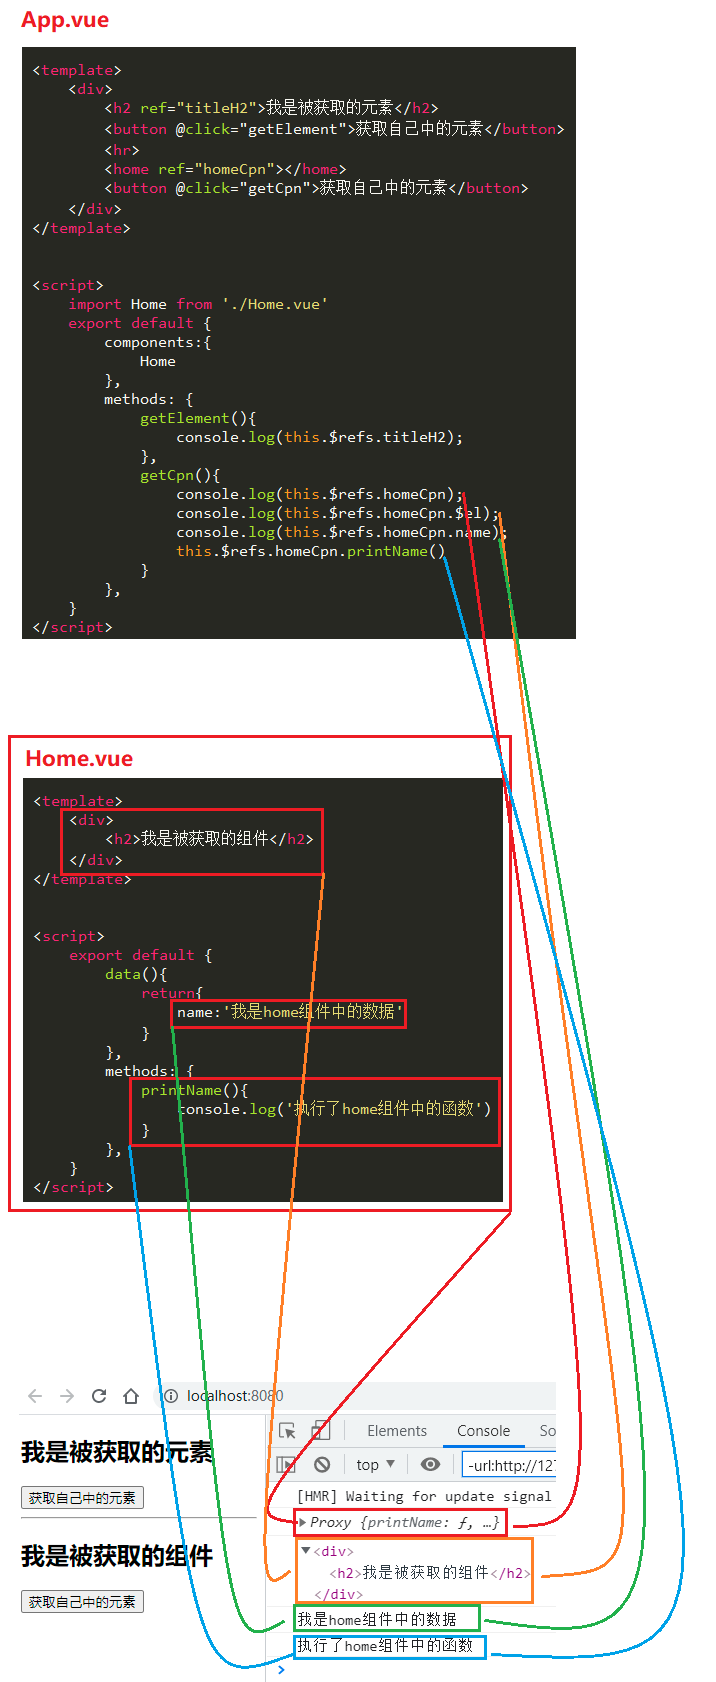
App.vue
<template>
    <div>
        <h2 ref="titleH2">我是被获取的元素</h2>
        <button @click="getElement">获取自己中的元素</button>
        <hr>
        <home ref="homeCpn"></home>
        <button @click="getCpn">获取自己中的元素</button>
    </div>
</template>

<script>
    import Home from './Home.vue'
    export default {
        components:{
            Home
        },
        methods: {
            getElement(){
                console.log(this.$refs.titleH2);
            },
            getCpn(){
                console.log(this.$refs.homeCpn);
                console.log(this.$refs.homeCpn.$el);
                console.log(this.$refs.homeCpn.name);
                this.$refs.homeCpn.printName()
            }
        },
    }
</script>

<style scoped>

</style>
Home.vue
<template>
    <div>
        <h2>我是被获取的组件</h2>
    </div>
</template>

<script>
    export default {
        data(){
            return{
                name:'我是home组件中的数据'
            }
        },
        methods: {
            printName(){
                console.log('执行了home组件中的函数')
            }
        },
    }
</script>

<style scoped>

</style>
$parent和$root
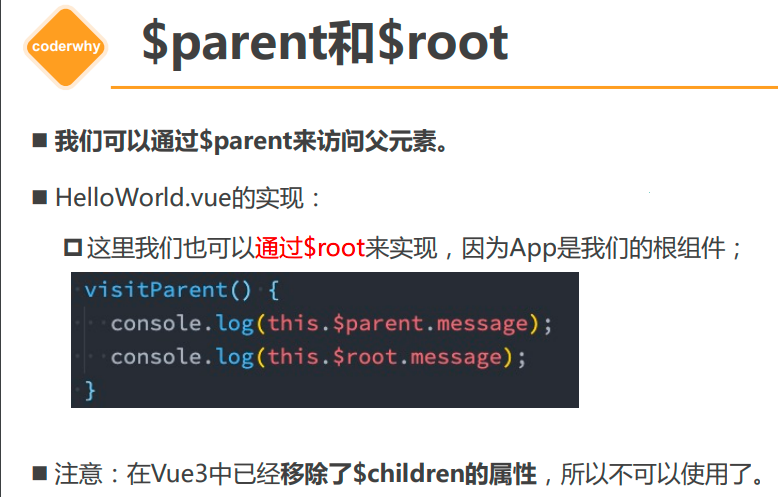
生命周期

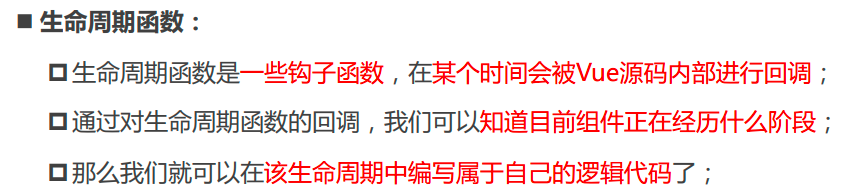
生命周期流程
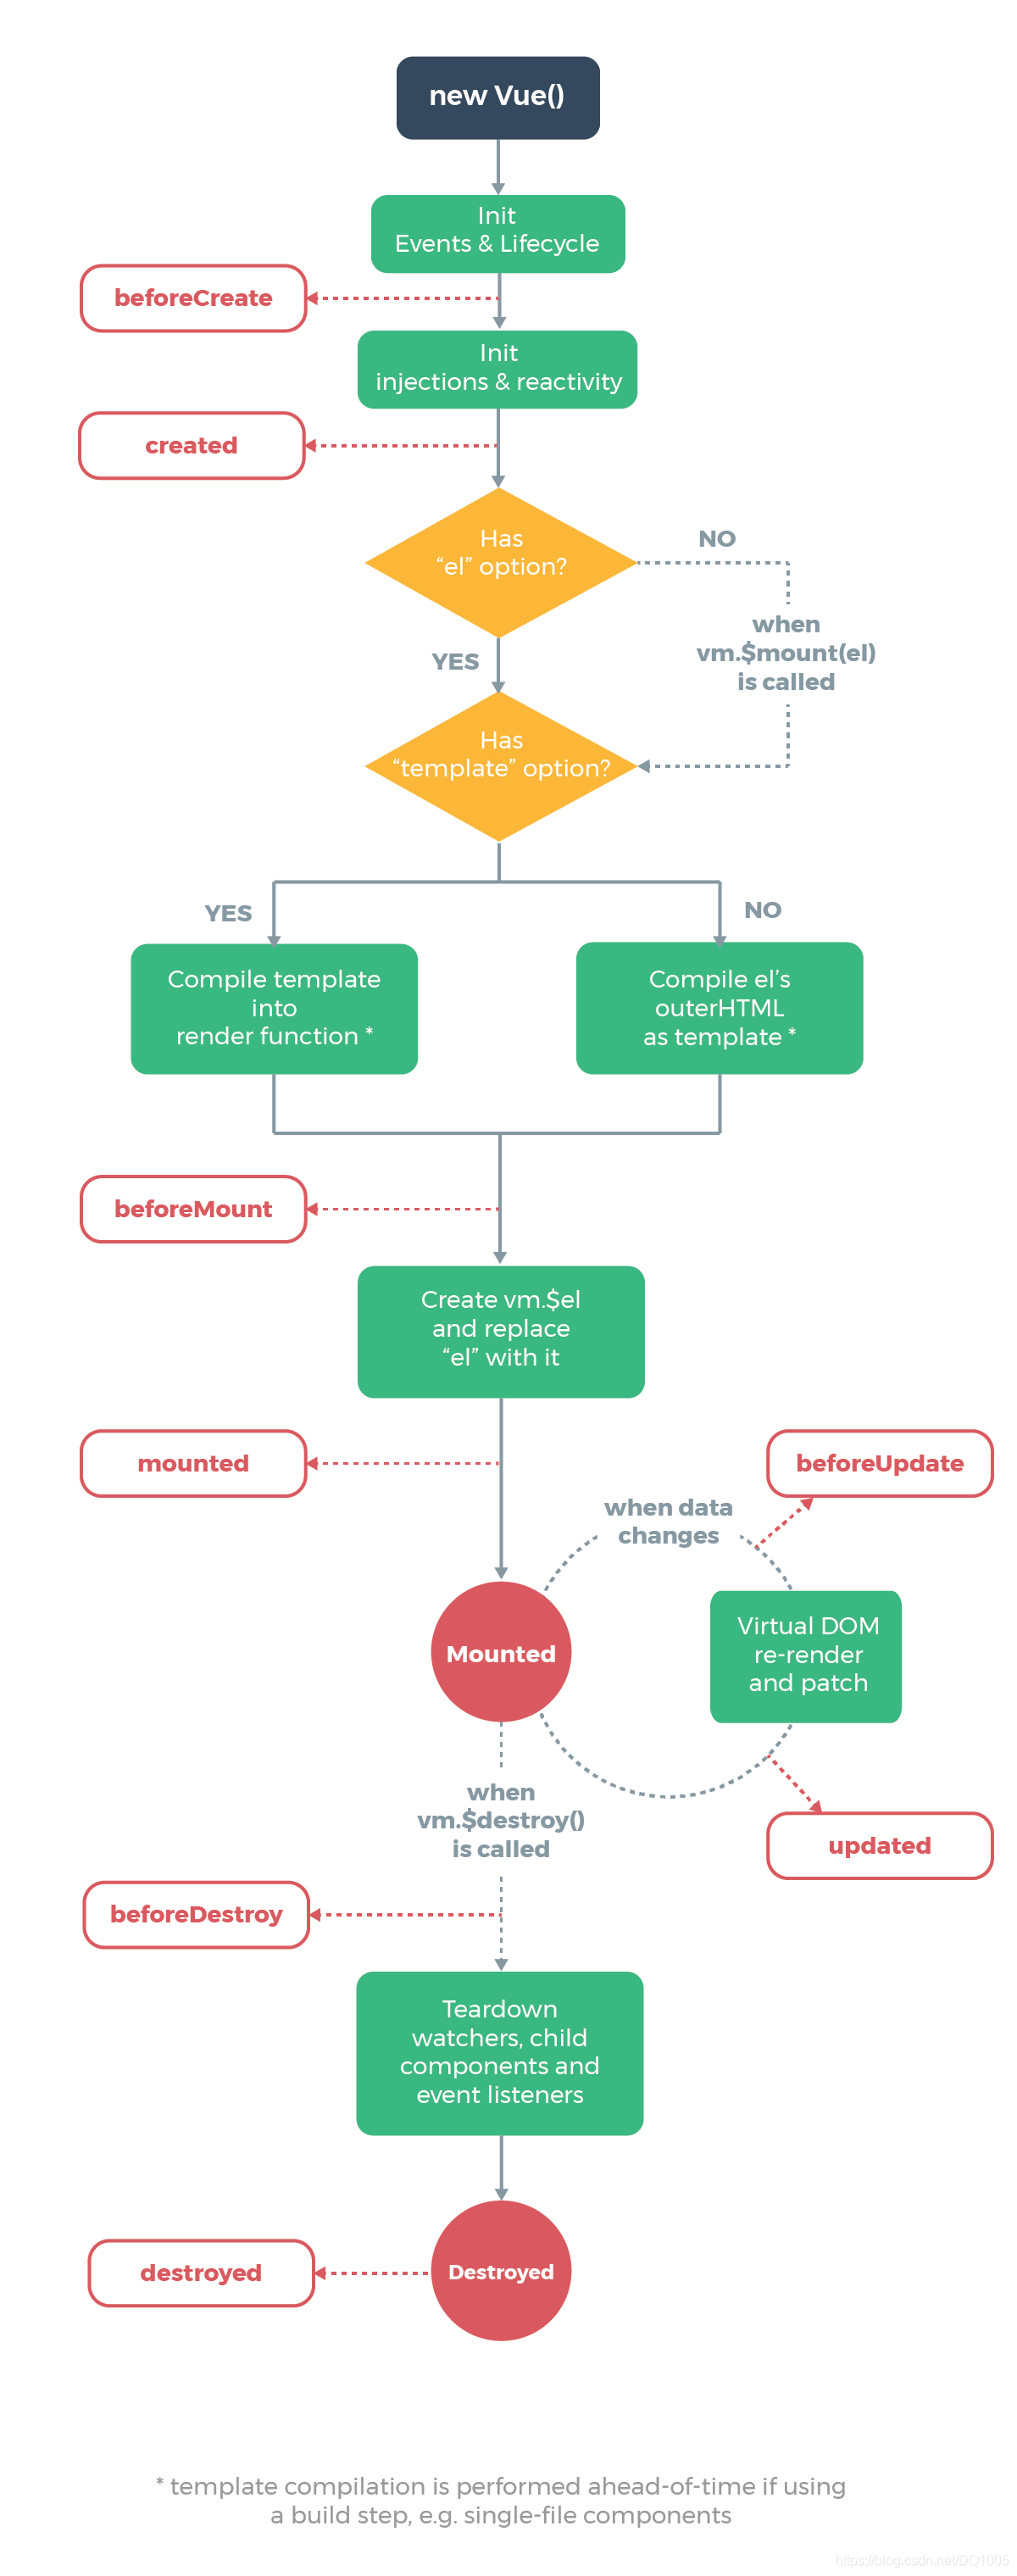
缓存组件的生命周期

首先看看缓存组件和非缓存组件的区别
这里的About是缓存组件,Category是非缓存组件,
缓存组件的只会一行一次created(),然后就什么都不执行了,
而非非缓存组件created()和unmounted()只要切换就是会执行.
我们现在希望这个非缓存组件且能够频繁执行某些生命周期函数.

期望的输出效果

About.vue
关键代码
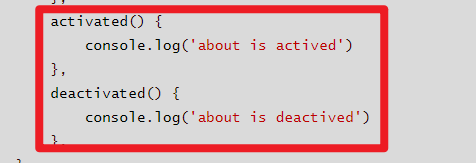
<template>
    <div>
        <h3>About.vue</h3>
        <button @click="increase">{{counter}}</button>
    </div>
</template>

<script>
    export default {
        name:'about',
        data() {
            return {
                counter:0
            }
        },
        methods: {
            increase(){
                this.counter ++
            }
        },
        created() {
            console.log('about is created')
        },
        unmounted() {
            console.log('about is unmounted')
        },
        activated() {
            console.log('about is actived')
        },
        deactivated() {
            console.log('about is deactived')
        },
    }
</script>

<style scoped>

</style>
组件的v-model
基本使用
输出效果
代码逻辑图
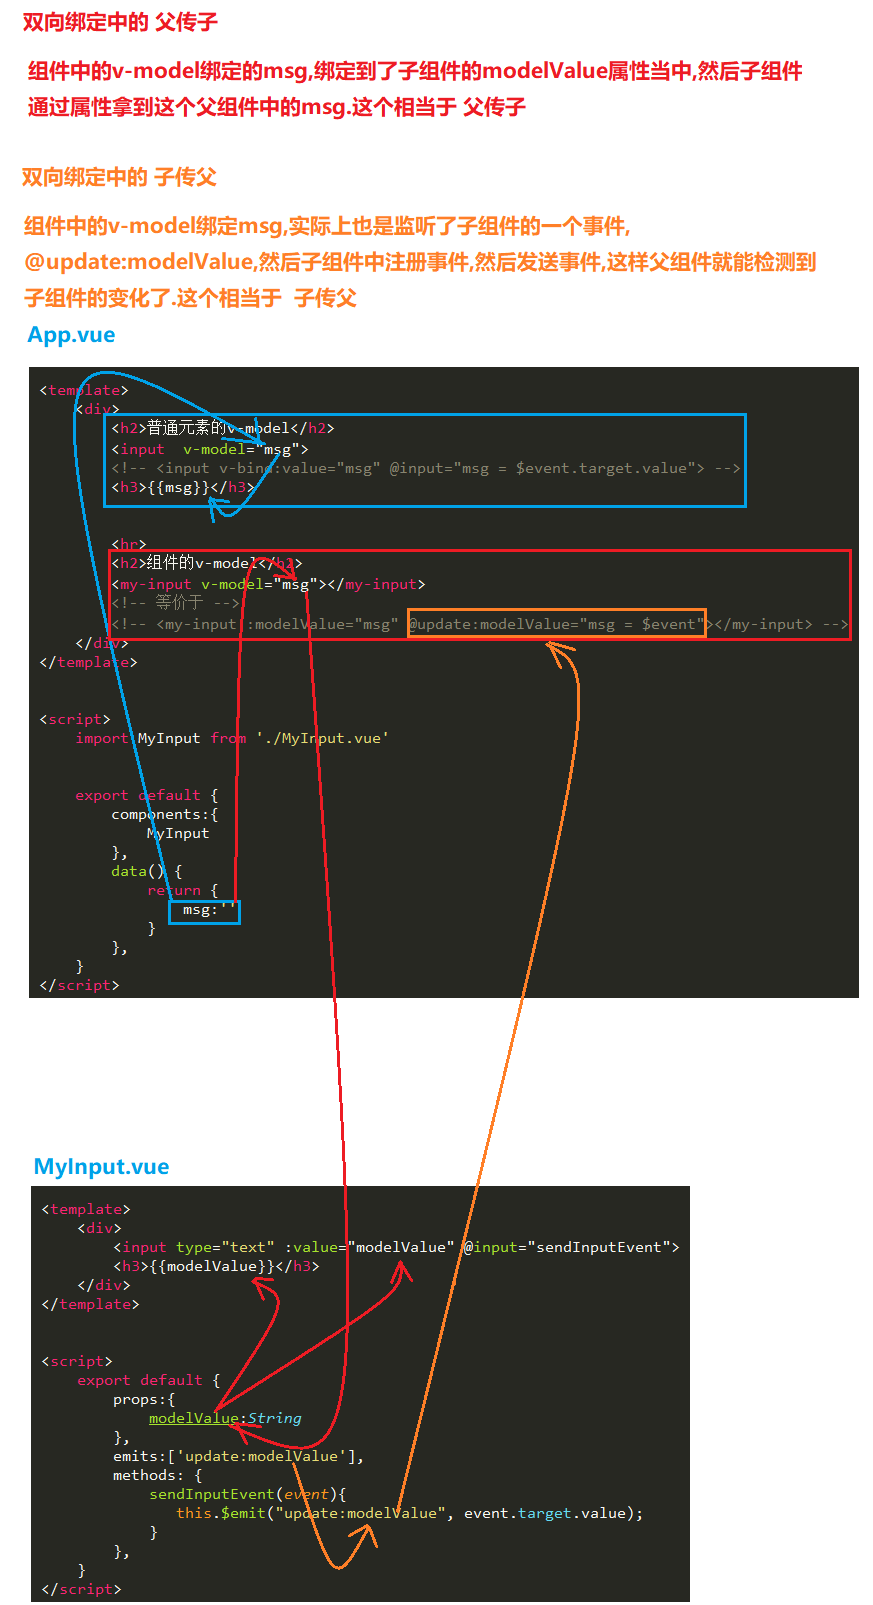
App.vue
<template>
    <div>
        <h2>普通元素的v-model</h2>
        <input  v-model="msg">
        <!-- <input v-bind:value="msg" @input="msg = $event.target.value"> -->
        <h3>{{msg}}</h3>
<!-- ------------------------------------------------------------------------------------------ -->
        <hr>
        <h2>组件的v-model</h2>
        <my-input v-model="msg"></my-input>
        <!-- 等价于 -->
        <!-- <my-input :modelValue="msg" @update:modelValue="msg = $event"></my-input> -->
    </div>
</template>

<script>
    import MyInput from './MyInput.vue'

    export default {
        components:{
            MyInput
        },
        data() {
            return {
                msg:''
            }
        },
    }
</script>

<style scoped>

</style>
MyInput.vue
<template>
    <div>
        <input type="text" :value="modelValue" @input="sendInputEvent">
        <h3>{{modelValue}}</h3>
    </div>
</template>

<script>
    export default {
        props:{
            modelValue:String
        },
        emits:['update:modelValue'],
        methods: {
            sendInputEvent(event){
               this.$emit("update:modelValue", event.target.value);
            }
        },
    }
</script>

<style scoped>

</style>
优化
上面的例子,虽然实现了组件v-model的基本使用,但是还存在一些小的问题,比如’ '我们这里的双向绑定,竟然绑定的是属性,这显然是不合逻辑的,因为这里面一般都是存放从父组件传递过来的数据,我们希望这些数据保持原样,子组件最好不要修改.这个就是时候我们就希望把这些数据copy一份,然后再次基础上进行操作,从而也降低了组件间的耦合性,于是就想到了计算属性.
代码逻辑

MyInput.vue
双向绑定
计算属性间接属性的值
给父组件发送触发事件
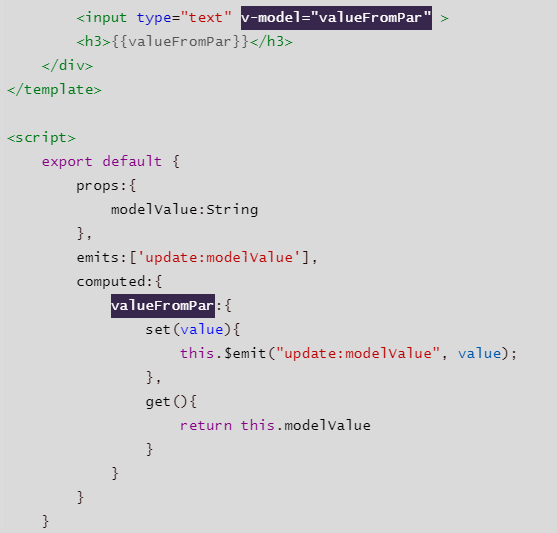
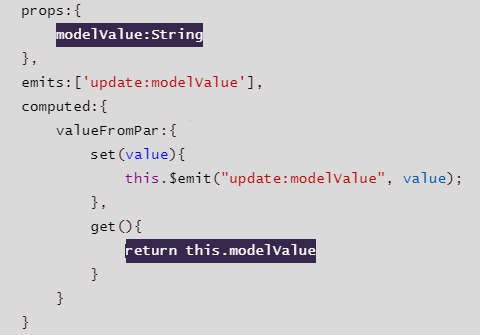
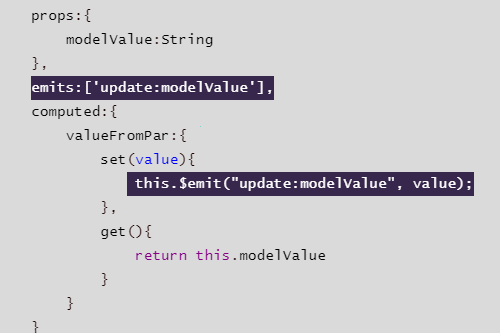
<template>
    <div>
        <input type="text" v-model="valueFromPar" >
        <h3>{{valueFromPar}}</h3>
    </div>
</template>

<script>
    export default {
        props:{
            modelValue:String
        },
        emits:['update:modelValue'],
        computed:{
            valueFromPar:{
                set(value){
                    this.$emit("update:modelValue", value);
                },
                get(){
                    return this.modelValue
                }
            }
        }
    }
</script>

<style scoped>

</style>
绑定多个v-model
代码逻辑图

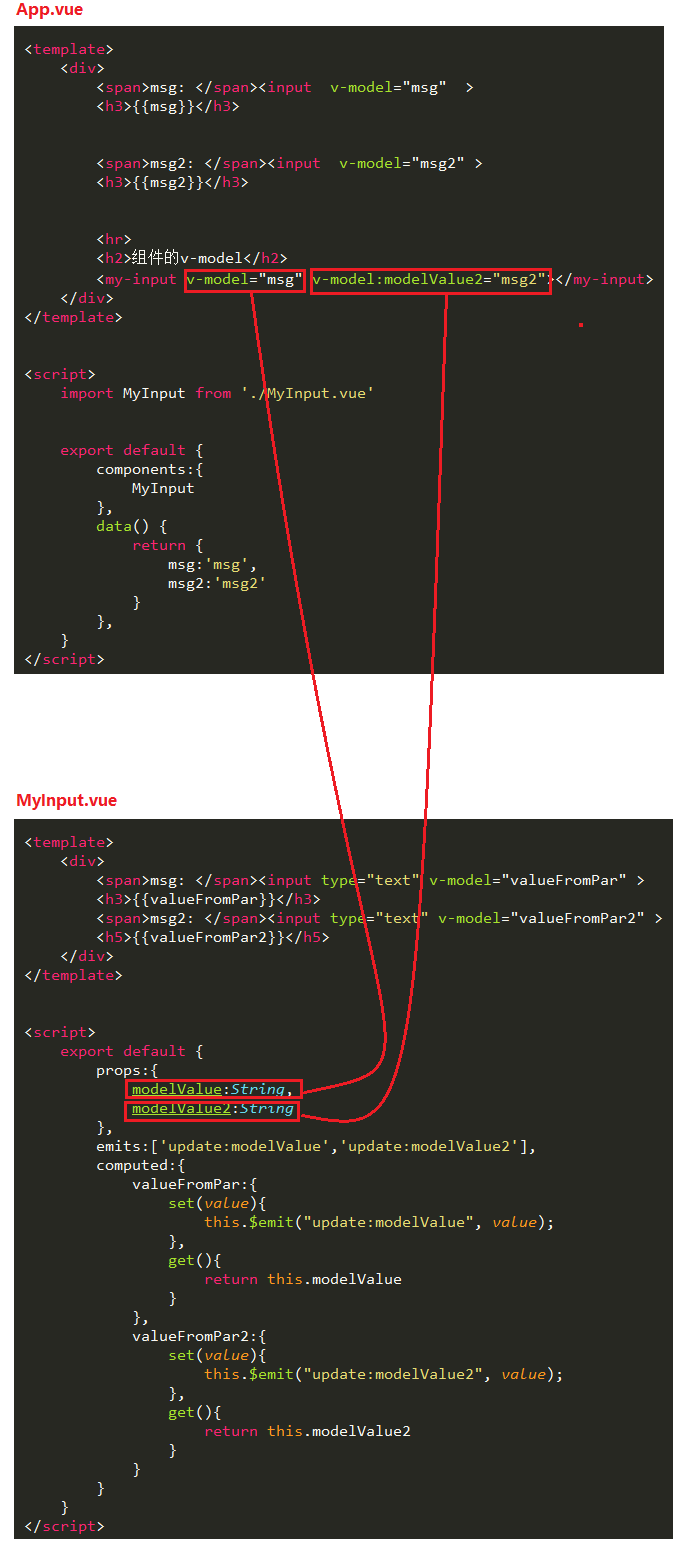
普通标签上面不支持绑定多个v-model
App.vue
<template>
    <div>
        <span>msg: </span><input  v-model="msg"  >
        <h3>{{msg}}</h3>

        <span>msg2: </span><input  v-model="msg2" >
        <h3>{{msg2}}</h3>

        <hr>
        <h2>组件的v-model</h2>
        <my-input v-model="msg" v-model:modelValue2="msg2"></my-input>
    </div>
</template>

<script>
    import MyInput from './MyInput.vue'

    export default {
        components:{
            MyInput
        },
        data() {
            return {
                msg:'msg',
                msg2:'msg2'
            }
        },
    }
</script>

<style scoped>

</style>
MyInput.vue
<template>
    <div>
        <span>msg: </span><input type="text" v-model="valueFromPar" >
        <h3>{{valueFromPar}}</h3>
        <span>msg2: </span><input type="text" v-model="valueFromPar2" >
        <h5>{{valueFromPar2}}</h5>
    </div>
</template>

<script>
    export default {
        props:{
            modelValue:String,
            modelValue2:String
        },
        emits:['update:modelValue','update:modelValue2'],
        computed:{
            valueFromPar:{
                set(value){
                    this.$emit("update:modelValue", value);
                },
                get(){
                    return this.modelValue
                }
            },
            valueFromPar2:{
                set(value){
                    this.$emit("update:modelValue2", value);
                },
                get(){
                    return this.modelValue2
                }
            }
        }
    }
</script>

<style scoped>

</style>
Vue3过渡&动画实现
认识动画
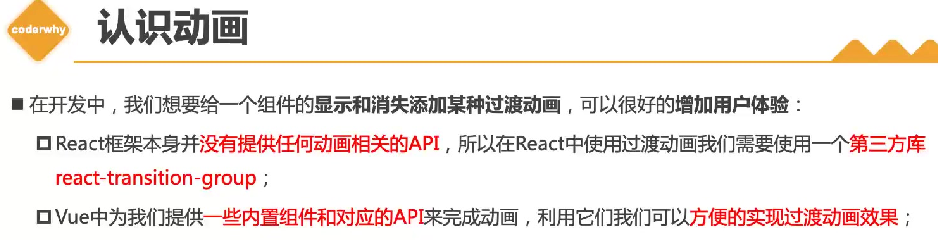
案例_hello world的显示和隐藏
没有动画效果
输出效果

App.vue
<template>
    <div>
        <button @click="isShow = !isShow">toggle</button>
        <h2 v-if="isShow">hello world</h2>
    </div>
</template>

<script>
    export default {
        data() {
            return {
                isShow:true
            }
        },
    }
</script>

<style scoped>

</style>
加入动画效果
输出效果
App.vue
transition标签将要显示或隐藏的内容包裹起来
根据其的名字来设置css样式
可以省略的代码
将这个元素完全显示出来他的opacity默认就是1,所以可以省略不写,也是可以的.
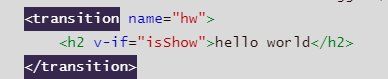

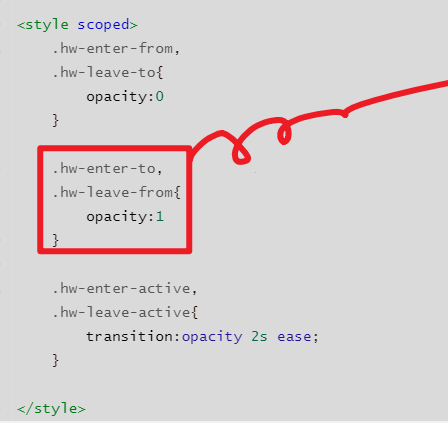
<template>
    <div>
        <button @click="isShow = !isShow">toggle</button>
        <transition name="hw">
            <h2 v-if="isShow">hello world</h2>
        </transition>
    </div>
</template>

<script>
    export default {
        data() {
            return {
                isShow:true
            }
        },
    }
</script>

<style scoped>
    .hw-enter-from,
    .hw-leave-to{
        opacity:0
    }

    .hw-enter-to,
    .hw-leave-from{
        opacity:1
    }

    .hw-enter-active,
    .hw-leave-active{
        transition:opacity 2s ease;
    }

</style>
transition组件的原理
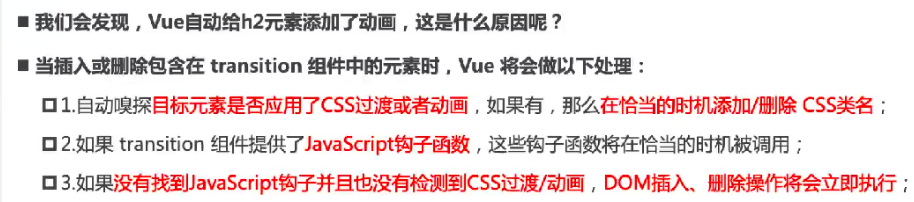
过渡动画class

class的添加或删除的时机
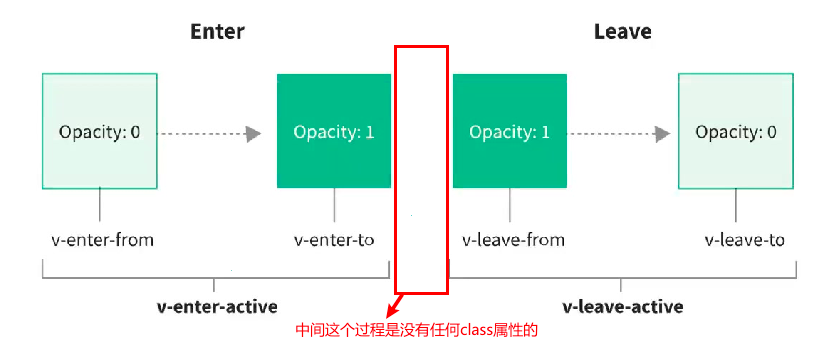
class的name命名规则

animation动画
输出效果
App.vue

<template>
    <div>
        <button @click="isShow = !isShow">toggle</button>
        <hr>
        <transition name="hw">
            <h2 class='hello' v-if="isShow">hello world</h2>
        </transition>
    </div>
</template>

<script>
    export default {
        data() {
            return {
                isShow:true
            }
        },
    }
</script>

<style scoped>
    .hello {
        display: inline-block;
    }
    .hw-enter-active {
        animation:bounce 2s ease
    }
    .hw-leave-active {
        animation:bounce 2s ease reverse
    }


    @keyframes bounce {
    0% {
      transform: scale(0)
    }

    50% {
      transform: scale(1.2);
    }

    100% {
      transform: scale(1);
    }
  }

</style>
transition的属性
type属性

duration属性
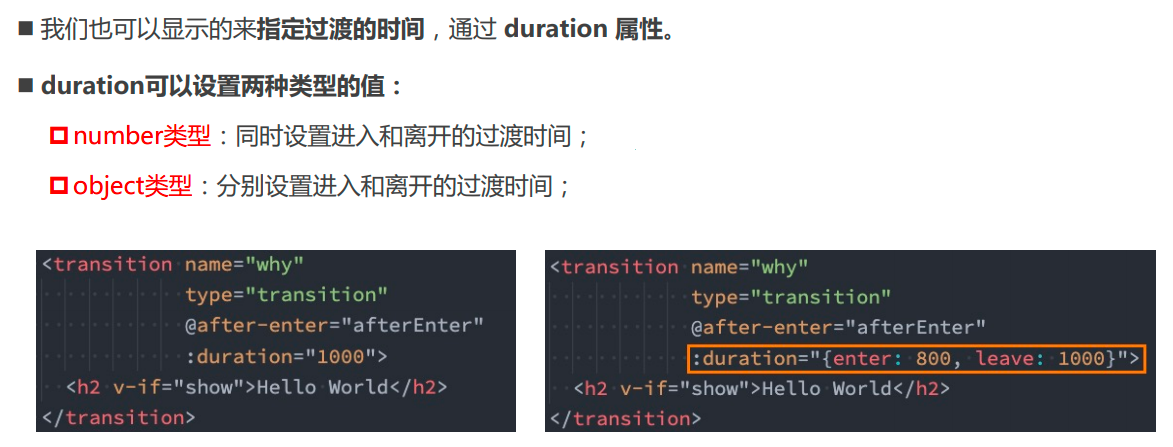
mode属性(常用多个元素切换)

存在的问题
两个元素进行切换的时候,发现前面一个元素还没有离开,后面的元素就是进来了,然后前面的元素完全离开,后面的元素才会过来占位,有种一卡一卡的感觉.

App.vue
<template>
    <div>
        <button @click="isShow = !isShow">toggle</button>
        <hr>
        <transition name="hw">
            <h2 class='hello' v-if="isShow">hello world</h2>
            <h2 class='hello' v-else>I'am computer</h2>
        </transition>
    </div>
</template>

<script>
    export default {
        data() {
            return {
                isShow:true
            }
        },
    }
</script>

<style scoped>
    .hello {
        display: inline-block;
    }

    .hw-enter-from,
    .hw-leave-to{
        opacity:0
    }

    .hw-enter-to,
    .hw-leave-from{
        opacity:1
    }

    .hw-enter-active,
    .hw-leave-active{
        transition:opacity 1s ease;
    }


</style>
改进后的输出效果

App.vue
mode的模式
先让前面的元素离开,然后再进来.就是这种丝滑的感觉.
我们由此可知前面的卡卡的感觉,先让后面的元素进来,等待前面的元素离去,就是in-out了

<template>
    <div>
        <button @click="isShow = !isShow">toggle</button>
        <hr>
        <transition name="hw" mode="out-in">
            <h2 class='hello' v-if="isShow">hello world</h2>
            <h2 class='hello' v-else>I'am computer</h2>
        </transition>
    </div>
</template>

<script>
    export default {
        data() {
            return {
                isShow:true
            }
        },
    }
</script>

<style scoped>
    .hello {
        display: inline-block;
    }

    .hw-enter-from,
    .hw-leave-to{
        opacity:0
    }

    .hw-enter-to,
    .hw-leave-from{
        opacity:1
    }

    .hw-enter-active,
    .hw-leave-active{
        transition:opacity 1s ease;
    }


</style>
appear属性

下面的例子是一个组件的例子和普通元素差不多.
输出效果
App.vue
<template>
    <div>
        <button @click="isShow = !isShow">toggle</button>
        <hr>
        <transition name="hw" mode="out-in" appear="true">
            <component :is="isShow?'home':'about'"></component>
        </transition>
    </div>
</template>

<script>
    import About from './pages/About.vue'
    import Home from './pages/Home.vue'
    export default {
        components:{
            About,
            Home
        },
        data() {
            return {
                isShow:true
            }
        },
    }
</script>

<style scoped>
    .hello {
        display: inline-block;
    }

    .hw-enter-from,
    .hw-leave-to{
        opacity:0
    }

    .hw-enter-to,
    .hw-leave-from{
        opacity:1
    }

    .hw-enter-active,
    .hw-leave-active{
        transition:opacity 1s ease;
    }


</style>
animate.css动画
https://animate.style/
http://www.animate.net.cn/
https://www.dowebok.com/demo/2014/98/
介绍

如何使用
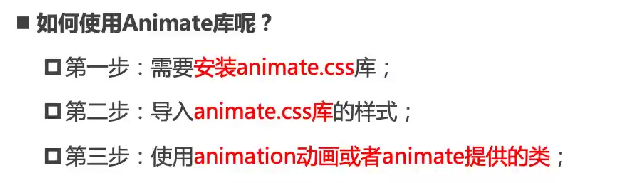
安装animate.css
命令行输入
npm install animate.css
输出效果

导入animate.css

基本使用
输出效果

App.vue
关键代码

<template>
    <div>
        <button @click="isShow = !isShow">toggle</button>
        <hr>
        <transition name="hw">
            <h2 class='title' v-if="isShow">hello world</h2>
        </transition>
    </div>
</template>

<script>
    export default {
        data() {
            return {
                isShow:true
            }
        },
    }
</script>

<style scoped>
    .title {
        text-align: center;
    }
    .hw-enter-active {
        animation: bounceInDown 2s ease
    }
    .hw-leave-active {
        animation: bounceOutDown 2s ease
    }
</style>
自定义过渡class_使用animate中的类

输出效果
和上面的例子中输出效果一样,只不过这里使用了不同的方式
代码逻辑
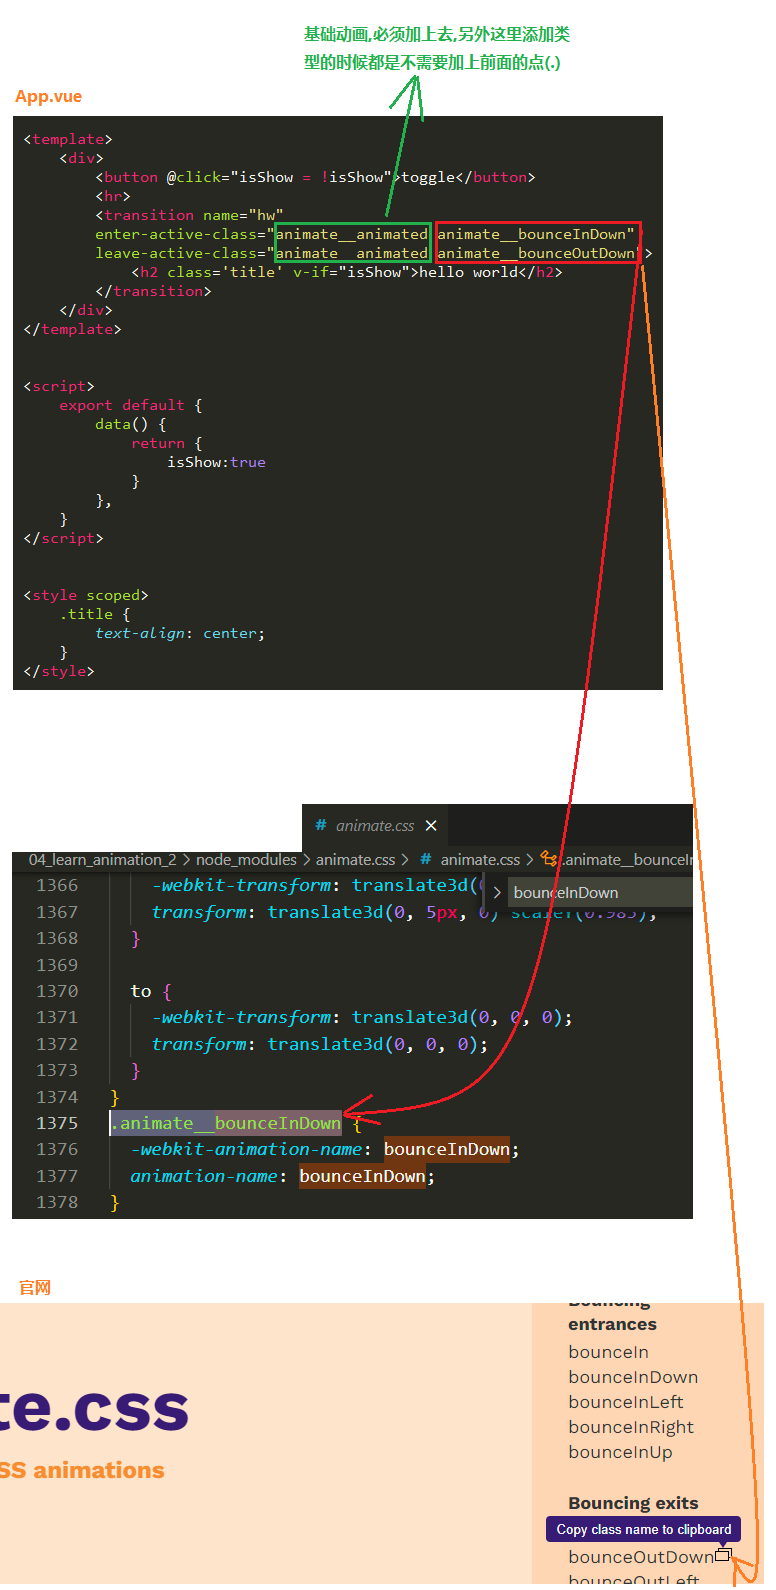
App.vue
关键代码
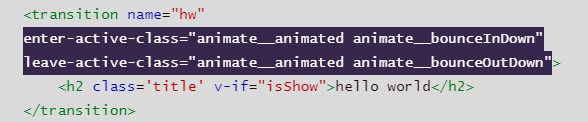
<template>
    <div>
        <button @click="isShow = !isShow">toggle</button>
        <hr>
        <transition name="hw"
        enter-active-class="animate__animated animate__bounceInDown"
        leave-active-class="animate__animated animate__bounceOutDown">
            <h2 class='title' v-if="isShow">hello world</h2>
        </transition>
    </div>
</template>

<script>
    export default {
        data() {
            return {
                isShow:true
            }
        },
    }
</script>

<style scoped>
    .title {
        text-align: center;
    }
</style>
小修改
有时候我们对第三方库的动画效果进行小小的修改,比如说添加个reverse.
输出效果

App.vue
关键代码
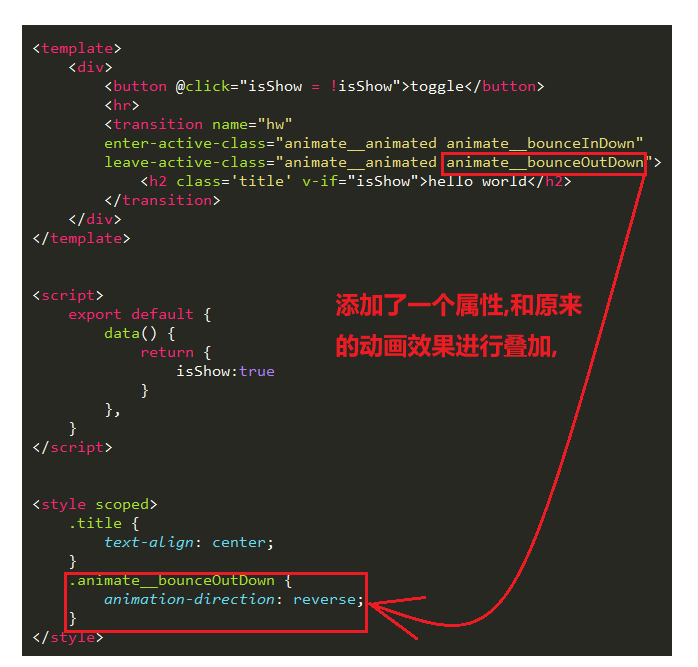
<template>
    <div>
        <button @click="isShow = !isShow">toggle</button>
        <hr>
        <transition name="hw"
        enter-active-class="animate__animated animate__bounceInDown"
        leave-active-class="animate__animated animate__bounceOutDown">
            <h2 class='title' v-if="isShow">hello world</h2>
        </transition>
    </div>
</template>

<script>
    export default {
        data() {
            return {
                isShow:true
            }
        },
    }
</script>

<style scoped>
    .title {
        text-align: center;
    }
    .animate__bounceOutDown {
        animation-direction: reverse;
    }
</style>
自定义过渡class_使用自己定义的类
输出效果

关键代码
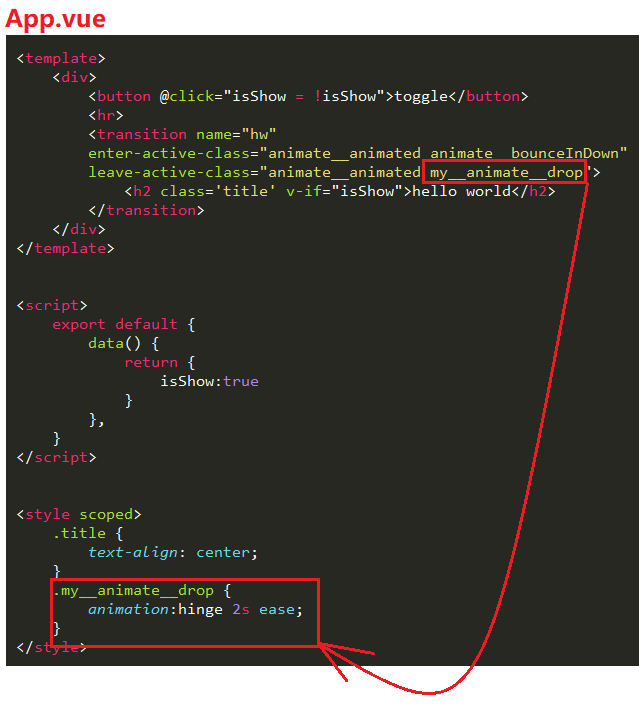
App.vue
<template>
    <div>
        <button @click="isShow = !isShow">toggle</button>
        <hr>
        <transition name="hw"
        enter-active-class="animate__animated animate__bounceInDown"
        leave-active-class="animate__animated my__animate__drop">
            <h2 class='title' v-if="isShow">hello world</h2>
        </transition>
    </div>
</template>

<script>
    export default {
        data() {
            return {
                isShow:true
            }
        },
    }
</script>

<style scoped>
    .title {
        text-align: center;
    }
    .my__animate__drop {
        animation:hinge 2s ease;
    }
</style>
gsap库
https://www.npmjs.com/package/gsap
https://greensock.com/
介绍

如何使用
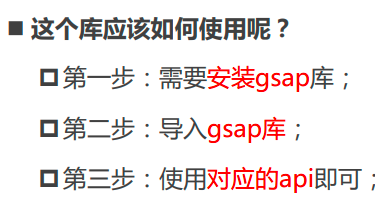
安装gsap库
命令行
npm install gsap
JavaScript钩子
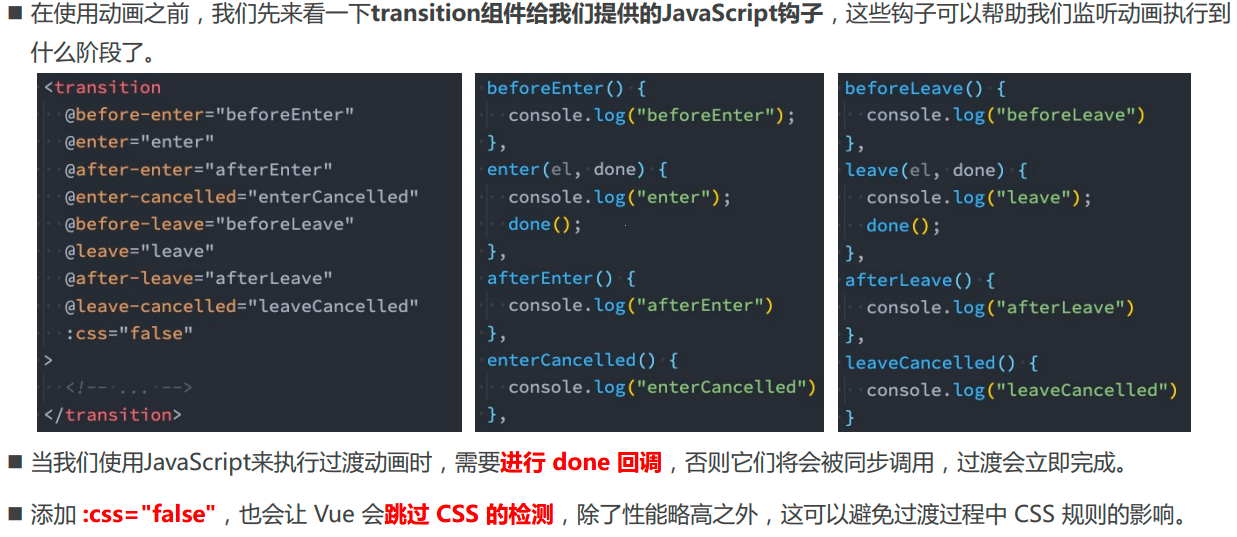
输出效果
App.vue
<template>
  <div>
    <button @click="isShow = !isShow">toggle</button>
    <hr />
    <transition
      @before-enter="beforeEnter"
      @enter="enter"
      @after-enter="afterEnter"
      @before-leave="beforeLeave"
      @leave="leave"
      @afterLeave="afterLeave"
    >
      <h2 class="title" v-if="isShow">hello world</h2>
    </transition>
  </div>
</template>

<script>
export default {
  data() {
    return {
      isShow: true,
    };
  },
  methods: {
    beforeEnter() {
      console.log("beforeEnter");
    },
    enter() {
      console.log("enter");
    },
    afterEnter() {
      console.log("afterEnter");
    },
    beforeLeave() {
      console.log("beforeLeave");
    },
    leave() {
      console.log("leave");
    },
    afterLeave() {
      console.log("afterLeave");
    },
  },
};
</script>

<style scoped>
.title {
  text-align: center;
}
</style>
基本使用gsap
参考网址: https://greensock.com/get-started/
输出
代码逻辑

App.vue
<template>
  <div>
    <button @click="isShow = !isShow">toggle</button>
    <hr />
    <transition
      @enter="enter"
      @leave="leave"
    >
      <h2 class="title" v-if="isShow">hello world</h2>
    </transition>
  </div>
</template>

<script>
    import gsap from 'gsap'
    export default {
    data() {
        return {
        isShow: true,
        };
    },
    methods: {
        enter(el,done) {
          console.log("enter");
          gsap.from(el,{
              scale:0,
              x:200,
              onComplete:done
          })
        },
        leave(el,done) {
          console.log("leave");
          gsap.to(el,{
              scale:0,
              x:200,
              onComplete:done
          })
        },

    },
    };
</script>

<style scoped>
  .title {
    text-align: center;
 }
</style>
gsap实现数字增长效果
输出

App.vue
关键代码

<template>
  <div>
    <input type="number" step=100 v-model="counter">
    <hr>
    <h2>{{showCounter.toFixed(0)}}</h2>
  </div>
</template>

<script>
    import gsap from 'gsap'
    export default {
      data() {
          return {
            counter:0,
            showCounter:0
          };
      },
      watch:{
        counter(newValue){
          gsap.to(this,{
            duration:1,
            showCounter:newValue
          })
        }
      }
    };
</script>

<style scoped>
  .title {
    text-align: center;
 }
</style>
列表的过渡

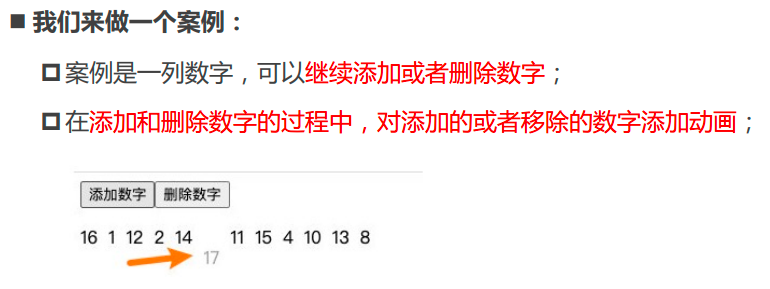
App.vue

<template>
    <div>
        <button @click="addNum">添加数字</button>
        <button @click="removeNum">删除数字</button>

        <transition-group tag="p" name="why">
          <span v-for="item in numbers" :key="item" class="item">
              {{item}}
          </span>
        </transition-group>
    </div>
</template>

<script>
    export default {
        data() {
            return {
                numbers:[0,1,2,3,4,5,6,7,8,9],
            }
        },
        methods: {
            addNum() {
                this.numbers.splice(this.randomIndex(), 0, this.numCounter)
            },
            removeNum() {
                this.numbers.splice(this.randomIndex(), 1)
            },
            randomIndex() {
                return Math.floor(Math.random() * this.numbers.length)
            },
        },
        computed:{
            numCounter(){
                return this.numbers.length
            }
        }
    }
</script>

<style scoped>
    .item {
    margin-right: 10px;
    display: inline-block;
  }

  .why-enter-from,
  .why-leave-to {
    opacity: 0;
    transform: translateY(30px);
  }

  .why-enter-active,
  .why-leave-active {
    transition: all 1s ease;
  }

</style>
输出效果与不足
现在的情况是添加数字和删除数字都是具有动画的,而剩余在数组中的其他数字占位却显得很生硬,
尝试在App.vue添加如下代码:
App.vue添加的代码
<style scoped>
  .why-move {
    transition: transform 1s ease;
  }
</style>
输出效果
现在的情况是添加数字时,无论是添加的数字还是移动的数字都是具有动画的,而删除数字时,删除的数字有动画,但是移动的数字很生硬.原因是因为当一个数字被删除时,这个动画还没有执行完成,这个元素仍然是标准流中的元素,所以会占位.我们现在希望这个删除的时候就是不要占位,因此可以将其删除时候的属性设置为absolute,脱离标准流.
在App.vue继续增加如下代码
<style scoped>
  .why-leave-active {
    position: absolute;
  }
</style>
输出效果
输出效果还可以,无论删除或增加数字,以及由此引起的数字的移动,都是具有动画的.

完整App.vue代码
<template>
    <div>
        <button @click="addNum">添加数字</button>
        <button @click="removeNum">删除数字</button>

        <transition-group tag="p" name="why">
          <span v-for="item in numbers" :key="item" class="item">
              {{item}}
          </span>
        </transition-group>
    </div>
</template>

<script>
    export default {
        data() {
            return {
                numbers:[0,1,2,3,4,5,6,7,8,9],
            }
        },
        methods: {
            addNum() {
                this.numbers.splice(this.randomIndex(), 0, this.numCounter)
            },
            removeNum() {
                this.numbers.splice(this.randomIndex(), 1)
            },
            randomIndex() {
                return Math.floor(Math.random() * this.numbers.length)
            },
        },
        computed:{
            numCounter(){
                return this.numbers.length
            }
        }
    }
</script>

<style scoped>
    .item {
    margin-right: 10px;
    display: inline-block;
  }

  .why-enter-from,
  .why-leave-to {
    opacity: 0;
    transform: translateY(30px);
  }

  .why-enter-active,
  .why-leave-active {
    transition: all 1s ease;
  }

  .why-leave-active {
    position: absolute;
  }

  .why-move {
    transition: transform 1s ease;
  }
</style>
列表的交错过渡
代码逻辑图

App.vue
HTML5中数据传递的方式
数组的过滤


<template>
  <div>
    <input v-model="keyword">
    <transition-group tag="ul" name="why" :css="false"
                      @before-enter="beforeEnter"
                      @enter="enter"
                      @leave="leave">
      <li v-for="(item, index) in showNames" :key="item" :data-index="index">
        {{item}}
      </li>
    </transition-group>
  </div>
</template>

<script>
  import gsap from 'gsap';

  export default {
    data() {
      return {
        names: ["abc", "cba", "nba", "why", "lilei", "hmm", "kobe", "james"],
        keyword: ""
      }
    },
    computed: {
      showNames() {
        return this.names.filter(item => item.indexOf(this.keyword) !== -1)
      }
    },
    methods: {
      beforeEnter(el) {
        el.style.opacity = 0;
        el.style.height = 0;
      },
      enter(el, done) {
        gsap.to(el, {
          opacity: 1,
          height: "1.5em",
          delay: el.dataset.index * 0.5,
          onComplete: done
        })
      },
      leave(el, done) {
        gsap.to(el, {
          opacity: 0,
          height: 0,
          delay: el.dataset.index * 0.5,
          onComplete: done
        })
      }
    }
  }
</script>

<style scoped>

</style>
输出

数字洗牌
用到了了一个第三方库,首先安装这个第三方库,在命令行输入:
npm install lodash
然后再App.vue中使用:
App.vue

<template>
  <div>
    <button @click="addNum">添加数字</button>
    <button @click="removeNum">删除数字</button>
    <button @click="shuffleNum">数字洗牌</button>

    <transition-group tag="p" name="why">
      <span v-for="item in numbers" :key="item" class="item">
        {{item}}
      </span>
    </transition-group>
  </div>
</template>

<script>
  import _ from 'lodash';

  export default {
    data() {
      return {
        numbers: [0, 1, 2, 3, 4, 5, 6, 7, 8, 9],
        numCounter: 10
      }
    },
    methods: {
      addNum() {
        this.numbers.splice(this.randomIndex(), 0, this.numCounter++)
      },
      removeNum() {
        this.numbers.splice(this.randomIndex(), 1)
      },
      shuffleNum() {
        this.numbers = _.shuffle(this.numbers);
      },
      randomIndex() {
        return Math.floor(Math.random() * this.numbers.length)
      }
    },
  }
</script>

<style scoped>
  .item {
    margin-right: 10px;
    display: inline-block;
  }

  .why-enter-from,
  .why-leave-to {
    opacity: 0;
    transform: translateY(30px);
  }

  .why-enter-active,
  .why-leave-active {
    transition: all 1s ease;
  }

  .why-leave-active {
    position: absolute;
  }

  .why-move {
    transition: transform 1s ease;
  }
</style>
输出效果

Mixin
认识Mixin
关键就是把组件中相同的代码逻辑进行抽取.
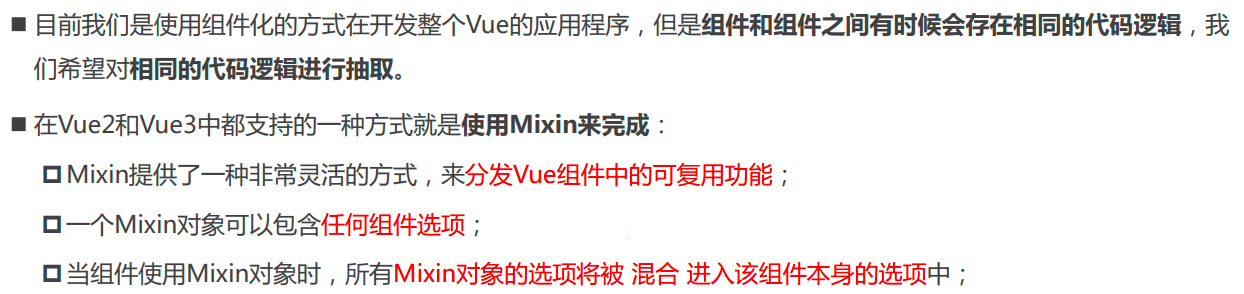
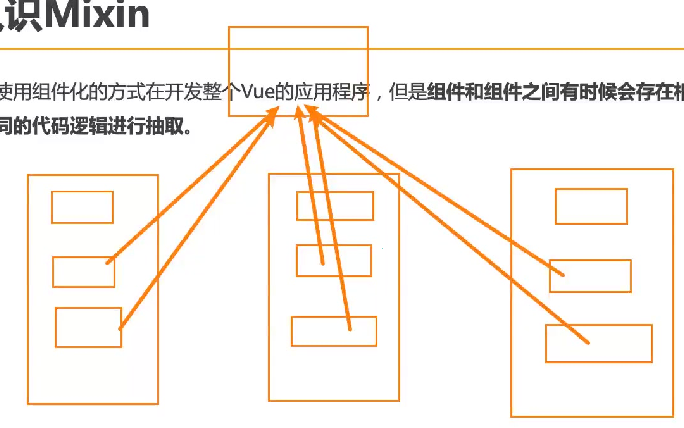
Mixin的基本使用
export default和export两种不同的导出方式
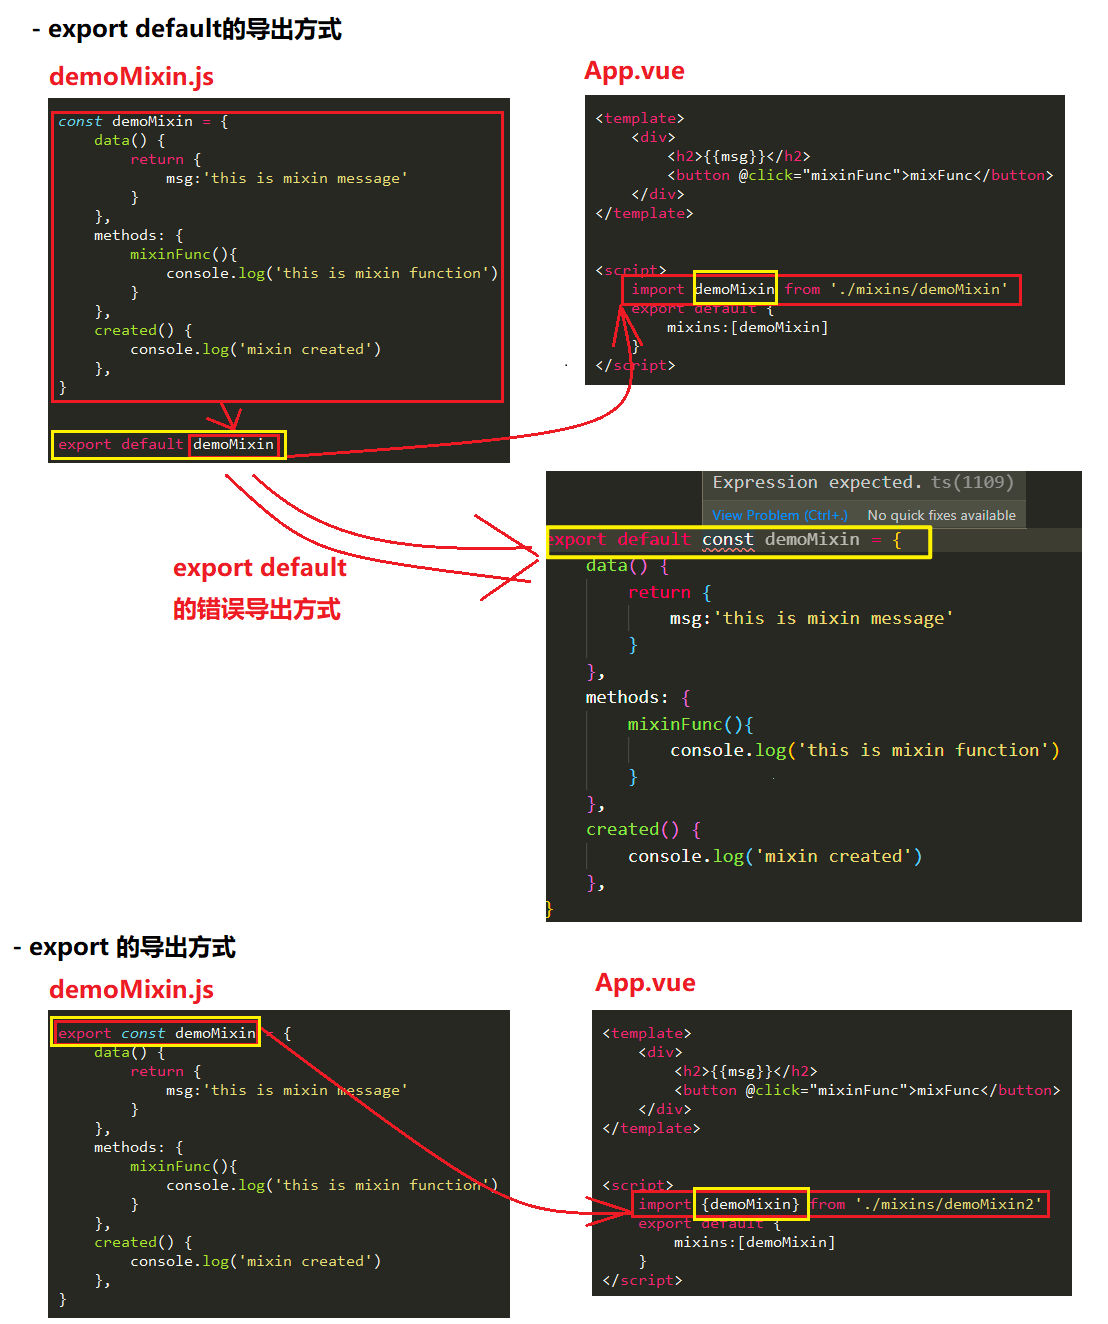
代码逻辑图
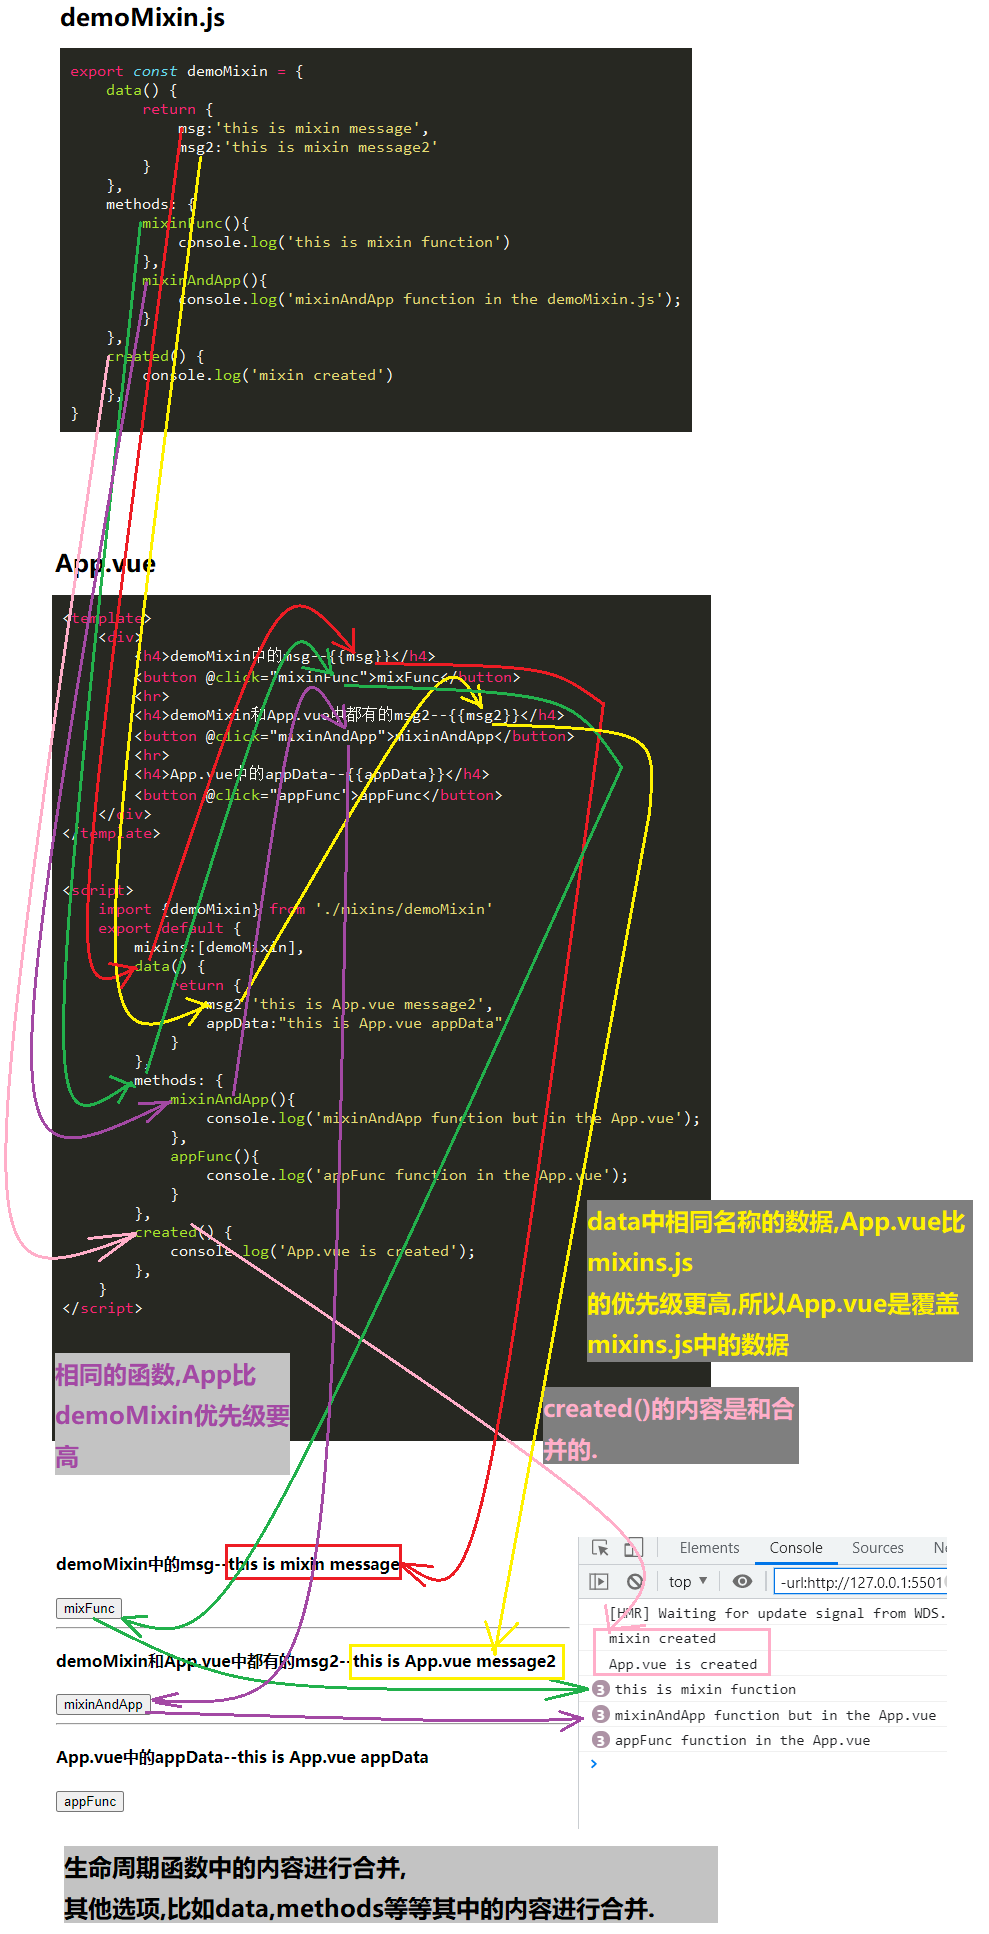
mixins>demoMixin.js
export const demoMixin = {
    data() {
        return {
            msg:'this is mixin message',
            msg2:'this is mixin message2'
        }
    },
    methods: {
        mixinFunc(){
            console.log('this is mixin function')
        },
        mixinAndApp(){
            console.log('mixinAndApp function in the demoMixin.js');
        }
    },
    created() {
        console.log('mixin created')
    },
}
App.vue
<template>
    <div>
        <h4>demoMixin中的msg--{{msg}}</h4>
        <button @click="mixinFunc">mixFunc</button>
        <hr>
        <h4>demoMixin和App.vue中都有的msg2--{{msg2}}</h4>
        <button @click="mixinAndApp">mixinAndApp</button>
        <hr>
        <h4>App.vue中的appData--{{appData}}</h4>
        <button @click="appFunc">appFunc</button>
    </div>
</template>

<script>
    import {demoMixin} from './mixins/demoMixin'
    export default {
        mixins:[demoMixin],
        data() {
            return {
                msg2:'this is App.vue message2',
                appData:"this is App.vue appData"
            }
        },
        methods: {
            mixinAndApp(){
                console.log('mixinAndApp function but in the App.vue');
            },
            appFunc(){
                console.log('appFunc function in the App.vue');
            }
        },
        created() {
            console.log('App.vue is created');
        },
    }
</script>

<style scoped>

</style>
输出效果
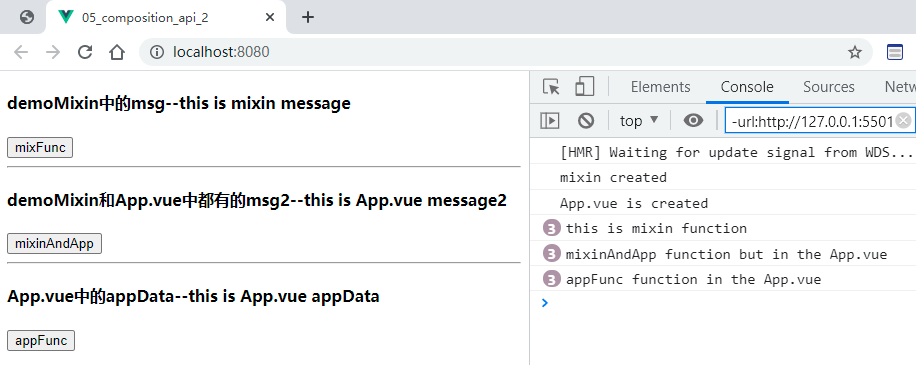
Mixin的合并规则

全局混入Mixin

代码逻辑

main.js
import { createApp } from 'vue'
import App from './02_mixin的全局混入/App.vue'

const app = createApp(App)
app.mixin({
    data() {
        return {
            msgInMain:'msg data in main.js'
        }
    },
})

app.mount('#app')
extends
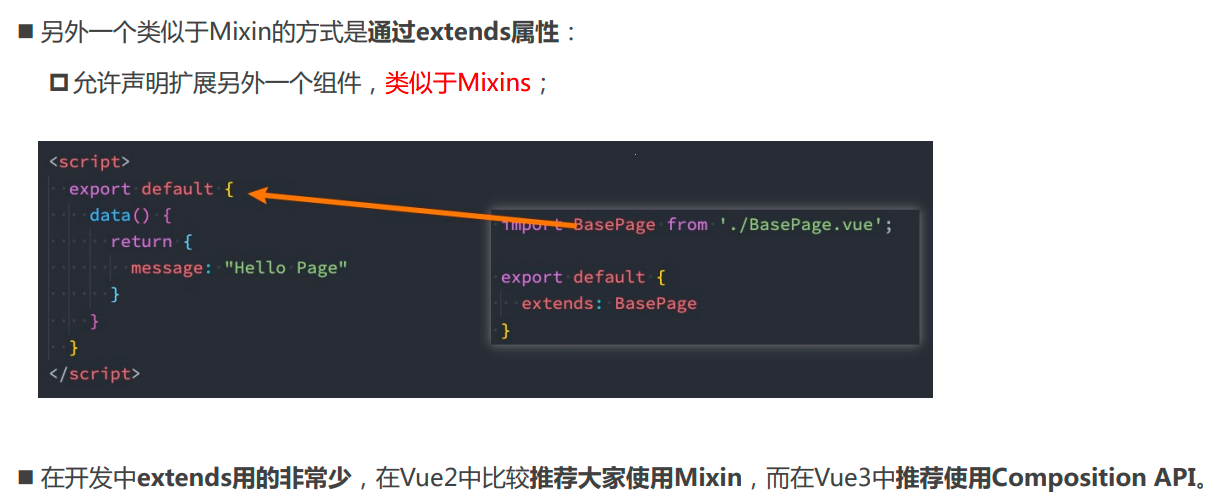
Options API的弊端
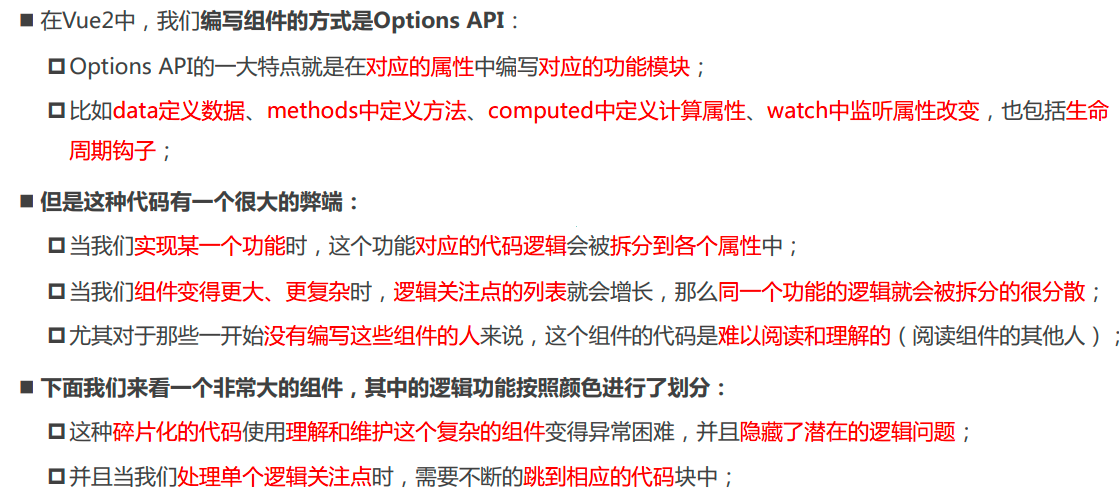
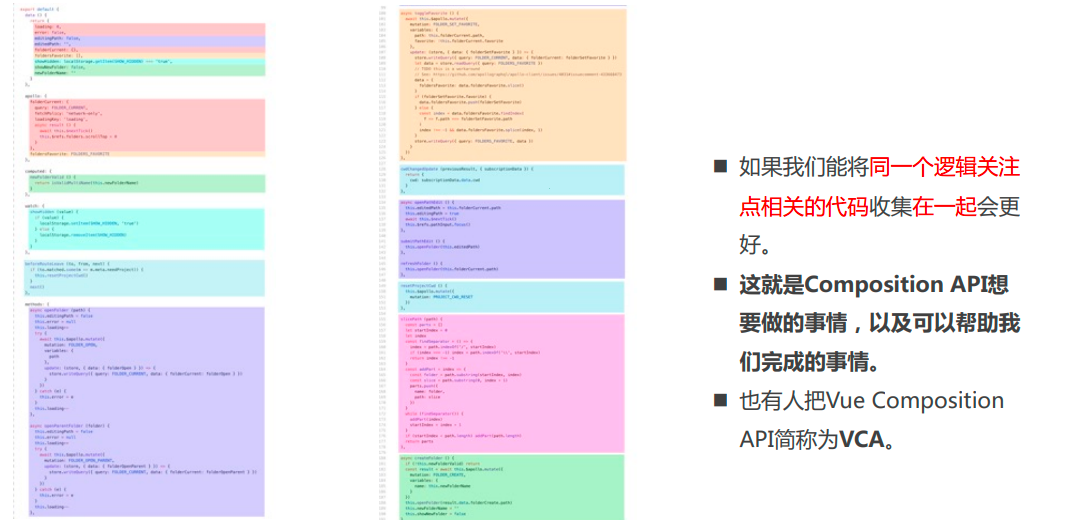
Composition API
setup函数的参数
props

通过props拿到父组件传递过来的数据
父组件:App.vue
<template>
    <div>
        App
        <hr>
        <home paraFromParent="hello my son"></home>
    </div>
</template>

<script>
    import Home from './Home.vue'
    export default {
        components:{
            Home
        }
    }
</script>

<style scoped>

</style>
子组件:Home.vue
<template>
    <div>
        Home
    </div>
</template>

<script>
    export default {
        props:{
            paraFromParent:{
                type:String,
                required:true
            }
        },
        setup(props) {
            console.log(props.paraFromParent);  //=>hello my son
            console.log(this);                  //=>undefined
            // console.log(this.paraFromParent);//=>报错
        }
    }
</script>

<style scoped>

</style>
输出
- setup()不能使用this
- 父组件传递过来的数据通过props拿到.

context

非prop的attribute
代码的逻辑

父组件:App.vue
<template>
    <div>
        App
        <hr>
        <home
            paraFromParent="hello my son"
            class="helloHome"
            id="helloHome_1"
        ></home>
    </div>
</template>

<script>
    import Home from './Home.vue'
    export default {
        components:{
            Home
        }
    }
</script>

<style scoped>

</style>
子组件:Home.vue
<template>
    <div>
        Home
    </div>
</template>

<script>
    export default {
        props:{
            paraFromParent:{
                type:String,
                required:true
            }
        },
        setup(props,context) {
            console.log(props.paraFromParent);  //=>hello my son
            console.log(context.attrs)Proxy //=>{class: "helloHome", id: "helloHome_1", __vInternal: 1}
            console.log(context.attrs.class)//=>helloHome
            console.log(context.attrs.id)//=>helloHome_1
        }
    }
</script>

<style scoped>

</style>
子组件:Home.vue
解构赋值
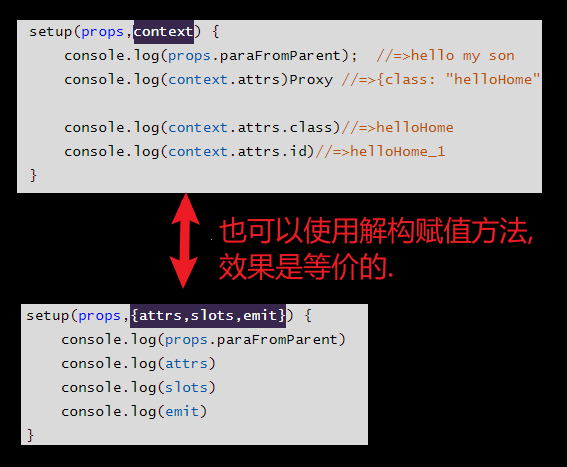
<template>
    <div>
        Home
    </div>
</template>

<script>
    export default {
        props:{
            paraFromParent:{
                type:String,
                required:true
            }
        },
        setup(props,{attrs,slots,emit}) {
            console.log(props.paraFromParent)
            console.log(attrs)
            console.log(slots)
            console.log(emit)
        }
    }
</script>

<style scoped>

</style>
setup函数的返回值
代码逻辑图
setup的返回值
setup的返回值可以在template中使用.
存在的问题
虽然数字能够绑定到mustache语法中,但是数据不是动态绑定的.
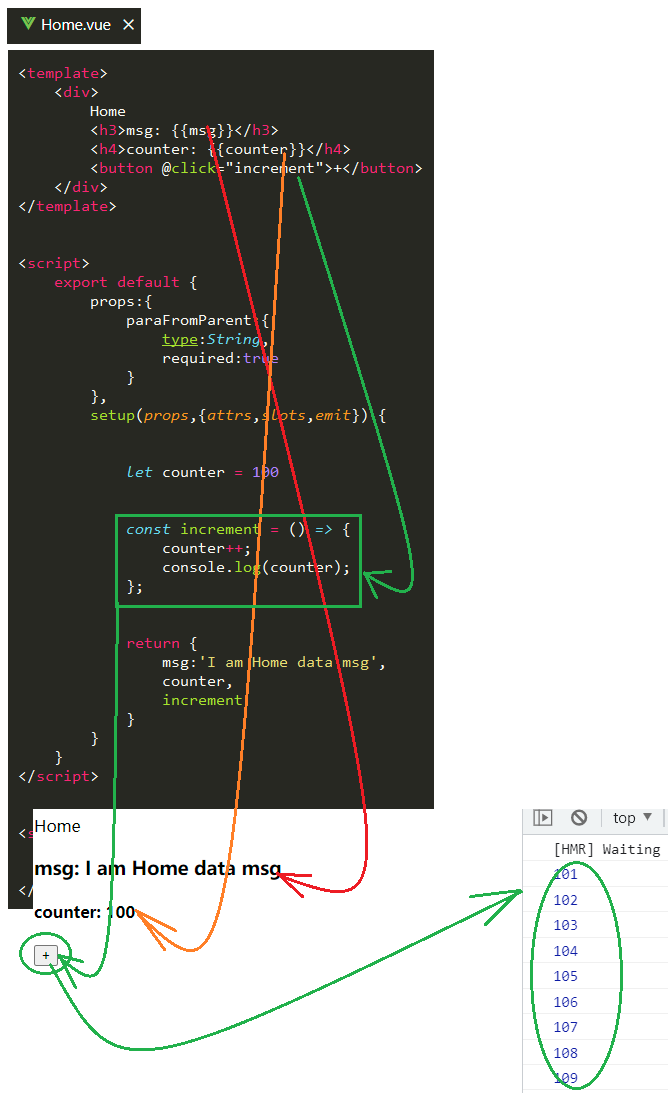
Home.vue
<template>
    <div>
        Home
        <h3>msg: {{msg}}</h3>
        <h4>counter: {{counter}}</h4>
        <button @click="increment">+</button>
    </div>
</template>

<script>
    export default {
        props:{
            paraFromParent:{
                type:String,
                required:true
            }
        },
        setup(props,{attrs,slots,emit}) {

            let counter = 100

            const increment = () => {
                counter++;
                console.log(counter);
            };

            return {
                msg:'I am Home data msg',
                counter,
                increment
            }
        }
    }
</script>

<style scoped>

</style>
补充
在setup中的函数也要返回
Reactive API_动态绑定数据
代码逻辑图
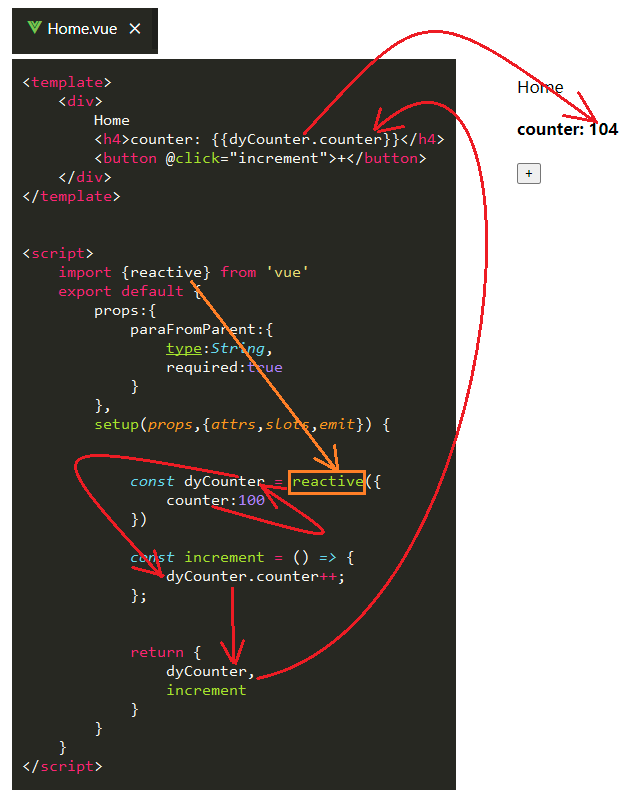
Home.vue
关键代码
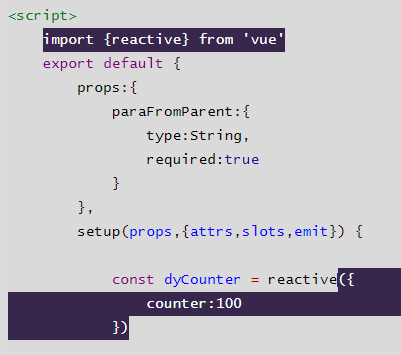
<template>
    <div>
        Home
        <h4>counter: {{dyCounter.counter}}</h4>
        <button @click="increment">+</button>
    </div>
</template>

<script>
    import {reactive} from 'vue'
    export default {
        props:{
            paraFromParent:{
                type:String,
                required:true
            }
        },
        setup(props,{attrs,slots,emit}) {

            const dyCounter = reactive({
                counter:100
            })

            const increment = () => {
                dyCounter.counter++;
            };

            return {
                dyCounter,
                increment
            }
        }
    }
</script>

<style scoped>

</style>
输出

Ref API

代码逻辑图

Home.vue
关键代码
自动解包功能
自动解包功能,本来这里应该填写
counter.value,vue帮我们做了自动解析,所以这里填写counter也是可以的.
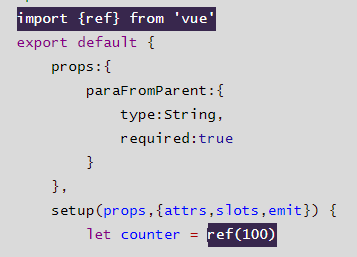
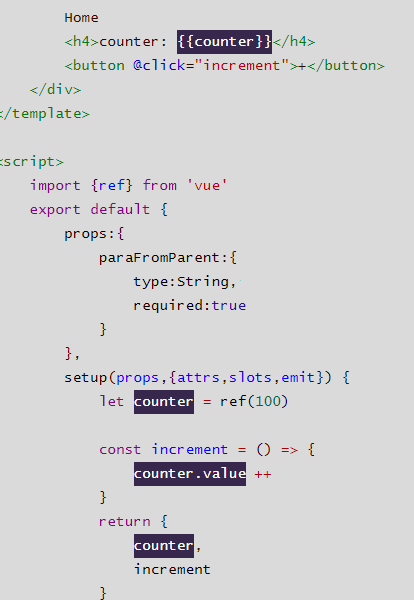
<template>
    <div>
        Home
        <h4>counter: {{counter}}</h4>
        <button @click="increment">+</button>
    </div>
</template>

<script>
    import {ref} from 'vue'
    export default {
        props:{
            paraFromParent:{
                type:String,
                required:true
            }
        },
        setup(props,{attrs,slots,emit}) {
            let counter = ref(100)

            const increment = () => {
                counter.value ++
            }
            return {
                counter,
                increment
            }
        }
    }
</script>

<style scoped>

</style>
自动解包的层数
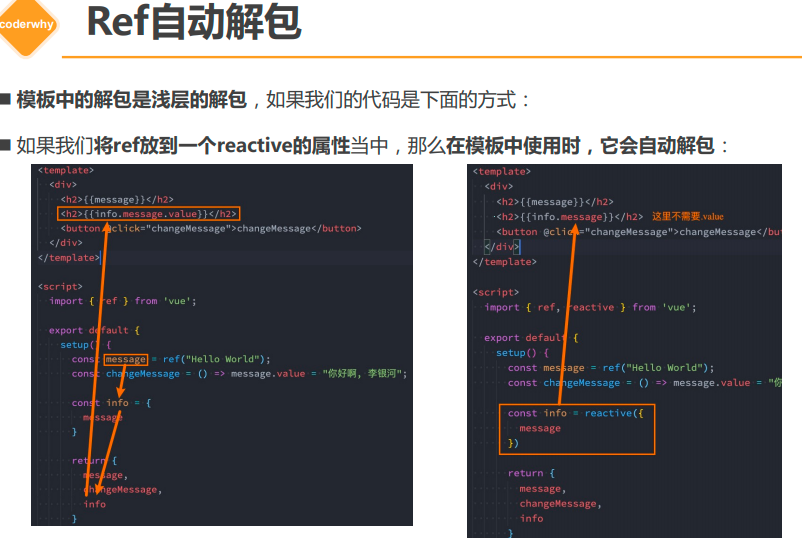
代码的逻辑图

Home.vue
<template>
    <div>
        Home
        <h4>counter: {{info}}</h4>
        <h4>info.counter: {{info.counter}}</h4>
        <h4>info.counter.value: {{info.counter.value}}</h4>
        <button @click="increment">+</button>
    </div>
</template>

<script>
    import {ref} from 'vue'
    export default {
        props:{
            paraFromParent:{
                type:String,
                required:true
            }
        },
        setup(props,{attrs,slots,emit}) {
            let counter = ref(100)

            const info = {
                counter
            }

            const increment = () => {
                info.counter.value ++
            }
            return {
                info,
                increment
            }
        }
    }
</script>

<style scoped>

</style>
readonly


关键代码
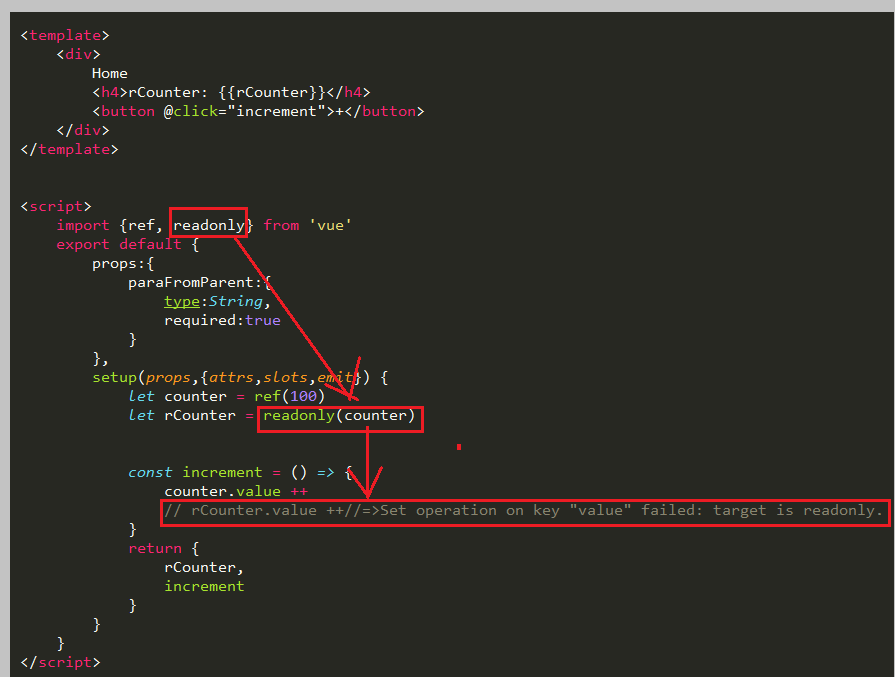
Home.vue
<template>
    <div>
        Home
        <h4>rCounter: {{rCounter}}</h4>
        <button @click="increment">+</button>
    </div>
</template>

<script>
    import {ref, readonly} from 'vue'
    export default {
        props:{
            paraFromParent:{
                type:String,
                required:true
            }
        },
        setup(props,{attrs,slots,emit}) {
            let counter = ref(100)
            let rCounter = readonly(counter)

            const increment = () => {
              	//正确使用方式
                //counter.value ++
                rCounter.value ++//=>Set operation on key "value" failed: target is readonly.
            }
            return {
                rCounter,
                increment
            }
        }
    }
</script>

<style scoped>

</style>
输出
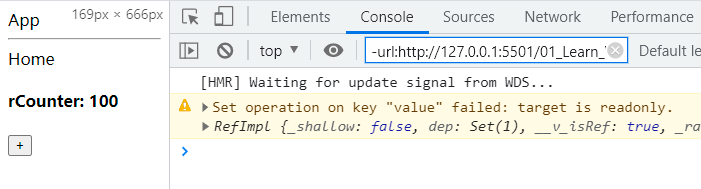
Reactive判断的API
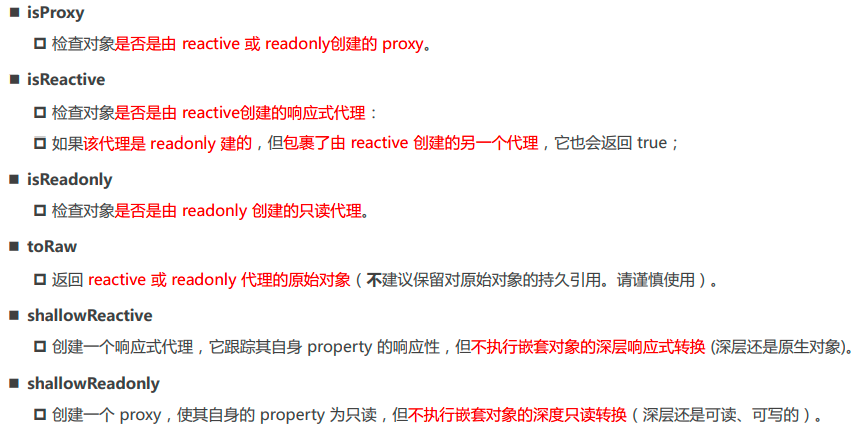
toRefs

使用结构赋值存在的问题
App.vue
<template>
    <div>
        <h3>{{name}}--{{age}}</h3>
        <button @click="changAge">changName</button>
    </div>
</template>

<script>
    import {reactive} from 'vue'
    export default {
        setup() {
            const {name,age} = reactive({name:'Alice',age:18})

            const changAge = ()=>{
               age ++
            }

            return {
                name,
                age,
                changAge
            }
        }
    }
</script>

<style scoped>

</style>
输出
- 发现使用解构赋值之后,这个age就不是动态数据了.
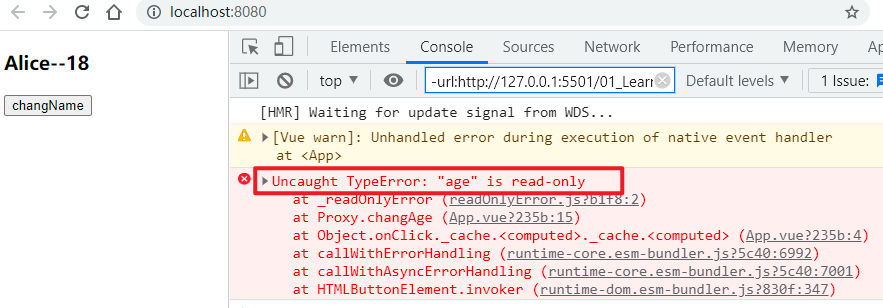
使用toRefs解决解构赋值的问题
App.vue
关键代码
toRefs一般和reactive搭配使用
toRefs()里面传入的一定是reactive类型的对象.


<template>
    <div>
        <h3>{{name}}--{{age}}</h3>
        <button @click="changAge">changName</button>
    </div>
</template>

<script>
    import {reactive,toRefs} from 'vue'
    export default {
        setup() {
            const info = reactive({name:'Alice',age:18})

            let {name,age} = toRefs(info)


            const changAge = ()=>{
                // info.age ++  //有作用
                // age ++       //没有作用
                age.value ++     //有作用
               console.log(info.age);
            }

            return {
                name,
                age,
                changAge
            }
        }
    }
</script>

<style scoped>

</style>
输出
- toRefs在
 这两者之间建立了联系,两者之中只要有一个改变,另外一个也会改变.

toRef
App.vue
解构赋值的单独使用

<template>
    <div>
        <h3>{{name}}--{{age}}</h3>
        <button @click="changAge">changName</button>
    </div>
</template>

<script>
    import {reactive,toRef} from 'vue'
    export default {
        setup() {
            const info = reactive({name:'Alice',age:18})

            let {name} = info
            // let {age} = toRef(info,age) //没有作用
            // let age = toRef(info,age)//没有作用
            // let {age} = toRef(info,'age')//没有作用
            let age = toRef(info,'age')//有作用


            const changAge = ()=>{
                info.age ++
                console.log(info.age);
            }

            return {
                name,
                age,
                changAge
            }
        }
    }
</script>

<style scoped>

</style>
输出

ref其他的API

shallowRef&triggerRef
问题背景
App.vue
<template>
    <div>
        <h3>{{info.name}}--{{info.age}}</h3>
        <button @click="changAge">changAge</button>
        <hr>
        <h4>{{info.friend.name}}--{{info.friend.age}}</h4>
        <button @click="changFriendAge">changFriendAge</button>
    </div>
</template>

<script>
    import {ref} from 'vue'
    export default {
        setup() {

            const info = ref({name:'Alice',age:18,friend:{name:'Celina',age:20}})


            const changAge = ()=>{
                info.value.age ++
                console.log('changAge--'+info.value.age);
            }

            const changFriendAge = ()=>{
                info.value.friend.age ++
                console.log('changFriendAge--'+info.value.friend.age);
            }

            return {
                info,
                changAge,
                changFriendAge
            }
        }
    }
</script>

<style scoped>

</style>
输出
- 无论是第一层’
 '的age都是能够被修改的.

目标需求
-
我们现在希望这个第一层’
 '的age是不能够被修改的.
 -
这个时候我们就可以使用shallowRef’
 '了.
'了. -
shallRef一般搭配
 使用
使用
使用shallowRef后没有反应的代码
App.vue
<template>
    <div>
        <h3>{{info.name}}--{{info.age}}</h3>
        <button @click="changAge">changAge</button>
        <hr>
        <h4>{{info.friend.name}}--{{info.friend.age}}</h4>
        <button @click="changFriendAge">changFriendAge</button>
    </div>
</template>

<script>
    import {ref,shallowRef} from 'vue'
    export default {
        setup() {

            const info = shallowRef({name:'Alice',age:18,friend:{name:'Celina',age:20}})


            const changAge = ()=>{
                info.value.age ++
                console.log('changAge--'+info.value.age);
            }

            const changFriendAge = ()=>{
                info.value.friend.age ++
                console.log('changFriendAge--'+info.value.friend.age);
            }

            return {
                info,
                changAge,
                changFriendAge
            }
        }
    }
</script>

<style scoped>

</style>
输出
- 虽然info.value.age的值和info.value.friend.age的值都是发生改变了,但是在mustache语法中的值没有改变.

shallowRef需要搭配triggerRef
搭配triggerRef的代码:App.vue
<template>
    <div>
        <h3>{{info.name}}--{{info.age}}</h3>
        <button @click="changAge">changAge</button>
        <hr>
        <h4>{{info.friend.name}}--{{info.friend.age}}</h4>
        <button @click="changFriendAge">changFriendAge</button>
    </div>
</template>

<script>
    import {ref,shallowRef, triggerRef} from 'vue'
    export default {
        setup() {

            const info = shallowRef({name:'Alice',age:18,friend:{name:'Celina',age:20}})


            const changAge = ()=>{
                info.value.age ++
                triggerRef(info)
                console.log('changAge--'+info.value.age);
            }

            const changFriendAge = ()=>{
                info.value.friend.age ++
                // triggerRef(info)
                console.log('changFriendAge--'+info.value.friend.age);
            }

            return {
                info,
                changAge,
                changFriendAge
            }
        }
    }
</script>

<style scoped>

</style>
输出
- 在第一层’
 ’,所以数据是动态绑定的
 - 在第二层’
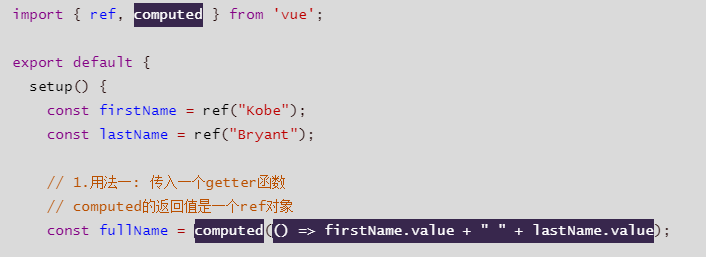 ’,所以数据无法动态更新
 - 当我们再次点击第一个changeAge时,我们又再一次触发这个trigger,所以不仅第一层的age更新了,第二层的age也更新了.

customRef
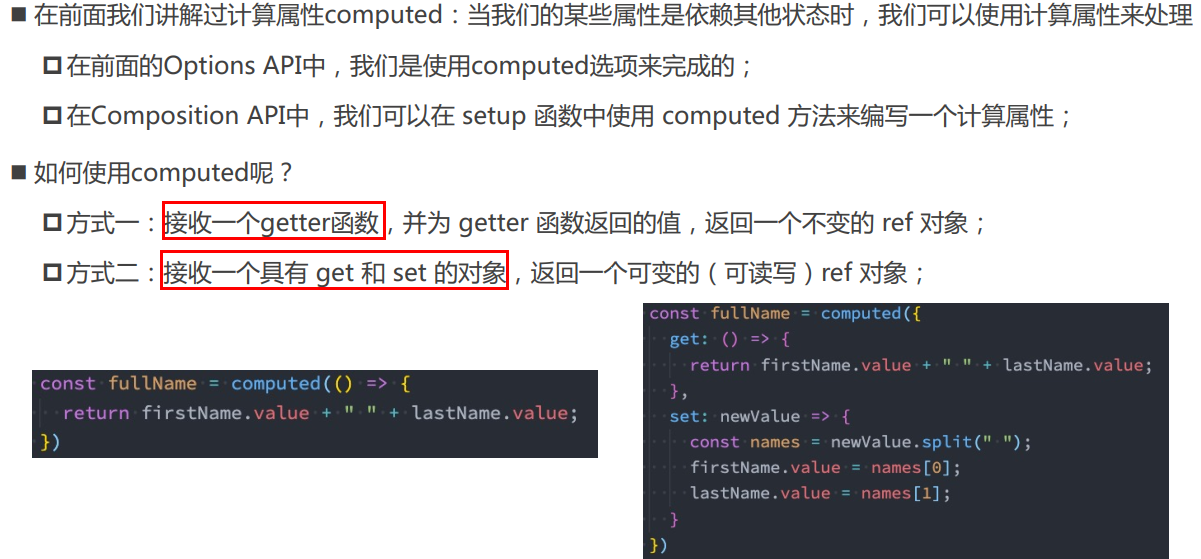
App.vue
<template>
    <div>
        <input type="text"  v-model="msg">
        <h2>{{msg}}</h2>
    </div>
</template>

<script>
    import debounceRef from './hook/useDebounceRef'
    export default {
        setup(props) {

            const msg = debounceRef('hello world')

            return{
                msg
            }
        }
    }
</script>

<style scoped>

</style>
hook>useDebounceRef.js
import { customRef } from 'vue';

// 自定义ref
export default function(value, delay = 300) {
  let timer = null;

  return customRef((track, trigger) => {
    return {
      get() {
        track();
        return value;
      },

      set(newValue) {
        clearTimeout(timer);
        timer = setTimeout(() => {
          value = newValue;
          trigger();
        }, delay);
      }
    }
  })
}
输出
- 输入延时的效果
- 防抖
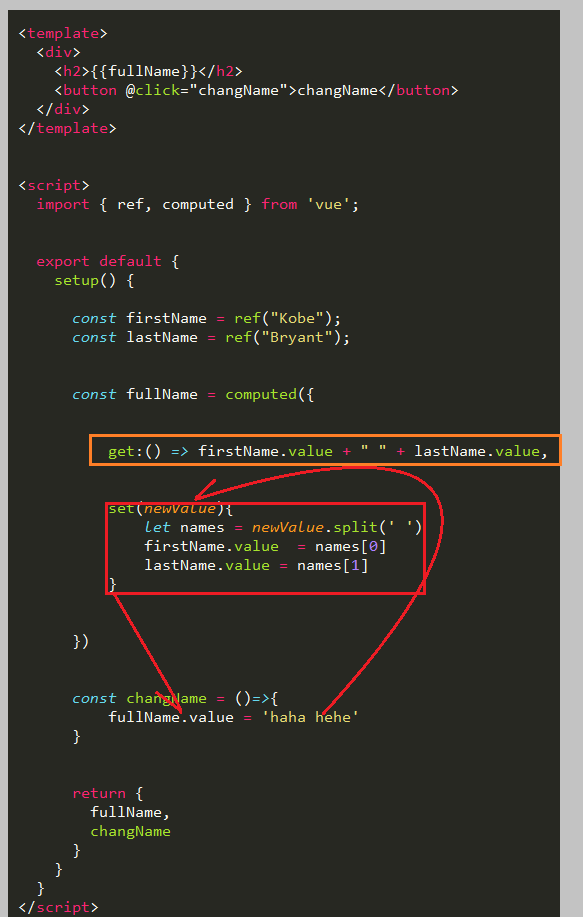
computed
基本使用_传入一个getter函数
App.vue
<template>
  <div>
    <h2>{{fullName}}</h2>
  </div>
</template>

<script>
  import { ref, computed } from 'vue';

  export default {
    setup() {
      const firstName = ref("Kobe");
      const lastName = ref("Bryant");

      // 1.用法一: 传入一个getter函数
      // computed的返回值是一个ref对象
      const fullName = computed(() => firstName.value + " " + lastName.value);

      return {
        fullName,
      }
    }
  }
</script>

<style scoped>

</style>
输出

传入一个对象,包含getter和setter
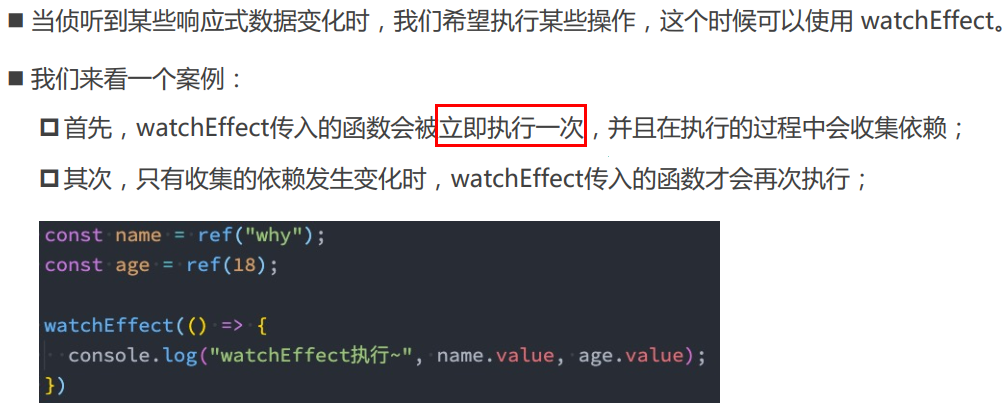
代码逻辑

App.vue
<template>
  <div>
    <h2>{{fullName}}</h2>
    <button @click="changName">changName</button>
  </div>
</template>

<script>
  import { ref, computed } from 'vue';

  export default {
    setup() {
      const firstName = ref("Kobe");
      const lastName = ref("Bryant");

      const fullName = computed({
          get:() => firstName.value + " " + lastName.value,
          set(newValue){
              let names = newValue.split(' ')
              firstName.value  = names[0]
              lastName.value = names[1]
          }
      })
      const changName = ()=>{
          fullName.value = 'haha hehe'
      }

      return {
        fullName,
        changName
      }
    }
  }
</script>

<style scoped>

</style>
输出
侦听数据的变化_watchEffect

watchEffect
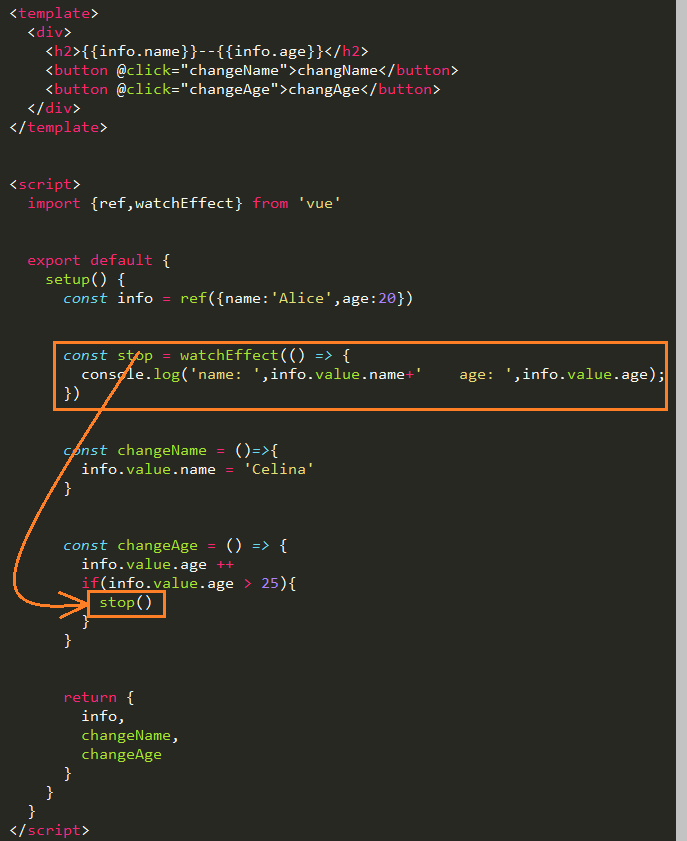
App.vue

<template>
  <div>
    <h2>{{info.name}}--{{info.age}}</h2>
    <button @click="changeName">changName</button>
    <button @click="changeAge">changAge</button>
  </div>
</template>

<script>
  import {ref,watchEffect} from 'vue'

  export default {
    setup() {
      const info = ref({name:'Alice',age:20})


      const changeName = ()=>{
        info.value.name = 'Celina'
      }
      const changeAge = () => {
        info.value.age ++
      }

      watchEffect(
        () => {
        	console.log('name: ',info.value.name+'    age: ',info.value.age);
        }
      )
      return {
        info,
        changeName,
        changeAge
      }
    }
  }
</script>

<style scoped>

</style>
输出
- watchEffect会监听所有的数据,当其中只要有一个数据发生变化时,就是输出
- 刚开始的时候会立即执行一次.
[外链图片转存失败,源站可能有防盗链机制,建议将图片保存下来直接上传(img-KSpdfiF1-1634743836658)(https://img2020.cnblogs.com/blog/1222814/202110/1222814-20211020231150360-2081718128.png)]
watchEffect的停止侦听

代码逻辑图
App.vue
<template>
  <div>
    <h2>{{info.name}}--{{info.age}}</h2>
    <button @click="changeName">changName</button>
    <button @click="changeAge">changAge</button>
  </div>
</template>

<script>
  import {ref,watchEffect} from 'vue'

  export default {
    setup() {
      const info = ref({name:'Alice',age:20})

      const stop = watchEffect(() => {
        console.log('name: ',info.value.name+'    age: ',info.value.age);
      })

      const changeName = ()=>{
        info.value.name = 'Celina'
      }

      const changeAge = () => {
        info.value.age ++
        if(info.value.age > 25){
          stop()
        }
      }

      return {
        info,
        changeName,
        changeAge
      }
    }
  }
</script>

<style scoped>

</style>
输出

watchEffect清除副作用
App.vue
<template>
  <div>
    <h2>{{info.name}}--{{info.age}}</h2>
    <button @click="changeName">changName</button>
    <button @click="changeAge">changAge</button>
  </div>
</template>

<script>
  import {ref,watchEffect} from 'vue'

  export default {
    setup() {
      const info = ref({name:'Alice',age:20})

      const stop = watchEffect((onInvalidate) => {
        onInvalidate(() => {
          //在这里面清除额外的副作用
          console.log('onInvaliddata');
        })

        console.log('name: ',info.value.name+'    age: ',info.value.age);
      })

      const changeName = ()=>{
        info.value.name = 'Celina'
      }

      const changeAge = () => {
        info.value.age ++
      }

      return {
        info,
        changeName,
        changeAge
      }
    }
  }
</script>

<style scoped>

</style>
输出
- 每次输出都会执行onInvaliddata中的程序,
- 相当于清除的作用
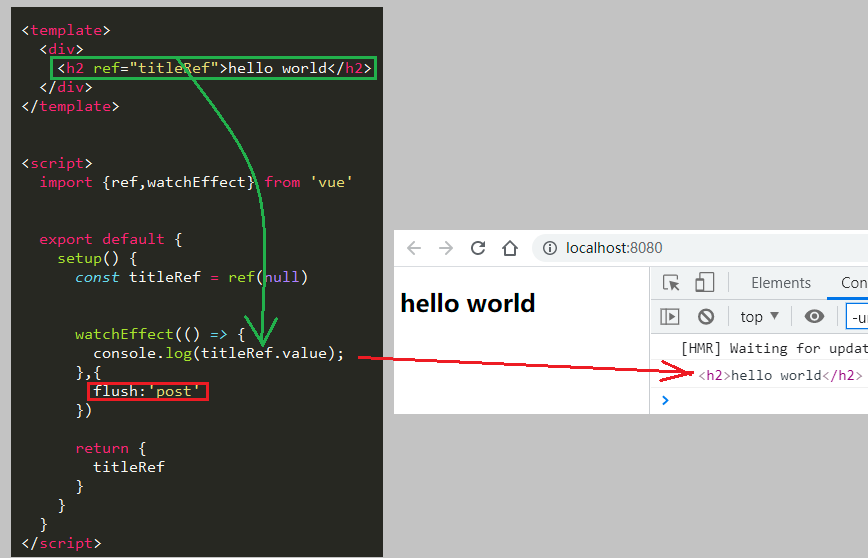
App.vue
<template>
  <div>
    <h2>{{info.name}}--{{info.age}}</h2>
    <button @click="changeName">changName</button>
    <button @click="changeAge">changAge</button>
  </div>
</template>

<script>
  import {ref,watchEffect} from 'vue'

  export default {
    setup() {
      const info = ref({name:'Alice',age:20})
      const timer = setTimeout(() =>{
        console.log('网络请求成功');
      },2000)

      const stop = watchEffect((onInvalidate) => {
        onInvalidate(() => {
          //在这里面清除额外的副作用
          clearTimeout(timer)
          console.log('清除上次的网络请求');
        })

        console.log('name: ',info.value.name+'    age: ',info.value.age);
      })

      const changeName = ()=>{
        info.value.name = 'Celina'
      }

      const changeAge = () => {
        info.value.age ++
      }

      return {
        info,
        changeName,
        changeAge
      }
    }
  }
</script>

<style scoped>

</style>
输出

代码逻辑图
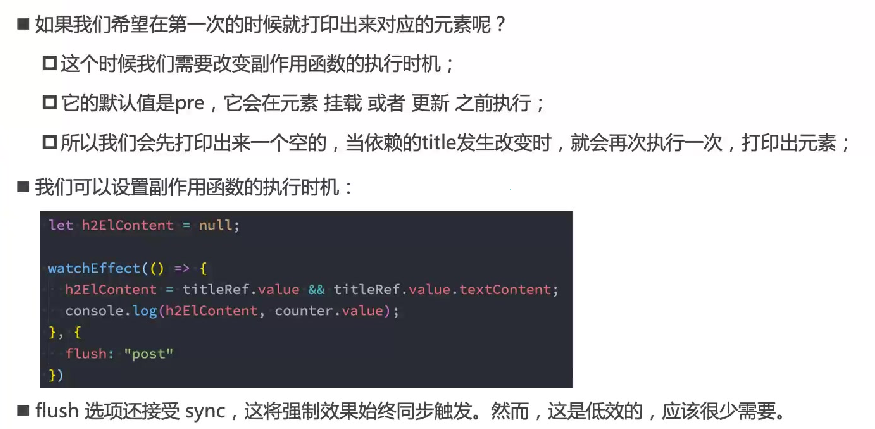
模拟网络请求的例子:App.vue
<template>
  <div>
    <h2>{{info.name}}--{{info.age}}</h2>
    <button @click="changeName">changName</button>
    <button @click="changeAge">changAge</button>
  </div>
</template>

<script>
  import {ref,watchEffect} from 'vue'

  export default {
    setup() {
      const info = ref({name:'Alice',age:20})
      const timer = setTimeout(() =>{
        console.log('网络请求成功');
      },3000)

      const stop = watchEffect((onInvalidate) => {
        onInvalidate(() => {
          //在这里面清除额外的副作用
          clearTimeout(timer)
          console.log('清除上次的网络请求');
          console.log('准备下次的网络请求...');
          setTimeout(() =>{
            console.log('网络再次请求成功');
          },3000)
          console.log('----');
        })

        console.log('name: ',info.value.name+'    age: ',info.value.age);
      })

      const changeName = ()=>{
        info.value.name = 'Celina'
      }

      const changeAge = () => {
        info.value.age ++
      }

      return {
        info,
        changeName,
        changeAge
      }
    }
  }
</script>

<style scoped>

</style>
输出:模拟网络请求
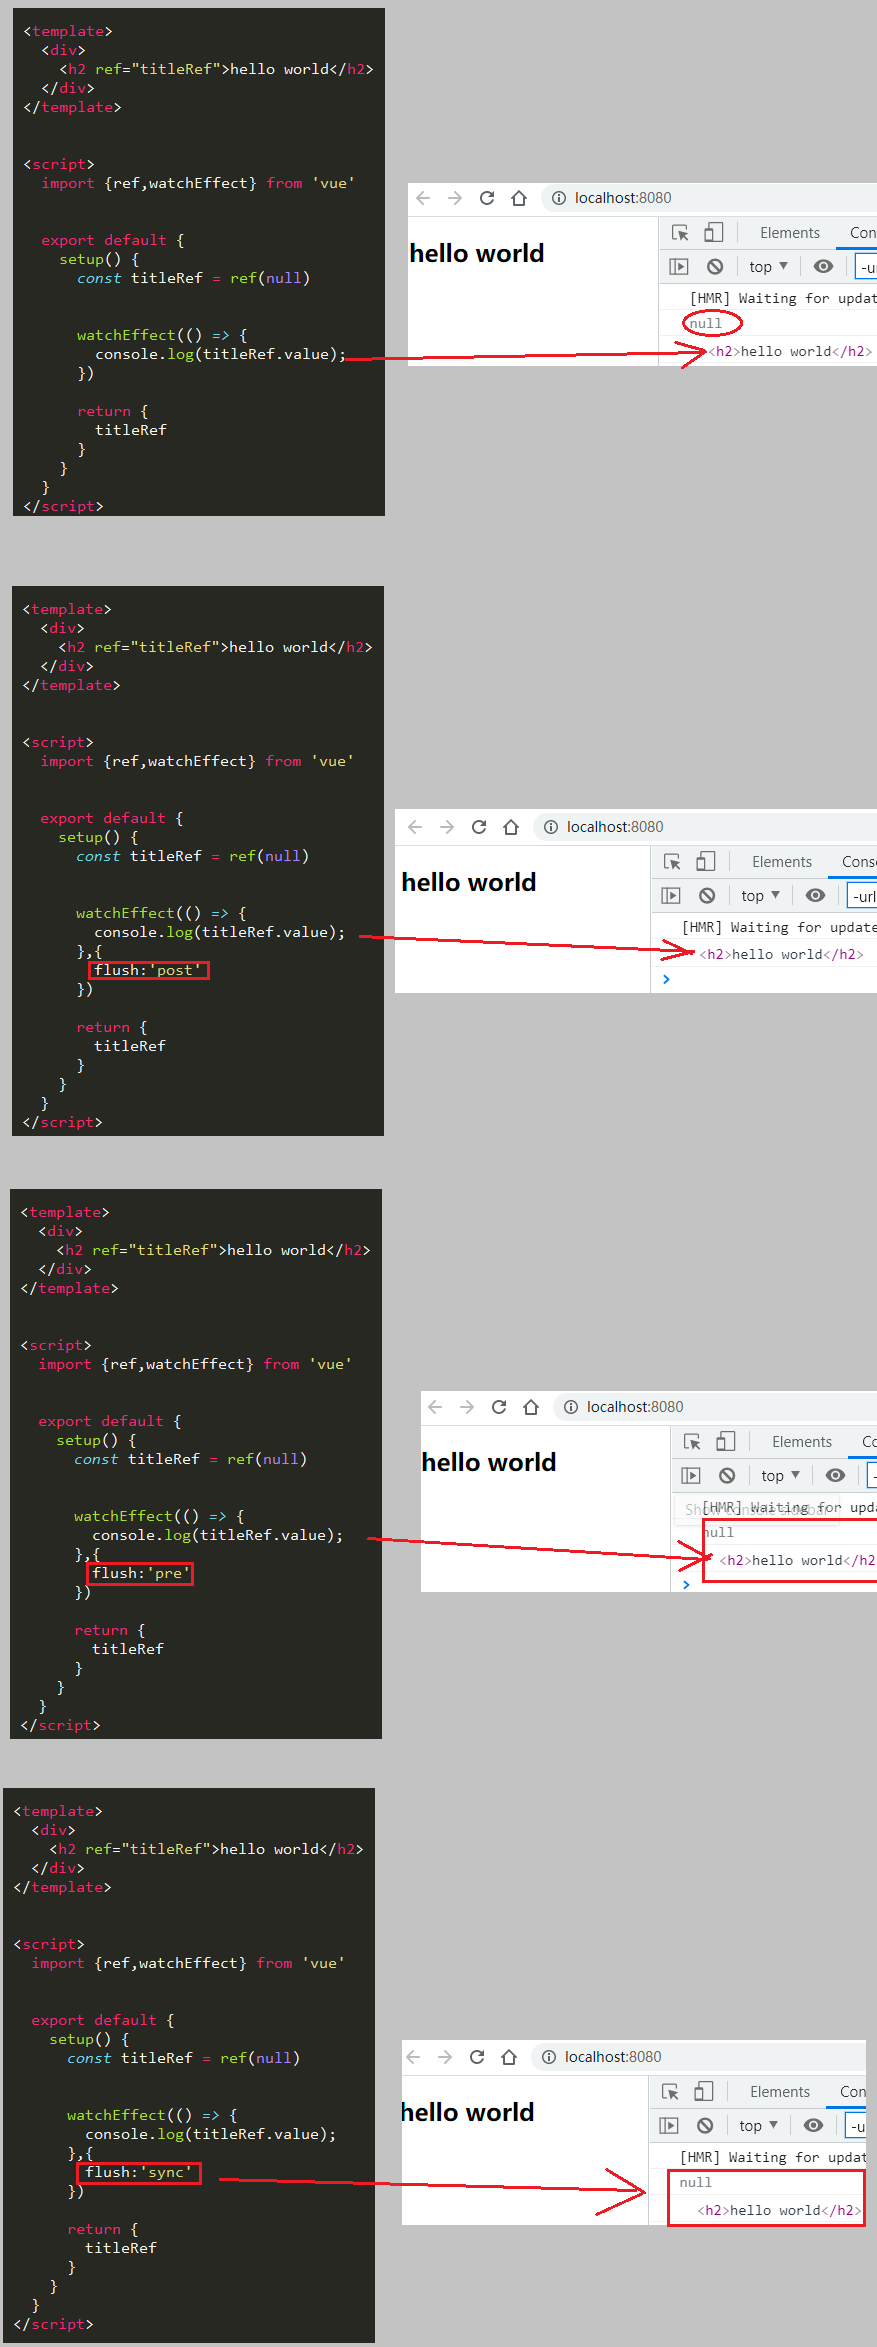
setup中使用ref
App.vue
<template>
  <div>
    <h2 ref="titleRef">hello world</h2>
  </div>
</template>

<script>
  import {ref,watchEffect} from 'vue'

  export default {
    setup() {
      const titleRef = ref(null)

      watchEffect(() => {
        console.log(titleRef.value);
      },{
        flush:'post'
      })

      return {
        titleRef
      }
    }
  }
</script>

<style scoped>

</style>
输出

几种输出比较
- 为什么打印了两次
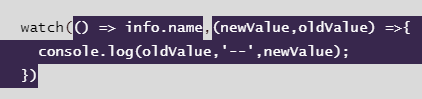
- 其他补充:
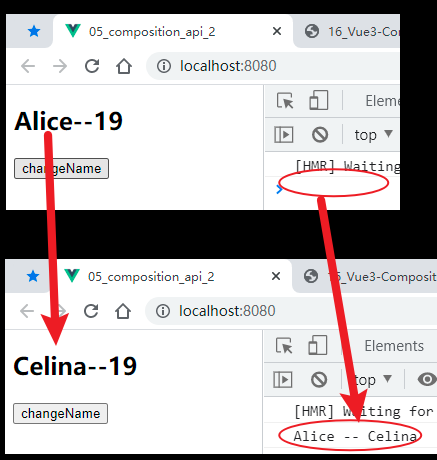

侦听数据的变化_watch
侦听reactive对象
第一种传入方式’ ’
’
App.vue
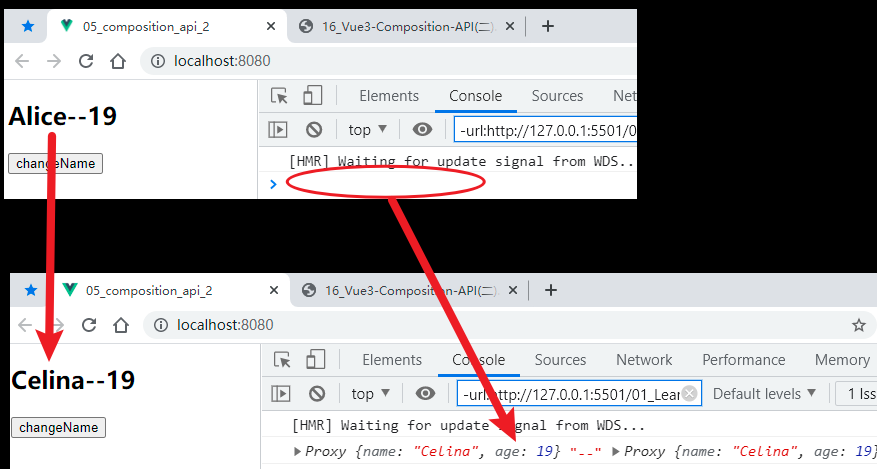
<template>
  <div>
    <h2>{{info.name}}--{{info.age}}</h2>
    <button @click="changeName">changeName</button>
  </div>
</template>

<script>
  import {reactive,watch} from 'vue'

  export default {
    setup() {
      const info = reactive({name:'Alice',age:19})

      const changeName = () => {
        info.name = 'Celina'
      }

      watch(() => info.name,(newValue,oldValue) =>{
        console.log(oldValue,'--',newValue);
      })

      return {
        info,
        changeName
      }
    }
  }
</script>

<style scoped>

</style>
输出
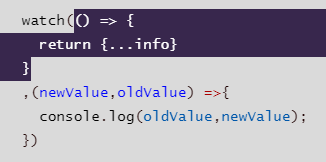
第二种传入方式’ ’
’
App.vue
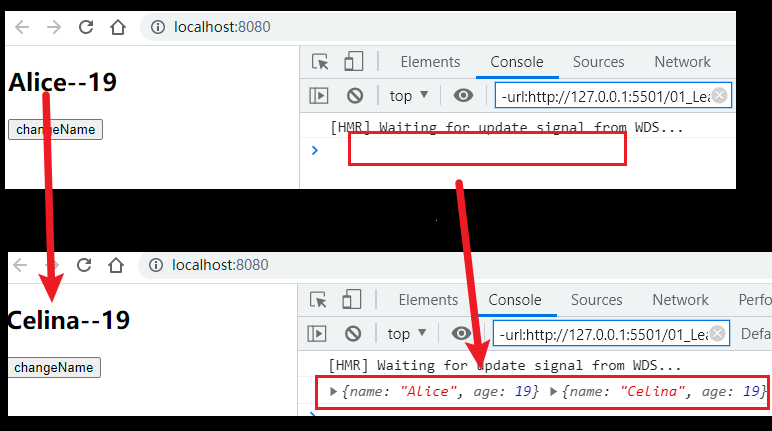
<template>
  <div>
    <h2>{{info.name}}--{{info.age}}</h2>
    <button @click="changeName">changeName</button>
  </div>
</template>

<script>
  import {reactive,watch} from 'vue'

  export default {
    setup() {
      const info = reactive({name:'Alice',age:19})

      const changeName = () => {
        info.name = 'Celina'
      }

      watch(info,(newValue,oldValue) =>{
        console.log(oldValue,'--',newValue);
      })

      return {
        info,
        changeName
      }
    }
  }
</script>

<style scoped>

</style>
输出

结构赋值
App.vue
关键代码
和上面的对比


<template>
  <div>
    <h2>{{info.name}}--{{info.age}}</h2>
    <button @click="changeName">changeName</button>
  </div>
</template>

<script>
  import {reactive,watch} from 'vue'

  export default {
    setup() {
      const info = reactive({name:'Alice',age:19})

      const changeName = () => {
        info.name = 'Celina'
      }

      watch(() => {
        return {...info}
      }
      ,(newValue,oldValue) =>{
        console.log(oldValue,newValue);
      })

      return {
        info,
        changeName
      }
    }
  }
</script>

<style scoped>

</style>
输出
[外链图片转存失败,源站可能有防盗链机制,建议将图片保存下来直接上传(img-vI3Iy6Wh-1634743836726)(https://img2020.cnblogs.com/blog/1222814/202110/1222814-20211020231154893-1501892486.png)]
侦听ref对象
App.vue
<template>
  <div>
    <h2>{{name}}</h2>
    <button @click="changeName">changeName</button>
  </div>
</template>

<script>
  import {ref,watch} from 'vue'

  export default {
    setup() {
      const name = ref('Alice')

      const changeName = () => {
        name.value = 'Celina'
      }

      watch(name,(newValue,oldValue) =>{
        console.log(oldValue,'--',newValue);
      })

      return {
        name,
        changeName
      }
    }
  }
</script>

<style scoped>

</style>
输出
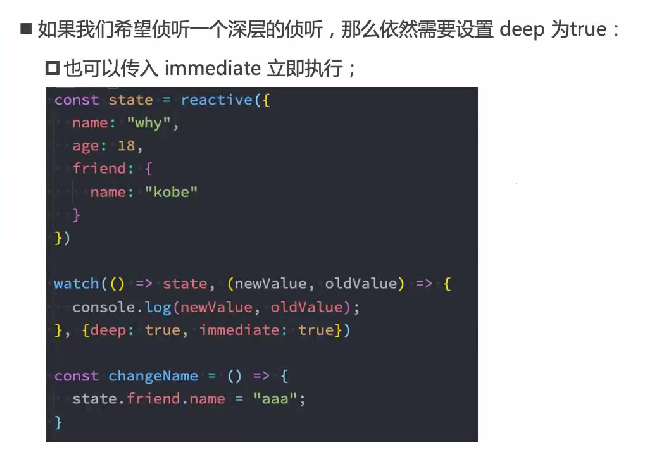
侦听多个数据

App.vue
传入的值是一个数组
传入的值是一个数组,返回的新旧的值也是一对数组.
<template>
  <div>
    <h2 ref="title">{{info.name}}</h2>
    <button @click="changeData">修改数据</button>
  </div>
</template>

<script>
  import { ref, reactive, watch } from 'vue';

  export default {
    setup() {
      // 1.定义可响应式的对象
      const info = reactive({name: "why", age: 18});
      const name = ref("why");

      // 2.侦听器watch
      watch([() => ({...info}), name], ([newInfo, newName], [oldInfo, oldName]) => {
        console.log(newInfo, newName,'---', oldInfo, oldName);
      })

      const changeData = () => {
        info.name = "kobe";
      }

      return {
        changeData,
        info
      }
    }
  }
</script>

<style scoped>

</style>
侦听数组

深层侦听

生命周期钩子
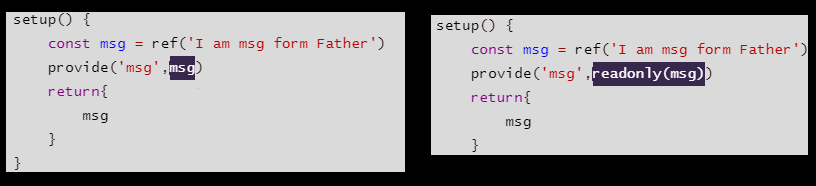
App.vue
<template>
    <div>
        <h2>{{name}}</h2>
        <button @click="changeName">changName</button>
    </div>
</template>

<script>
    import {ref,onMounted, onUpdated} from 'vue'
    export default {
        setup(props) {
            onMounted(() => {
                console.log('App onMounted_1');
            })
            onMounted(() => {
                console.log('App onMounted_2');
            })

            onUpdated(() =>{
                console.log('App onUpdated');
            })

            const name = ref("Alice")
            const changeName = () => {
                name.value = 'Celina'
            }
            return {
                name,
                changeName
            }
        }
    }
</script>

<style scoped>

</style>
输出
- 生命周期函数可以重复定义,其中执行的代码会叠加.
- 改变用户名称时,会执行onUpdated()

Provide和Inject
基本使用_父组件向子组件传递数据
数据传递过程图
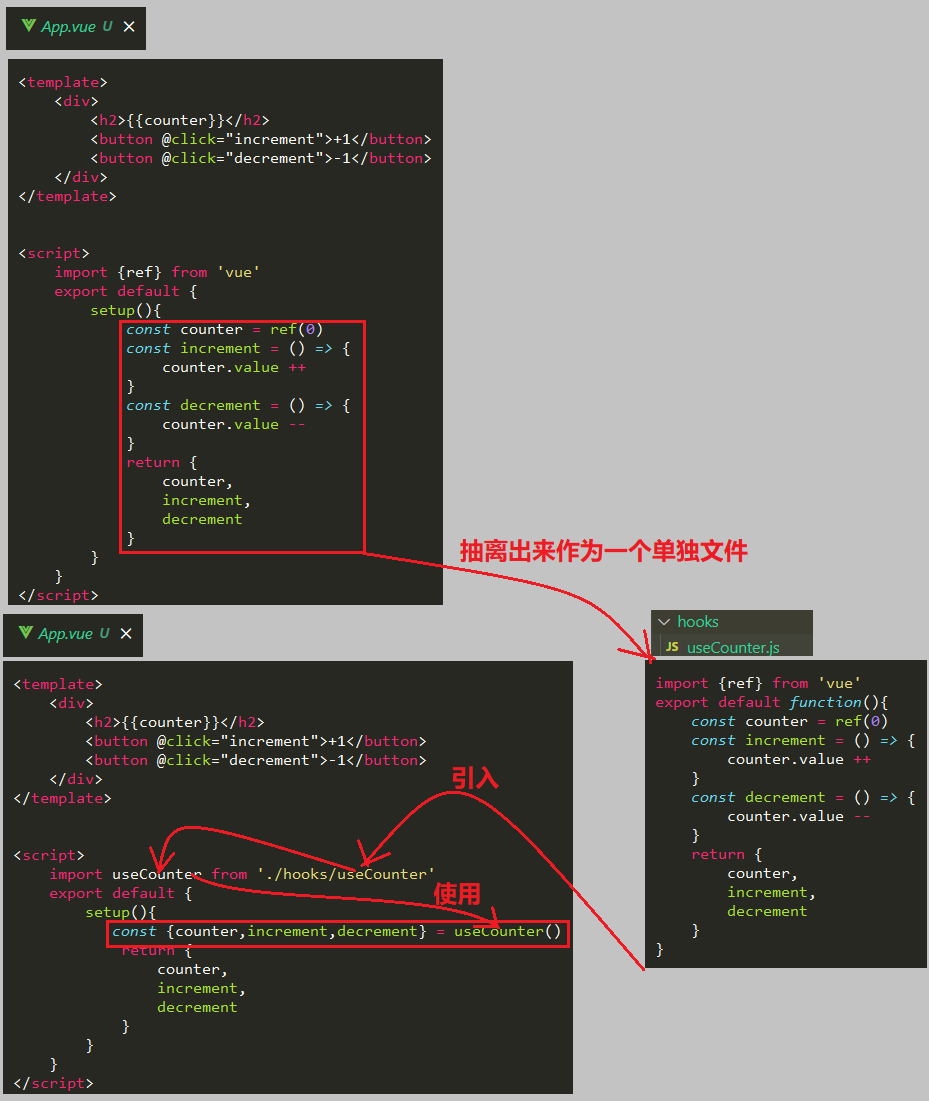
App.vue
<template>
    <div>
        App
        <hr>
        <home></home>
    </div>
</template>

<script>
    import {ref,provide} from 'vue'
    import Home from './Home.vue'
    export default {
        components:{
            Home
        },
        setup() {
            const msg = ref('I am msg form Father')
            provide('msg',msg)
        }
    }
</script>

<style scoped>

</style>
Home.vue
<template>
    <div>
        Home
        <h2>{{msg}}</h2>
    </div>
</template>

<script>
    import {inject} from 'vue'
    export default {
        setup() {
            const msg = inject('msg')

            return{
                msg
            }
        }
    }
</script>

<style scoped>

</style>
基本使用_动态数据传递
父组件:App.vue
<template>
    <div>
        <h1>App.vue</h1>
        <input type="text" v-model="msg">
        <hr>
        <home></home>
    </div>
</template>

<script>
    import {ref,provide} from 'vue'
    import Home from './Home.vue'
    export default {
        components:{
            Home
        },
        setup() {
            const msg = ref('I am msg form Father')
            provide('msg',msg)
            return{
                msg
            }
        }
    }
</script>

<style scoped>

</style>
Home.vue
<template>
    <div>
        <h1>Home.vue</h1>
        <h2>{{msg}}</h2>
        <input type="text" v-model="msg">
    </div>
</template>

<script>
    import {inject} from 'vue'
    export default {
        setup() {
            const msg = inject('msg')

            return{
                msg
            }
        }
    }
</script>

<style scoped>


</style>
输出
- 父组件能够传递数据到子组件
- 父组件的数据能够动态绑定到子组件中,也就修改父组件中的数据,子组件中的数据能够动态变化.
- 存在的问题,就是子组件修改数据,父组件中的数据也遭受到修改,违反了数据的单向流原则,不太友好
[外链图片转存失败,源站可能有防盗链机制,建议将图片保存下来直接上传(img-I82HpT98-1634743836742)(https://img2020.cnblogs.com/blog/1222814/202110/1222814-20211020231157127-2055290198.gif)]
改进_数据单向流
针对上面出现的问题,修改子组件中的数据,父组件中的数据也会遭到修改.
父组件:App.vue
和上面代码对比

<template>
    <div>
        <h1>App.vue</h1>
        <input type="text" v-model="msg">
        <hr>
        <home></home>
    </div>
</template>

<script>
    import {ref,provide,readonly} from 'vue'
    import Home from './Home.vue'
    export default {
        components:{
            Home
        },
        setup() {
            const msg = ref('I am msg form Father')
            provide('msg',readonly(msg))
            return{
                msg
            }
        }
    }
</script>

<style scoped>

</style>
输出效果
Composition API练习
计数器案例
代码提取图

App.vue
<template>
<div>
<h2>{{counter}}</h2>
<button @click="increment">+1</button>
<button @click="decrement">-1</button>
</div>
</template>
<script>
import useCounter from './hooks/useCounter'
export default {
setup(){
const {counter,increment,decrement} = useCounter()
return {
counter,
increment,
decrement
}
}
}
</script>
<style scoped>
</style>
hooks>useCounter.js
import {ref} from 'vue'
export default function(){
const counter = ref(0)
const increment = () => {
counter.value ++
}
const decrement = () => {
counter.value --
}
return {
counter,
increment,
decrement
}
}
useTitle案例
App.vue
<template>
<div>
</div>
</template>
<script>
import useTitle from './hooks/useTitle'
export default {
setup(){
const titleRef = useTitle('myTitle')
setTimeout(() => {
titleRef.value = 'youTitle'
},2000)
}
}
</script>
<style scoped>
</style>
hooks>useTitle
import {ref,watch} from 'vue'
export default function(title = 'default title'){
const titleRef = ref(title)
document.title = title
watch(titleRef,(newTitle) => {
document.title = newTitle
})
return titleRef
}
输出
- 刷新的时候显示默认的title,即default title
- 然后迅速变换成myTitle
- 最后经过两秒过后,这个变成youTitle
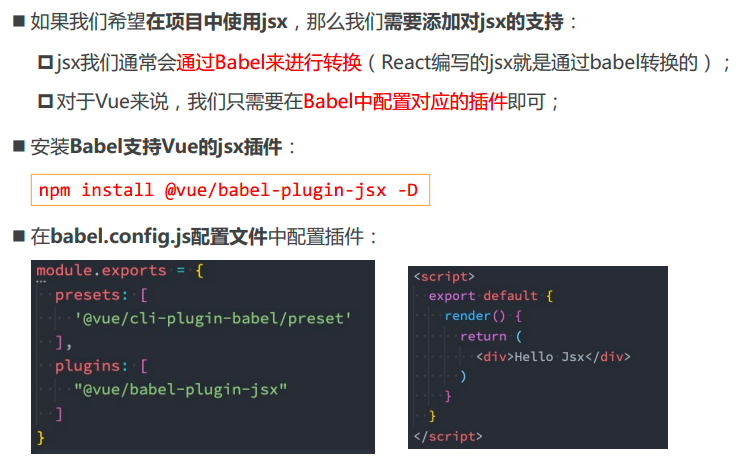
综合案例
关键代码逻辑

App.vue
<template>
<div>
<h2>{{ counter }}</h2>
<button @click="increment">+1</button>
<button @click="decrement">-1</button>
<hr />
<p class="content"></p>
<div class="scroll">
<div class="scroll-x">scrollX: {{ scrollX }}</div>
<div class="scroll-y">scrollY: {{ scrollY }}</div>
</div>
<div class="mouse">
<div class="mouse-x">mouseX: {{ mouseX }}</div>
<div class="mouse-y">mouseY: {{ mouseY }}</div>
</div>
</div>
</template>
<script>
import useCounter from "./hooks/useCounter";
import useTitle from "./hooks/useTitle";
import useScrollPosition from './hooks/useScrollPosition'
import useMousePosition from './hooks/useMousePosition'
export default {
setup() {
const { counter, increment, decrement } = useCounter();
useTitle("myTitle");
const {scrollX, scrollY} = useScrollPosition()
const {mouseX,mouseY} = useMousePosition()
return {
counter,
increment,
decrement,
scrollX,
scrollY,
mouseX,
mouseY
};
},
};
</script>
<style scoped>
.content {
width: 3000px;
height: 5000px;
}
.scroll {
position: fixed;
right: 30px;
bottom: 30px;
}
.mouse {
position: fixed;
right: 30px;
bottom: 80px;
}
</style>
hooks>useScrollPosition
import { ref } from 'vue';
export default function() {
const scrollX = ref(0);
const scrollY = ref(0);
document.addEventListener("scroll", () => {
scrollX.value = window.scrollX;
scrollY.value = window.scrollY;
});
return {
scrollX,
scrollY
}
}
hooks>useMousePosition
import { ref } from 'vue';
export default function() {
const mouseX = ref(0);
const mouseY = ref(0);
window.addEventListener("mousemove", (event) => {
mouseX.value = event.pageX;
mouseY.value = event.pageY;
});
return {
mouseX,
mouseY
}
}
输出

代码整合优化
所有导入合并成一个单独的文件
jsx
基本使用
App.vue
- 非常简单,就是把template标签扔掉了,然后直接 在render()的返回值里面写html代码
<script>
export default {
render() {
return <h2>hello, I am render</h2>
}
}
</script>
<style scoped>
</style
输出
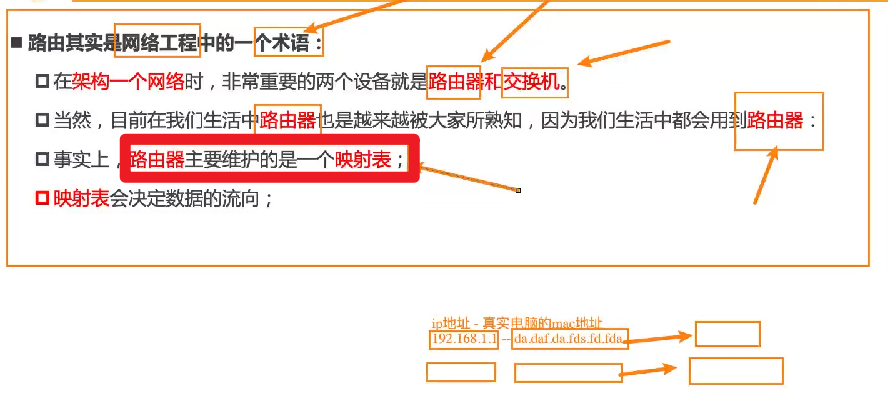
计数器案例
App.vue
<script>
export default {
data() {
return {
counter:0
}
},
render() {
const increment = () =>this.counter ++
const decrement = () =>this.counter --
return (
<div>
<h2>当前计数:{this.counter}</h2>
<button onClick={increment}>+1</button>
<button onClick={decrement}>-1</button>
</div>
)
}
}
</script>
<style scoped>
</style>
输出

引入子组件
基本使用
App.vue
<script>
import Home from './Home.vue'
export default {
render() {
return (
<div>
<h3>App.vue</h3>
<hr></hr>
<Home></Home>
</div>
)
}
}
</script>
<style scoped>
</style>
Home.vue
<template>
<div>
<h3>Home</h3>
</div>
</template>
<script>
export default {
}
</script>
<style scoped>
</style>
输出

使用插槽
App.vue
<script>
import Home from './Home.vue'
export default {
render() {
return (
<div>
<h3>App.vue</h3>
<hr></hr>
<Home>
{{default:props => <button>Button</button>}}
</Home>
</div>
)
}
}
</script>
<style scoped>
</style>
Home.vue
<script>
export default {
render(h) {
return(
<div>
<h3>Home.vue</h3>
{this.$slots.default ? this.$slots.default():<span>hahaha</span>}
</div>
)
},
}
</script>
<style scoped>
</style>
输出
- 当父组件传递插槽过来时,就是使用父组件的插槽
- 当父组件没有传递插槽过来时,就是使用默认的组件.

VueRouter
概念
路由器
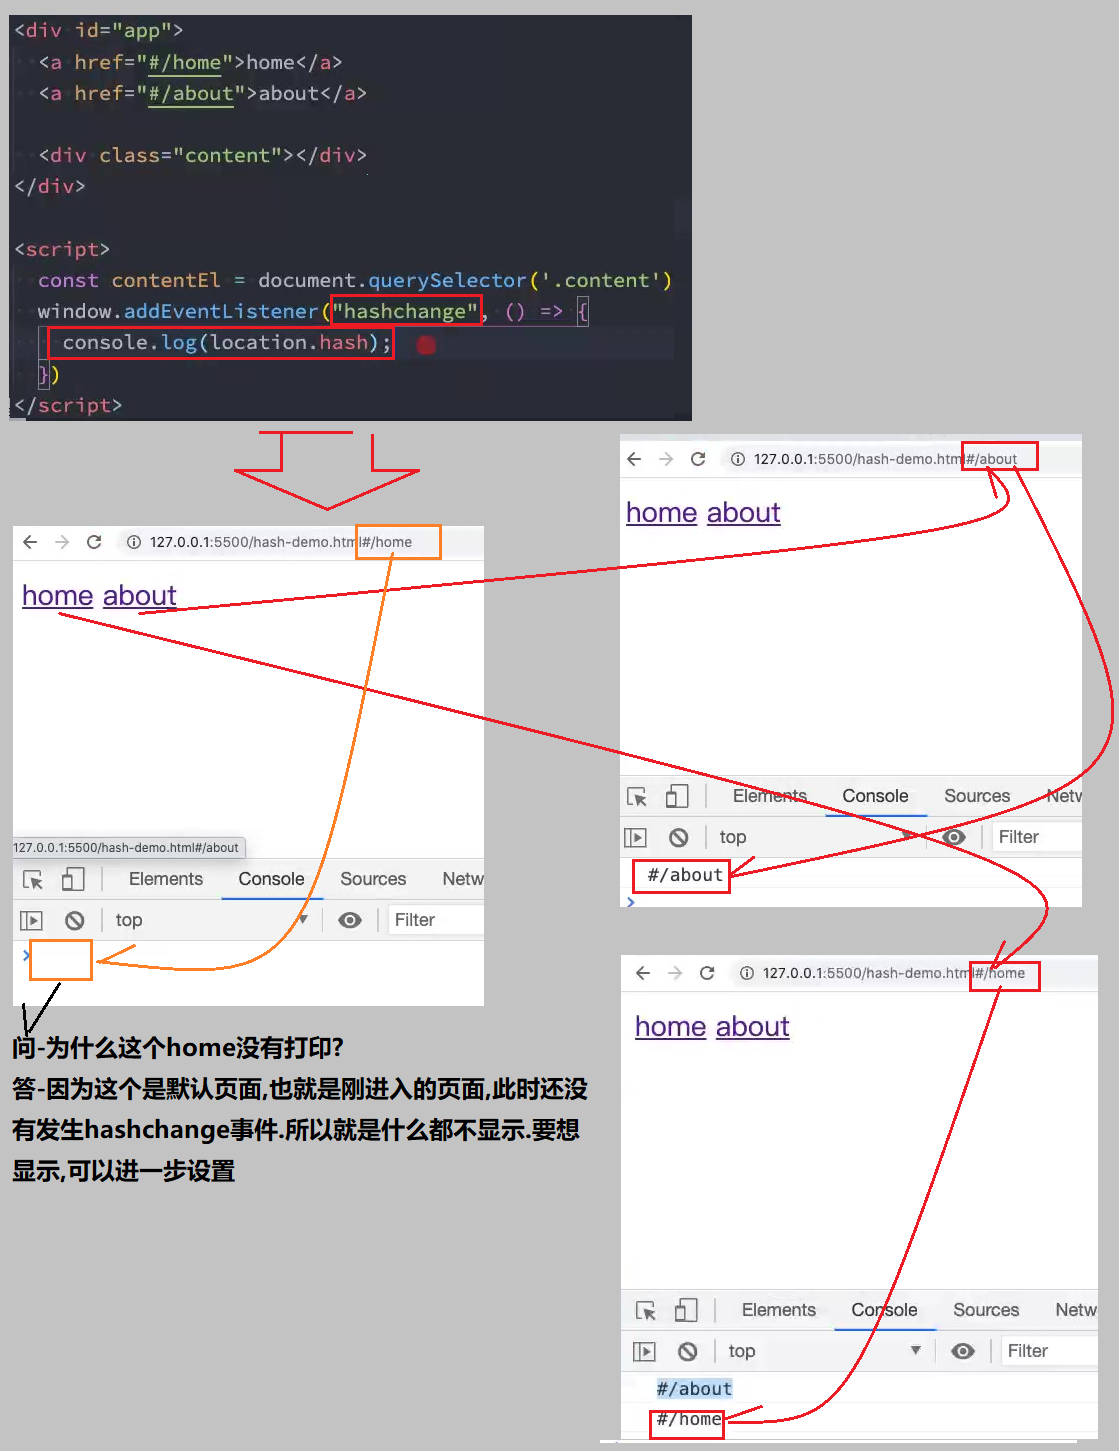
前后端分离阶段

URL的hash

代码理解1
[外链图片转存失败,源站可能有防盗链机制,建议将图片保存下来直接上传(img-wVtirRO6-1634743836769)(https://img2020.cnblogs.com/blog/1222814/202110/1222814-20211020231201803-1048287985.png)]
代码理解2

代码理解3
[外链图片转存失败,源站可能有防盗链机制,建议将图片保存下来直接上传(img-HuzP4HYG-1634743836772)(https://img2020.cnblogs.com/blog/1222814/202110/1222814-20211020231202432-1233714614.gif)]
HTML5的History
[外链图片转存失败,源站可能有防盗链机制,建议将图片保存下来直接上传(img-x0lbEiWE-1634743836776)(https://img2020.cnblogs.com/blog/1222814/202110/1222814-20211020231202730-48274783.png)]
代码理解1
[外链图片转存失败,源站可能有防盗链机制,建议将图片保存下来直接上传(img-Sz5AuURU-1634743836781)(https://img2020.cnblogs.com/blog/1222814/202110/1222814-20211020231202897-2108420382.png)]
e.preventDefault()
代码理解:history.html
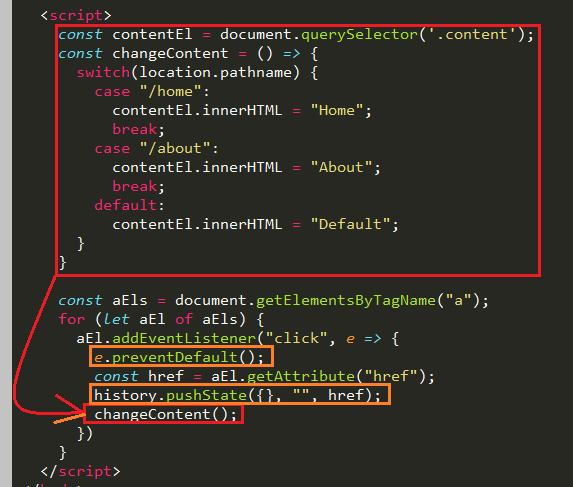
<!DOCTYPE html>
<html lang="en">
<head>
<meta charset="UTF-8">
<meta http-equiv="X-UA-Compatible" content="IE=edge">
<meta name="viewport" content="width=device-width, initial-scale=1.0">
<title>Document</title>
</head>
<body>
<div id="app">
<a href="/home">home</a>
<a href="/about">about</a>
<div class="content">Default</div>
</div>
<script>
const aEls = document.getElementsByTagName("a");
for (let aEl of aEls) {
aEl.addEventListener("click", e => {
e.preventDefault();
console.log("clicked");
})
}
</script>
</body>
</html>
输出
- 没有用
e.preventDefault();时,浏览器地址会进行跳转 - 使用了
e.preventDefault();,浏览器地址不会跳转,不会变化, - 问-为什么要阻止浏览器地址的跳转?答-因为浏览器地址跳转会引发网络请求,而每次引发网络请求,频繁的网络请求也是不好的.
[外链图片转存失败,源站可能有防盗链机制,建议将图片保存下来直接上传(img-qJBrrruj-1634743836789)(https://img2020.cnblogs.com/blog/1222814/202110/1222814-20211020231203356-1125157459.gif)]
history.pushState({}, “”, href);
使用history方式跳转页面:history.html
阻止网络请求
[外链图片转存失败,源站可能有防盗链机制,建议将图片保存下来直接上传(img-7xEH9ULK-1634743836793)(https://img2020.cnblogs.com/blog/1222814/202110/1222814-20211020231203679-356167998.gif)]
使用新的路径
[外链图片转存失败,源站可能有防盗链机制,建议将图片保存下来直接上传(img-R4WGTLeI-1634743836797)(https://img2020.cnblogs.com/blog/1222814/202110/1222814-20211020231204044-1028348893.png)]
<!DOCTYPE html>
<html lang="en">
<head>
<meta charset="UTF-8">
<meta http-equiv="X-UA-Compatible" content="IE=edge">
<meta name="viewport" content="width=device-width, initial-scale=1.0">
<title>Document</title>
</head>
<body>
<div id="app">
<a href="/home">home</a>
<a href="/about">about</a>
<div class="content">Default</div>
</div>
<script>
const contentEl = document.querySelector('.content');
const changeContent = () => {
switch(location.pathname) {
case "/home":
contentEl.innerHTML = "Home";
break;
case "/about":
contentEl.innerHTML = "About";
break;
default:
contentEl.innerHTML = "Default";
}
}
const aEls = document.getElementsByTagName("a");
for (let aEl of aEls) {
aEl.addEventListener("click", e => {
e.preventDefault();
const href = aEl.getAttribute("href");
history.pushState({}, "", href);
changeContent();
})
}
</script>
</body>
</html>
代码理解
[外链图片转存失败,源站可能有防盗链机制,建议将图片保存下来直接上传(img-9NeTx4JJ-1634743836800)(https://img2020.cnblogs.com/blog/1222814/202110/1222814-20211020231204262-1828601027.png)]
输出
- 实现了即使改变url的部分内容,不用网络请求
[外链图片转存失败,源站可能有防盗链机制,建议将图片保存下来直接上传(img-DixPvLes-1634743836801)(https://img2020.cnblogs.com/blog/1222814/202110/1222814-20211020231204532-633789497.gif)]
history.pushState({}, "", href);这个过程类似入栈,出栈的过程,所以可以前进后退.
[外链图片转存失败,源站可能有防盗链机制,建议将图片保存下来直接上传(img-axYCAlPN-1634743836803)(https://img2020.cnblogs.com/blog/1222814/202110/1222814-20211020231204827-206735112.png)]
history.replaceState({},’’,href)
使用history中的
history.replaceState({},'',href):history.html关键代码
[外链图片转存失败,源站可能有防盗链机制,建议将图片保存下来直接上传(img-n2Y2YZoH-1634743836816)(https://img2020.cnblogs.com/blog/1222814/202110/1222814-20211020231205053-1150201436.png)]
<!DOCTYPE html>
<html lang="en">
<head>
<meta charset="UTF-8">
<meta http-equiv="X-UA-Compatible" content="IE=edge">
<meta name="viewport" content="width=device-width, initial-scale=1.0">
<title>Document</title>
</head>
<body>
<div id="app">
<a href="/home">home</a>
<a href="/about">about</a>
<div class="content">Default</div>
</div>
<script>
const contentEl = document.querySelector('.content');
const changeContent = () => {
switch(location.pathname) {
case "/home":
contentEl.innerHTML = "Home";
break;
case "/about":
contentEl.innerHTML = "About";
break;
default:
contentEl.innerHTML = "Default";
}
}
const aEls = document.getElementsByTagName("a");
for (let aEl of aEls) {
aEl.addEventListener("click", e => {
e.preventDefault();
const href = aEl.getAttribute("href");
// history.pushState({}, "", href);
history.replaceState({},'',href)
changeContent();
})
}
</script>
</body>
</html>
输出
- 这个
history.replaceState({},'',href)就不是history.pushState({}, "", href);的出栈入栈了,而是直接替换,所以无法前进和后退’[外链图片转存失败,源站可能有防盗链机制,建议将图片保存下来直接上传(img-8JoOU8Wr-1634743836817)(https://img2020.cnblogs.com/blog/1222814/202110/1222814-20211020231205397-815595052.png)]’.
[外链图片转存失败,源站可能有防盗链机制,建议将图片保存下来直接上传(img-GokMqecY-1634743836820)(https://img2020.cnblogs.com/blog/1222814/202110/1222814-20211020231205692-961565742.png)]
认识vue-router
[外链图片转存失败,源站可能有防盗链机制,建议将图片保存下来直接上传(img-uSG3xP3g-1634743836823)(https://img2020.cnblogs.com/blog/1222814/202110/1222814-20211020231205996-92500572.png)]
安装vue-router
[外链图片转存失败,源站可能有防盗链机制,建议将图片保存下来直接上传(img-GSjAw3Jm-1634743836829)(https://img2020.cnblogs.com/blog/1222814/202110/1222814-20211020231206456-1584019000.png)]
路由的使用步骤
[外链图片转存失败,源站可能有防盗链机制,建议将图片保存下来直接上传(img-ichgLo0i-1634743836833)(https://img2020.cnblogs.com/blog/1222814/202110/1222814-20211020231206686-357628896.gif)]
[外链图片转存失败,源站可能有防盗链机制,建议将图片保存下来直接上传(img-RBrOiYmh-1634743836837)(https://img2020.cnblogs.com/blog/1222814/202110/1222814-20211020231206967-1334548514.gif)]
代码结构图
[外链图片转存失败,源站可能有防盗链机制,建议将图片保存下来直接上传(img-cDTJKiBT-1634743836840)(https://img2020.cnblogs.com/blog/1222814/202110/1222814-20211020231207271-599127830.png)]
App.vue
<template>
<div>
<h3>App</h3>
<hr>
<!-- vue-router中的超链接,类似a标签 -->
<router-link to="/home">home</router-link>
<router-link to="/about">about</router-link>
<hr>
<!-- 子组件显示的区域 -->
<router-view></router-view>
</div>
</template>
<script>
export default {
}
</script>
<style scoped>
</style>
router>index.js
import {createRouter,createWebHashHistory, createWebHistory} from 'vue-router'
import Home from '../pages/Home.vue'
import About from '../pages/About.vue'
//配置映射关系
const routes = [
{path:'/home',component:Home},
{path:'/about',component:About}
]
//创建一个路由对象router
const router = createRouter({
routes,
history:createWebHashHistory()
})
export default router
Home.vue
<template>
<div>
Home
</div>
</template>
<script>
export default {
}
</script>
<style scoped>
</style>
About.vue
<template>
<div>
About
</div>
</template>
<script>
export default {
}
</script>
<style scoped>
</style>
代码逻辑图
[外链图片转存失败,源站可能有防盗链机制,建议将图片保存下来直接上传(img-y6KA9zdZ-1634743836844)(https://img2020.cnblogs.com/blog/1222814/202110/1222814-20211020231207545-657483772.png)]
输出
[外链图片转存失败,源站可能有防盗链机制,建议将图片保存下来直接上传(img-QgCldzVO-1634743836846)(https://img2020.cnblogs.com/blog/1222814/202110/1222814-20211020231207783-1901021789.png)]
存在的问题
- 刚进来的时候没有默认的页面,会有一个警告
[外链图片转存失败,源站可能有防盗链机制,建议将图片保存下来直接上传(img-wPDFMpBB-1634743836848)(https://img2020.cnblogs.com/blog/1222814/202110/1222814-20211020231207962-1072849973.png)]
路由的默认路径
[外链图片转存失败,源站可能有防盗链机制,建议将图片保存下来直接上传(img-eKtCB1c9-1634743836852)(https://img2020.cnblogs.com/blog/1222814/202110/1222814-20211020231208196-1915647600.gif)]
router>index.js

import {createRouter,createWebHashHistory} from 'vue-router'
import Home from '../pages/Home.vue'
import About from '../pages/About.vue'
//配置映射关系
const routes = [
{path:'/',redirect:'/home'},
{path:'/home',component:Home},
{path:'/about',component:About}
]
//创建一个路由对象router
const router = createRouter({
routes,
history:createWebHashHistory()
})
export default router
输出
- 以前的默认打开地址栏’
 ’
’ - 现在的默认打开地址栏[外链图片转存失败,源站可能有防盗链机制,建议将图片保存下来直接上传(img-TQO0poRT-1634743836859)(https://img2020.cnblogs.com/blog/1222814/202110/1222814-20211020231209304-1643742547.png)]
[外链图片转存失败,源站可能有防盗链机制,建议将图片保存下来直接上传(img-hmfUwHvQ-1634743836861)(https://img2020.cnblogs.com/blog/1222814/202110/1222814-20211020231209483-129866870.png)]
router-linker
[外链图片转存失败,源站可能有防盗链机制,建议将图片保存下来直接上传(img-j2ZqYdcm-1634743836862)(https://img2020.cnblogs.com/blog/1222814/202110/1222814-20211020231209765-1081160699.gif)]
active-class&exact-active-class属性
输出
[外链图片转存失败,源站可能有防盗链机制,建议将图片保存下来直接上传(img-SS2zZPQi-1634743836864)(https://img2020.cnblogs.com/blog/1222814/202110/1222814-20211020231210104-1840733390.png)]
两者的区别
- 当点击Home时,两个属性[外链图片转存失败,源站可能有防盗链机制,建议将图片保存下来直接上传(img-xjD9u4M4-1634743836865)(https://img2020.cnblogs.com/blog/1222814/202110/1222814-20211020231210407-2048600610.png)]都会被激活
- 当点击Home中的
消息或商品时,只会激活其中一个属性[外链图片转存失败,源站可能有防盗链机制,建议将图片保存下来直接上传(img-ixAmvvvX-1634743836867)(https://img2020.cnblogs.com/blog/1222814/202110/1222814-20211020231210640-1582818629.png)]
[外链图片转存失败,源站可能有防盗链机制,建议将图片保存下来直接上传(img-lwB524C6-1634743836868)(https://img2020.cnblogs.com/blog/1222814/202110/1222814-20211020231210913-1137915021.png)]
路由懒加载
[外链图片转存失败,源站可能有防盗链机制,建议将图片保存下来直接上传(img-PT6fQcNa-1634743836869)(https://img2020.cnblogs.com/blog/1222814/202110/1222814-20211020231211180-895808863.png)]
分包_魔法注释
懒加载,肯定要分包
index.js
import {createRouter,createWebHistory} from 'vue-router'
// import Home from '../pages/Home.vue'
// import About from '../pages/About.vue'
//配置映射关系
const routes = [
{path:'/',redirect:'/home'},
// {path:'/home',component:Home},
// {path:'/about',component:About}
{path:'/home',component:() => import(/* webpackChunkName:"chunk-home" */'../pages/Home.vue')},
{path:'/about',component:() => import(/* webpackChunkName:"chunk-about" */'../pages/About.vue')}
]
//创建一个路由对象router
const router = createRouter({
routes,
history:createWebHistory()
})
export default router
代码逻辑图
[外链图片转存失败,源站可能有防盗链机制,建议将图片保存下来直接上传(img-RPxGIkQN-1634743836871)(https://img2020.cnblogs.com/blog/1222814/202110/1222814-20211020231211423-1195132143.png)]
路由的其他属性
[外链图片转存失败,源站可能有防盗链机制,建议将图片保存下来直接上传(img-bNQTgeUW-1634743836875)(https://img2020.cnblogs.com/blog/1222814/202110/1222814-20211020231211613-1973236825.png)]
动态路由_参数传递
发送参数
[外链图片转存失败,源站可能有防盗链机制,建议将图片保存下来直接上传(img-DZZsCyil-1634743836880)(https://img2020.cnblogs.com/blog/1222814/202110/1222814-20211020231211876-120830714.gif)]
接受参数
[外链图片转存失败,源站可能有防盗链机制,建议将图片保存下来直接上传(img-rw2XuR6i-1634743836882)(https://img2020.cnblogs.com/blog/1222814/202110/1222814-20211020231212239-449917584.png)]
index.js
传递参数的关键代码
[外链图片转存失败,源站可能有防盗链机制,建议将图片保存下来直接上传(img-FHMgXrIN-1634743836884)(https://img2020.cnblogs.com/blog/1222814/202110/1222814-20211020231212444-175274715.gif)]
import {createRouter,createWebHistory} from 'vue-router'
//配置映射关系
const routes = [
{path:'/',redirect:'/home'},
{path:'/home',component:() => import(/* webpackChunkName:"chunk-home" */'../pages/Home.vue')},
{path:'/about',component:() => import(/* webpackChunkName:"chunk-about" */'../pages/About.vue')},
{
path:'/user/:userName',
component:() => import(/* webpackChunkName:"chunk-user" */'../pages/User.vue')}
]
//创建一个路由对象router
const router = createRouter({
routes,
history:createWebHistory()
})
export default router
App.vue
发送参数的关键代码
[外链图片转存失败,源站可能有防盗链机制,建议将图片保存下来直接上传(img-aKRIRJ3D-1634743836885)(https://img2020.cnblogs.com/blog/1222814/202110/1222814-20211020231212698-25479102.png)]
<template>
<div>
<h3>App</h3>
<hr>
<!-- vue-router中的超链接,类似a标签 -->
<router-link to="/home" >Home</router-link>
<router-link to="/about" >About</router-link>
<router-link to="/user/Bruce/Celina" >User</router-link>
<hr>
<!-- 子组件显示的区域 -->
<router-view></router-view>
</div>
</template>
<script>
export default {
}
</script>
<style scoped>
</style>
输出
- 通过在
/user后面添加/Alice,可以传递参数
[外链图片转存失败,源站可能有防盗链机制,建议将图片保存下来直接上传(img-zQSbdks3-1634743836887)(https://img2020.cnblogs.com/blog/1222814/202110/1222814-20211020231212883-1531769682.png)]
子组件接受参数:User.vue
接受参数的关键代码
[外链图片转存失败,源站可能有防盗链机制,建议将图片保存下来直接上传(img-DGk5l1GY-1634743836888)(https://img2020.cnblogs.com/blog/1222814/202110/1222814-20211020231213078-678030523.png)]
<template>
<div>
User
</div>
</template>
<script>
export default {
created() {
console.log(this.$route)
},
}
</script>
<style scoped>
</style>
输出
[外链图片转存失败,源站可能有防盗链机制,建议将图片保存下来直接上传(img-cVHccuEY-1634743836890)(https://img2020.cnblogs.com/blog/1222814/202110/1222814-20211020231213241-232851451.png)]
子组件接受指定的参数:User.vue
关键代码
[外链图片转存失败,源站可能有防盗链机制,建议将图片保存下来直接上传(img-ZdsAeE0y-1634743836892)(https://img2020.cnblogs.com/blog/1222814/202110/1222814-20211020231213427-1621933604.png)]
<template>
<div>
User
</div>
</template>
<script>
export default {
created() {
console.log(this.$route)
console.log(this.$route.params.userName)
},
}
</script>
<style scoped>
</style>
输出
[外链图片转存失败,源站可能有防盗链机制,建议将图片保存下来直接上传(img-EXGFh6Xl-1634743836895)(https://img2020.cnblogs.com/blog/1222814/202110/1222814-20211020231213638-781543719.png)]
User.vue
关键代码
[外链图片转存失败,源站可能有防盗链机制,建议将图片保存下来直接上传(img-SI3FK69X-1634743836898)(https://img2020.cnblogs.com/blog/1222814/202110/1222814-20211020231213847-238664521.png)]
<template>
<div>
User : {{$route.params.userName}}
</div>
</template>
<script>
export default {
created() {
console.log(this.$route)
console.log(this.$route.params.userName)
},
}
</script>
<style scoped>
</style>
输出
[外链图片转存失败,源站可能有防盗链机制,建议将图片保存下来直接上传(img-DzMz2ulY-1634743836899)(https://img2020.cnblogs.com/blog/1222814/202110/1222814-20211020231214036-1907706620.png)]
如何在setup()中的拿到动态路由传递的参数
代码逻辑图
[外链图片转存失败,源站可能有防盗链机制,建议将图片保存下来直接上传(img-CfTRjFpL-1634743836902)(https://img2020.cnblogs.com/blog/1222814/202110/1222814-20211020231214290-87311620.png)]
User.vue
关键代码
[外链图片转存失败,源站可能有防盗链机制,建议将图片保存下来直接上传(img-MLvDDe6g-1634743836903)(https://img2020.cnblogs.com/blog/1222814/202110/1222814-20211020231214479-22491041.png)]
<template>
<div>
User : {{$route.params.userName}}
</div>
</template>
<script>
import { useRoute } from 'vue-router'
export default {
created() {
console.log(this.$route)
},
setup() {
const route = useRoute();
console.log(route.params.userName);
}
}
</script>
<style scoped>
</style>
输出
[外链图片转存失败,源站可能有防盗链机制,建议将图片保存下来直接上传(img-xDzidJUQ-1634743836905)(https://img2020.cnblogs.com/blog/1222814/202110/1222814-20211020231214674-1252796984.png)]
多参数传递
[外链图片转存失败,源站可能有防盗链机制,建议将图片保存下来直接上传(img-ogudETXr-1634743836907)(https://img2020.cnblogs.com/blog/1222814/202110/1222814-20211020231214864-308756606.png)]
路由配置文件 : index.js
传递多个参数的关键配置
[外链图片转存失败,源站可能有防盗链机制,建议将图片保存下来直接上传(img-loJx5lXq-1634743836908)(https://img2020.cnblogs.com/blog/1222814/202110/1222814-20211020231215149-1063514329.png)]
import {createRouter,createWebHistory} from 'vue-router'
//配置映射关系
const routes = [
{path:'/',redirect:'/home'},
{path:'/home',component:() => import(/* webpackChunkName:"chunk-home" */'../pages/Home.vue')},
{path:'/about',component:() => import(/* webpackChunkName:"chunk-about" */'../pages/About.vue')},
{
path:'/user/:userName/:age',
component:() => import(/* webpackChunkName:"chunk-user" */'../pages/User.vue')}
]
//创建一个路由对象router
const router = createRouter({
routes,
history:createWebHistory()
})
export default router
父组件 : App.vue
传递多个参数
[外链图片转存失败,源站可能有防盗链机制,建议将图片保存下来直接上传(img-GOfwLDJA-1634743836909)(https://img2020.cnblogs.com/blog/1222814/202110/1222814-20211020231215326-354338892.png)]
<template>
<div>
<h3>App</h3>
<hr>
<!-- vue-router中的超链接,类似a标签 -->
<router-link to="/home" >Home</router-link>
<router-link to="/about" >About</router-link>
<router-link to="/user/Alice/19" >User</router-link>
<hr>
<!-- 子组件显示的区域 -->
<router-view></router-view>
</div>
</template>
<script>
export default {
}
</script>
<style scoped>
</style>
子组件 : User.vue
<template>
<div>
User : {{$route.params.userName}}
Age : {{$route.params.age}}
</div>
</template>
<script>
import { useRoute } from 'vue-router'
export default {
created() {
console.log(this.$route)
},
// setup() {
// const route = useRoute();
// console.log(route.params.userName);
// }
}
</script>
<style scoped>
</style>
输出
[外链图片转存失败,源站可能有防盗链机制,建议将图片保存下来直接上传(img-TN8rK0r1-1634743836912)(https://img2020.cnblogs.com/blog/1222814/202110/1222814-20211020231215516-879356976.png)]
NotFound
[外链图片转存失败,源站可能有防盗链机制,建议将图片保存下来直接上传(img-5okL3NNK-1634743836913)(https://img2020.cnblogs.com/blog/1222814/202110/1222814-20211020231215756-1138079293.png)]
映射表配置文件:
route>index.js关键代码
[外链图片转存失败,源站可能有防盗链机制,建议将图片保存下来直接上传(img-vcEstvrj-1634743836914)(https://img2020.cnblogs.com/blog/1222814/202110/1222814-20211020231216026-988957031.png)]
import {createRouter,createWebHistory} from 'vue-router'
//配置映射关系
const routes = [
{path:'/',redirect:'/home'},
{path:'/home',component:() => import(/* webpackChunkName:"chunk-home" */'../pages/Home.vue')},
{path:'/about',component:() => import(/* webpackChunkName:"chunk-about" */'../pages/About.vue')},
{
path:'/user/:userName/:age',
component:() => import(/* webpackChunkName:"chunk-user" */'../pages/User.vue')
},
{
path:'/:pathMatch(.*)',
component:() => import(/* webpackChunkName:"chunk-notFound" */ '../pages/NotFound.vue')
}
]
//创建一个路由对象router
const router = createRouter({
routes,
history:createWebHistory()
})
export default router
输出
[外链图片转存失败,源站可能有防盗链机制,建议将图片保存下来直接上传(img-dtV09L7o-1634743836916)(https://img2020.cnblogs.com/blog/1222814/202110/1222814-20211020231216325-1768356826.png)]
$route.params.pathMatch
NotFound.vue
<template>
<div>
Not Found
<h4>{{$route.params.pathMatch}}</h4>
</div>
</template>
<script>
export default {
}
</script>
<style scoped>
</style>
输出
[外链图片转存失败,源站可能有防盗链机制,建议将图片保存下来直接上传(img-ZKvNbXmY-1634743836918)(https://img2020.cnblogs.com/blog/1222814/202110/1222814-20211020231216505-370869488.png)]
匹配规则加*
[外链图片转存失败,源站可能有防盗链机制,建议将图片保存下来直接上传(img-QlbUJP6w-1634743836919)(https://img2020.cnblogs.com/blog/1222814/202110/1222814-20211020231216725-2025637599.gif)]
路由的嵌套
[外链图片转存失败,源站可能有防盗链机制,建议将图片保存下来直接上传(img-amCte36g-1634743836921)(https://img2020.cnblogs.com/blog/1222814/202110/1222814-20211020231216939-1140140836.png)]
路由配置文件: index.js
关键代码
[外链图片转存失败,源站可能有防盗链机制,建议将图片保存下来直接上传(img-Flz8lKCV-1634743836922)(https://img2020.cnblogs.com/blog/1222814/202110/1222814-20211020231217152-2086438639.gif)]
import {createRouter,createWebHistory} from 'vue-router'
//配置映射关系
const routes = [
{path:'/',redirect:'/home'},
{
path:'/home',
component:() => import(/* webpackChunkName:"chunk-home" */'../pages/Home.vue'),
children:[
{
path:'msg',
component:() => import('../pages/HomeMsg.vue')
},
{
path:'pro',
component:() => import('../pages/HomeShops.vue')
}
]
},
{path:'/about',component:() => import(/* webpackChunkName:"chunk-about" */'../pages/About.vue')},
{
path:'/user/:userName/:age',
component:() => import(/* webpackChunkName:"chunk-user" */'../pages/User.vue')
},
{
path:'/:pathMatch(.*)',
component:() => import(/* webpackChunkName:"chunk-notFound" */ '../pages/NotFound.vue')
}
]
//创建一个路由对象router
const router = createRouter({
routes,
history:createWebHistory()
})
export default router
Home.vue
关键代码
[外链图片转存失败,源站可能有防盗链机制,建议将图片保存下来直接上传(img-uPOYqsPo-1634743836925)(https://img2020.cnblogs.com/blog/1222814/202110/1222814-20211020231217348-297005134.png)]
<template>
<div>
<table border="1">
<div>Home</div>
<router-link to="/home/msg">消息</router-link>
<router-link to="/home/pro">商品</router-link>
<router-view></router-view>
</table>
</div>
</template>
<script>
export default {
}
</script>
<style scoped>
</style>
HomeMsg.vue
<template>
<div>
<table border="1">
HomeMsg
</table>
</div>
</template>
<script>
export default {
}
</script>
<style scoped>
</style>
HomeShops.vue
<template>
<div>
<table border="1">
HomeShops
</table>
</div>
</template>
<script>
export default {
}
</script>
<style scoped>
</style>
输出
[外链图片转存失败,源站可能有防盗链机制,建议将图片保存下来直接上传(img-4V726BAy-1634743836927)(https://img2020.cnblogs.com/blog/1222814/202110/1222814-20211020231217604-777405644.png)]
编程式控制路由
App.vue
关键代码
[外链图片转存失败,源站可能有防盗链机制,建议将图片保存下来直接上传(img-RHSVDSxi-1634743836929)(https://img2020.cnblogs.com/blog/1222814/202110/1222814-20211020231217863-1300439155.png)]
<template>
<div>
<table border="1">
<h3>App</h3>
<!-- vue-router中的超链接,类似a标签 -->
<router-link to="/home" >Home</router-link>
<router-link to="/about" >About</router-link>
<router-link to="/user/Alice/19" >User</router-link><br>
<button @click="jumpToHome">Home</button>
<button @click="jumpToAbout">About</button>
<button @click="jumpToUser">User</button>
<!-- 子组件显示的区域 -->
<router-view></router-view>
</table>
</div>
</template>
<script>
import {useRouter} from 'vue-router'
export default {
setup() {
const router = useRouter()
const jumpToHome = () => {
router.push('/home')
}
const jumpToAbout = () => {
router.push('/about')
}
const jumpToUser = () => {
router.push('/user/Alice/19')
}
return {
jumpToHome,
jumpToAbout,
jumpToUser
}
}
}
</script>
<style scoped>
</style>
输出
[外链图片转存失败,源站可能有防盗链机制,建议将图片保存下来直接上传(img-cxVhaM7c-1634743836931)(https://img2020.cnblogs.com/blog/1222814/202110/1222814-20211020231218069-684133680.png)]
router-link的v-slot
[外链图片转存失败,源站可能有防盗链机制,建议将图片保存下来直接上传(img-uHj8cbjB-1634743836935)(https://img2020.cnblogs.com/blog/1222814/202110/1222814-20211020231218366-1785074971.gif)]
[外链图片转存失败,源站可能有防盗链机制,建议将图片保存下来直接上传(img-sQRIlS3R-1634743836940)(https://img2020.cnblogs.com/blog/1222814/202110/1222814-20211020231218738-1962418597.gif)]
v-slot的基本使用
[外链图片转存失败,源站可能有防盗链机制,建议将图片保存下来直接上传(img-ONy7ftBg-1634743836945)(https://img2020.cnblogs.com/blog/1222814/202110/1222814-20211020231219132-653050866.png)]
custom的作用和如何通过插槽给内部传值
[外链图片转存失败,源站可能有防盗链机制,建议将图片保存下来直接上传(img-svkq7OWS-1634743836947)(https://img2020.cnblogs.com/blog/1222814/202110/1222814-20211020231219418-1117055798.png)]
navigate导航函数
[外链图片转存失败,源站可能有防盗链机制,建议将图片保存下来直接上传(img-xwoxSFZ2-1634743836952)(https://img2020.cnblogs.com/blog/1222814/202110/1222814-20211020231219657-1819683881.png)]
isActive
[外链图片转存失败,源站可能有防盗链机制,建议将图片保存下来直接上传(img-9v3FQkhf-1634743836953)(https://img2020.cnblogs.com/blog/1222814/202110/1222814-20211020231219855-796732447.png)]
router-view的v-slot
[外链图片转存失败,源站可能有防盗链机制,建议将图片保存下来直接上传(img-8WQL1Zlv-1634743836955)(https://img2020.cnblogs.com/blog/1222814/202110/1222814-20211020231220143-5353474.png)]
动态添加路由
添加一级路由
[外链图片转存失败,源站可能有防盗链机制,建议将图片保存下来直接上传(img-upLUPdDc-1634743836958)(https://img2020.cnblogs.com/blog/1222814/202110/1222814-20211020231220518-1447028218.png)]
添加二级路由
[外链图片转存失败,源站可能有防盗链机制,建议将图片保存下来直接上传(img-XajeXrOR-1634743836962)(https://img2020.cnblogs.com/blog/1222814/202110/1222814-20211020231220737-1892702388.png)]
[外链图片转存失败,源站可能有防盗链机制,建议将图片保存下来直接上传(img-SEUL0X6b-1634743836965)(https://img2020.cnblogs.com/blog/1222814/202110/1222814-20211020231221020-90472520.png)]
动态删除路由
[外链图片转存失败,源站可能有防盗链机制,建议将图片保存下来直接上传(img-W4qTOiY0-1634743836966)(https://img2020.cnblogs.com/blog/1222814/202110/1222814-20211020231221315-800547957.png)]
[外链图片转存失败,源站可能有防盗链机制,建议将图片保存下来直接上传(img-DDVvBQtc-1634743836969)(https://img2020.cnblogs.com/blog/1222814/202110/1222814-20211020231221562-591659026.png)]
路由导航守卫
https://next.router.vuejs.org/zh/guide/advanced/navigation-guards.html
[外链图片转存失败,源站可能有防盗链机制,建议将图片保存下来直接上传(img-cBoQuOJq-1634743836970)(https://img2020.cnblogs.com/blog/1222814/202110/1222814-20211020231221786-1095513300.png)]
登录守卫功能
[外链图片转存失败,源站可能有防盗链机制,建议将图片保存下来直接上传(img-gjwbEiHl-1634743836971)(https://img2020.cnblogs.com/blog/1222814/202110/1222814-20211020231221989-889710726.png)]
Vuex的状态管理
https://next.vuex.vuejs.org/
批量引入Vuex中的数据_mapState
[外链图片转存失败,源站可能有防盗链机制,建议将图片保存下来直接上传(img-PrtCeYHs-1634743836973)(https://img2020.cnblogs.com/blog/1222814/202110/1222814-20211020231222185-1508544011.png)]
setup中如何使用mapState
[外链图片转存失败,源站可能有防盗链机制,建议将图片保存下来直接上传(img-K2Y5RQi4-1634743836975)(https://img2020.cnblogs.com/blog/1222814/202110/1222814-20211020231222463-160769040.png)]
Home.vue
<template>
<div class="home">
<table border="1">
<h5>{{ name }}</h5>
<h5>{{ age }}</h5>
<h5>{{ counter }}</h5>
</table>
</div>
</template>
<script>
import { useStore, mapState } from "vuex";
import { computed } from "vue";
export default {
setup() {
const store = useStore();
const storeStateFns = mapState(["name", "age", "counter"]);
// console.log(storeStateFns);//=>{name: ƒ, age: ƒ, counter: ƒ}
const storeState = {};
Object.keys(storeStateFns).forEach((fnKey) => {
const fn = storeStateFns[fnKey].bind({ $store: store });
storeState[fnKey] = computed(fn);
});
return {
...storeState,
};
},
};
</script>
<style></style>
setup中使用mapState的封装
[外链图片转存失败,源站可能有防盗链机制,建议将图片保存下来直接上传(img-oiZ5s0lt-1634743836977)(https://img2020.cnblogs.com/blog/1222814/202110/1222814-20211020231222702-1519398150.png)]
hooks>useState.js
import { useStore, mapState } from "vuex";
import { computed } from "vue";
export function useState(mapper) {
const store = useStore();
const storeStateFns = mapState(mapper);
const storeState = {};
Object.keys(storeStateFns).forEach((fnKey) => {
const fn = storeStateFns[fnKey].bind({ $store: store });
storeState[fnKey] = computed(fn);
});
return storeState;
}
Home.vue
<template>
<div class="home">
<table border="1">
<h5>{{ name }}</h5>
<h5>{{ age }}</h5>
<h5>{{ counter }}</h5>
</table>
</div>
</template>
<script>
import { useState } from "../hooks/useState";
export default {
setup() {
const storeState = useState(["name", "age", "counter"]);
return {
...storeState,
};
},
};
</script>
<style></style>
Vuex的计算属性_getters
使用state中的数据
[外链图片转存失败,源站可能有防盗链机制,建议将图片保存下来直接上传(img-vXJ94E8v-1634743836978)(https://img2020.cnblogs.com/blog/1222814/202110/1222814-20211020231222925-988745970.png)]
使用getters中的数据
[外链图片转存失败,源站可能有防盗链机制,建议将图片保存下来直接上传(img-RqurF0qB-1634743836980)(https://img2020.cnblogs.com/blog/1222814/202110/1222814-20211020231223191-1041303350.png)]
getters返回一个函数
[外链图片转存失败,源站可能有防盗链机制,建议将图片保存下来直接上传(img-S6Gt8q3r-1634743836982)(https://img2020.cnblogs.com/blog/1222814/202110/1222814-20211020231223429-952426201.png)]
index.js
import { createStore } from "vuex";
export default createStore({
state() {
return {
counter: 10,
name: "Alice",
age: 19,
height: 180,
books: [
{ name: "Alice", price: 10, count: 1 },
{ name: "Bruce", price: 9, count: 1 },
{ name: "Celina", price: 11, count: 1 },
],
};
},
getters: {
totalBooksPrice(state) {
return function (disCount) {
let totalPrice = 0;
for (const book of state.books) {
totalPrice += book.price * book.count * disCount;
}
return totalPrice;
};
},
},
mutations: {
increment(state) {
state.counter++;
},
decrement(state) {
state.counter--;
},
},
actions: {},
modules: {},
});
Home.vue
<template>
<div class="home">
<table border="1">
<h2>{{ $store.getters.totalBooksPrice(0.8) }}</h2>
</table>
</div>
</template>
<script>
export default {
setup() {},
};
</script>
<style></style>
批量拿到getters中的数据
[外链图片转存失败,源站可能有防盗链机制,建议将图片保存下来直接上传(img-0pO3sTl8-1634743836983)(https://img2020.cnblogs.com/blog/1222814/202110/1222814-20211020231223665-357050118.png)]
Home.vue
<template>
<div class="home">
<table border="1">
<h2>{{ $store.getters.totalBooksPrice }}</h2>
<h2>{{ $store.getters.info }}</h2>
<hr />
<h2>{{ totalBooksPrice }}</h2>
<h2>{{ info }}</h2>
</table>
</div>
</template>
<script>
import { mapGetters, useStore } from "vuex";
import { computed } from "vue";
export default {
setup() {
const store = useStore();
const gettersFns = mapGetters(["totalBooksPrice", "info"]);
const getters = {};
Object.keys(gettersFns).forEach((key) => {
const fn = gettersFns[key].bind({ $store: store });
getters[key] = computed(fn);
});
return {
...getters,
};
},
};
</script>
<style></style>
封装批量拿到getters中的数据
[外链图片转存失败,源站可能有防盗链机制,建议将图片保存下来直接上传(img-yQ71zbh1-1634743836985)(https://img2020.cnblogs.com/blog/1222814/202110/1222814-20211020231223892-1816012496.png)]
hooks>useGetters.js
import { mapGetters, useStore } from "vuex";
import { computed } from "vue";
export function useGetters(mapper) {
const store = useStore();
const gettersFns = mapGetters(mapper);
const getters = {};
Object.keys(gettersFns).forEach((key) => {
const fn = gettersFns[key].bind({ $store: store });
getters[key] = computed(fn);
});
return getters;
}
mapState 和mapGetters的综合封装
图解
[外链图片转存失败,源站可能有防盗链机制,建议将图片保存下来直接上传(img-OW4OR7h2-1634743836987)(https://img2020.cnblogs.com/blog/1222814/202110/1222814-20211020231224115-1853993190.png)]
hooks>useMapper.js
import { useStore } from "vuex";
import { computed } from "vue";
export function useMapper(mapper, mapFunc) {
const store = useStore();
const gettersFns = mapFunc(mapper);
const getters = {};
Object.keys(gettersFns).forEach((key) => {
const fn = gettersFns[key].bind({ $store: store });
getters[key] = computed(fn);
});
return getters;
}
hooks>useState.js
import { mapState } from "vuex";
import { useMapper } from "./useMapper";
export function useState(mapper) {
return useMapper(mapper, mapState);
}
hooks>useGetters.js
import { useMapper } from "./useMapper";
import { mapGetters } from "vuex";
export function useGetters(mapper) {
return useMapper(mapper, mapGetters);
}
hooks>index.js
import { useGetters } from "./useGetters";
import { useState } from "./useState";
export { useGetters, useState };
引用useGetters的文件:Home.vue
<template>
<div class="home">
<table border="1">
<h2>{{ $store.getters.totalBooksPrice }}</h2>
<h2>{{ $store.getters.info }}</h2>
<hr />
<h2>{{ totalBooksPrice }}</h2>
<h2>{{ info }}</h2>
</table>
</div>
</template>
<script>
// import { useGetters } from "../hooks/useGetters";
import { useGetters } from "../hooks/index";
export default {
setup() {
return {
...useGetters(["totalBooksPrice", "info"]),
};
},
};
</script>
<style></style>
Mutation
无参数传递_计数器
[外链图片转存失败,源站可能有防盗链机制,建议将图片保存下来直接上传(img-tvzzBMmT-1634743836989)(https://img2020.cnblogs.com/blog/1222814/202110/1222814-20211020231224321-1943172650.png)]
App.vue
<template>
<div class="app">
<table border="1">
<h2>{{ $store.state.counter }}</h2>
<button @click="increment">+1</button>
<button @click="decrement">-1</button>
</table>
</div>
</template>
<script>
export default {
name: "App",
components: {},
methods: {
increment() {
this.$store.commit("increment");
},
decrement() {
this.$store.commit("decrement");
},
},
};
</script>
<style></style>
有参数传递_计数器
图解
传递普通参数
[外链图片转存失败,源站可能有防盗链机制,建议将图片保存下来直接上传(img-aaQoOo10-1634743836991)(https://img2020.cnblogs.com/blog/1222814/202110/1222814-20211020231224573-1114998813.png)]
传递对象类型参数
[外链图片转存失败,源站可能有防盗链机制,建议将图片保存下来直接上传(img-rcwz7NLD-1634743837004)(https://img2020.cnblogs.com/blog/1222814/202110/1222814-20211020231224806-624518842.png)]
两种提交风格
[外链图片转存失败,源站可能有防盗链机制,建议将图片保存下来直接上传(img-6MB5selb-1634743837008)(https://img2020.cnblogs.com/blog/1222814/202110/1222814-20211020231225061-337419833.png)]
App.vue
<template>
<div class="app">
<table border="1">
<h2>{{ $store.state.counter }}</h2>
<button @click="increment">+1</button>
<button @click="decrement">-1</button>
<hr />
<button @click="increment_10">+10</button>
</table>
</div>
</template>
<script>
export default {
name: "App",
components: {},
methods: {
increment() {
this.$store.commit("increment");
},
decrement() {
this.$store.commit("decrement");
},
increment_10() {
this.$store.commit("incrementN", { step: 10 });
},
},
};
</script>
<style></style>
store>index.js
import { createStore } from "vuex";
export default createStore({
state() {
return {
counter: 10,
name: "Alice",
age: 19,
height: 180,
books: [
{ name: "Alice", price: 10, count: 1 },
{ name: "Bruce", price: 9, count: 1 },
{ name: "Celina", price: 11, count: 1 },
],
};
},
getters: {
totalBooksPrice(state) {
let totalPrice = 0;
for (const book of state.books) {
totalPrice += book.price * book.count;
}
return totalPrice;
},
info(state) {
return state.name + state.age;
},
},
mutations: {
increment(state) {
state.counter++;
},
decrement(state) {
state.counter--;
},
incrementN(state, payload) {
state.counter += payload.step;
},
},
actions: {},
modules: {},
});
常量类型
图解
[外链图片转存失败,源站可能有防盗链机制,建议将图片保存下来直接上传(img-ToKSJAHJ-1634743837011)(https://img2020.cnblogs.com/blog/1222814/202110/1222814-20211020231225269-1771211526.png)]
store>index.js
import { createStore } from "vuex";
import { INCREMENT_N } from "./mutation-types";
export default createStore({
state() {
return {
counter: 10,
name: "Alice",
age: 19,
height: 180,
books: [
{ name: "Alice", price: 10, count: 1 },
{ name: "Bruce", price: 9, count: 1 },
{ name: "Celina", price: 11, count: 1 },
],
};
},
getters: {
totalBooksPrice(state) {
let totalPrice = 0;
for (const book of state.books) {
totalPrice += book.price * book.count;
}
return totalPrice;
},
info(state) {
return state.name + state.age;
},
},
mutations: {
increment(state) {
state.counter++;
},
decrement(state) {
state.counter--;
},
// incrementN(state, payload) {
// state.counter += payload.step;
// },
[INCREMENT_N](state, payload) {
state.counter += payload.step;
},
},
actions: {},
modules: {},
});
store>mutation-types.js
export const INCREMENT_N = "incrementN";
App.vue
<template>
<div class="app">
<table border="1">
<h2>{{ $store.state.counter }}</h2>
<button @click="increment">+1</button>
<button @click="decrement">-1</button>
<hr />
<button @click="increment_10">+10</button>
</table>
</div>
</template>
<script>
import { INCREMENT_N } from "./store/mutation-types";
export default {
name: "App",
components: {},
methods: {
increment() {
this.$store.commit("increment");
},
decrement() {
this.$store.commit("decrement");
},
// 第一种提交风格
increment_10() {
this.$store.commit(INCREMENT_N, { step: 10 });
},
// 第二种提交风格
// increment_10() {
// this.$store.commit({
// type: "incrementN",
// step: 10,
// });
// },
},
};
</script>
<style></style>
mapMutation
图解
[外链图片转存失败,源站可能有防盗链机制,建议将图片保存下来直接上传(img-8h38syHH-1634743837012)(https://img2020.cnblogs.com/blog/1222814/202110/1222814-20211020231225510-1579645842.png)]
App.vue
<template>
<div class="app">
<table border="1">
<h2>{{ $store.state.counter }}</h2>
<button @click="increment">+1</button>
<button @click="decrement">-1</button>
<hr />
<button @click="incrementN(10)">+10</button>
</table>
</div>
</template>
<script>
import { INCREMENT_N } from "./store/mutation-types";
import { mapMutations } from "vuex";
export default {
name: "App",
components: {},
setup() {
const mutations = mapMutations(["increment", "decrement", INCREMENT_N]);
return {
...mutations,
};
},
};
</script>
<style></style>
actions
[外链图片转存失败,源站可能有防盗链机制,建议将图片保存下来直接上传(img-NwyaJ6mP-1634743837014)(https://img2020.cnblogs.com/blog/1222814/202110/1222814-20211020231225763-176180570.png)]
基本使用
- 在组件中调用store中actions的函数.
- 在actions中调用mutations中的方法.
- 真正的数据修改发生在mutations的方法里面.
[外链图片转存失败,源站可能有防盗链机制,建议将图片保存下来直接上传(img-yCVPwzp3-1634743837016)(https://img2020.cnblogs.com/blog/1222814/202110/1222814-20211020231225991-1209323146.png)]
App.vue
<template>
<div class="app">
<table border="1">
<h2>{{ $store.state.counter }}</h2>
<button @click="increment">+1</button>
</table>
</div>
</template>
<script>
export default {
name: "App",
components: {},
methods: {
increment() {
console.log("1.在App.vue中调用store中的actions的incrementAction()");
this.$store.dispatch("incrementAction");
},
},
};
</script>
<style></style>
index.js
import { createStore } from "vuex";
export default createStore({
state() {
return {
counter: 10,
name: "Alice",
age: 19,
height: 180,
books: [
{ name: "Alice", price: 10, count: 1 },
{ name: "Bruce", price: 9, count: 1 },
{ name: "Celina", price: 11, count: 1 },
],
};
},
getters: {},
mutations: {
increment(state) {
console.log("3.真正调用mutations中的increment");
state.counter++;
},
},
actions: {
incrementAction(context) {
console.log("2.在actions中调用mutations中的increment");
context.commit("increment");
},
},
modules: {},
});
基本使用-异步请求-一秒后加一的计数器
图解
[外链图片转存失败,源站可能有防盗链机制,建议将图片保存下来直接上传(img-Vffey2NE-1634743837019)(https://img2020.cnblogs.com/blog/1222814/202110/1222814-20211020231226197-1528102828.png)]
App.vue
<template>
<div class="app">
<table border="1">
<h2>{{ $store.state.counter }}</h2>
<button @click="increment">+1</button>
</table>
</div>
</template>
<script>
export default {
name: "App",
components: {},
methods: {
increment() {
this.$store.dispatch("incrementAction");
},
},
mounted() {
this.$store.dispatch("getBannerDataAction");
},
};
</script>
<style></style>
store>index.js
import { createStore } from "vuex";
import axios from "axios";
export default createStore({
sta
最后
以上就是含蓄乌冬面最近收集整理的关于vue3 学习笔记简介环境搭建计数器案例命令式和声明式编程MVVM模型template属性data属性methods属性this的指向VSCode代码片段Musache语法基本指令重要指令v-ifv-showv-for数组更新检测VNode计算属性-computedWatch综合案例_书籍购物车v-model组件化开发组件通信插槽动态组件Webpack的代码分包&异步组件$refs的使用生命周期组件的v-modelVue3过渡&动画实现animate.css动画gsap库Mixinextends的全部内容,更多相关vue3内容请搜索靠谱客的其他文章。


发表评论 取消回复