… 不定期更新
文章目录
- 调试环境
- 1,编绎及运行程序
- 2,安装镜像并使用容器 --> Faucet
- 根据官方说明文档在实际环境中运行
- 1, [OVS Faucet Tutorial](https://docs.openvswitch.org/en/latest/tutorials/faucet/)
- 1)前言
- 2)Layer 2, Switching
- 1> 环境的配置
- 2> 在跟踪数据流前,对流表及相应的工具做一些了解
- 3> 跟踪数据流
- 3)Layer 2, Routing
- 1> 环境的配置
- 2> 跟踪数据流
- 代码目录(暂定)
调试环境
1,编绎及运行程序
在正式阅读和调试openvswitch的代码前,先准备好环境。参考文档 Tutorials,考虑到网络问题,建议在本地镜像该网站,方法参见利用wget备份一个网站
** 代码
$ git clone https://github.com/openvswitch/ovs.git
** 源码编绎,可能会出现依赖错误,如`automake`等没安装,这时google一般都能解决,用apt源下载好即可
** 	link: https://docs.openvswitch.org/en/latest/intro/install/general/
$ cd ovs
$ ./boot.sh
$ ./configure
$ make -j4
** 如果后面没有改动文件结构,只加了一些调试信息,只需要再调用`make`即可
############################################################################################
** 以上是编绎过程,当程序都编绎好后,就可以利用`sandbox`搭建模拟的ovs环境,而不会对系统本身产生影响
$ cd ovs	** 进入主目录
$ make -j4	** 以得到所有二进制执行文件为准
$ ./tutorial/ovs-sandbox -s .
** 这样`sandbox`就建好了,如何确定环境无误呢?(博主的系统已经安装好ovs了,如何确认`sandbox`是在使用
** 源码编绎的执行文件呢)
$ ps -ef | grep ovs
xxxxxxx   1537 20111  0 11:18 pts/0    00:00:00 tmux a -t ovs
root      1722     1  0 Oct12 ?        00:00:00 ovsdb-server: monitoring pid 1723 (healthy)
root      1723  1722  0 Oct12 ?        00:00:04 ovsdb-server /etc/openvswitch/conf.db -vconsole:emer -vsyslog:err -vfile:info --remote=punix:/var/run/openvswitch/db.sock --private-key=db:Open_vSwitch,SSL,private_key --certificate=db:Open_vSwitch,SSL,certificate --bootstrap-ca-cert=db:Open_vSwitch,SSL,ca_cert --no-chdir --log-file=/var/log/openvswitch/ovsdb-server.log --pidfile=/var/run/openvswitch/ovsdb-server.pid --detach --monitor
root      1821     1  0 Oct12 ?        00:00:00 ovs-vswitchd: monitoring pid 1822 (healthy)
root      1822  1821  0 Oct12 ?        00:03:24 ovs-vswitchd unix:/var/run/openvswitch/db.sock -vconsole:emer -vsyslog:err -vfile:info --mlockall --no-chdir --log-file=/var/log/openvswitch/ovs-vswitchd.log --pidfile=/var/run/openvswitch/ovs-vswitchd.pid --detach --monitor
xxxxxxx   2645 31695  0 11:20 pts/5    00:00:00 /bin/sh ./tutorial/ovs-sandbox -s .
xxxxxxx   2715     1  0 11:20 ?        00:00:00 ovsdb-server --detach --no-chdir --pidfile -vconsole:off --log-file -vsyslog:off --remote=punix:/home/xxxxxxx/docker-ovs/ovs/sandbox/db.sock --remote=db:Open_vSwitch,Open_vSwitch,manager_options
xxxxxxx   2719     1  0 11:20 ?        00:00:00 ovs-vswitchd --detach --no-chdir --pidfile -vconsole:off --log-file -vsyslog:off --enable-dummy=override -vvconn -vnetdev_dummy
xxxxxxx   2756 31542  0 11:20 pts/4    00:00:00 grep --color=auto --exclude-dir=.bzr --exclude-dir=CVS --exclude-dir=.git --exclude-dir=.hg --exclude-dir=.svn ovs
** 可以看到有多个`ovs-vswitchd`,`ovsdb-server`进程运行,哪一个是`sandbox`中启动的进程?
** 	2719 和 2715
** 注意:OVS主要由两个service实现功能:`ovs-vswitchd`,`ovsdb-server`,它们都有`daemon`进程,由此
** 		很容易区分开来,`sandbox`中的进程是孤儿进程
$ lsof -p 2719
COMMAND    PID    USER   FD      TYPE             DEVICE SIZE/OFF    NODE NAME
ovs-vswit 2719 xxxxxxx  cwd       DIR                8,1     4096 1053020 /home/xxxxxxx/docker-ovs/ovs/sandbox
ovs-vswit 2719 xxxxxxx  rtd       DIR                8,1     4096       2 /
ovs-vswit 2719 xxxxxxx  txt       REG                8,1 14669744 1314212 /home/xxxxxxx/docker-ovs/ovs/vswitchd/ovs-vswitchd
... ...
ovs-vswit 2719 xxxxxxx    3w      REG                8,1      576 1053312 /home/xxxxxxx/docker-ovs/ovs/sandbox/ovs-vswitchd.log
... ...
ovs-vswit 2719 xxxxxxx   10uW     REG                8,1        5 1053313 /home/xxxxxxx/docker-ovs/ovs/sandbox/ovs-vswitchd.pid
ovs-vswit 2719 xxxxxxx   11w     FIFO               0,10      0t0 2249436 pipe
ovs-vswit 2719 xxxxxxx   12u     unix 0x0000000000000000      0t0 2247581 /home/xxxxxxx/docker-ovs/ovs/sandbox/ovs-vswitchd.2719.ctl type=STREAM
... ...
*** 可以看到进程是由源码编绎生成的文件执行而来的,这样仿真环境就建立好了
2,安装镜像并使用容器 --> Faucet
为了建立网络拓扑,首先需要一些网络节点,最方便的莫过于docker了,其它的虚拟化,甚至是物理机都行。这里参考官方文档 OVS Faucet Tutorial
$ git clone https://github.com/faucetsdn/faucet.git
$ cd faucet
** 接下来是创建容器,同样是国内网络问题,下载速度可能会极慢,甚至失败。
$ ln -s Dockerfile.faucet Dockerfile
$ docker build -t faucet/faucet .
$ docker images
REPOSITORY          TAG                 IMAGE ID            CREATED             SIZE
faucet/faucet       latest              4be032d13566        12 hours ago        215MB
faucet/python3      4.0.0               301fd7e94942        2 months ago        58.4MB

** 接下来是运行该镜像
** 先在faucet目录下新建文件夹,这是给容器使用的,容器本身在后台运行,其交互都由这个文件夹来完成
$ cd faucet
$ mkdir inst
$ docker run -d --name faucet --restart=always
		-v $(pwd)/inst/:/etc/faucet/
		-v $(pwd)/inst/:/var/log/faucet/
		-p 6653:6653 -p 9302:9302
		faucet/faucet
5cbebce29c44bde9ef8d4242826ec7d6c6996641c137283c8c678f9cb368b5a3
$ docker ps
CONTAINER ID        IMAGE               COMMAND                  CREATED             STATUS              PORTS                                            NAMES
5cbebce29c44        faucet/faucet       "/usr/local/bin/entr…"   4 seconds ago       Up 2 seconds        0.0.0.0:6653->6653/tcp, 0.0.0.0:9302->9302/tcp   faucet
** 在后面的调试中需要更改容器的配置,一般需要重启容器
$ docker restart faucet
faucet
根据官方说明文档在实际环境中运行
1, OVS Faucet Tutorial
这一篇主要是使用sandbox和faucet容器结合起来介绍OVS在Layer2和Layer3上的特性,是一篇很好的入门文档,下面是博主在自己的机器上实际操作的过程,以及一些粗浅的理解。
注意:该官方文档应该有一段时间了,博主下载的版本在实际操作过程中与该文档并不完全一致,这里以博主所用版本为准
** OVS版本信息
$ cd ovs
$ git status
On branch master
Your branch is up-to-date with 'origin/master'.
$ git log
commit 53c0bd5de496f54f9ce85ace4b67b3dee59b0ed3
Author: Ilya Maximets <i.maximets@ovn.org>
Date:   Wed Oct 9 16:23:31 2019 +0200
... ...

$ ./vswitchd/ovs-vswitchd --version
ovs-vswitchd (Open vSwitch) 2.12.90
** faucet版本信息
$ cd faucet
$ git status
On branch master
Your branch is up-to-date with 'origin/master'.
$ git log
commit a05e8c93a3143668e8368e9def70e5fce06c62e1
Merge: 072cb9c bfb0669
Author: Brad Cowie <brad@wand.net.nz>
Date:   Mon Oct 7 14:56:39 2019 +1300
... ...
** 宿主机信息
$ uname -a
Linux docker 4.4.0-157-generic #185-Ubuntu SMP Tue Jul 23 09:17:01 UTC 2019 x86_64 x86_64 x86_64 GNU/Linux
$ lsb_release -a
No LSB modules are available.
Distributor ID: Ubuntu
Description:    Ubuntu 16.04.6 LTS
Release:        16.04
Codename:       xenial
1)前言
当OVS和Faucet都准备好后,就可以开始了。下面的内容主要包括三个方面:
Switch: Layer 2Routing: Layer 3ACLs: Access Control rules
每一步都会讨论下面三个部分
Faucet:
这是网络节点,主要通过faucet.yaml来进行配置,尔后重启容器即可。The OpenFlow subsystem in Open vSwitch:
这个部分是OpenFlow协议,OVS遵守这个协议,在这里体现为openflow table,即所谓流表。主要用到下面这些工具:ovs-vsctl用来管理BRIDGE设备的,在这里用来创建网桥(OVS下的网桥,与linux下的网桥设备不一样,但其在TCP/IP协议栈上的位置是一样的)ovs-ofctl用来查看流表配置ovs-appctl它与守护进程 ovs-vswitchd可以进行通信,在这里的作用就是制造数据包发送出去
Open vSwitch datapath这个指的是OVS底层数据流的走向,术语叫datapath。一般而言指这两种:Linux kernel 和 DPDK。讨论这个的原因在于对OVS而言,datapath的"长度"是决定它性能的主导因素。
2)Layer 2, Switching
这里用到的网络拓扑如下图所示
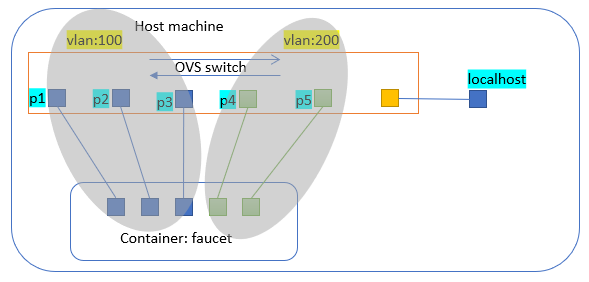
1> 环境的配置
- container的配置
** 先根据上面的方法建立起容器<faucet>
$ cd faucet/inst
$ vim faucet.yaml
dps:
    switch-1:
        dp_id: 0x1
        timeout: 3600
        arp_neighbor_timeout: 1200
        interfaces:
            1:
                native_vlan: 100
            2:
                native_vlan: 100
            3:
                native_vlan: 100
            4:
                native_vlan: 200
            5:
                native_vlan: 200
vlans:
    100:
    200:
** 重启容器,这里的配置会被容器读取并作用于容器内部,作用就是配置interfaces
$ docker restart faucet
faucet
** 容器重启并读取该配置后,如若成功,应该能看到以下log
$ cat faucet.log
... ...
Oct 14 06:32:53 faucet INFO     Add new datapath DPID 1 (0x1)
... ...
- 在宿主机创建switch
** 为了不对宿主机造成影响,且为了调试OVS源码,使用`sandbox`来创建switch。具体方法如前所述,但要注意一点,请为`sandbox`新开一个窗口,
** 后面的所有操作都应该在这个环境下执行,否则是不起作用的
$ cd ovs
$ make -j4 	** 将执行文件编好,如果已经存在就不必执行这句了
$ ./tutorial/ovs-sandbox -s .
*** 这下就进行`sandbox`的环境中了,这里创建,修改,删除的设备都不会对外界有影响,反之如是
** 下面创建了一个ovs bridge设备,其中配置的参数与给container<faucet>的配置参数是对应的,否则它将无法连接到这个bridge上
$ ovs-vsctl add-br br0
         -- set bridge br0 other-config:datapath-id=0000000000000001
         -- add-port br0 p1 -- set interface p1 ofport_request=1
         -- add-port br0 p2 -- set interface p2 ofport_request=2
         -- add-port br0 p3 -- set interface p3 ofport_request=3
         -- add-port br0 p4 -- set interface p4 ofport_request=4
         -- add-port br0 p5 -- set interface p5 ofport_request=5
         -- set-controller br0 tcp:127.0.0.1:6653
         -- set controller br0 connection-mode=out-of-band
当bridge创建好后,container(faucet)就会连上来,此时在container的log中能看到以下信息
$ cat faucet.log
Oct 14 06:40:42 faucet.valve INFO     DPID 1 (0x1) switch-1 Cold start configuring DP
Oct 14 06:40:42 faucet.valve INFO     DPID 1 (0x1) switch-1 Port 1 (1) configured
Oct 14 06:40:42 faucet.valve INFO     DPID 1 (0x1) switch-1 Port 2 (2) configured
Oct 14 06:40:42 faucet.valve INFO     DPID 1 (0x1) switch-1 Port 3 (3) configured
Oct 14 06:40:42 faucet.valve INFO     DPID 1 (0x1) switch-1 Port 4 (4) configured
Oct 14 06:40:42 faucet.valve INFO     DPID 1 (0x1) switch-1 Port 5 (5) configured
Oct 14 06:40:42 faucet.valve INFO     DPID 1 (0x1) switch-1 Configuring VLAN 100 vid:100 untagged: Port 1,Port 2,Port 3
Oct 14 06:40:42 faucet.valve INFO     DPID 1 (0x1) switch-1 Configuring VLAN 200 vid:200 untagged: Port 4,Port 5
由信息可以看到各interface均已连上OVS switch DP0x1上了,且vlan也按规则分配好了,同时看OVS switch的log信息
$ cat ovs-vswitchd.log
2019-10-14T06:41:05.303Z|00107|vconn|DBG|unix#2: sent (Success): OFPT_FEATURES_REPLY (xid=0x8): dpid:0000000000000001
n_tables:254, n_buffers:0
capabilities: FLOW_STATS TABLE_STATS PORT_STATS QUEUE_STATS ARP_MATCH_IP
actions: output enqueue set_vlan_vid set_vlan_pcp strip_vlan mod_dl_src mod_dl_dst mod_nw_src mod_nw_dst mod_nw_tos mod_tp_src mod_tp_dst
 1(p1): addr:aa:55:aa:55:00:23
     config:     0
     state:      0
     speed: 0 Mbps now, 0 Mbps max
 2(p2): addr:aa:55:aa:55:00:20
     config:     0
     state:      0
     speed: 0 Mbps now, 0 Mbps max
 3(p3): addr:aa:55:aa:55:00:21
     config:     0
     state:      0
     speed: 0 Mbps now, 0 Mbps max
 4(p4): addr:aa:55:aa:55:00:24
     config:     0
     state:      0
     speed: 0 Mbps now, 0 Mbps max
 5(p5): addr:aa:55:aa:55:00:22
     config:     0
     state:      0
     speed: 0 Mbps now, 0 Mbps max
 LOCAL(br0): addr:2e:18:a6:32:34:4a
     config:     0
     state:      0
     speed: 0 Mbps now, 0 Mbps max
2> 在跟踪数据流前,对流表及相应的工具做一些了解
流表(OpenFlow table),在OVS中作为一个专业术语,某种意义上与iptables中的表是一回事,都是根据各种规则匹配不同的动作(action)。由于openflow本身只是一个协议,不管具体实现,因此不同版本对它的处理可能不一样,事实上博主所用版本的OVS的流表规则与官方文档中的已有一些区别,但本质都是一样的。
$ vim ovs/Documentation/tutorials
... ...
209 Our switch design will consist of five main flow tables, each of which
210 implements one stage in the switch pipeline:
211
212 Table 0
213   Admission control.
214
215 Table 1
216   VLAN input processing.
217
218 Table 2
219   Learn source MAC and VLAN for ingress port.
220
221 Table 3
222   Look up learned port for destination MAC and VLAN.
223
224 Table 4
225   Output processing.
226
227 The section below describes how to set up the scenario, followed by a section
228 for each OpenFlow table.
229
230 You can cut and paste the ``ovs-vsctl`` and ``ovs-ofctl`` commands in each of
231 the sections below into your ``ovs-sandbox`` shell.  They are also available as
232 shell scripts in this directory, named ``t-setup``, ``t-stage0``, ``t-stage1``,
233 ..., ``t-stage4``.  The ``ovs-appctl`` test commands are intended for cutting
234 and pasting and are not supplied separately.
... ...
顺便一提,这篇文章也有相应的说明。
那么如何查看流表呢?这就要用到下面的命令了,为了方便起见,将它们写到脚本中,其中主体命令是 ovs-ofctl dump-flows br0,但里面信息太多,可以做一下精简
- script 1: dump-flows
#!/bin/bash
ovs-ofctl -OOpenFlow13 --names --no-stat dump-flows "$@"
   | sed 's/cookie=0x5adc15c0, //'
为了对前后两张流表进行对比,增加如下两个脚本
- script 2: save-flows
#!/bin/bash
ovs-ofctl -OOpenFlow13 --no-names --sort dump-flows "$@"
- script 3: diff-flows
#!/bin/bash
ovs-ofctl -OOpenFlow13 diff-flows "$@" | sed 's/cookie=0x5adc15c0 //'
最后看一下实际的流表的模样,下面是目前为止的流表的内容,注意前缀没有table=x标识的是table=0,它只是被过滤掉了而已
 priority=9000,in_port=p1,vlan_tci=0x0000/0x1fff actions=push_vlan:0x8100,set_field:4196->vlan_vid,goto_table:1
 priority=9000,in_port=p2,vlan_tci=0x0000/0x1fff actions=push_vlan:0x8100,set_field:4196->vlan_vid,goto_table:1
 priority=9000,in_port=p3,vlan_tci=0x0000/0x1fff actions=push_vlan:0x8100,set_field:4196->vlan_vid,goto_table:1
 priority=9000,in_port=p4,vlan_tci=0x0000/0x1fff actions=push_vlan:0x8100,set_field:4296->vlan_vid,goto_table:1
 priority=9000,in_port=p5,vlan_tci=0x0000/0x1fff actions=push_vlan:0x8100,set_field:4296->vlan_vid,goto_table:1
 priority=0 actions=drop
 table=1, priority=20490,dl_type=0x9000 actions=drop
 table=1, priority=20480,dl_src=ff:ff:ff:ff:ff:ff actions=drop
 table=1, priority=20480,dl_src=0e:00:00:00:00:01 actions=drop
 table=1, priority=4096,dl_vlan=100 actions=CONTROLLER:96,goto_table:2
 table=1, priority=4096,dl_vlan=200 actions=CONTROLLER:96,goto_table:2
 table=1, priority=0 actions=goto_table:2
 table=2, priority=0 actions=goto_table:3
 table=3, priority=8240,dl_dst=01:00:0c:cc:cc:cc actions=drop
 table=3, priority=8240,dl_dst=01:00:0c:cc:cc:cd actions=drop
 table=3, priority=8240,dl_vlan=100,dl_dst=ff:ff:ff:ff:ff:ff actions=pop_vlan,output:p1,output:p2,output:p3
 table=3, priority=8240,dl_vlan=200,dl_dst=ff:ff:ff:ff:ff:ff actions=pop_vlan,output:p4,output:p5
 table=3, priority=8236,dl_dst=01:80:c2:00:00:00/ff:ff:ff:ff:ff:f0 actions=drop
 table=3, priority=8216,dl_vlan=100,dl_dst=01:80:c2:00:00:00/ff:ff:ff:00:00:00 actions=pop_vlan,output:p1,output:p2,output:p3
 table=3, priority=8216,dl_vlan=100,dl_dst=01:00:5e:00:00:00/ff:ff:ff:00:00:00 actions=pop_vlan,output:p1,output:p2,output:p3
 table=3, priority=8216,dl_vlan=200,dl_dst=01:80:c2:00:00:00/ff:ff:ff:00:00:00 actions=pop_vlan,output:p4,output:p5
 table=3, priority=8216,dl_vlan=200,dl_dst=01:00:5e:00:00:00/ff:ff:ff:00:00:00 actions=pop_vlan,output:p4,output:p5
 table=3, priority=8208,dl_vlan=100,dl_dst=33:33:00:00:00:00/ff:ff:00:00:00:00 actions=pop_vlan,output:p1,output:p2,output:p3
 table=3, priority=8208,dl_vlan=200,dl_dst=33:33:00:00:00:00/ff:ff:00:00:00:00 actions=pop_vlan,output:p4,output:p5
 table=3, priority=8192,dl_vlan=100 actions=pop_vlan,output:p1,output:p2,output:p3
 table=3, priority=8192,dl_vlan=200 actions=pop_vlan,output:p4,output:p5
 table=3, priority=0 actions=drop
仔细观察会发现它与iptables的表的逻辑是一样的,只是具体规则与动作不同而已
3> 跟踪数据流
关于交换机(switch)的部分很简单,介绍MAC learning即可。使用工具为ovs-appctl,详细介绍google即可,目前只需要使用它就行。
动作:
- 第一步:从p1发包出去,此时交换机上没有学习到任何mac地址,因此会将这个包广播给vlan1下的所有其它端口,并学习到p1的mac地址
- 第二步:从p2发包给p1,这时p1的mac地址已知,此包只会发给p1,而不会广播给同在vlan1下的p3
实验验证:
- 从p1发包出去
** 进入`sandbox`的环境
** 先保存现在的流表,运行放在inst目录下的脚本<dump-flows>
$ cd inst
$ ./save-flows br0 > flows1

$ ovs-appctl ofproto/trace br0 in_port=p1,dl_src=00:01:02:03:04:05,dl_dst=00:10:20:30:40:50 --generate
Flow: in_port=1,vlan_tci=0x0000,dl_src=00:01:02:03:04:05,dl_dst=00:10:20:30:40:50,dl_type=0x0000

bridge("br0")
-------------
 0. in_port=1,vlan_tci=0x0000/0x1fff, priority 9000, cookie 0x5adc15c0
    push_vlan:0x8100
    set_field:4196->vlan_vid
    goto_table:1
 1. dl_vlan=100, priority 4096, cookie 0x5adc15c0
    CONTROLLER:96
    goto_table:2
 2. priority 0, cookie 0x5adc15c0
    goto_table:3
 3. dl_vlan=100, priority 8192, cookie 0x5adc15c0
    pop_vlan
    output:1
     >> skipping output to input port
    output:2
    output:3

Final flow: unchanged
Megaflow: recirc_id=0,eth,in_port=1,dl_src=00:01:02:03:04:05,dl_dst=00:10:20:30:40:50,dl_type=0x0000
Datapath actions: push_vlan(vid=100,pcp=0),userspace(pid=0,controller(reason=1,dont_send=0,continuation=0,recirc_id=1,rule_cookie=0x5adc15c0,controller_id=0,max_len=96)),pop_vlan,2,3

** 可以看到这个包最终被送到了2和3(output: 2; output: 3)

** 关于这个结果,用流表在这里稍微解释一下。(flows1)
1. priority=9000,in_port=p1,vlan_tci=0x0000/0x1fff actions=push_vlan:0x8100,set_field:4196->vlan_vid,goto_table:1
** 这条规则为进入p1的包打上vlan tag<100>,这里解释一下(set_field:4196->vlan_id),
** 其中之所以为4196是因为OVS中对vlan用了13个bit。其中最高位用于标识vlan的存在与否,如为1则表示此为tag包,
** 将4196写成16进制就很清楚了
$ echo "obase=16; 4196" | bc
1064
$ echo $((16#64))
100

** 这两条不解释
2. table=1, priority=4096,dl_vlan=100 actions=CONTROLLER:96,goto_table:2
3. table=2, priority=0 actions=goto_table:3

4.  table=3, priority=8192,dl_vlan=100 actions=pop_vlan,output:p1,output:p2,output:p3
** 可以看到匹配到这一条时,动作就是脱去vlan id然后送入vlan1下的三个端口,同时跳过发送端口p1

** 保存现在的流表
$ ./save-flows br0 > flows2

** 对现在的流表进行对比
$ ./diff-flows flows1 br0
+table=1 priority=8191,in_port=1,dl_vlan=100,dl_src=00:01:02:03:04:05 cookie=0x5adc15c0 hard_timeout=3467 actions=goto_table:2
+table=2 priority=8192,dl_vlan=100,dl_dst=00:01:02:03:04:05 cookie=0x5adc15c0 idle_timeout=5267 actions=pop_vlan,output:1
** 可以看到在table2中将vlan id属于100,而mac地址为00:01:02:03:04:05直接送到端口1上去,也就是说交换机学习了这个mac地址
- 从p2发包给p1
ovs-appctl ofproto/trace br0 in_port=p2,dl_src=00:10:20:30:40:50,dl_dst=00:01:02:03:04:05 --generate
Flow: in_port=2,vlan_tci=0x0000,dl_src=00:10:20:30:40:50,dl_dst=00:01:02:03:04:05,dl_type=0x0000

bridge("br0")
-------------
 0. in_port=2,vlan_tci=0x0000/0x1fff, priority 9000, cookie 0x5adc15c0
    push_vlan:0x8100
    set_field:4196->vlan_vid
    goto_table:1
 1. dl_vlan=100, priority 4096, cookie 0x5adc15c0
    CONTROLLER:96
    goto_table:2
 2. dl_vlan=100,dl_dst=00:01:02:03:04:05, priority 8192, cookie 0x5adc15c0
    pop_vlan
    output:1

Final flow: unchanged
Megaflow: recirc_id=0,eth,in_port=2,dl_src=00:10:20:30:40:50,dl_dst=00:01:02:03:04:05,dl_type=0x0000
Datapath actions: push_vlan(vid=100,pcp=0),userspace(pid=0,controller(reason=1,dont_send=0,continuation=0,recirc_id=2,rule_cookie=0x5adc15c0,controller_id=0,max_len=96)),pop_vlan,1
** 可以看到该包从table2直接到达了端口1,而没有广播给3,说明mac地址学习正确
** 再次对比一下前后的流表
$ ./diff-flows flows2 br0
+table=1 priority=8191,in_port=2,dl_vlan=100,dl_src=00:10:20:30:40:50 cookie=0x5adc15c0 hard_timeout=3520 actions=goto_table:2
+table=2 priority=8192,dl_vlan=100,dl_dst=00:10:20:30:40:50 cookie=0x5adc15c0 idle_timeout=5320 actions=pop_vlan,output:2
** 可以看到端口2的mac地址也被学习正确了
3)Layer 2, Routing
这里用到的网络拓扑如下图所示
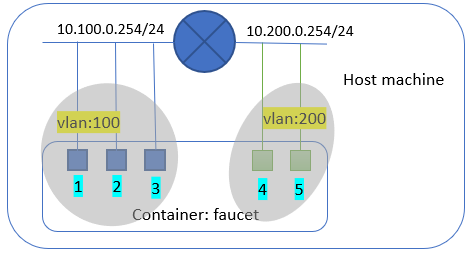
1> 环境的配置
container需要为vlan配置子网
** 先根据上面的方法建立起容器<faucet>
$ cd faucet/inst
$ vim faucet.yaml
dps:
    switch-1:
        dp_id: 0x1
        timeout: 3600
        arp_neighbor_timeout: 3600
        interfaces:
            1:
                native_vlan: 100
            2:
                native_vlan: 100
            3:
                native_vlan: 100
            4:
                native_vlan: 200
            5:
                native_vlan: 200
vlans:
    100:
        faucet_vips: ["10.100.0.254/24"]
    200:
        faucet_vips: ["10.200.0.254/24"]
routers:
    router-1:
        vlans: [100, 200]

** 重启container以实现配置
$ docker restart faucet
faucet

** 为后面的比较保存现有的流表
$ ./save-flows br0 > flows3
2> 跟踪数据流
步骤如图所示
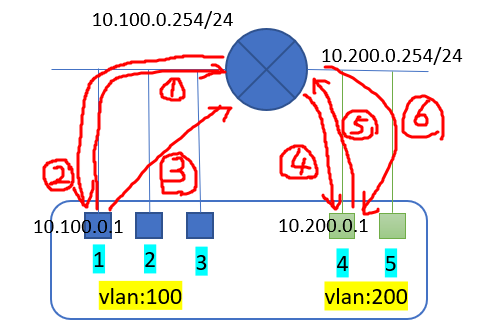
现模拟p1向p4发送udp包的过程 (10.100.0.1 => 10.200.0.1)
- 由于目标地址属于不同网段,首先p1将此包发给网关,但此时p1要先知道网关的mac地址,因此发送arp包
$ ovs-appctl ofproto/trace br0 in_port=p1,
	dl_src=00:01:02:03:04:05,
	dl_dst=ff:ff:ff:ff:ff:ff,
	dl_type=0x806,
	arp_spa=10.100.0.1,
	arp_tpa=10.100.0.254,
	arp_sha=00:01:02:03:04:05,
	arp_tha=ff:ff:ff:ff:ff:ff,
	arp_op=1
	-generate

Flow: arp,in_port=1,vlan_tci=0x0000,dl_src=00:01:02:03:04:05,dl_dst=ff:ff:ff:ff:ff:ff,arp_spa=10.100.0.1,arp_tpa=10.100.0.254,arp_op=1,arp_sha=00:01:02:03:04:05,arp_tha=ff:ff:ff:ff:ff:ff

bridge("br0")
-------------
 0. in_port=1,vlan_tci=0x0000/0x1fff, priority 9000, cookie 0x5adc15c0
    push_vlan:0x8100
    set_field:4196->vlan_vid
    goto_table:1
 1. arp,dl_vlan=100, priority 16384, cookie 0x5adc15c0
    goto_table:3
 3. arp,dl_dst=ff:ff:ff:ff:ff:ff,arp_tpa=10.100.0.254, priority 12320, cookie 0x5adc15c0
    CONTROLLER:64

Final flow: arp,in_port=1,dl_vlan=100,dl_vlan_pcp=0,vlan_tci1=0x0000,dl_src=00:01:02:03:04:05,dl_dst=ff:ff:ff:ff:ff:ff,arp_spa=10.100.0.1,arp_tpa=10.100.0.254,arp_op=1,arp_sha=00:01:02:03:04:05,arp_tha=ff:ff:ff:ff:ff:ff
Megaflow: recirc_id=0,eth,arp,in_port=1,dl_src=00:01:02:03:04:05,dl_dst=ff:ff:ff:ff:ff:ff,arp_tpa=10.100.0.254
Datapath actions: push_vlan(vid=100,pcp=0),userspace(pid=0,controller(reason=1,dont_send=0,continuation=0,recirc_id=4,rule_cookie=0x5adc15c0,controller_id=0,max_len=64))

** 此时查看流表和的变化和faucet的log信息,可以看到端口1的mac地址被学习到了
$ ./diff-flows flows3 br0
+table=1 priority=8191,in_port=1,dl_vlan=100,dl_src=00:01:02:03:04:05 cookie=0x5adc15c0 hard_timeout=3460 actions=goto_table:4
+table=2 priority=12320,ip,dl_vlan=200,nw_dst=10.100.0.1 cookie=0x5adc15c0 actions=set_field:4196->vlan_vid,set_field:0e:00:00:00:00:01->eth_src,set_field:00:01:02:03:04:05->eth_dst,dec_ttl,goto_table:4
+table=2 priority=12320,ip,dl_vlan=100,nw_dst=10.100.0.1 cookie=0x5adc15c0 actions=set_field:4196->vlan_vid,set_field:0e:00:00:00:00:01->eth_src,set_field:00:01:02:03:04:05->eth_dst,dec_ttl,goto_table:4
+table=4 priority=8192,dl_vlan=100,dl_dst=00:01:02:03:04:05 cookie=0x5adc15c0 idle_timeout=5260 actions=pop_vlan,output:1

$ cat faucet.log
 60 Oct 14 22:55:28 faucet.valve INFO     DPID 1 (0x1) switch-1 L2 learned on Port 1 00:01:02:03:04:05 (L2 type 0x0806, L2 dst ff:ff:ff:ff:ff:ff, L3 src 10.100.0.1, L3 dst 10.100.0.254) Port 1 VLAN 100 (1 hosts total)
 61 Oct 14 22:55:28 faucet.valve INFO     DPID 1 (0x1) switch-1 Adding new route 10.100.0.1/32 via 10.100.0.1 (00:01:02:03:04:05) on VLAN 100
 62 Oct 14 22:55:28 faucet.valve INFO     DPID 1 (0x1) switch-1 Resolve response to 10.100.0.254 from 00:01:02:03:04:05 (L2 type 0x0806, L2 dst ff:ff:ff:ff:ff:ff, L3 src 10.100.0.1, L3 dst 10.100.0.254) Port 1 VLAN 100
- 网关收到arp request之后需要回应p1网关的mac地址
** 当p1向网关发送arp request后,网关就会给p1发送arp reply,这里需要能抓取端口的包才能了解情况
$ for i in 1 2 3 4 5;
do
ovs-vsctl set interface p$i options:pcap=p$i.pcap;
done
** 这样就会在sandbox目录下看到在container faucet的interface上抓取到的数据包
** 查看命令如下
$ tcpdump -evvvr ./p1.pcap
reading from file ./p1.pcap, link-type EN10MB (Ethernet)

** 现在重新进行第一步,从p1发送arp request给网关,然后可以看到p1的数据包如下
$ tcpdump -evvvr ./p1.pcap
reading from file ./p1.pcap, link-type EN10MB (Ethernet)
07:13:49.882752 0e:00:00:00:00:01 (oui Unknown) > 00:01:02:03:04:05 (oui Unknown), ethertype ARP (0x0806), length 60: Ethernet (len 6), IPv4 (len 4), Reply 10.100.0.254 is-at 0e:00:00:00:00:01 (oui Unknown), length 46
** 可以看到网关的mac地址为"0e:00:00:00:00:01"
- 接下来,p1要将udp包发送给网关
$ ovs-appctl ofproto/trace br0 in_port=p1,
dl_src=00:01:02:03:04:05,
dl_dst=0e:00:00:00:00:01,
udp,
nw_src=10.100.0.1,
nw_dst=10.200.0.1,
nw_ttl=64
-generate
Flow: udp,in_port=1,vlan_tci=0x0000,dl_src=00:01:02:03:04:05,dl_dst=0e:00:00:00:00:01,nw_src=10.100.0.1,nw_dst=10.200.0.1,nw_tos=0,nw_ecn=0,nw_ttl=64,tp_src=0,tp_dst=0

bridge("br0")
-------------
 0. in_port=1,vlan_tci=0x0000/0x1fff, priority 9000, cookie 0x5adc15c0
    push_vlan:0x8100
    set_field:4196->vlan_vid
    goto_table:1
 1. ip,dl_vlan=100,dl_dst=0e:00:00:00:00:01, priority 16384, cookie 0x5adc15c0
    goto_table:2
 2. ip,dl_vlan=100,nw_dst=10.200.0.0/24, priority 12312, cookie 0x5adc15c0
    goto_table:3
 3. ip,dl_dst=0e:00:00:00:00:01, priority 12317, cookie 0x5adc15c0
    CONTROLLER:110

Final flow: udp,in_port=1,dl_vlan=100,dl_vlan_pcp=0,vlan_tci1=0x0000,dl_src=00:01:02:03:04:05,dl_dst=0e:00:00:00:00:01,nw_src=10.100.0.1,nw_dst=10.200.0.1,nw_tos=0,nw_ecn=0,nw_ttl=64,tp_src=0,tp_dst=0
Megaflow: recirc_id=0,eth,udp,in_port=1,dl_src=00:01:02:03:04:05,dl_dst=0e:00:00:00:00:01,nw_dst=10.200.0.0/25,nw_frag=no
Datapath actions: push_vlan(vid=100,pcp=0),userspace(pid=0,controller(reason=1,dont_send=0,continuation=0,recirc_id=7,rule_cookie=0x5adc15c0,controller_id=0,max_len=110))
- 由于目标地址属于10.200.0.0/24网段,因此路由器将其转发到这个子网,但此时路由器不知道10.200.0.1的mac地址是什么,因此需要先发送arp request来获取mac地址
** 当上一步完成时,路由器就会向vlan200子网发送arp request广播,这个从下面的数据包中看出来
$ tcpdump -evvvr ./p4.pcap
reading from file ./p4.pcap, link-type EN10MB (Ethernet)
07:19:22.744307 0e:00:00:00:00:01 (oui Unknown) > Broadcast, ethertype ARP (0x0806), length 60: Ethernet (len 6), IPv4 (len 4), Request who-has 10.200.0.1 tell 10.200.0.254, length 46

$ tcpdump -evvvr ./p5.pcap
reading from file ./p5.pcap, link-type EN10MB (Ethernet)
07:19:22.744320 0e:00:00:00:00:01 (oui Unknown) > Broadcast, ethertype ARP (0x0806), length 60: Ethernet (len 6), IPv4 (len 4), Request who-has 10.200.0.1 tell 10.200.0.254, length 46
- 接下来,从p4发送arp request给网关,告诉它我就是’10.200.0.1’所在的interface
$ ovs-appctl ofproto/trace br0 in_port=p4,
dl_src=00:10:20:30:40:50,
dl_dst=0e:00:00:00:00:01,
dl_type=0x806,
arp_spa=10.200.0.1,
arp_tpa=10.200.0.254,
arp_sha=00:10:20:30:40:50,
arp_tha=0e:00:00:00:00:01,
arp_op=2
-generate

Flow: arp,in_port=4,vlan_tci=0x0000,dl_src=00:10:20:30:40:50,dl_dst=0e:00:00:00:00:01,arp_spa=10.200.0.1,arp_tpa=10.200.0.254,arp_op=2,arp_sha=00:10:20:30:40:50,arp_tha=0e:00:00:00:00:01

bridge("br0")
-------------
 0. in_port=4,vlan_tci=0x0000/0x1fff, priority 9000, cookie 0x5adc15c0
    push_vlan:0x8100
    set_field:4296->vlan_vid
    goto_table:1
 1. arp,dl_vlan=200, priority 16384, cookie 0x5adc15c0
    goto_table:3
 3. arp,dl_dst=0e:00:00:00:00:01, priority 12320, cookie 0x5adc15c0
    CONTROLLER:64

Final flow: arp,in_port=4,dl_vlan=200,dl_vlan_pcp=0,vlan_tci1=0x0000,dl_src=00:10:20:30:40:50,dl_dst=0e:00:00:00:00:01,arp_spa=10.200.0.1,arp_tpa=10.200.0.254,arp_op=2,arp_sha=00:10:20:30:40:50,arp_tha=0e:00:00:00:00:01
Megaflow: recirc_id=0,eth,arp,in_port=4,dl_src=00:10:20:30:40:50,dl_dst=0e:00:00:00:00:01
Datapath actions: push_vlan(vid=200,pcp=0),userspace(pid=0,controller(reason=1,dont_send=0,continuation=0,recirc_id=8,rule_cookie=0x5adc15c0,controller_id=0,max_len=64))

** 现在再从流表和faucet的log中查看p4的mac的学习情况,可以看到学习成功
$ cat faucet.log
Oct 14 23:31:06 faucet.valve INFO     DPID 1 (0x1) switch-1 L2 learned on Port 4 00:10:20:30:40:50 (L2 type 0x0806, L2 dst 0e:00:00:00:00:01, L3 src 10.200.0.1, L3 dst 10.200.0.254) Port 4 VLAN 200 (1 hosts total)

$ ./dump-flows br0 | grep '00:10:'
 table=1, hard_timeout=3452, priority=8191,in_port=p4,dl_vlan=200,dl_src=00:10:20:30:40:50 actions=goto_table:4
 table=4, idle_timeout=5252, priority=8192,dl_vlan=200,dl_dst=00:10:20:30:40:50 actions=pop_vlan,output:p4
- 最后网关将udp包发送到p4上,完成一次发包
** 由于上一次发出去的包已经被网关丢弃,因此重新发送一次
$ ovs-appctl ofproto/trace br0
	in_port=p1,
	dl_src=00:01:02:03:04:05,
	dl_dst=0e:00:00:00:00:01,
	udp,nw_src=10.100.0.1,
	nw_dst=10.200.0.1,
	nw_ttl=64 -generate
Flow: udp,in_port=1,vlan_tci=0x0000,dl_src=00:01:02:03:04:05,dl_dst=0e:00:00:00:00:01,nw_src=10.100.0.1,nw_dst=10.200.0.1,nw_tos=0,nw_ecn=0,nw_ttl=64,tp_src=0,tp_dst=0

bridge("br0")
-------------
 0. in_port=1,vlan_tci=0x0000/0x1fff, priority 9000, cookie 0x5adc15c0
    push_vlan:0x8100
    set_field:4196->vlan_vid
    goto_table:1
 1. ip,dl_vlan=100,dl_dst=0e:00:00:00:00:01, priority 16384, cookie 0x5adc15c0
    goto_table:2
 2. ip,dl_vlan=100,nw_dst=10.200.0.1, priority 12320, cookie 0x5adc15c0
    set_field:4296->vlan_vid
    set_field:0e:00:00:00:00:01->eth_src
    set_field:00:10:20:30:40:50->eth_dst
    dec_ttl
    goto_table:4
 4. dl_vlan=200,dl_dst=00:10:20:30:40:50, priority 8192, cookie 0x5adc15c0
    pop_vlan
    output:4

Final flow: udp,in_port=1,vlan_tci=0x0000,dl_src=0e:00:00:00:00:01,dl_dst=00:10:20:30:40:50,nw_src=10.100.0.1,nw_dst=10.200.0.1,nw_tos=0,nw_ecn=0,nw_ttl=63,tp_src=0,tp_dst=0
Megaflow: recirc_id=0,eth,ip,in_port=1,dl_src=00:01:02:03:04:05,dl_dst=0e:00:00:00:00:01,nw_dst=10.200.0.1,nw_ttl=64,nw_frag=no
Datapath actions: set(eth(src=0e:00:00:00:00:01,dst=00:10:20:30:40:50)),set(ipv4(ttl=63)),4

** 可以看到它已经被正确送入p4了
代码目录(暂定)
以下是各入口代码文件,随研究的深入会不断修正
| 目标执行文件 | 入口 | 描述 |
|---|---|---|
| ovsdb-server | ovs/ovsdb/ovsdb-server.c | 守护进程1 |
| ovs-vswitchd | ovs/vswitchd/ovs-vswitchd.c | 守护进程2 |
| ovs-vsctl | … | 以下均为工具 |
| … | 待续… |
最后
以上就是激动雨最近收集整理的关于openvswitch笔记调试环境根据官方说明文档在实际环境中运行代码目录(暂定)的全部内容,更多相关openvswitch笔记调试环境根据官方说明文档在实际环境中运行代码目录(暂定)内容请搜索靠谱客的其他文章。


![Centos6.7 Centos7.0 安装OpenVSwitch痛苦经历[root@centos6 ~]# 一、 官方网站下载源码二、 rpmbulid编译三、 解决方案 四、 总结](https://www.shuijiaxian.com/files_image/reation/bcimg25.png)
发表评论 取消回复