

wolfcstech | 作者
承香墨影 | 校对
https://www.wolfcstech.com/2017/02/23/OkHttp实现分析之Websocket | 原文
前段时间写了篇文章,讲解了如何使用 OkHttp 实现 WebSocket 通信,但是只停留在一些使用和理论上,分享出来各项数据还不错。本来想继续写一篇 OkHttp 关于 WebSocket 源码的分析文章。但搜索了一下,发现有一个个人博客写的文章非常详细,我就不再重复输出了,今天就给你带来这篇优秀的文章,希望对大家有帮助。
如果只对利用 OkHttp 实现 WebSocket 通信感兴趣,可以看看之前的文章《OkHttp实现WebSocket,包括鉴权和长连接保活及其原理》。
HTML5 拥有许多引人注目的新特性,WebSocket 就是其中之一。
WebSocket 一向有着 "Web 的 TCP" 之称。通常 WebSocket 都是用于 Web 的,用于构建实时的 Web 应用。它可以在浏览器和服务器之间提供一个基于 TCP 连接的双向通道。
WebSocket 协议本质上是一个基于 TCP 的协议。为了建立一个 WebSocket 连接,浏览器首先要向服务器发起一个 HTTP 请求,这个请求和通常的 HTTP 请求不同,包含了一些附加头信息,其中附加头信息 "Upgrade: WebSocket" 表明这是一个申请协议升级的 HTTP 请求,服务器端解析这些附加的头信息然后产生应答信息,返回给客户端,客户端和服务器端的 WebSocket 连接就建立起来了,双方就可以通过这个连接通道自由的传递信息,并且这个连接会持续存在直到客户端或者服务器端的某一方主动的关闭连接。
Websocket 同样可以用于移动端。尽管移动端 Android/iOS 的本地应用可以直接通过 Socket 与服务器建立连接,并定义自己的协议来解决 Web 中实时应用创建困难的问题,但 WebSocket 服务通常复用 Web 的 80 端口,且可以比较方便的基于 Web 服务器来实现,因而对于某些端口容易被封的网络环境而言,WebSocket 就变得非常有意义。
OkHttp 是在 2016 年 6 月 10 日发布的 3.4.1 版中添加的对 WebSocket 的支持的。本文通过分析 OkHttp-3.5.0 的 WebSocket 实现来学习一下这个协议。
一、OkHttp API 使用
在开始分析 WebSocket 的实现之前,我们先来看一下 OkHttp 的 WebSocket API 怎么用。
示例代码如下:
public class WebsocketClient {
    private static final int NORMAL_CLOSURE_STATUS = 1000;
    private static OkHttpClient sClient;
    private static WebSocket sWebSocket;
    public static synchronized void startRequest() {
        if (sClient == null) {
            sClient = new OkHttpClient();
        }
        if (sWebSocket == null) {
            Request request = new Request.Builder().url("ws://echo.websocket.org").build();
            EchoWebSocketListener listener = new EchoWebSocketListener();
            sWebSocket = sClient.newWebSocket(request, listener);
        }
    }
    private static void sendMessage(WebSocket webSocket) {
        webSocket.send("Knock, knock!");
        webSocket.send("Hello!");
        webSocket.send(ByteString.decodeHex("deadbeef"));
    }
    public static void sendMessage() {
        WebSocket webSocket;
        synchronized (WebsocketClient.class) {
            webSocket = sWebSocket;
        }
        if (webSocket != null) {
            sendMessage(webSocket);
        }
    }
    public static synchronized void closeWebSocket() {
        if (sWebSocket != null) {
            sWebSocket.close(NORMAL_CLOSURE_STATUS, "Goodbye!");
            sWebSocket = null;
        }
    }
    public static synchronized void destroy() {
        if (sClient != null) {
            sClient.dispatcher().executorService().shutdown();
            sClient = null;
        }
    }
    private static void resetWebSocket() {
        synchronized (WebsocketClient.class) {
            sWebSocket = null;
        }
    }
    public static class EchoWebSocketListener extends WebSocketListener {
        private static final String TAG = "EchoWebSocketListener";
        @Override
        public void onOpen(WebSocket webSocket, Response response) {
            sendMessage(webSocket);
        }
        @Override
        public void onMessage(WebSocket webSocket, String text) {
            Log.i(TAG, "Receiving: " + text);
        }
        @Override
        public void onMessage(WebSocket webSocket, ByteString bytes) {
            Log.i(TAG, "Receiving: " + bytes.hex());
        }
        @Override
        public void onClosing(WebSocket webSocket, int code, String reason) {
            webSocket.close(NORMAL_CLOSURE_STATUS, null);
            Log.i(TAG, "Closing: " + code + " " + reason);
            resetWebSocket();
        }
        @Override
        public void onClosed(WebSocket webSocket, int code, String reason) {
            Log.i(TAG, "Closed: " + code + " " + reason);
        }
        @Override
        public void onFailure(WebSocket webSocket, Throwable t, Response response) {
            t.printStackTrace();
            resetWebSocket();
        }
    }
}
这个过程与发送 HTTP 请求的过程有许多相似之处,它们都需要创建 OkHttpClient 和 Request。然而它们不同的地方更多:
WebSocket 请求通过 WebSocketListener 来接收连接的状态和活动,而 HTTP 请求则通过 Callback。同时请求的 URL 的 scheme 是 "ws" 或者是 "wss" (TLS 之上的 WebSocket),而不是 HTTP 的 "http" 和 "https";
HTTP 请求的连接建立及执行需要基于 Request 和回调创建 Call,并调用 Call 的方法手动进行;而对于 WebSocket 请求,则在基于 Request 和回调创建 WebSocket 的时候,OkHttp 会自动发起连接建立的过程;
这也是 WebSocket 与 HTTP 最大的不同。对于 WebSocket,我们可以保存 WebSocket 对象,并在后续多次通过该对象向服务器发送数据;
通过回调可以获得更多 WebSocket 的状态变化。在连接建立、收到服务器发送回来的消息、服务器要关闭连接,以及出现 error 时,都能得到通知。不像 HTTP 请求那样,只在最后得到一个请求成功或者失败的结果;
后两点正是 WebSocket 全双工连接的体现。
二、OkHttp 的 WebSocket 实现
接着我们来看 OkHttp 的 WebSocket 实现。
WebSocket 包含两个部分,分别是握手和数据传输,数据传输又包括数据的发送,数据的接收,连接的保活,以及连接的关闭等,我们将分别分析这些过程。
2.1 连接握手
创建 WebSocket 的过程如下:
public class OkHttpClient implements Cloneable, Call.Factory, WebSocket.Factory {
  // ...
  @Override public WebSocket newWebSocket(Request request, WebSocketListener listener) {
    RealWebSocket webSocket = new RealWebSocket(request, listener, new SecureRandom());
    webSocket.connect(this);
    return webSocket;
  }
在这里会创建一个 RealWebSocket 对象,然后执行其 connect() 方法建立连接。RealWebSocket 对象的创建过程如下:
public final class RealWebSocket implements WebSocket, WebSocketReader.FrameCallback {
  // ...
  public RealWebSocket(Request request, WebSocketListener listener, Random random) {
    if (!"GET".equals(request.method())) {
      throw new IllegalArgumentException("Request must be GET: " + request.method());
    }
    this.originalRequest = request;
    this.listener = listener;
    this.random = random;
    byte[] nonce = new byte[16];
    random.nextBytes(nonce);
    this.key = ByteString.of(nonce).base64();
    this.writerRunnable = new Runnable() {
      @Override public void run() {
        try {
          while (writeOneFrame()) {
          }
        } catch (IOException e) {
          failWebSocket(e, null);
        }
      }
    };
  }
这里最主要的是初始化了 key,以备后续连接建立及握手之用。Key 是一个 16 字节长的随机数经过 Base64 编码得到的。此外还初始化了 writerRunnable 等。
连接建立及握手过程如下:
public final class RealWebSocket implements WebSocket, WebSocketReader.FrameCallback {
  // ...
  public void connect(OkHttpClient client) {
    client = client.newBuilder()
        .protocols(ONLY_HTTP1)
        .build();
    final int pingIntervalMillis = client.pingIntervalMillis();
    final Request request = originalRequest.newBuilder()
        .header("Upgrade", "websocket")
        .header("Connection", "Upgrade")
        .header("Sec-WebSocket-Key", key)
        .header("Sec-WebSocket-Version", "13")
        .build();
    call = Internal.instance.newWebSocketCall(client, request);
    call.enqueue(new Callback() {
      @Override public void onResponse(Call call, Response response) {
        try {
          checkResponse(response);
        } catch (ProtocolException e) {
          failWebSocket(e, response);
          closeQuietly(response);
          return;
        }
        // Promote the HTTP streams into web socket streams.
        StreamAllocation streamAllocation = Internal.instance.streamAllocation(call);
        streamAllocation.noNewStreams(); // Prevent connection pooling!
        Streams streams = streamAllocation.connection().newWebSocketStreams(streamAllocation);
        // Process all web socket messages.
        try {
          listener.onOpen(RealWebSocket.this, response);
          String name = "OkHttp WebSocket " + request.url().redact();
          initReaderAndWriter(name, pingIntervalMillis, streams);
          streamAllocation.connection().socket().setSoTimeout(0);
          loopReader();
        } catch (Exception e) {
          failWebSocket(e, null);
        }
      }
      @Override public void onFailure(Call call, IOException e) {
        failWebSocket(e, null);
      }
    });
  }
连接建立及握手的过程主要是向服务器发送一个 HTTP 请求。这个 HTTP 请求的特别之处在于,它包含了如下的一些 Headers:
Upgrade: WebSocket
Connection: Upgrade
Sec-WebSocket-Key: 7wgaspE0Tl7/66o4Dov2kw==
Sec-WebSocket-Version: 13
其中 Upgrade 和 Connection header 向服务器表明,请求的目的就是要将客户端和服务器端的通讯协议从 HTTP 协议升级到 WebSocket 协议,同时在请求处理完成之后,连接不要断开。
Sec-WebSocket-Key header 值正是我们前面看到的 key,它是 WebSocket 客户端发送的一个 base64 编码的密文,要求服务端必须返回一个对应加密的 "Sec-WebSocket-Accept" 应答,否则客户端会抛出 "Error during WebSocket handshake" 错误,并关闭连接。
来自于 HTTP 服务器的响应到达的时候,即是连接建立大功告成的时候,也就是热豆腐熟了的时候。
然而,响应到达时,尽管连接已经建立,还要为数据的收发做一些准备。这些准备中的第一步就是检查 HTTP 响应:
public final class RealWebSocket implements WebSocket, WebSocketReader.FrameCallback {
  // ...
  void checkResponse(Response response) throws ProtocolException {
    if (response.code() != 101) {
      throw new ProtocolException("Expected HTTP 101 response but was '"
          + response.code() + " " + response.message() + "'");
    }
    String headerConnection = response.header("Connection");
    if (!"Upgrade".equalsIgnoreCase(headerConnection)) {
      throw new ProtocolException("Expected 'Connection' header value 'Upgrade' but was '"
          + headerConnection + "'");
    }
    String headerUpgrade = response.header("Upgrade");
    if (!"websocket".equalsIgnoreCase(headerUpgrade)) {
      throw new ProtocolException(
          "Expected 'Upgrade' header value 'websocket' but was '" + headerUpgrade + "'");
    }
    String headerAccept = response.header("Sec-WebSocket-Accept");
    String acceptExpected = ByteString.encodeUtf8(key + WebSocketProtocol.ACCEPT_MAGIC)
        .sha1().base64();
    if (!acceptExpected.equals(headerAccept)) {
      throw new ProtocolException("Expected 'Sec-WebSocket-Accept' header value '"
          + acceptExpected + "' but was '" + headerAccept + "'");
    }
  }
  // ...
  public void failWebSocket(Exception e, Response response) {
    Streams streamsToClose;
    synchronized (this) {
      if (failed) return; // Already failed.
      failed = true;
      streamsToClose = this.streams;
      this.streams = null;
      if (cancelFuture != null) cancelFuture.cancel(false);
      if (executor != null) executor.shutdown();
    }
    try {
      listener.onFailure(this, e, response);
    } finally {
      closeQuietly(streamsToClose);
    }
  }
根据 WebSocket 的协议,服务器端用如下响应,来表示接受建立 WebSocket 连接的请求:
响应码是 101;
"Connection" header 的值为 "Upgrade",以表明服务器并没有在处理完请求之后把连接断开;
"Upgrade" header 的值为 "websocket",以表明服务器接受后面使用 WebSocket 来通信;
"Sec-WebSocket-Accept" header 的值为,key + WebSocketProtocol.ACCEPT_MAGIC 做 SHA1 hash,然后做 base64 编码,来做服务器接受连接的验证。关于这部分的设计的详细信息,可参考 《WebSocket 协议规范》。
为数据收发做准备的第二步是,初始化用于输入输出的 Source 和 Sink。Source 和 Sink 创建于之前发送 HTTP 请求的时候。这里会阻止在这个连接上再创建新的流。
public final class RealConnection extends Http2Connection.Listener implements Connection {
  // ...
  public RealWebSocket.Streams newWebSocketStreams(final StreamAllocation streamAllocation) {
    return new RealWebSocket.Streams(true, source, sink) {
      @Override public void close() throws IOException {
        streamAllocation.streamFinished(true, streamAllocation.codec());
      }
    };
  }
Streams 是一个 BufferedSource 和 BufferedSink 的 holder:
public final class RealWebSocket implements WebSocket, WebSocketReader.FrameCallback {
  // ...
  public abstract static class Streams implements Closeable {
    public final boolean client;
    public final BufferedSource source;
    public final BufferedSink sink;
    public Streams(boolean client, BufferedSource source, BufferedSink sink) {
      this.client = client;
      this.source = source;
      this.sink = sink;
    }
  }
第三步是调用回调 onOpen()。
第四步是初始化 Reader 和 Writer:
public final class RealWebSocket implements WebSocket, WebSocketReader.FrameCallback {
  // ...
  public void initReaderAndWriter(
      String name, long pingIntervalMillis, Streams streams) throws IOException {
    synchronized (this) {
      this.streams = streams;
      this.writer = new WebSocketWriter(streams.client, streams.sink, random);
      this.executor = new ScheduledThreadPoolExecutor(1, Util.threadFactory(name, false));
      if (pingIntervalMillis != 0) {
        executor.scheduleAtFixedRate(
            new PingRunnable(), pingIntervalMillis, pingIntervalMillis, MILLISECONDS);
      }
      if (!messageAndCloseQueue.isEmpty()) {
        runWriter(); // Send messages that were enqueued before we were connected.
      }
    }
    reader = new WebSocketReader(streams.client, streams.source, this);
  }
OkHttp 使用 WebSocketReader 和 WebSocketWriter 来处理数据的收发。在发送数据时将数据组织成帧,在接收数据时则进行反向擦除,同时处理 WebSocket 的控制消息。
WebSocket 的所有数据发送动作,都会在单线程线程池的线程中,通过 WebSocketWriter 执行。在这里会创建 ScheduledThreadPoolExecutor 用于跑数据的发送操作。
WebSocket 协议中主要会传输两种类型的帧:
控制帧,主要是用于连接保活的 Ping 帧等;
数据载荷帧。在这里会根据用户的配置,调度 Ping 帧周期性地发送。我们在调用 WebSocket 的接口发送数据时,数据并不是同步发送的,而是被放在了一个消息队列中。发送消息的 Runnable 从消息队列中读取数据发送。其中会检查消息队列中是否有数据,如果有的话,会调度发送消息的 Runnable 执行。
第五步是配置 socket 的超时时间为 0,也就是阻塞 IO。
第六步执行 loopReader()。这实际上是进入了消息读取循环了,也就是数据接收的逻辑了。
2.2 数据发送
我们可以通过 WebSocket 接口的 send(String text) 和 send(ByteString bytes) 分别发送文本的和二进制格式的消息。
public final class RealWebSocket implements WebSocket, WebSocketReader.FrameCallback {
  // ...
  @Override public boolean send(String text) {
    if (text == null) throw new NullPointerException("text == null");
    return send(ByteString.encodeUtf8(text), OPCODE_TEXT);
  }
  @Override public boolean send(ByteString bytes) {
    if (bytes == null) throw new NullPointerException("bytes == null");
    return send(bytes, OPCODE_BINARY);
  }
  private synchronized boolean send(ByteString data, int formatOpcode) {
    // Don't send new frames after we've failed or enqueued a close frame.
    if (failed || enqueuedClose) return false;
    // If this frame overflows the buffer, reject it and close the web socket.
    if (queueSize + data.size() > MAX_QUEUE_SIZE) {
      close(CLOSE_CLIENT_GOING_AWAY, null);
      return false;
    }
    // Enqueue the message frame.
    queueSize += data.size();
    messageAndCloseQueue.add(new Message(formatOpcode, data));
    runWriter();
    return true;
  }
  // ...
  private void runWriter() {
    assert (Thread.holdsLock(this));
    if (executor != null) {
      executor.execute(writerRunnable);
    }
  }
可以看到我们调用发送数据的接口时,做的事情主要是将数据格式化,构造消息,放进一个消息队列,然后调度 writerRunnable 执行。
此外,值得注意的是,当消息队列中的未发送数据,超出最大大小限制,WebSocket 连接会被直接关闭。对于发送失败过或被关闭了的 WebSocket,将无法再发送信息。
在 writerRunnable 中会循环调用 writeOneFrame() 逐帧发送数据,直到数据发完,或发送失败。在 WebSocket 协议中,客户端需要发送 4 种类型的帧:
PING 帧
PONG 帧
CLOSE 帧
MESSAGE 帧
PING 帧用于连接保活,它的发送是在 PingRunnable 中执行的,在初始化 Reader 和 Writer 的时候,就会根据设置调度执行或不执行。
除 PING 帧外的其它三种帧,都在 writeOneFrame() 中发送。PONG 帧是对服务器发过来的 PING 帧的响应,同样用于保活连接。
后面我们在分析连接的保活时会更详细的分析 PING 和 PONG 这两种帧。CLOSE 帧用于关闭连接,稍后我们在分析连接关闭过程时再来详细地分析。
这里我们主要关注用户数据发送的部分。PONG 帧具有最高的发送优先级。在没有 PONG 帧需要发送时,writeOneFrame() 从消息队列中取出一条消息,如果消息不是 CLOSE 帧,则主要通过如下的过程进行发送:
public final class RealWebSocket implements WebSocket, WebSocketReader.FrameCallback {
  // ...
  boolean writeOneFrame() throws IOException {
    WebSocketWriter writer;
    ByteString pong;
    Object messageOrClose = null;
    int receivedCloseCode = -1;
    String receivedCloseReason = null;
    Streams streamsToClose = null;
    synchronized (RealWebSocket.this) {
      if (failed) {
        return false; // Failed web socket.
      }
      writer = this.writer;
      pong = pongQueue.poll();
      if (pong == null) {
        messageOrClose = messageAndCloseQueue.poll();
  // ...
      } else if (messageOrClose instanceof Message) {
        ByteString data = ((Message) messageOrClose).data;
        BufferedSink sink = Okio.buffer(writer.newMessageSink(
            ((Message) messageOrClose).formatOpcode, data.size()));
        sink.write(data);
        sink.close();
        synchronized (this) {
          queueSize -= data.size();
        }
      } else if (messageOrClose instanceof Close) {
数据发送的过程可以总结如下:
创建一个 BufferedSink 用于数据发送;
将数据写入前面创建的 BufferedSink 中;
关闭 BufferedSink;
更新 queueSize 以正确地指示未发送数据的长度;
这里面的玄机主要在创建的 BufferedSink。创建的 Sink 是一个 FrameSink:
static void toggleMask(byte[] buffer, long byteCount, byte[] key, long frameBytesRead) {
  int keyLength = key.length;
  for (int i = 0; i < byteCount; i++, frameBytesRead++) {
    int keyIndex = (int) (frameBytesRead % keyLength);
    buffer[i] = (byte) (buffer[i] ^ key[keyIndex]);
  }
}
// ...
Sink newMessageSink(int formatOpcode, long contentLength) {
  if (activeWriter) {
    throw new IllegalStateException("Another message writer is active. Did you call close()?");
  }
  activeWriter = true;
  // Reset FrameSink state for a new writer.
  frameSink.formatOpcode = formatOpcode;
  frameSink.contentLength = contentLength;
  frameSink.isFirstFrame = true;
  frameSink.closed = false;
  return frameSink;
}
void writeMessageFrameSynchronized(int formatOpcode, long byteCount, boolean isFirstFrame,
    boolean isFinal) throws IOException {
  assert Thread.holdsLock(this);
  if (writerClosed) throw new IOException("closed");
  int b0 = isFirstFrame ? formatOpcode : OPCODE_CONTINUATION;
  if (isFinal) {
    b0 |= B0_FLAG_FIN;
  }
  sink.writeByte(b0);
  int b1 = 0;
  if (isClient) {
    b1 |= B1_FLAG_MASK;
  }
  if (byteCount <= PAYLOAD_BYTE_MAX) {
    b1 |= (int) byteCount;
    sink.writeByte(b1);
  } else if (byteCount <= PAYLOAD_SHORT_MAX) {
    b1 |= PAYLOAD_SHORT;
    sink.writeByte(b1);
    sink.writeShort((int) byteCount);
  } else {
    b1 |= PAYLOAD_LONG;
    sink.writeByte(b1);
    sink.writeLong(byteCount);
  }
  if (isClient) {
    random.nextBytes(maskKey);
    sink.write(maskKey);
    for (long written = 0; written < byteCount; ) {
      int toRead = (int) Math.min(byteCount, maskBuffer.length);
      int read = buffer.read(maskBuffer, 0, toRead);
      if (read == -1) throw new AssertionError();
      toggleMask(maskBuffer, read, maskKey, written);
      sink.write(maskBuffer, 0, read);
      written += read;
    }
  } else {
    sink.write(buffer, byteCount);
  }
  sink.emit();
}
final class FrameSink implements Sink {
  int formatOpcode;
  long contentLength;
  boolean isFirstFrame;
  boolean closed;
  @Override public void write(Buffer source, long byteCount) throws IOException {
    if (closed) throw new IOException("closed");
    buffer.write(source, byteCount);
    // Determine if this is a buffered write which we can defer until close() flushes.
    boolean deferWrite = isFirstFrame
        && contentLength != -1
        && buffer.size() > contentLength - 8192 /* segment size */;
    long emitCount = buffer.completeSegmentByteCount();
    if (emitCount > 0 && !deferWrite) {
      synchronized (WebSocketWriter.this) {
        writeMessageFrameSynchronized(formatOpcode, emitCount, isFirstFrame, false /* final */);
      }
      isFirstFrame = false;
    }
  }
  @Override public void flush() throws IOException {
    if (closed) throw new IOException("closed");
    synchronized (WebSocketWriter.this) {
      writeMessageFrameSynchronized(formatOpcode, buffer.size(), isFirstFrame, false /* final */);
    }
    isFirstFrame = false;
  }
  @Override public Timeout timeout() {
    return sink.timeout();
  }
  @SuppressWarnings("PointlessBitwiseExpression")
  @Override public void close() throws IOException {
    if (closed) throw new IOException("closed");
    synchronized (WebSocketWriter.this) {
      writeMessageFrameSynchronized(formatOpcode, buffer.size(), isFirstFrame, true /* final */);
    }
    closed = true;
    activeWriter = false;
  }
}
FrameSink 的 write() 会先将数据写入一个 Buffer 中,然后再从这个 Buffer 中读取数据来发送。如果是第一次发送数据,同时剩余要发送的数据小于 8192 字节时,会延迟执行实际的数据发送,等 close() 时刷新。
根据 RealWebSocket 的 writeOneFrame() 的逻辑,在 write() 时,总是写入整个消息的所有数据,因而在 FrameSink 的 write() 中总是不会发送数据的。
writeMessageFrameSynchronized() 将用户数据格式化并发送出去。规范中定义的数据格式如下: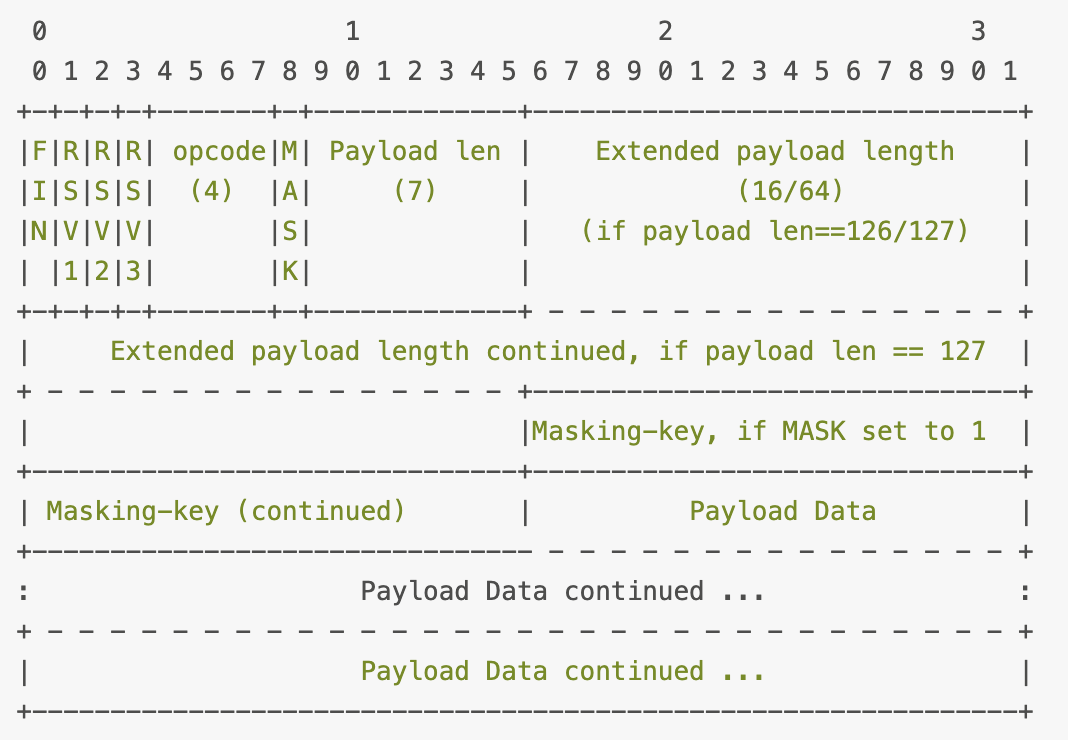
基本结构为:
第一个字节是 meta data 控制位,包括 4 位的操作码,用于指明这是否是消息的最后一帧的 FIN 位及三个保留位;
第二个字节包括掩码位,和载荷长度或载荷长度指示。只有载荷长度比较小,在 127 以内时,载荷长度才会包含在这个字节中。否则这个字节中将包含载荷长度指示的位;
可选的载荷长度。载荷长度大于 127 时,帧中会专门有一些字节来描述载荷的长度。载荷长度具体占用几个字节,因载荷的实际长度而异;
可选的掩码字节。客户端发送的帧,设置掩码指示位,并包含四个字节的掩码字节;
载荷数据。客户端发送的数据,会将原始的数据与掩码字节做异或之后再发送;
关于帧格式的更详细信息,可以参考 《WebSocket Protocol 规范》。
2.3 数据的接收
如我们前面看到的, 在握手的 HTTP 请求返回之后,会在 HTTP 请求的回调里,启动消息读取循环 loopReader():
public final class RealWebSocket implements WebSocket, WebSocketReader.FrameCallback {
  // ...
  /** Receive frames until there are no more. Invoked only by the reader thread. */
  public void loopReader() throws IOException {
    while (receivedCloseCode == -1) {
      // This method call results in one or more onRead* methods being called on this thread.
      reader.processNextFrame();
    }
  }
在这个循环中,不断通过 WebSocketReader 的 processNextFrame() 读取消息,直到收到了关闭连接的消息。
final class WebSocketReader {
  public interface FrameCallback {
    void onReadMessage(String text) throws IOException;
    void onReadMessage(ByteString bytes) throws IOException;
    void onReadPing(ByteString buffer);
    void onReadPong(ByteString buffer);
    void onReadClose(int code, String reason);
  }
  // ...
  void processNextFrame() throws IOException {
    readHeader();
    if (isControlFrame) {
      readControlFrame();
    } else {
      readMessageFrame();
    }
  }
  private void readHeader() throws IOException {
    if (closed) throw new IOException("closed");
    // Disable the timeout to read the first byte of a new frame.
    int b0;
    long timeoutBefore = source.timeout().timeoutNanos();
    source.timeout().clearTimeout();
    try {
      b0 = source.readByte() & 0xff;
    } finally {
      source.timeout().timeout(timeoutBefore, TimeUnit.NANOSECONDS);
    }
    opcode = b0 & B0_MASK_OPCODE;
    isFinalFrame = (b0 & B0_FLAG_FIN) != 0;
    isControlFrame = (b0 & OPCODE_FLAG_CONTROL) != 0;
    // Control frames must be final frames (cannot contain continuations).
    if (isControlFrame && !isFinalFrame) {
      throw new ProtocolException("Control frames must be final.");
    }
    boolean reservedFlag1 = (b0 & B0_FLAG_RSV1) != 0;
    boolean reservedFlag2 = (b0 & B0_FLAG_RSV2) != 0;
    boolean reservedFlag3 = (b0 & B0_FLAG_RSV3) != 0;
    if (reservedFlag1 || reservedFlag2 || reservedFlag3) {
      // Reserved flags are for extensions which we currently do not support.
      throw new ProtocolException("Reserved flags are unsupported.");
    }
    int b1 = source.readByte() & 0xff;
    isMasked = (b1 & B1_FLAG_MASK) != 0;
    if (isMasked == isClient) {
      // Masked payloads must be read on the server. Unmasked payloads must be read on the client.
      throw new ProtocolException(isClient
          ? "Server-sent frames must not be masked."
          : "Client-sent frames must be masked.");
    }
    // Get frame length, optionally reading from follow-up bytes if indicated by special values.
    frameLength = b1 & B1_MASK_LENGTH;
    if (frameLength == PAYLOAD_SHORT) {
      frameLength = source.readShort() & 0xffffL; // Value is unsigned.
    } else if (frameLength == PAYLOAD_LONG) {
      frameLength = source.readLong();
      if (frameLength < 0) {
        throw new ProtocolException(
            "Frame length 0x" + Long.toHexString(frameLength) + " > 0x7FFFFFFFFFFFFFFF");
      }
    }
    frameBytesRead = 0;
    if (isControlFrame && frameLength > PAYLOAD_BYTE_MAX) {
      throw new ProtocolException("Control frame must be less than " + PAYLOAD_BYTE_MAX + "B.");
    }
    if (isMasked) {
      // Read the masking key as bytes so that they can be used directly for unmasking.
      source.readFully(maskKey);
    }
  }
processNextFrame() 先读取 Header 的两个字节,然后根据 Header 的信息,读取数据内容。
在读取 Header 时,读的第一个字节是同步的不计超时时间的。WebSocketReader 从 Header 中,获取到这个帧是不是消息的最后一帧,消息的类型,是否有掩码字节,保留位,帧的长度,以及掩码字节等信息。
WebSocket 通过掩码位和掩码字节来区分数据是从客户端发送给服务器的,还是服务器发送给客户端的。这里会根据协议,对这些信息进行有效性一致性检验,若不一致则会抛出 ProtocolException。
WebSocketReader 同步读取时的调用栈如下:
通过帧的 Header 确定了是数据帧,则会执行 readMessageFrame() 读取消息帧:
final class WebSocketReader {
  // ...
  private void readMessageFrame() throws IOException {
    int opcode = this.opcode;
    if (opcode != OPCODE_TEXT && opcode != OPCODE_BINARY) {
      throw new ProtocolException("Unknown opcode: " + toHexString(opcode));
    }
    Buffer message = new Buffer();
    readMessage(message);
    if (opcode == OPCODE_TEXT) {
      frameCallback.onReadMessage(message.readUtf8());
    } else {
      frameCallback.onReadMessage(message.readByteString());
    }
  }
  /** Read headers and process any control frames until we reach a non-control frame. */
  void readUntilNonControlFrame() throws IOException {
    while (!closed) {
      readHeader();
      if (!isControlFrame) {
        break;
      }
      readControlFrame();
    }
  }
  /**
   * Reads a message body into across one or more frames. Control frames that occur between
   * fragments will be processed. If the message payload is masked this will unmask as it's being
   * processed.
   */
  private void readMessage(Buffer sink) throws IOException {
    while (true) {
      if (closed) throw new IOException("closed");
      if (frameBytesRead == frameLength) {
        if (isFinalFrame) return; // We are exhausted and have no continuations.
        readUntilNonControlFrame();
        if (opcode != OPCODE_CONTINUATION) {
          throw new ProtocolException("Expected continuation opcode. Got: " + toHexString(opcode));
        }
        if (isFinalFrame && frameLength == 0) {
          return; // Fast-path for empty final frame.
        }
      }
      long toRead = frameLength - frameBytesRead;
      long read;
      if (isMasked) {
        toRead = Math.min(toRead, maskBuffer.length);
        read = source.read(maskBuffer, 0, (int) toRead);
        if (read == -1) throw new EOFException();
        toggleMask(maskBuffer, read, maskKey, frameBytesRead);
        sink.write(maskBuffer, 0, (int) read);
      } else {
        read = source.read(sink, toRead);
        if (read == -1) throw new EOFException();
      }
      frameBytesRead += read;
    }
  }
这个过程中,会读取一条消息包含的所有数据帧。按照 WebSocket 的标准,包含用户数据的消息数据帧可以和控制帧交替发送。
但消息之间的数据帧不可以。因而在这个过程中,若遇到了控制帧,则会先读取控制帧进行处理,然后继续读取消息的数据帧,直到读取了消息的所有数据帧。
掩码位和掩码字节,对于客户端而言,发送的数据中包含这些东西,在接收的数据中不包含这些。对于服务器而言,则是在接收的数据中包含这些,发送的数据中不包含。OkHttp 既支持服务器开发,也支持客户端开发,因而可以看到对于掩码位和掩码字节完整的处理。
在一个消息读取完成之后,会通过回调 FrameCallback 将读取的内容通知出去。
final class WebSocketReader {
  // ...
  WebSocketReader(boolean isClient, BufferedSource source, FrameCallback frameCallback) {
    if (source == null) throw new NullPointerException("source == null");
    if (frameCallback == null) throw new NullPointerException("frameCallback == null");
    this.isClient = isClient;
    this.source = source;
    this.frameCallback = frameCallback;
  }
这一事件会通知到 RealWebSocket。
public final class RealWebSocket implements WebSocket, WebSocketReader.FrameCallback {
  // ...
  @Override public void onReadMessage(String text) throws IOException {
    listener.onMessage(this, text);
  }
  @Override public void onReadMessage(ByteString bytes) throws IOException {
    listener.onMessage(this, bytes);
  }
在 RealWebSocket 中,这一事件又被通知到我们在应用程序中创建的回调 WebSocketListener。
2.4 连接的保活
连接的保活通过 PING 帧和 PONG 帧来实现。如我们前面看到的,若用户设置了 PING 帧的发送周期,在握手的 HTTP 请求返回时,消息读取循环开始前会调度 PingRunnable 周期性的向服务器发送 PING 帧:
public final class RealWebSocket implements WebSocket, WebSocketReader.FrameCallback {
  // ...
  private final class PingRunnable implements Runnable {
    PingRunnable() {
    }
    @Override public void run() {
      writePingFrame();
    }
  }
  void writePingFrame() {
    WebSocketWriter writer;
    synchronized (this) {
      if (failed) return;
      writer = this.writer;
    }
    try {
      writer.writePing(ByteString.EMPTY);
    } catch (IOException e) {
      failWebSocket(e, null);
    }
  }
在 PingRunnable 中,通过 WebSocketWriter 发送 PING 帧:
final class WebSocketWriter {
  // ...
  /** Send a ping with the supplied {@code payload}. */
  void writePing(ByteString payload) throws IOException {
    synchronized (this) {
      writeControlFrameSynchronized(OPCODE_CONTROL_PING, payload);
    }
  }
  // ...
  private void writeControlFrameSynchronized(int opcode, ByteString payload) throws IOException {
    assert Thread.holdsLock(this);
    if (writerClosed) throw new IOException("closed");
    int length = payload.size();
    if (length > PAYLOAD_BYTE_MAX) {
      throw new IllegalArgumentException(
          "Payload size must be less than or equal to " + PAYLOAD_BYTE_MAX);
    }
    int b0 = B0_FLAG_FIN | opcode;
    sink.writeByte(b0);
    int b1 = length;
    if (isClient) {
      b1 |= B1_FLAG_MASK;
      sink.writeByte(b1);
      random.nextBytes(maskKey);
      sink.write(maskKey);
      byte[] bytes = payload.toByteArray();
      toggleMask(bytes, bytes.length, maskKey, 0);
      sink.write(bytes);
    } else {
      sink.writeByte(b1);
      sink.write(payload);
    }
    sink.flush();
  }
PING 帧是一个不包含载荷的控制帧。关于掩码位和掩码字节的设置,与消息的数据帧相同。即客户端发送的帧,设置掩码位,帧中包含掩码字节。服务器发送的帧,不设置掩码位,帧中不包含掩码字节。
通过 WebSocket 通信的双方,在收到对方发来的 PING 帧时,需要用 PONG 帧来回复。在 WebSocketReader 的 readControlFrame() 中可以看到这一点:
final class WebSocketReader {
  // ...
  private void readControlFrame() throws IOException {
    Buffer buffer = new Buffer();
    if (frameBytesRead < frameLength) {
      if (isClient) {
        source.readFully(buffer, frameLength);
      } else {
        while (frameBytesRead < frameLength) {
          int toRead = (int) Math.min(frameLength - frameBytesRead, maskBuffer.length);
          int read = source.read(maskBuffer, 0, toRead);
          if (read == -1) throw new EOFException();
          toggleMask(maskBuffer, read, maskKey, frameBytesRead);
          buffer.write(maskBuffer, 0, read);
          frameBytesRead += read;
        }
      }
    }
    switch (opcode) {
      case OPCODE_CONTROL_PING:
        frameCallback.onReadPing(buffer.readByteString());
        break;
      case OPCODE_CONTROL_PONG:
        frameCallback.onReadPong(buffer.readByteString());
        break;
PING 帧和 PONG 帧都不带载荷,控制帧读写时对于载荷长度的处理,都是为 CLOSE 帧做的。因而针对 PING 帧和 PONG 帧,除了 Header 外, readControlFrame() 实际上无需再读取任何数据,但它会将这些事件通知出去:
public final class RealWebSocket implements WebSocket, WebSocketReader.FrameCallback {
  // ...
  @Override public synchronized void onReadPing(ByteString payload) {
    // Don't respond to pings after we've failed or sent the close frame.
    if (failed || (enqueuedClose && messageAndCloseQueue.isEmpty())) return;
    pongQueue.add(payload);
    runWriter();
    pingCount++;
  }
  @Override public synchronized void onReadPong(ByteString buffer) {
    // This API doesn't expose pings.
    pongCount++;
  }
可见在收到 PING 帧的时候,总是会发一个 PONG 帧出去,且通常其没有载荷数据。在收到一个 PONG 帧时,则通常只是记录一下,然后什么也不做。如我们前面所见,PONG 帧在 writerRunnable 中被发送出去:
public final class RealWebSocket implements WebSocket, WebSocketReader.FrameCallback {
      // ...
      if (pong != null) {
        writer.writePong(pong);
      } else if (messageOrClose instanceof Message) {
PONG 帧的发送与 PING 帧的非常相似:
final class WebSocketWriter {
  // ...
  /** Send a pong with the supplied {@code payload}. */
  void writePong(ByteString payload) throws IOException {
    synchronized (this) {
      writeControlFrameSynchronized(OPCODE_CONTROL_PONG, payload);
    }
  }
2.5 连接的关闭
连接的关闭,与数据发送的过程颇有几分相似之处。通过 WebSocket 接口的 close(int code, String reason) 我们可以关闭一个 WebSocket 连接:
public final class RealWebSocket implements WebSocket, WebSocketReader.FrameCallback {
  // ...
  @Override public boolean close(int code, String reason) {
    return close(code, reason, CANCEL_AFTER_CLOSE_MILLIS);
  }
  synchronized boolean close(int code, String reason, long cancelAfterCloseMillis) {
    validateCloseCode(code);
    ByteString reasonBytes = null;
    if (reason != null) {
      reasonBytes = ByteString.encodeUtf8(reason);
      if (reasonBytes.size() > CLOSE_MESSAGE_MAX) {
        throw new IllegalArgumentException("reason.size() > " + CLOSE_MESSAGE_MAX + ": " + reason);
      }
    }
    if (failed || enqueuedClose) return false;
    // Immediately prevent further frames from being enqueued.
    enqueuedClose = true;
    // Enqueue the close frame.
    messageAndCloseQueue.add(new Close(code, reasonBytes, cancelAfterCloseMillis));
    runWriter();
    return true;
  }
在执行关闭连接动作前,会先检查一下 close code 的有效性在合法范围内。关于不同 close code 的详细说明,可以参考 《WebSocket 协议规范》。
检查完了之后,会构造一个 Close 消息放入发送消息队列,并调度 writerRunnable 执行。Close 消息可以带有不超出 123 字节的字符串,以作为 Close message,来说明连接关闭的原因。
连接的关闭分为主动关闭和被动关闭。客户端先向服务器发送一个 CLOSE 帧,然后服务器恢复一个 CLOSE 帧,对于客户端而言,这个过程为主动关闭。反之则为对客户端而言则为被动关闭。
在 writerRunnable 执行的 writeOneFrame() 实际发送 CLOSE 帧:
public final class RealWebSocket implements WebSocket, WebSocketReader.FrameCallback {
  // ...
  messageOrClose = messageAndCloseQueue.poll();
  if (messageOrClose instanceof Close) {
    receivedCloseCode = this.receivedCloseCode;
    receivedCloseReason = this.receivedCloseReason;
    if (receivedCloseCode != -1) {
      streamsToClose = this.streams;
      this.streams = null;
      this.executor.shutdown();
    } else {
      // When we request a graceful close also schedule a cancel of the websocket.
      cancelFuture = executor.schedule(new CancelRunnable(),
                                       ((Close) messageOrClose).cancelAfterCloseMillis, MILLISECONDS);
    }
  } else if (messageOrClose == null) {
    return false; // The queue is exhausted.
  }
}
// ...
} else if (messageOrClose instanceof Close) {
  Close close = (Close) messageOrClose;
  writer.writeClose(close.code, close.reason);
  // We closed the writer: now both reader and writer are closed.
  if (streamsToClose != null) {
    listener.onClosed(this, receivedCloseCode, receivedCloseReason);
  }
} else {
发送 CLOSE 帧也分为主动关闭的发送还是被动关闭的发送。
对于被动关闭,在发送完 CLOSE 帧之后,连接被最终关闭,因而,发送 CLOSE 帧之前,这里会停掉发送消息用的 executor。而在发送之后,则会通过 onClosed() 通知用户。
而对于主动关闭,则在发送前会调度 CancelRunnable 的执行,发送后不会通过 onClosed() 通知用户。
final class WebSocketWriter {
  // ...
  void writeClose(int code, ByteString reason) throws IOException {
    ByteString payload = ByteString.EMPTY;
    if (code != 0 || reason != null) {
      if (code != 0) {
        validateCloseCode(code);
      }
      Buffer buffer = new Buffer();
      buffer.writeShort(code);
      if (reason != null) {
        buffer.write(reason);
      }
      payload = buffer.readByteString();
    }
    synchronized (this) {
      try {
        writeControlFrameSynchronized(OPCODE_CONTROL_CLOSE, payload);
      } finally {
        writerClosed = true;
      }
    }
  }
将 CLOSE 帧发送到网络的过程与 PING 和 PONG 帧的颇为相似,仅有的差别就是 CLOSE 帧有载荷。关于掩码位和掩码自己的规则,同样适用于 CLOSE 帧的发送。
CLOSE 的读取在 WebSocketReader 的 readControlFrame()中:
final class WebSocketReader {
  // ...
  private void readControlFrame() throws IOException {
    Buffer buffer = new Buffer();
    if (frameBytesRead < frameLength) {
      if (isClient) {
        source.readFully(buffer, frameLength);
      } else {
        while (frameBytesRead < frameLength) {
          int toRead = (int) Math.min(frameLength - frameBytesRead, maskBuffer.length);
          int read = source.read(maskBuffer, 0, toRead);
          if (read == -1) throw new EOFException();
          toggleMask(maskBuffer, read, maskKey, frameBytesRead);
          buffer.write(maskBuffer, 0, read);
          frameBytesRead += read;
        }
      }
    }
    switch (opcode) {
      // ...
      case OPCODE_CONTROL_CLOSE:
        int code = CLOSE_NO_STATUS_CODE;
        String reason = "";
        long bufferSize = buffer.size();
        if (bufferSize == 1) {
          throw new ProtocolException("Malformed close payload length of 1.");
        } else if (bufferSize != 0) {
          code = buffer.readShort();
          reason = buffer.readUtf8();
          String codeExceptionMessage = WebSocketProtocol.closeCodeExceptionMessage(code);
          if (codeExceptionMessage != null) throw new ProtocolException(codeExceptionMessage);
        }
        frameCallback.onReadClose(code, reason);
        closed = true;
        break;
      default:
        throw new ProtocolException("Unknown control opcode: " + toHexString(opcode));
    }
  }
读到 CLOSE 帧时,WebSocketReader 会将这一事件通知出去:
public final class RealWebSocket implements WebSocket, WebSocketReader.FrameCallback {
  // ...
  @Override public void onReadClose(int code, String reason) {
    if (code == -1) throw new IllegalArgumentException();
    Streams toClose = null;
    synchronized (this) {
      if (receivedCloseCode != -1) throw new IllegalStateException("already closed");
      receivedCloseCode = code;
      receivedCloseReason = reason;
      if (enqueuedClose && messageAndCloseQueue.isEmpty()) {
        toClose = this.streams;
        this.streams = null;
        if (cancelFuture != null) cancelFuture.cancel(false);
        this.executor.shutdown();
      }
    }
    try {
      listener.onClosing(this, code, reason);
      if (toClose != null) {
        listener.onClosed(this, code, reason);
      }
    } finally {
      closeQuietly(toClose);
    }
  }
对于收到的 CLOSE 帧处理同样分为主动关闭的情况和被动关闭的情况。与 CLOSE 发送时的情形正好相反,若是主动关闭,则在收到 CLOSE 帧之后,WebSocket 连接最终断开,因而需要停掉 executor,被动关闭则暂时不需要。
收到 CLOSE 帧,总是会通过 onClosing() 将事件通知出去。
对于主动关闭的情形,最后还会通过 onClosed() 通知用户,连接已经最终关闭。
关于 WebSocket 的 CLOSE 帧的更多说明,可以参考 WebSocket 协议规范。
三、WebSocket 连接的生命周期
总结一下 WebSocket 连接的生命周期:
连接通过一个 HTTP 请求握手并建立连接。WebSocket 连接可以理解为是通过 HTTP 请求建立的普通 TCP 连接。
WebSocket 做了二进制分帧。WebSocket 连接中收发的数据以帧为单位。主要有用于连接保活的控制帧 PING 和 PONG,用于用户数据发送的 MESSAGE 帧,和用于关闭连接的控制帧 CLOSE。
连接建立之后,通过 PING 帧和 PONG 帧做连接保活。
一次 send 数据,被封为一个消息,通过一个或多个 MESSAGE 帧进行发送。一个消息的帧和控制帧可以交叉发送,不同消息的帧之间不可以。
WebSocket 连接的两端相互发送一个 CLOSE 帧以最终关闭连接。
关于 WebSocket 的详细信息,可以参考《 WebSocket 协议规范》。
references:
WebSocket 协议规范:https://tools.ietf.org/html/rfc6455
WebSocket 实战:https://www.ibm.com/developerworks/cn/java/j-lo-WebSocket/index.html
使用 HTML5 WebSocket 构建实时 Web 应用:https://www.ibm.com/developerworks/cn/web/1112_huangxa_websocket/index.html
WebSocket Client Example with OkHttp:http://howtoprogram.xyz/2016/12/24/websocket-client-example-okhttp/
热文推荐:
取代安卓?谷歌新系统Fuchsia OS即将杀青,详解编程语言的选择
安卓的分屏功能,真香
漫画:聊聊线程池中,线程的增长/回收策略
公众号后台回复成长『成长』,将会得到我准备的学习资料。

最后
以上就是真实鸡最近收集整理的关于源码角度,分析OkHttp实现WebSocket | 握手/保活/数据处理...一、OkHttp API 使用的全部内容,更多相关源码角度,分析OkHttp实现WebSocket内容请搜索靠谱客的其他文章。


发表评论 取消回复