rk3328-jd4核心板 LCD lli9341驱动芯片
1.修改编译配置文件,将fbtft编进内核
参考:https://blog.csdn.net/jklinux/article/details/79612831
可通过内核 make menuconfig查看需要增加的CONFIG
make menuconfig ARCH=arm CROSS_COMPILE=arm-linux-gnueabihf-

    Device Drivers  --->
    Graphics support  --->
       <*> Support for small TFT LCD display modules  --->
           ... //屏的驱动IC型号
           <*>   FB driver for the ILI9340 LCD Controller   //drivers/video/fbtft/fb_ili9340.c
           <*>   FB driver for the ST7735R LCD Controller  //drivers/video/fbtft/fb_st7735r.c
               ...
           <M>   Module to for adding FBTFT devices      //drivers/video/fbtft/fbtft_device.c
更改自己的板子deconfig文件 路径 /kernel/arch/arm64/configs/
1.1 将FBTFT和ILI9341配置进内核
CONFIG_FB_TFT=y
CONFIG_FB_TFT_AGM1264K_FL=y
CONFIG_FB_TFT_BD663474=y
CONFIG_FB_TFT_HX8340BN=y
CONFIG_FB_TFT_HX8347D=y
CONFIG_FB_TFT_HX8353D=y
CONFIG_FB_TFT_ILI9320=y
CONFIG_FB_TFT_ILI9325=y
CONFIG_FB_TFT_ILI9340=y
CONFIG_FB_TFT_ILI9341=y
CONFIG_FB_TFT_ILI9481=y
CONFIG_FB_TFT_ILI9486=y
CONFIG_FB_TFT_PCD8544=y
CONFIG_FB_TFT_RA8875=y
CONFIG_FB_TFT_S6D02A1=y
CONFIG_FB_TFT_S6D1121=y
CONFIG_FB_TFT_SSD1289=y
CONFIG_FB_TFT_SSD1306=y
CONFIG_FB_TFT_SSD1331=y
CONFIG_FB_TFT_SSD1351=y
CONFIG_FB_TFT_ST7735R=y
CONFIG_FB_TFT_TINYLCD=y
CONFIG_FB_TFT_TLS8204=y
CONFIG_FB_TFT_UC1701=y
CONFIG_FB_TFT_UPD161704=y
CONFIG_FB_TFT_WATTEROTT=y
CONFIG_FB_FLEX=y
CONFIG_FB_TFT_FBTFT_DEVICE=m
驱动路径:
git下载fbtft存放在 /drivers/video/fbdev/fbtft 或者sdk原有 /drivers/staging/fbtft
git clone https://github.com/notro/fbtft.git
二者都可以驱动9341LCD 选其中一个使用
1.2 若是git下载的驱动在上一级Kconfig增加
source "drivers/video/fbdev/fbtft/Kconfig"
makefile中增加
obj-y += fbtft/
1.3 设备树注册和配置
参考:http://zero.lichee.pro/%E8%B4%A1%E7%8C%AE/article%203.html
 &spi0 {

       status = "okay";

       ili9341@00 {
               compatible = "ilitek,ili9341";
               reg = <0>;

               spi-max-frequency = <20000000>;
               rotate = <270>;
               bgr;
               fps = <10>;
               buswidth = <8>;

                dc-gpios = <&gpio2 12 GPIO_ACTIVE_LOW>;  /*gpi02 B4*/

                reset-gpios = <&gpio2 2 GPIO_ACTIVE_LOW>;/*gpi02 A2*/

                led-gpios = <&gpio2 6 GPIO_ACTIVE_HIGH>;/*gpi02 A6*///注意背光io集性


               // reset-gpios = <&pio 1 7 GPIO_ACTIVE_LOW>;
              // dc-gpios = <&pio 1 5 GPIO_ACTIVE_LOW>;
               debug = <7>; //等级0~7 越高信息越多
       };

 };
2.修改默认spi busnum 可忽略这一步
将busnum 改为0 (应该可以不用改)
参考:https://blog.csdn.net/dreamflyliwei9/article/details/79294269
spi32766.0 -> spi0.0
查看更改成功 /sys/bus/spi/devices/spi0.0
/drivers/spi/spi.c

@@ -1783,7 +1783,8 @@ static int of_spi_register_master(struct spi_master *master)
  */
 int spi_register_master(struct spi_master *master)
 {
-       static atomic_t         dyn_bus_id = ATOMIC_INIT((1<<15) - 1);
+       //static atomic_t               dyn_bus_id = ATOMIC_INIT((1<<15) - 1);
+       static atomic_t         dyn_bus_id = ATOMIC_INIT(1);
        struct device           *dev = master->dev.parent;
        struct boardinfo        *bi;
        int                     status = -ENODEV;
3,根据错认修改驱动源码
加栽ili9341驱动是发生错误 -12
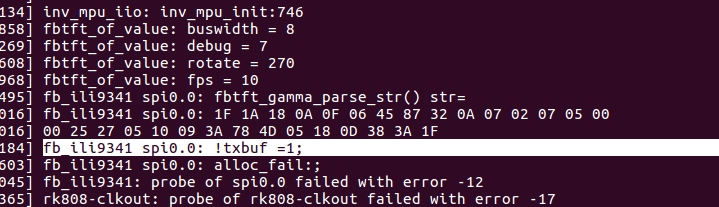
调试定位到dma申请空间失败
/drivers/staging/fbtft/fbtft-core.c
@@ -44,7 +44,7 @@ module_param(debug, ulong, 0);
 MODULE_PARM_DESC(debug, "override device debug level");

 #ifdef CONFIG_HAS_DMA
-static bool dma = true;
+static bool dma = 0;//true;
 module_param(dma, bool, 0);
 MODULE_PARM_DESC(dma, "Use DMA buffer");
 #endif
@@ -813,7 +813,12 @@ struct fb_info *fbtft_framebuffer_alloc(struct fbtft_display *display,
        if (par->gamma.curves && gamma) {
                if (fbtft_gamma_parse_str(par,
                        par->gamma.curves, gamma, strlen(gamma)))
+                       {
+                               fbtft_par_dbg(DEBUG_INIT_DISPLAY, par,
+                               "fbtft_gamma_parse_str failed:n");
+
                        goto alloc_fail;
+                       }
        }

        /* Transmit buffer */
@@ -830,13 +835,23 @@ struct fb_info *fbtft_framebuffer_alloc(struct fbtft_display *display,
                if (dma) {
                        dev->coherent_dma_mask = ~0;
                        txbuf = dmam_alloc_coherent(dev, txbuflen, &par->txbuf.dma, GFP_DMA);
+                       fbtft_par_dbg(DEBUG_INIT_DISPLAY, par,
+                               "CONFIG_HAS_DMA %d;n",txbuflen);
                } else
 #endif
                {
                        txbuf = devm_kzalloc(par->info->device, txbuflen, GFP_KERNEL);
+                       fbtft_par_dbg(DEBUG_INIT_DISPLAY, par,
+                               "NO CONFIG_HAS_DMA %d;n",txbuflen);
+
                }
                if (!txbuf)
+               {
+                       fbtft_par_dbg(DEBUG_INIT_DISPLAY, par,
+                               "!txbuf =1;n");
+
                        goto alloc_fail;
+               }
                par->txbuf.buf = txbuf;
                par->txbuf.len = txbuflen;
        }
因为内核已经打开 CONFIG_HAS_DMA
手动关闭LCD dma
static bool dma = 0;//true; 这里没有深究为什么DMA申请空间失败
4.编译内核
sudo ./build.sh kernel
加载成功后, 会产生一个/dev/fb1设备文件,默认是一个fb0
debug等级7可以看到一些调试信息
5.配置qt环境变量
修改QT环境变量: export QT_QPA_PLATFORM=linuxfb:fb=/dev/fb1生效后,执行Qt程序,
执行QT程序效果
bty:busybox增加工具 ( depmod 配合modprobe)
解决提示找不到modules.dep /lib/modules
参考:https://blog.csdn.net/qq_39101111/article/details/78773362
最后
以上就是诚心服饰最近收集整理的关于rk3328 rk3399使用fbtft驱动SPI LCD显示的全部内容,更多相关rk3328内容请搜索靠谱客的其他文章。


发表评论 取消回复