我们有时没有时间重新编译整个固件,但是却又想修改其中的某个功能,这时就涉及到了固件的解包与打包
下面提供一个简单的解包打包脚本:openwrt固件修改(squashfs+jffs2格式固件)。
#!/bin/sh
sudo echo "Starting..."
MKSQSHFS4='./bin/mksquashfs4'
PADJFFS2='./bin/padjffs2'
case "$1" in
'extract'|'e')
offset1=`grep -oba hsqs $2 | grep -oP '[0-9]*(?=:hsqs)'`
offset2=`wc -c $2 | grep -oP '[0-9]*(?= )'`
size2=`expr $offset2 - $offset1`
#echo $offset1 " " $offset2 " " $size2
dd if=$2 of=kernel.bin bs=1 ibs=1 count=$offset1
dd if=$2 of=secondchunk.bin bs=1 ibs=1 count=$size2 skip=$offset1
sudo rm -rf squashfs-root 2>&1
sudo unsquashfs -d squashfs-root secondchunk.bin
rm secondchunk.bin
;;
'create'|'c')
sudo $MKSQSHFS4 ./squashfs-root ./newsecondchunk.bin -nopad -noappend -root-owned -comp xz -Xpreset 9 -Xe -Xlc 0 -Xlp 2 -Xpb 2 -b 256k -processors 1
sudo chown $USER ./newsecondchunk.bin
cat kernel.bin newsecondchunk.bin > $2
$PADJFFS2 $2
rm newsecondchunk.bin
;;
*)
echo 'run
"modify-firmware.sh extract firmware.bin"
You will find file "kernel.bin" and folder "squashfs-root".
Modify "squashfs-root" as you like,after everything is done,run
"modify-firmware.sh create newfirmware.bin"
And you will get a modified firmware named newfirmware.bin.
'
;;
esac
然而,修改好固件重新打包之后,固件末尾的签名却丢失了。
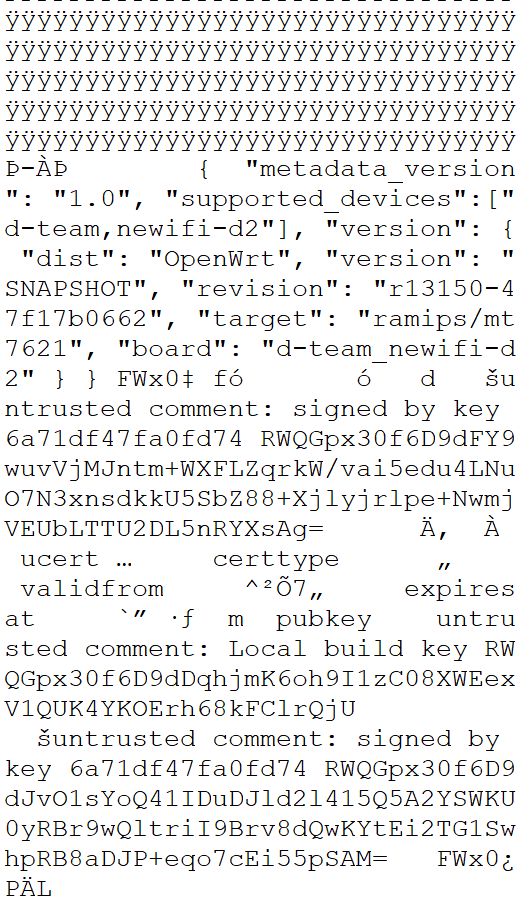 官方固件结尾 官方固件结尾
|
 修改后结尾丢失 修改后结尾丢失
|
- 元数据
metadata - 签名
comment
查找openwrt编译所用工具目录openwrt/staging_dir/host/bin,发现以下两个程序与签名以及元数据有关:
fwtool
usign
分别查看帮助如下:
$ ./fwtool
Usage: ./fwtool <options> <firmware>

Options:
  -S <file>:            Append signature file to firmware image
  -I <file>:            Append metadata file to firmware image
  -s <file>:            Extract signature file from firmware image
  -i <file>:            Extract metadata file from firmware image
  -t:                   Remove extracted chunks from firmare image (using -s, -i)
  -T:                   Output firmware image without extracted chunks to stdout (using -s, -i)
  -q:                   Quiet (suppress error messages)
$ ./usign
Usage: ./usign <command> <options>
Commands:
  -V:                   verify (needs at least -m and -p|-P)
  -S:                   sign (needs at least -m and -s)
  -F:                   print key fingerprint of public/secret key or signature
  -G:                   generate a new keypair (needs at least -p and -s)
Options:
  -c <comment>:         add comment to keys
  -m <file>:            message file
  -p <file>:            public key file (verify/fingerprint only)
  -P <path>:            public key directory (verify only)
  -q:                   quiet (do not print verification result, use return code only)
  -s <file>:            secret key file (sign/fingerprint only)
  -x <file>:            signature file (defaults to <message file>.sig)
分析可知签名步骤如下:
- 从编译好的固件提取元数据
metadata,如果不是自己编译的固件或者已经删除编译目录,还需要提取build key。
./fwtool -i ~/mt7621.meta ~/mt7621.bin #提取元数据
- 将元数据
metadata附加到新固件尾。
./fwtool -I ~/mt7621.meta ~/newifi3_nosign.bin
- 根据
build key生成签名文件,默认生成为同目录下<message file>.sig。
./usign -S -m ~/newifi3_nosign.bin -s ~/openwrt/key-build
- 附加签名到末尾。
./fwtool -S ~/newifi3_nosign.bin.sig ~/newifi3_nosign.bin
此时已经可以正常刷入。如果想要和官方固件格式完全相同。还可以把ucert文件再添加到末尾。
最后
以上就是糟糕汉堡最近收集整理的关于openwrt squashfs固件解包打包与签名方法的全部内容,更多相关openwrt内容请搜索靠谱客的其他文章。
本图文内容来源于网友提供,作为学习参考使用,或来自网络收集整理,版权属于原作者所有。


![[RK3399][Android7.1] 调试笔记 --- FwFactoryTool_v5.50_20190306拆包打包工具烧录后黑屏](https://www.shuijiaxian.com/files_image/reation/bcimg12.png)


发表评论 取消回复