目录
1.基本说明
2. Netty启动过程源码剖析
2.1源码剖析目的
2.2 源码剖析
2.3源码剖析过程
2.4Netty启动过程梳理
3. Netty接受请求过程源码剖析
3.1源码剖析目的
3.2源码剖析
3.3 Netty接受请求过程梳理
4. Pipeline Handler HandlerContext创建源码剖析
4.1源码剖析目的
4.2源码剖析说明
4.3源码剖析
4.4 Pipeline Handler HandlerContext 创建过程梳理
5. ChannelPipeline 调度handler的源码剖析
5.1源码剖析的目的
5.2源码剖析
5.3 ChannelPipeline调度handler梳理
6.Netty心跳(heartbeat)服务源码剖析
6.1源码剖析目的
6.2源码剖析
7. Netty核心组件EventLoop源码剖析
7.1源码剖析目的
7.2源码剖析
8.handler中加入线程池和Context中添加线程池的源码剖析
8.1源码剖析目的
8.2源码剖析
1.基本说明
- 只有看过
Netty源码,才能说是真的掌握了Netty框架。- 在
io.netty.example包下,有很多Netty源码案例,可以用来分析。- 源码分析章节是针对有
Java项目经验,并且玩过框架源码的人员讲的,否则你听起来会有相当的难度
2. Netty启动过程源码剖析
2.1源码剖析目的
用源码分析的方式走一下
Netty(服务器)的启动过程,更好的理解Netty的整体设计和运行机制。
2.2 源码剖析
说明:
- 源码需要剖析到
Netty调用doBind方法,追踪到NioServerSocketChannel的doBind。- 并且要
Debug程序到NioEventLoop类的run代码,无限循环,在服务器端运行。

2.3源码剖析过程
demo源码的基本理解
// 服务器启动类源码
/*
 * Copyright 2012 The Netty Project
 *
 * The Netty Project licenses this file to you under the Apache License,
 * version 2.0 (the "License"); you may not use this file except in compliance
 * with the License. You may obtain a copy of the License at:
 *
 *   http://www.apache.org/licenses/LICENSE-2.0
 *
 * Unless required by applicable law or agreed to in writing, software
 * distributed under the License is distributed on an "AS IS" BASIS, WITHOUT
 * WARRANTIES OR CONDITIONS OF ANY KIND, either express or implied. See the
 * License for the specific language governing permissions and limitations
 * under the License.
 */
package newer.netty.example.echo2;

import io.netty.bootstrap.ServerBootstrap;
import io.netty.channel.ChannelFuture;
import io.netty.channel.ChannelInitializer;
import io.netty.channel.ChannelOption;
import io.netty.channel.ChannelPipeline;
import io.netty.channel.EventLoopGroup;
import io.netty.channel.nio.NioEventLoopGroup;
import io.netty.channel.socket.SocketChannel;
import io.netty.channel.socket.nio.NioServerSocketChannel;
import io.netty.handler.logging.LogLevel;
import io.netty.handler.logging.LoggingHandler;
import io.netty.handler.ssl.SslContext;
import io.netty.handler.ssl.SslContextBuilder;
import io.netty.handler.ssl.util.SelfSignedCertificate;

/**
 * Echoes back any received data from a client.
 */
public final class EchoServer {

    static final boolean SSL = System.getProperty("ssl") != null;
    static final int PORT = Integer.parseInt(System.getProperty("port", "8007"));

    public static void main(String[] args) throws Exception {
        // Configure SSL.
        final SslContext sslCtx;
        if (SSL) {
            SelfSignedCertificate ssc = new SelfSignedCertificate();
            sslCtx = SslContextBuilder.forServer(ssc.certificate(), ssc.privateKey()).build();
        } else {
            sslCtx = null;
        }

        // Configure the server.
        EventLoopGroup bossGroup = new NioEventLoopGroup(1);
        EventLoopGroup workerGroup = new NioEventLoopGroup();
        try {
            ServerBootstrap b = new ServerBootstrap();
            b.group(bossGroup, workerGroup)
                    .channel(NioServerSocketChannel.class)
                    .option(ChannelOption.SO_BACKLOG, 100)
                    .handler(new LoggingHandler(LogLevel.INFO))
                    .childHandler(new ChannelInitializer<SocketChannel>() {
                        @Override
                        public void initChannel(SocketChannel ch) throws Exception {
                            ChannelPipeline p = ch.pipeline();
                            if (sslCtx != null) {
                                p.addLast(sslCtx.newHandler(ch.alloc()));
                            }
                            //p.addLast(new LoggingHandler(LogLevel.INFO));
                            p.addLast(new EchoServerHandler());
                        }
                    });

            // Start the server.
            ChannelFuture f = b.bind(PORT).sync();

            // Wait until the server socket is closed.
            f.channel().closeFuture().sync();
        } finally {
            // Shut down all event loops to terminate all threads.
            bossGroup.shutdownGracefully();
            workerGroup.shutdownGracefully();
        }
    }
}
说明:
- 先看启动类:
main方法中,首先创建了关于 SSL 的配置类。- 重点分析下创建了两个
EventLoopGroup对象:
EventLoopGroup bossGroup = new NioEventLoopGroup(1);
EventLoopGroup workerGroup = new NioEventLoopGroup();
(1) 这两个对象是整个
Netty的核心对象,可以说,整个Netty的运作都依赖于他们。bossGroup用于接受TCP请求,他会将请求交给workerGroup,workerGroup会获取到真正的连接,然后和连接进行通信,比如读写解码编码等操作。(2)
EventLoopGroup是事件循环组(线程组)含有多个EventLoop,可以注册channel,用于在事件循环中去进行选择(和选择器相关)。【debug看】(3)
new NioEventLoopGroup(1);这个1表示bossGroup事件组有1个线程你可以指定,如果new NioEventLoopGroup()会含有默认个线程cpu核数 * 2,即可以充分的利用多核的优势,【可以dubug一把】
DEFAULT_EVENT_LOOP_THREADS = Math.max(1, SystemPropertyUtil.getInt("io.netty.eventLoopThreads", NettyRuntime.availableProcessors() * 2));会创建
EventExecutor数组children = new EventExecutor[nThreads];//debug一下每个元素的类型就是NIOEventLoop,NIOEventLoop实现了EventLoop接口和Executor接口try块中创建了一个ServerBootstrap对象,他是一个引导类,用于启动服务器和引导整个程序的初始化(看下源码allowseasybootstrapof{@linkServerChannel})。它和ServerChannel关联,而ServerChannel继承了Channel,有一些方法remoteAddress等[可以Debug下]随后,变量b调用了group方法将两个group放入了自己的字段中,用于后期引导使用【debug下group方法
/**
 *Set the {@link EventLoopGroup} for the parent (acceptor) and the child (client) . These
 *{@link EventLoopGroup}'s are used to handle all the events and IO for {@link ServerChannel} and
 *{@link Channel}'s.
 */
(4) 然后添加了一个
channel,其中参数一个Class对象,引导类将通过这个Class对象反射创建ChannelFactory。然后添加了一些TCP的参数。【说明:Channel的创建在bind方法,可以Debug下bind,会找到channel = channelFactory.newChannel();】(5) 再添加了一个服务器专属的日志处理器
handler。(6) 再添加一个
SocketChannel(不是ServerSocketChannel)的handler。(7) 然后绑定端口并阻塞至连接成功。
(8) 最后
main线程阻塞等待关闭。(9)
finally块中的代码将在服务器关闭时优雅关闭所有资源。
/*
 * Copyright 2012 The Netty Project
 *
 * The Netty Project licenses this file to you under the Apache License,
 * version 2.0 (the "License"); you may not use this file except in compliance
 * with the License. You may obtain a copy of the License at:
 *
 *   http://www.apache.org/licenses/LICENSE-2.0
 *
 * Unless required by applicable law or agreed to in writing, software
 * distributed under the License is distributed on an "AS IS" BASIS, WITHOUT
 * WARRANTIES OR CONDITIONS OF ANY KIND, either express or implied. See the
 * License for the specific language governing permissions and limitations
 * under the License.
 */
package newer.netty.example.echo2;

import io.netty.channel.ChannelHandler.Sharable;
import io.netty.channel.ChannelHandlerContext;
import io.netty.channel.ChannelInboundHandlerAdapter;

/**
 * Handler implementation for the echo server.
 */
@Sharable
public class EchoServerHandler extends ChannelInboundHandlerAdapter {

    @Override
    public void channelRead(ChannelHandlerContext ctx, Object msg) {
        ctx.write(msg);
    }

    @Override
    public void channelReadComplete(ChannelHandlerContext ctx) {
        ctx.flush();
    }

    @Override
    public void exceptionCaught(ChannelHandlerContext ctx, Throwable cause) {
        // Close the connection when an exception is raised.
        cause.printStackTrace();
        ctx.close();
    }
}
说明:
- 这是一个普通的处理器类,用于处理客户端发送来的消息,在我们这里,我们简单的解析出客户端传过来的内容,然后打印,最后发送字符串给客户端。
- 大致讲解了我们的
demo源码的作用。后面的debug的时候会详细。
分析 EventLoopGroup 的过程
- 构造器方法
public NioEventLoopGroup (int nThreads) {
    this(nThreads, (Executor) null);
}- 上面的
this(nThreads, (Executor) null);调用构造器(通过alt + d看即可)
public NioEventLoopGroup (int nThreads, Executor executor) {
    this(nThreads, executor, SelectorProvider.provider());
}- 上面的
this(nThreads, executor, SelectorProvider.provider());调用下面构造器
public NioEventLoopGroup (int nThreads, Executor executor, final SelectorProvider selectorProvider) {
    this(nThreads, executor, selectorProvider,DefaultSelectStrategyFactory.INSTANCE);
}- 上面的
this()...调用构造器(alt + d)
public NioEventLoopGroup (int nThreads, Executor executor, final SelectorProvider selectorProvider,final SelectStrategyFactory selectStrategyFactory) {
    super(nThreads, executor, selectorProvider, selectStrategyFactory, RejectedExecutionHandlers.reject());
}-
上面的
super()..的方法是父类:MultithreadEventLoopGroupprotected MultithreadEventLoopGroup (int nThreads, Executor executor, Object...args) { super(nThreads == 0 ? DEFAULT_EVENT_LOOP_THREADS : nThreads, executor, args); }2.6 追踪到源码抽象类
MultithreadEventExecutorGroup的构造器方法MultithreadEventExecutorGroup才是NioEventLoopGroup真正的构造方法,这里可以看成是一个模板方法,使用了设计模式的模板模式(可看我录制视频),所以,我们就需要好好分析MultithreadEventExecutorGroup方法了 - 分析
MultithreadEventExecutorGroup
参数说明:
@param nThreads使用的线程数,默认为core * 2【可以追踪源码】@param executor执行器:如果传入null, 则采用Netty默认的线程工厂和默认的执行器ThreadPerTaskExecutor@param chooserFactory单例new DefaultEventExecutorChooserFactory()@param args args在创建执行器的时候传入固定参数
protected MultithreadEventExecutorGroup(int nThreads, Executor executor,
                                        EventExecutorChooserFactory chooserFactory, Object... args) {
    if (nThreads <= 0) {
        throw new IllegalArgumentException(String.format("nThreads: %d (expected: > 0)", nThreads));
    }

    if (executor == null) { // 如果传入的执行器是空的则采用默认的线程工厂和默认的执行器
        executor = new ThreadPerTaskExecutor(newDefaultThreadFactory());
    }

    // 创建指定线程数的执行器数组
    children = new EventExecutor[nThreads];

    // 初始化线程数组
    for (int i = 0; i < nThreads; i ++) {
        boolean success = false;
        try {
            // 创建 new NioEventLoop
            children[i] = newChild(executor, args);
            success = true;
        } catch (Exception e) {
            // TODO: Think about if this is a good exception type
            throw new IllegalStateException("failed to create a child event loop", e);
        } finally {
            // 如果创建失败,优雅关闭
            if (!success) {
                for (int j = 0; j < i; j ++) {
                    children[j].shutdownGracefully();
                }

                for (int j = 0; j < i; j ++) {
                    EventExecutor e = children[j];
                    try {
                        while (!e.isTerminated()) {
                            e.awaitTermination(Integer.MAX_VALUE, TimeUnit.SECONDS);
                        }
                    } catch (InterruptedException interrupted) {
                        // Let the caller handle the interruption.
                        Thread.currentThread().interrupt();
                        break;
                    }
                }
            }
        }
    }

    chooser = chooserFactory.newChooser(children);

    final FutureListener<Object> terminationListener = new FutureListener<Object>() {
        @Override
        public void operationComplete(Future<Object> future) throws Exception {
            if (terminatedChildren.incrementAndGet() == children.length) {
                terminationFuture.setSuccess(null);
            }
        }
    };

    // 为每一个单例线程池添加一个关闭监听器
    for (EventExecutor e: children) {
        e.terminationFuture().addListener(terminationListener);
    }

    Set<EventExecutor> childrenSet = new LinkedHashSet<EventExecutor>(children.length);
    //将所有的单例线程池添加到一个 HashSet 中。
    Collections.addAll(childrenSet, children);
    readonlyChildren = Collections.unmodifiableSet(childrenSet);
}
说明:
- 如果
executor是null,创建一个默认的ThreadPerTaskExecutor,使用Netty默认的线程工厂。- 根据传入的线程数(
CPU * 2)创建一个线程池(单例线程池)数组。- 循环填充数组中的元素。如果异常,则关闭所有的单例线程池。
- 根据线程选择工厂创建一个线程选择器。
- 为每一个单例线程池添加一个关闭监听器。
- 将所有的单例线程池添加到一个
HashSet中。
ServerBootstrap 创建和构造过程
ServerBootstrap是个空构造,但是有默认的成员变量
private final Map<ChannelOption<?>, Object> childOptions = new LinkedHashMap<ChannelOption<?>, Object>();
private final Map<AttributeKey<?>, Object> childAttrs = new ConcurrentHashMap<AttributeKey<?>, Object>();

// config 对象,会在后面起很大作用
private final ServerBootstrapConfig config = new ServerBootstrapConfig(this);
private volatile EventLoopGroup childGroup;
private volatile ChannelHandler childHandler;- 分析一下
ServerBootstrap基本使用情况
ServerBootstrap b = new ServerBootstrap();
b.group(bossGroup, workerGroup)
        .channel(NioServerSocketChannel.class)
        .option(ChannelOption.SO_BACKLOG, 100)
        .handler(new LoggingHandler(LogLevel.INFO))
        .childHandler(new ChannelInitializer<SocketChannel>() {
            @Override
            public void initChannel(SocketChannel ch) throws Exception {
                ChannelPipeline p = ch.pipeline();
                if (sslCtx != null) {
                    p.addLast(sslCtx.newHandler(ch.alloc()));
                }
                //p.addLast(new LoggingHandler(LogLevel.INFO));
                p.addLast(new EchoServerHandler());
            }
        });
说明:
- 链式调用:
group方法,将boss和worker传入,boss赋值给parentGroup属性,worker赋值给childGroup属性。channel方法传入NioServerSocketChannelclass对象。会根据这个class创建channel对象。option方法传入TCP参数,放在一个LinkedHashMap中。handler方法传入一个handler中,这个hanlder只专属于ServerSocketChannel而不是SocketChannel。childHandler传入一个hanlder,这个handler将会在每个客户端连接的时候调用。供SocketChannel使用。
绑定端口的分析
- 服务器就是在这个
bind方法里启动完成的 4.2bind方法代码,追踪到创建了一个端口对象,并做了一些空判断,核心代码doBind,我们看看
public ChannelFuture bind(SocketAddress localAddress) {
    validate();
    if (localAddress == null) {
        throw new NullPointerException("localAddress");
    }
    return doBind(localAddress);
}doBind源码剖析,核心是两个方法initAndRegister和doBind0
private ChannelFuture doBind(final SocketAddress localAddress) {
    final ChannelFuture regFuture = initAndRegister();
    final Channel channel = regFuture.channel();
    if (regFuture.cause() != null) {
        return regFuture;
    }

    if (regFuture.isDone()) {
        // At this point we know that the registration was complete and successful.
        ChannelPromise promise = channel.newPromise();
        //============================================
        //说明:执行doBind0方法,完成对端口的绑定
        //============================================
        doBind0(regFuture, channel, localAddress, promise);
        return promise;
    } else {
        // Registration future is almost always fulfilled already, but just in case it's not.
        final PendingRegistrationPromise promise = new PendingRegistrationPromise(channel);
        regFuture.addListener(new ChannelFutureListener() {
            @Override
            public void operationComplete(ChannelFuture future) throws Exception {
                Throwable cause = future.cause();
                if (cause != null) {
                    // Registration on the EventLoop failed so fail the ChannelPromise directly to not cause an
                    // IllegalStateException once we try to access the EventLoop of the Channel.
                    promise.setFailure(cause);
                } else {
                    // Registration was successful, so set the correct executor to use.
                    // See https://github.com/netty/netty/issues/2586
                    promise.registered();

                    doBind0(regFuture, channel, localAddress, promise);
                }
            }
        });
        return promise;
    }
}- 分析说明
initAndRegister
final ChannelFuture initAndRegister() {
    Channel channel = null;
    try {
        channel = channelFactory.newChannel();

        /**
         * 说明:channelFactory.newChannel() 方法的作用通过 ServerBootstrap 的通道工厂反射创建一个 NioServerSocketChannel,具体追踪源码可以得到下面结论
         * (1)通过 NIO 的 SelectorProvider 的 openServerSocketChannel 方法得到 JDK 的 channel。目的是让 Netty 包装 JDK 的 channel。
         * (2)创建了一个唯一的 ChannelId,创建了一个 NioMessageUnsafe,用于操作消息,创建了一个 DefaultChannelPipeline 管道,是个双向链表结构,用于过滤所有的进出的消息。
         * (3)创建了一个 NioServerSocketChannelConfig 对象,用于对外展示一些配置。

         * channel = channelFactory.newChannel();//NioServerSocketChannel

         * 说明:init 初始化这个 NioServerSocketChannel,具体追踪源码可以得到如下结论
         * (1) init 方法,这是个抽象方法 (AbstractBootstrap类的),由ServerBootstrap实现(可以追一下源码//setChannelOptions(channel,options,logger);)。
         * (2)设置 NioServerSocketChannel 的 TCP 属性。
         * (3)由于 LinkedHashMap 是非线程安全的,使用同步进行处理。
         * (4)对 NioServerSocketChannel 的 ChannelPipeline 添加 ChannelInitializer 处理器。
         * (5)可以看出,init 的方法的核心作用在和 ChannelPipeline 相关。
         * (6)从 NioServerSocketChannel 的初始化过程中,我们知道,pipeline 是一个双向链表,并且,他本身就初始化了 head 和 tail,这里调用了他的 addLast 方法,也就是将整个 handler 插入到 tail 的前面,因为 tail 永远会在后面,需要做一些系统的固定工作。
         */
        init(channel);
    } catch (Throwable t) {
        if (channel != null) {
            channel.unsafe().closeForcibly();
            return new DefaultChannelPromise(channel, GlobalEventExecutor.INSTANCE).setFailure(t);
        }
        return new DefaultChannelPromise(new FailedChannel(), GlobalEventExecutor.INSTANCE).setFailure(t);
    }

    ChannelFuture regFuture = config().group().register(channel);
    if (regFuture.cause() != null) {
        if (channel.isRegistered()) {
            channel.close();
        } else {
            channel.unsafe().closeForcibly();
        }
    }
    return regFuture;
}
说明:
- 基本说明:
initAndRegister()初始化NioServerSocketChannel通道并注册各个handler,返回一个future。- 通过
ServerBootstrap的通道工厂反射创建一个NioServerSocketChannel。init初始化这个NioServerSocketChannel。config().group().register(channel)通过ServerBootstrap的bossGroup注册NioServerSocketChannel。- 最后,返回这个异步执行的占位符即
regFuture。
init方法会调用addLast,现在进入到addLast方法内查看
@Override
public final ChannelPipeline addLast(EventExecutorGroup group, String name, ChannelHandler handler) {
    final AbstractChannelHandlerContext newCtx;
    synchronized (this) {
        checkMultiplicity(handler);
        newCtx = newContext(group, filterName(name, handler), handler);
        addLast0(newCtx);
        if (!registered) {
            newCtx.setAddPending();
            callHandlerCallbackLater(newCtx, true);
            return this;
        }
        EventExecutor executor = newCtx.executor();
        if (!executor.inEventLoop()) {
            callHandlerAddedInEventLoop(newCtx, executor);
            return this;
        }
    }
    callHandlerAdded0(newCtx);
    return this;
}
说明:
addLast方法,在DefaultChannelPipeline类中addLast方法这就是pipeline方法的核心- 检查该
handler是否符合标准。- 创建一个
AbstractChannelHandlerContext对象,这里说一下,ChannelHandlerContext对象是ChannelHandler和ChannelPipeline之间的关联,每当有ChannelHandler添加到Pipeline中时,都会创建Context。Context的主要功能是管理他所关联的Handler和同一个Pipeline中的其他Handler之间的交互。- 将
Context添加到链表中。也就是追加到tail节点的前面。- 最后,同步或者异步或者晚点异步的调用
callHandlerAdded0方法
- 前面说了
dobind方法有2个重要的步骤,initAndRegister说完,接下来看doBind0方法,代码如下
private static void doBind0(
        final ChannelFuture regFuture, final Channel channel,
        final SocketAddress localAddress, final ChannelPromise promise) {

    // This method is invoked before channelRegistered() is triggered.  Give user handlers a chance to set up
    // the pipeline in its channelRegistered() implementation.
    channel.eventLoop().execute(new Runnable() {
        @Override
        public void run() {
            if (regFuture.isSuccess()) {
                //bind方法这里下断点,这里下断点,来玩!!
                channel.bind(localAddress, promise).addListener(ChannelFutureListener.CLOSE_ON_FAILURE);
            } else {
                promise.setFailure(regFuture.cause());
            }
        }
    });
}
说明
- 该方法的参数为
initAndRegister的future,NioServerSocketChannel,端口地址,NioServerSocketChannel的promise- 这里就可以根据前面下的断点,一直
debug:
// 将调用 LoggingHandler 的 invokeBind 方法,最后会追到
// DefaultChannelPipeline 类的 bind
// 然后进入到 unsafe.bind 方法 debug,注意要追踪到
// unsafe.bind,要 debug 第二圈的时候,才能看到。

@Override
public void bind (ChannelHandlerContext ctx, SocketAddress localAddress, ChannelPromise promise) throws Exception {
    unsafe.bind(localAddress,promise);
}

// 继续追踪 AbstractChannel 的

public final void bind (final SocketAddress localAddress, final ChannelPromise promise) {
    //....
    try{
        //!!!! 小红旗可以看到,这里最终的方法就是 doBind 方法,执行成功后,执行通道的 fireChannelActive 方法,告诉所有的 handler,已经成功绑定。
        doBind(localAddress);//
    } catch (Throwable t) {
        safeSetFailure(promise, t);
        closeIfClosed();
        return;
    }
}- 最终
doBind就会追踪到NioServerSocketChannel的doBind,说明Netty底层使用的是NIO
@Override
protected void doBind (SocketAddress localAddress) throws Exception {
    if (PlatformDependent.javaVersion() >= 7) {
        javaChannel().bind(localAddress, config.getBacklog());
    } else {
        javaChannel().socket().bind(localAddress, config.getBacklog());
    }
}- 回到
bind方法(alt + v),最后一步:safeSetSuccess(promise),告诉promise任务成功了。其可以执行监听器的方法了。到此整个启动过程已经结束了,ok 了 - 继续
atl + v服务器就回进入到(NioEventLoop类)一个循环代码,进行监听
@Override
protected void run() {
    for(;;) {
        try{

        }
    }
}
2.4Netty启动过程梳理
- 创建
2个EventLoopGroup线程池数组。数组默认大小CPU * 2,方便chooser选择线程池时提高性能BootStrap将boss设置为group属性,将worker设置为childer属性- 通过
bind方法启动,内部重要方法为initAndRegister和dobind方法initAndRegister方法会反射创建NioServerSocketChannel及其相关的NIO的对象,pipeline,unsafe,同时也为pipeline初始了head节点和tail节点。- 在
register0方法成功以后调用在dobind方法中调用doBind0方法,该方法会调用NioServerSocketChannel的doBind方法对JDK的channel和端口进行绑定,完成Netty服务器的所有启动,并开始监听连接事件。
3. Netty接受请求过程源码剖析
3.1源码剖析目的
- 服务器启动后肯定是要接受客户端请求并返回客户端想要的信息的,下面源码分析
Netty在启动之后是如何接受客户端请求的- 在
io.netty.example包下
3.2源码剖析
说明
- 从之前服务器启动的源码中,我们得知,服务器最终注册了一个
Accept事件等待客户端的连接。我们也知道,NioServerSocketChannel将自己注册到了boss单例线程池(reactor线程)上,也就是EventLoop。- 先简单说下
EventLoop的逻辑(后面我们详细讲解EventLoop)
EventLoop的作用是一个死循环,而这个循环中做 3 件事情:
- 有条件的等待
NIO事件。- 处理
NIO事件。- 处理消息队列中的任务。
- 仍用前面的项目来分析:进入到
NioEventLoop源码中后,在private void processSelectedKey(SelectionKey k, AbstractNioChannel ch)方法开始调试最终我们要分析到AbstractNioChannel的doBeginRead方法,当到这个方法时,针对于这个客户端的连接就完成了,接下来就可以监听读事件了
源码分析过程
- 断点位置
NioEventLoop的如下方法processSelectedKey
if((readyOps & (SelectionKey.OP_READ | SelectionKey.OP_ACCEPT)) != 0 || readyOps == 0) {
    unsafe.read();//断点位置
}
- 执行浏览器
http://localhost:8007/,客户端发出请求- 从的断点我们可以看到,
readyOps是16,也就是Accept事件。说明浏览器的请求已经进来了。- 这个
unsafe是boss线程中NioServerSocketChannel的AbstractNioMessageChannel$NioMessageUnsafe对象。我们进入到AbstractNioMessageChannel$NioMessageUnsafe的read方法中read方法代码并分析:
@Override
public void read() {
    asserteventLoop().inEventLoop();
    final ChannelConfig config = config();
    final ChannelPipeline pipeline = pipeline();
    final RecvByteBufAllocator.Handle allocHandle = unsafe().recvBufAllocHandle();
    allocHandle.reset(config);
    booleanclosed = false;
    Throwable exception = null;
    try {
        try {
            do {
                int localRead = doReadMessages(readBuf);
                if (localRead == 0) {
                    break;
                }
                if (localRead < 0) {
                    closed = true;
                    break;
                }

                allocHandle.incMessagesRead(localRead);
            } while (allocHandle.continueReading());
        } catch (Throwable t) {
            exception = t;
        }

        int size = readBuf.size();
        for (int i = 0; i < size; i++) {
            readPending = false;
            pipeline.fireChannelRead(readBuf.get(i));
        }
        readBuf.clear();
        allocHandle.readComplete();
        pipeline.fireChannelReadComplete();

        if (exception != null) {
            closed = closeOnReadError(exception);

            pipeline.fireExceptionCaught(exception);
        }

        if (closed) {
            inputShutdown = true;
            if(isOpen()) {
                close(voidPromise());
            }
        }
    } finally {
        //Check if there is a readPending which was not processed yet.
        //This could be for two reasons:
        //* The user called Channel.read() or ChannelHandlerContext.read() in channelRead(...) method
        //* The user called Channel.read() or ChannelHandlerContext.read() in channelReadComplete(...) method
        //
        // See https://github.com/netty/netty/issues/2254
        if (!readPending && !config.isAutoRead()) {
            removeReadOp();
        }
    }
}
说明
1)检查该
eventloop线程是否是当前线程。asserteventLoop().inEventLoop()2)执行
doReadMessages方法,并传入一个readBuf变量,这个变量是一个List,也就是容器。3)循环容器,执行
pipeline.fireChannelRead(readBuf.get(i));4)
doReadMessages是读取boss线程中的NioServerSocketChannel接受到的请求。并把这些请求放进容器,一会我们debug下doReadMessages方法。5)循环遍历容器中的所有请求,调用
pipeline的fireChannelRead方法,用于处理这些接受的请求或者其他事件,在read方法中,循环调用ServerSocket的pipeline的fireChannelRead方法,开始执行管道中的handler的ChannelRead方法(debug进入)
- 追踪一下
doReadMessages方法,就可以看得更清晰
protected int doReadMessages (List<Object> buf) throws Exception {
    SocketChannel ch = SocketUtils.accept(javaChannel());
    buf.add(newNioSocketChannel(this, ch));
    return 1;
}
说明
1)通过工具类,调用
NioServerSocketChannel内部封装的serverSocketChannel的accept方法,这是NIO做法。2)获取到一个
JDK的SocketChannel,然后,使用NioSocketChannel进行封装。最后添加到容器中3)这样容器
buf中就有了NioSocketChannel【如果有兴趣可以追一下NioSocketChannel是如何创建的,我就不追了】
- 回到
read方法,继续分析循环执行pipeline.fireChannelRead方法
1)前面分析
doReadMessages方法的作用是通过ServerSocket的accept方法获取到TCP连接,然后封装成Netty的NioSocketChannel对象。最后添加到容器中2)在
read方法中,循环调用ServerSocket的pipeline的fireChannelRead方法,开始执行管道中的handler的ChannelRead方法(debug进入)3)经过
dubug(多次),可以看到会反复执行多个handler的ChannelRead,我们知道,pipeline里面又4个handler,分别是Head,LoggingHandler,ServerBootstrapAcceptor,Tail。4)我们重点看看
ServerBootstrapAcceptor。debug之后,断点会进入到ServerBootstrapAcceptor中来。我们来看看ServerBootstrapAcceptor的channelRead方法(要多次debug才可以)5)
channelRead方法
public void channelRead (ChannelHandlerContext ctx, Object msg) {
    final Channelchild = (Channel)msg;
    child.pipeline().addLast(childHandler);
    setChannelOptions(child, childOptions, logger);
    for (Entry<AttributeKey<?>, Object> e : childAttrs) {
        child.attr((AttributeKey<Object>)e.getKey()).set(e.getValue());
    }
    try {//将客户端连接注册到 worker 线程池
        childGroup.register(child).addListener(new ChannelFutureListener() {
            @Override
            public void operationComplete(ChannelFuturefuture) throws Exception {
                if (!future.isSuccess()) {
                    forceClose(child, future.cause());
                }
            }
        });
    } catch (Throwable t) {
        forceClose(child, t);
    }
}
说明
1)
msg强转成Channel,实际上就是NioSocketChannel。2)添加
NioSocketChannel的pipeline的handler,就是我们main方法里面设置的childHandler方法里的。3)设置
NioSocketChannel的各种属性。4)将该
NioSocketChannel注册到childGroup中的一个EventLoop上,并添加一个监听器。5)这个
childGroup就是我们main方法创建的数组workerGroup。
- 进入
register方法查看(步步追踪会到)
@Override
public final void register (EventLoop eventLoop, final ChannelPromise promise) {
    AbstractChannel.this.eventLoop = eventLoop;
    if (eventLoop.inEventLoop()) {
        register0(promise);
    } else {
        eventLoop.execute(new Runnable(){
            @Override
            public void run() {
                register0(promise);//进入到这里
            }
        });
    }
}

// 继续进入到下面方法,执行管道中可能存在的任务,这里我们就不追了- 最终会调用
doBeginRead方法,也就是AbstractNioChannel类的方法
@Override
protected void doBeginRead() throws Exception {
    //Channel.read() or ChannelHandlerContext.read() was called
    final SelectionKey selectionKey = this.selectionKey;//断点
    if (!selectionKey.isValid()) {
        return;
    }
    readPending = true;
    final int interestOps = selectionKey.interestOps();
    if ((interestOps&readInterestOp) == 0) {
        selectionKey.interestOps(interestOps | readInterestOp);
    }
}
- 这个地方调试时,请把前面的断点都去掉,然后启动服务器就会停止在
doBeginRead(需要先放过该断点,然后浏览器请求,才能看到效果)- 执行到这里时,针对于这个客户端的连接就完成了,接下来就可以监听读事件了
3.3 Netty接受请求过程梳理
总体流程:接受连接 --> 创建一个新的
NioSocketChannel--> 注册到一个workerEventLoop上 --> 注册selecotRead事件。
- 服务器轮询
Accept事件,获取事件后调用unsafe的read方法,这个unsafe是ServerSocket的内部类,该方法内部由2部分组成doReadMessages用于创建NioSocketChannel对象,该对象包装JDK的NioChannel客户端。该方法会像创建ServerSocketChanel类似创建相关的pipeline,unsafe,config- 随后执行执行
pipeline.fireChannelRead方法,并将自己绑定到一个chooser选择器选择的workerGroup中的一个EventLoop。并且注册一个0,表示注册成功,但并没有注册读(1)事件
4. Pipeline Handler HandlerContext创建源码剖析
4.1源码剖析目的
Netty中的ChannelPipeline、ChannelHandler和ChannelHandlerContext是非常核心的组件,我们从源码来分析Netty是如何设计这三个核心组件的,并分析是如何创建和协调工作的.
4.2源码剖析说明
说明 分析过程中,有很多的图形,所以我们准备了一个文档,在文档的基础上来做源码剖析
4.3源码剖析
- ChannelPipeline | ChannelHandler | ChannelHandlerContext介绍
- 1 三者关系
1)每当
ServerSocket创建一个新的连接,就会创建一个Socket,对应的就是目标客户端。2)每一个新创建的
Socket都将会分配一个全新的ChannelPipeline(以下简称pipeline)3)每一个
ChannelPipeline内部都含有多个ChannelHandlerContext(以下简称Context)4)他们一起组成了双向链表,这些
Context用于包装我们调用addLast方法时添加的ChannelHandler(以下简称handler)

上图中:
ChannelSocket和ChannelPipeline是一对一的关联关系,而pipeline内部的多个Context形成了链表,Context只是对Handler的封装。 2)当一个请求进来的时候,会进入Socket对应的pipeline,并经过pipeline所有的handler,对,就是设计模式中的过滤器模式
ChannelPipeline 作用及设计
pipeline的接口设计
- 部分源码
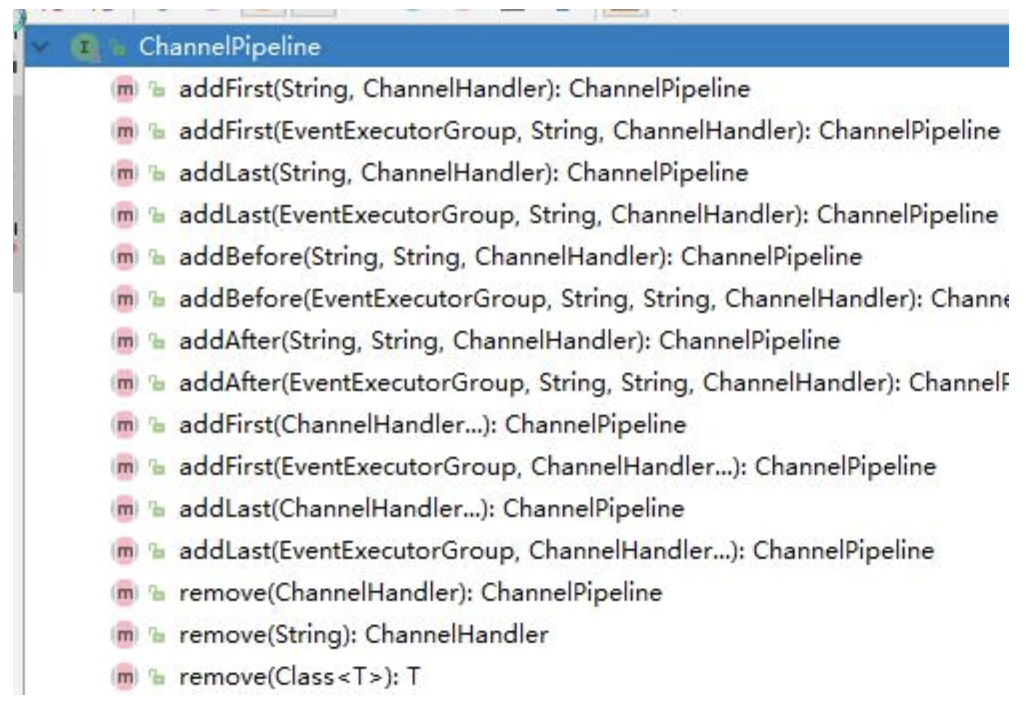
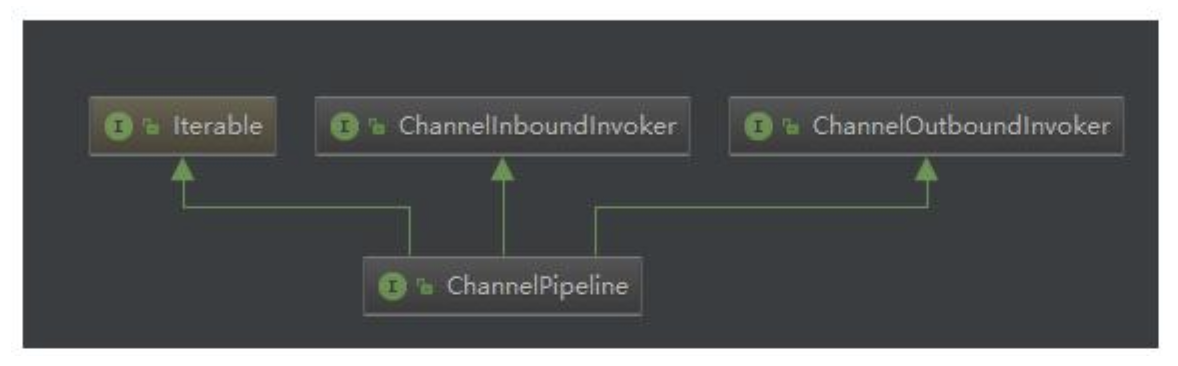
可以看到该接口继承了
inBound,outBound,Iterable接口,表示他可以调用数据出站的方法和入站的方法,同时也能遍历内部的链表,看看他的几个代表性的方法,基本上都是针对handler链表的插入,追加,删除,替换操作,类似是一个LinkedList。同时,也能返回channel(也就是socket)
- 在
pipeline的接口文档上,提供了一幅图
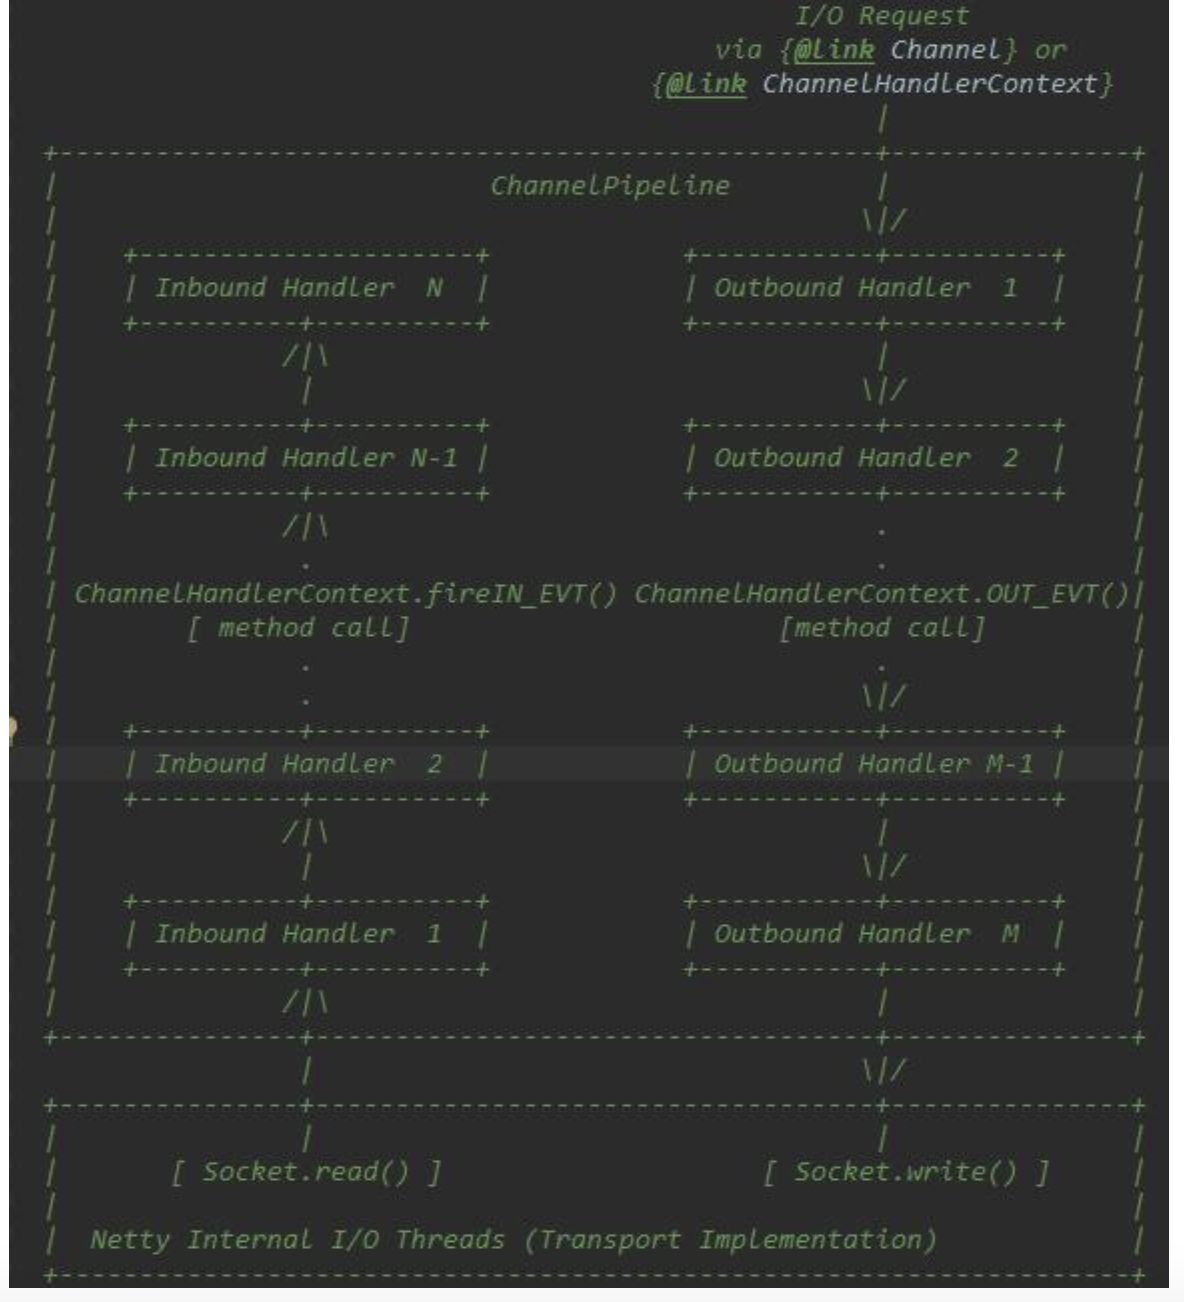
对上图的解释说明: *这是一个
handler的list,handler用于处理或拦截入站事件和出站事件,pipeline实现了过滤器的高级形式,以便用户控制事件如何处理以及handler在pipeline中如何交互。*上图描述了一个典型的
handler在pipeline中处理I/O事件的方式,IO事件由inboundHandler或者outBoundHandler处理,并通过调用ChannelHandlerContext.fireChannelRead方法转发给其最近的处理程序。*入站事件由入站处理程序以自下而上的方向处理,如图所示。入站处理程序通常处理由图底部的
I/O线程生成入站数据。入站数据通常从如SocketChannel.read(ByteBuffer)获取。*通常一个
pipeline有多个handler,例如,一个典型的服务器在每个通道的管道中都会有以下处理程序协议解码器-将二进制数据转换为Java对象。协议编码器-将Java对象转换为二进制数据。业务逻辑处理程序-执行实际业务逻辑(例如数据库访问)*你的业务程序不能将线程阻塞,会影响
IO的速度,进而影响整个Netty程序的性能。如果你的业务程序很快,就可以放在IO线程中,反之,你需要异步执行。或者在添加handler的时候添加一个线程池,例如:// 下面这个任务执行的时候,将不会阻塞
IO线程,执行的线程来自group线程池pipeline.addLast(group, "handler", new MyBusinessLogicHandler());
ChannelHandler 作用及设计
- 源码
public interface ChannelHandler {
    //当把 ChannelHandler 添加到 pipeline 时被调用
    void handlerAdded(ChannelHandlerContext ctx) throws Exception;
    //当从 pipeline 中移除时调用
    void handlerRemoved(ChannelHandlerContext ctx) throws Exception;
    //当处理过程中在 pipeline 发生异常时调用
    @Deprecated
    void exceptionCaught(ChannelHandlerContext ctx, Throwable cause) throws Exception;
}
ChannelHandler的作用就是处理IO事件或拦截IO事件,并将其转发给下一个处理程序ChannelHandler。Handler处理事件时分入站和出站的,两个方向的操作都是不同的,因此,Netty定义了两个子接口继承ChannelHandler
ChannelInboundHandler入站事件接口
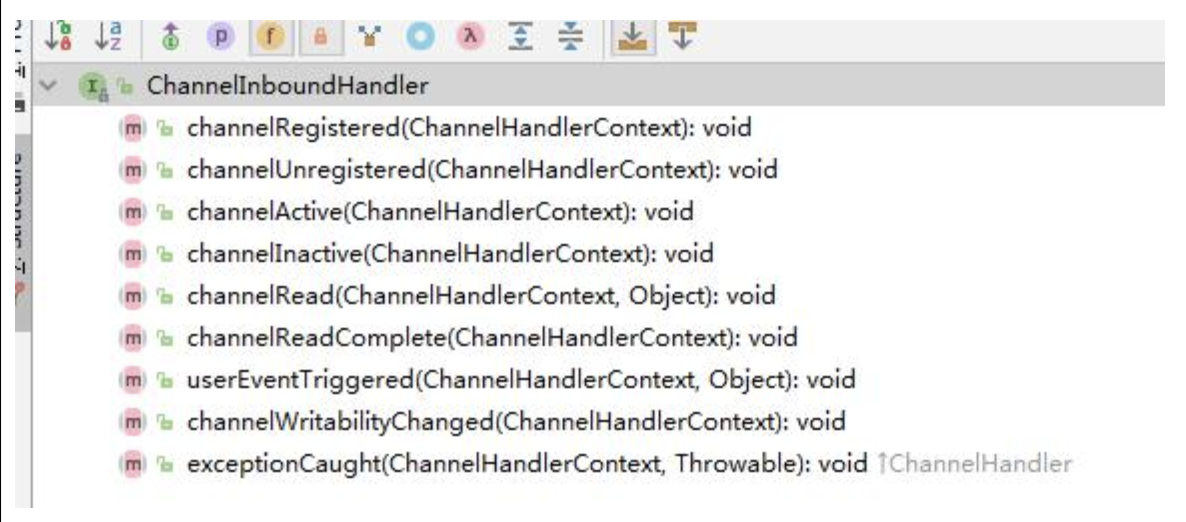
channelActive用于当Channel处于活动状态时被调用;*
channelRead当从Channel读取数据时被调用等等方法。*程序员需要重写一些方法,当发生关注的事件,需要在方法中实现我们的业务逻辑,因为当事件发生时,
Netty会回调对应的方法。
- ChannelOutboundHandler 出站事件接口
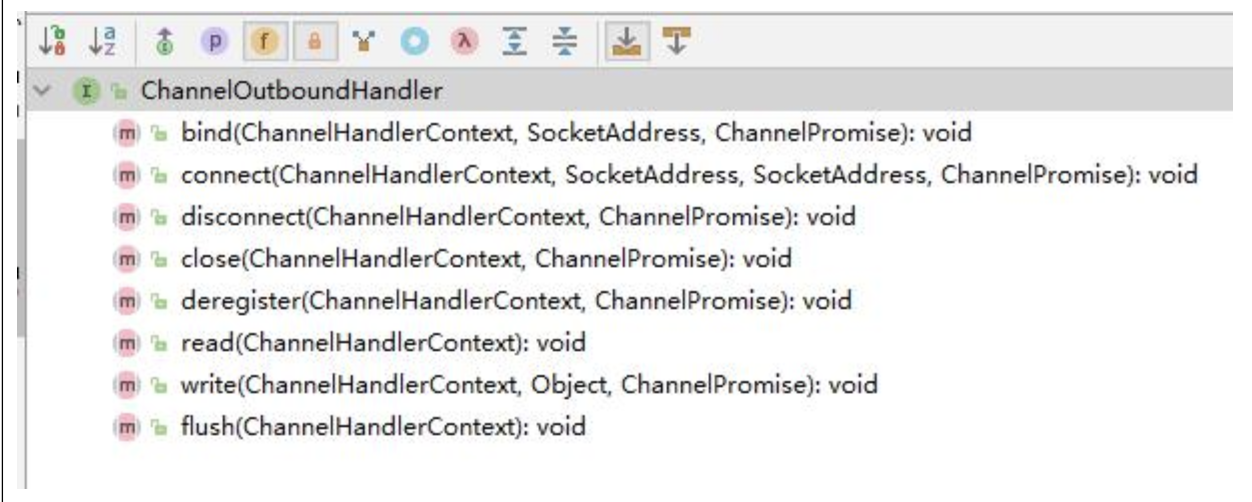
bind方法,当请求将Channel绑定到本地地址时调用*
close方法,当请求关闭Channel时调用等等*出站操作都是一些连接和写出数据类似的方法
ChannelDuplexHandler处理出站和入站事件
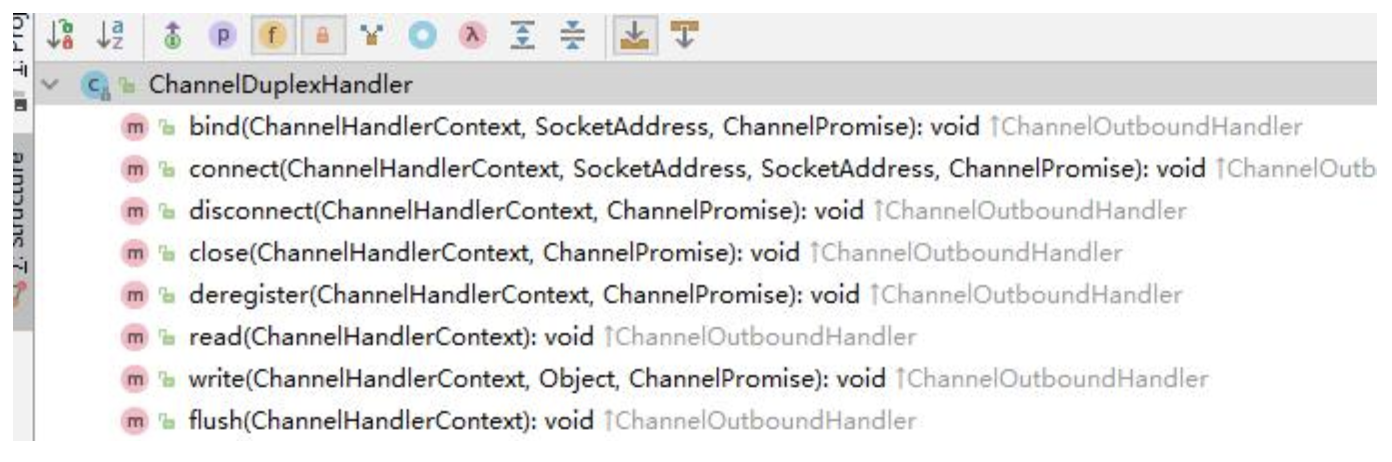
ChannelDuplexHandler间接实现了入站接口并直接实现了出站接口。*是一个通用的能够同时处理入站事件和出站事件的类。
ChannelHandlerContext 作用及设计
ChannelHandlerContextUML图

ChannelHandlerContext继承了出站方法调用接口和入站方法调用接口
ChannelOutboundInvoker和ChannelInboundInvoker部分源码
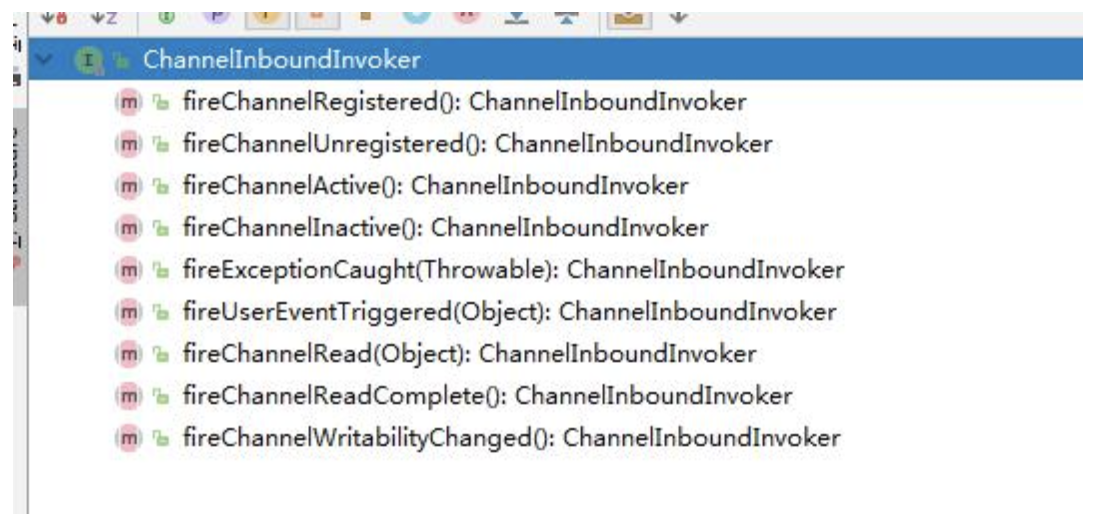
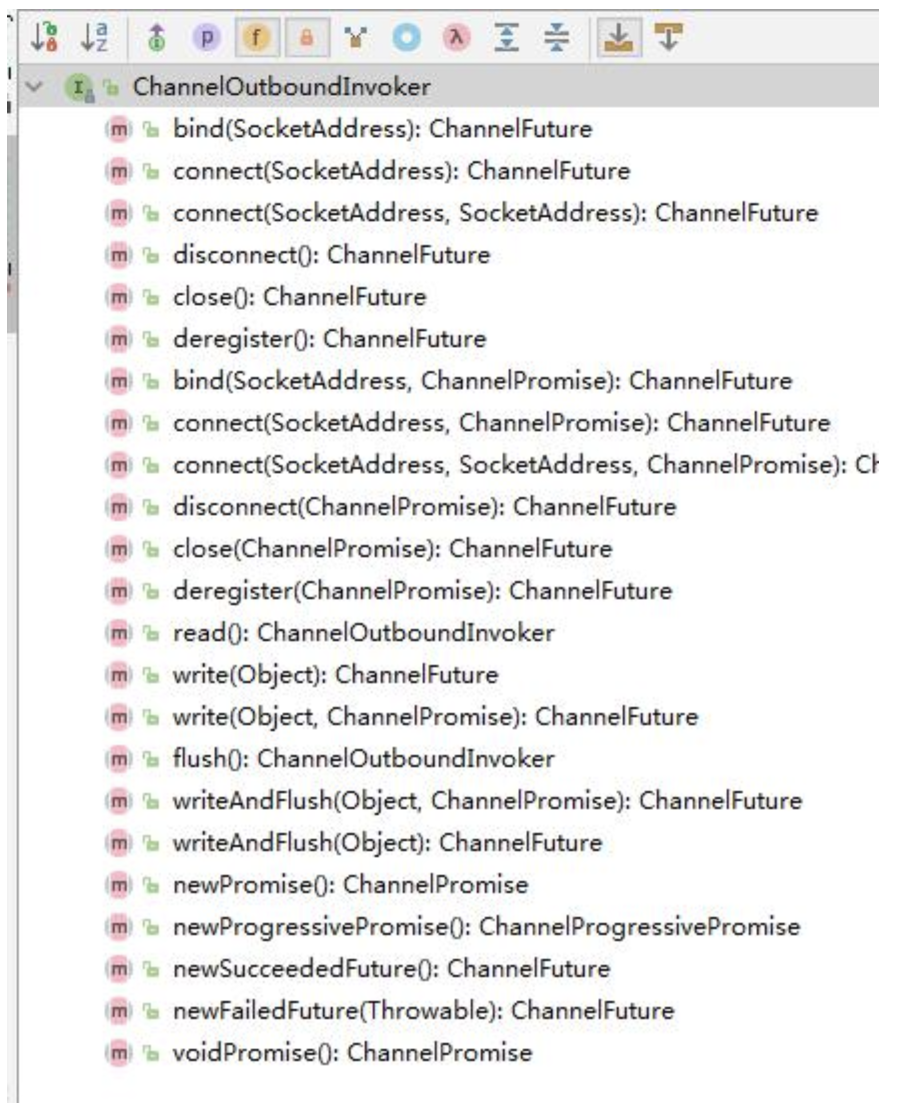
这两个
invoker就是针对入站或出站方法来的,就是在入站或出站handler的外层再包装一层,达到在方法前后拦截并做一些特定操作的目的
ChannelHandlerContext部分源码

*
ChannelHandlerContext不仅仅时继承了他们两个的方法,同时也定义了一些自己的方法*这些方法能够获取
Context上下文环境中对应的比如channel,executor,handler,pipeline,内存分配器,关联的handler是否被删除。*
Context就是包装了handler相关的一切,以方便Context可以在pipeline方便的操作handler
ChannelPipeline | ChannelHandler | ChannelHandlerContext
创建过程分为
3个步骤来看创建的过程:*任何一个
ChannelSocket创建的同时都会创建一个pipeline。*当用户或系统内部调用
pipeline的add*** 方法添加
handler时,都会创建一个包装这handler的Context。*这些
Context在pipeline中组成了双向链表。
Socket创建的时候创建pipeline在SocketChannel的抽象父类AbstractChannel的构造方法中
protected AbstractChannel(Channel parent) {
    this.parent=parent;//断点测试
    id = newId();
    unsafe = new Unsafe();
    pipeline = new ChannelPipeline();
}-
Debug一下,可以看到代码会执行到这里,然后继续追踪到
protected DefaultChannelPipeline(Channel channel) {
    this.channel = ObjectUtil.checkNotNull(channel, "channel");
    succeededFuture = new SucceededChannelFuture(channel, null);
    voidPromise = new VoidChannelPromise(channel, true);
    tail = new TailContext(this);
    head = new HeadContext(this);
    head.next = tail;
    tail.prev = head;
}
说明:
1)将
channel赋值给channel字段,用于pipeline操作channel。2)创建一个
future和promise,用于异步回调使用。3)创建一个
inbound的tailContext,创建一个既是inbound类型又是outbound类型的headContext。4)最后,将两个
Context互相连接,形成双向链表。5)
tailContext和HeadContext非常的重要,所有pipeline中的事件都会流经他们,
- 在 add添加处理器的时候创建Context看下
DefaultChannelPipeline的addLast方法如何创建的Context,代码如下
@Override
public final ChannelPipeline addLast(EventExecutorGroup executor, ChannelHandler... handlers) {
    if (handlers == null) {//断点
        throw new NullPointerException("handlers");
    }
    for (ChannelHandler h : handlers) {
        if (h == null) {
            break;
        }
        addLast(executor, null, h);
    }
    return this;
}
继续 Debug
public final ChannelPipeline addLast(EventExecutorGroup group, String name, ChannelHandler handler) {
    final AbstractChannelHandlerContext newCtx;
    synchronized(this) {
        checkMultiplicity(handler);

        newCtx = newContext(group, filterName(name, handler), handler);
        addLast0(newCtx);
        //If the registered is false it means that the channel was not registered on an eventloop yet.
        //In this case we add the context to the pipeline and add a task that will call
        //ChannelHandler.handlerAdded(...) once the channel is registered.
        if (!registered) {
            newCtx.setAddPending();
            callHandlerCallbackLater(newCtx, true);
            return this;
        }

        EventExecutor executor = newCtx.executor();
        if (!executor.inEventLoop()) {
            newCtx.setAddPending();
            executor.execute(new Runnable() {
                @Override
                public void run () {
                    callHandlerAdded0(newCtx);
                }
            });
            return this;
        }
    }
    callHandlerAdded0(newCtx);
    return this;
}
说明
1)
pipeline添加handler,参数是线程池,name是null,handler是我们或者系统传入的handler。Netty为了防止多个线程导致安全问题,同步了这段代码,步骤如下:2)检查这个
handler实例是否是共享的,如果不是,并且已经被别的pipeline使用了,则抛出异常。3)调用
new Context(group, filterName(name, handler), handler)方法,创建一个Context。从这里可以看出来了,每次添加一个handler都会创建一个关联Context。4)调用
addLast方法,将Context追加到链表中。5)如果这个通道还没有注册到
selecor上,就将这个Context添加到这个pipeline的待办任务中。当注册好了以后,就会调用callHandlerAdded0方法(默认是什么都不做,用户可以实现这个方法)。6)到这里,针对三对象创建过程,了解的差不多了,和最初说的一样,每当创建
ChannelSocket的时候都会创建一个绑定的pipeline,一对一的关系,创建pipeline的时候也会创建tail节点和head节点,形成最初的链表。tail是入站inbound类型的handler,head既是inbound也是outbound类型的handler。在调用pipeline的addLast方法的时候,会根据给定的handler创建一个Context,然后,将这个Context插入到链表的尾端(tail前面)。到此就OK了。
4.4 Pipeline Handler HandlerContext 创建过程梳理
- 每当创建
ChannelSocket的时候都会创建一个绑定的pipeline,一对一的关系,创建pipeline的时候也会创建tail节点和head节点,形成最初的链表。- 在调用
pipeline的addLast方法的时候,会根据给定的handler创建一个Context,然后,将这个Context插入到链表的尾端(tail前面)。Context包装handler,多个Context在pipeline中形成了双向链表- 入站方向叫
inbound,由head节点开始,出站方法叫outbound,由tail节点开始
5. ChannelPipeline 调度handler的源码剖析
5.1源码剖析的目的
- 当一个请求进来的时候,
ChannelPipeline是如何调用内部的这些handler的呢?我们一起来分析下。- 首先,当一个请求进来的时候,会第一个调用
pipeline的相关方法,如果是入站事件,这些方法由fire开头,表示开始管道的流动。让后面的handler继续处理
5.2源码剖析
说明
当浏览器输入
http://localhost:8007。可以看到会执行handler在Debug时,可以将断点下在DefaultChannelPipeline类的
public final ChannelPipeline fireChannelActive() {
    AbstractChannelHandlerContext.invokeChannelActive(head);//断点
    return this;
}
源码分析
DefaultChannelPipeline是如何实现这些fire方法的 3.1DefaultChannelPipeline源码
public class DefaultChannelPipeline implements ChannelPipeline {
    @Override
    public final ChannelPipeline fireChannelActive() {
        AbstractChannelHandlerContext.invokeChannelActive(head);
        return this;
    }

    @Override
    public final ChannelPipelinefireChannelInactive() {
        AbstractChannelHandlerContext.invokeChannelInactive(head);
        return this;
    }

    @Override
    public final ChannelPipeline fireExceptionCaught(Throwable cause) {
        AbstractChannelHandlerContext.invokeExceptionCaught(head, cause);
        return this;
    }

    @Override
    public final ChannelPipeline fireUserEventTriggered(Object event) {
        AbstractChannelHandlerContext.invokeUserEventTriggered(head, event);
        return this;
    }

    @Override
    public final ChannelPipeline fireChannelRead(Objectmsg) {
        AbstractChannelHandlerContext.invokeChannelRead(head, msg);
        return this;
    }

    @Override
    public final ChannelPipeline fireChannelReadComplete() {
        AbstractChannelHandlerContext.invokeChannelReadComplete(head);
        return this;
    }

    @Override
    public final ChannelPipeline fireChannelWritabilityChanged() {
        AbstractChannelHandlerContext.invokeChannelWritabilityChanged(head);
        return this;
    }
}
说明: 可以看出来,这些方法都是
inbound的方法,也就是入站事件,调用静态方法传入的也是inbound的类型headhandler。这些静态方法则会调用head的ChannelInboundInvoker接口的方法,再然后调用handler的真正方法
- 再看下
piepline的outbound的fire方法实现源码
public class DefaultChannelPipeline implements ChannelPipeline {
    @Override
    public final ChannelFuture bind(SocketAddress localAddress) {
        return tail.bind(localAddress);
    }

    @Override
    public final ChannelFuture connect(SocketAddress remoteAddress) {
        return tail.connect(remoteAddress);
    }

    @Override
    public final ChannelFuture connect(SocketAddress remoteAddress, SocketAddress localAddress) {
        return tail.connect(remoteAddress, localAddress);
    }

    @Override
    public final ChannelFuture disconnect(){
        return tail.disconnect();
    }

    @Override
    public final ChannelFuture close() {
        return tail.close();
    }

    @Override
    public final ChannelFuture deregister() {
        return tail.deregister();
    }

    @Override
    public final ChannelPipeline flush() {
        tail.flush();
        return this;
    }

    @Override
    public final ChannelFuture bind(SocketAddress localAddress, ChannelPromise promise) {
        return tail.bind(localAddress, promise);
    }

    @Override
    public final ChannelFuture connect(SocketAddress remoteAddress, ChannelPromise promise) {
        return tail.connect(remoteAddress, promise);
    }

    @Override
    public final ChannelFuture connect(SocketAddress remoteAddress, SocketAddress localAddress, ChannelPromise promise) {
        return tail.connect(remoteAddress, localAddress, promise);
    }

    @Override
    public final ChannelFuture disconnect(ChannelPromise promise) {
        return tail.disconnect(promise);
    }
}
说明:
1)这些都是出站的实现,但是调用的是
outbound类型的tailhandler来进行处理,因为这些都是outbound事件。2)出站是
tail开始,入站从head开始。因为出站是从内部向外面写,从tail开始,能够让前面的handler进行处理,防止handler被遗漏,比如编码。反之,入站当然是从head往内部输入,让后面的handler能够处理这些输入的数据。比如解码。因此虽然head也实现了outbound接口,但不是从 head 开始执行出站任务
- 关于如何调度,用一张图来表示:
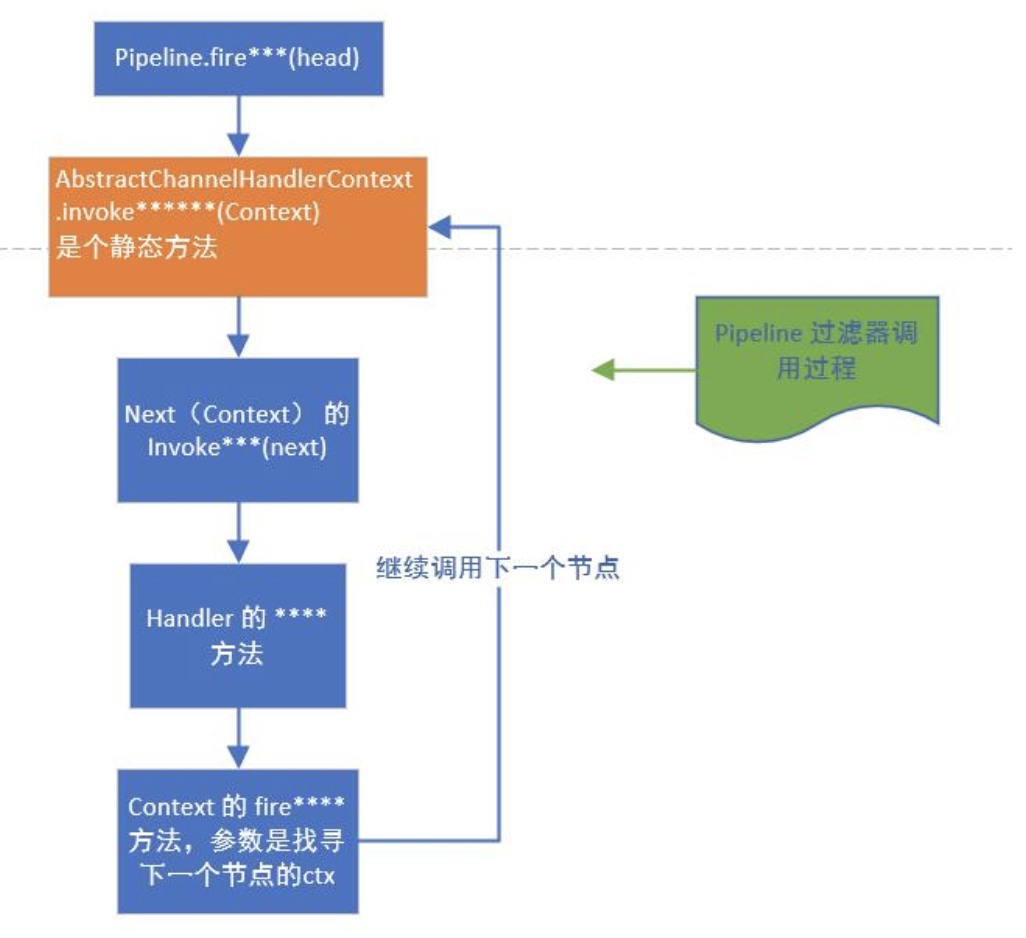
说明:
1)
pipeline首先会调用Context的静态方法fireXXX,并传入Context2)然后,静态方法调用
Context的invoker方法,而invoker方法内部会调用该Context所包含的Handler的真正的XXX方法,调用结束后,如果还需要继续向后传递,就调用Context的fireXXX2方法,循环往复。
5.3 ChannelPipeline调度handler梳理
Context包装handler,多个Context在pipeline中形成了双向链表,入站方向叫inbound,由head节点开始,出站方法叫outbound,由tail节点开始。- 而节点中间的传递通过
Abstract ChannelHandlerContext类内部的fire系列方法,找到当前节点的下一个节点不断的循环传播。是一个过滤器形式完成对handler的调度
6.Netty心跳(heartbeat)服务源码剖析
6.1源码剖析目的
Netty作为一个网络框架,提供了诸多功能,比如编码解码等,Netty还提供了非常重要的一个服务 -- 心跳机制heartbeat。通过心跳检查对方是否有效,这是RPC框架中是必不可少的功能。下面我们分析一下Netty内部心跳服务源码实现。
6.2源码剖析
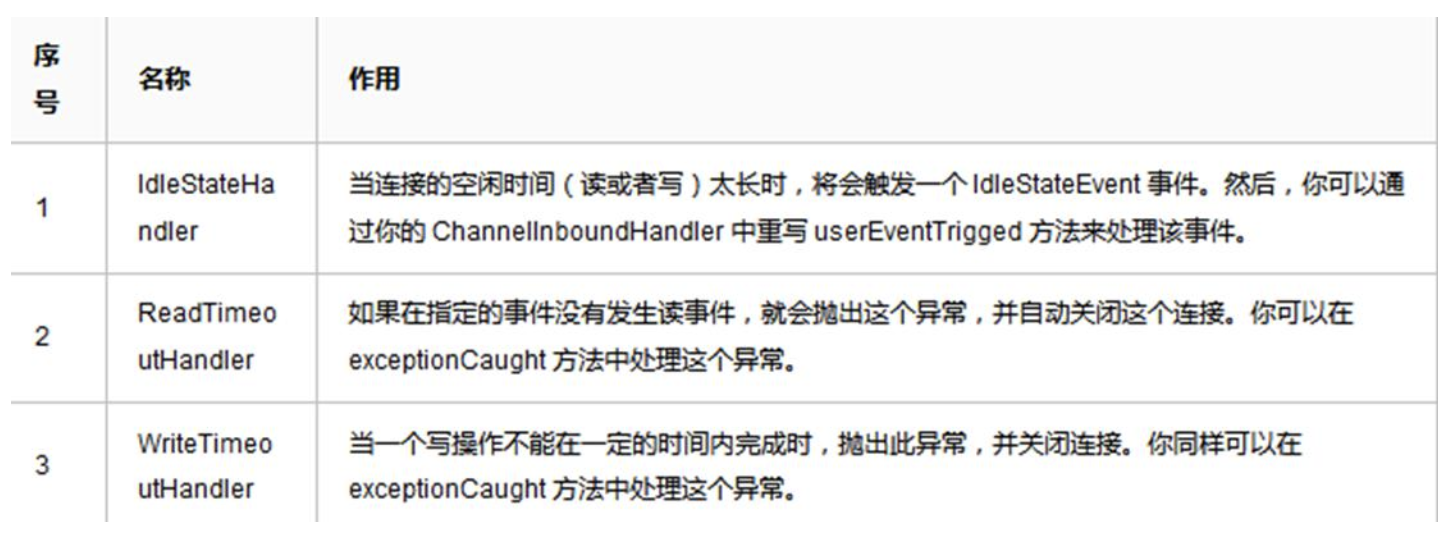
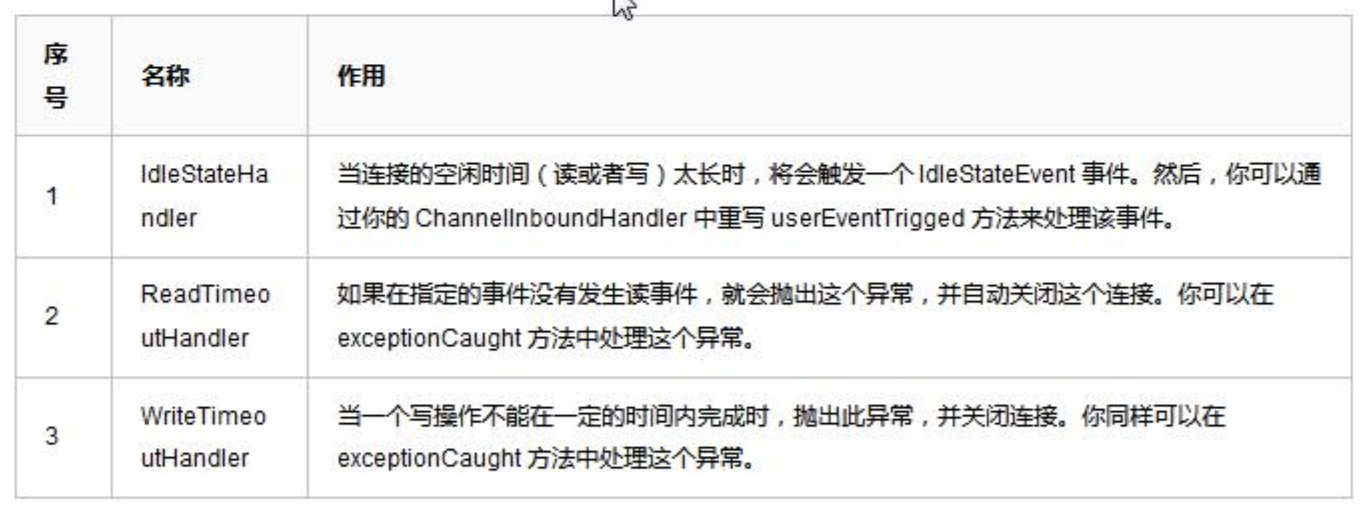
说明
Netty提供了IdleStateHandler,ReadTimeoutHandler,WriteTimeoutHandler三个Handler检测连接的有效性,重点分析IdleStateHandler。
如图
源码剖析:
Netty提供的心跳介绍
Netty提供了IdleStateHandler,ReadTimeoutHandler,WriteTimeoutHandler三个Handler检测连接的有效性。- 如图
ReadTimeout事件和WriteTimeout事件都会自动关闭连接,而且,属于异常处理,所以,这里只是介绍以下,我们重点看IdleStateHandler。
IdleStateHandler分析
4个属性
private final boolean observeOutput; //是否考虑出站时较慢的情况。默认值是 false

private final long readerIdleTimeNanos; //读事件空闲时间,0 则禁用事件

private final long writerIdleTimeNanos;//写事件空闲时间,0 则禁用事件

private final long allIdleTimeNanos;//读或写空闲时间,0 则禁用事件
handlerAdded方法
- 当该
handler被添加到pipeline中时,则调用initialize方法
private void initialize(ChannelHandlerContext ctx) {
    //Avoid the case where destroy() is called before scheduling timeouts.
    //See:https://github.com/netty/netty/issues/143
    switch(state) {
        case1:
        case2:
            return;
    }

    state=1;
    initOutputChanged(ctx);

    lastReadTime = lastWriteTime = ticksInNanos();

    if(readerIdleTimeNanos > 0) {
        //这里的 schedule 方法会调用 eventLoop 的 schedule 方法,将定时任务添加进队列中
        readerIdleTimeout = schedule(ctx, new ReaderIdleTimeoutTask(ctx), readerIdleTimeNanos, TimeUnit.NANOSECONDS);
    }

    if(writerIdleTimeNanos > 0) {
        writerIdleTimeout = schedule(ctx, new WriterIdleTimeoutTask(ctx), writerIdleTimeNanos, TimeUnit.NANOSECONDS);
    }

    if(allIdleTimeNanos > 0) {
        allIdleTimeout = schedule(ctx, new AllIdleTimeoutTask(ctx), allIdleTimeNanos, TimeUnit.NANOSECONDS);
    }
}- 只要给定的参数大于
0,就创建一个定时任务,每个事件都创建。同时,将state状态设置为1,防止重复初始化。调用initOutputChanged方法,初始化“监控出站数据属性”。
该类内部的
3个定时任务类
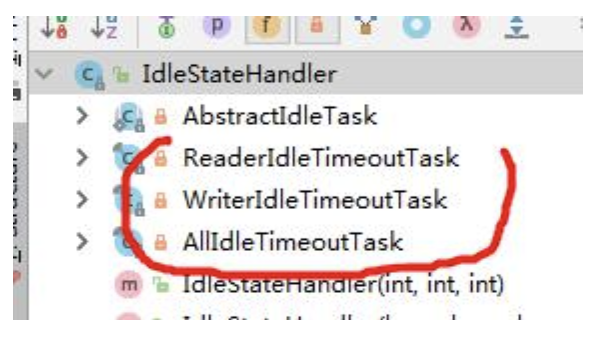
- 这
3个定时任务分别对应读,写,读或者写事件。共有一个父类(AbstractIdleTask)。这个父类提供了一个模板方法
private abstract static class AbstractIdleTask implements Runnable {

    private final ChannelHandlerContext ctx;

    AbstractIdleTask(ChannelHandlerContext ctx) {
        this.ctx = ctx;
    }

    @Override
    public void run() {
        if(!ctx.channel().isOpen()) {
            return;
        }
        run(ctx);
    }

    protected abstract void run(ChannelHandlerContext ctx);
}
说明:当通道关闭了,就不执行任务了。反之,执行子类的 run 方法
.读事件的
run方法(即ReaderIdleTimeoutTask的run方法)分析
- 代码及其说明
@Override
protected void run(ChannelHandlerContext ctx) {
    long nextDelay = readerIdleTimeNanos;
    if(!reading) {
        nextDelay -= ticksInNanos() - lastReadTime;
    }

    if(nextDelay <= 0) {
        //Reader is idle-set a new timeout and notify the callback.
        //用于取消任务 promise
        readerIdleTimeout = schedule(ctx, this, readerIdleTimeNanos, TimeUnit.NANOSECONDS);
        boolean first = firstReaderIdleEvent;
        firstReaderIdleEvent = false;
        try {
            //再次提交任务
            IdleStateEvent event = new IdleStateEvent(IdleState.READER_IDLE, first);
            //触发用户 handler use
            channelIdle(ctx, event);
        } catch (Throwable t) {
            ctx.fireExceptionCaught(t);
        }
    } else {
        //Read occurred before the timeout - set a new timeout with shorter delay.
        readerIdleTimeout = schedule(ctx, this, nextDelay, TimeUnit.NANOSECONDS);
    }
}
说明
1)得到用户设置的超时时间。
2)如果读取操作结束了(执行了
channelReadComplete方法设置),就用当前时间减去给定时间和最后一次读(执操作的时间行了channelReadComplete方法设置),如果小于0,就触发事件。反之,继续放入队列。间隔时间是新的计算时间。3)触发的逻辑是:首先将任务再次放到队列,时间是刚开始设置的时间,返回一个
promise对象,用于做取消操作。然后,设置first属性为false,表示,下一次读取不再是第一次了,这个属性在channelRead方法会被改成true。4)创建一个
IdleStateEvent类型的写事件对象,将此对象传递给用户的UserEventTriggered方法。完成触发事件的操作。5)总的来说,每次读取操作都会记录一个时间,定时任务时间到了,会计算当前时间和最后一次读的时间的间隔,如果间隔超过了设置的时间,就触发
UserEventTriggered方法。//前面介绍IdleStateHandler说过,可以看一下8.写事件的
run方法(即WriterIdleTimeoutTask的run方法)分析
run代码和分析
@Override
protected void run(ChannelHandlerContext ctx) {
    long lastWriteTime = IdleStateHandler.this.lastWriteTime;
    long nextDelay = writerIdleTimeNanos - (ticksInNanos()-lastWriteTime);
    if (nextDelay <=0 ) {
        //Writer is idle - set a new timeout and notify the callback.
        writerIdleTimeout = schedule(ctx, this, writerIdleTimeNanos, TimeUnit.NANOSECONDS);
        boolean first = firstWriterIdleEvent;
        firstWriterIdleEvent = false;
        try {
            if(hasOutputChanged(ctx, first)) {
                return;
            }

            IdleStateEvent event = new IdleStateEvent(IdleState.WRITER_IDLE, first);
            channelIdle(ctx, event);
        } catch (Throwable t) {
            ctx.fireExceptionCaught(t);
        }
    } else {
        //Write occurred before the timeout - set a new timeout with shorter delay.
        writerIdleTimeout = schedule(ctx, this, nextDelay, TimeUnit.NANOSECONDS);
    }
}
说明:写任务的 run 代码逻辑基本和读任务的逻辑一样,唯一不同的就是有一个针对出站较慢数据的判断 hasOutputChanged
所有事件的
run方法(即AllIdleTimeoutTask的run方法)分析
- 代码分析
@Override
protected void run(ChannelHandlerContext ctx) {
    long nextDelay = allIdleTimeNanos;
    if(!reading) {
        nextDelay -= ticksInNanos() - Math.max(lastReadTime, lastWriteTime);
    }

    if(nextDelay <= 0) {
        //Both reader and writer are idle - set a new timeout and
        //notify the callback.
        allIdleTimeout = schedule(ctx, this, allIdleTimeNanos, TimeUnit.NANOSECONDS);
        boolean first = firstAllIdleEvent;
        firstAllIdleEvent = false;
        try {
            if(hasOutputChanged(ctx, first)) {
                return;
            }

            IdleStateEvent event = new IdleStateEvent(IdleState.ALL_IDLE, first);
            channelIdle(ctx, event);
        } catch(Throwable t) {
            ctx.fireExceptionCaught(t);
        }
    } else {
        //Either read or write occurred before the timeout - set a new
        //timeout with shorter delay.
        allIdleTimeout = schedule(ctx, this, nextDelay, TimeUnit.NANOSECONDS);
    }
}
说明:
1)表示这个监控着所有的事件。当读写事件发生时,都会记录。代码逻辑和写事件的的基本一致:
2)需要大家注意的地方是
long nextDelay = allIdleTimeNanos;
if(!reading) {
    //当前时间减去最后一次写或读的时间,若大于 0,说明超时了
    nextDelay -= ticksInNanos() - Math.max(lastReadTime, lastWriteTime);
}
这里的时间计算是取读写事件中的最大值来的。然后像写事件一样,判断是否发生了写的慢的情况
小结 Netty 的心跳机制
1)
IdleStateHandler可以实现心跳功能,当服务器和客户端没有任何读写交互时,并超过了给定的时间,则会触发用户handler的userEventTriggered方法。用户可以在这个方法中尝试向对方发送信息,如果发送失败,则关闭连接。2)
IdleStateHandler的实现基于EventLoop的定时任务,每次读写都会记录一个值,在定时任务运行的时候,通过计算当前时间和设置时间和上次事件发生时间的结果,来判断是否空闲。3)内部有
3个定时任务,分别对应读事件,写事件,读写事件。通常用户监听读写事件就足够了。4)同时,
IdleStateHandler内部也考虑了一些极端情况:客户端接收缓慢,一次接收数据的速度超过了设置的空闲时间。Netty通过构造方法中的observeOutput属性来决定是否对出站缓冲区的情况进行判断。5)如果出站缓慢,
Netty不认为这是空闲,也就不触发空闲事件。但第一次无论如何也是要触发的。因为第一次无法判断是出站缓慢还是空闲。当然,出站缓慢的话,可能造成OOM,OOM比空闲的问题更大。6)所以,当你的应用出现了内存溢出,
OOM之类,并且写空闲极少发生(使用了observeOutput为true),那么就需要注意是不是数据出站速度过慢。7)还有一个注意的地方:就是
ReadTimeoutHandler,它继承自IdleStateHandler,当触发读空闲事件的时候,就触发ctx.fireExceptionCaught方法,并传入一个ReadTimeoutException,然后关闭Socket。8)而
WriteTimeoutHandler的实现不是基于IdleStateHandler的,他的原理是,当调用write方法的时候,会创建一个定时任务,任务内容是根据传入的promise的完成情况来判断是否超出了写的时间。当定时任务根据指定时间开始运行,发现promise的isDone方法返回false,表明还没有写完,说明超时了,则抛出异常。当write方法完成后,会打断定时任务。
7. Netty核心组件EventLoop源码剖析
7.1源码剖析目的
Echo第一行代码就是:EventLoopGroup bossGroup = new NioEventLoopGroup(1); 下面分析其最核心的组件EventLoop。
7.2源码剖析
源码剖析
1.
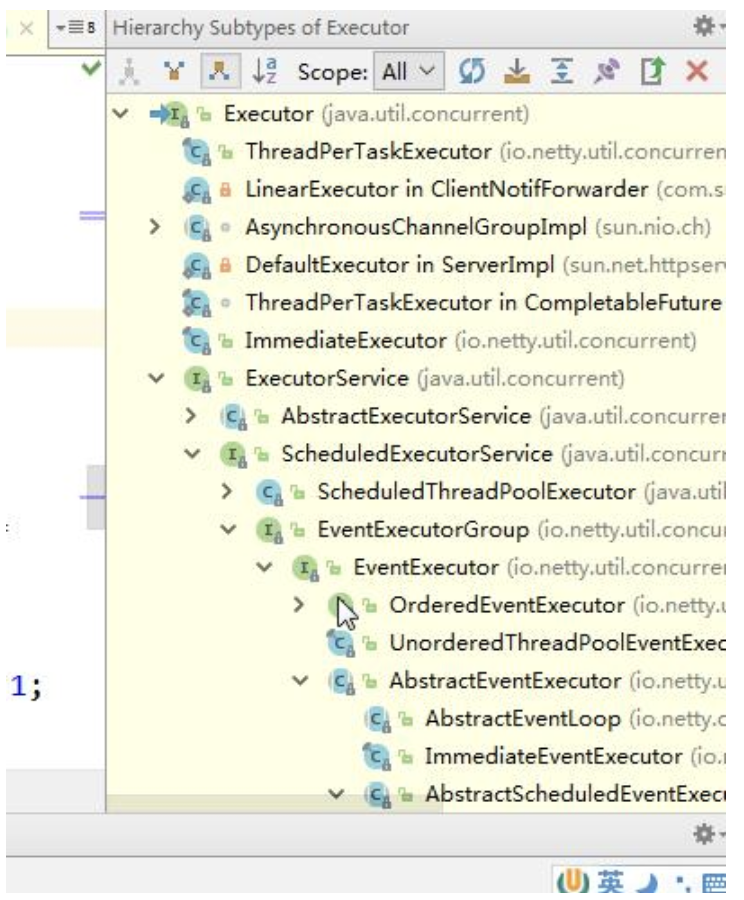
EventLoop介绍 1.1首先看看NioEventLoop的继承图

说明重点:
1)
ScheduledExecutorService接口表示是一个定时任务接口,EventLoop可以接受定时任务。2)
EventLoop接口:Netty接口文档说明该接口作用:一旦Channel注册了,就处理该Channel对应的所有I/O操作。3)
SingleThreadEventExecutor表示这是一个单个线程的线程池4)
EventLoop是一个单例的线程池,里面含有一个死循环的线程不断的做着3件事情:监听端口,处理端口事件,处理队列事件。每个EventLoop都可以绑定多个Channel,而每个Channel始终只能由一个EventLoop来处理
NioEventLoop 的使用 - execute 方法
execute源码剖析
在
EventLoop的使用,一般就是eventloop.execute(task);看下execute方法的实现(在SingleThreadEventExecutor类中)
@Override
public void execute(Runnable task) {
    if(task == null) {
        throw new NullPointerException("task");
    }
    boolean inEventLoop = inEventLoop();
    if(inEventLoop) {
        addTask(task);
    } else {
        startThread();
        addTask(task);
        if(isShutdown() && removeTask(task)) {
            reject();
        }
    }

    if(!addTaskWakesUp&&wakesUpForTask(task)) {
        wakeup(inEventLoop);
    }
}
说明:
1)首先判断该
EventLoop的线程是否是当前线程,如果是,直接添加到任务队列中去,如果不是,则尝试启动线程(但由于线程是单个的,因此只能启动一次),随后再将任务添加到队列中去。2)如果线程已经停止,并且删除任务失败,则执行拒绝策略,默认是抛出异常。
3)如果
addTaskWakesUp是false,并且任务不是NonWakeupRunnable类型的,就尝试唤醒selector。这个时候,阻塞在selecor的线程就会立即返回4)可以下断点来追踪
- 我们
debugaddTask和offerTask方法源码
protected void addTask(Runnable task) {
    if(task == null) {
        throw new NullPointerException("task");
    }

    if(!offerTask(task)) {
        reject(task);
    }
}

final boolean offerTask(Runnable task) {
    if(isShutdown()) {
        reject();
    }
    return taskQueue.offer(task);
}
3.
NioEventLoop的父类SingleThreadEventExecutor的startThread方法 3.1当执行execute方法的时候,如果当前线程不是EventLoop所属线程,则尝试启动线程,也就是startThread方法,dubug 代码如下:
private void startThread() {
    if(state == ST_NOT_STARTED) {
        if(STATE_UPDATER.compareAndSet(this, ST_NOT_STARTED, ST_STARTED)) {
            try{
                doStartThread();
            } catch(Throwable cause) {
                STATE_UPDATER.set(this, ST_NOT_STARTED);
                PlatformDependent.throwException(cause);
            }
        }
    }
}
说明:该方法首先判断是否启动过了,保证
EventLoop只有一个线程,如果没有启动过,则尝试使用Cas将state状态改为ST_STARTED,也就是已启动。然后调用doStartThread方法。如果失败,则进行回滚
- 看下
doStartThread方法
private void doStartThread() {
    executor.execute(new Runnable() {
        @Override
        public void run() {
            boolean success = false;
            updateLastExecutionTime();
            try{
                SingleThreadEventExecutor.this.run();
                success=true;
            } finally {
                for( ; ; ) {
                    intoldState = state;
                    if(oldState >= ST_SHUTTING_DOWN || STATE_UPDATER.compareAndSet(SingleThreadEventExecutor.this, oldState, ST_SHUTTING_DOWN)) {
                        break;
                    }
                }
                try {
                    for( ; ; ) {
                        if(confirmShutdown()) {
                            break;
                        }
                    }
                } finally {
                    try {
                        cleanup();
                    } finally {
                        STATE_UPDATER.set(SingleThreadEventExecutor.this,ST_TERMINATED);
                        threadLock.release();
                        terminationFuture.setSuccess(null);
                    }
                }
            }
        }
    });
}
说明:
1)首先调用
executor的execute方法,这个executor就是在创建EventLoopGroup的时候创建的ThreadPerTaskExecutor类。该execute方法会将Runnable包装成Netty的FastThreadLocalThread。2)任务中,首先判断线程中断状态,然后设置最后一次的执行时间。
3)执行当前
NioEventLoop的run方法,注意:这个方法是个死循环,是整个EventLoop的核心4)在
finally块中,使用CAS不断修改state状态,改成ST_SHUTTING_DOWN。也就是当线程Loop结束的时候。关闭线程。最后还要死循环确认是否关闭,否则不会break。然后,执行cleanup操作,更新状态为5)
ST_TERMINATED,并释放当前线程锁。如果任务队列不是空,则打印队列中还有多少个未完成的任务。并回调terminationFuture方法。6)其实最核心的就是
EventLoop自身的run方法。再继续深入run方法
4.EventLoop 中的 Loop 是靠 run 实现的,我们分析下 run 方法(该方法在 NioEventLoop)
@Override
protected void run() {
    for( ; ; ) {
        try {
            switch(selectStrategy.calculateStrategy(selectNowSupplier,hasTasks())) {
                case SelectStrategy.CONTINUE:
                    continue;
                case SelectStrategy.SELECT:
                    select(wakenUp.getAndSet(false));
                    if(wakenUp.get()) {
                        selector.wakeup();
                    }
                default:
            }

            cancelledKeys = 0;
            needsToSelectAgain = false;
            final int ioRatio = this.ioRatio;
            if(ioRatio == 100) {
                try {
                    processSelectedKeys();
                } finally {
                    //Ensure we always run tasks.
                    runAllTasks();
                }
            } else {
                final long ioStartTime = System.nanoTime();
                try {
                    processSelectedKeys();
                } finally {
                    //Ensure we always runtasks.
                    final long ioTime = System.nanoTime() - ioStartTime;
                    runAllTasks(ioTime * (100 - ioRatio) / ioRatio);
                }
            }
        } catch(Throwable t) {
            handleLoopException(t);
        }
        //Always handle shutdown even if the loop processing threw an exception.
        try {
            if(isShuttingDown()) {
                closeAll();
                if(confirmShutdown()) {
                    return;
                }
            }
        } catch (Throwable t) {
            handleLoopException(t);
        }
    }
}
说明:
1)从上面的步骤可以看出,整个
run方法做了3件事情:select获取感兴趣的事件。processSelectedKeys处理事件。runAllTasks执行队列中的任务。2)上面的三个方法,我们就追一下
select方法(体现非阻塞)核心select方法解析
private void select(boolean oldWakenUp) throws IOException {
    Selector selector = this.selector;
    try {
        int selectCnt = 0;
        long currentTimeNanos = System.nanoTime();
        long selectDeadLineNanos = currentTimeNanos + delayNanos(currentTimeNanos);
        for( ; ; ) {
            long timeoutMillis = (selectDeadLineNanos - currentTimeNanos + 500000L)/1000000L;
            if(timeoutMillis <= 0) {
                if(selectCnt == 0) {
                    selector.selectNow();
                    selectCnt=1;
                }
                break;
            }
            //If a task was submitted when wakenUp value was true, the task didn't get a chance to call
            //Selector#wakeup. So we need to check task queue again before executing select operation.
            //If wedon't, the task might be pended until select operation was timedout.
            //It might be pended until idle timeout if IdleStateHandler existed inpipeline.
            if(hasTasks() && wakenUp.compareAndSet(false, true)) {
                selector.selectNow();
                selectCnt = 1;
                break;
            }

            int selectedKeys = selector.select(timeoutMillis);//否则阻塞给定时间,默认一秒
            selectCnt++;
            //如果 1 秒后返回,有返回值||select被用户唤醒||任务队列有任务||有定时任务即将被执行;则跳出循环
            if(selectedKeys != 0 || oldWakenUp || wakenUp.get() || hasTasks() || hasScheduledTasks()) {
                //-Selected something,
                //-waken up by user,or
                //-the task queue has apending task.
                //-a scheduled task is ready for processing
                break;
            }

            if(Thread.interrupted()) {
                //Thread was interrupted so reset selected keys and break so we not run into a busy loop.
                //As this is most likely a bug in the handler of the user or it's client library we will
                //also log it.
                //
                //See https://github.com/netty/netty/issues/2426
                if(logger.isDebugEnabled()) {
                    logger.debug("Selector.select() returned prematurely because " + " Thread.currentThread().interrupt() was called. Use " + " NioEventLoop.shutdownGracefully() to shutdowntheNioEventLoop.");
                }
                selectCnt = 1;
                break;
            }
            long time = System.nanoTime();
            if(time - TimeUnit.MILLISECONDS.toNanos(timeoutMillis) >= currentTimeNanos) {
                //timeoutMillis elapsed without any thing selected.
                selectCnt =1;
            } else if(SELECTOR_AUTO_REBUILD_THRESHOLD > 0 && selectCnt >= SELECTOR_AUTO_REBUILD_THRESHOLD) {
                //The selector returned prematurely many times in a row.
                //Rebuild the selector to work around the problem.
                logger.warn("Selector.select() returned prematurely {} times in a row; rebuilding Selector {}.", selectCnt, selector);
                rebuildSelector();
                selector = this.selector;
                //Select again to populate selectedKeys.
                selector.selectNow();
                selectCnt = 1;
                break;
            }

            currentTimeNanos = time;
        }

        if(selectCnt > MIN_PREMATURE_SELECTOR_RETURNS) {
            if(logger.isDebugEnabled()) {
                logger.debug("Selector.select()returned prematurely {} times in a row for Selector{}.", selectCnt - 1, selector);
            }
        }
    } catch (CancelledKeyException e) {
        if(logger.isDebugEnabled()) {
            logger.debug(CancelledKeyException.class.getSimpleName() + "raisedbyaSelector {} - JDKbug?", selector, e);
        }
        //Harmless exception - log anyway
    }
}
说明:调用
selector的select方法,默认阻塞一秒钟,如果有定时任务,则在定时任务剩余时间的基础上在加上0.5秒进行阻塞。当执行execute方法的时候,也就是添加任务的时候,唤醒selector,防止selector阻塞时间过长
5.EventLoop 作为 Netty 的核心的运行机制小结
1)每次执行
execute方法都是向队列中添加任务。当第一次添加时就启动线程,执行run方法,而run方法是整个EventLoop的核心,就像EventLoop的名字一样,LoopLoop,不停的Loop,Loop做什么呢?做3件事情。调用
selector的select方法,默认阻塞一秒钟,如果有定时任务,则在定时任务剩余时间的基础上在加上0.5秒进行阻塞。当执行execute方法的时候,也就是添加任务的时候,唤醒selecor,防止selector阻塞时间过长。当
selector返回的时候,回调用processSelectedKeys方法对selectKey进行处理。当
processSelectedKeys方法执行结束后,则按照ioRatio的比例执行runAllTasks方法,默认是IO任务时间和非IO任务时间是相同的,你也可以根据你的应用特点进行调优。比如非IO任务比较多,那么你就将
ioRatio调小一点,这样非IO任务就能执行的长一点。防止队列积攒过多的任务。
8.handler中加入线程池和Context中添加线程池的源码剖析
8.1源码剖析目的
- 在
Netty中做耗时的,不可预料的操作,比如数据库,网络请求,会严重影响Netty对Socket的处理速度。- 而解决方法就是将耗时任务添加到异步线程池中。但就添加线程池这步操作来讲,可以有
2种方式,而且这2种方式实现的区别也蛮大的。- 处理耗时业务的第一种方式 --
handler中加入线程池- 处理耗时业务的第二种方式 --
Context中添加线程池- 我们就来分析下两种方式
8.2源码剖析
说明 演示两种方式的实现,以及从源码来追踪两种方式执行流程
- 处理耗时业务的第一种方式 -- handler种加入线程池 11.1对前面的
Nettydemo源码进行修改,在EchoServerHandler的channelRead方法进行异步
@Sharable
public class EchoServerHandler extends ChannelInboundHandlerAdapter {

    static final EventExecutorGroup group = new DefaultEventExecutorGroup(16);

    @Override
    public void channelRead(ChannelHandlerContext ctx, Object msg) throws UnsupportedEncodingException, InterruptedException {
        final Object msgCop = msg;
        final ChannelHandlerContext cxtCop = ctx;
        group.submit(new Callable<Object>() {
            @Override
            public Object call() throws Exception {
                ByteBuf buf = (ByteBuf)msgCop;
                byte[] req = new byte[buf.readableBytes()];
                buf.readBytes(req);
                String body = new String(req, "UTF-8");
                Thread.sleep(10 * 1000);
                System.err.println(body + " " + Thread.currentThread().getName());
                String reqString = "Helloiamserver~~~";
                ByteBuf resp = Unpooled.copiedBuffer(reqString.getBytes());
                cxtCop.writeAndFlush(resp);
                return null;
            }
        });
        System.out.println("goon..");
    }

    @Override
    public void channelReadComplete(ChannelHandlerContext ctx) {
        ctx.flush();
    }

    @Override
    public void exceptionCaught(ChannelHandlerContext ctx, Throwable cause) {
        // Close the connection when an exception is raised.
        cause.printStackTrace();
        ctx.close();
    }
}
说明: 在
channelRead方法,模拟了一个耗时10秒的操作,这里,我们将这个任务提交到了一个自定义的业务线程池中,这样,就不会阻塞Netty的IO线程。
- 这样处理之后,整个程序的逻辑如图

说明:
1)解释一下上图,当
IO线程轮询到一个socket事件,然后,IO线程开始处理,当走到耗时handler的时候,将耗时任务交给业务线程池。2)当耗时任务执行完毕再执行
pipeline write方法的时候,(代码中使用的是context的write方法,上图画的是执行pipeline方法,是一个意思)会将任务这个任务交给IO线程
write方法的源码(在AbstractChannelHandlerContext类)
private void write(Object msg, boolean flush, ChannelPromise promise) {
    AbstractChannelHandlerContext next = findContextOutbound();
    final Object m = pipeline.touch(msg, next);
    EventExecutor executor = next.executor();
    if(executor.inEventLoop()) {
        if(flush) {
            next.invokeWriteAndFlush(m, promise);
        } else {
            next.invokeWrite(m, promise);
        }
    } else {
        AbstractWriteTask task;
        if(flush) {
            task = WriteAndFlushTask.newInstance(next, m, promise);
        } else {
            task = WriteTask.newInstance(next, m, promise);
        }
        safeExecute(executor, task, promise, m);
    }
}
说明:
1)当判定下个
outbound的executor线程不是当前线程的时候,会将当前的工作封装成task,然后放入mpsc队列中,等待IO任务执行完毕后执行队列中的任务。2)这里可以 Debug 来验证(提醒:Debug 时,服务器端 Debug, 客户端
Run的方式),当我们使用了group.submit(new Callable<Object> (){}在handler中加入线程池,就会进入到safeExecute(executor, task, promise, m);如果去掉这段代码,而使用普通方式来执行耗时的业务,那么就不会进入到safeExecute(executor, task, promise, m);(说明:普通方式执行耗时代码,看我准备好的案例即可)
- .处理耗时业务的第二种方式 -
Context中添加线程池 1.1在添加pipeline中的handler时候,添加一个线程池
static final EventExecutorGroup group = new DefaultEventExecutorGroup(16);
ServerBootstrap b = new ServerBootstrap();
                b.group(bossGroup, workerGroup)
                 .channel(NioServerSocketChannel.class)
                 .option(ChannelOption.SO_BACKLOG, 100)
                 .handler(newLoggingHandler(LogLevel.INFO))
                 .childHandler(new ChannelInitializer<SocketChannel>() {
                     @Override
                     public void initChannel(SocketChannel ch) throws Exception {
                         ChannelPipeline p = ch.pipeline();
                         if(sslCtx != null) {
                             p.addLast(sslCtx.newHandler(ch.alloc()));
                         }
                         //p.addLast(new LoggingHandler(LogLevel.INFO));
                         //p.addLast(new EchoServerHandler());
                         p.addLast(group, new EchoServerHandler());
                    }
                });
说明:
1)
handler中的代码就使用普通的方式来处理耗时业务。2)当我们在调用
addLast方法添加线程池后,handler将优先使用这个线程池,如果不添加,将使用IO线程3)当走到
AbstractChannelHandlerContext的invokeChannelRead方法的时候,executor.inEventLoop()是不会通过的,因为当前线程是IO线程Context(也就是Handler)的executor是业务线程,所以会异步执行,debug 下源码
static void invokeChannelRead(final AbstractChannelHandlerContext next, Object msg) {
    final Object m = next.pipeline.touch(ObjectUtil.checkNotNull(msg, "msg"), next);
    EventExecutor executor = next.executor();
    if(executor.inEventLoop()) {
        next.invokeChannelRead(m);
    } else {
        executor.execute(new Runnable() {//执行run
            @Override
            public void run() {
                next.invokeChannelRead(m);
            }
        });
    }
}
4)验证时,我们如果去掉
p.addLast(group,newEchoServerHandler());改成p.addLastnewEchoServerHandler());你会发现代码不会进行异步执行。5)后面的整个流程就变成和第一个方式一样了
两种方式的比较
1)第一种方式在
handler中添加异步,可能更加的自由,比如如果需要访问数据库,那我就异步,如果不需要,就不异步,异步会拖长接口响应时间。因为需要将任务放进mpscTask中。如果IO时间很短,task很多,可能一个循环下来,都没时间执行整个task,导致响应时间达不到指标。2)第二种方式是
Netty标准方式(即加入到队列),但是,这么做会将整个handler都交给业务线程池。不论耗时不耗时,都加入到队列里,不够灵活。3)各有优劣,从灵活性考虑,第一种较好。
最后
以上就是野性饼干最近收集整理的关于Netty 核心源码剖析的全部内容,更多相关Netty内容请搜索靠谱客的其他文章。


发表评论 取消回复