Vite号称是 下一代的前端开发和构建工具 ,目前已经在前端社区里逐步开始流行起来了。它采用了全新的unbundle思想来提升整体的前端开发体验。比起传统的webpack构建,在性能速度上都有了质的提高。那么接下来这篇文章,将主要介绍其使用方法和工作原理。
是什么
Vite名字来源于法语, 意思为rapid,quickly。正好反映了其核心卖点—— "快速" 。在整体功能上实现了类似于预配置的webpack加dev server的功能, 用于提高前端项目的整体构建速度。根据测试,服务器启动速度和HMR基本上都可以达到毫秒级别。
使用方法
vite的使用方式十分简单,目前官方提供了脚手架来快速启动一个新项目:
npm init @vitejs/app

// yarn
yarn create @vitejs/app
接着就会进入交互式模式,让你选择对应的模板,输入项目名等操作。如果需要手动指定模板和项目名,可以使用如下命令:
npm init @vitejs/app my-vite-demo --template react
这里指定的所有相关项目模板都可以在 https://github.com/vitejs/awesome-vite#templates 仓库中找到。项目启动后,就可以直接使用如下命令进行启动和预览了
# 安装依赖
yarn install

# 开发环境下使用
yarn dev

# 打包
yarn run build
# 用来预览打包后的效果
yarn run serve
插件机制
vite主要使用插件进行扩展功能,可以看到上述最简单的初始化项目启动后,在其配置文件 vite.config.ts 文件下,有如下代码:
import { defineConfig } from 'vite'
import reactRefresh from '@vitejs/plugin-react-refresh'

// [https:](https://vitejs.dev/config/)[//vitejs.dev/config/](https://vitejs.dev/config/)
export default defineConfig({
  plugins: [reactRefresh()]
})
可以看到这里引用了一个名为 reactRefresh 的插件, 这个插件可以在修改react组件的时候,不丢失其状态。同样的,如果有需要实现其他额外的功能,都可以借助vite的插件机制进行扩展。这些第三方插件模块可以通过 https://github.com/vitejs/awesome-vite#plugins 这个仓库找到。同时,由于vite插件扩展了rollup的接口,所以要实现一个自己的vite插件跟写rollup插件是类似的。此处,可以参考 插件 API | Vite 官方中文文档 。
工作原理
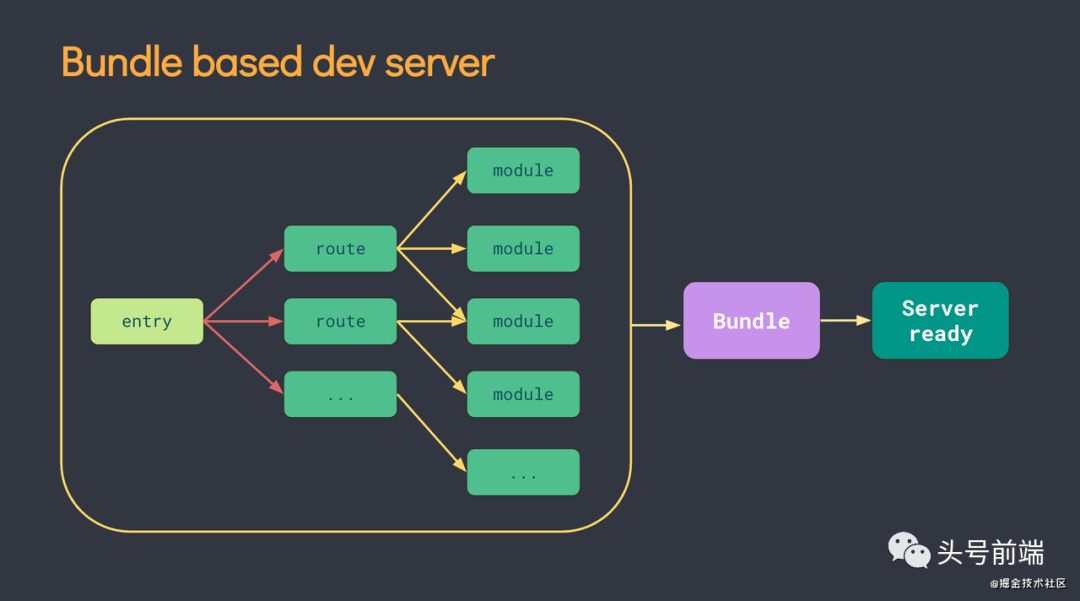
上面介绍了这么多,那么Vite是如何实现超快速的开发体验的呢? https://github.com/vitejs/vite/tree/main/packages 我们都知道,传统打包构建工具,在服务器启动之前,需要从入口文件完整解析构建整个应用。因此,有大量的时间都花在了依赖生成,构建编译上。
而vite主要遵循的是使用ESM(Es modules模块)的规范来执行代码,由于现代浏览器基本上都支持了ESM规范,所以在开发阶段并不需要将代码打包编译成es5模块即可在浏览器上运行。我们只需要从入口文件出发, 在遇到对应的 import 语句时,将对应的模块加载到浏览器中就可以了。因此,这种不需要打包的特性,也是vite的速度能够如此快速的原因。
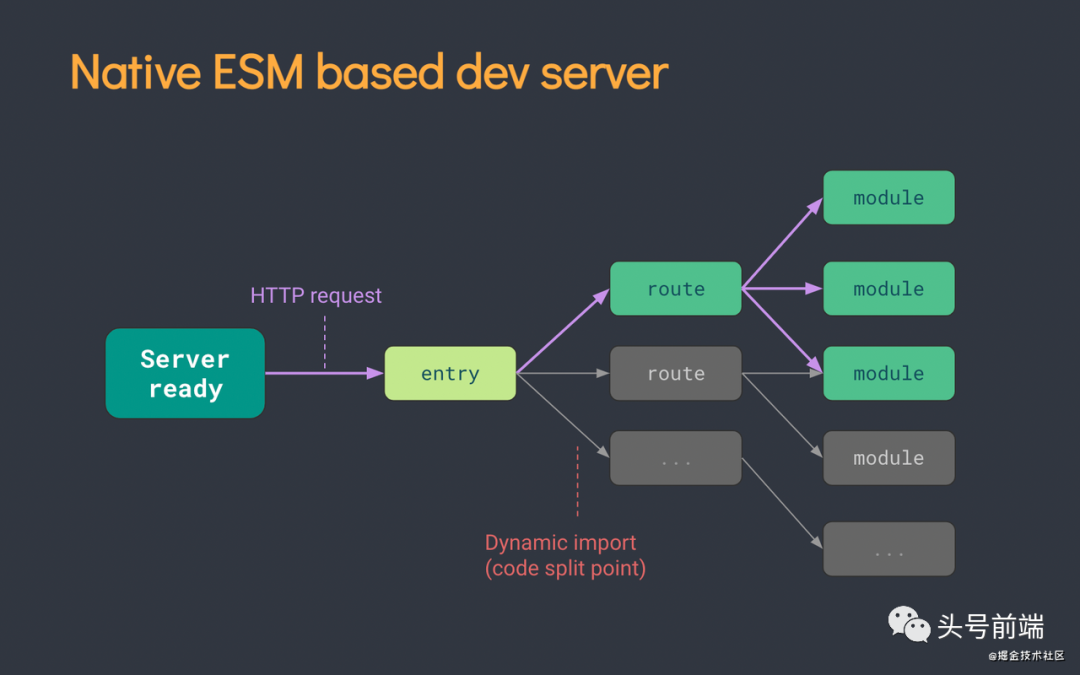
同时ts/jsx等文件的转译工作也会借助了esbuild来提升速度。Vite在内部实现上,会启动一个dev server, 并接受独立模块的HTTP请求,并让浏览器自身去解析和处理模块加载。下面以官方提供的demo为例,可以看到运行后,在访问对应页面的时候,不是加载一整个的bundle.js文件,而是按模块去加载。

从代码实现上,在允许 yarn dev 命令后,Vite就会启动一个dev server,然后加载各种中间件,进而监听对应的前端访问请求。 https://github.com/vitejs/vite/blob/main/packages/vite/src/node/cli.ts#L80
const { createServer } = await import('./server')
try {
  const server = await createServer({
    root,
    base: options.base,
    mode: options.mode,
    configFile: options.config,
    logLevel: options.logLevel,
    clearScreen: options.clearScreen,
    server: cleanOptions(options) as ServerOptions
  })
  await server.listen()
} catch (e) {
  createLogger(options.logLevel).error(
    chalk.red(`error when starting dev server:n${e.stack}`)
  )
  process.exit(1)
}
同时,会在开发环境中注入Vite自身的client客户端代码,用于监听HMR等处理。 https://github.com/vitejs/vite/blob/main/packages/vite/src/node/server/middlewares/indexHtml.ts#L141
裸模块重写
由于目前ESM不支持类似 import vue from "vue" 这样的裸模块加载(import maps 提案 https://github.com/WICG/import-maps 可解决这个问题,但还未实现),所以需要对模块加载地址进行重写操作。将其转换成类似于 import vue from "/ @modules/vue" 这种形式。实现原理上主要通过 es-module-lexer 和 magic-string 两个包进行替换,比起AST语义解析和转换,在性能上更有优势。下面介绍一下这两个包:
Es-module-lexer
https://github.com/guybedford/es-module-lexer 虽然js代码的词法分析通常都使用babel, acorn等工具,但是针对ESM文件来说,使用es-module-lexer库在性能上能够有很大的提升,其压缩后的体积只有4kb,而且根据官方给出的例子720kb的Angular1库经过acorn解析要超过100ms,而使用es-module-lexer库只需要5ms, 在性能上提升了将近20倍。
Magic-string
https://github.com/rich-harris/magic-string#readme vite中使用了大量这个库做一些字符串的替换工作,从而避免操作AST。具体代码可以参考 https://github.com/vitejs/vite/blob/main/packages/vite/src/node/plugins/importAnalysis.ts#L155 整体思路大概类似于下面代码:
import { init, parse as parseImports, ImportSpecifier } from 'es-module-lexer'

// 借助es-module-lexer来分析import语句
imports = parseImports(source)[0]

// 接着在依赖分析及路径重写过程中利用magic-string来替换源码。
let s: MagicString | undefined
const str = () => s || (s = new MagicString(source))

// 省略部分代码
for (let index = 0; index < imports.length; index++) {
        const {
          s: start,
          e: end,
          ss: expStart,
          se: expEnd,
          d: dynamicIndex,
          n: specifier
        } = imports[index]

// 省略部分代码

// 解析代码
 const { imports, importsString, exp, endIndex, base, pattern } =
              await transformImportGlob(
                source,
                start,
                importer,
                index,
                root,
                normalizeUrl
              )
            str().prepend(importsString)
            str().overwrite(expStart, endIndex, exp)
            imports.forEach((url) => importedUrls.add(url.replace(base, '/')))
            if (!(importerModule.file! in server._globImporters)) {
              server._globImporters[importerModule.file!] = {
                module: importerModule,
                importGlobs: []
              }
            }
            server._globImporters[importerModule.file!].importGlobs.push({
              base,
              pattern
            })
}

// 最终返回处理过的代码
if (s) {
  return s.toString()
} else {
  return source
}
自定义区块处理
这个功能是通过在模块后面链接 ?type= 的参数来区分不同区块。然后针对每个区块单独进行处理。

根据不同的区块类型,在transform的时候会使用不同的插件进行编译。下面以json文件为例,在处理 xxx.json 为结尾的文件的时候,首先json插件会匹配模块的id名是否是json。接着再进行转译工作。
// Custom json filter for vite
const jsonExtRE = /.json($|?)(?!commonjs-proxy)/

export function jsonPlugin(
  options: JsonOptions = {},
  isBuild: boolean
): Plugin {
  return {
    name: 'vite:json',

    transform(json, id) {
      if (!jsonExtRE.test(id)) return null
      if (SPECIAL_QUERY_RE.test(id)) return null

      try {
        if (options.stringify) {
          if (isBuild) {
            return {
              code: `export default JSON.parse(${JSON.stringify(
                JSON.stringify(JSON.parse(json))
              )})`,
              map: { mappings: '' }
            }
          } else {
            return `export default JSON.parse(${JSON.stringify(json)})`
          }
        }

        const parsed = JSON.parse(json)
        return {
          code: dataToEsm(parsed, {
            preferConst: true,
            namedExports: options.namedExports
          }),
          map: { mappings: '' }
        }
      } catch (e) {
        const errorMessageList = /[d]+/.exec(e.message)
        const position = errorMessageList && parseInt(errorMessageList[0], 10)
        const msg = position
          ? `, invalid JSON syntax found at line ${position}`
          : `.`
        this.error(`Failed to parse JSON file` + msg, e.idx)
      }
    }
  }
}
HMR
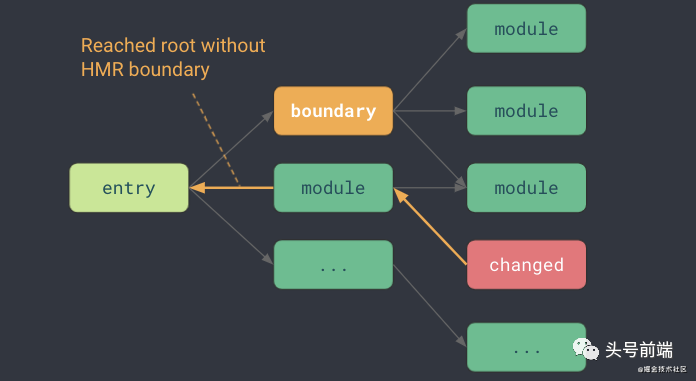
热更新是前端开发体验中很重要的一环,那么Vite中主要依赖以下几个步骤来实现HMR的功能:
-
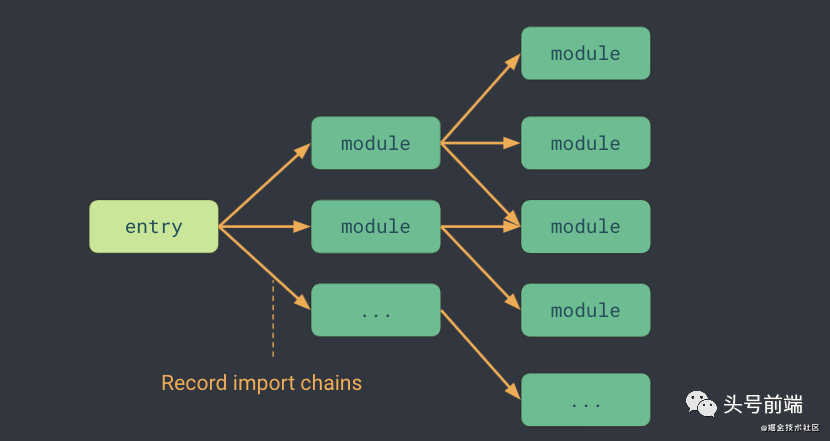
在重写模块地址的时候,记录模块依赖链
importMaps。这样在后续更新的时候,可以知道哪些文件需要被热更新。
-
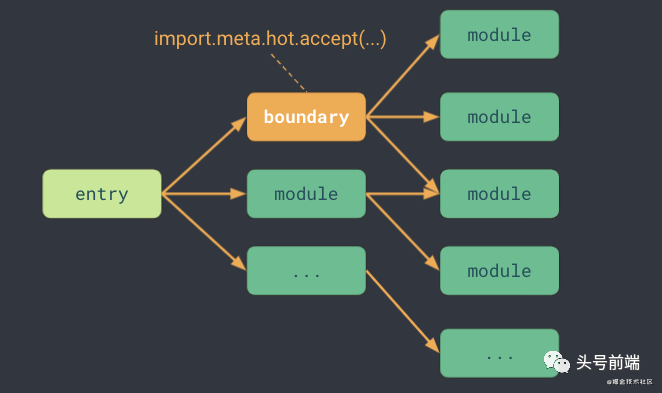
代码中可以使用
import.meta.hot接口来标记"HMR Boundary"。
-
接着,当文件更新的时候,会沿着之前记录下
imoprtMaps链式结构找到对应的"HMR Boundary", 再从此处重新加载对应更新的模块。
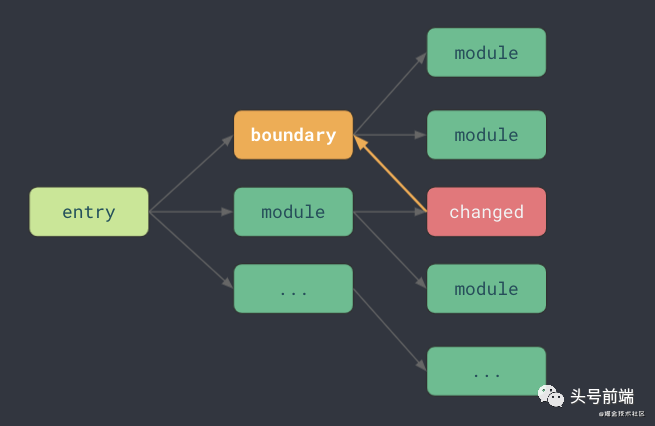
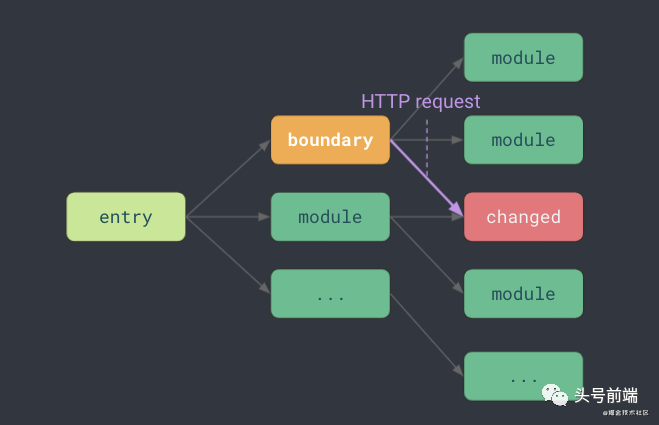
-
如果没有遇到对应的boundary, 则整个应用重新刷新。
使用方法如下:
import foo from './foo.js'

foo()

if (import.meta.hot) {
    import.meta.hot.accept('./foo.js', (newFoo) => {
        newFoo.foo()
    })
}
下面将以具体代码进行介绍其原理。客户端逻辑: https://github.com/vitejs/vite/blob/main/packages/vite/src/node/plugins/importAnalysis.ts#L399
// record for HMR import chain analysis
// make sure to normalize away base
importedUrls.add(url.replace(base, '/'))
if (hasHMR && !ssr) {
  debugHmr(
    `${
      isSelfAccepting
        ? `[self-accepts]`
        : acceptedUrls.size
        ? `[accepts-deps]`
        : `[detected api usage]`
    } ${prettyImporter}`
  )
  // 在用户业务代码中注入Vite客户端代码
  str().prepend(
    `import { createHotContext as __vite__createHotContext } from "${clientPublicPath}";` +
      `import.meta.hot = __vite__createHotContext(${JSON.stringify(
        importerModule.url
      )});`
  )
}
https://github.com/vitejs/vite/blob/main/packages/vite/src/client/client.ts#L70
case 'update':
     notifyListeners('vite:beforeUpdate', payload)
      // 发生错误的时候,重新加载整个页面
      if (isFirstUpdate && hasErrorOverlay()) {
        window.location.reload()
        return
      } else {
        clearErrorOverlay()
        isFirstUpdate = false
      }

      payload.updates.forEach((update) => {
        if (update.type === 'js-update') {
          // js更新逻辑, 会进入一个缓存队列,批量更新,从而保证更新顺序
          queueUpdate(fetchUpdate(update))
        } else {
          // css更新逻辑, 检测到更新的时候,直接替换对应模块的链接,重新发起请求
          let { path, timestamp } = update
          path = path.replace(/?.*/, '')

          const el = (
            [].slice.call(
              document.querySelectorAll(`link`)
            ) as HTMLLinkElement[]
          ).find((e) => e.href.includes(path))
          if (el) {
            const newPath = `${path}${
              path.includes('?') ? '&' : '?'
            }t=${timestamp}`
            el.href = new URL(newPath, el.href).href
          }
          console.log(`[vite] css hot updated: ${path}`)
        }
      })
      break
break
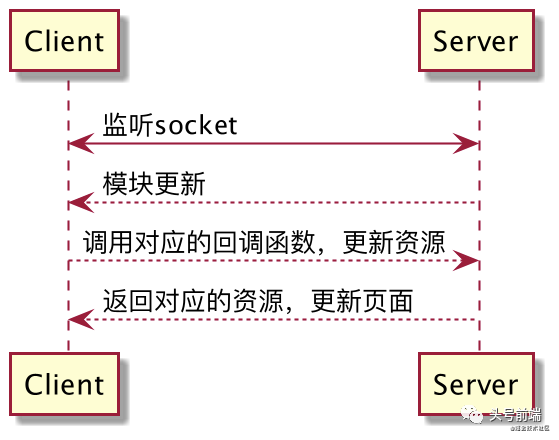
服务端处理HMR模块更新逻辑: https://github.com/vitejs/vite/blob/main/packages/vite/src/node/server/hmr.ts#L42
export async function handleHMRUpdate(
  file: string,
  server: ViteDevServer
): Promise<any> {
  const { ws, config, moduleGraph } = server
  const shortFile = getShortName(file, config.root)

  const isConfig = file === config.configFile
  const isConfigDependency = config.configFileDependencies.some(
    (name) => file === path.resolve(name)
  )
  const isEnv = config.inlineConfig.envFile !== false && file.endsWith('.env')
  if (isConfig || isConfigDependency || isEnv) {
    // 重启server
    await restartServer(server)
    return
  }

  // (dev only) the client itself cannot be hot updated.
  if (file.startsWith(normalizedClientDir)) {
    ws.send({
      type: 'full-reload',
      path: '*'
    })
    return
  }

  const mods = moduleGraph.getModulesByFile(file)

  // check if any plugin wants to perform custom HMR handling
  const timestamp = Date.now()
  const hmrContext: HmrContext = {
    file,
    timestamp,
    modules: mods ? [...mods] : [],
    read: () => readModifiedFile(file),
    server
  }

  for (const plugin of config.plugins) {
    if (plugin.handleHotUpdate) {
      const filteredModules = await plugin.handleHotUpdate(hmrContext)
      if (filteredModules) {
        hmrContext.modules = filteredModules
      }
    }
  }

  if (!hmrContext.modules.length) {
    // html file cannot be hot updated
    if (file.endsWith('.html')) {
      [config.logger.info](http://config.logger.info/)(chalk.green(`page reload `) + chalk.dim(shortFile), {
        clear: true,
        timestamp: true
      })
      ws.send({
        type: 'full-reload',
        path: config.server.middlewareMode
          ? '*'
          : '/' + normalizePath(path.relative(config.root, file))
      })
    } else {
      // loaded but not in the module graph, probably not js
      debugHmr(`[no modules matched] ${chalk.dim(shortFile)}`)
    }
    return
  }

  updateModules(shortFile, hmrContext.modules, timestamp, server)
}

function updateModules(
  file: string,
  modules: ModuleNode[],
  timestamp: number,
  { config, ws }: ViteDevServer
) {
  const updates: Update[] = []
  const invalidatedModules = new Set<ModuleNode>()
  let needFullReload = false

  for (const mod of modules) {
    invalidate(mod, timestamp, invalidatedModules)
    if (needFullReload) {
      continue
    }

    const boundaries = new Set<{
      boundary: ModuleNode
      acceptedVia: ModuleNode
    }>()

    // 向上传递更新,直到遇到边界
    const hasDeadEnd = propagateUpdate(mod, timestamp, boundaries)
    if (hasDeadEnd) {
      needFullReload = true
      continue
    }

    updates.push(
      ...[...boundaries].map(({ boundary, acceptedVia }) => ({
        type: `${boundary.type}-update` as Update['type'],
        timestamp,
        path: boundary.url,
        acceptedPath: acceptedVia.url
      }))
    )
  }

  if (needFullReload) {
    // 重刷页面
  } else {
   // 相ws客户端发送更新事件, Websocket 监听模块更新, 并且做对应的处理。
    ws.send({
      type: 'update',
      updates
    })
  }
}
优化策略
由于vite打包是让浏览器一个个模块去加载的,因此,就很容易存在http请求的瀑布流问题(浏览器并发一次最多6个请求)。此次,vite内部为了解决这个问题,主要采取了3个方案。
-
预打包,确保每个依赖只对应一个请求/文件。比如lodash。此处可以参考 https://github.com/vitejs/vite/blob/main/packages/vite/src/node/optimizer/esbuildDepPlugin.ts#L73
-
代码分割code split。可以借助rollup内置的
manualChunks来实现。 -
Etag 304状态码,让浏览器在重复加载的时候直接使用浏览器缓存。
https://github.com/vitejs/vite/blob/main/packages/vite/src/node/server/middlewares/transform.ts#L155
// check if we can return 304 early
const ifNoneMatch = req.headers['if-none-match']
if (
  ifNoneMatch &&
  (await moduleGraph.getModuleByUrl(url))?.transformResult?.etag ===
    ifNoneMatch
) {
  isDebug && debugCache(`[304] ${prettifyUrl(url, root)}`)
  res.statusCode = 304
  return res.end()
}
esbuild的使用
https://github.com/vitejs/vite/blob/main/packages/vite/src/node/plugins/esbuild.ts#L82 利用esbuild来转换ts/jsx文件,从而更快地提升编译速度。
export async function transformWithEsbuild(
  code: string,
  filename: string,
  options?: TransformOptions,
  inMap?: object
): Promise<ESBuildTransformResult> {
  // if the id ends with a valid ext, use it (e.g. vue blocks)
  // otherwise, cleanup the query before checking the ext
  const ext = path.extname(
    /.w+$/.test(filename) ? filename : cleanUrl(filename)
  )

  let loader = ext.slice(1)
  if (loader === 'cjs' || loader === 'mjs') {
    loader = 'js'
  }

  const resolvedOptions = {
    loader: loader as Loader,
    sourcemap: true,
    // ensure source file name contains full query
    sourcefile: filename,
    ...options
  } as ESBuildOptions

  delete resolvedOptions.include
  delete resolvedOptions.exclude
  delete resolvedOptions.jsxInject

  try {
    const result = await transform(code, resolvedOptions)
    if (inMap) {
      const nextMap = JSON.parse(result.map)
      nextMap.sourcesContent = []
      return {
        ...result,
        map: combineSourcemaps(filename, [
          nextMap as RawSourceMap,
          inMap as RawSourceMap
        ]) as SourceMap
      }
    } else {
      return {
        ...result,
        map: JSON.parse(result.map)
      }
    }
  } catch (e) {
    debug(`esbuild error with options used: `, resolvedOptions)
    // patch error information
    if (e.errors) {
      e.frame = ''
      e.errors.forEach((m: Message) => {
        e.frame += `n` + prettifyMessage(m, code)
      })
      e.loc = e.errors[0].location
    }
    throw e
  }
}
总结
总体来说,Vite在前端构建工具领域上开辟了一条和webpack完全不同的道路,很好地解决了前端开发阶段构建速度慢的问题。预计将会使前端开发体验上更上一层楼。同时,vite.js的源码也在不停迭代过程中,如果有想要更加了解其具体的实现细节,还是希望能够亲自去阅读其源码。本文主要希望能够起到抛砖引玉的作用。
参考文档
https://cn.vitejs.dev/guide/#overview
https://www.youtube.com/watch?v=xXrhg26VCSc
https://www.youtube.com/watch?v=fgwSJ-xXUTY
最后
以上就是专一铃铛最近收集整理的关于Vite介绍和原理解析是什么使用方法插件机制工作原理总结参考文档的全部内容,更多相关Vite介绍和原理解析是什么使用方法插件机制工作原理总结参考文档内容请搜索靠谱客的其他文章。


发表评论 取消回复