WebAssembly 初体验:从零开始重构计算模块从属于笔者的 Web 前端入门与工程实践,更多相关资料文章参考WebAssembly 学习与实践资料索引和 React 学习与实践资料索引。本文中使用的游戏代码修改自 WebAssembly 101: a developer's first steps。
WebAssembly 的概念、意义以及未来带来的性能提升相信已是耳熟能详,笔者在前端每周清单系列中也是经常会推荐 WebAssembly 相关文章。不过笔者也只是了解其概念而未真正付诸实践,本文即是笔者在将我司某个简单项目中的计算模块重构为 WebAssembly 过程中的总结。在简单的实践中笔者个人感觉,WebAssembly 的抽象程度会比 JavaScript 高不少,未来对于大型项目的迁移,对于纯前端工程师而言可能存在的坑也是不少,仿佛又回到了被指针统治的年代。本文笔者使用的案例已经集成到了 React 脚手架 create-react-boilerplate 中 ,可以方便大家快速本地实践。
编译环境搭建
我们使用 Emscripten 将 C 代码编译为 wasm 格式,官方推荐的方式是首先下载 Portable Emscripten SDK for Linux and OS X (emsdk-portable.tar.gz) 然后利用 emsdk 进行安装:
$ ./emsdk update
$ ./emsdk install latest
# 如果出现异常使用 ./emsdk install sdk-1.37.12-64bit
# https://github.com/kripken/emscripten/issues/5272
安装完毕后激活响应环境即可以进行编译:
$ ./emsdk activate latest
$ source ./emsdk_env.sh  # you can add this line to your .bashrc
笔者在本地执行上述搭建步骤时一直失败,因此改用了 Docker 预先配置好的镜像进行处理:
# 拉取 Docker 镜像
docker pull 42ua/emsdk

# 执行编译操作
docker run --rm -v $(pwd):/home/src 42ua/emsdk emcc hello_world.c
对应的 Dockfile 如下所示,我们可以自行修改以适应未来的编译环境:
FROM ubuntu

RUN
    apt-get update && apt-get install -y build-essential
    cmake python2.7 python nodejs-legacy default-jre git-core curl &&
    apt-get clean &&

    cd ~/ &&
    curl -sL https://s3.amazonaws.com/mozilla-games/emscripten/releases/emsdk-portable.tar.gz | tar xz &&
    cd emsdk-portable/ &&
    ./emsdk update &&
    ./emsdk install -j1 latest &&
    ./emsdk activate latest &&

    rm -rf ~/emsdk-portable/clang/tag-*/src &&
    find . -name "*.o" -exec rm {} ; &&
    find . -name "*.a" -exec rm {} ; &&
    find . -name "*.tmp" -exec rm {} ; &&
    find . -type d -name ".git" -prune -exec rm -rf {} ; &&

    apt-get -y --purge remove curl git-core cmake &&
    apt-get -y autoremove && apt-get clean

# http://docs.docker.com/engine/reference/run/#workdir
WORKDIR /home/src
到这里基本环境已经配置完毕,我们可以对简单的 counter.c 进行编译,源文件如下:
int counter = 100;

int count() {
    counter += 1;
    return counter;
}
编译命令如下所示,如果本地安装好了 emcc 则可以直接使用,否则使用 Docker 环境进行编译:
$ docker run --rm -v $(pwd):/home/src 42ua/emsdk emcc counter.c -s WASM=1 -s SIDE_MODULE=1 -o counter.wasm
$ emcc counter.c -s WASM=1 -s SIDE_MODULE=1 -o counter.wasm

# 如果出现以下错误,则是由如下参数
# WebAssembly Link Error: import object field 'DYNAMICTOP_PTR' is not a Number
emcc counter.c -O1 -s WASM=1 -s SIDE_MODULE=1 -o counter.wasm
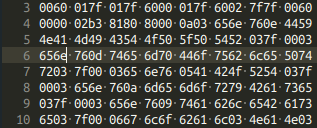
这样我们就得到了 WebAssembly 代码:
与 JavaScript 集成使用
独立的 .wasm 文件并不能直接使用,我们需要在客户端中使用 JavaScript 代码将其加载进来。最朴素的加载 WebAssembly 的方式就是使用 fetch 抓取然后编译,整个过程可以封装为如下函数:
    // 判断是否支持 WebAssembly
    if (!('WebAssembly' in window)) {
      alert('当前浏览器不支持 WebAssembly!');
    }
    // Loads a WebAssembly dynamic library, returns a promise.
    // imports is an optional imports object
    function loadWebAssembly(filename, imports) {
      // Fetch the file and compile it
      return fetch(filename)
        .then(response => response.arrayBuffer())
        .then(buffer => WebAssembly.compile(buffer))
        .then(module => {
          // Create the imports for the module, including the
          // standard dynamic library imports
          imports = imports || {};
          imports.env = imports.env || {};
          imports.env.memoryBase = imports.env.memoryBase || 0;
          imports.env.tableBase = imports.env.tableBase || 0;
          if (!imports.env.memory) {
            imports.env.memory = new WebAssembly.Memory({ initial: 256 });
          }
          if (!imports.env.table) {
            imports.env.table = new WebAssembly.Table({ initial: 0, element: 'anyfunc' });
          }
          // Create the instance.
          return new WebAssembly.Instance(module, imports);
        });
    }
我们可以使用上述工具函数加载 wasm 文件:
    loadWebAssembly('counter.wasm')
      .then(instance => {
        var exports = instance.exports; // the exports of that instance
        var count = exports. _count; // the "_count" function (note "_" prefix)
        // 下面即可以调用 count 函数
      }
    );
而在笔者的脚手架中,使用了 wasm-loader 进行加载,这样可以将 wasm 直接打包在 Bundle 中,然后通过 import 导入:
import React, { PureComponent } from "react";

import CounterWASM from "./counter.wasm";
import Button from "antd/es/button/button";

import "./Counter.scss";

/**
 * Description 简单计数器示例
 */
export default class Counter extends PureComponent {
  state = {
    count: 0
  };

  componentDidMount() {
    this.counter = new CounterWASM({
      env: {
        memoryBase: 0,
        tableBase: 0,
        memory: new window.WebAssembly.Memory({ initial: 256 }),
        table: new window.WebAssembly.Table({ initial: 0, element: "anyfunc" })
      }
    });
    this.setState({
      count: this.counter.exports._count()
    });
  }

  /**
   * Description 默认渲染函数
   */
  render() {
    const isWASMSupport = "WebAssembly" in window;

    if (!isWASMSupport) {
      return (
        <div>
          浏览器不支持 WASM
        </div>
      );
    }

    return (
      <div className="Counter__container">
        <span>
          简单计数器示例:
        </span>
        <span>{this.state.count}</span>
        <Button
          type="primary"
          onClick={() => {
            this.setState({
              count: this.counter.exports._count()
            });
          }}
        >
          点击自增
        </Button>
      </div>
    );
  }
}
在使用 wasm-loader 时,其会调用 new WebAssembly.Instance(module, importObject);
module即 WebAssembly.Module 实例。importObject即默认的由wasm-loader提供的对象。
简单游戏引擎重构
上文我们讨论了利用 WebAssembly 重构简单的计数器模块,这里我们以简单的游戏为例,交互式的感受 WebAssembly 带来的性能提升,可以直接查看游戏的在线演示。这里的游戏引擎即是执行部分计算与重新赋值操作,譬如这里的计算下一个位置状态的函数在 C 中实现为:
EMSCRIPTEN_KEEPALIVE
void computeNextState()
{
  loopCurrentState();

  int neighbors = 0;
  int i_m1, i_p1, i_;
  int j_m1, j_p1;
  int height_limit = height - 1;
  int width_limit = width - 1;
  for (int i = 1; i < height_limit; i++)
  {
    i_m1 = (i - 1) * width;
    i_p1 = (i + 1) * width;
    i_ = i * width;
    for (int j = 1; j < width_limit; j++)
    {
      j_m1 = j - 1;
      j_p1 = j + 1;
      neighbors = current[i_m1 + j_m1];
      neighbors += current[i_m1 + j];
      neighbors += current[i_m1 + j_p1];
      neighbors += current[i_ + j_m1];
      neighbors += current[i_ + j_p1];
      neighbors += current[i_p1 + j_m1];
      neighbors += current[i_p1 + j];
      neighbors += current[i_p1 + j_p1];
      if (neighbors == 3)
      {
        next[i_ + j] = 1;
      }
      else if (neighbors == 2)
      {
        next[i_ + j] = current[i_ + j];
      }
      else
      {
        next[i_ + j] = 0;
      }
    }
  }
  memcpy(current, next, width * height);
}
而对应的 JS 版本引擎的实现为:
computeNextState() {
  let neighbors, iM1, iP1, i_, jM1, jP1;

  this.loopCurrentState();

  for (let i = 1; i < this._height - 1; i++) {
    iM1 = (i - 1) * this._width;
    iP1 = (i + 1) * this._width;
    i_ = i * this._width;
    for (let j = 1; j < this._width - 1; j++) {
      jM1 = j - 1;
      jP1 = j + 1;
      neighbors = this._current[iM1 + jM1];
      neighbors += this._current[iM1 + j];
      neighbors += this._current[iM1 + jP1];
      neighbors += this._current[i_ + jM1];
      neighbors += this._current[i_ + jP1];
      neighbors += this._current[iP1 + jM1];
      neighbors += this._current[iP1 + j];
      neighbors += this._current[iP1 + jP1];
      if (neighbors === 3) {
        this._next[i_ + j] = 1;
      } else if (neighbors === 2) {
        this._next[i_ + j] = this._current[i_ + j];
      } else {
        this._next[i_ + j] = 0;
      }
    }
  }
  this._current.set(this._next);
}
本部分的编译依旧是直接将 [engine.c]() 编译为 engine.wasm,不过在导入的时候我们需要动态地向 wasm 中注入外部函数:
    this.module = new EngineWASM({
      env: {
        memoryBase: 0,
        tableBase: 0,
        memory: new window.WebAssembly.Memory({ initial: 1024 }),
        table: new window.WebAssembly.Table({ initial: 0, element: "anyfunc" }),
        _malloc: size => {
          let buffer = new ArrayBuffer(size);
          return new Uint8Array(buffer);
        },
        _memcpy: (source, target, size) => {
          let sourceEnd = source.byteLength;

          let i, j;

          for (
            (i = 0), (j = 0), (k = new Uint8Array(target)), (l = new Uint8Array(
              source
            ));
            i < sourceEnd;
            ++i, ++j
          )
            k[j] = l[i];
        }
      }
    });
到这里文本告一段落,笔者最后需要声明的是因为这只是随手做的实验,最后的代码包括对于内存的操作可能存在潜在问题,请读者批评指正。
最后
以上就是优雅树叶最近收集整理的关于 WebAssembly 初体验:从零开始重构计算模块编译环境搭建与 JavaScript 集成使用简单游戏引擎重构的全部内容,更多相关内容请搜索靠谱客的其他文章。


发表评论 取消回复