rsync工具用于将文件和目录从一个位置同步到另一个位置。同步的位置可以在本地服务器或远程服务器上。
在Centos中使用下面命令安装rsync:
对于负荷较重的 rsync 服务器应该使用独立运行方式
# yum install rsync xinetd --服务安装
# /usr/bin/rsync --daemon
对于负荷较轻的 rsync 服务器可以使用 xinetd 运行方式
# yum install rsync xinetd --服务安装
# vim /etc/xinetd.d/rsync --配置托管服务,将下项改为 no
disable = no
# /etc/init.d/xinetd start --启动托管服务 xinetd
# chkconfig rsync on
# netstat -ntpl | grep 873 --查看服务是否启动
实例一:本机中的两个目录进行同步
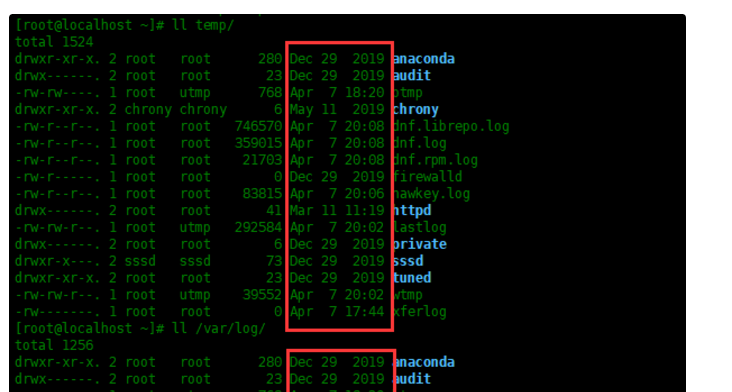
要同步本地计算机中的两个目录,使用rsync -zvr命令:
[root@localhost ~]# rsync -zvr /var/log/ /root/temp/
sending incremental file list
btmp
dnf.librepo.log
...
sssd/sssd_implicit_files.log
sssd/sssd_nss.log
tuned/tuned.log

sent 516,136 bytes  received 605 bytes  1,033,482.00 bytes/sec
total size is 5,451,242  speedup is 10.55
参数解释:
-z 启用压缩
-v 输出详细信息
-r 表示递归
查看一下/root/temp目录,发现rsync在同步期间未保留时间戳。
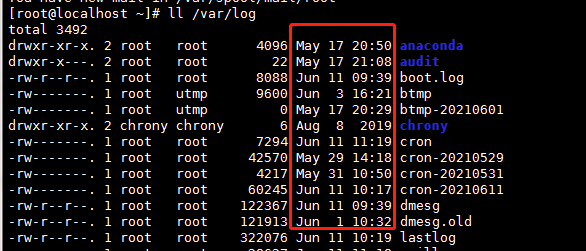
实例二:使用rsync -a在同步期间保留时间戳
rsync命令的-a选项表示存档模式。-a选项递归同步、保留符号链接、保留权限、保留时间戳、保留所有者和组。
现在,执行以下命令,然后查看文件的时间:
[root@localhost ~]# rsync -azv /var/log/ /root/temp/
sending incremental file list
./
btmp
dnf.librepo.log
dnf.log
dnf.rpm.log
...
sssd/sssd_nss.log
tuned/
tuned/tuned.log

sent 516,231 bytes  received 629 bytes  1,033,720.00 bytes/sec
total size is 5,451,789  speedup is 10.55
如下所示,rsync在同步期间保留了时间戳。
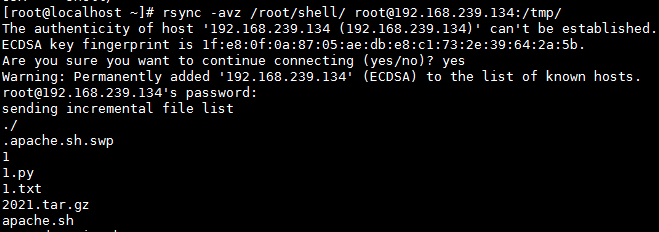
实例三:将文件从本地同步到远程目录
rsync允许在本地和远程系统之间同步文件/目录,前提是本地和远程系统都要安装rsync才行,否则会提示如下信息:
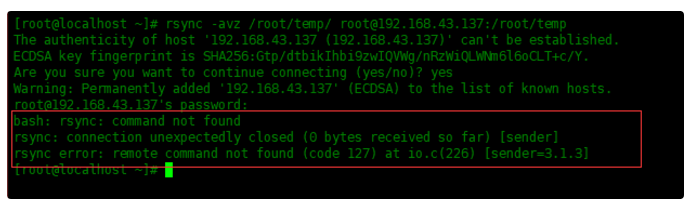
[root@localhost ~]# rsync -avz /root/temp/ root@192.168.43.137:/root/temp
root@192.168.43.137's password:
sending incremental file list
created directory /root/temp
./
btmp
dnf.librepo.log
dnf.log
dnf.rpm.log
...
sssd/sssd_nss.log
tuned/
tuned/tuned.log

sent 516,231 bytes  received 662 bytes  206,757.20 bytes/sec
total size is 5,451,789  speedup is 10.55
下面是在远程系统里面查看已同步的目录:
上面可以看到同步时需要输入密码,有时候不希望将文件从本地服务器备份到远程服务器时输入密码,可以在两台主机间设置免密要登录。
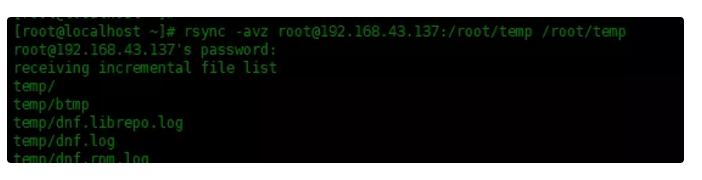
实例四:将文件从远程目录同步到本地
要将文件从远程系统同步到本地时,如下所示,在源中指定远程路径,在目标中指定本地路径即可:
[root@localhost ~]# rsync -avz root@192.168.43.137:/root/temp /root/temp
root@192.168.43.137's password:
receiving incremental file list
temp/
temp/btmp
temp/dnf.librepo.log
temp/dnf.log
...
temp/tuned/
temp/tuned/tuned.log

sent 634 bytes  received 516,247 bytes  206,752.40 bytes/sec
total size is 5,451,789  speedup is 10.55
实例五:不要覆盖目标位置上已修改的文件
如果在目标位置修改了文件,我们可能不想用源位置的旧文件覆盖该文件。使用-u选项就可以做到这一点。在下面的示例中,在本地将test.txt文件修改了内容。它不会被远程系统的test.txt文件所覆盖:
# 查看一下远程系统temp目录下的test.txt文件大小
[root@localhost ~]# ssh root@192.168.43.137 ls -l /root/temp
root@192.168.43.137's password:
total 4
-rw-r--r--. 1 root root 7 Apr  7  2021 test.txt
# 查看一下本机的temp目录下的test.txt文件大小,本机的test.txt文件已修改,所以比远程系统里面的test.txt文件大
[root@localhost ~]# ll /root/temp/
total 4
-rw-r--r--. 1 root root 77 Apr  7 21:10 test.txt
# 执行rsync -avzu同步一下
[root@localhost ~]# rsync -avzu root@192.168.43.137:/root/temp /root/
root@192.168.43.137's password:
receiving incremental file list

sent 25 bytes  received 76 bytes  40.40 bytes/sec
total size is 7  speedup is 0.07
下面查看一下本机的/root/temp目录里面的test.txt是否被覆盖:
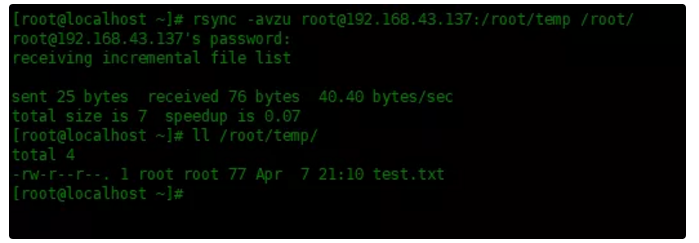
发现并没有被覆盖。
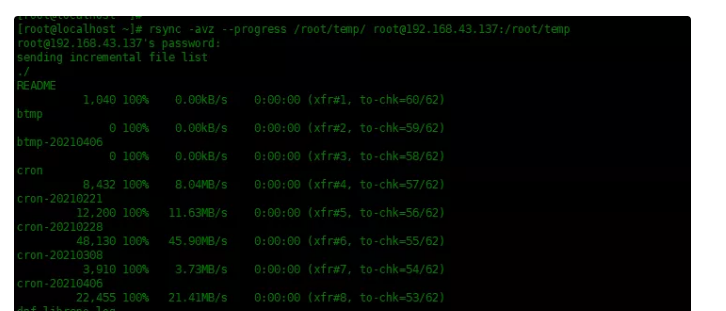
实例六:在传输过程中查看rsync进度
使用–progress选项显示rsync执行的详细进度,如下所示:
# rsync -avz --progress /root/temp/ root@192.168.43.137:/root/temp
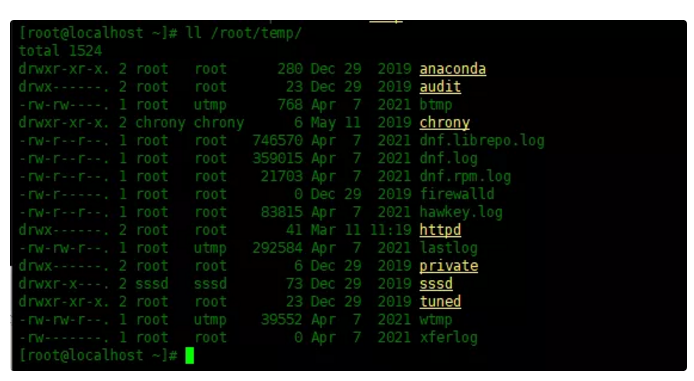
实例七:在目标目录中删除源目录不存在的文件
如果文件不在源中而是在目标中存在,则可能希望在rsync同步期间删除目标上的文件。在这种情况下,请使用–delete选项:
# 查看一下源目录里面的文件
[root@localhost ~]# ll /root/temp/
total 0
-rw-r--r--. 1 root root 0 Apr  7 21:46 name.csv
# 查看一下目标目录里面的文件
[root@localhost ~]# ssh root@192.168.43.137 ls -l /root/temp
root@192.168.43.137's password:
total 944
drwxr-xr-x. 2 root root      6 Apr  7  2021 anaconda
drwx------. 2 root root      6 Apr  7  2021 audit
-rw-------. 1 root root      0 Apr  7  2021 btmp
-rw-------. 1 root root      0 Apr  7  2021 btmp-20210406
drwxr-xr-x. 2 root root      6 Apr  7  2021 chrony
-rw-------. 1 root root   8432 Apr  7  2021 cron
-rw-------. 1 root root  12200 Apr  7  2021 cron-20210221
-rw-------. 1 root root  48130 Apr  7  2021 cron-20210228
-rw-------. 1 root root   3910 Apr  7  2021 cron-20210308
-rw-------. 1 root root  22455 Apr  7  2021 cron-20210406
-rw-------. 1 root root 383369 Apr  7  2021 dnf.librepo.log
-rw-------. 1 root root 476949 Apr  7  2021 dnf.librepo.log-20210221
# rsync使用--delete选项删除目标目录中不包含源目录的文件
[root@localhost ~]# rsync -avz --delete /root/temp root@192.168.43.137:/root
root@192.168.43.137's password:
sending incremental file list
deleting temp/chrony/
deleting temp/audit/
deleting temp/anaconda/
deleting temp/dnf.librepo.log-20210221
deleting temp/dnf.librepo.log
deleting temp/cron-20210406
deleting temp/cron-20210308
deleting temp/cron-20210228
deleting temp/cron-20210221
deleting temp/cron
deleting temp/btmp-20210406
deleting temp/btmp
temp/
temp/name.csv

sent 123 bytes  received 281 bytes  161.60 bytes/sec
total size is 0  speedup is 0.00
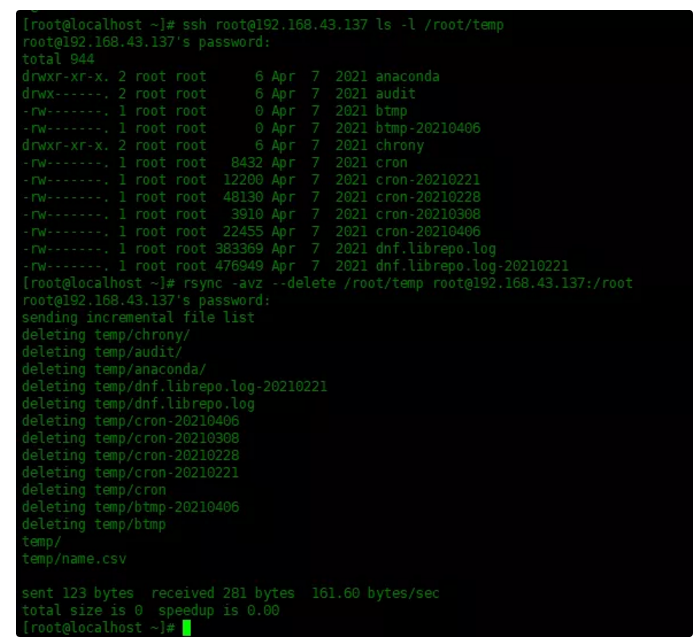
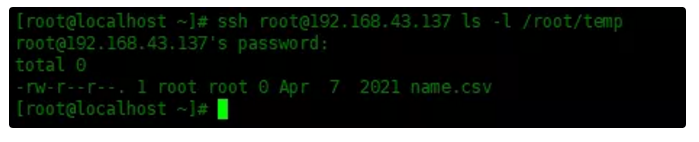
在查看一下目标目录是否删除:
实例八:文件传输过程中的include和exclude模式
rsync允许在进行同步时提供要包括和排除文件或目录的模式。
[root@localhost ~]# rsync -avz --include 'P*' --exclude '*' root@192.168.43.137:/var/lib/rpm/ /root/temp/
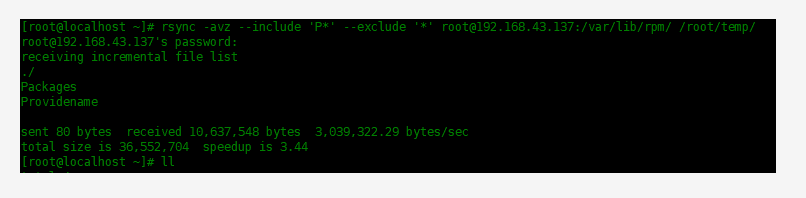
在上面的示例中,它仅包括以’P’开头的文件或目录,并排除所有其他文件。
实例九:不传输大文件
可以使用rsync --max-size选项告诉rsync不要传输大于指定大小的文件。
[root@localhost ~]# rsync -avz --max-size='1M' root@192.168.43.137:/var/lib/rpm/ /root/temp/
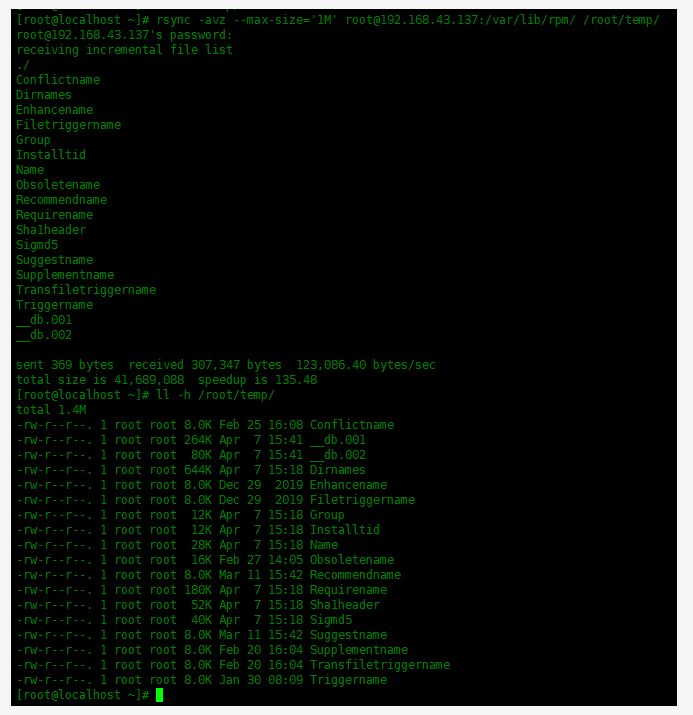
–max-size=1M使rsync仅传输小于或等于1M的文件。单位可以是K,M,G等。
还可以使用–min-size=参数,指定传输最小文件的大小。
参考链接 :
Linux 中 rsync 备份数据使用实例 : https://mp.weixin.qq.com/s/H9gW7apgfVNXmkURxDowtg
https://www.cnblogs.com/george-guo/p/7718515.html
最后
以上就是高兴海燕最近收集整理的关于CentOS 7中 rsync 备份数据使用实例的全部内容,更多相关CentOS内容请搜索靠谱客的其他文章。


发表评论 取消回复