Qcom_Sensor(八)--- 之 DSPS架构分析
- sns_init_once
- QCCI API讲解
之前的文章我们知道了SensorDaemon服务端的启动以及dsps的架构及主要组成模块,今天我们继续深入挖掘下SensorDaemon与dsps具体的通信构建过程。
首先回顾下,SensorDaemon的启动过程。
1.init.qcom.sh中配置调用start_sensors启动,配置settings文件;
2.call start sensors则我们的daemon进程main方法开始执行
3.初始化sensors,sns_init_once;
4.创建服务端socket,注册sns_main_notify_cb回调
5.启动线程监听服务端数据,一旦数据达到,遍历客户端 handle,将数据发到client端
那么SensorDaemon又是怎样与DSPS端通信的呢?我们跟进sns_init_once来一探究竟。
sns_init_once
static void sns_init_once( void )
{
  int              i;
  struct sigaction action;
  sigset_t         set;

  static const struct init_ptrs
  {
    sns_init_fcn fcn;
    const char * fcn_name;
  } init_ptrs[] = SNS_INIT_FUNCTIONS;

  static const struct opt_init_ptrs
  {
    sns_init_fcn fcn;
    const char * fcn_name;
  } opt_init_ptrs[] = SNS_INIT_OPT_FUNCTIONS;

  /* Mask of SIGALRM for use by EM */
  sigemptyset( &set );
  sigaddset( &set, SIGALRM );
  sigprocmask( SIG_SETMASK, &set, NULL );

  /* Set up the fault handler */
  action.sa_handler = sns_init_fault_hndlr;
  sigemptyset(&action.sa_mask);
  action.sa_flags = 0;
  for( i = 1; i < NSIG ; i++ )
  {
    sigaction( i, &action, &old_action[i] );
  }

  (void)sem_init( &sns_init_sem, 0, 0 );

  /* Call each module's init function */
  for( i = 0; NULL != init_ptrs[i].fcn; i++ ) {
    SNS_PRINTF_STRING_HIGH_1(SNS_DBG_MOD_APPS_INIT,
                             "initializing %s",
                             (intptr_t)init_ptrs[i].fcn_name);

    sns_init_sns_err = init_ptrs[i].fcn();
    if( SNS_SUCCESS != sns_init_sns_err ) {
      SNS_PRINTF_STRING_ERROR_2(SNS_DBG_MOD_APPS_INIT,
                                "Error %d initializing %s",
                                sns_init_sns_err,
                                (intptr_t)init_ptrs[i].fcn_name);

      return;
    }
    SNS_PRINTF_STRING_HIGH_1(SNS_DBG_MOD_APPS_INIT,
                             "Waiting for %s...",
                             (intptr_t)init_ptrs[i].fcn_name);
    sem_wait( &sns_init_sem );
    SNS_PRINTF_STRING_HIGH_1(SNS_DBG_MOD_APPS_INIT,
                             "Done waiting for %s",
                             (intptr_t)init_ptrs[i].fcn_name);
  }

  /* Call each module's optional init function */
  for( i = 0; NULL != opt_init_ptrs[i].fcn; i++ ) {
    SNS_PRINTF_STRING_HIGH_1(SNS_DBG_MOD_APPS_INIT,
                             "initializing %s",
                             (intptr_t)opt_init_ptrs[i].fcn_name);

    sns_init_sns_err = opt_init_ptrs[i].fcn();
    if( SNS_SUCCESS != sns_init_sns_err ) {
      SNS_PRINTF_STRING_ERROR_2(SNS_DBG_MOD_APPS_INIT,
                                "Error %d initializing %s",
                                sns_init_sns_err,
                                (intptr_t)opt_init_ptrs[i].fcn_name);
      sns_init_sns_err = SNS_SUCCESS;
      continue;
    }
    SNS_PRINTF_STRING_HIGH_1(SNS_DBG_MOD_APPS_INIT,
                             "Waiting for %s...",
                             (intptr_t)opt_init_ptrs[i].fcn_name);
    sem_wait( &sns_init_sem );
    SNS_PRINTF_STRING_HIGH_1(SNS_DBG_MOD_APPS_INIT,
                             "Done waiting for %s",
                             (intptr_t)opt_init_ptrs[i].fcn_name);
  }

  (void)sem_destroy( &sns_init_sem );
  SNS_PRINTF_STRING_HIGH_0(SNS_DBG_MOD_APPS_INIT,
                           "All modules initializied" );
}
之前也提到过,这个方法的主体部分就是通过定义的init_ptrs以及opt_init_ptrs指向的多个init func依次调用。
我们从log来看看这些fuction的初始化顺序。
[ 01-03 04:39:11.125 713: 713 I/] main, sensordaemon started.
[ 01-03 04:39:11.125 713: 713 I/] sensor1_init, huilin, sns_acm.c
01-03 04:39:11.125 E/Sensors: sns_debug_set_dbg_str_mask: Setting log level to 0
01-03 04:39:11.132 I/Sensors: sns_init_la.c(216):Waiting for sns_debug_test_init1...
01-03 04:39:11.132 I/Sensors: sns_init_la.c(220):Done waiting for sns_debug_test_init1
01-03 04:39:11.132 I/Sensors: sns_init_la.c(203):initializing sns_pwr_init
01-03 04:39:11.134 I/Sensors: sns_pwr.c(332):releasing wakelock
01-03 04:39:11.134 I/Sensors: sns_pwr.c(338):sns_pwr_wake_unlock: wakeunlock write error: -1, 22
01-03 04:39:11.134 I/Sensors: sns_pwr.c(332):releasing wakelock
01-03 04:39:11.134 I/Sensors: sns_pwr.c(338):sns_pwr_wake_unlock: wakeunlock write error: -1, 22
01-03 04:39:11.134 I/Sensors: sns_init_la.c(216):Waiting for sns_pwr_init...
01-03 04:39:11.134 I/Sensors: sns_init_la.c(220):Done waiting for sns_pwr_init
01-03 04:39:11.134 I/Sensors: sns_init_la.c(203):initializing sns_em_init
01-03 04:39:11.134 I/Sensors: sns_init_la.c(216):Waiting for sns_em_init...
01-03 04:39:11.135 I/Sensors: sns_init_la.c(220):Done waiting for sns_em_init
01-03 04:39:11.135 I/Sensors: sns_init_la.c(203):initializing sns_reg_init
01-03 04:39:11.137 I/Sensors: sns_init_la.c(216):Waiting for sns_reg_init...
01-03 04:39:11.654 I/Sensors: sns_init_la.c(220):Done waiting for sns_reg_init
01-03 04:39:11.654 I/Sensors: sns_init_la.c(203):initializing sns_time_init
01-03 04:39:11.657 I/Sensors: sns_init_la.c(216):Waiting for sns_time_init...
01-03 04:39:11.660 I/Sensors: sns_init_la.c(220):Done waiting for sns_time_init
01-03 04:39:11.660 I/Sensors: sns_init_la.c(203):initializing sns_sam_init
01-03 04:39:11.660 I/Sensors: sns_init_la.c(216):Waiting for sns_sam_init...
01-03 04:39:11.819 D/Sensors: sns_sam.c(4745):SAM Started.....
01-03 04:39:11.820 I/Sensors: sns_init_la.c(220):Done waiting for sns_sam_init
01-03 04:39:11.820 I/Sensors: sns_init_la.c(203):initializing sns_file_init
01-03 04:39:11.821 D/Sensors: sns_file.c(373):sns_file_init
01-03 04:39:11.832 W/XTCC-5.1.0.8: [CCC-Main] wifi: 1, ap cell: 0, modem cell: 1, waa: 0, sstp: 0
01-03 04:39:11.865 E/XTCC-5.1.0.8: [StorageMgr] init tile_folder = /data/misc/location/xtwifi
01-03 04:39:11.866 I/Sensors: sns_init_la.c(216):Waiting for sns_file_init...
01-03 04:39:11.875 I/Sensors: sns_init_la.c(220):Done waiting for sns_file_init
01-03 04:39:11.875 I/Sensors: sns_init_la.c(203):initializing sns_acm_init
01-03 04:39:13.969 I/Sensors: sns_init_la.c(216):Waiting for sns_acm_init...
01-03 04:39:13.969 I/Sensors: sns_pwr.c(650):sns_pwr_off: vote mask 0x1, g_vote_mask 0x0, fd: -1
01-03 04:39:13.969 D/Sensors: sns_acm.c(1355):Initialization complete
01-03 04:39:13.969 I/Sensors: sns_init_la.c(220):Done waiting for sns_acm_init
01-03 04:39:13.969 I/Sensors: sns_init_la.c(227):initializing sns_debug_test_init2
01-03 04:39:13.970 D/Sensors: sns_debug_main.c(861):Init: In DIAG_Debug_Test_Init function!
01-03 04:39:13.971 D/Sensors: sns_debug_main.c(917):Sensors Diag Init:Can create EM timer object
01-03 04:39:13.971 D/Sensors: sns_debug_main.c(349):SNS DEBUG thread started
01-03 04:39:13.971 D/Sensors: sns_debug_main.c(929):Sensors DIAG Init: Initialization complete
01-03 04:39:13.971 I/Sensors: sns_init_la.c(240):Waiting for sns_debug_test_init2...
01-03 04:39:13.971 E/Sensors: sns_debug_main.c(544):Debug Config File missing in EFS!
01-03 04:39:13.971 D/Sensors: sns_debug_mr.c(401):DEBUG VERSION RESP: Ver: 1   Max ID:3
01-03 04:39:13.972 I/Sensors: sns_init_la.c(244):Done waiting for sns_debug_test_init2
01-03 04:39:13.972 I/Sensors: sns_init_la.c(249):All modules initializied
01-03 04:39:13.975 I/Sensors: sns_main.c(227):enabled=true
01-03 04:39:13.975 D/Sensors: sns_main.c(1689):Start thread to monitor ADSP restart
01-03 04:39:13.975 D/Sensors: sns_main.c(1602):Register for SMRG service
01-03 04:39:13.975 D/Sensors: sns_main.c(1620):Waiting for SMGR service up
01-03 04:39:13.975 D/Sensors: sns_main.c(1631):Get SMGR servive info
01-03 04:39:13.975 D/Sensors: sns_main.c(1642):Initialize client for SMRG
01-03 04:39:13.976 D/Sensors: sns_main.c(1653):Register for SMGR error notification
01-03 04:39:14.906 I/libsensor1: sensor1_init_once: Setting log level to 0
01-03 04:39:14.906 E/mm-camera-isp2: isp_module_start_session:361 num_session_opened 1
01-03 04:39:14.906 D/libsensor1: sensor1_init_once
很显然,就是我们在sns_init.h中函数指针声明的顺序呀。
/* LA-based Builds */
# define SNS_INIT_FUNCTIONS
  { { sns_memmgr_init, "sns_memmgr_init" },            // 用于内存管理
    { sns_debug_test_init1, "sns_debug_test_init1" },  // 调试模块,得益于此,我么你才能看到上面的log输出
    { sns_pwr_init, "sns_pwr_init" },                  // power管理模块
    { sns_em_init, "sns_em_init" },                    // event manager
    { sns_reg_init, "sns_reg_init" },                  // Sensors Registry,会创建一个线程处理寄存器数据sns.reg
    { sns_time_init, "sns_time_init" },                // 时间管理器
    { sns_sam_init, "sns_sam_init" },                  // SAM (sensor algorithm manager)
    { sns_file_init, "sns_file_init" },                // 文件管理器,处理open,write,close等操作并管理打开的文件列表
    { sns_acm_init, "sns_acm_init" },                  // application client manager, 应用客户端管理器,直接与sensor client交互.
    {  NULL, ""} }
# define SNS_INIT_OPT_FUNCTIONS
  { { sns_debug_test_init2, "sns_debug_test_init2" },   // 第二个debug模块入口
    {  NULL, ""} }
我们还是重点关注下重要模块ACM,先看其init方法:
sns_err_code_e sns_acm_init( void )
{
  sns_err_code_e error_code;
  int32_t        i;
  uint8_t        err;
  int32_t        max_clients = sns_acm_max_clients();

  if( true == sns_acm_initialized ) {
    return SNS_SUCCESS;
  }

  error_code = sns_em_create_timer_obj( sns_acm_timer_cb,
                                        (void*)(intptr_t)SNS_ACM_TMR_WRITABLE,
                                        SNS_EM_TIMER_TYPE_ONESHOT,
                                        &sns_acm_writable_tmr_ptr);

  if( SNS_SUCCESS != error_code ) {
    SNS_PRINTF_STRING_FATAL_0( SNS_DBG_MOD_ACM,
                               "init: can't create EM timer object" );
    return SNS_ERR_NOMEM;
  }

  sns_acm_flag_grp = sns_os_sigs_create( 0, &err );
  if( sns_acm_flag_grp == NULL ) {
    sns_em_delete_timer_obj( sns_acm_writable_tmr_ptr );
    SNS_PRINTF_STRING_FATAL_0( SNS_DBG_MOD_ACM,
                               "init: can't create OS signal" );
    return SNS_ERR_NOMEM;
  }

  for( i = 0; i < max_clients; i++ ) {
    sns_acm_init_client_handle( sns_acm_client_handle( i ) );
  }

  sns_acm_db_mutex = sns_os_mutex_create( SNS_MODULE_PRI_ACM_MUTEX,
                                          &err );
  if( 0 != err ) {
    SNS_PRINTF_STRING_FATAL_0( SNS_DBG_MOD_ACM,
                               "init: can't create db mutex" );

    sns_em_delete_timer_obj( sns_acm_writable_tmr_ptr );
    return SNS_ERR_FAILED;
  }

  sns_acm_log_mutex = sns_os_mutex_create( SNS_MODULE_PRI_ACM_MUTEX,
                                          &err );
  if( 0 != err ) {
    SNS_PRINTF_STRING_FATAL_0( SNS_DBG_MOD_ACM,
                               "init: can't create log mutex" );

    sns_em_delete_timer_obj( sns_acm_writable_tmr_ptr );
    sns_os_mutex_del( sns_acm_db_mutex, 0, &err );
    return SNS_ERR_FAILED;
  }

  error_code = sns_acm_mr_init( sns_acm_flag_grp, SNS_ACM_SMR_RX_FLAG );

  if( SNS_SUCCESS != error_code ) {
    sns_em_delete_timer_obj( sns_acm_writable_tmr_ptr );
    sns_os_mutex_del( sns_acm_db_mutex, 0, &err );
    sns_os_mutex_del( sns_acm_log_mutex, 0, &err );

    SNS_PRINTF_STRING_FATAL_0( SNS_DBG_MOD_ACM,
                               "init: can't register with SMR" );

    return SNS_ERR_FAILED;
  }

  error_code = sns_os_task_create( sns_acm_rx_thread,
                                   NULL,
                                   NULL,
                                   SNS_MODULE_PRI_ACM );
  if( 0 != error_code ) {

    SNS_PRINTF_STRING_FATAL_0( SNS_DBG_MOD_ACM,
                               "init: can't create thread" );
    sns_em_delete_timer_obj( sns_acm_writable_tmr_ptr );
    sns_os_mutex_del( sns_acm_db_mutex, 0, &err );
    sns_os_mutex_del( sns_acm_log_mutex, 0, &err );
    // TODO: it is not possible to deregister from SMR

    return SNS_ERR_FAILED;
  }

  sns_acm_initialized = true;
  return SNS_SUCCESS;
}
这里的一个重要方调用时sns_acm_mr_init,这个方法用于给sensor1的服务端请求QMI的信息,mr指的是message router的东西。
sns_err_code_e sns_acm_mr_init( OS_FLAG_GRP *sig_grp_ptr, OS_FLAGS sig_flag )
{
  UNREFERENCED_PARAMETER( sig_grp_ptr );
  UNREFERENCED_PARAMETER( sig_flag );

  uint32_t i;
  uint8_t os_err = 0;
  pthread_t thread_id[SNS_ACM_MAX_SVC_ID];
  pthread_attr_t thread_attr;

  sns_acm_mr_msg_queue_first = NULL;
  sns_acm_mr_msg_queue_last = NULL;

  sns_acm_mr_queue_mutex = sns_os_mutex_create( SNS_MODULE_PRI_APPS_ACM_MUTEX, &os_err );
  if( 0 != os_err )
  {
    SNS_PRINTF_STRING_FATAL_1( SNS_DBG_MOD_ACM, "Cannot create mutex %i", os_err );
    return SNS_ERR_FAILED;
  }

  if( -1 == sem_init( &sns_acm_mr_queue_sem, 0, SNS_ACM_MAX_MSG_QUEUE ) )
  {
    SNS_PRINTF_STRING_FATAL_1( SNS_DBG_MOD_ACM, "Cannot create semaphore %i", errno );
    return SNS_ERR_FAILED;
  }

  pthread_attr_init( &thread_attr );
  pthread_attr_setdetachstate( &thread_attr, PTHREAD_CREATE_JOINABLE );

  for( i = 0; i < SNS_ACM_MAX_SVC_ID; i++ )
  {
    uint32_t *svc_id = SNS_OS_MALLOC( SNS_MODULE_ACM, sizeof(uint32_t) );
    if( NULL == svc_id )
    {
      SNS_PRINTF_STRING_ERROR_0( SNS_DBG_MOD_ACM, "Malloc Error" );
      return SNS_ERR_FAILED;
    }
    else
    {
      *svc_id = i;
      pthread_create( &thread_id[ i ], &thread_attr, sns_acm_mr_client_init, svc_id );
    }
  }
  pthread_attr_destroy( &thread_attr );

  for( i = 0; i < SNS_ACM_MAX_SVC_ID; i++ )
  {
    pthread_join( thread_id[ i ], NULL );
  }

  return SNS_SUCCESS;
}
for循环中执行60次,构建60个mr client:
pthread_create( &thread_id[ i ], &thread_attr, sns_acm_mr_client_init, svc_id );
我们跟进看一下client的初始化流程。
void* sns_acm_mr_client_init( void *svc_id )
{
  sns_err_code_e sns_err;
  uint32_t j, svc_num = *((uint32_t *)svc_id);
  int timeout_ms = (svc_num == 0) ? 10000 : 2000;

  qmi_idl_service_object_type service;

  service = sns_smr_get_svc_obj( svc_num );
  if( service == NULL )
  {
    SNS_PRINTF_STRING_HIGH_1( SNS_DBG_MOD_ACM, "Service %i is NULL", svc_num );
    // 如果得到的service为null,则并不会去请求该server的info
  }
  else
  {
    SNS_PRINTF_STRING_LOW_1( SNS_DBG_MOD_ACM, "Initializing connection for svc %i", svc_num );

    sns_err = sns_smr_get_qmi_service_info( &service, timeout_ms, &service_info[ svc_num ] );
    // 获取server端对应的info
    if( SNS_SUCCESS == sns_err )
    {
      SNS_PRINTF_STRING_LOW_1( SNS_DBG_MOD_ACM, "Retrieved info for service %i", svc_num );
      service_enabled[ svc_num ] = true;
    }
    else
    {
      SNS_PRINTF_STRING_ERROR_1( SNS_DBG_MOD_ACM, "Error getting info for service %i", svc_num );
      service_enabled[ svc_num ] = false;
    }

    for( j = 0; j < SNS_ACM_MAX_CLIENTS; j++ )
    {
      external_clients[ j ].cb_data[ svc_num ] = NULL;
    }
  }

  SNS_OS_FREE( svc_id );
  return NULL;
}
sns_err_code_e sns_smr_get_qmi_service_info (
    qmi_idl_service_object_type const *svc_obj,
    uint32_t timeout_ms, qmi_service_info *svc_info)
{
  qmi_client_type notifier_handle;
  qmi_client_error_type qmi_err;
  qmi_cci_os_signal_type os_params_tmp;
  qmi_service_info svc_info_array[ SMR_MAX_QMI_SVC_CNT ];
  qmi_service_instance instance_id;
  sns_err_code_e rv = SNS_SUCCESS;
  uint32_t svc_num = -1,
           num_entries = SMR_MAX_QMI_SVC_CNT,
           num_services,
           i,
           max_iid,
           max_idx;

  qmi_idl_get_service_id( *svc_obj, &svc_num );

#if defined(SNS_DSPS_BUILD) || defined(SNS_PCSIM) || defined(QDSP6)
  os_params_tmp.ext_signal = NULL;
  os_params_tmp.sig = SNS_SMR_QMI_CLI_SIG;
  os_params_tmp.timer_sig = SNS_SMR_QMI_TIMER_SIG;
#endif

  qmi_err = qmi_client_notifier_init( *svc_obj, &os_params_tmp, ¬ifier_handle ); //
  if( QMI_NO_ERR != qmi_err )
  {
    SNS_PRINTF_STRING_ERROR_1( SMR_DBG_MODULE_ID,
        "qmi_client_notifier_init error %i", qmi_err );
    rv = SNS_ERR_FAILED;
  }
  else
  {
    QMI_CCI_OS_SIGNAL_WAIT( &os_params_tmp, timeout_ms );
    QMI_CCI_OS_SIGNAL_CLEAR( &os_params_tmp );
    if( os_params_tmp.timed_out )
    {
      SNS_PRINTF_STRING_ERROR_2( SMR_DBG_MODULE_ID,
              "Unable to initialize service %d with QCCI, timed out (%d ms)",
              svc_num, timeout_ms );
      rv = SNS_ERR_FAILED;
    }
    else if( QMI_NO_ERR != ( qmi_err =
          qmi_client_get_service_list( *svc_obj, svc_info_array,
                                       &num_entries, &num_services ) ) )
    {
      SNS_PRINTF_STRING_ERROR_1( SMR_DBG_MODULE_ID,
              "Unable to initialize service %d with QCCI",
              svc_num );
      rv = SNS_ERR_FAILED;
    }
    else if( num_entries > 0 )
    {
      if( num_services != num_entries )
      {
        SNS_PRINTF_STRING_LOW_2( SMR_DBG_MODULE_ID,
          "Too many service instances found (%i / %i)", num_services, num_entries );
      }
      for( i = 0, max_idx = 0, max_iid = 0; i < num_entries; i++ )
      {
        if( QMI_NO_ERR == ( qmi_err =
              qmi_client_get_instance_id( &svc_info_array[ i ], &instance_id) ))
        {
          // Choose the service with the largest instance ID
          if( max_iid < instance_id )
          {
            max_idx = i;
            max_iid = instance_id;
          }
        }
        else
        {
          SNS_PRINTF_STRING_MEDIUM_2( SMR_DBG_MODULE_ID,
              "Instance ID not found for service %i (%i)",
              svc_num, qmi_err );
        }
      }

      *svc_info = svc_info_array[ max_idx ];
    }
    else
    {
      SNS_PRINTF_STRING_ERROR_2( SMR_DBG_MODULE_ID,
              "No services found for num %i (%i)",
              svc_num, qmi_err );
      rv = SNS_ERR_FAILED;
    }

    qmi_client_release( notifier_handle );
  }
  return rv;
}
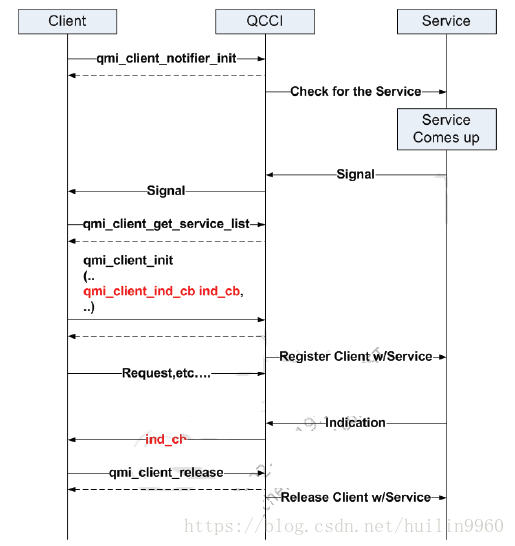
上面的流程主要是微Application Client Manager创建QCCI的客户端,这里就可以看到QCCI的标准API了,
其实这些API在之前的博文中我已经提提过,
这里在详细说一下。
QCCI API讲解
qmi_client_error_type qmi_client_notifier_init
(
 qmi_idl_service_object_type               service_obj,
 qmi_client_os_params                      *os_params,
 qmi_client_type                           *user_handle
)
该方法通过向指定的service obj注册一个notifier,一旦对应的服务器成功注册且用于支持对应的service obj,会发送一个sig信号或者以event的方式放置在os_params中。
qmi_client_get_service_list
(
 	qmi_idl_service_object_type   service_obj,
 	qmi_service_info       *service_info_array,
	unsigned int *num_entries,
 	unsigned int *num_services
)
用于获取服务端的地址信息以访问该服务,如果对应的服务器列表中有匹配service type的类型,
那么将会把该服务的信息填充到service_info_array结构体中,该service信息将会传给qmi_client_init方法,
这样客户端就可以操作该service以获取相应的功能了。
extern  qmi_client_error_type
qmi_client_init
(
  const char                                *dev_id,
  qmi_idl_service_object_type               service_obj,/* Defined in the  Library header file */
  qmi_client_ind_cb                         ind_cb,
  void                                      *ind_cb_data,
  qmi_client_type                           *user_handle
)
该方法用于客户端连接服务器端的初始化工作。
下图展示了client端使用QCCI API初始化的流程
另一方面, sns_acm_init方法后有call sns_monitor_adsp_restart方法,该方法中启动了一个线程来进行连接SMGR服务的初始化工作。
static int sns_monitor_adsp_restart()
{
  pthread_t thread_id;
  pthread_attr_t attr;

  SNS_PRINTF_STRING_MEDIUM_0( SNS_DBG_MOD_APPS_MAIN, "Start thread to monitor ADSP restart");
  pthread_attr_init( &attr );
  pthread_attr_setdetachstate( &attr, PTHREAD_CREATE_DETACHED );
  pthread_create( &thread_id,  &attr, sns_handle_adsp_restart,  NULL );
  pthread_attr_destroy( &attr );

  return 0;
}
static void* sns_handle_adsp_restart( void *unused )
{
  qmi_client_error_type qmi_err;
  qmi_service_info service_info;
  qmi_client_type smgr_client;
  qmi_idl_service_object_type service;
  qmi_client_type notifier_handle;
  qmi_cci_os_signal_type os_params;

  UNREFERENCED_PARAMETER(unused);

  SNS_PRINTF_STRING_MEDIUM_0( SNS_DBG_MOD_APPS_MAIN,
                              "Register for SMRG service");
  service = sns_smr_get_svc_obj( SNS_SMGR_SVC_ID_V01 );
  if( service == NULL )
  {
    SNS_PRINTF_STRING_ERROR_0( SNS_DBG_MOD_APPS_MAIN,
                               "Error: SMGR service is NULL" );
    return (void*)0;
  }

  qmi_err = qmi_client_notifier_init( service, &os_params, ¬ifier_handle );
  if( QMI_NO_ERR != qmi_err )
  {
    SNS_PRINTF_STRING_ERROR_1( SNS_DBG_MOD_APPS_MAIN,
                               "qmi_client_notifier_init for SMGR failed, err=%d",
                               qmi_err );
    return (void*)0;
  }
  SNS_PRINTF_STRING_MEDIUM_0( SNS_DBG_MOD_APPS_MAIN,
                              "Waiting for SMGR service up" );
  QMI_CCI_OS_SIGNAL_WAIT( &os_params, SNS_SMGR_SVC_TIMEOUT_MS );
  if( QMI_CCI_OS_SIGNAL_TIMED_OUT(&os_params) )
  {
    SNS_PRINTF_STRING_ERROR_0( SNS_DBG_MOD_APPS_MAIN,
                               "Timeout waiting for SMGR service. Exit sensors daemon!" );
    sns_main_exit();
  }
  else
  {
    SNS_PRINTF_STRING_MEDIUM_0( SNS_DBG_MOD_APPS_MAIN,
                                "Get SMGR servive info" );
    qmi_err = qmi_client_get_any_service( service, &service_info );
    if( qmi_err != QMI_NO_ERR )
    {
      SNS_PRINTF_STRING_ERROR_1( SNS_DBG_MOD_APPS_MAIN,
                                 "qmi_client_get_any_service for SMGR failed, err=%d",
                                 qmi_err );
    }
    else
    {
      SNS_PRINTF_STRING_MEDIUM_0( SNS_DBG_MOD_APPS_MAIN,
                                  "Initialize client for SMRG" );
      qmi_err = qmi_client_init( &service_info, service, NULL, NULL, NULL, &smgr_client );
      if( QMI_NO_ERR != qmi_err )
      {
        SNS_PRINTF_STRING_ERROR_1( SNS_DBG_MOD_APPS_MAIN,
                                   "qmi_client_init for SMGR failed, err=%d",
                                   qmi_err);
      }
      else
      {
        SNS_PRINTF_STRING_MEDIUM_0( SNS_DBG_MOD_APPS_MAIN,
                                    "Register for SMGR error notification" );
        qmi_err = qmi_client_register_error_cb( smgr_client, sns_smgr_svc_error_cb, NULL );
        if( QMI_NO_ERR != qmi_err )
        {
          SNS_PRINTF_STRING_ERROR_1( SNS_DBG_MOD_APPS_MAIN,
                                     "qmi_client_register_error_cb for SMGR failed, err=%d",
                                     qmi_err );
          qmi_client_release( smgr_client );
        }
      }
    }
  }

  qmi_client_release( notifier_handle );

  return (void*)0;
}
这里通过sns_smr_get_svc_obj获取的是我们的sensor manager服务。
 Sensor manager.  */
#define SNS_SMGR_SVC_ID_V01 0
所以这部分流程则是初始化的SMGR的客户端部分。
#define SNS_MODULE_APPS_PP        (SNS_MODULE_APPS + 00)    /* Power Proxy */
#define SNS_MODULE_APPS_SAM       (SNS_MODULE_APPS + 01)    /* Legacy Sensor Algorithm Manager */
#define SNS_MODULE_APPS_SMR       (SNS_MODULE_APPS + 02)    /* Sensors Message Router */
#define SNS_MODULE_APPS_DIAG      (SNS_MODULE_APPS + 03)    /* Sensors diag agent module */
#define SNS_MODULE_APPS_ACM       (SNS_MODULE_APPS + 04)    /* Sensors application client module */
#define SNS_MODULE_APPS_REG       (SNS_MODULE_APPS + 05)    /* Sensors Registry Module */
#define SNS_MODULE_APPS_EM        (SNS_MODULE_APPS + 06)    /* Sensors Event Manager Module */
#define SNS_MODULE_APPS_INIT      (SNS_MODULE_APPS + 07)    /* Initialization module */
#define SNS_MODULE_APPS_PWR       (SNS_MODULE_APPS + 8)     /* Power module */
#define SNS_MODULE_APPS_TIME      (SNS_MODULE_APPS + 9)     /* Sensors Time Module */
#define SNS_MODULE_APPS_SCM       (SNS_MODULE_APPS + 10)    /* Sensors Calibration Module on Apps */
#define SNS_MODULE_APPS_FILE      (SNS_MODULE_APPS + 11)    /* Sensors File internal module */
#define SNS_MODULE_APPS_SAM2      (SNS_MODULE_APPS + 12)    /* Updated SAM Framework */
如上定义的module,都会有对应的client端创建。
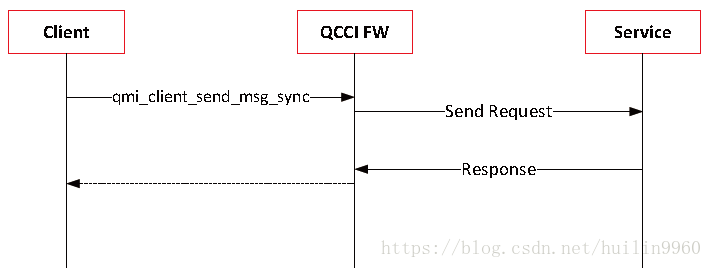
一旦这些client成功创建,便可以通过QMI的标准API向服务端发送消息了。
qmi_client_send_msg_sync
qmi_client_send_msg_async
qmi_client_send_raw_msg_sync
qmi_client_send_raw_msg_async
client端发送同步消息的流程如下:
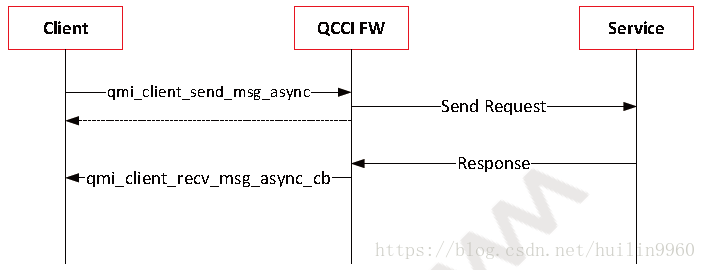
发送异步消息:
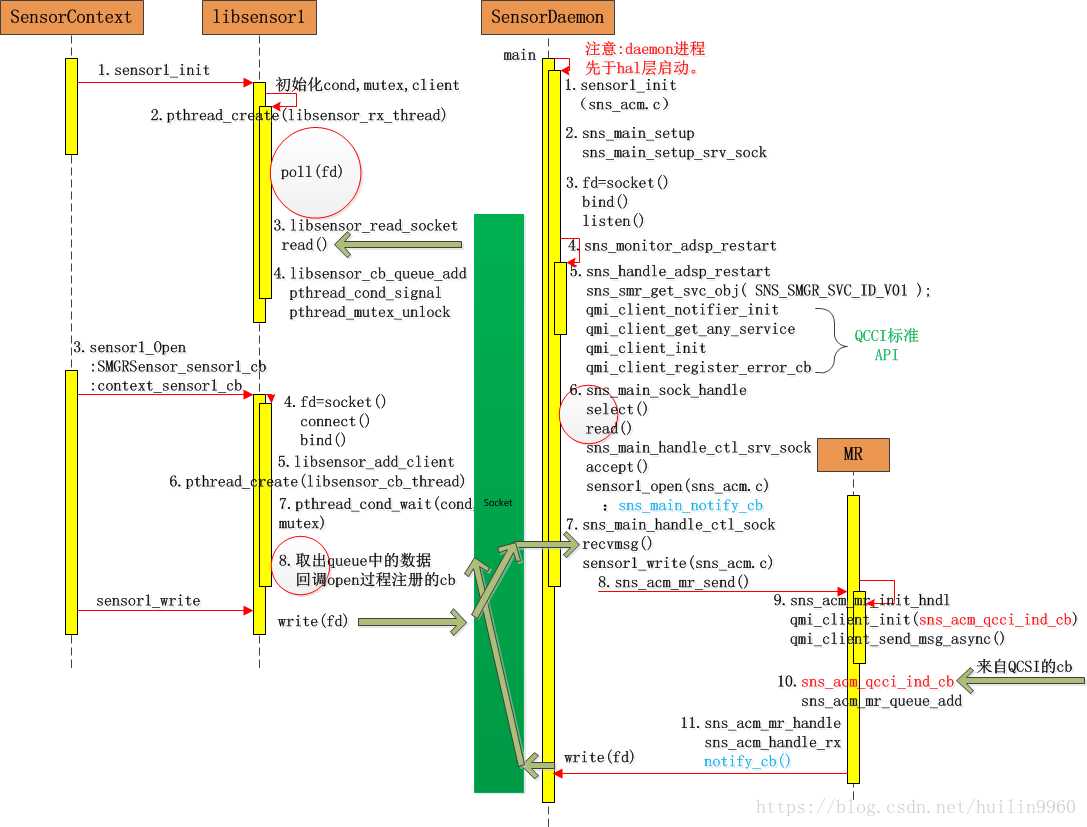
这些所谓的服务都在modem端有相应的处理函数,关于server端(adsp)部分,我们会在后续文章中继续分析,欢迎关注。
后面的文章我们将深入driver层,看看sensor driver的具体实现了,现在我们串一下SensorContext到SensorDaemon的数据流程图,QCCI部分在上面的流程图里已经给出,请各位参考:
最后
以上就是懦弱绿草最近收集整理的关于Qcom_Sensor(八)--- 之 DSPS架构分析的全部内容,更多相关Qcom_Sensor(八)---内容请搜索靠谱客的其他文章。


发表评论 取消回复