QML_Button或者Rectangle倒圆角的特殊应用
说明:由于QML没有直接属性可以设置某一个角倒圆角,只要设置了radius属性,则四个角度都会统一改变,当我们需要实现一个中英文切换的按钮时就是很痛苦。
方法一:利用叠加(一个Rectangle拥有合适的圆角叠加在Button的左侧或者是右侧)的方法实现这种效果。
方法二:通过Shape组件来实现。
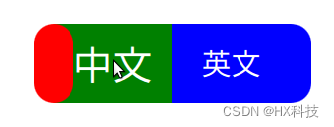
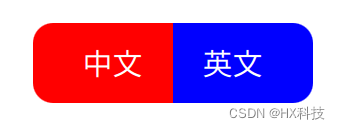

1、叠加方法效果展示:
import QtQuick 2.12
import QtQuick.Controls 2.13
import QtQuick.Window 2.12

Window {
    width: 800
    height: 480
    visible: true
    title: qsTr("Qt基于Qml任意圆角矩形定制")
    color:"white"

    Row{
        anchors.centerIn: parent
        Button{
            id:button1
            width: 120
            height: 80
            background: Rectangle{
                anchors.fill: parent
                color: button1.pressed ? "green":"red"
            }
            Rectangle{
                width: radius*2
                height: parent.height
                anchors.horizontalCenter: parent.left
                color: button1.pressed ? "green":"red"
                radius: 20
            }
            Text {
                id: chanice
                anchors.centerIn: parent
                font.pixelSize: button1.pressed ? 40:30
                color: "white"
                text: qsTr("中文")
            }
        }
        Button{
            id:button2
            width: 120
            height: 80
            background: Rectangle{
                anchors.fill: parent
                color: button2.pressed ? "green":"blue"
            }
            Rectangle{
                width: radius*2
                height: parent.height
                anchors.horizontalCenter: parent.right
                color:  button2.pressed ? "green":"blue"
                radius: 20
            }
            Text {
                id: enight
                anchors.centerIn: parent
                font.pixelSize: button2.pressed ? 40:30
                color: "white"
                text: qsTr("英文")
            }
        }
    }
}
2、通过Shape组件来实现
Mybutton.qml
import QtQuick 2.12
import QtQuick.Shapes 1.12
//自定义矩形组件
Shape {
    id: idShapeControl
    property var cornersRadius
    property color color
    property color borderColor:"transparent"
    property int borderWidth: 1
    layer.enabled: true
    layer.samples: 4
    layer.smooth: true
    ShapePath {
        startX: 0
        startY: cornersRadius[0]
        fillColor: color
        strokeColor: borderColor
        strokeWidth: borderWidth
        PathQuad { x: cornersRadius[0]; y: 0; controlX: 0; controlY: 0 }
        PathLine { x: idShapeControl.width - cornersRadius[1]; y: 0 }
        PathQuad { x: idShapeControl.width; y: cornersRadius[1]; controlX: idShapeControl.width; controlY: 0 }
        PathLine { x: idShapeControl.width; y: idShapeControl.height - cornersRadius[2] }
        PathQuad { x: idShapeControl.width - cornersRadius[2]; y: idShapeControl.height; controlX: idShapeControl.width; controlY: idShapeControl.height }
        PathLine { x: cornersRadius[3]; y: idShapeControl.height }
        PathQuad { x: 0; y: idShapeControl.height - cornersRadius[3]; controlX: 0; controlY: idShapeControl.height }
        PathLine { x: 0; y: cornersRadius[0] }
    }
}
main.qml
import QtQuick 2.12
import QtQuick.Controls 2.13
import QtQuick.Window 2.12

Window {
    width: 800
    height: 480
    visible: true
    title: qsTr("Qt基于Qml任意圆角矩形定制")
    color:"black"
    //测试组件

    Row{
        id:idRow
        spacing: 20
        anchors.centerIn: parent
        property int w: 180
        property int h: 180
        property var colors :["red","#FF00FF","#00FFFF","orange"]
        Mybutton{
            width: parent.w
            height: parent.h
            color: parent.colors[0]
            cornersRadius: [20,0,20,0]
            borderWidth:1
            borderColor:"yellow"
        }
        Mybutton{
            width: parent.w
            height: parent.h
            color: parent.colors[1]
            cornersRadius: [30,50,40,0]

        }
        Mybutton{
            width: parent.w
            height: parent.h
            color: parent.colors[2]
            cornersRadius: [30,0,0,30]
        }
        Mybutton{
            width: parent.w
            height: parent.h
            color: parent.colors[3]
            cornersRadius: [0,20,20,0]
        }
    }
}
最后
以上就是文艺野狼最近收集整理的关于QML_Button或者Rectangle倒圆角的特殊应用的全部内容,更多相关QML_Button或者Rectangle倒圆角内容请搜索靠谱客的其他文章。
本图文内容来源于网友提供,作为学习参考使用,或来自网络收集整理,版权属于原作者所有。


发表评论 取消回复