一、理想质量 - 弹簧 - 阻尼系统
弹簧-质量-阻尼系统是一种比较普遍的机械振动系统,生活中也随处可见这种系统,例如汽车缓冲器就是一种可以耗减运动能量的装置,是保证驾驶员行车安全的必备装置。我们通过建立理想的质量 - 弹簧 - 阻尼系统的二阶物理系统模型,来学习simulink的应用。系统方程的的组成部分为质量,刚度和阻尼,方程如下所示:
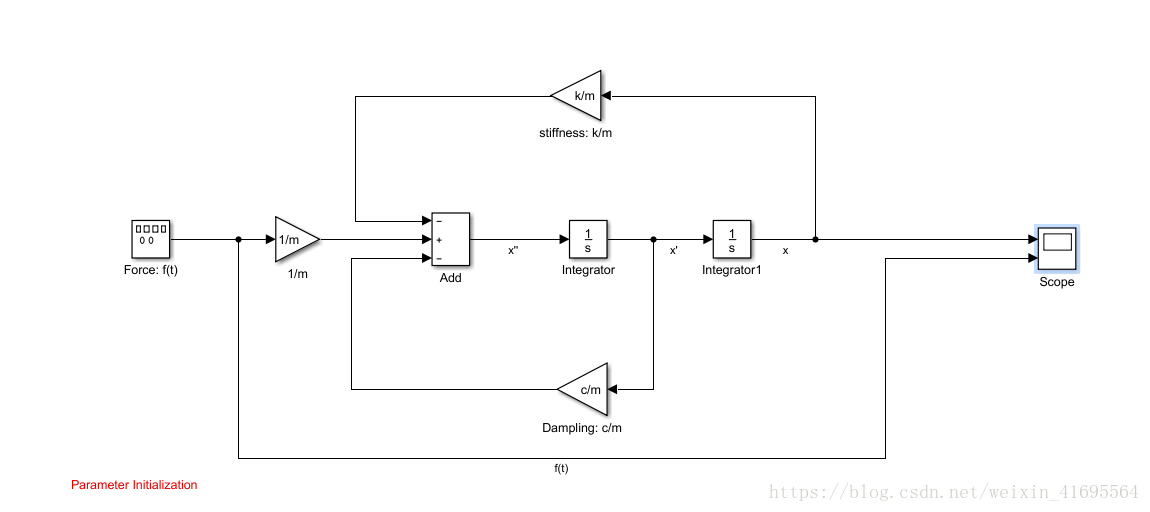
接下来我们建立模型如下所示:
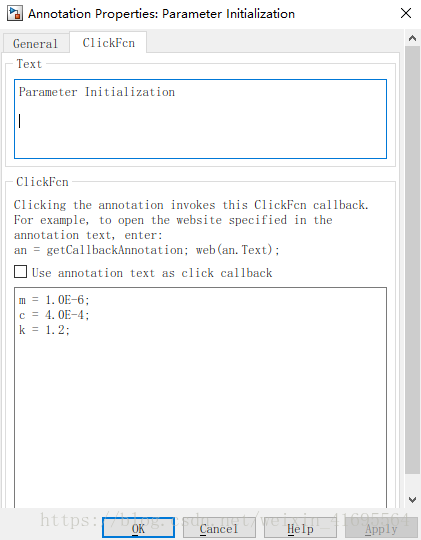
我们打开红色文本 Parameter Initialization,里面是一些参数初始化命令,如下所示:
在运行模型前,点击该文本,触发回调函数,完成参数初始化过程,点击之后,我们观察到工作空间中的变量如下: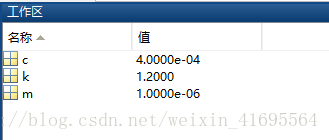
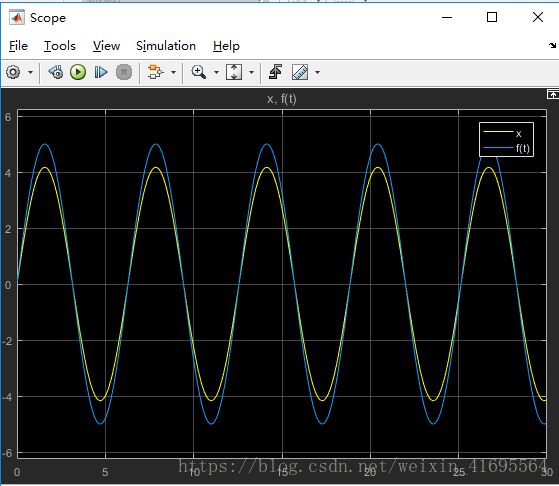
参数初始化以后,我们运行模型:
二、C代码自动生成
本示例学习如何为Simulink模型选择目标,生成用于实时模拟的C代码以及查看生成的文件。该模型代表一个8位计数器,为一个触发子系统提供信号,该子系统由常量模块INC,LIMIT和RESET等组成。 输入和输出表示模型的I / O,放大器子系统通过增益系数K放大输入信号,当信号equal_to_count为真时,增益系数K更新。
模型如下所示: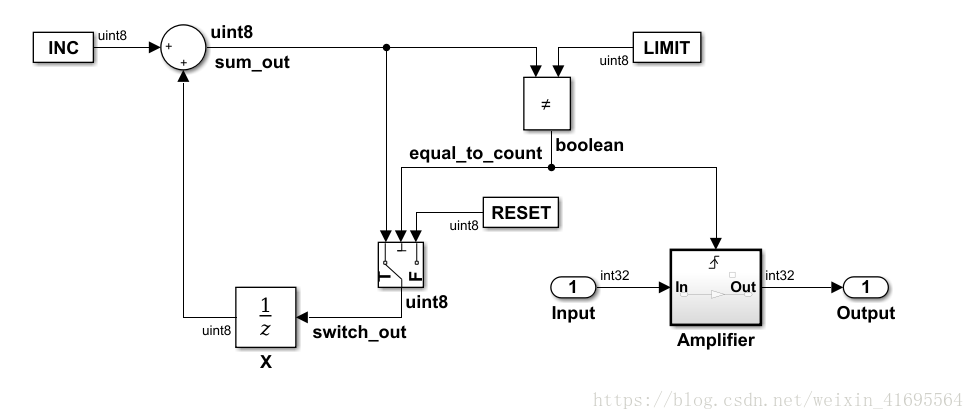
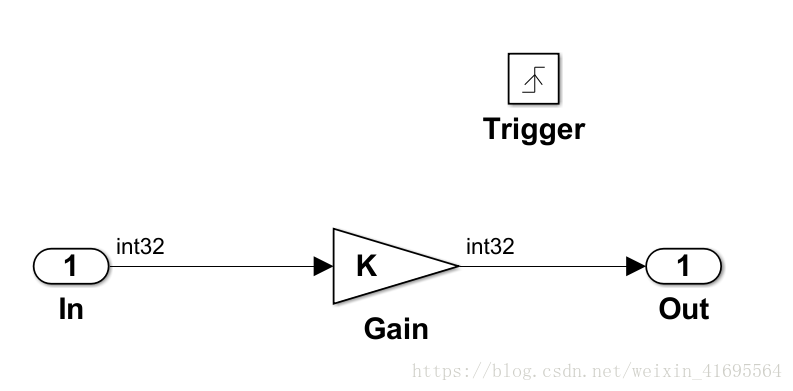
打开放大器子系统,可以看到内部结构如下:
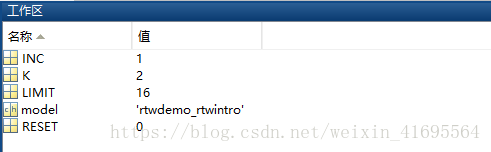
变量的参数初始化如下所示:
建立好模型以后,单击Simulation -> Configuration Parameters,从模型编辑器打开Configuration Parameters对话框:
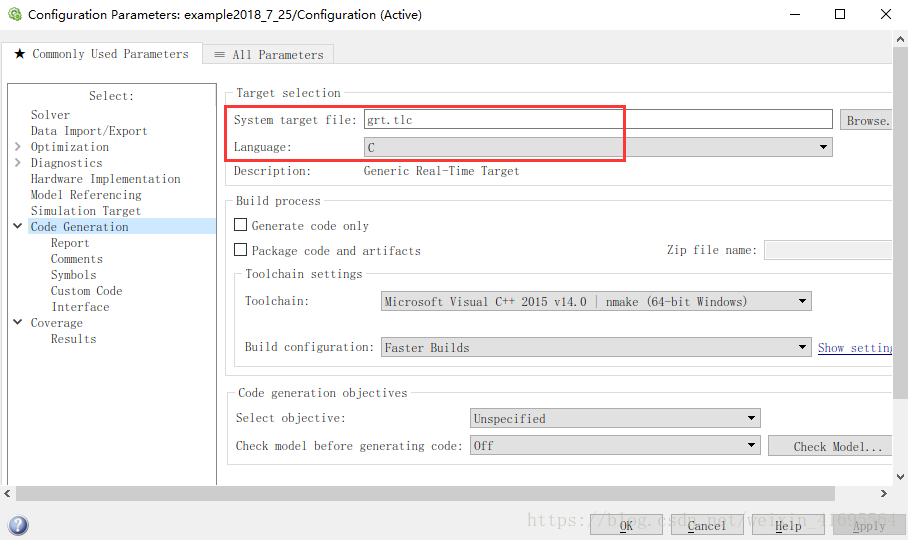
为了生成特定目标环境或目的代码,我们需要使用系统目标文件提供一些内置目标选项,系统目标文件控制目标代码的生成过程。
设置完成以后,回到模型窗口,使用快捷键Ctrl + B生成代码:
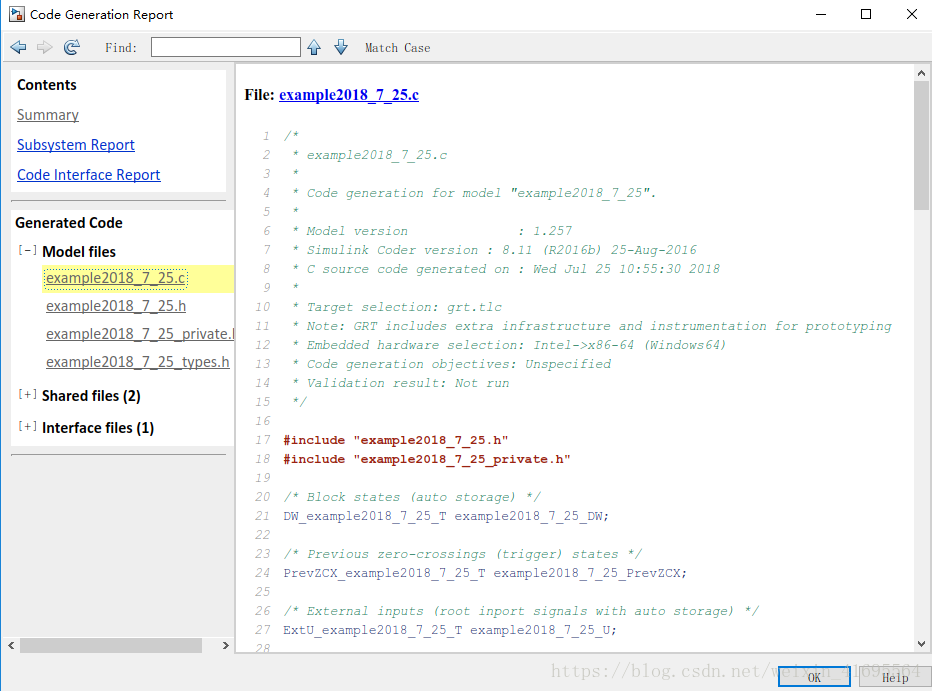
在生成的文件当中,我们找到这几个源文件和头文件:

接下来我们解读自动生成的代码,为了方便起见,我们把它的注释删除掉。
头文件 example2018_7_25.h 如下所示:
#ifndef RTW_HEADER_example2018_7_25_h_
#define RTW_HEADER_example2018_7_25_h_
#include <stddef.h>
#include <string.h>
#ifndef example2018_7_25_COMMON_INCLUDES_
# define example2018_7_25_COMMON_INCLUDES_
#include "rtwtypes.h"
#include "rtw_continuous.h"
#include "rtw_solver.h"
#endif

#include "example2018_7_25_types.h"


#include "multiword_types.h"


#ifndef rtmGetErrorStatus
# define rtmGetErrorStatus(rtm)        ((rtm)->errorStatus)
#endif

#ifndef rtmSetErrorStatus
# define rtmSetErrorStatus(rtm, val)   ((rtm)->errorStatus = (val))
#endif


typedef struct {
  uint8_T X;
} DW_example2018_7_25_T;


typedef struct {
  ZCSigState Amplifier_Trig_ZCE;
} PrevZCX_example2018_7_25_T;


typedef struct {
  int32_T Input;
} ExtU_example2018_7_25_T;


typedef struct {
  int32_T Output;
} ExtY_example2018_7_25_T;


struct tag_RTM_example2018_7_25_T {
  const char_T *errorStatus;
};


extern DW_example2018_7_25_T example2018_7_25_DW;

extern ExtU_example2018_7_25_T example2018_7_25_U;

extern ExtY_example2018_7_25_T example2018_7_25_Y;


extern void example2018_7_25_initialize(void);
extern void example2018_7_25_step(void);
extern void example2018_7_25_terminate(void);


extern RT_MODEL_example2018_7_25_T *const example2018_7_25_M;

#endif
头文件 example2018_7_25_private.h 如下所示:
#ifndef RTW_HEADER_example2018_7_25_private_h_
#define RTW_HEADER_example2018_7_25_private_h_
#include "rtwtypes.h"
#include "multiword_types.h"
#endif
源文件如下所示:
#include "example2018_7_25.h"
#include "example2018_7_25_private.h"


// UnitDelay Block states
DW_example2018_7_25_T  example2018_7_25_DW;

// Previous zero-crossings (trigger) states
PrevZCX_example2018_7_25_T  example2018_7_25_PrevZCX;

// External inputs
ExtU_example2018_7_25_T  example2018_7_25_U;

// External outputs
ExtY_example2018_7_25_T example2018_7_25_Y;

// Real-time model
RT_MODEL_example2018_7_25_T  example2018_7_25_M_;

RT_MODEL_example2018_7_25_T *const example2018_7_25_M = &example2018_7_25_M_;


/* Model step function */
void example2018_7_25_step(void)

{

  boolean_T rtb_equal_to_count;
  // 定义了一个布尔变量,用来表示比较结果

  example2018_7_25_DW.X++;
  //  example2018_7_25_DW.X是延时模块的值,即累加值,
  //  由于模型中的INC为常数1,所以每次加1。
  //  首先呢,变量example2018_7_25_DW是一个结构体,其变量声明语句如下所示:
  //  extern DW_example2018_7_25_T example2018_7_25_DW;
  //  显然,DW_example2018_7_25_T代表一个结构体,我们找到这个结构体的定义如下:
  //  typedef struct{
  //		  uint8_T X;
  //	    } DW_example2018_7_25_T;

  rtb_equal_to_count = (example2018_7_25_DW.X != 16);

  if ( rtb_equal_to_count && (example2018_7_25_PrevZCX.Amplifier_Trig_ZCE != POS_ZCSIG))
  {

    example2018_7_25_Y.Output = example2018_7_25_U.Input << 1;
	// 对于逻辑(算术)左移,且不发生溢出时,结果增加两倍,
	// 这正好对应于模型中触发子系统中的增益模块的增益值2
  }
  // 首先呢,变量example2018_7_25_PrevZCX 也是一个结构体变量,其变量声明语句如下所示:
  // PrevZCX_example2018_7_25_T  example2018_7_25_PrevZCX;
  // 显然,PrevZCX_example2018_7_25_T是一个结构体,其结构体定义如下:
  //    typedef struct {
  //         ZCSigState Amplifier_Trig_ZCE;
  //      } PrevZCX_example2018_7_25_T;

  // 那么,变量example2018_7_25_U 的定义如下:
  // ExtU_example2018_7_25_T   example2018_7_25_U;
  // 结构体 ExtU_example2018_7_25_T的定义如下:
  //  typedef struct {
  //	  int32_T Input;
  //	} ExtU_example2018_7_25_T;

  //  最后,变量example2018_7_25_Y 的定义如下:
  //  ExtY_example2018_7_25_T   example2018_7_25_Y;
  //  结构体 ExtY_example2018_7_25_T 的定义如下:
  //   typedef struct {
  //		  int32_T Output;
  // 	} ExtY_example2018_7_25_T;


  example2018_7_25_PrevZCX.Amplifier_Trig_ZCE = rtb_equal_to_count;
  // 更新触发状态

  if (!rtb_equal_to_count)

  {
    example2018_7_25_DW.X = 0U;
  }
  // 当布尔值rtb_equal_to_count为假时,代表计数器已经计数到16了,
  // 当计数到16时,需要重新将延时模块UnitDelay的状态值(即累加值)归零,
  // 此时0U表示无符号形式存储的零值
  // 在头文件中,还有定义:
  // Logical type definitions
	/*  #if (!defined(__cplusplus))
				#  ifndef false
				#   define false                       (0U)
				#  endif

				#  ifndef true
				#   define true                        (1U)
				#  endif
				#endif
				#endif
   */
}


/* Model initialize function */
void example2018_7_25_initialize(void)

{

  rtmSetErrorStatus(example2018_7_25_M, (NULL));
  // 首先,变量example2018_7_25_M的定义如下:
  // RT_MODEL_example2018_7_25_T * const  example2018_7_25_M  =  &example2018_7_25_M_;
  // 那么,RT_MODEL_example2018_7_25_T又是个什么数据类型呢?可以看到定义如下:
  //  typedef   struct  tag_RTM_example2018_7_25_T    RT_MODEL_example2018_7_25_T;


  (void) memset((void *)&example2018_7_25_DW, 0,sizeof(DW_example2018_7_25_T));
  // 将example2018_7_25_DW所在的内存空间赋0
  // memset函数经常用于清0

  example2018_7_25_U.Input = 0;

  example2018_7_25_Y.Output = 0;

  example2018_7_25_PrevZCX.Amplifier_Trig_ZCE = POS_ZCSIG;

  example2018_7_25_DW.X = 0U;

  example2018_7_25_Y.Output = 0;

}


/* Model terminate function */
void example2018_7_25_terminate(void)
{
  /* (no terminate code required) */
}
显然自动生成的代码默认变量的数据类型为结构体,因此程序中运用了大量的结构体类型,读起来额外的费劲,后期可以自己手动完善来增强的代码的可读性。当然源文件当中没有主函数,不能直接运行,里面只是逻辑代码,也没有涉及到硬件的底层驱动。不过,基于模型的设计还是能够加快项目的研发速度,降低研发成本。
最后
以上就是帅气星月最近收集整理的关于Simlulink学习笔记——C代码自动生成解析的全部内容,更多相关Simlulink学习笔记——C代码自动生成解析内容请搜索靠谱客的其他文章。


发表评论 取消回复