配置类:ThingsboardSecurityConfiguration
用户名密码登录
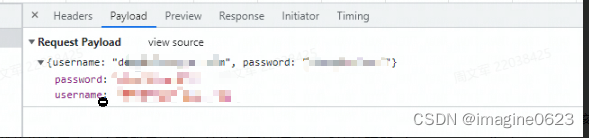
用户名密码登录请求URL: /api/auth/login
配置中发现:在默认的用户名密码认证之前添加了认证拦截器【RestLoginProcessingFilter】,而该拦截器拦截将拦截用户名密码登录请求,并传入了认证成功后的处理器(successHandler)。


RestLoginProcessingFilter定义如下:
// 认证方法
@Override
public Authentication attemptAuthentication(HttpServletRequest request, HttpServletResponse response)
        throws AuthenticationException, IOException, ServletException {

    //。。。省略

    // 提取用户名
    UserPrincipal principal = new UserPrincipal(UserPrincipal.Type.USER_NAME, loginRequest.getUsername());
    // 提取密码
    UsernamePasswordAuthenticationToken token = new UsernamePasswordAuthenticationToken(principal, loginRequest.getPassword());
    token.setDetails(authenticationDetailsSource.buildDetails(request));

    // 执行认证
    return this.getAuthenticationManager().authenticate(token);
}

@Override
protected void successfulAuthentication(HttpServletRequest request, HttpServletResponse response, FilterChain chain,
                                        Authentication authResult) throws IOException, ServletException {
    successHandler.onAuthenticationSuccess(request, response, authResult);
}
进入authenticate方法(位于ProviderManager.class)
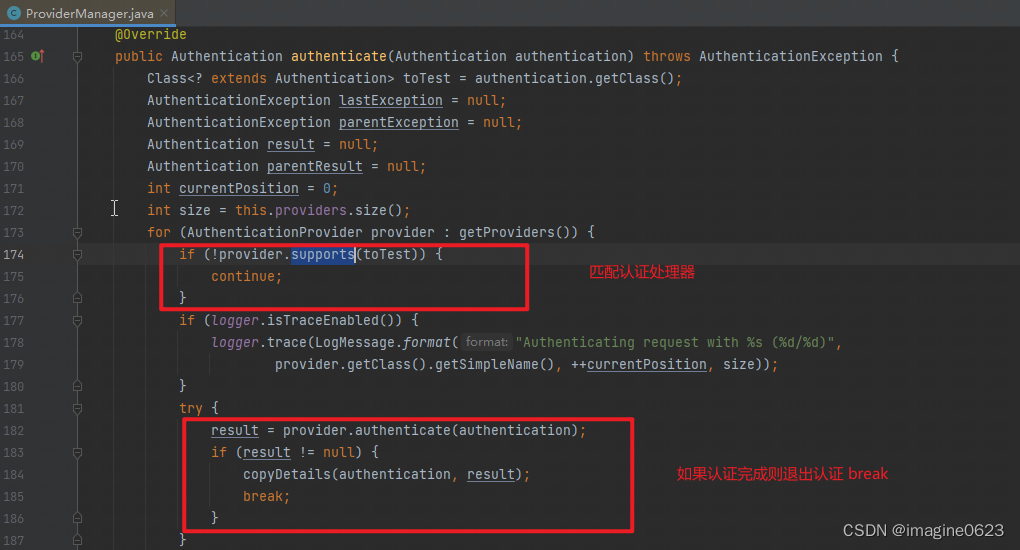
通过认证请求的类型从providers中匹配到认证处理器,provider的实现类有:
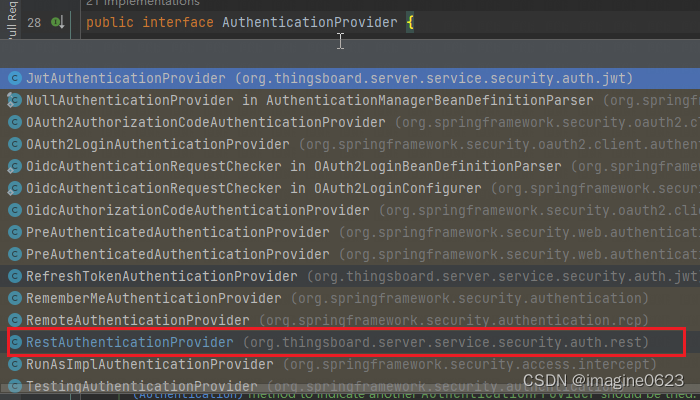
其中注意到自定义的类:RestAuthenticationProvider,主要代码如下:
@Override
public boolean supports(Class<?> authentication) {
    // 匹配
    return (UsernamePasswordAuthenticationToken.class.isAssignableFrom(authentication));
}

@Override
public Authentication authenticate(Authentication authentication) throws AuthenticationException {
    Assert.notNull(authentication, "No authentication data provided");

    Object principal = authentication.getPrincipal();
    if (!(principal instanceof UserPrincipal)) {
        throw new BadCredentialsException("Authentication Failed. Bad user principal.");
    }

    UserPrincipal userPrincipal = (UserPrincipal) principal;
    if (userPrincipal.getType() == UserPrincipal.Type.USER_NAME) {
        String username = userPrincipal.getValue();
        String password = (String) authentication.getCredentials();
        // 校验用户名和密码:1.从用户表查询用户信息 2.校验用户密码是否一致
        return authenticateByUsernameAndPassword(authentication, userPrincipal, username, password);
    }
    // 省略其他代码
}
如果认证成功,则执行successHandler,从配置类【ThingsboardSecurityConfiguration】得知handler是:
全局搜索defaultAuthenticationSuccessHandler :
@Component(value = "defaultAuthenticationSuccessHandler")
public class RestAwareAuthenticationSuccessHandler implements AuthenticationSuccessHandler {
    // 。。。

    @Override
    public void onAuthenticationSuccess(HttpServletRequest request, HttpServletResponse response,
                                        Authentication authentication) throws IOException, ServletException {
        SecurityUser securityUser = (SecurityUser) authentication.getPrincipal();

        JwtToken accessToken = tokenFactory.createAccessJwtToken(securityUser);
        JwtToken refreshToken = refreshTokenRepository.requestRefreshToken(securityUser);

        // 生成access_token 和 refreshToken
        Map<String, String> tokenMap = new HashMap<String, String>();
        tokenMap.put("token", accessToken.getToken());
        tokenMap.put("refreshToken", refreshToken.getToken());

        // 将token写入响应对象
        response.setStatus(HttpStatus.OK.value());
        response.setContentType(MediaType.APPLICATION_JSON_VALUE);
        mapper.writeValue(response.getWriter(), tokenMap);

        // 。。。
    }
}
至此登录完成,前端可使用jwt请求用户数据。
JWT请求用户数据
登录完成后,使用jwt请求用户数据,例如请求当前用户基础信息:
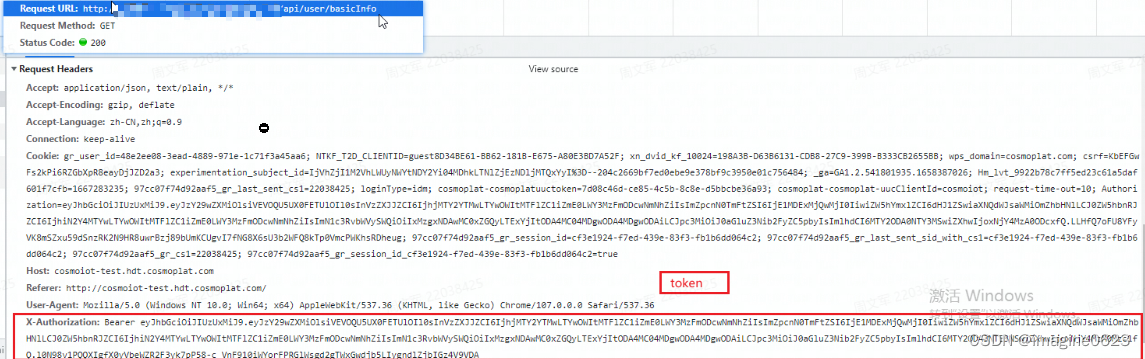
使用jwt请求用户数据,首先要认证该jwt是否合法,然后将jwt表示的用户放入上下文中,然后执行具体的查询逻辑;既然是认证,还是从安全配置类【ThingsboardSecurityConfiguration】开始:


可知Filter【JwtTokenAuthenticationProcessingFilter】默认处理除了指定skip的url外,定义如下:
public class JwtTokenAuthenticationProcessingFilter extends AbstractAuthenticationProcessingFilter {
    // ...
    @Override
    public Authentication attemptAuthentication(HttpServletRequest request, HttpServletResponse response)
            throws AuthenticationException, IOException, ServletException {
        RawAccessJwtToken token = new RawAccessJwtToken(tokenExtractor.extract(request));
        //匹配处理类JwtAuthenticationToken的认证器,然后执行认证
        return getAuthenticationManager().authenticate(new JwtAuthenticationToken(token));
    }

    @Override
    protected void successfulAuthentication(HttpServletRequest request, HttpServletResponse response, FilterChain chain,
                                            Authentication authResult) throws IOException, ServletException {
        // 认证成功,将认证结果缓存到上下文中
        SecurityContext context = SecurityContextHolder.createEmptyContext();
        context.setAuthentication(authResult);
        SecurityContextHolder.setContext(context);
        chain.doFilter(request, response);
    }
    // ...
 }
可发现自定义的认证器【JwtAuthenticationProvider 】匹配类【JwtAuthenticationToken】
@Component
@RequiredArgsConstructor
public class JwtAuthenticationProvider implements AuthenticationProvider {
    //...
    @Override
    public Authentication authenticate(Authentication authentication) throws AuthenticationException {
        RawAccessJwtToken rawAccessToken = (RawAccessJwtToken) authentication.getCredentials();
        // 解析jwt、校验jwt,返回jwt表示的用户
        SecurityUser securityUser = tokenFactory.parseAccessJwtToken(rawAccessToken);
        //...
        if (tokenOutdatingService.isOutdated(rawAccessToken, securityUser.getId())) {
            throw new JwtExpiredTokenException("Token is outdated");
        }
        return new JwtAuthenticationToken(securityUser);
    }

    @Override
    public boolean supports(Class<?> authentication) {
        return (JwtAuthenticationToken.class.isAssignableFrom(authentication));
    }
}
OAuth2授权码登录(以github为例)
配置信息
http.oauth2Login()
        .authorizationEndpoint()
        // cookie存储请求
        .authorizationRequestRepository(httpCookieOAuth2AuthorizationRequestRepository)
        // 请求解析器
        .authorizationRequestResolver(oAuth2AuthorizationRequestResolver)
        .and()
        .loginPage("/oauth2Login")
        .loginProcessingUrl(oauth2Configuration.getLoginProcessingUrl())
        // 授权成功处理器
        .successHandler(oauth2AuthenticationSuccessHandler)
        // 授权失败处理器
        .failureHandler(oauth2AuthenticationFailureHandler);
配置GitHub授权登录
当部署TB后,默认是不支持GitHub授权登录的,看不到GitHub登录按钮,请参考oauth2配置教程。
整体流程
为了流程更清晰,请先登录github
-
进入登录页面,先获取已支持的授权登录方式,用来渲染登录按钮和按钮的链接
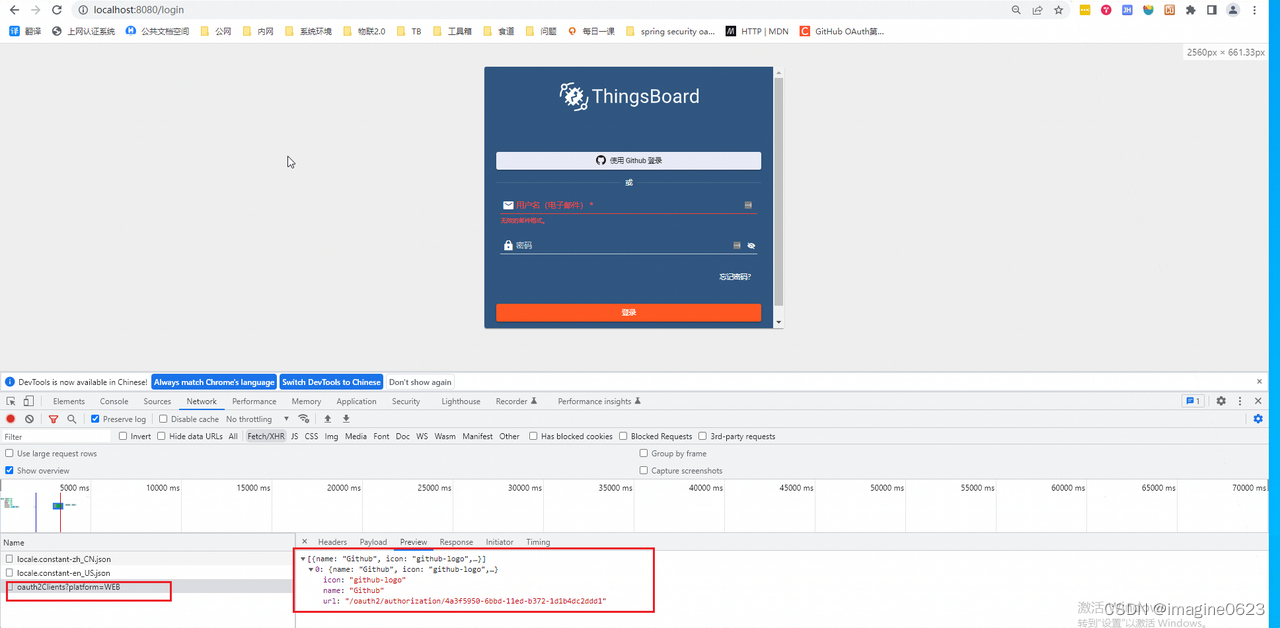
-
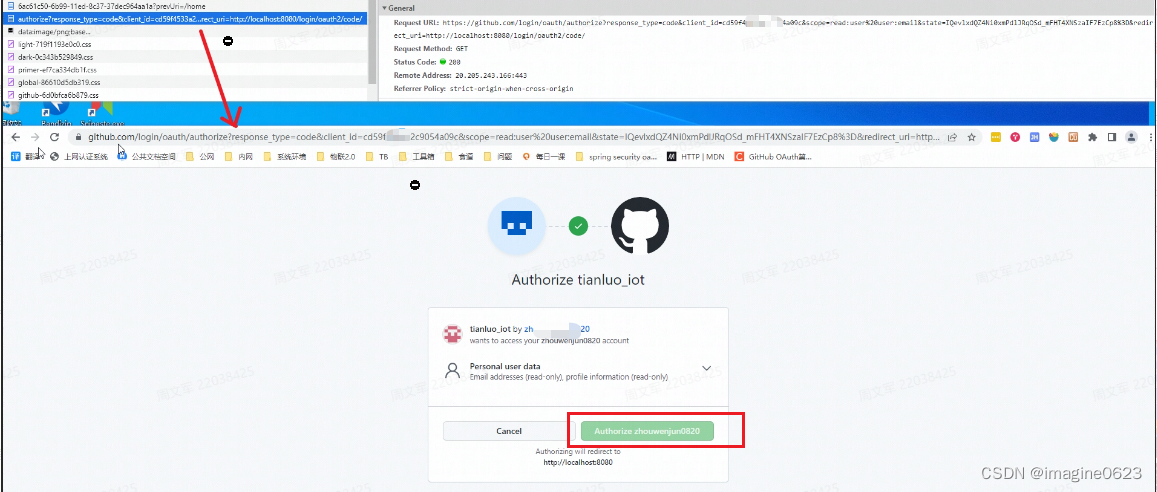
点击Github登录按钮,系统根据请求中的id判断本次授权登录是通过github登录,因此响应302使前端重定向到github的授权页面

-
在github的页面确认授权即可(后续再登录就无需授权了)
-
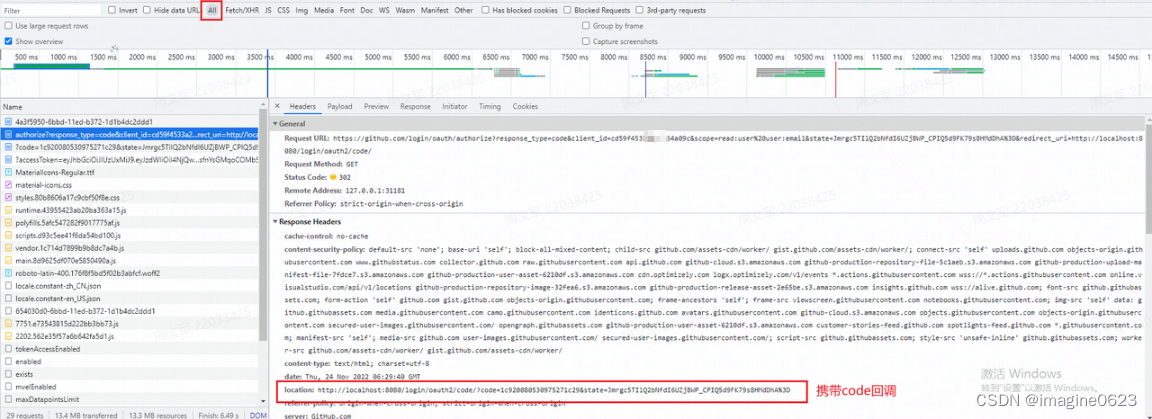
git授权认证后携带code回调
-
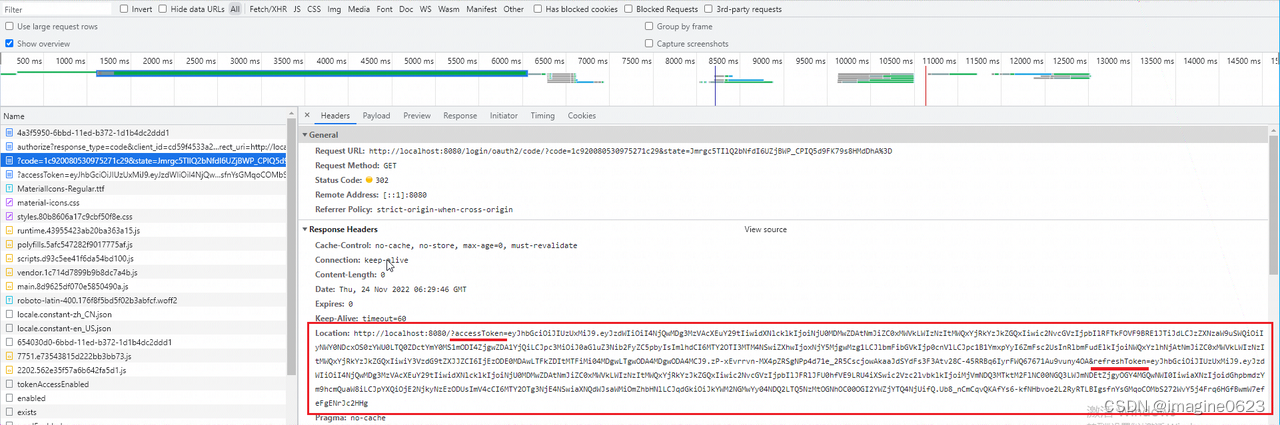
发起回调,系统用code到github中换access_token,再用access_token到github中查询github用户信息,然后匹配本地用户,如不存在则注册新用户;再生成登录态jwt(access_token和refresh_token),并重定向到首页
详细解析
自定义ClientRegistrationRepository
public interface ClientRegistrationRepository {
    ClientRegistration findByRegistrationId(String registrationId);
}
ClientRegistrationRepository 是spring security给开发者的扩展点,使得开发者可以根据id选择不同的client(即不同的授权认证方式),在spring security认证filter中会调用该接口获取client注册信息,然后存入认证请求中:
TB里自定义的ClientRegistrationRepository:
@Component
public class HybridClientRegistrationRepository implements ClientRegistrationRepository {
    private static final String defaultRedirectUriTemplate = "{baseUrl}/login/oauth2/code/{registrationId}";

    @Autowired
    private OAuth2Service oAuth2Service;

    @Override
    public ClientRegistration findByRegistrationId(String registrationId) {
    	// 从库中查询client注册信息
        OAuth2Registration registration = oAuth2Service.findRegistration(UUID.fromString(registrationId));
        // 构造ClientRegistration对象
        return registration == null ?
                null : toSpringClientRegistration(registration);
    }

    private ClientRegistration toSpringClientRegistration(OAuth2Registration registration){
        String registrationId = registration.getUuidId().toString();
        return ClientRegistration.withRegistrationId(registrationId)
                .clientName(registration.getName())
                .clientId(registration.getClientId())
                .authorizationUri(registration.getAuthorizationUri())
                .clientSecret(registration.getClientSecret())
                .tokenUri(registration.getAccessTokenUri())
                .scope(registration.getScope())
                .authorizationGrantType(AuthorizationGrantType.AUTHORIZATION_CODE)
                .userInfoUri(registration.getUserInfoUri())
                .userNameAttributeName(registration.getUserNameAttributeName())
                .jwkSetUri(registration.getJwkSetUri())
                .clientAuthenticationMethod(new ClientAuthenticationMethod(registration.getClientAuthenticationMethod()))
                .redirectUri(defaultRedirectUriTemplate)
                .build();
    }
}
获取授权URL
从表【oauth2_registration】查询到registrationId,然后拼接到授权URl中并返回。
授权请求解析,重定向到github
接收到授权请求:/oauth2/authorization/529c39e0-1958-11ed-947e-9d3049528ec9
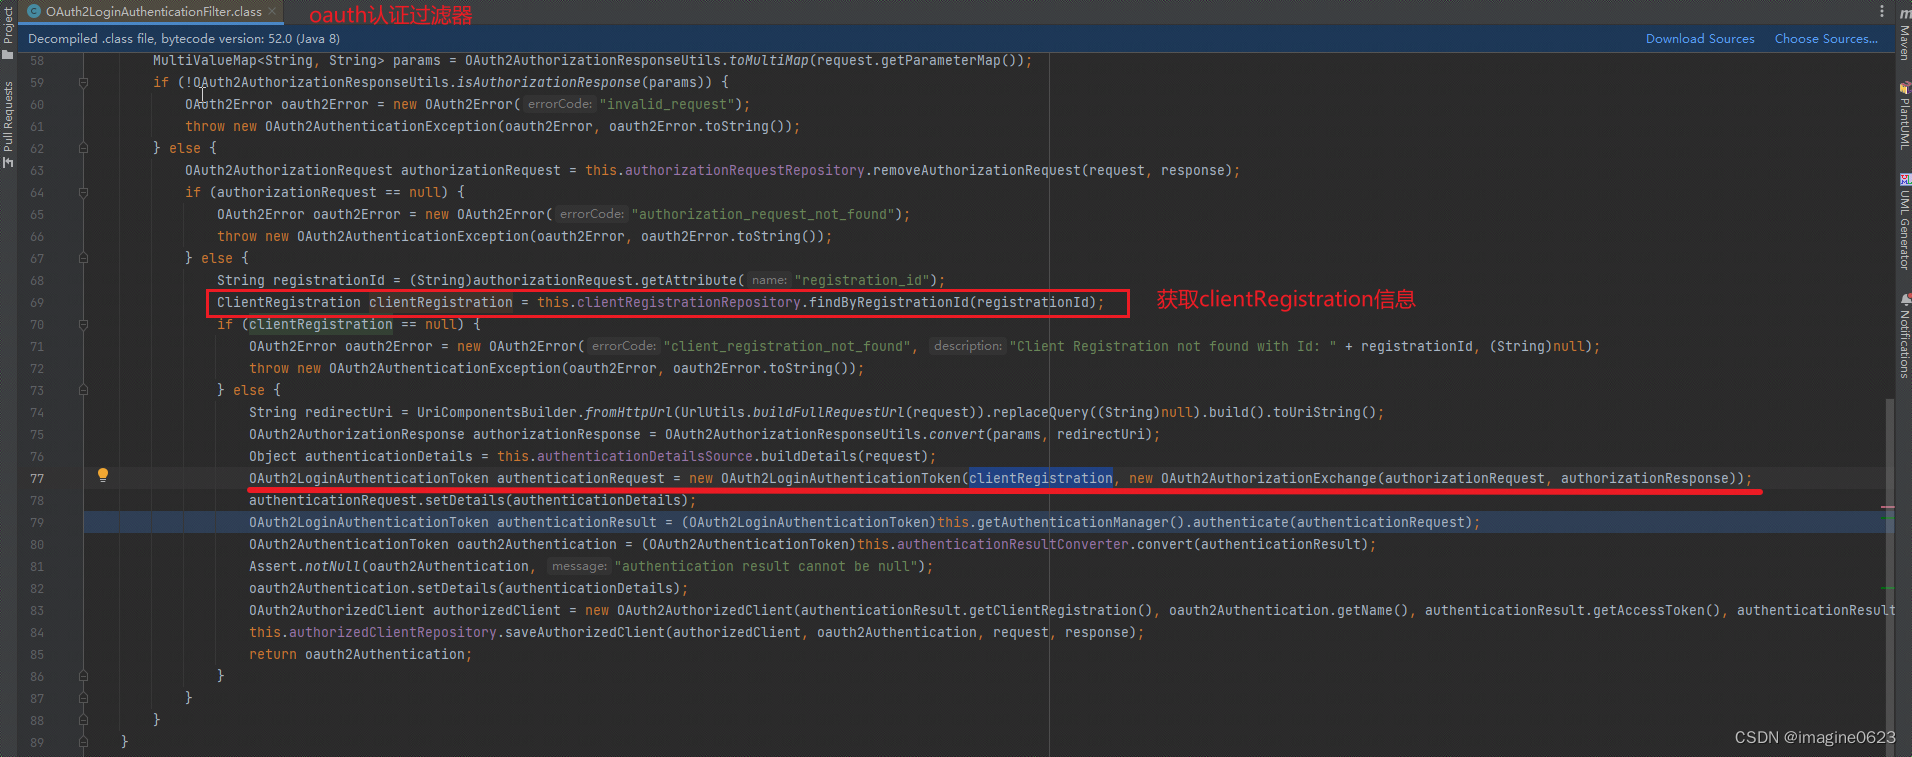
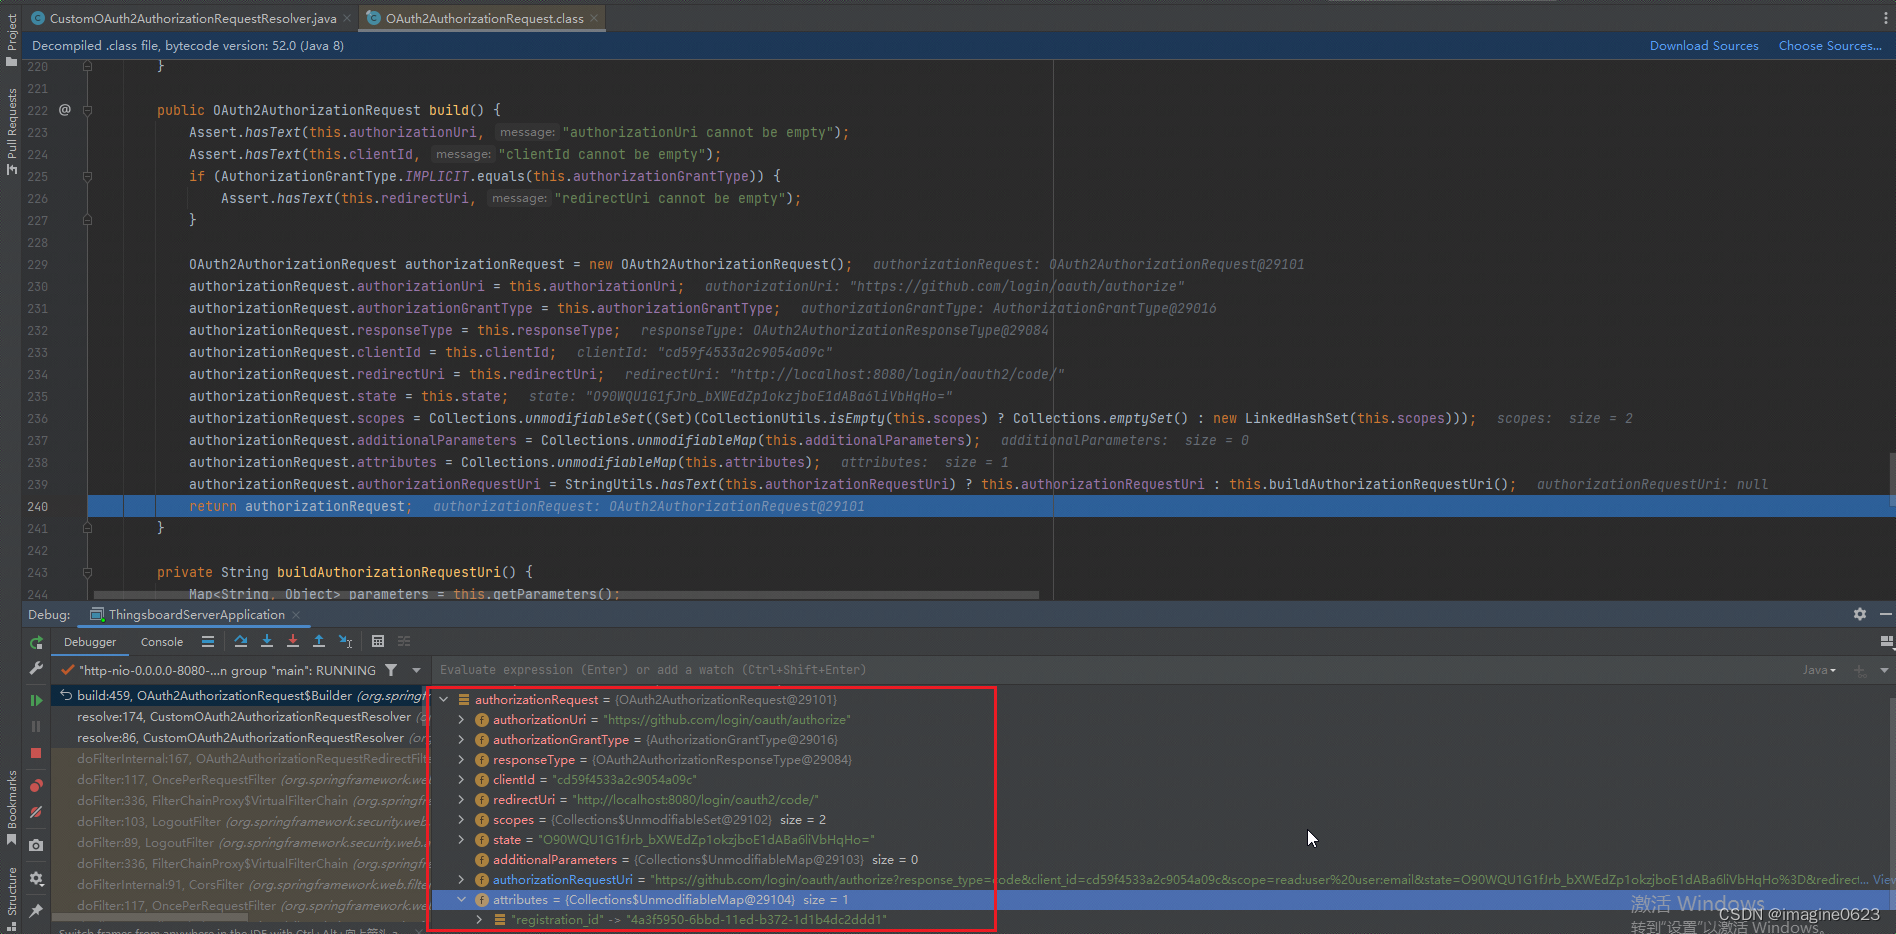
根据授权请求解析器【oAuth2AuthorizationRequestResolver】根据表【oauth2_registration】构造OAuth2AuthorizationRequest对象,其具体实现类【CustomOAuth2AuthorizationRequestResolver】的核心方法是:
private OAuth2AuthorizationRequest resolve(HttpServletRequest request, String registrationId, String redirectUriAction, String appPackage, String appToken) {
    // 根据registrationId查找当前使用的是什么平台的client登记信息,这里是github的客户端信息
    ClientRegistration clientRegistration = this.clientRegistrationRepository.findByRegistrationId(registrationId);
    Map<String, Object> attributes = new HashMap<>();
    attributes.put(OAuth2ParameterNames.REGISTRATION_ID, clientRegistration.getRegistrationId());
    String appSecret = this.oAuth2Service.findAppSecret(UUID.fromString(registrationId), appPackage);
    String callbackUrlScheme = this.oAuth2AppTokenFactory.validateTokenAndGetCallbackUrlScheme(appPackage, appToken, appSecret);
    attributes.put(TbOAuth2ParameterNames.CALLBACK_URL_SCHEME, callbackUrlScheme);
    // 构造回调URL
    String redirectUriStr = expandRedirectUri(request, clientRegistration, redirectUriAction);
    return builder
            .clientId(clientRegistration.getClientId())
            .authorizationUri(clientRegistration.getProviderDetails().getAuthorizationUri())
            .redirectUri(redirectUriStr)
            .scopes(clientRegistration.getScopes())
            .state(this.stateGenerator.generateKey())
            .attributes(attributes)
            .build();
}
解析出对象:
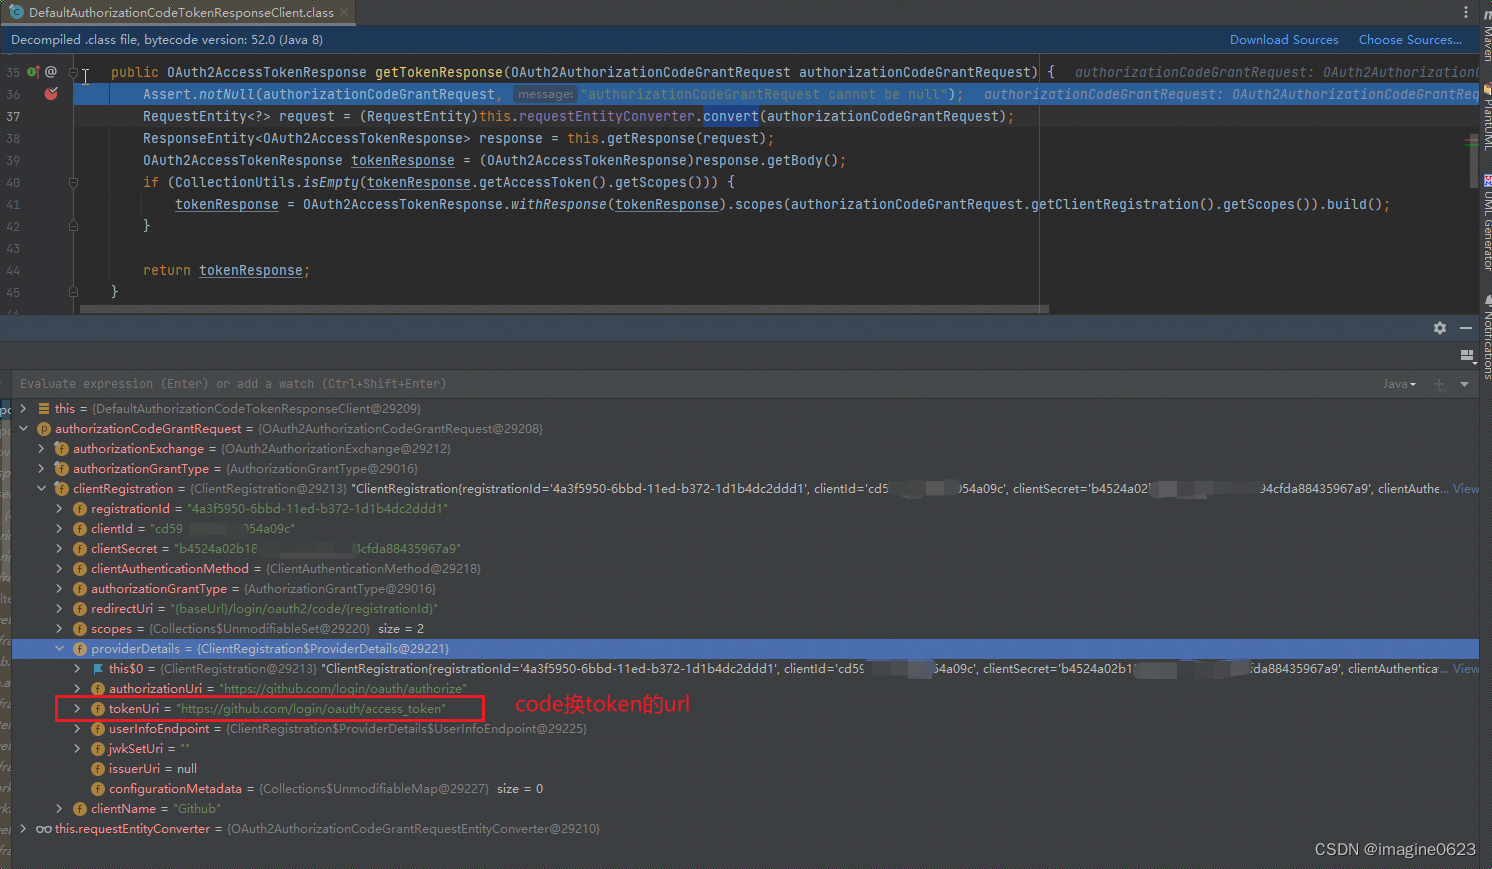
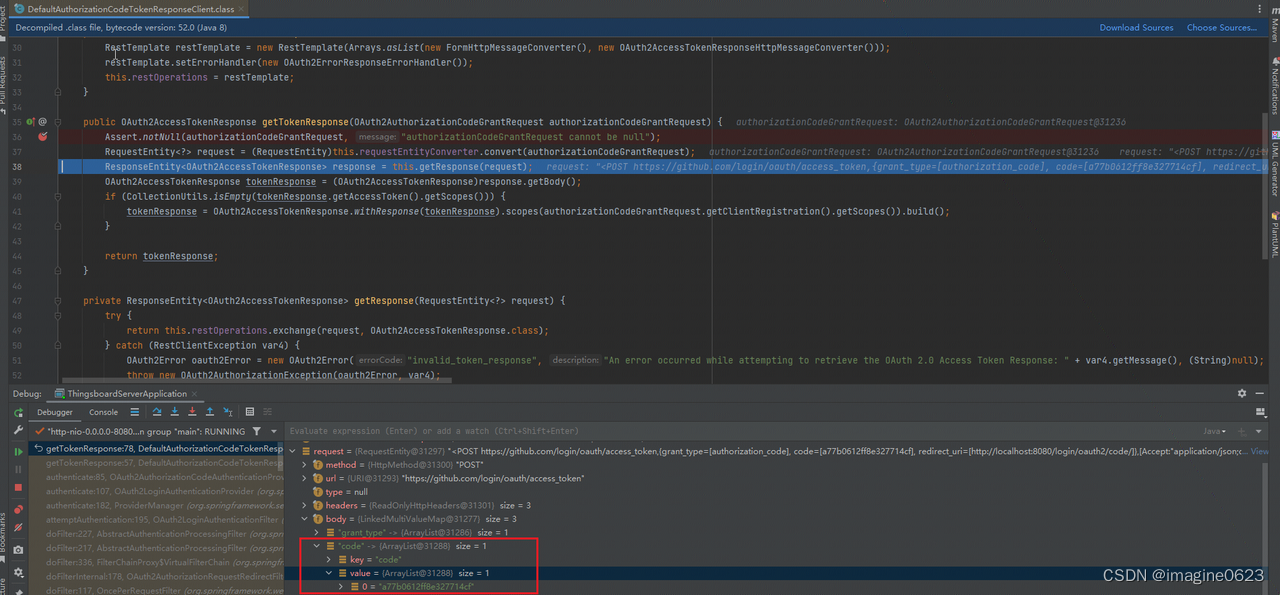
code换access_token
待github认证后回调时会携带code,配置类中未自定义code转token的实现类,
则使用默认实现类【DefaultAuthorizationCodeTokenResponseClient】
token查询用户信息
也没有自定义用户信息查询服务,因此使用默认的DefaultOAuth2UserService:
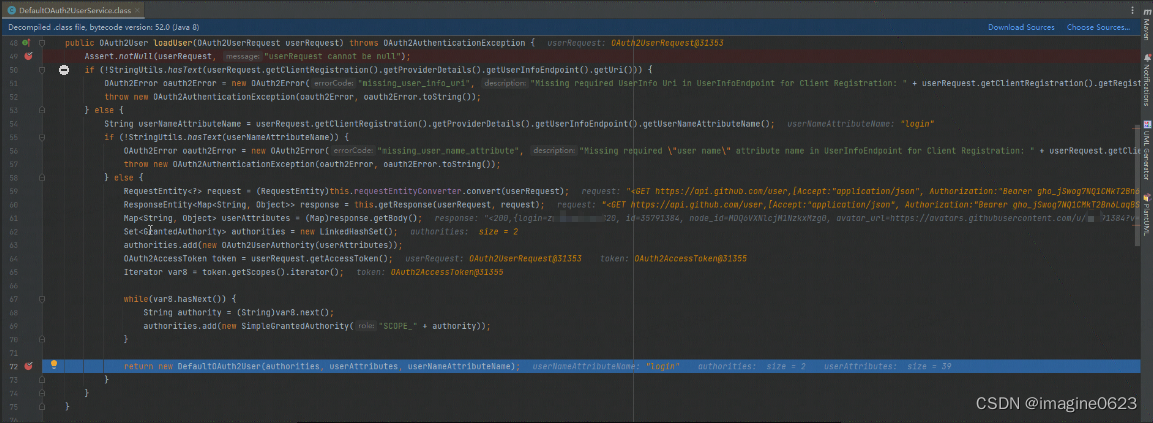
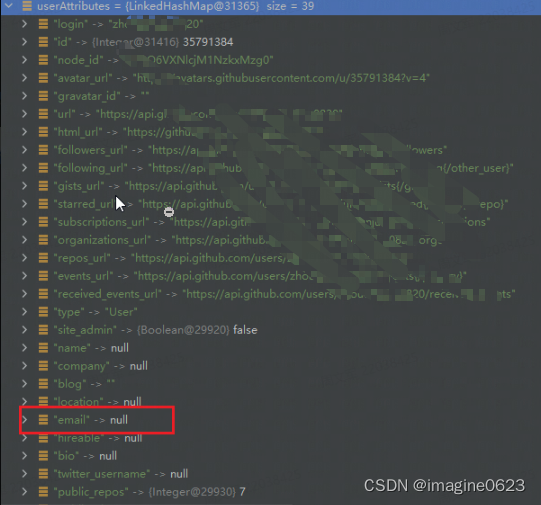
查询到github用户信息如下:
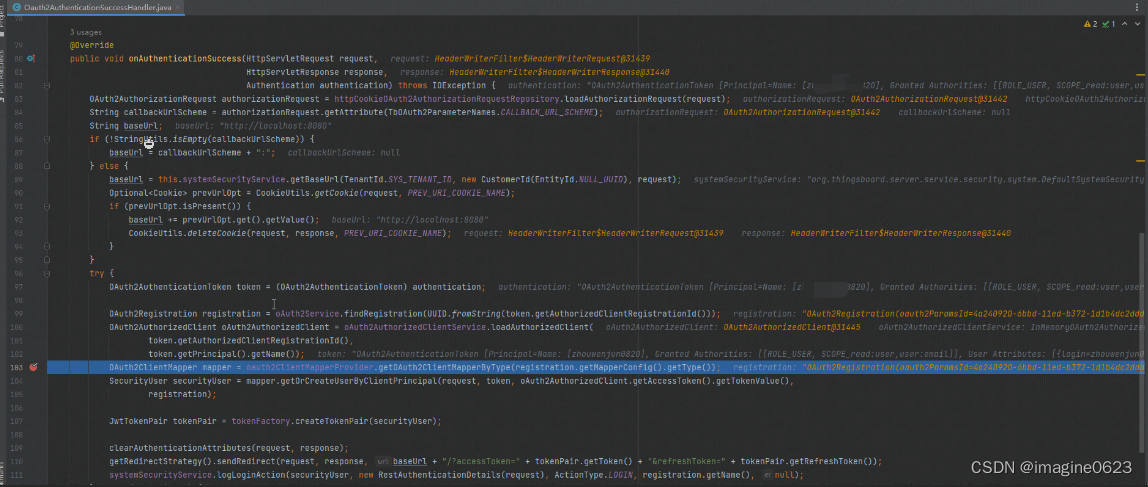
认证成功处理器
OAuth2AuthenticationToken token = (OAuth2AuthenticationToken) authentication;
// 查找cient登记信息
OAuth2Registration registration = oAuth2Service.findRegistration(UUID.fromString(token.getAuthorizedClientRegistrationId()));
OAuth2AuthorizedClient oAuth2AuthorizedClient = oAuth2AuthorizedClientService.loadAuthorizedClient(
token.getAuthorizedClientRegistrationId(),
token.getPrincipal().getName());
// 构造本地用户 SecurityUser
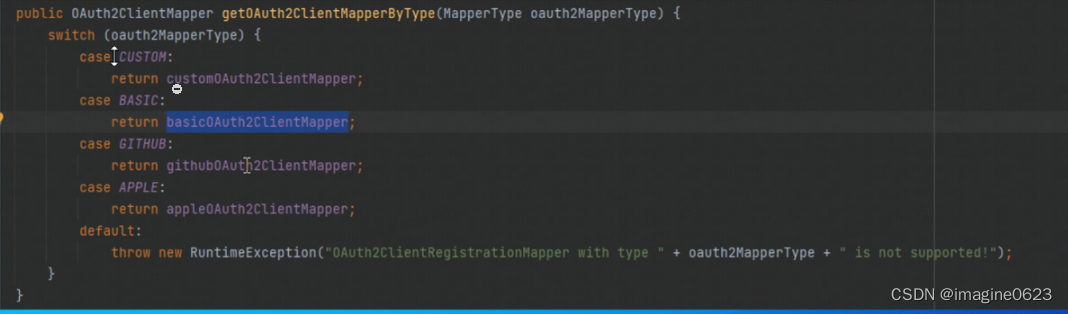
OAuth2ClientMapper mapper = oauth2ClientMapperProvider.getOAuth2ClientMapperByType(registration.getMapperConfig().getType());
SecurityUser securityUser = mapper.getOrCreateUserByClientPrincipal(request, token, oAuth2AuthorizedClient.getAccessToken().getTokenValue(),
registration);
// 生成token
JwtToken accessToken = tokenFactory.createAccessJwtToken(securityUser);
JwtToken refreshToken = refreshTokenRepository.requestRefreshToken(securityUser);
// 重定向到首页
getRedirectStrategy().sendRedirect(request, response, baseUrl + "/?accessToken=" + accessToken.getToken() + "&refreshToken=" + refreshToken.getToken());
其中Github对应的mapper是githubOAuth2ClientMapper
不同的mappr构造本地用户的实现不相同,例如github返回的用户信息中没有email,因此需要再次请求github获取email,而苹果用户认证返回的用户信息包含email,则不再需要发起请求。
再次请求github查询用户email:

然后使用github用户信息和邮箱创建本地用户

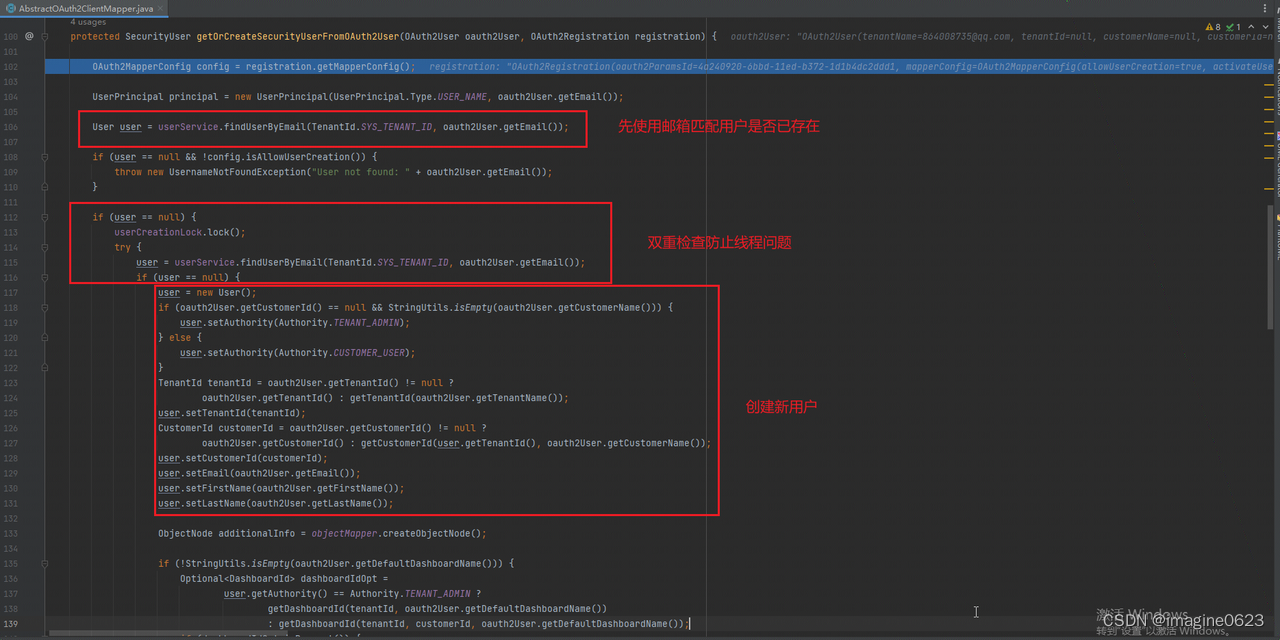
首次登录成功后,user表中新增用户信息:

TIPS
TB的用户体系中,邮箱是可作为用户的唯一标识,这和国内通常使用手机号作为用户标识不同,可能因为TB是外国人开发的,他们认为手机号属于隐私。
最后
以上就是俭朴毛巾最近收集整理的关于ThingsBoard源码解析-登录认证用户名密码登录JWT请求用户数据OAuth2授权码登录(以github为例)TIPS的全部内容,更多相关ThingsBoard源码解析-登录认证用户名密码登录JWT请求用户数据OAuth2授权码登录(以github为例)TIPS内容请搜索靠谱客的其他文章。


发表评论 取消回复