端口多路复用(PAT)
设置方式:
方法一:建立地址池(单一地址)作为对外全局地址
方法二:不建立地址池(设置端口作为对外地址)
方法一:
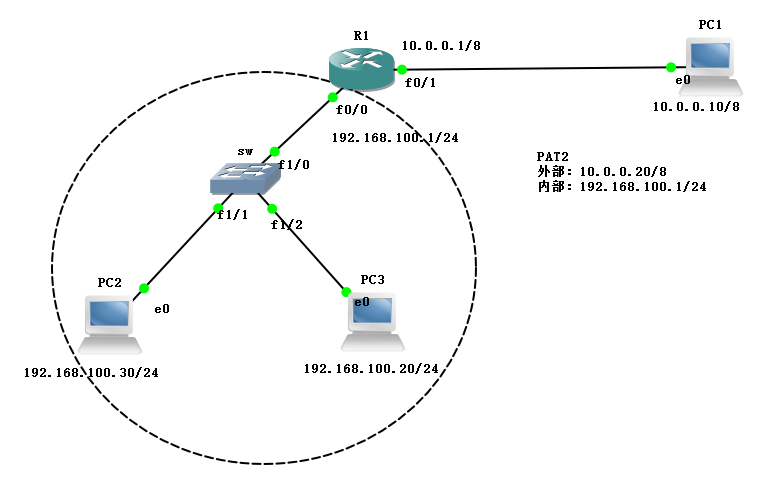
拓扑图如下:
实验步骤:
1、设定三台PC机的地址
PC1
PC1>
PC1> ip 192.168.100.30 192.168.100.1
Checking for duplicate address...
PC1 : 192.168.100.30 255.255.255.0 gateway 192.168.100.1

PC1>
PC2
PC2>
PC2> ip 192.168.100.20 192.168.100.1
Checking for duplicate address...
PC1 : 192.168.100.20 255.255.255.0 gateway 192.168.100.1

PC2>
PC3
PC3>
PC3> ip 10.0.0.10 10.0.0.1
Checking for duplicate address...
PC1 : 10.0.0.10 255.255.255.0 gateway 10.0.0.1

PC3>
2、设定二层交换机sw
sw#conf t
Enter configuration commands, one per line.  End with CNTL/Z.
sw(config)#no ip routing                      //关闭路由功能,使三层交换镜像变为二层交换机
sw(config)#
3、设定路由R1
R1#conf t
Enter configuration commands, one per line.  End with CNTL/Z.
R1(config)#int f 0/0
R1(config-if)#ip add 192.168.100.1 255.255.255.0        //仅设定IP地址与子网掩码
R1(config-if)#no shut
*Mar  1 00:06:33.063: %LINK-3-UPDOWN: Interface FastEthernet0/0, changed state to up
*Mar  1 00:06:34.063: %LINEPROTO-5-UPDOWN: Line protocol on Interface FastEthernet0/0, changed state to up
R1(config-if)#int f 0/1
R1(config-if)#ip add 10.0.0.1 255.0.0.0                //仅设定IP地址与子网掩码
R1(config-if)#no shut
R1(config-if)#ex
*Mar  1 00:06:48.191: %LINK-3-UPDOWN: Interface FastEthernet0/1, changed state to up
*Mar  1 00:06:49.191: %LINEPROTO-5-UPDOWN: Line protocol on Interface FastEthernet0/1, changed state to up
R1(config)#
注意:此时理论上是已经可以做到全网互通的,具体见下图。如果无法连接请自行检查命令。
为满足实验要求,下面将正式进行PAT(端口多路复用)的设置。
4、在路由R1上进行PAT设置
R1(config)#access-list 1 permit 192.168.100.0 0.0.0.255               //建立标准ACL
R1(config)#ip nat pool kgc 10.0.0.20 10.0.0.20 netmask 255.0.0.0      //建立地址池
*Mar  1 00:08:29.815: %LINEPROTO-5-UPDOWN: Line protocol on Interface NVI0, changed state to up
R1(config)#ip nat inside source list 1 pool kgc                 //建立PAT

R1(config)#int f 0/1
R1(config-if)#ip nat inside                            //在内部启用PAT
R1(config-if)#int f 0/0
R1(config-if)#ip nat outside                          //在外部启用PAT
R1(config-if)#end
R1#
*Mar  1 00:10:27.007: %SYS-5-CONFIG_I: Configured from console by console
R1#
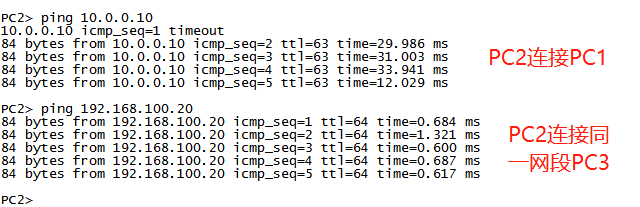
验证结果
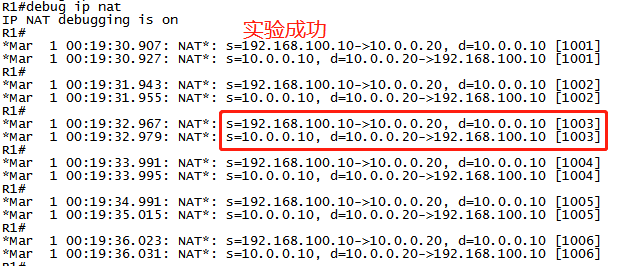
实验成功,外网能访问的IP地址以更改为公网IP。
方法二:
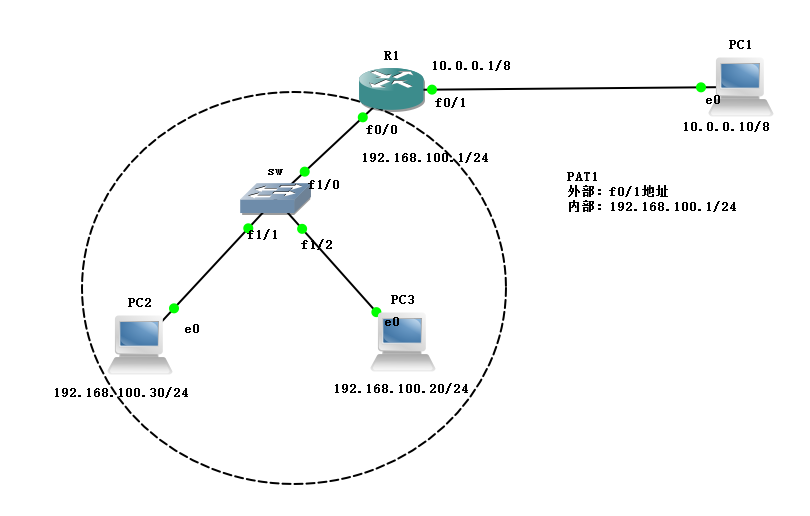
拓扑图如下:
实验步骤
前面所有对PC1、PC2、PC3、sw以及R1的设置均与方法一相同,不再过多赘述。这里只对PAT的设置与启用进行说明
设置PAT
R1(config)#access-list 1 permit 192.168.100.0 0.0.0.255           //建立标准ACL
R1(config)#ip nat inside source list 1 interface f0/1 overload      //不进行地址池的设置,将外部端口f0/1的IP作为对外全局地址

R1(config)#
R1(config)#int f 0/0
R1(config-if)#ip nat inside                     //启用内部PAT
R1(config-if)#int f 0/1
R1(config-if)#ip nat outside                    //启用外部PAT
R1(config-if)#end
R1#
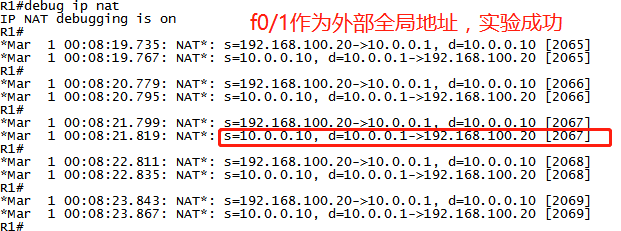
实验结果
最后
以上就是顺心红牛最近收集整理的关于NAT实战——端口多路复用(PAT)端口多路复用(PAT)的全部内容,更多相关NAT实战——端口多路复用(PAT)端口多路复用(PAT)内容请搜索靠谱客的其他文章。
本图文内容来源于网友提供,作为学习参考使用,或来自网络收集整理,版权属于原作者所有。


发表评论 取消回复