linux内核提供了一个经典的双向链表模板list_head,做内核驱动开发时时常会用到。在这里我举一个简单的使用实例,来叙述list_head的使用方法。
示例:创建一个链表,每个节点中存放一个整型数字num,并为其随便赋一个数值。
我们希望完成针对这个链表初始化、插入节点、删除节点、遍历等操作。注意,链表的头节点通常是不使用的,因此我们使用头节点来存储该链表的节点的个数。
下面的内容会逐步实现这个示例。
1. 定义
list_head的结构体定义如下。
include/linux/types.h
--------------------------------------
struct list_head {
	struct list_head *next, *prev;
};
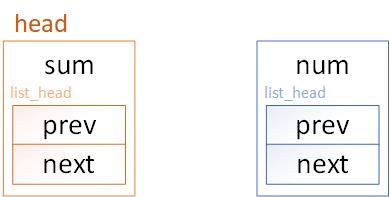
结构体中定义了两个指针next和prev,分别指向前一个节点和后一个节点。但可以发现,这个结构体中只有两个指针,没有存放具有实际意义数据的字段,因此,我们通常要再创建一个宿主结构体,其中嵌套具有实际意义的数据字段(本例中为num)和list_head字段,定义如下。
//链表的头节点
struct list_array {
	int sum;
	struct list_head list;
};

//链表的其他节点
struct list_node {
	int num;
	struct list_head list;
};
节点的结构如下图所示。
2. 初始化链表
内核提供了初始化链表的接口,我们通常用来初始化链表的头节点。通常使用内联函数INIT_LIST_HEAD来初始化链表,定义如下。
include/linux/list.h
--------------------------------------
static inline void INIT_LIST_HEAD(struct list_head *list)
{
	WRITE_ONCE(list->next, list);
	list->prev = list;
}
这里说明一下,WRITE_ONCE(list->next, list)的本质就是list->next = list,也就是说,INIT_LIST_HEAD函数的作用就是将list_head的两个指针均指向自身。
使用WRITE_ONCE这个宏的作用主要是解决并行程序中的变量访问问题,这里不再过多解释,感兴趣的可以阅读这篇博客。
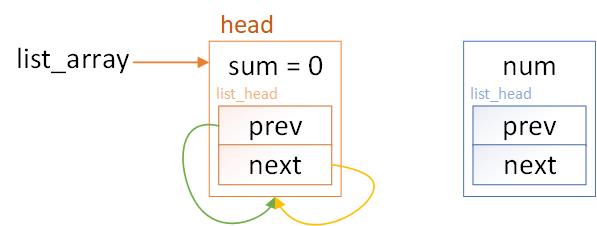
继续前面的例子。我们定义一个头节点指针my_list,并为其分配存储空间,然后使用INIT_LIST_HEAD进行初始化。
int init_list_array(void)
{
	my_list = (struct list_array *)kzalloc(sizeof(struct list_array), GFP_KERNEL);
	if (my_list == NULL) {
		pr_err("my_list kzalloc failed");
		return -ENOMEM;
	}
	my_list->sum = 0;
	INIT_LIST_HEAD(&(my_list->list));
	return 0;
}
数据结构如下图。
此外,内核还提供了另一个用来初始化的宏LIST_HEAD,其定义如下。
include/linux/list.h
--------------------------------------
#define LIST_HEAD_INIT(name) { &(name), &(name) }
#define LIST_HEAD(name)
    struct list_head name = LIST_HEAD_INIT(name)
这里,我们代入的是头节点的list_head字段。用于初始化的两个宏乍一看上去有些不好理解,我们将宏展开,就是
#define LIST_HEAD(name)
    struct list_head name = { &(name), &(name) }
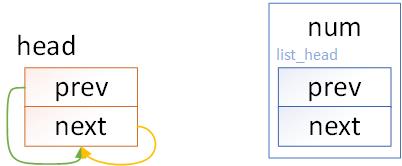
这个宏和INIT_LIST_HEAD在使用上略有不同,可以看到LIST_HEAD相当于直接帮你定义了头节点,不再需要自己定义。但也因此,这个头节点的模式也就是固定的了,只有两个指针prev和next,你不可以自己再定义其他数据域。
LIST_HEAD(head);
等价于
struct list_head head = {&head, &head};
等价于
struct list_head head = LIST_HEAD_INIT(head);
其数据结构如下图。
当然,也可以使用宏LIST_HEAD_INIT进行初始化,但这种方式的缺陷同样是必须在定义的同时初始化,不能先定义再赋值,因此也不能用于嵌套在其他结构中的list_head的初始化。
这个帖子对INIT_LIST_HEAD和LIST_HEAD_INIT之间的区别做了详细的阐述,有兴趣的可以一阅。(英文版原帖也被我找出来了,原帖在此)
3. 插入节点
插入节点使用list_add函数,其定义如下。
include/linux/list.h
--------------------------------------
static inline void __list_add(struct list_head *new,
							struct list_head *prev,
							struct list_head *next)
{
	if (!__list_add_valid(new, prev, next))
		return;

	next->prev = new;
	new->next = next;
	new->prev = prev;
	WRITE_ONCE(prev->next, new);
}

static inline void list_add(struct list_head *new, struct list_head *head)
{
	__list_add(new, head, head->next);
}
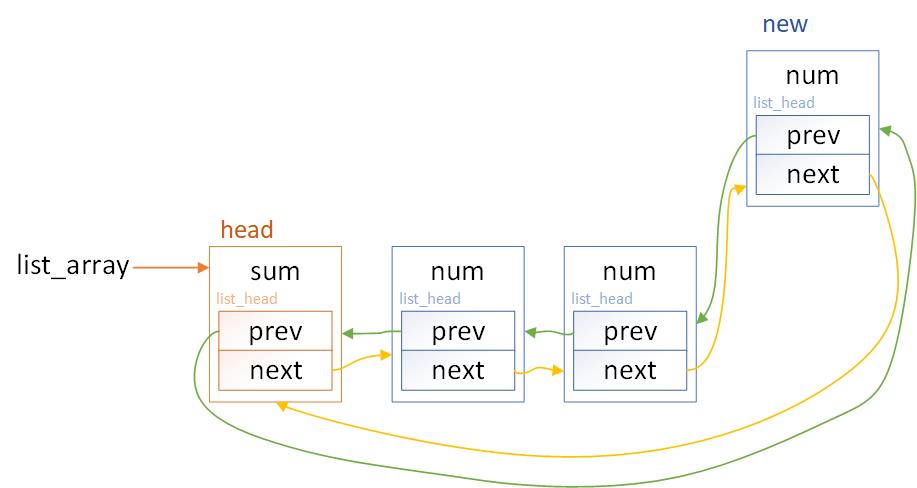
可见list_add的作用就是在链表的头节点和头节点后的第一个节点之间插入一个新的节点,如下图。
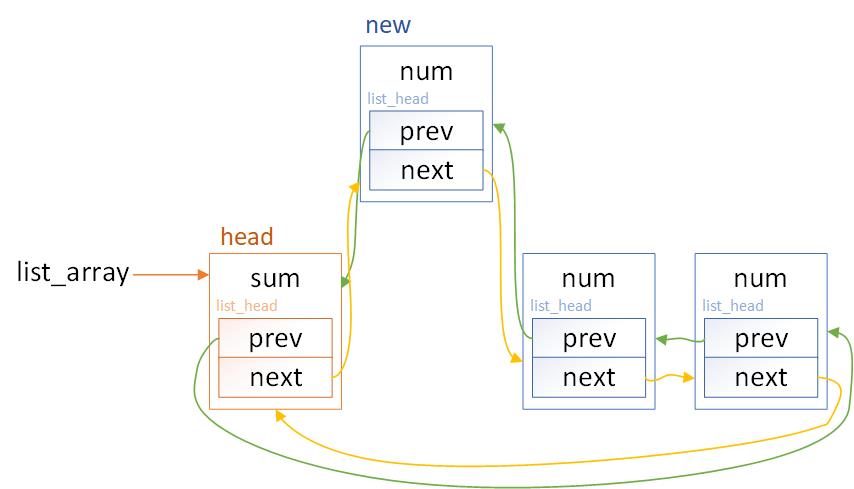
此外还有list_add_tail,作用是向链表尾添加节点,具体实现为
static inline void list_add_tail(struct list_head *new, struct list_head *head)
{
	__list_add(new, head->prev, head);
}
数据结构如图。
下面我们实现一个函数,作用为向链表尾添加一个节点,并输入参数作为将节点num域。
int insert_node(int num)
{
	struct list_node *pnode = NULL;

	if (!my_list) {
		pr_err("%s, list array is nulln", __func__);
		return -EINVAL;
	}

	pnode = (struct list_node *)kzalloc(sizeof(struct list_node), GFP_KERNEL);
	if (pnode == NULL) {
		pr_err("node kzalloc failedn");
		return -ENOMEM;
	}

	pnode->num = num;
	my_list->sum++;
	list_add_tail(&(pnode->list), &(my_list->list));
	return 0;
}
4. 删除节点
linux内核提供的删除节点的接口是list_del,具体实现如下
include/linux/list.h
--------------------------------------
static inline void __list_del(struct list_head * prev, struct list_head * next)
{
	next->prev = prev;
	WRITE_ONCE(prev->next, next);
}

static inline void __list_del_entry(struct list_head *entry)
{
	if (!__list_del_entry_valid(entry))
		return;

	__list_del(entry->prev, entry->next);
}

static inline void list_del(struct list_head *entry)
{
	__list_del_entry(entry);
	entry->next = LIST_POISON1;
	entry->prev = LIST_POISON2;
}
LIST_POISON1/2在/include/linux/poison.h中被定义,实际上就是两个地址,没有什么特定的含义,和entry->next = NULL、entry->prev = NULL的本质是一样的。
补充:之所以使用LIST_POISON1/2,是因为在其他情况下有些节点在内存申请时出现错误也会返回NULL,而LIST_POISON1/2定义的这两个地址处于低地址处,基本上不可能作为内存分配时被分配出去。使用这种不可能被分配的地址作为标记,以与出现NULL的情况进行区分。详情可见此贴。
include/linux/poison.h
--------------------------------------
#define LIST_POISON1 ((void *) 0x00100100)
#define LIST_POISON2 ((void *) 0x00200200)
5. 遍历链表
linux内核提供的遍历链表的接口常用的有list_for_each、list_for_each_entry、list_for_each_entry_safe三个,下面依次进行介绍。
list_for_each定义了一个循环,该循环的作用是从链表头节点向后遍历,每到一个节点都执行依次循环体中的内容,直至再次回到链表头。参数pos放入一个list_head指针,用于在循环中指向当前节点,head放入链表头的地址。
#define list_for_each(pos, head)
	for (pos = (head)->next; pos != (head); pos = pos->next)
list_for_each的缺陷是每个节点必须只能是list_head结构体,但我们更常使用的情况是将list_head结构体内嵌到一个更大的结构体中,因为只使用list_head而没有其他数据域是无意义的。list_for_each_entry的出现就是为了解决这个问题,其作用与list_for_each相同,但输入的参数多了一个member,将list_head在节点中的名称赋值给该参数。list_for_each_entry的定义如下。
#define list_for_each_entry(pos, head, member)
	for (pos = list_first_entry(head, typeof(*pos), member);
		!list_entry_is_head(pos, head, member);
		pos = list_next_entry(pos, member))
下面我们实现一下示例中的遍历,打印每个节点中的data值,代码如下。
void traverse_list_array(void)
{
	struct list_node *pnode = NULL;

	if (!my_list) {
		pr_err("%s, list array is nulln", __func__);
		return;
	}

	list_for_each_entry(pnode, &(my_list->list), list)
		printk("%d ", pnode->num);
	printk("n");
	return;
}
list_for_each_entry_safe也是一个用来遍历的宏,它和list_for_each_entry的区别就是,会新增一个指针n来临时存储当前节点的下一个节点,这样可以保证如果我们想删除当前节点,可以安全的删除并使用n指针完成接下来的遍历,而list_for_each_entry无法继续遍历。
#define list_for_each_entry_safe(pos, n, head, member)
	for (pos = list_first_entry(head, typeof(*pos), member),
		n = list_next_entry(pos, member);
		!list_entry_is_head(pos, head, member);
		pos = n, n = list_next_entry(n, member))
下面我们完成示例中的内容,定义一个函数,输入的参数是一个整型数字,遍历链表,找到data域与输入数字相等的节点,删除该节点并打印这个数值。代码如下。
bool del_node(int num)
{
	bool result = false;
	struct list_node *pnode = NULL, *pnext = NULL;

	if (!my_list) {
		pr_err("%s, list array is nulln", __func__);
		return -EINVAL;
	}

	list_for_each_entry_safe(pnode, pnext, &(my_list->list), list) {
		if (pnode->num == num) {
			list_del(&(pnode->list));
			kfree(pnode);
			my_list->sum--;
			result = true;
			printk("delete num = %dn", num);
		}
	}
	return result;
}
6. 完整的示例代码
至此,我们已经介绍完了一个链表的最基本功能,包括初始化、插入节点、删除节点、遍历链表,下面给出完整的示例程序。
#include <linux/init.h>
#include <linux/module.h>
#include <linux/slab.h>

MODULE_LICENSE("GPL");
MODULE_AUTHOR("zz"); //作者名称,可以随意命名

struct list_array {
	int sum;
	struct list_head list;
};

struct list_node {
	int num;
	struct list_head list;
};

struct list_array *my_list = NULL;

/************************
功能:初始化链表
输入:空
返回:初始化成功返回0,失败返回错误代码
************************/
int init_list_array(void)
{
	my_list = (struct list_array *)kzalloc(sizeof(struct list_array), GFP_KERNEL);
	if (my_list == NULL) {
		pr_err("my_list kzalloc failed");
		return -ENOMEM;
	}

	my_list->sum = 0;
	INIT_LIST_HEAD(&(my_list->list));
	return 0;
}

/************************
功能:向链表中插入一个节点,并将该节点的data域设置成函数的输入
输入:节点的data域的数值
返回:插入成功返回0,失败返回错误代码
************************/
int insert_node(int num)
{
	struct list_node *pnode = NULL;

	if (!my_list) {
		pr_err("%s, list array is nulln", __func__);
		return -EINVAL;
	}

	pnode = (struct list_node *)kzalloc(sizeof(struct list_node), GFP_KERNEL);
	if (pnode == NULL) {
		pr_err("node kzalloc failedn");
		return -ENOMEM;
	}

	pnode->num = num;
	my_list->sum++;
	list_add_tail(&(pnode->list), &(my_list->list));
	return 0;
}

/************************
功能:删除data域与函数的输入值相同的节点
输入:要删除的节点的data的值
返回:如果链表中能找到该数值,则返回true,否则返回false
************************/
bool del_node(int num)
{
	bool result = false;
	struct list_node *pnode = NULL, *pnext = NULL;

	if (!my_list) {
		pr_err("%s, list array is nulln", __func__);
		return -EINVAL;
	}

	list_for_each_entry_safe(pnode, pnext, &(my_list->list), list) {
		if (pnode->num == num) {
			list_del(&(pnode->list));
			kfree(pnode);
			my_list->sum--;
			result = true;
			printk("delete num = %dn", num);
		}
	}
	return result;
}

/************************
功能:依次释放链表中的每个节点
输入:空
返回:空
************************/
void release_list_array(void)
{
	struct list_node *pnode = NULL, *pnext = NULL;

	if (!my_list) {
		pr_err("%s, list array is nulln", __func__);
		return;
	}

	list_for_each_entry_safe(pnode, pnext, &(my_list->list), list) {
		list_del(&(pnode->list));
		kfree(pnode);
		my_list->sum--;
	}
	kfree(my_list);
	my_list = NULL;
	return;
}

/************************
功能:遍历链表中的每个节点,并打印它的data域
输入:空
返回:空
************************/
void traverse_list_array(void)
{
	struct list_node *pnode = NULL;

	if (!my_list) {
		pr_err("%s, list array is nulln", __func__);
		return;
	}

	list_for_each_entry(pnode, &(my_list->list), list)
		printk("%d ", pnode->num);
	printk("n");
	return;
}

static int hello_init(void)
{
	int i = 0;

	init_list_array();
	printk("sum = %dn", my_list->sum);

	for (i = 1; i <= 5; i++)
		insert_node(i);
	traverse_list_array();

	del_node(3);
	traverse_list_array();

	release_list_array();
	return 0;
}

static void hello_exit(void)
{
	printk("list head exitn");
	return;
}

module_init(hello_init);
module_exit(hello_exit);
最后
以上就是魔幻小丸子最近收集整理的关于linux内核链表list_head1. 定义2. 初始化链表3. 插入节点4. 删除节点5. 遍历链表6. 完整的示例代码的全部内容,更多相关linux内核链表list_head1.内容请搜索靠谱客的其他文章。


发表评论 取消回复