背景
先简单介绍一下Polkadot[1] 与Substrate[2] 。
Polkadot 目标是成为一个连接各区块链的区块链(网络),Substrate 是 Polkadot 生态中重要的一环, 他是一套工具与框架的集合,让我们以模块化的方式来构建自己的区块链。Polkadot本身也是基于 Subsstrate 创建的。
学习Substrate 开发的第一步就是环境搭建,本文的目标是把Substrate编译出来,用 substrate 启动一个区块链开发网络。
安装依赖项
Substrate 本身是由 Rust 开发, 也依赖很多其他的模块,Substrate编译需要先安装依赖。
方式 1:用官方脚本自动安装
Substrate 官方提供了一个安装脚本,只需要使用下面一个命令就可以安装好编译Substrate所需要的全部依赖。
curl https://getsubstrate.io -sSf | bash -s -- --fast有兴趣的同学可以打开:https://getsubstrate.io 查看脚本详情。
脚本安装依赖包括如:openssl(密码学库)、cmake(编译工具)、 llvm(编译器框架)、Rust。
使用脚本很简单,不过国内网络网络环境,下载依赖包可能非常慢,甚至无法下载,那么就只能使用下面的方式 2 了。
方式 2:手动安装
Brew 安装库
我的环境是 Mac(其他平台可参考[3]), Mac 下安装软件包很多使用 brew[4] ,大家的电脑上应该都已经安装了,如果没可以可以参考这个链接[5]安装。
brew 的下载源在国内下载是龟速,我们可以配置使用清华大学镜像站的源,配置方式是修改环境变量HOMEBREW_BOTTLE_DOMAIN,例如下方式写入到 .bash_profile
echo 'export HOMEBREW_BOTTLE_DOMAIN=https://mirrors.tuna.tsinghua.edu.cn/homebrew-bottles' >> ~/.bash_profilesource ~/.bash_profile现在用brew 安装openssl cmake llvm:
brew install openssl cmake llvmRust 安装
Rustup[6] 是 Rust 官方的跨平台 Rust 安装工具, cargo 是Rust 的包管理工具。
我们需要用 rustup 安装 Rust, cargo 本身在安装 Rust 的时候就会自带安装,之后用 cargo 去安装 Rust 软件包(库)。
rustup 和 cargo 就像 nvm 和 npm 的区别。
使用 rustup 安装 rust 时,同样可以启用清华源,执行:
$ echo 'export RUSTUP_DIST_SERVER=https://mirrors.tuna.tsinghua.edu.cn/rustup' >> ~/.bash_profile使用 rustup 安装 Rust 语言环境:
curl https://sh.rustup.rs -sSf | sh rustup default stableRust 提供了三个版本渠道:nightly,beta,stable, 默认启用stable(稳定版)。
Wasm 编译
Substrate 使用 Wasm 作为智能合约的运行环境,wasm 是一个虚拟机环境。最初是想为浏览器提供一个高性能的执行环境,不过现在也可以使用非浏览器环境。
wasm目前仅在 nightly 版本上支持,因此需要配置一下:
wasm 目前仅在 nightly 上支持,
Substrate uses WebAssembly (Wasm), and you will need to configure your Rust compiler to use nightly to support this build target.
rustup update nightlyrustup target add wasm32-unknown-unknown --toolchain nightly配置 cargo 源
在后面编译substrate, 需要安装大量的 Rust 依赖包,同样为了避免龟速访问的问题,配置一下cargo 源为清华大学镜像源:
编辑 ~/.cargo/config 文件,添加以下内容:
[source.crates-io]replace-with = 'tuna'[source.tuna]registry = "https://mirrors.tuna.tsinghua.edu.cn/git/crates.io-index.git"编译 substrate
下载substrate代码
先 git clone substrate 的代码:
git clone https://github.com/paritytech/substrate.gitgithub.com 在国内也是龟速,因此我在 gitee.com fork 了一份,大家可以用以下命令 clone 代码:
git clone https://gitee.com/lbc-team/substrate.git编译 substrate
cd substratecargo build --release大约半小时,可以去喝个茶, 出现以下提示就成功了;
Finished release [optimized] target(s) in 29m 46s编译完之后,在 /target/release/会生成 substrate 可执行文件。
运行 substrate 节点网络
现在可以使用 substrate 来启动网络了,substrate用很多个命令(参数),可使用./target/release/substrate --help查看用法。
这里使用 --dev 以开发者模式运行节点网络:
./target/release/substrate --devsubstrate 启动后,会输出如:当前的客户端版本,节点名,数据库目录,节点身份 ID等等:
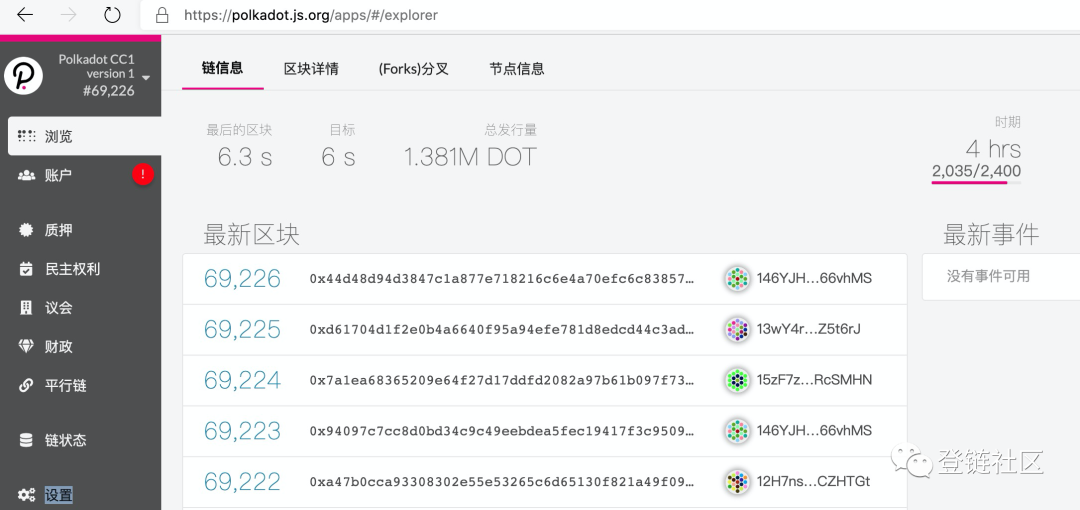
2020-05-31 19:34:44 Running in --dev mode, RPC CORS has been disabled.2020-05-31 19:34:44 Substrate Node2020-05-31 19:34:44 ✌️ version 2.0.0-rc2-12b6c5dbe-x86_64-macos2020-05-31 19:34:44 ❤️ by Parity Technologies , 2017-20202020-05-31 19:34:44 ? Chain specification: Development2020-05-31 19:34:44 ? Node name: homely-volcano-92832020-05-31 19:34:44 ? Role: AUTHORITY2020-05-31 19:34:44 ? Database: RocksDb at /Users/emmett/Library/Application Support/substrate/chains/dev/db2020-05-31 19:34:44 ⛓ Native runtime: node-251 (substrate-node-1.tx1.au10)2020-05-31 19:34:44 ? Highest known block at #1732020-05-31 19:34:44 Using default protocol ID "sup" because none is configured in the chain specs2020-05-31 19:34:44 ? Local node identity is: 12D3KooWEE4Gd4isn28sPsXQ3YBSPUqfpxmfVvKHzBxjWhEQPxV9 (legacy representation: QmVDyLimoKQjaGttsnvSdjLeJUkdxReUL6eDrF4LB7BL1h)2020-05-31 19:34:44 〽️ Prometheus server started at 127.0.0.1:96152020-05-31 19:34:44 ? Starting BABE Authorship worker2020-05-31 19:34:45 ? Starting consensus session on top of parent 0x8c3fffd67f59db85fd468dc5a4386ccaf58dc2841ab0370f8d94b6f5413a511f我们可以通过 https://polkadot.js.org/apps/ 查看当前节点的运行状态(也可以进行简单的交互), 打开 https://polkadot.js.org/apps/ 可以看到如下界面:
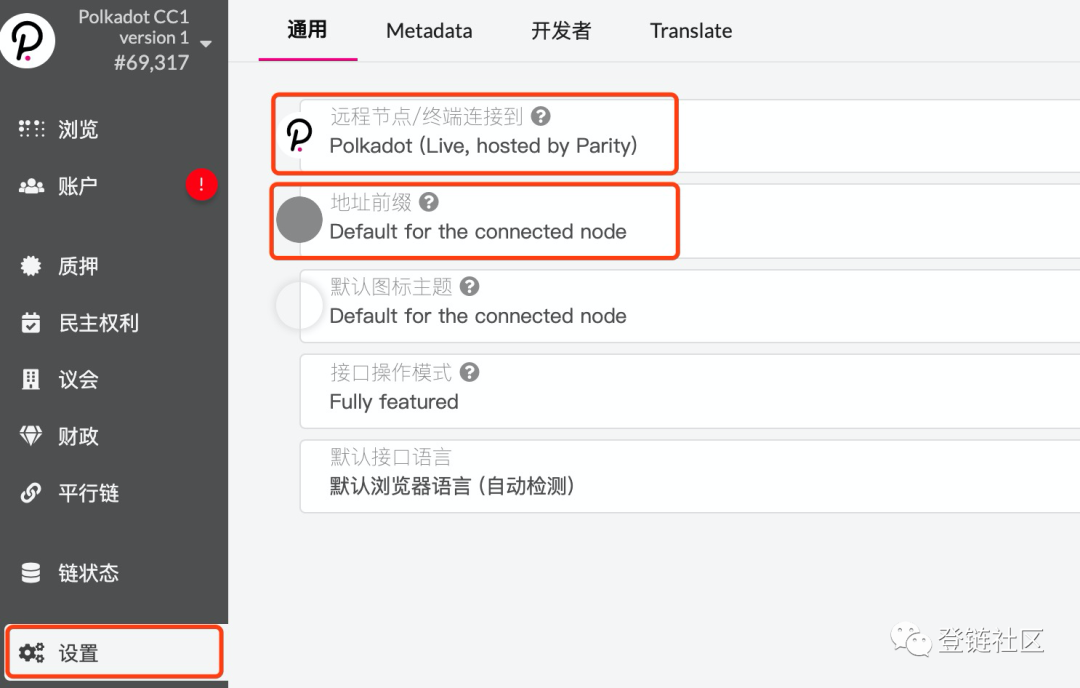
默认时浏览器是连接当前的Polkadot CC1 候选主网,不过我们可以让他连接到本地节点,点设置->选择节点及配置地址前缀, 方法如下:
节点依然下拉框拉到最下面,选择 Local Node(Own, 127.0.0.1:9944) , 地址前缀选:Substrate(generic) 如下图:
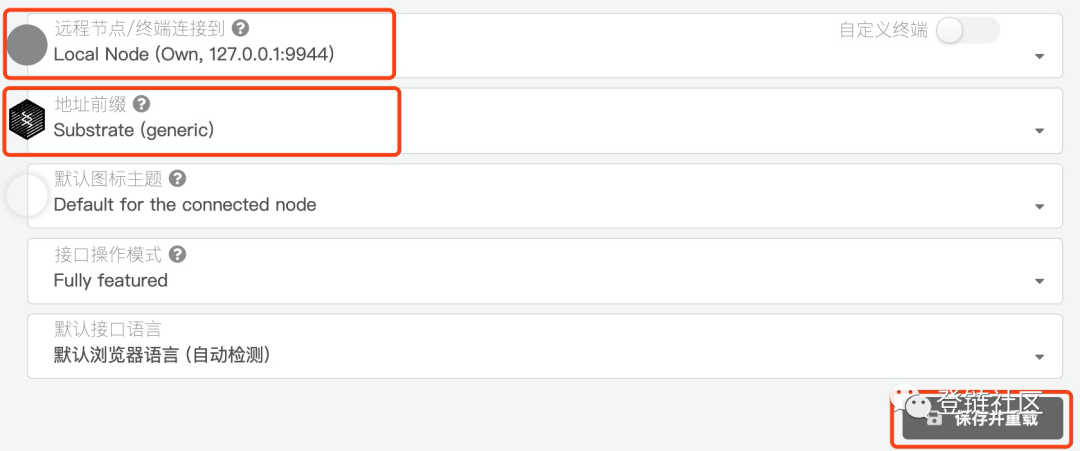
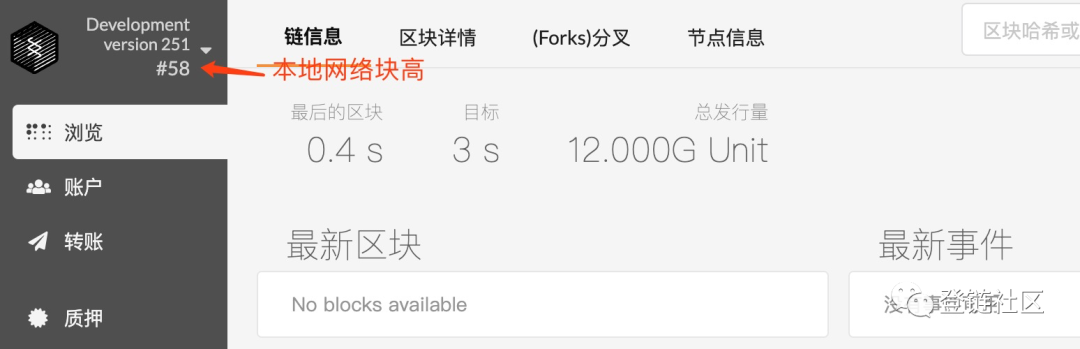
配置好,别忘了点保存哦,连接好,就可以看到本地网络的块高了,如下图:
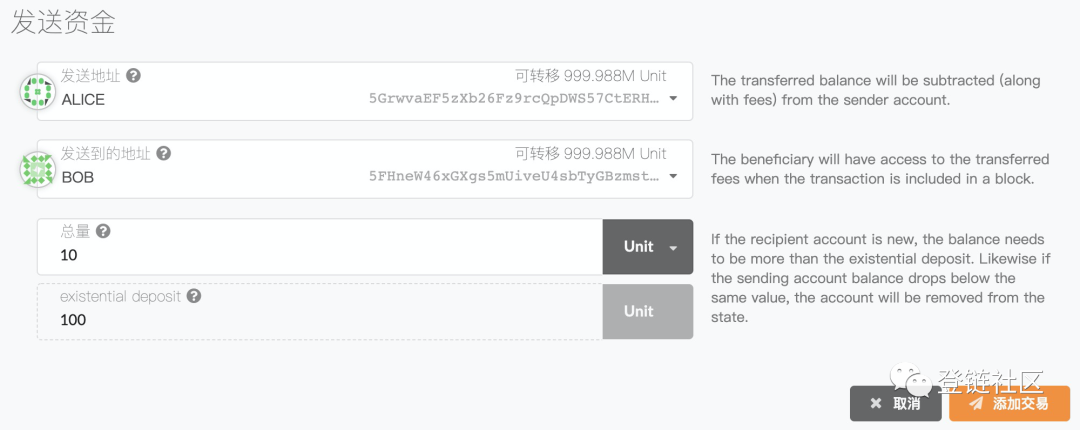
我们还可以测试一下转账功能:
运行多节点
在本地启动一个多节点连接的网络也是可以的,可以先以alice的名义启动一个验证人节点:
./target/release/substrate --alice --chain local--chain local 表示是一个本地的网络模式,之前我们是开发者模式,这个时候不会出块, 需要等待另一个节点加入才能出块。
再(在另一个终端)启动另一个节点, 注意这里需要用 -d 来定义一个数据目录:
./target/release/substrate --bob --chain local -d ./bob现在可以看到浏览器可以开始出块了。
好了, 已经踏入了Substrate开发的第一步。
References
[1] Polkadot: https://learnblockchain.cn/categories/Polkadot[2] Substrate: https://learnblockchain.cn/tags/Substrate[3] 可参考: https://www.substrate.io/kb/getting-started[4] brew: https://brew.sh/[5] 链接: https://zhuanlan.zhihu.com/p/59805070[6] Rustup: https://rustup.rs/

最后
以上就是专一大树最近收集整理的关于开发环境_Substrate 开发系列 环境搭建的全部内容,更多相关开发环境_Substrate内容请搜索靠谱客的其他文章。


发表评论 取消回复