微服务解决方案 – 消息队列 【RabbitMQ】
1 前言
1.1 什么是MQ?
MQ (Message Queue):翻译为消息队列,消息队列可以理解为一种在TCP协议之上构建的一个简单的协议,但它又不是具体的通信协议,而是更高层次的 通信模型 即 生产者 / 消费者模型,通过定义自己的生产者和消费者实现消息通信从而屏蔽复杂的底层通信协议;它为分布式应用系统提供异步解耦和削峰填谷的能力,同时也具备互联网应用所需的海量消息堆积、高吞吐、可靠重试等特性。
…
MQ是异步的,解耦用的,但是这个是MQ的效果而不是目的。MQ的真正目的是为了通讯,屏蔽底层复杂的通讯协议,定义了一套应用层更加简单的通讯协议。…
消息队列采用 FIFO 的方式,即 先进先出 的数据结构。

1.2 消息队列类型
一般分为有Broker和没有Broker,然而主流的MQ都是有Broker的,通常有一台服务器作为Broker,所有的消息都通过它中转。生产者把消息发送给它就结束自己的任务了,Broker则把消息主动推送给消费者(或者消费者主动轮询)。然而此文章就简单的写一下有Broker的RabbitMQ的玩法。
1.3 Topic
生产者会发送key和数据到Broker,由Broker比较key之后决定给哪个消费者。而Rabbit MQ是轻topic的代表,由Broker计算出Key对应的队列然后把数据交给队列。
2 RabbitMQ 的安装
docker的安装方式
version: '3.1'
services:
rabbitmq:
restart: always
image: rabbitmq:management
container_name: rabbitmq
ports:
- 5672:5672
# rabbitmq 的端口
- 15672:15672
# web UI
的端口
environment:
TZ: Asia/Shanghai
RABBITMQ_DEFAULT_USER: root
RABBITMQ_DEFAULT_PASS: 123456
volumes:
- ./data:/var/lib/rabbitmq
启动docker-compose up -d,访问ip:15672 账号密码如yaml配置
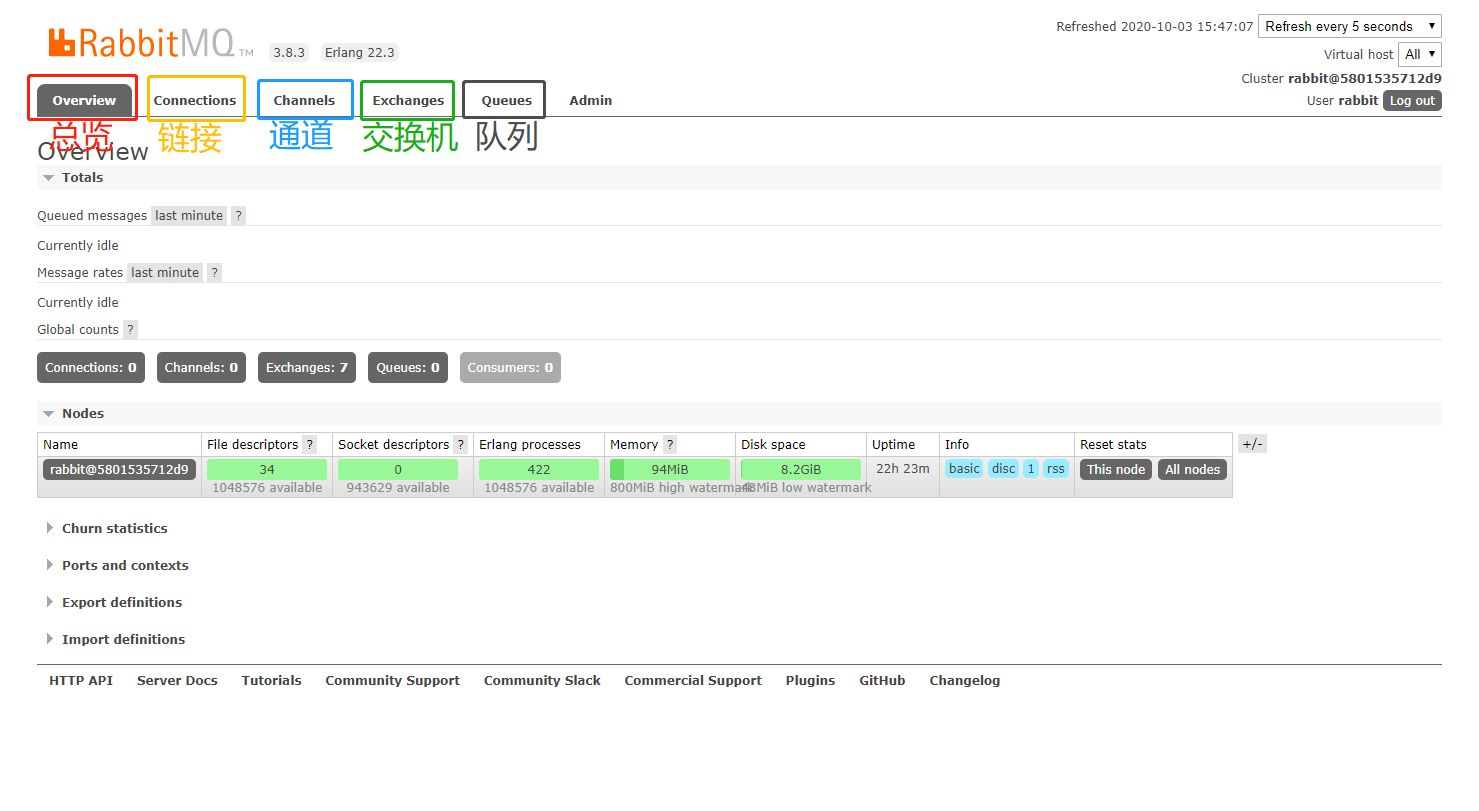
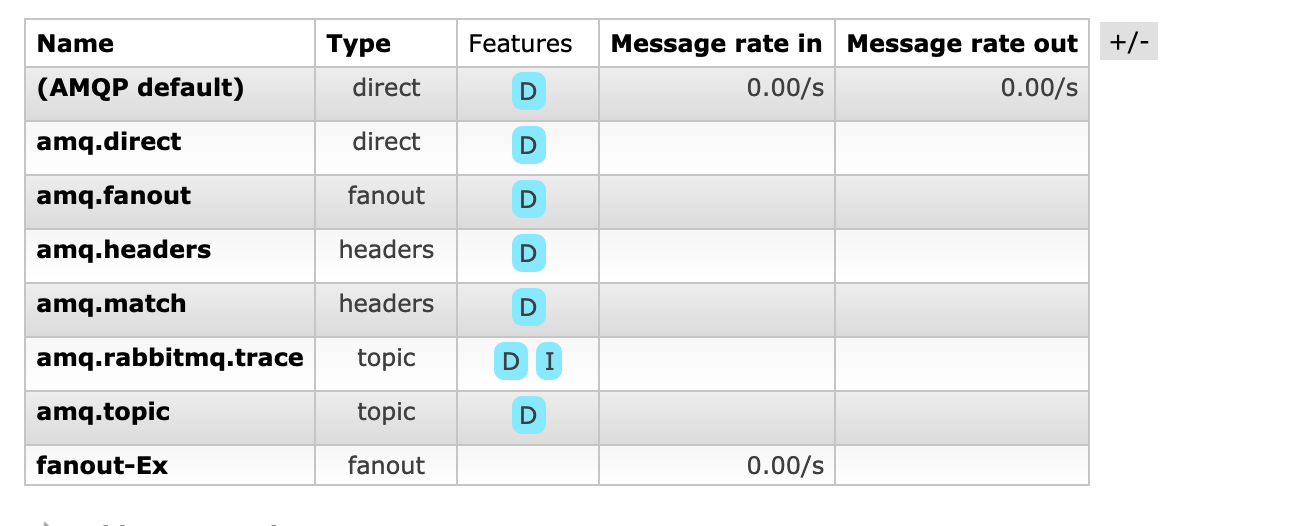
2.1 web管理界面
3 RabbitMQ 的使用

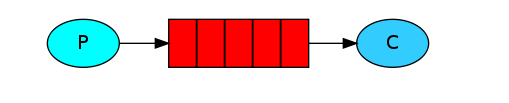
3.1 直连模式 hello-world
项目采用的是spring-boot-2.1.7RELEASE版本,其对应的rabbit-amqp-client的版本是<rabbit-amqp-client.version>5.4.3</rabbit-amqp-client.version>。而rabbitmq官网上说现在的RELEASE版本是5.9.0。

需要手动修改一下版本,不过以此项目不能直接在dependencies项目修改,需要在具体项目里进行修改pom.xml
<properties>
<rabbit-amqp-client.version>5.9.0</rabbit-amqp-client.version>
</properties>
provider
// 链接MQ工厂
ConnectionFactory factory = new ConnectionFactory();
// 设置连接主机
factory.setHost("120.79.0.210");
factory.setPort(5672);
// 设置虚拟主机,
factory.setVirtualHost("/");
factory.setUsername("rabbit");
factory.setPassword("123456");
// 获取连接
Connection connection = factory.newConnection();
// 获取通道 channel
Channel channel = connection.createChannel();
// chanel 绑定消息队列
// 1. queue 队列名字,队列不存在自动创建
// 2. durable 队列是否持久化 true 表示持久化
// 3. exclusive 是否独占
// 4. autoDelete 是否在消费完成之后自动删除队列
// 5. 额外参数
channel.queueDeclare("amqp-hello-queue",true,false,false,null);
Map<String,Object> objectMap = new HashMap<>();
objectMap.put("key","value");
String json = objectMapper.writeValueAsString(objectMap);
// 发布消息
// 1.交换机名称,没有传递空字符串
// 2.指定队列
// 3.传递参数 MessageProperties.PERSISTENT_TEXT_PLAIN 表示持久化消息
// 4.消息对象
channel.basicPublish("","amqp-hello-queue",MessageProperties.PERSISTENT_TEXT_PLAIN,json.getBytes());
// 关闭通道
channel.close();
// 关闭连接
connection.close();
consumer
// 创建新连接
Connection connection = factory.newConnection();
// 创建通道
Channel channel = connection.createChannel();
// 必须和发送端一致,不然就会新建一个channel
channel.queueDeclare("amqp-hello-queue",true,false,false,null);
// 1 待消费的队列名称
// 2 开始消息的自动确认机制
// 3 消费的回调接口
channel.basicConsume("amqp-hello-queue",true,new DefaultConsumer(channel) {
// body 表示消息队列取出的消息体
@Override
public void handleDelivery(String consumerTag, Envelope envelope, AMQP.BasicProperties properties, byte[] body) throws IOException {
String json =
new String(body);
System.out.println(json);
}
});
3.2 任务模式 work-queues
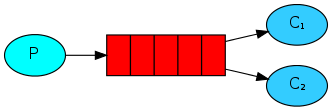
Work Queues任务模型也被称为Task Queues。当消息处理比较耗时的时候,可能产生的消息的速度远大于消耗消息的速度。长此以往消息就会堆积越来越多无法处理,此时就可以用work模型:让多个消费者绑定一个队列,共同消费队列中的消息 。队列中的消息一旦被消费就会消失,因此任务是并不会被重复执行的。
provider
Channel channel = connection.createChannel();
// 定义队列
channel.queueDeclare("amqp-work-queue",true,false,false,null);
// 生产多个消息
for (int i = 0; i < 200 ; i++) {
Map<String,Object> objectMap = new HashMap<>();
objectMap.put("key "+i,"value "+i);
String jsonStr = objectMapper.writeValueAsString(objectMap);
channel.basicPublish("","amqp-work-queue",null,jsonStr.getBytes());
}
consumer
rabbitmq在work模式默认是顺序的将消息发给消费者,平均每个消费者消费消息的数量是一致的。处理速度不一致也会导致消息堆积。
能者多劳:消息确认机制
// 第二个参数 表示消息自动确认 autoAck
channel.basicConsume("amqp-work-queue",true,new DefaultConsumer(channel) {
// body 表示消息队列取出的消息体
@SneakyThrows
@Override
public void handleDelivery(String consumerTag, Envelope envelope, AMQP.BasicProperties properties, byte[] body) throws IOException {
Thread.sleep(5000);
System.out.println("slow-consumer-1");
String json =
new String(body);
System.out.println(json);
}
});
消费者获取100个消息,当消费到第3个的时候消费者下线了,消息就会丢失98个。所以就需要设置autoAck设置为false。
Unacked表示未被确认的消息

Channel channel = connection.createChannel();
// 一次只消费一个消息
channel.basicQos(1);
// 必须和发送端一直,不然就会新建一个channel
channel.queueDeclare("amqp-work-queue",true,false,false,null);
// 1 待消费的队列名称
// 2 开始消息的自动确认机制 true 表示自动确认
// 3 消费的回调接口
channel.basicConsume("amqp-work-queue",false,new DefaultConsumer(channel) {
// body 表示消息队列取出的消息体
@SneakyThrows
@Override
public void handleDelivery(String consumerTag, Envelope envelope, AMQP.BasicProperties properties, byte[] body) throws IOException {
Thread.sleep(1000);
System.out.println("slow-consumer-1");
String json =
new String(body);
System.out.println(json);
// 手动确认消息
// 1 确认队列中具体消息
// 2 是否开启多个消息同时确认
channel.basicAck(envelope.getDeliveryTag(),false);
}
});
3.3 发布订阅模式 publish-subscribe
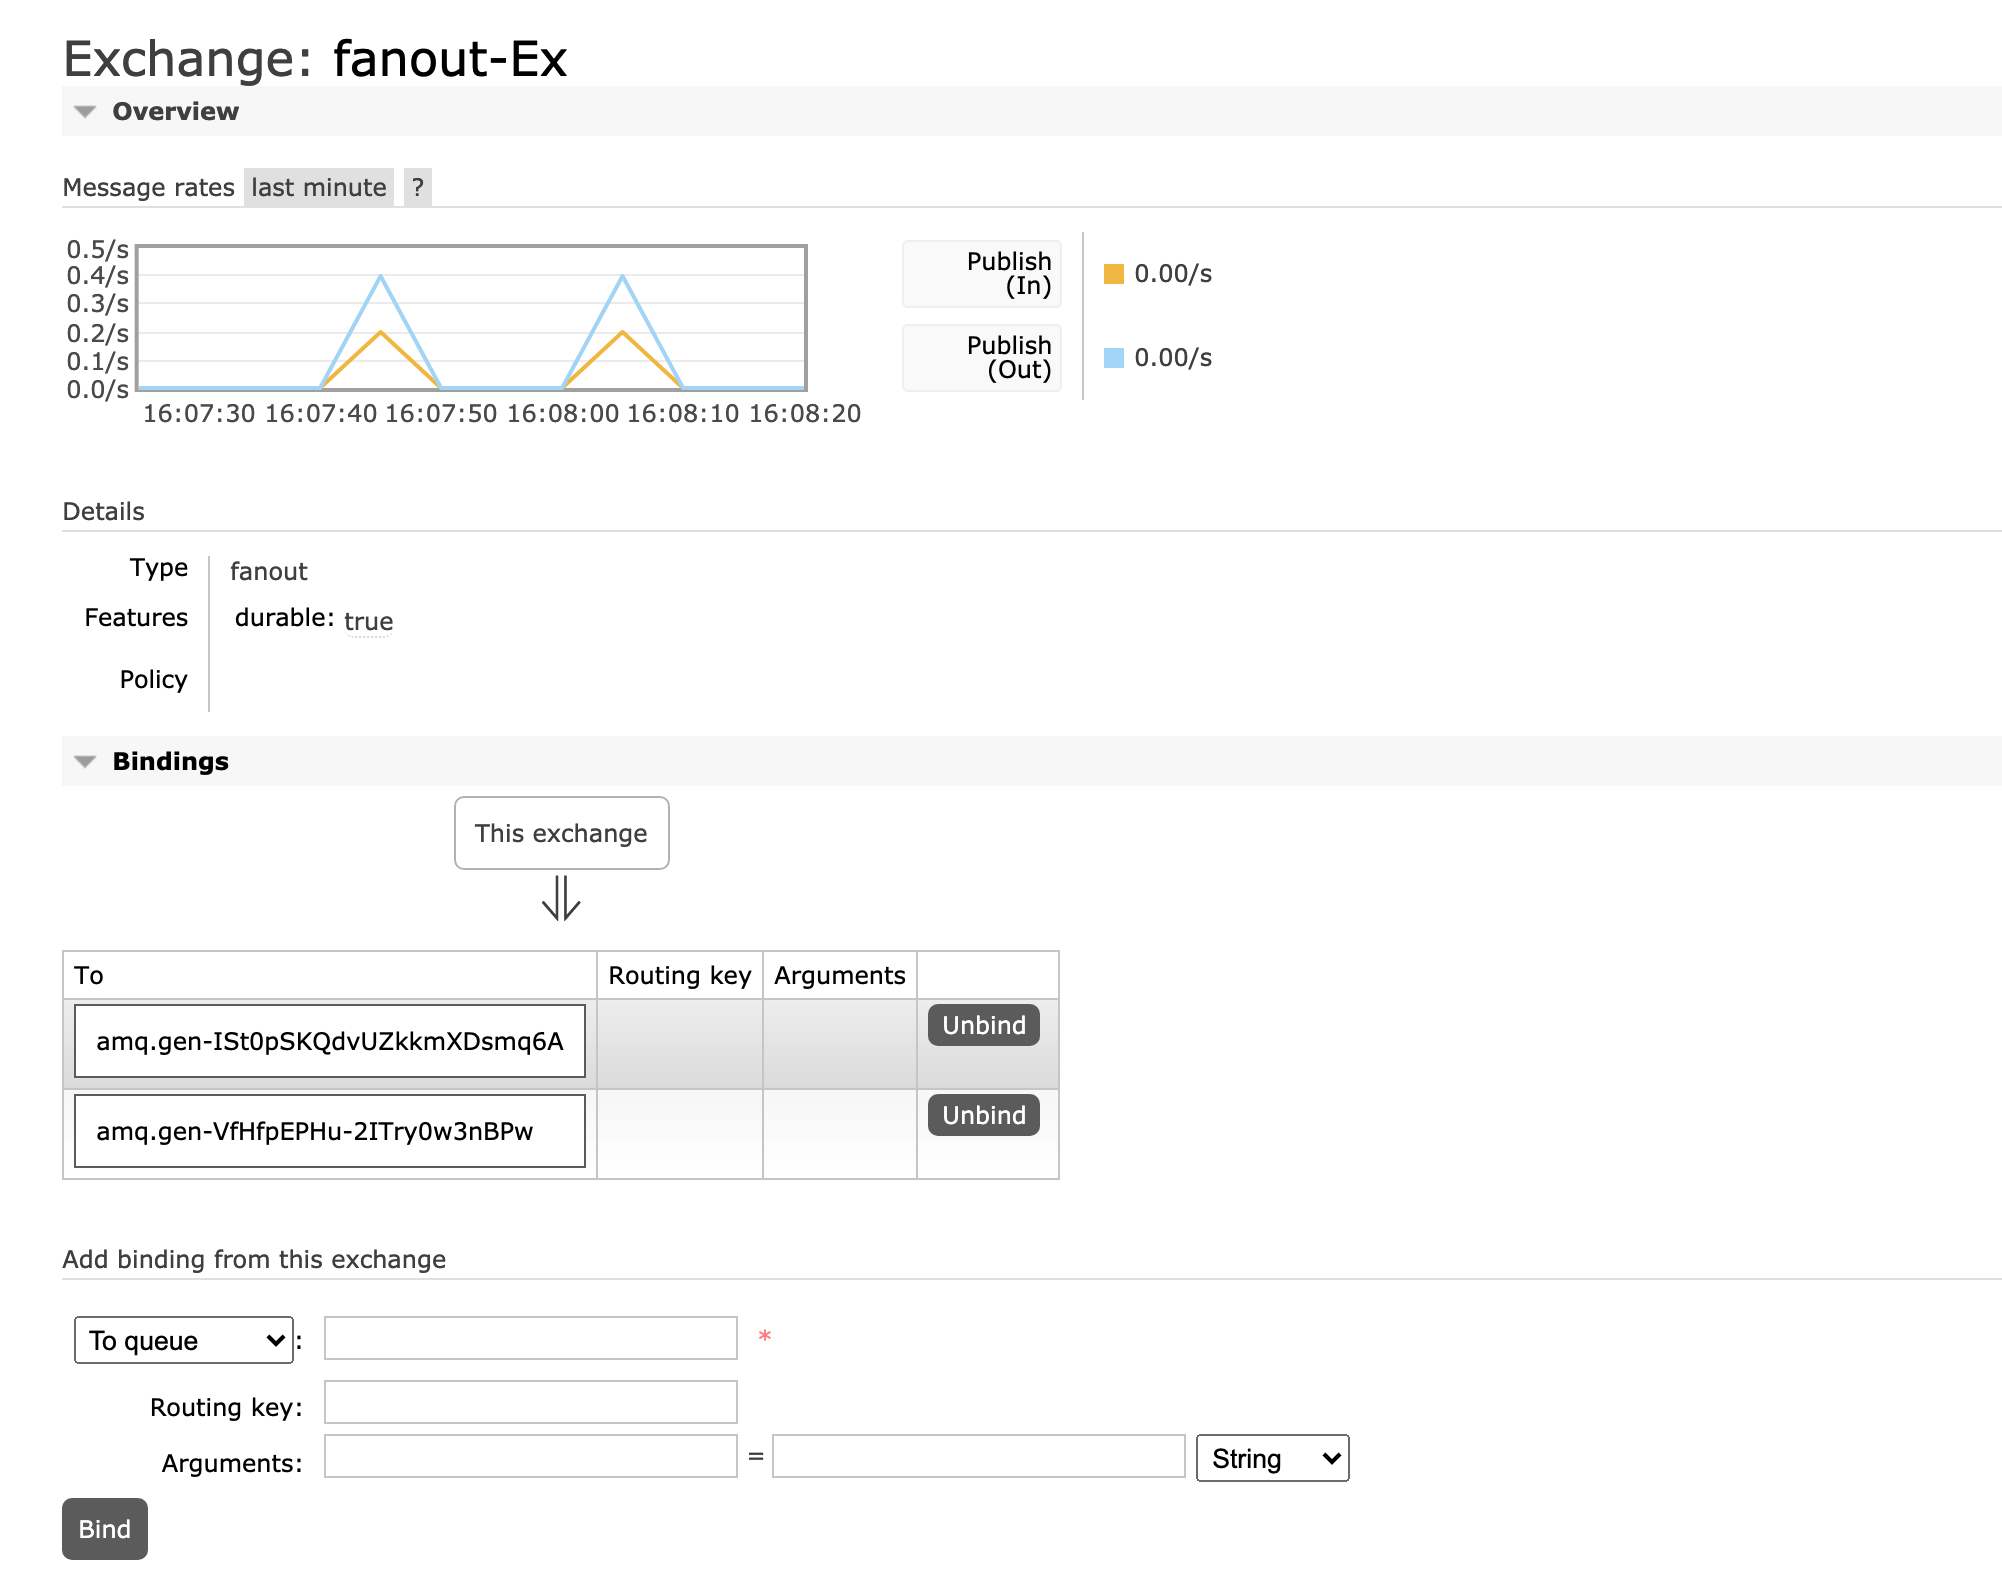
fanout也被称为广播模式,在广播模式下,每个消费者有自己的队列,每个队列都必须绑定到交换机上(图中的x)。生产者发送消息只能发送给交换机,交换机来决定给某个队列,生产者无法决定。交换机将消息发送给绑定上的队列,所有消费者都能拿到消息,实现一条消息被多个消费者消费。
provider
Channel channel = connection.createChannel();
// 将通道声明指定的交换机
// 1 交换机的名称
// 2 交换机的类型 fanout 表示广播类型
channel.exchangeDeclare("fanout-Ex","fanout");
// 发送消息
Map<String,Object> objectMap = new HashMap<>();
objectMap.put("key","fanout");
String json = objectMapper.writeValueAsString(objectMap);
// 1 交换机名称
// 2 路由key,广播模式无须关心路由key
// 3 消息额外参数(持久化)
// 4 消息体
channel.basicPublish("fanout-Ex","",null,json.getBytes());
channel.close();
connection.close();
consumer
Channel channel = connection.createChannel();
// 绑定交换机
channel.exchangeDeclare("fanout-Ex","fanout",true);
// 临时队列名
String queueName = channel.queueDeclare().getQueue();
// 绑定队列和交换机
channel.queueBind(queueName,"fanout-Ex","");
// 消费消息
channel.basicConsume(queueName,true,new DefaultConsumer(channel) {
// body 表示消息队列取出的消息体
@Override
public void handleDelivery(String consumerTag, Envelope envelope, AMQP.BasicProperties properties, byte[] body) throws IOException {
System.out.print("fanout-consumer-1 ");
String json =
new String(body);
System.out.println(json);
}
});
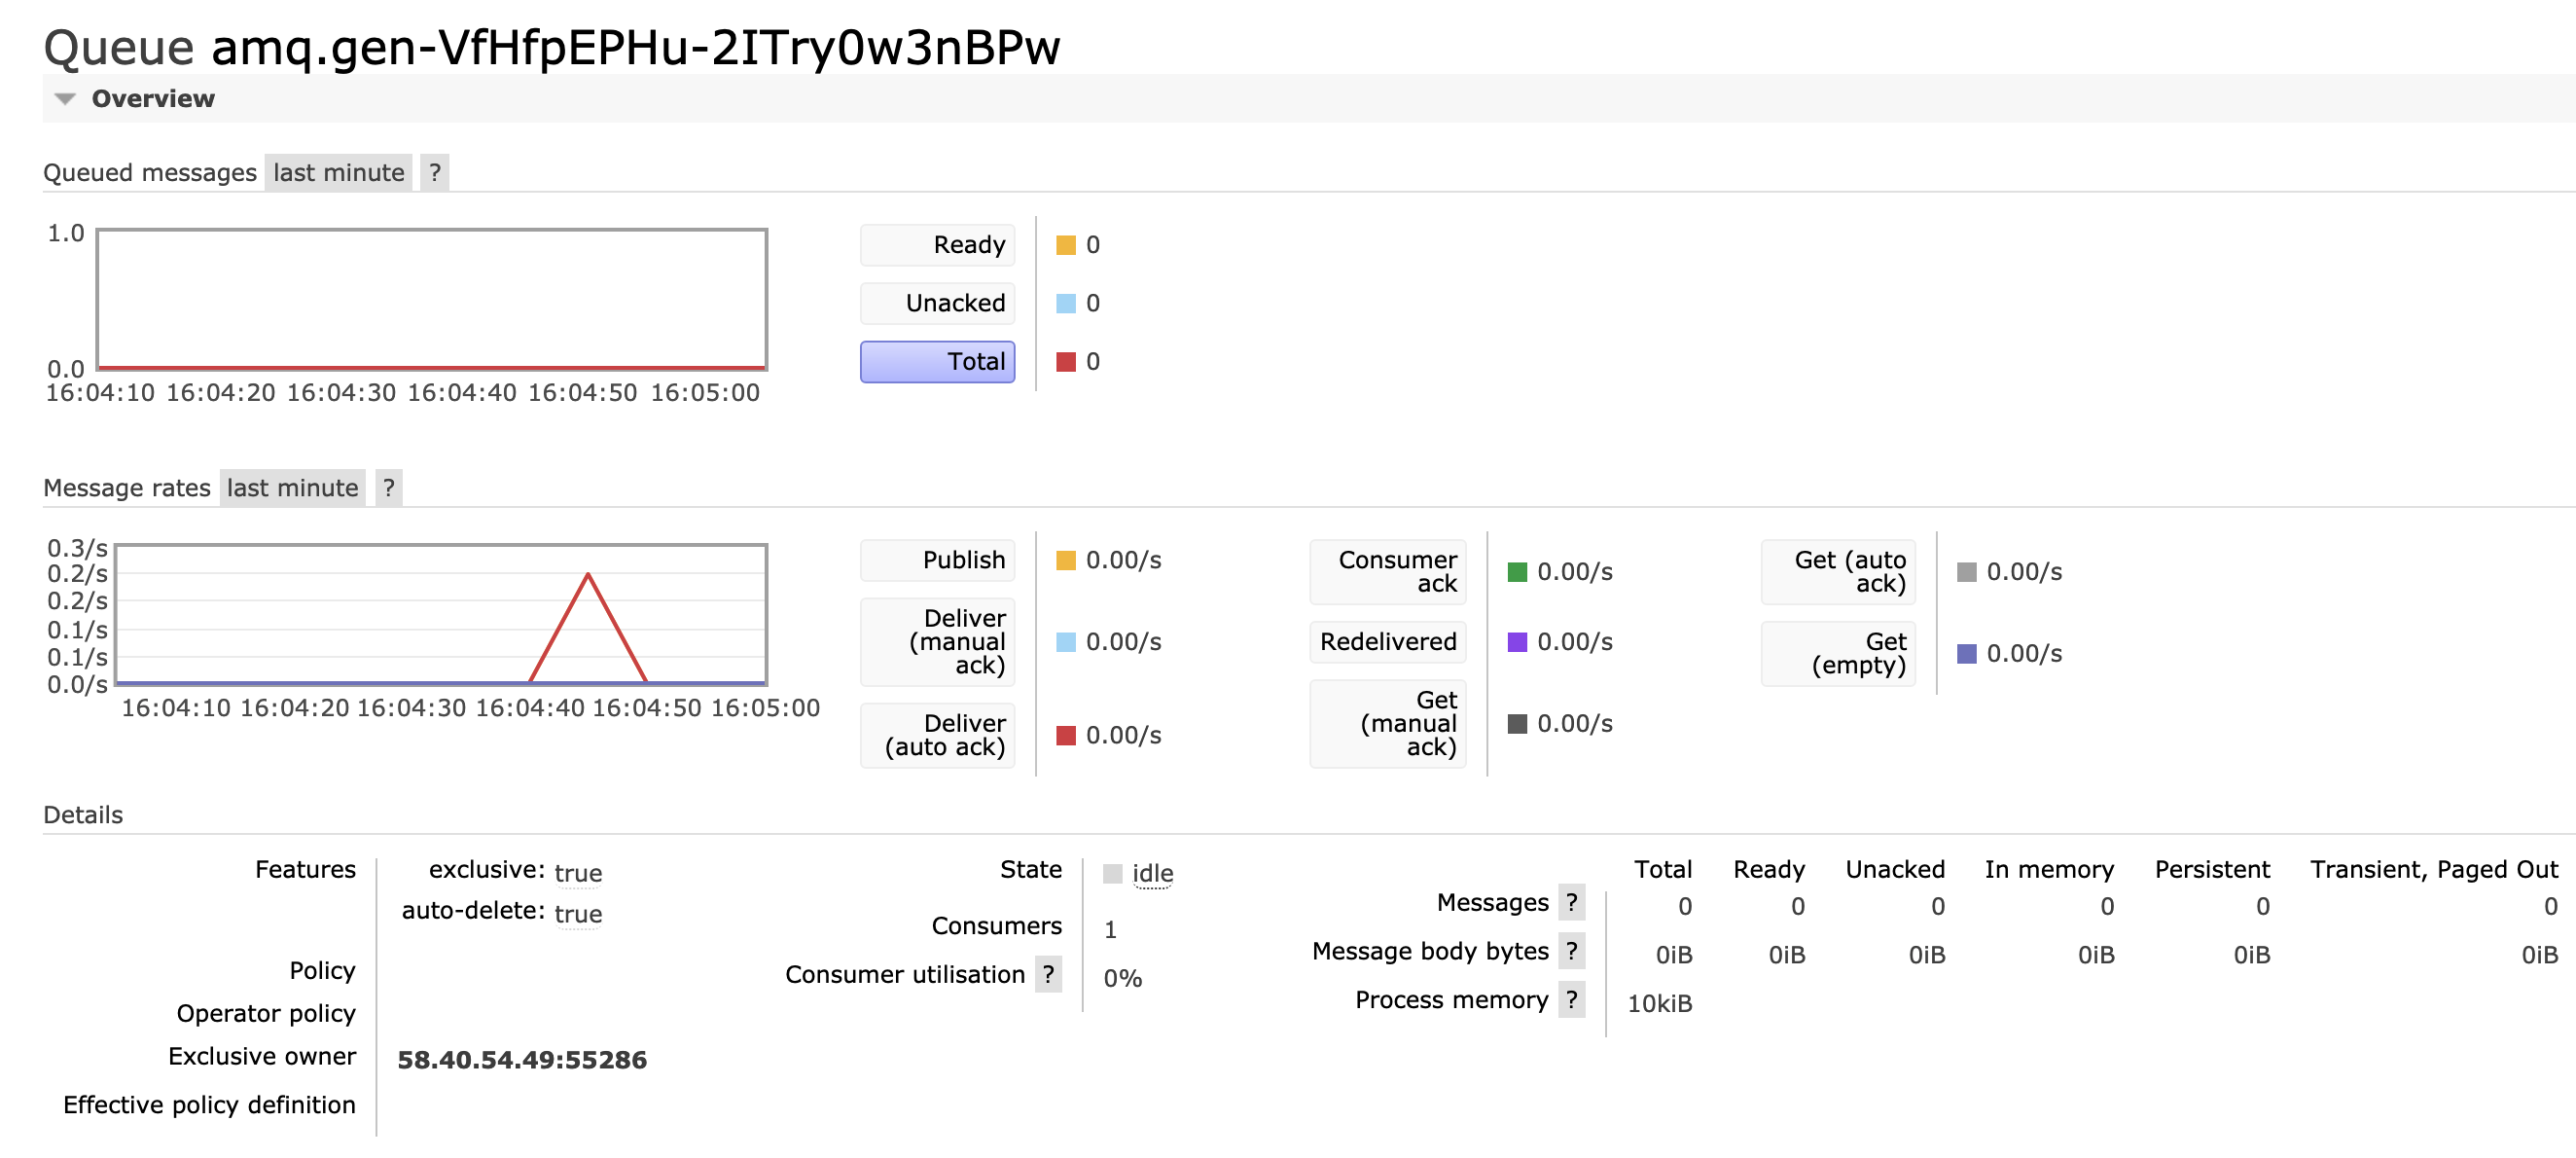
开启2个消费者,交换机收到一条消息会被2个消费者消费。
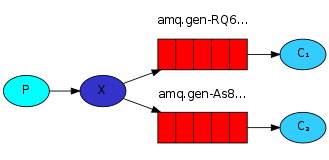
3.4 路由模式 routing
路由直连 Direct
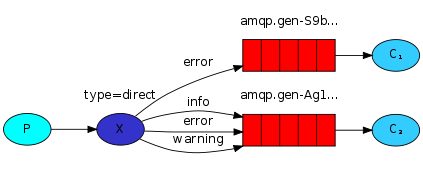
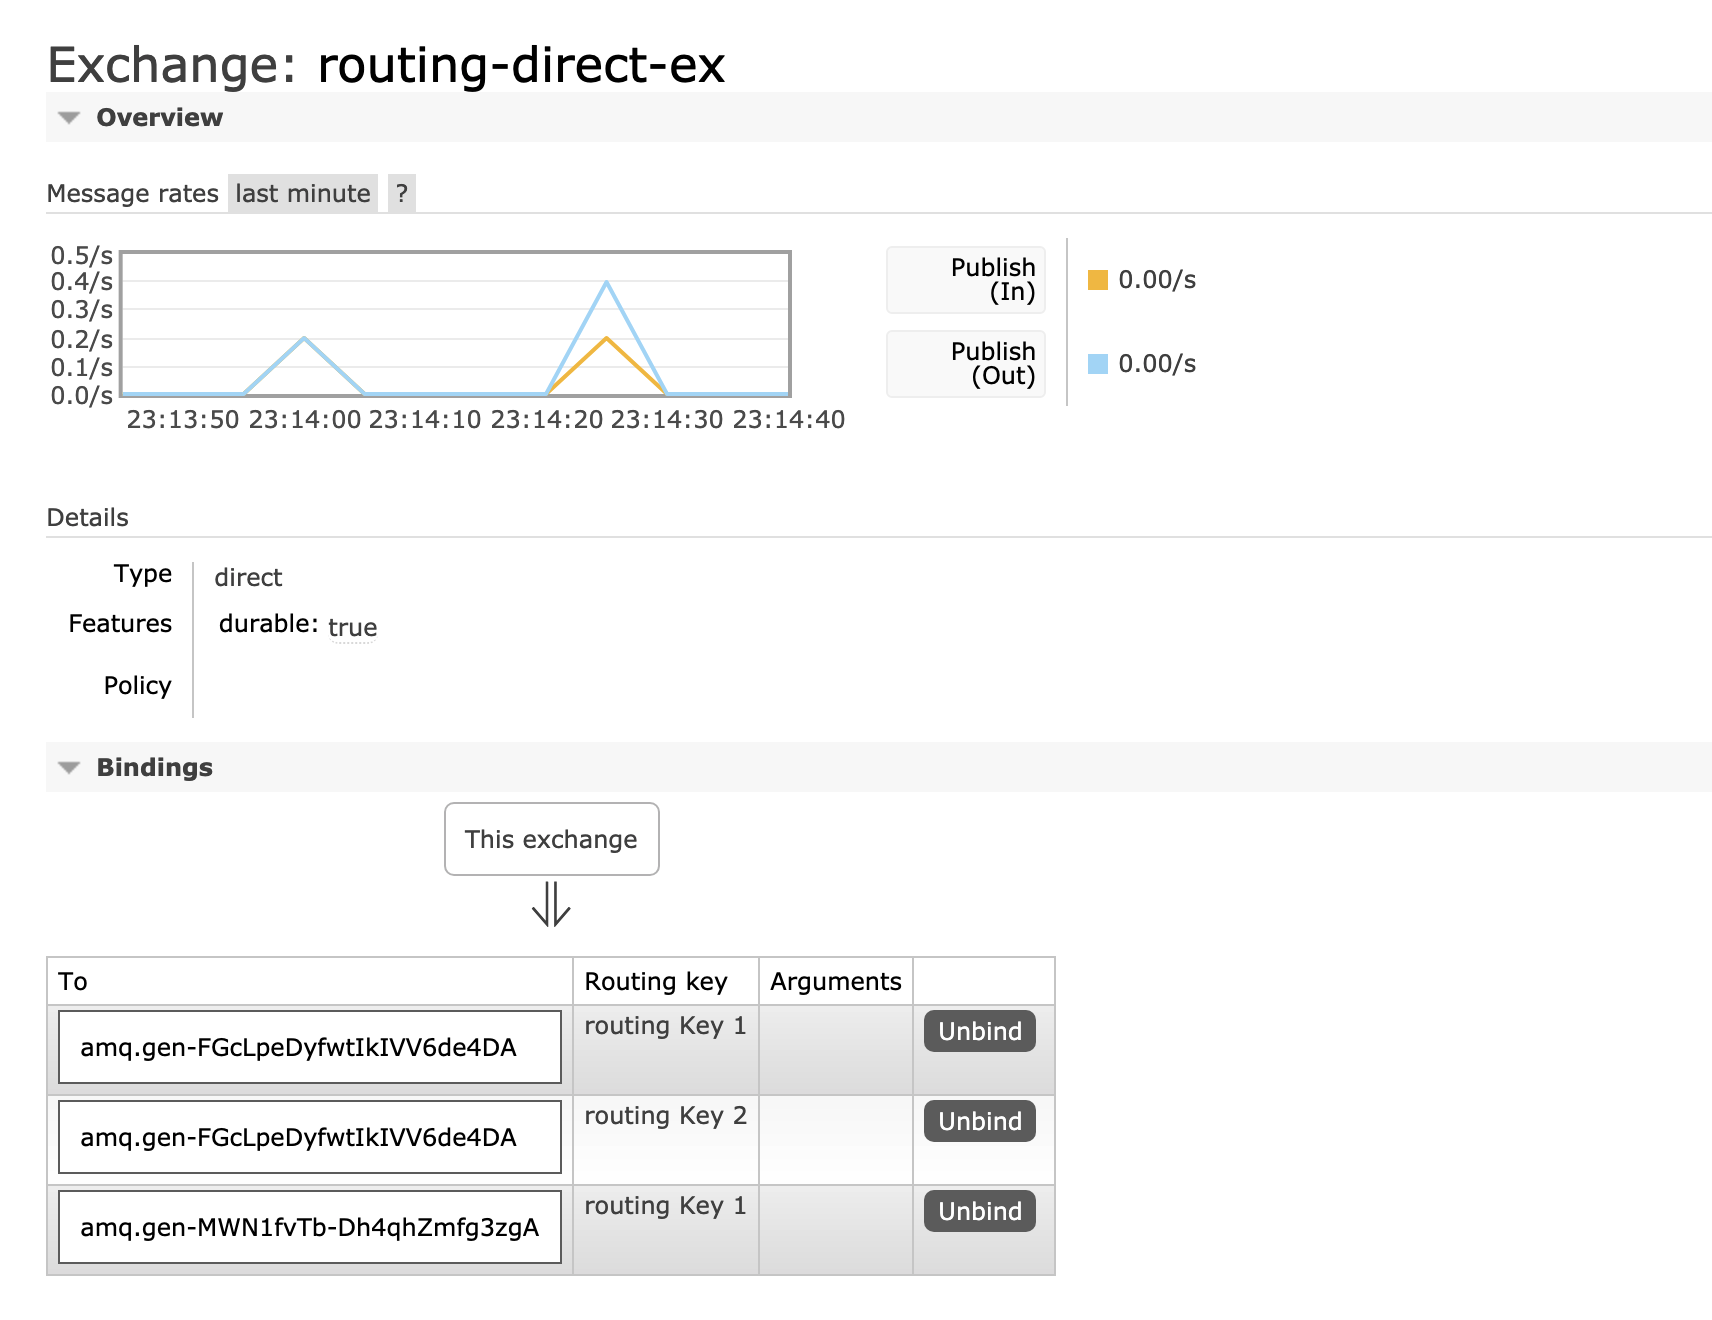
在fanout模型中,一条消息会被所有订阅的队列消费。但是在某些场景下,我们希望不同的消息被不同的消息队列消费。这是就要用到Direct类型的Exchange。队列和交换机绑定,必须指定一个RoutingKey。消息的发送方在向Exchange发送消息的同时。必须指定消息的RoutingKey。Exchange不在把消息交给每一个绑定的队列,而是根据消息的RoutingKey进行判断,只有消息的RoutingKey与队列的RoutingKey完全一致才会接收到消息。
provider
// 获取通道
Channel channel = connection.createChannel();
// 设置交换机
// BuiltinExchangeType.DIRECT 直连
channel.exchangeDeclare("routing-direct-ex", BuiltinExchangeType.DIRECT,true);
// 声明路由Key
String routingKey = "routing Key 1";
// 消息对象
Map<String,Object> objectMap = new HashMap<>();
objectMap.put("key",routingKey);
objectMap.put("value","routing -- direct");
String jsonStr = objectMapper.writeValueAsString(objectMap);
// 消息生产者 指定路由Key
channel.basicPublish("routing-direct-ex",routingKey,null,jsonStr.getBytes());
consumer
// 获取通道
Channel channel = connection.createChannel();
// 设置交换机
channel.exchangeDeclare("routing-direct-ex", BuiltinExchangeType.DIRECT,true);
// 路由key
String routingKey1 = "routing Key 1";
String routingKey2 = "routing Key 2";
// 临时队列名
String queueName = channel.queueDeclare().getQueue();
// 绑定队列,使用路由key 一个channel 绑定2个队列
channel.queueBind(queueName,"routing-direct-ex",routingKey1,null);
channel.queueBind(queueName,"routing-direct-ex",routingKey2,null);
channel.basicConsume(queueName,true,new DefaultConsumer(channel){
@Override
public void handleDelivery(String consumerTag,
Envelope envelope,
AMQP.BasicProperties properties,
byte[] body)throws IOException{
System.out.print("consumer :
"+ envelope.getRoutingKey());
String json =
new String(body);
System.out.println(json);
}
});
一个channel绑定多个队列,就类似上图的C2,不仅仅可以消费info,还可以消费error和warning的消息。
3.5 动态路由 topic
topic模式又称为动态路由,他是基于路由的基础之上演化来的。代替使用仅能进行虚拟广播的fanout交换机,我们使用direct交换机,并有选择地接收消息。但是它仍然存在局限性-它不能基于多个条件进行路由。Topic类型的Exchange可以让队列在绑定RoutingKey的使用使用通配符。这种一般都是由一个或者多个单词组成,多个单词以.的形式分隔。
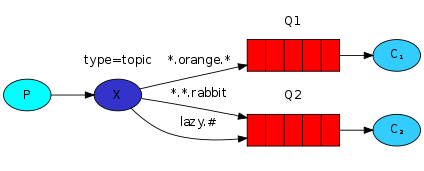
- *(星号)可以代替一个单词。
- #(哈希)可以替代零个或多个单词。
provider
Connection connection = RabbitUtils.openConnection();
// 获取通道
Channel channel = connection.createChannel();
String exchangeName = "topic-ex";
// 声明一个topic类型的交换机
channel.exchangeDeclare(exchangeName, BuiltinExchangeType.TOPIC,true);
// 声明消息体
String routingKey = "rabbit.laoshiren.topic";
Map<String,Object> map = new HashMap<>();
map.put("routing key",routingKey);
map.put("exchange", exchangeName);
String jsonStr = objectMapper.writeValueAsString(map);
// 向topic交换机发送消息
channel.basicPublish(exchangeName,routingKey,null,jsonStr.getBytes());
consumer
// 声明通道
Channel channel = connection.createChannel();
// 声明交换机
String exchangeName = "topic-ex";
channel.exchangeDeclare(exchangeName, BuiltinExchangeType.TOPIC,true);
// 声明队列并绑定
String queueName = channel.queueDeclare().getQueue();
channel.queueBind(queueName,exchangeName,"*.laoshiren.*",null);
// 消费消息
channel.basicConsume(queueName,true,new DefaultConsumer(channel){
@Override
public void handleDelivery(String consumerTag,
Envelope envelope,
AMQP.BasicProperties properties,
byte[] body) throws IOException
{
System.out.print("topic-consumer1 "+ envelope.getExchange()+" routing key "+envelope.getRoutingKey()+" ");
System.out.println(new String(body));
}
});
Topic exchange is powerful and can behave like other exchanges.
Topic 类型的交换机是一个强大的可以像其他交换机一样功能的交换机
When a queue is bound with “#” (hash) binding key - it will receive all the messages, regardless of the routing key - like in fanout exchange.
当一个队列被
#hash 绑定,他就会和fanout交换机一样,接收所有消息和routing key无关When special characters, “*” (star) and “#” (hash), aren’t used in bindings, the topic exchange will behave just like a direct one.
当他不使用任何通配符,
topic交换机又像direct交换机一样。 RabbitMQ 官网
4 Spring AMQP
4.1 spring-hello-world
我们使用测试用例作为生产,main代码里作为消息消费者。第一步引入依赖。
<properties>
<rabbit-amqp-client.version>5.9.0</rabbit-amqp-client.version>
</properties>
<dependencies>
<!-- spring boot -->
<dependency>
<groupId>org.springframework.boot</groupId>
<artifactId>spring-boot-starter-web</artifactId>
</dependency>
<dependency>
<groupId>org.springframework.boot</groupId>
<artifactId>spring-boot-starter-test</artifactId>
<scope>test</scope>
</dependency>
<!-- rabbit-mq start -->
<dependency>
<groupId>org.springframework.boot</groupId>
<artifactId>spring-boot-starter-amqp</artifactId>
</dependency>
<dependencies>
配置文件
spring:
## rabbit mq 基本设置
rabbitmq:
addresses: 120.79.0.210
port: 5672
username: rabbit
password: 123456
virtual-host: /
provider
消息生产者不会主动创建队列,只有消费者才会创建队列。
@Resource
private RabbitTemplate rabbitTemplate;
@Resource
private ObjectMapper objectMapper;
@Test
public void runEmpty() throws Exception {
String queueName = "amqp-spring-hello";
Map<String,Object> map = new HashMap<>();
map.put("key","spring-hello-world");
map.put("queueName",queueName);
String jsonStr = objectMapper.writeValueAsString(map);
// 向队列发送消息
// 1 队列名
// 2 消息体
rabbitTemplate.convertAndSend(queueName,jsonStr);
}
consumer
默认创建的就是持久化非独占的队列。
@Component
// 消费者监听
// queuesToDeclare 定义队列
// @Queue 队列
// 默认创建的就是 持久化非独占的队列
@RabbitListener(queuesToDeclare = {@Queue(name = "amqp-spring-hello",durable = "true")})
@Slf4j
public class HelloWorldConsumer {
/*
* 可以定义任意方法,但是只有一个方法能被@RabbitHandler修饰,不然就会报 no match 的异常
*/
/**
* 接收消息的方法
* @Annotation @RabbitHandler 表示mq消费者消费方法
* @param message
消息体
*/
@RabbitHandler
public void receiveMessage(String message){
log.info("queue: amqp-spring-hello
message {}",message);
}
}
4.2 spring-work-queues
依赖和配置文件其实是和spring-hello-world一致的。
provider
consumer
模拟2个消费者消费
@Component
@Slf4j
public class WorkConsumer {
@RabbitListener(queuesToDeclare = {@Queue("spring-work-queue")})
public void receiveMessageWork1(String message){
log.info("work1 {}",message);
}
@RabbitListener(queuesToDeclare = {@Queue("spring-work-queue")})
public void receiveMessageWork2(String message){
log.info("work2 {}",message);
}
}
输出日志
2020-10-06 22:24:14.293
INFO 20066 --- [ntContainer#0-1] c.l.h.r.s.work.consumer.WorkConsumer
: work1 {"value":0,"key":"spring-work-queue"}
2020-10-06 22:24:14.293
INFO 20066 --- [ntContainer#1-1] c.l.h.r.s.work.consumer.WorkConsumer
: work2 {"value":1,"key":"spring-work-queue"}
2020-10-06 22:24:14.295
INFO 20066 --- [
Thread-2] o.s.a.r.l.SimpleMessageListenerContainer : Waiting for workers to finish.
2020-10-06 22:24:14.296
INFO 20066 --- [ntContainer#0-1] c.l.h.r.s.work.consumer.WorkConsumer
: work1 {"value":2,"key":"spring-work-queue"}
2020-10-06 22:24:14.296
INFO 20066 --- [ntContainer#1-1] c.l.h.r.s.work.consumer.WorkConsumer
: work2 {"value":3,"key":"spring-work-queue"}
2020-10-06 22:24:14.296
INFO 20066 --- [ntContainer#0-1] c.l.h.r.s.work.consumer.WorkConsumer
: work1 {"value":4,"key":"spring-work-queue"}
2020-10-06 22:24:14.296
INFO 20066 --- [ntContainer#1-1] c.l.h.r.s.work.consumer.WorkConsumer
: work2 {"value":5,"key":"spring-work-queue"}
2020-10-06 22:24:14.296
INFO 20066 --- [ntContainer#0-1] c.l.h.r.s.work.consumer.WorkConsumer
: work1 {"value":6,"key":"spring-work-queue"}
2020-10-06 22:24:14.296
INFO 20066 --- [ntContainer#1-1] c.l.h.r.s.work.consumer.WorkConsumer
: work2 {"value":7,"key":"spring-work-queue"}
2020-10-06 22:24:14.296
INFO 20066 --- [ntContainer#0-1] c.l.h.r.s.work.consumer.WorkConsumer
: work1 {"value":8,"key":"spring-work-queue"}
2020-10-06 22:24:14.297
INFO 20066 --- [ntContainer#1-1] c.l.h.r.s.work.consumer.WorkConsumer
: work2 {"value":9,"key":"spring-work-queue"}
2020-10-06 22:24:14.297
INFO 20066 --- [ntContainer#0-1] c.l.h.r.s.work.consumer.WorkConsumer
: work1 {"value":10,"key":"spring-work-queue"}
2020-10-06 22:24:14.297
INFO 20066 --- [ntContainer#1-1] c.l.h.r.s.work.consumer.WorkConsumer
: work2 {"value":11,"key":"spring-work-queue"}
2020-10-06 22:24:14.297
INFO 20066 --- [ntContainer#0-1] c.l.h.r.s.work.consumer.WorkConsumer
: work1 {"value":12,"key":"spring-work-queue"}
能者多劳模式
4.3 spring-publish-subscribe
依赖和配置文件其实是和spring-hello-world一致的。
provider
@Test
public void runEmpty() throws Exception{
String exchangeName = "spring-fanout-ex";
Map<String,Object> map = new HashMap<>();
map.put("key","spring-Publish-Subscribe");
map.put("exchangeName",exchangeName);
String jsonStr = objectMapper.writeValueAsString(map);
// 1 交换机名称
// 2 路由key 发布订阅者 无须设置路由key
// 3 消息体
rabbitTemplate.convertAndSend(exchangeName,"",jsonStr);
}
consumer
public class FanoutConsumer {
/*
* 此处声明多个消费者
*/
@RabbitListener(
// 绑定
bindings = {@QueueBinding(
// 创建临时队列
value = @Queue(""),
// 配置交换机
exchange = @Exchange(name = "spring-fanout-ex",type = ExchangeTypes.FANOUT))
})
public void receiveMessageFanout1(String message){
log.info("fanout1 -- {}",message);
}
@RabbitListener(bindings = {@QueueBinding(
value = @Queue(""),
exchange = @Exchange(name = "spring-fanout-ex",type = ExchangeTypes.FANOUT))})
public void receiveMessageFanout2(String message){
log.info("fanout2 -- {}",message);
}
}
日志输出
2020-10-06 22:55:07.797
INFO 20911 --- [ntContainer#0-1] c.l.h.r.s.p.consumer.FanoutConsumer
: fanout1 -- {"exchangeName":"spring-fanout-ex","key":"spring-Publish-Subscribe"}
2020-10-06 22:55:07.797
INFO 20911 --- [ntContainer#1-1] c.l.h.r.s.p.consumer.FanoutConsumer
: fanout2 -- {"exchangeName":"spring-fanout-ex","key":"spring-Publish-Subscribe"}
4.4 spring-routing
依赖和配置文件其实是和spring-hello-world一致的。
provider
@Test
public void runEmpty() throws Exception {
String exchangeName = "spring-routing-ex";
String routingKey = "laoshiren";
// String routingKey = "rabbit";
Map<String,Object> map = new HashMap<>();
map.put("key","spring-routing");
map.put("exchangeName",exchangeName);
map.put("routingKey",routingKey);
String jsonStr = objectMapper.writeValueAsString(map);
// 1. exchange 名
// 2 routing 模式必须跟上路由key
// 3 消息
rabbitTemplate.convertAndSend(exchangeName,routingKey,jsonStr);
}
consumer
第一个消费者只绑定一个routingKey,第二个消费者绑定多个routingKey。
public class RoutingConsumer {
@RabbitListener(bindings = {
@QueueBinding(
// 临时队列
value = @Queue(),
// 交换机 type 默认就是direct直连模式
exchange = @Exchange(name = "spring-routing-ex",type = ExchangeTypes.DIRECT),
// 路由Key,可以声明多个
key = {"laoshiren"}
)
})
public void receiveMessageRouting1(String message){
log.info("routing 1 {}",message);
}
@RabbitListener(bindings = {
@QueueBinding(
value = @Queue(),
exchange = @Exchange(name = "spring-routing-ex",type = ExchangeTypes.DIRECT),
key = {"laoshiren","rabbit"}
)
})
public void receiveMessageRouting2(String message){
log.info("routing 2 {}",message);
}
}
日志输出
## 当路由key 为 laoshiren 时
2020-10-06 23:19:44.920
INFO 21637 --- [ntContainer#1-1] c.l.h.r.s.r.consumer.RoutingConsumer
: routing 2 {"exchangeName":"spring-routing-ex","key":"spring-routing","routingKey":"laoshiren"}
2020-10-06 23:19:44.920
INFO 21637 --- [ntContainer#0-1] c.l.h.r.s.r.consumer.RoutingConsumer
: routing 1 {"exchangeName":"spring-routing-ex","key":"spring-routing","routingKey":"laoshiren"}
## 当路由key 为 rabbit 时
2020-10-06 23:23:37.319
INFO 21725 --- [ntContainer#1-1] c.l.h.r.s.r.consumer.RoutingConsumer
: routing 2 {"exchangeName":"spring-routing-ex","key":"spring-routing","routingKey":"rabbit"}
4.5 spring-topic
依赖和配置文件其实是和spring-hello-world一致的。
provider
@Test
public void runEmpty() throws Exception {
String exchangeName = "spring-topic-ex";
String routingKey = "rabbit.laoshiren.1207";
Map<String,Object> map = new HashMap<>();
map.put("key","spring-topic");
map.put("exchangeName",exchangeName);
map.put("routingKey",routingKey);
String jsonStr = objectMapper.writeValueAsString(map);
// 1. exchange 名
// 2 routing 模式必须跟上路由key
// 3 消息
rabbitTemplate.convertAndSend(exchangeName,routingKey,jsonStr);
}
consumer
public class TopicConsumer {
@RabbitListener(bindings = {
@QueueBinding(
value = @Queue(""),
// 设置topic 类型的交换机
exchange = @Exchange(name = "spring-topic-ex",type = ExchangeTypes.TOPIC),
key = {"rabbit.#"}
)
})
public void receiveMessageTopic1(String message){
log.info("topic 1 {}",message);
}
@RabbitListener(bindings = {
@QueueBinding(
value = @Queue(""),
exchange = @Exchange(name = "spring-topic-ex",type = ExchangeTypes.TOPIC),
key = {"*.laoshiren.*","#.1207"}
)
})
public void receiveMessageTopic2(String message){
log.info("topic 2 {}",message);
}
}
日志输出
2020-10-06 23:47:45.579
INFO 22521 --- [ntContainer#0-1] c.l.h.r.s.topic.consumer.TopicConsumer
: topic 2 {"exchangeName":"spring-topic-ex","key":"spring-topic","routingKey":"rabbit.laoshiren.1207"}
2020-10-06 23:47:45.579
INFO 22521 --- [ntContainer#1-1] c.l.h.r.s.topic.consumer.TopicConsumer
: topic 1 {"exchangeName":"spring-topic-ex","key":"spring-topic","routingKey":"rabbit.laoshiren.1207"}
5 应用场景
5.1 异步处理
无须等待返回的可以交给MQ来处理,比如日志记录,短息邮件的发送,客户端无须关心事件完成的状态,引入消息队列,就是为了将不必要的业务逻辑从串行的方式分离出来。
5.2 应用解耦
传统的项目(特别是单体)业务与业务之间是高度耦合的,如今微服务或多或少解决了这个问题,而消息队列也可以帮助系统与系统之间的解耦。
5.3 削峰填谷
在高并发的场景下,流量过大会导致单点故障,而引入消息队列,就可以解决突然高并发的场景。
最后
以上就是魁梧凉面最近收集整理的关于微服务解决方案 -- 消息队列 【RabbitMQ】微服务解决方案 – 消息队列 【RabbitMQ】的全部内容,更多相关微服务解决方案内容请搜索靠谱客的其他文章。


发表评论 取消回复