我是靠谱客的博主 唠叨烧鹅,这篇文章主要介绍迁移学习-域分类损失函数-python代码实现域适应迁移学习的理解迁移学习的目标函数分为三部分域分类损失的理解代码实现在CNN中的结合代码实现及讲解,现在分享给大家,希望可以做个参考。
这里写目录标题
- **域适应迁移学习的理解**
- **迁移学习的目标函数分为三部分**
- **域分类损失的理解**
- **代码实现**
- **在CNN中的结合代码实现及讲解**
域适应迁移学习的理解
中源域和目标域经过相同的映射来实现对齐。
迁移学习的目标函数分为三部分
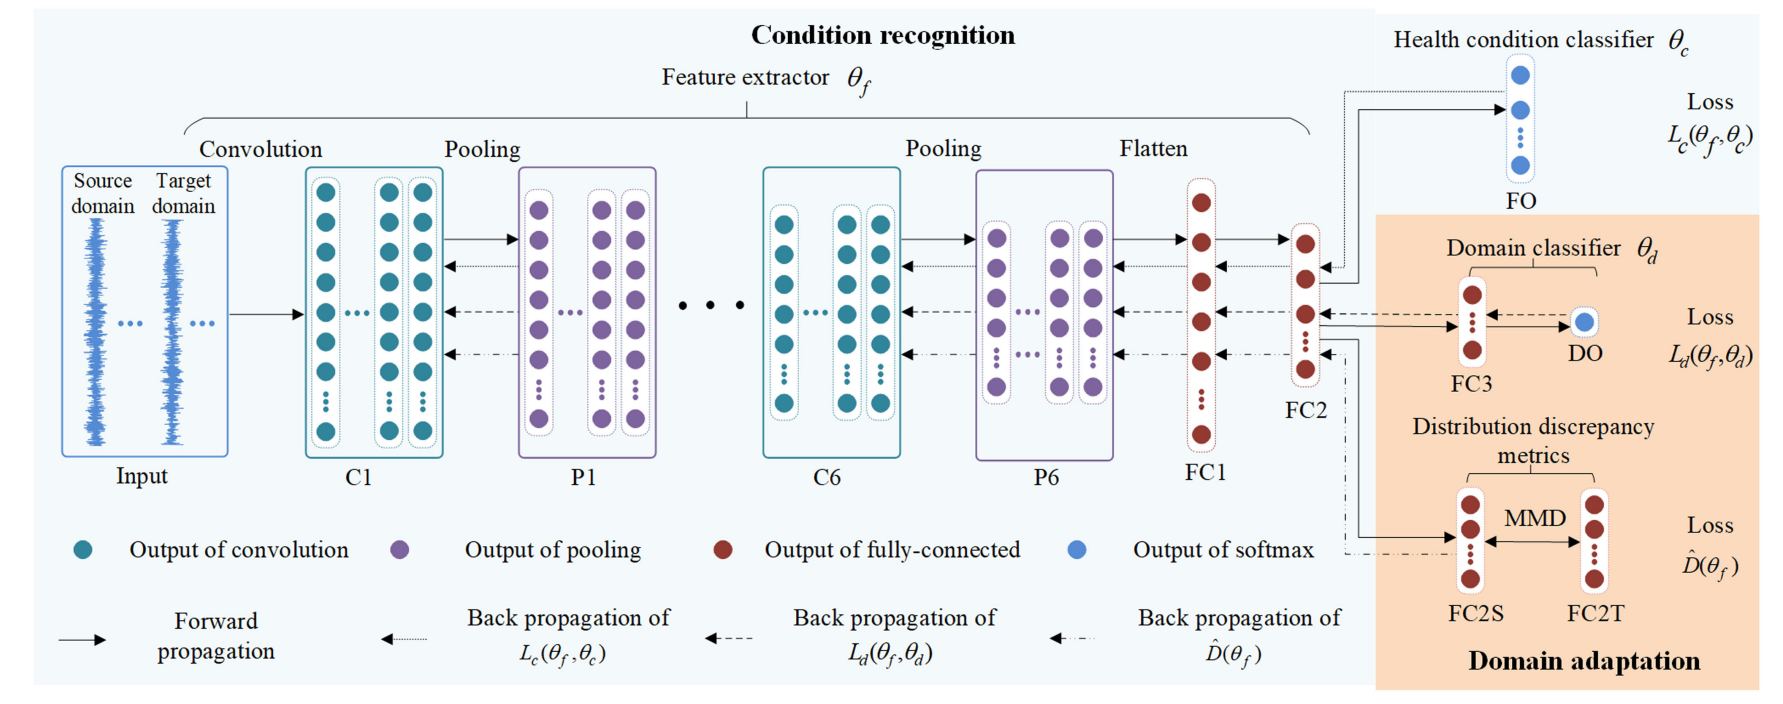
- 源域分类损失项
- 源域和目标域域分类损失项(又叫对抗loss,AdversarialLoss)
- 源域和目标域的特征分布差异损失项
域分类损失的理解
域分类时,源域的标签是1,目标域的标签是0,最大化域分类误差就是让域判别器分不清源域和目标域,如此这样源域和目标域在分布上就变得对齐了。
对于任意一个来自源域或者目标域的点,它通过域判别层后的结果是:

这个点的域分类误差定义为:

交叉熵函数:

把负号提入对数函数内就是上式的形式。
代码实现
注:以下代码基于jupyter notebook编辑器
编写AdversarialLoss类
import torch
import torch.nn as nn
from torch.autograd import Function
import torch.nn.functional as F
import numpy as np

class LambdaSheduler(nn.Module):
    def __init__(self, gamma=1.0, max_iter=1000, **kwargs):
        super(LambdaSheduler, self).__init__()
        self.gamma = gamma
        self.max_iter = max_iter
        self.curr_iter = 0

    def lamb(self):
        p = self.curr_iter / self.max_iter
        lamb = 2. / (1. + np.exp(-self.gamma * p)) - 1
        return lamb

    def step(self):
        self.curr_iter = min(self.curr_iter + 1, self.max_iter)

class AdversarialLoss(nn.Module):
    '''
    Acknowledgement: The adversarial loss implementation is inspired by http://transfer.thuml.ai/
    '''
    def __init__(self, gamma=1.0, max_iter=1000, use_lambda_scheduler=True, **kwargs):
        super(AdversarialLoss, self).__init__()
        self.domain_classifier = Discriminator()
        self.use_lambda_scheduler = use_lambda_scheduler
        if self.use_lambda_scheduler:
            self.lambda_scheduler = LambdaSheduler(gamma, max_iter)

    def forward(self, source, target):
        lamb = 1.0
        if self.use_lambda_scheduler:
            lamb = self.lambda_scheduler.lamb()
            self.lambda_scheduler.step()
        source_loss = self.get_adversarial_result(source, True, lamb)
        target_loss = self.get_adversarial_result(target, False, lamb)
        adv_loss = 0.5 * (source_loss + target_loss)
        return adv_loss

    def get_adversarial_result(self, x, source=True, lamb=1.0):
        x = ReverseLayerF.apply(x, lamb)
        domain_pred = self.domain_classifier(x)
        device = domain_pred.device
        if source:
            domain_label = torch.ones(len(x), 1).long()
        else:
            domain_label = torch.zeros(len(x), 1).long()
        loss_fn = nn.BCELoss()
        loss_adv = loss_fn(domain_pred, domain_label.float().to(device))
        return loss_adv

class ReverseLayerF(Function):
    @staticmethod
    def forward(ctx, x, alpha):
        ctx.alpha = alpha
        return x.view_as(x)

    @staticmethod
    def backward(ctx, grad_output):
        output = grad_output.neg() * ctx.alpha
        return output, None

class Discriminator(nn.Module):
    def __init__(self, input_dim=256, hidden_dim=256): #256是根据你的输入维度来修改的
        super(Discriminator, self).__init__()
        self.input_dim = input_dim
        self.hidden_dim = hidden_dim
        layers = [
            nn.Linear(input_dim, hidden_dim),
            nn.BatchNorm1d(hidden_dim),
            nn.ReLU(),
            nn.Linear(hidden_dim, hidden_dim),
            nn.BatchNorm1d(hidden_dim),
            nn.ReLU(),
            nn.Linear(hidden_dim, 1),
            nn.Sigmoid()
        ]
        self.layers = torch.nn.Sequential(*layers)

    def forward(self, x):
        return self.layers(x)
产生一个 AdversarialLoss对象
adv = AdversarialLoss()
模拟产生源域和目标域的经卷积和池化后的特征
source = torch.randn(64, 256) #假设batchsize=64, 假设全连接层之前的特征展平之后只有256维
target = torch.randn(64, 256) #假设batchsize=64, 假设全连接层之前的特征展平之后只有256维
print(source)
tensor([[-0.4985, -0.6358,  0.3027,  ..., -0.8884, -0.1802, -0.4709],
      [ 0.4836,  1.3529, -0.3280,  ...,  0.0411, -0.0222,  0.5455],
      [ 0.1531, -2.0797,  0.6390,  ..., -1.0654,  2.0309,  1.0322],
      ...,
      [-1.0026, -0.5956, -1.0667,  ...,  0.7895,  0.9637, -1.1251],
      [-1.7431, -1.8726, -0.2252,  ..., -0.0688,  0.5557,  1.6147],
      [-1.1098,  0.4996,  1.6020,  ...,  0.7608,  0.4584,  0.5445]])
y = adv(source, target)
print(y)
>>>output
tensor(0.7109, grad_fn=<MulBackward0>)
参考资料:
DANN:Domain-Adversarial Training of Neural Networks
在CNN中的结合代码实现及讲解
先创建一个4分类的2DCNN类,输入数据为batch_siza* 3 * 128 * 128
class Net_only(nn.Module):
  '''
  计算源域数据和目标域数据的MMD距离
  Params:
  x_in: 输入数据(batch, channel, hight, width)
  Return:
  x_out: 输出数据(batch, n_labes)
  '''
  ## 这里 x_in:batch=64, channel=3, hight=128, width=128
  ## x_out:batch=64, n_labes=5
  def __init__(self):
      super(Net_only, self).__init__()
      self.conv3_1 = nn.Conv2d(3, 32, 3)
      self.pool3_l = nn.MaxPool2d(2, 2)
      self.bn3_1 = nn.BatchNorm2d(32)
      self.conv3_2 = nn.Conv2d(32, 64, 3)
      self.pool3_2 = nn.MaxPool2d(2, 2)
      self.bn3_2 = nn.BatchNorm2d(64)
      self.conv3_3 = nn.Conv2d(64, 64, 3)
      self.pool3_3 = nn.MaxPool2d(2, 2)
      self.bn3_3 = nn.BatchNorm2d(64)
      self.conv3_3 = nn.Conv2d(64, 64, 3)
      self.drop1d = nn.Dropout(0.2)
      self.bn3_4 = nn.BatchNorm2d(64)
      self.fc3_1 = nn.Linear(64 * 14 * 14, 1024)
      self.fc3_2 = nn.Linear(1024, 256)
      self.fc3_3 = nn.Linear(256, 4)

  def forward(self, x):
      x3_1 = self.pool3_l(F.relu(self.conv3_1(x)))
      x3_1 = self.bn3_1(x3_1)
      x3_1 = self.pool3_2(F.relu(self.conv3_2(x3_1)))
      x3_1 = self.bn3_2(x3_1)
      x3_1 = self.pool3_3(F.relu(self.conv3_3(x3_1)))
      x3_1 = self.bn3_3(x3_1)
      x3_1 = x3_1.view(-1, x3_1.size(1) * x3_1.size(2) * x3_1.size(3)) #应该是输出这个地方的特征,也就是输入到全连接层之前展平的特征
      x = F.relu(self.fc3_1(x3_1))
      x = self.drop1d(x)
      x = F.relu(self.fc3_2(x))
      x = self.drop1d(x)
      x = self.fc3_3(x)

      return x3_1
```python
model = Net_only()
source = torch.randn(64, 3, 128, 128)
target = torch.randn(64, 3, 128, 128)
source_fea = model(source)
target_fea = model(target)
print('source_fea shape:',source_fea.shape)
print('source_fea',source_fea)
>>>output
source_fea shape: torch.Size([64, 12544])
source_fea tensor([[-1.2664,  0.7203, -0.4250,  ..., -1.0960,  3.5884,  1.1636],
       [-0.3925,  0.6477,  0.2863,  ...,  0.3167,  0.0590, -0.7221],
       [ 0.0295, -0.1499,  0.0195,  ..., -0.8049, -1.3314, -1.4949],
       ...,
       [ 0.8359,  0.6323, -1.5111,  ...,  1.6525, -0.5096, -0.4747],
       [-1.0632, -0.6873, -0.0960,  ..., -1.5370,  1.6044, -0.6295],
       [-0.4801, -1.5111,  1.2889,  ...,  0.5461, -1.5404,  2.8153]],
      grad_fn=<ViewBackward>)
发现展平之后变成12544维了。构建AdversarialLoss类
import torch
import torch.nn as nn
from torch.autograd import Function
import torch.nn.functional as F
import numpy as np

class LambdaSheduler(nn.Module):
   def __init__(self, gamma=1.0, max_iter=1000, **kwargs):
       super(LambdaSheduler, self).__init__()
       self.gamma = gamma
       self.max_iter = max_iter
       self.curr_iter = 0

   def lamb(self):
       p = self.curr_iter / self.max_iter
       lamb = 2. / (1. + np.exp(-self.gamma * p)) - 1
       return lamb

   def step(self):
       self.curr_iter = min(self.curr_iter + 1, self.max_iter)

class AdversarialLoss(nn.Module):
   '''
   Acknowledgement: The adversarial loss implementation is inspired by http://transfer.thuml.ai/
   '''
   def __init__(self, gamma=1.0, max_iter=1000, use_lambda_scheduler=True, **kwargs):
       super(AdversarialLoss, self).__init__()
       self.domain_classifier = Discriminator()
       self.use_lambda_scheduler = use_lambda_scheduler
       if self.use_lambda_scheduler:
           self.lambda_scheduler = LambdaSheduler(gamma, max_iter)

   def forward(self, source, target):
       lamb = 1.0
       if self.use_lambda_scheduler:
           lamb = self.lambda_scheduler.lamb()
           self.lambda_scheduler.step()
       source_loss = self.get_adversarial_result(source, True, lamb)
       target_loss = self.get_adversarial_result(target, False, lamb)
       adv_loss = 0.5 * (source_loss + target_loss)
       return adv_loss

   def get_adversarial_result(self, x, source=True, lamb=1.0):
       x = ReverseLayerF.apply(x, lamb)
       domain_pred = self.domain_classifier(x)
       device = domain_pred.device
       if source:
           domain_label = torch.ones(len(x), 1).long()
       else:
           domain_label = torch.zeros(len(x), 1).long()
       loss_fn = nn.BCELoss()
       loss_adv = loss_fn(domain_pred, domain_label.float().to(device))
       return loss_adv


class ReverseLayerF(Function):
   @staticmethod
   def forward(ctx, x, alpha):
       ctx.alpha = alpha
       return x.view_as(x)

   @staticmethod
   def backward(ctx, grad_output):
       output = grad_output.neg() * ctx.alpha
       return output, None

class Discriminator(nn.Module):
   def __init__(self, input_dim=12544, hidden_dim=12544):  # 这里换成12544了
       super(Discriminator, self).__init__()
       self.input_dim = input_dim
       self.hidden_dim = hidden_dim
       layers = [
           nn.Linear(input_dim, hidden_dim),
           nn.BatchNorm1d(hidden_dim),
           nn.ReLU(),
           nn.Linear(hidden_dim, hidden_dim),
           nn.BatchNorm1d(hidden_dim),
           nn.ReLU(),
           nn.Linear(hidden_dim, 1),
           nn.Sigmoid()
       ]
       self.layers = torch.nn.Sequential(*layers)
   def forward(self, x):
       return self.layers(x)
下面对特征计算域分类损失函数
loss = adv(source_fea, target_fea)
print('loss:',loss)
>>>output
loss: tensor(0.7067, grad_fn=<MulBackward0>)
王晋东迁移学习代码
guo2018-Deep Convolutional Transfer Learning Network A New Method for Intelligent Fault Diagnosis of Machines With Unlabeled Data
最后
以上就是唠叨烧鹅最近收集整理的关于迁移学习-域分类损失函数-python代码实现域适应迁移学习的理解迁移学习的目标函数分为三部分域分类损失的理解代码实现在CNN中的结合代码实现及讲解的全部内容,更多相关迁移学习-域分类损失函数-python代码实现域适应迁移学习内容请搜索靠谱客的其他文章。
本图文内容来源于网友提供,作为学习参考使用,或来自网络收集整理,版权属于原作者所有。


发表评论 取消回复