文章目录
- 1、课题概述
- 2、参考博客
- 3、开发环境
- 4、准备设备
- 5、系统设计
- 5.1、硬件
- 5.2、软件
- 6、系统实现
- 6.1、云服务器部署MQTT服务端
- 6.2、ESP8266连接MQTT服务端
- 6.2.1、arduino中先下载esp12e的相关组件库。
- 6.2.2、导入其它库
- 6.2.3、代码
- 6.3、单片机实现
- 6.4、HTTP服务实现
- 6.5、App实现
- 7、系统测试
- 8、系统回顾
- 9、项目地址
1、课题概述
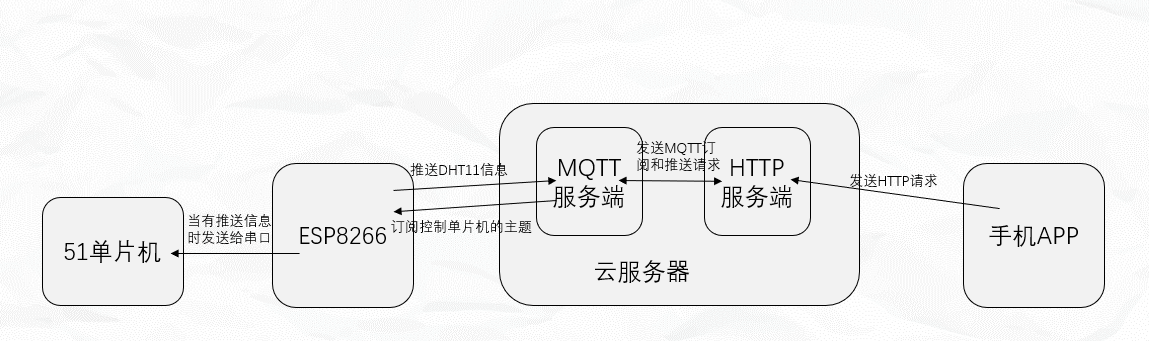
实现一个手机App,可以控制家里设备,并获取到相关温湿度信息。
App调用云服务器上的HTTP服务;HTTP服务封装了MQTT订阅和推送请求,对MQTT服务端进行更新;
esp8266模块联网连接MQTT服务端,将服务端传送过来的数据发送给51单片机进行控制,同时将DHT11采集到的温湿度信息发送给MQTT服务端。
2、参考博客
arduino下载和教程
esp8266和51通信
MQTT协议详解
服务器运行MQTT服务端
3、开发环境
1、IDEA(开发JavaWeb应用)
2、Android studio(开发手机App)
3、arduino(开发esp8266程序)
4、keil5(开发单片机程序)
5、串口调试工具
4、准备设备
-
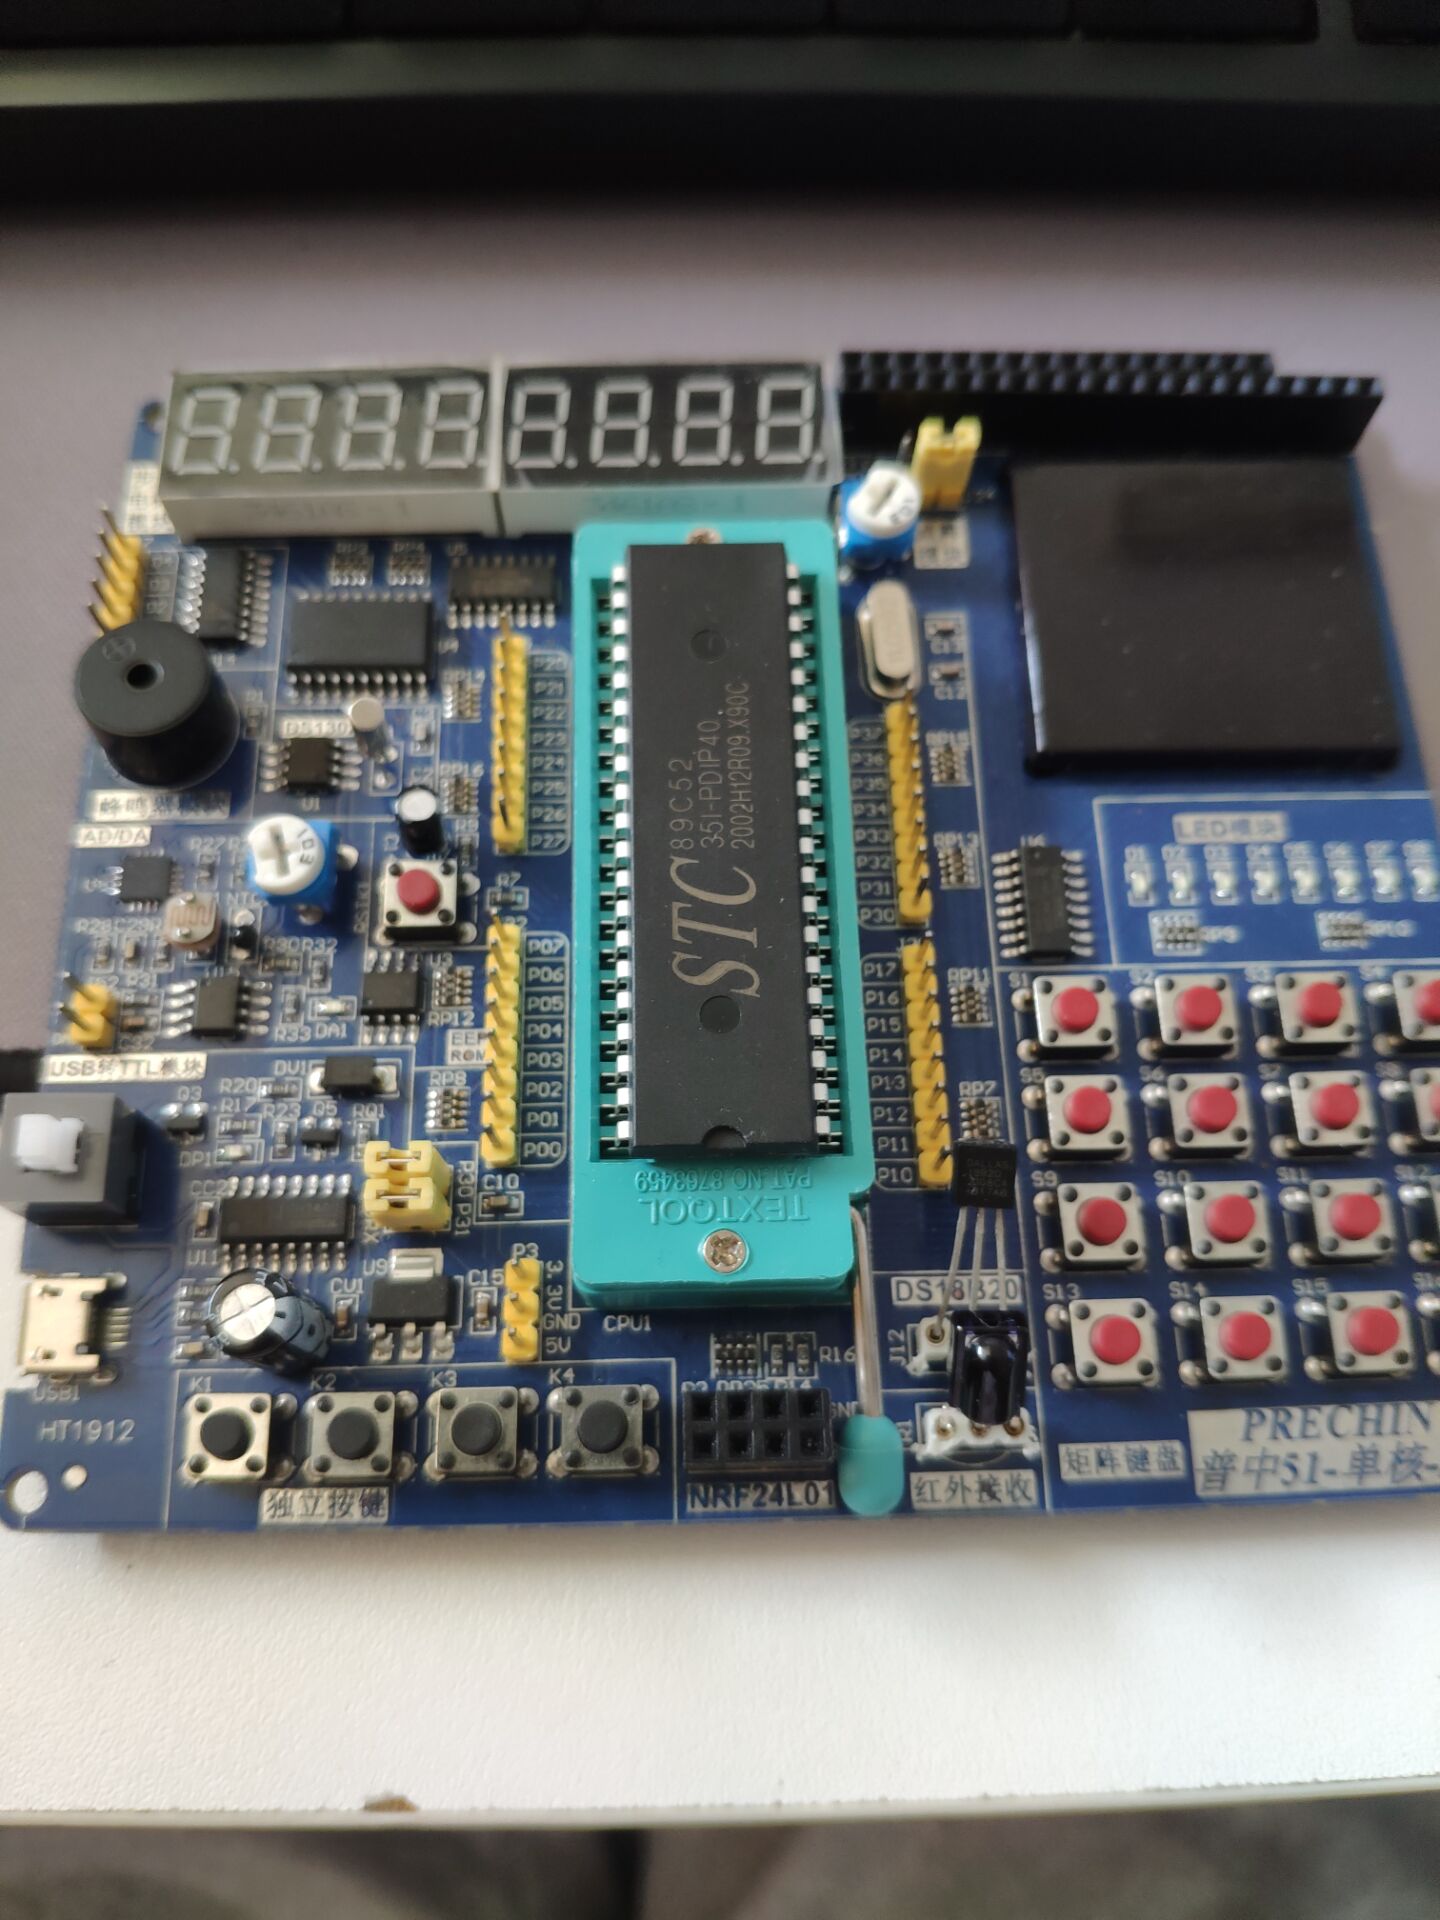
1、51单片机(用来管理家居设备)
-
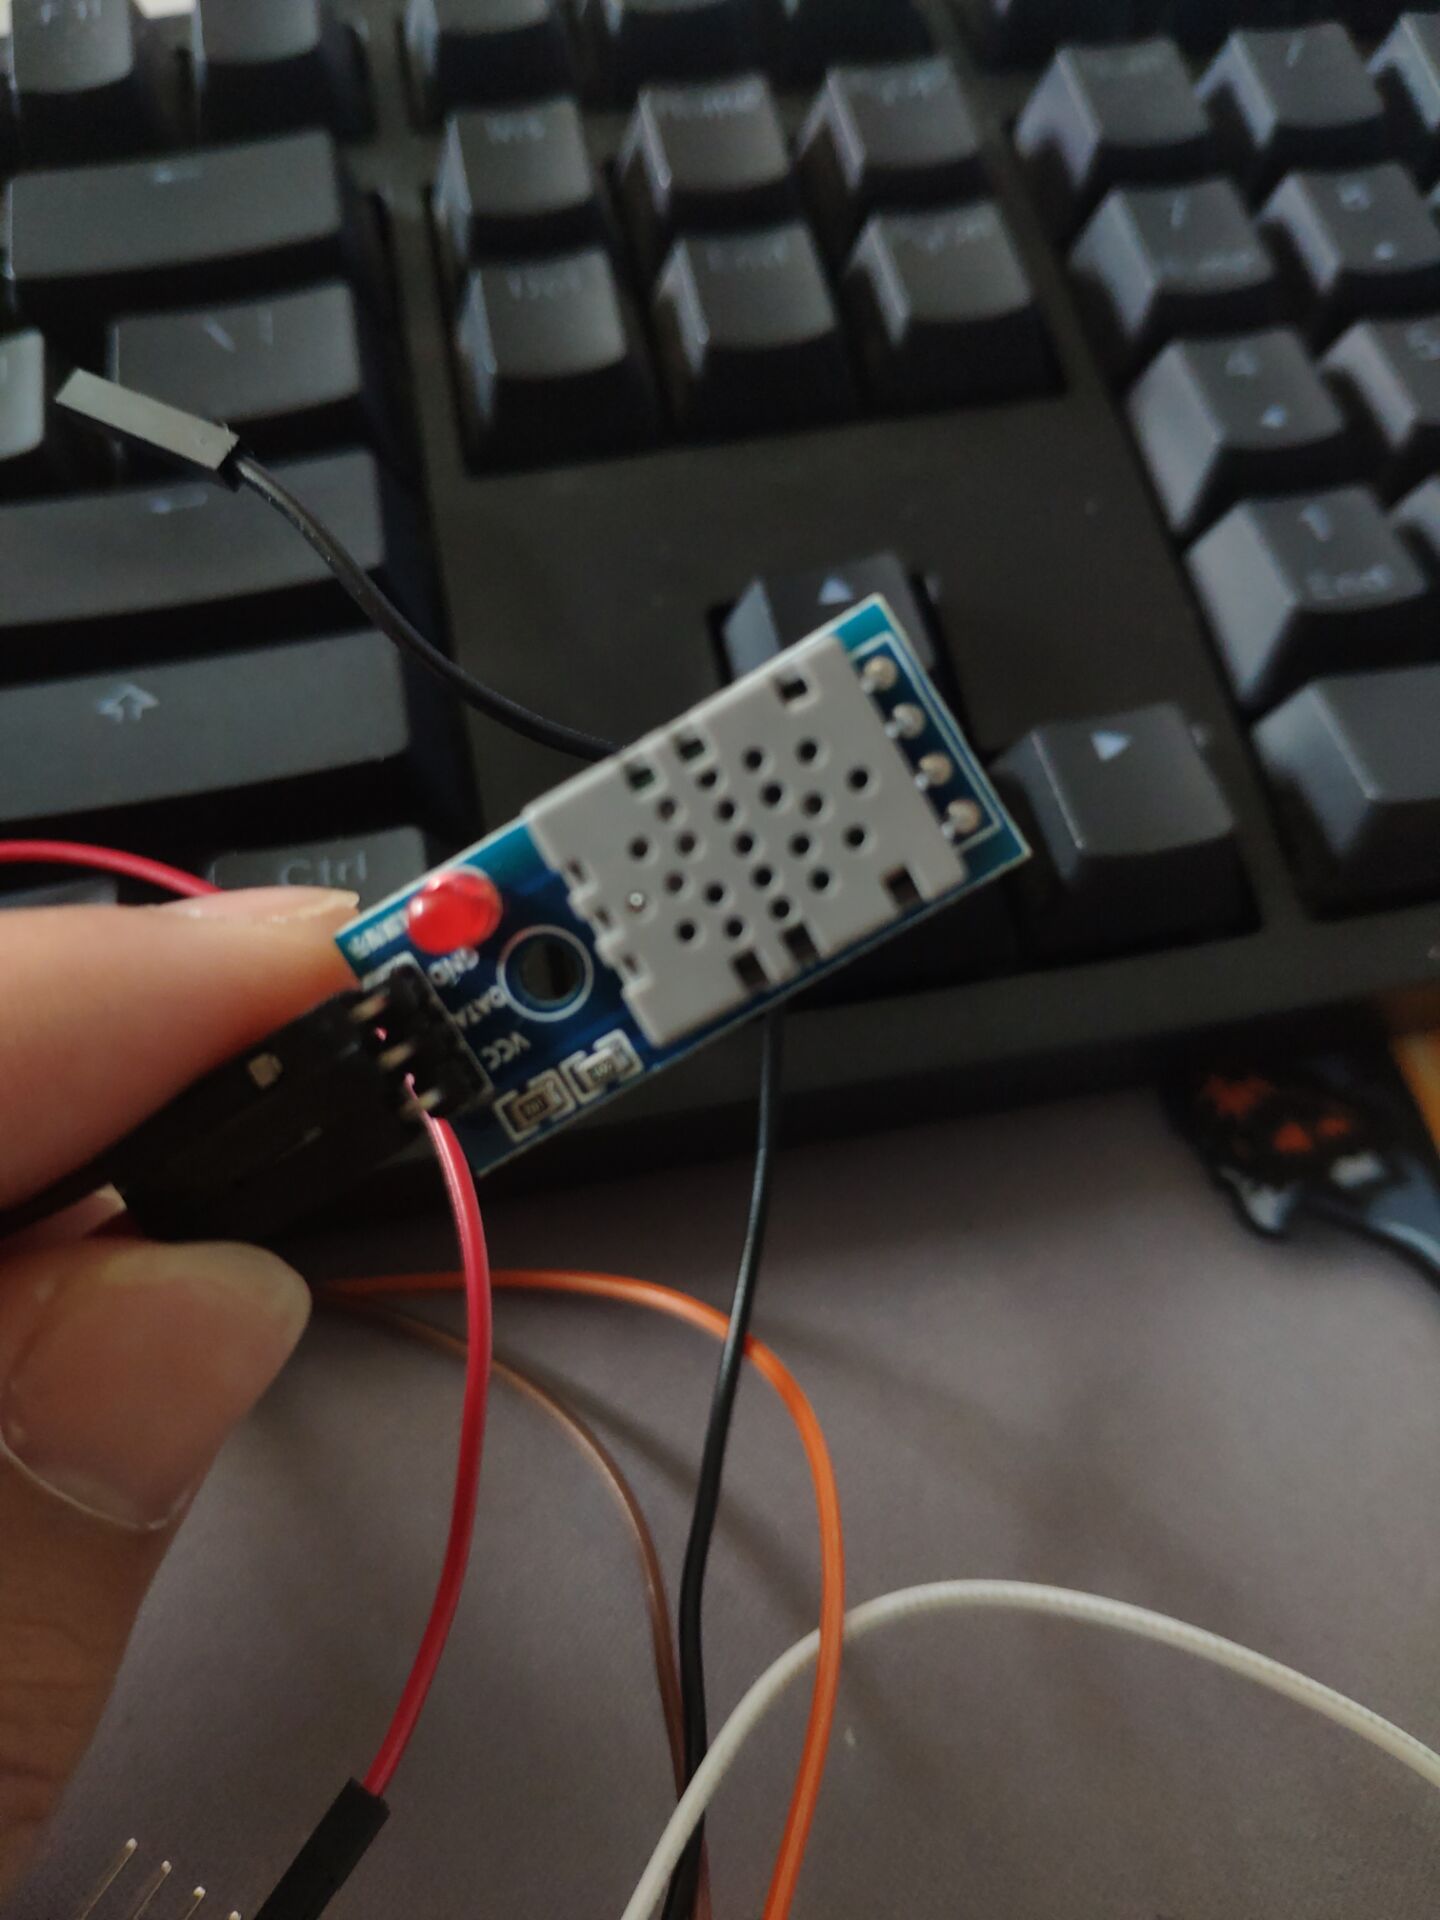
2、DHT11(用来获取温湿度信息)
-
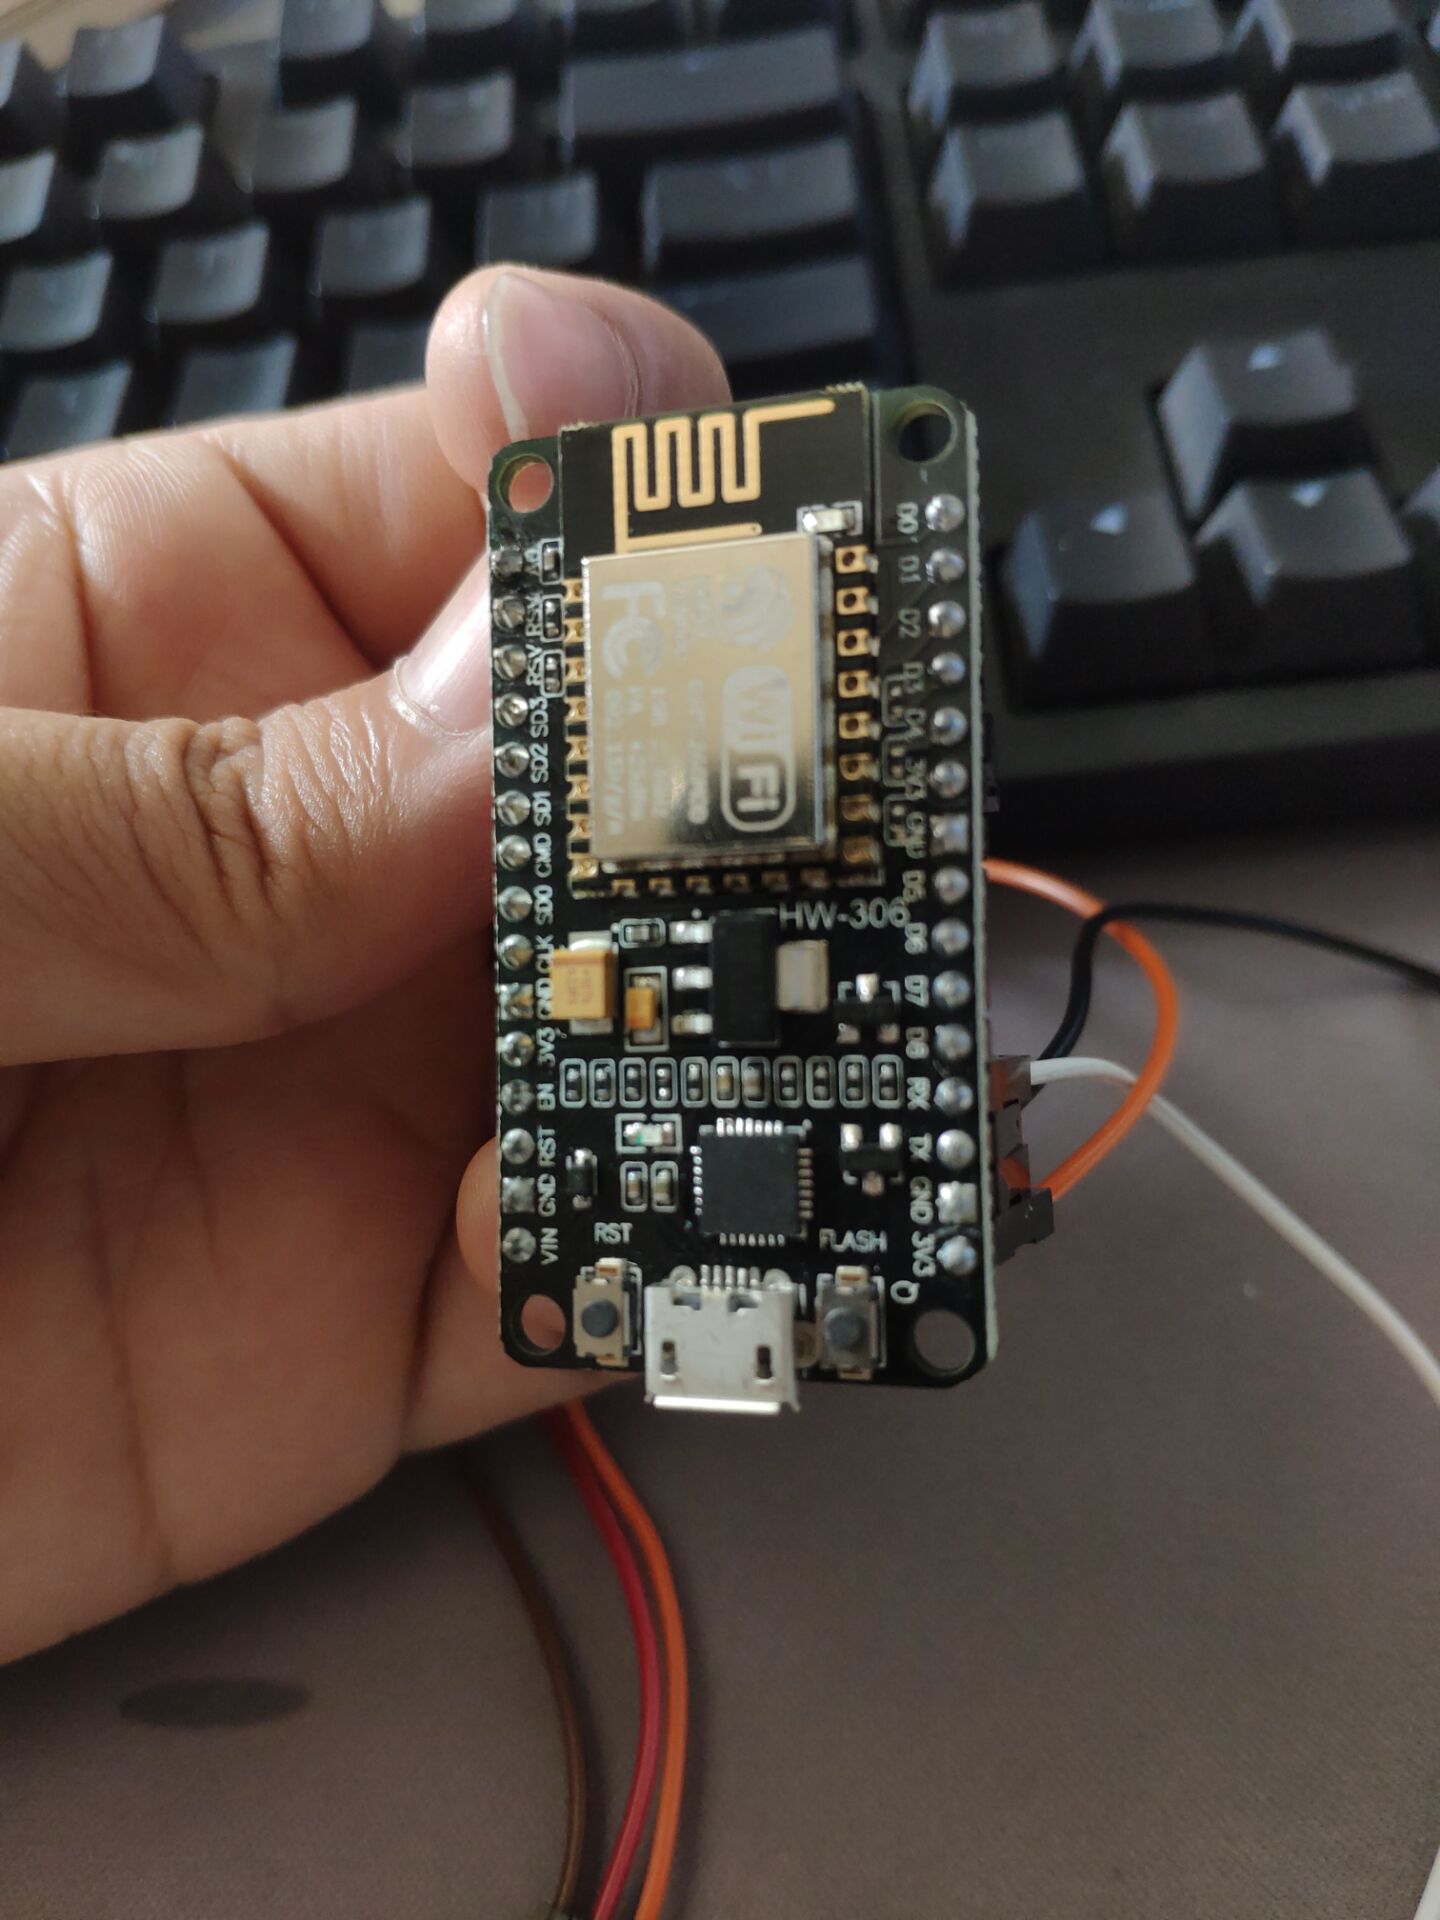
3、esp8266-12e(连接外网上的mqtt服务器)
-
4、云服务器(部署mqtt服务器,以及http服务)
5、系统设计
总体设计流程图
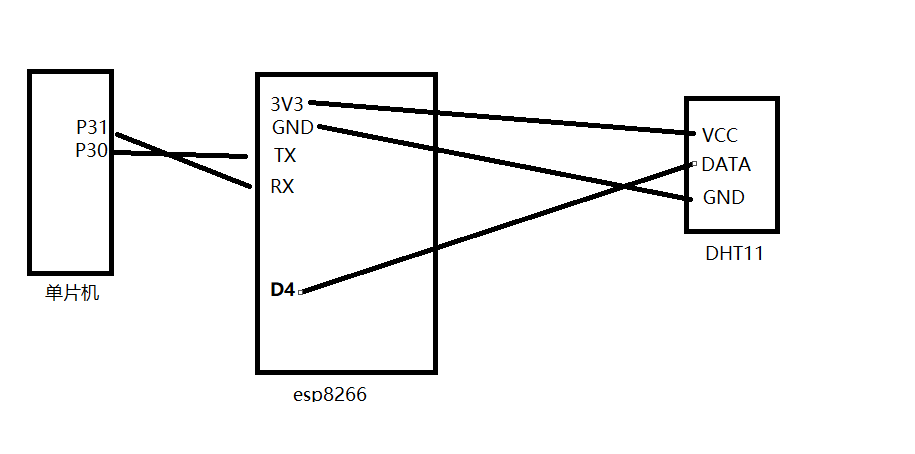
5.1、硬件
esp8266模块连接手机热点连接上互联网,然后连接MQTT服务器,推送相关温湿度信息上去,并订阅控制主题。
esp8266收到订阅信息后,直接发送给串口。
51单片机通过串口中断获取信息,然后进行相关处理。
5.2、软件
服务器端先部署一个MQTT服务器,然后对其相关操作封装一个Http服务。
最后手机App只需要发送http请求便可以操作相关硬件了。
6、系统实现
6.1、云服务器部署MQTT服务端
本方案采用的是Docker部署EMQ。
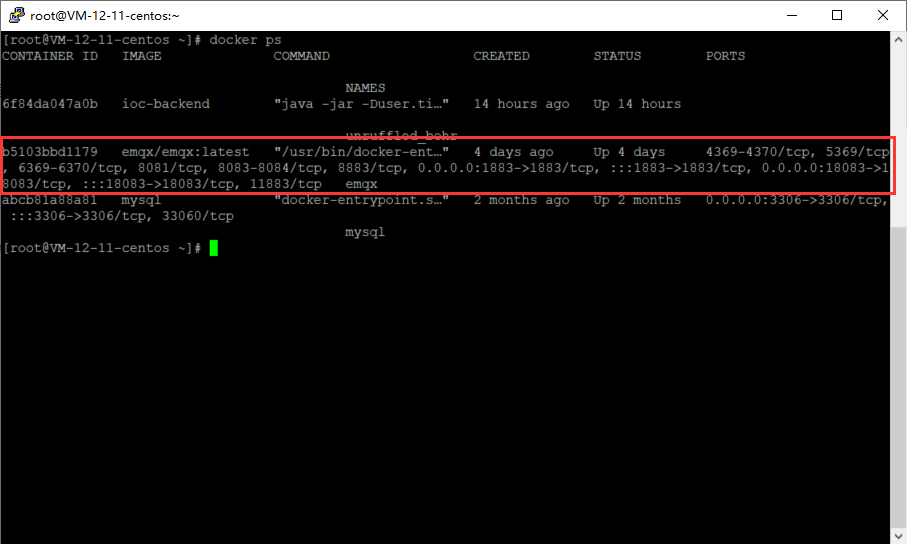
将官网镜像拉取到本地,然后运行镜像。
docker pull emqx/emqx:4.3.4
docker run -d --name emqx -p 1883:1883 -p 8081:8081 -p 8083:8083 -p 8084:8084 -p 8883:8883 -p 18083:18083 emqx/emqx:4.3.4
启动成功后,docker ps会有相关容器信息如下。
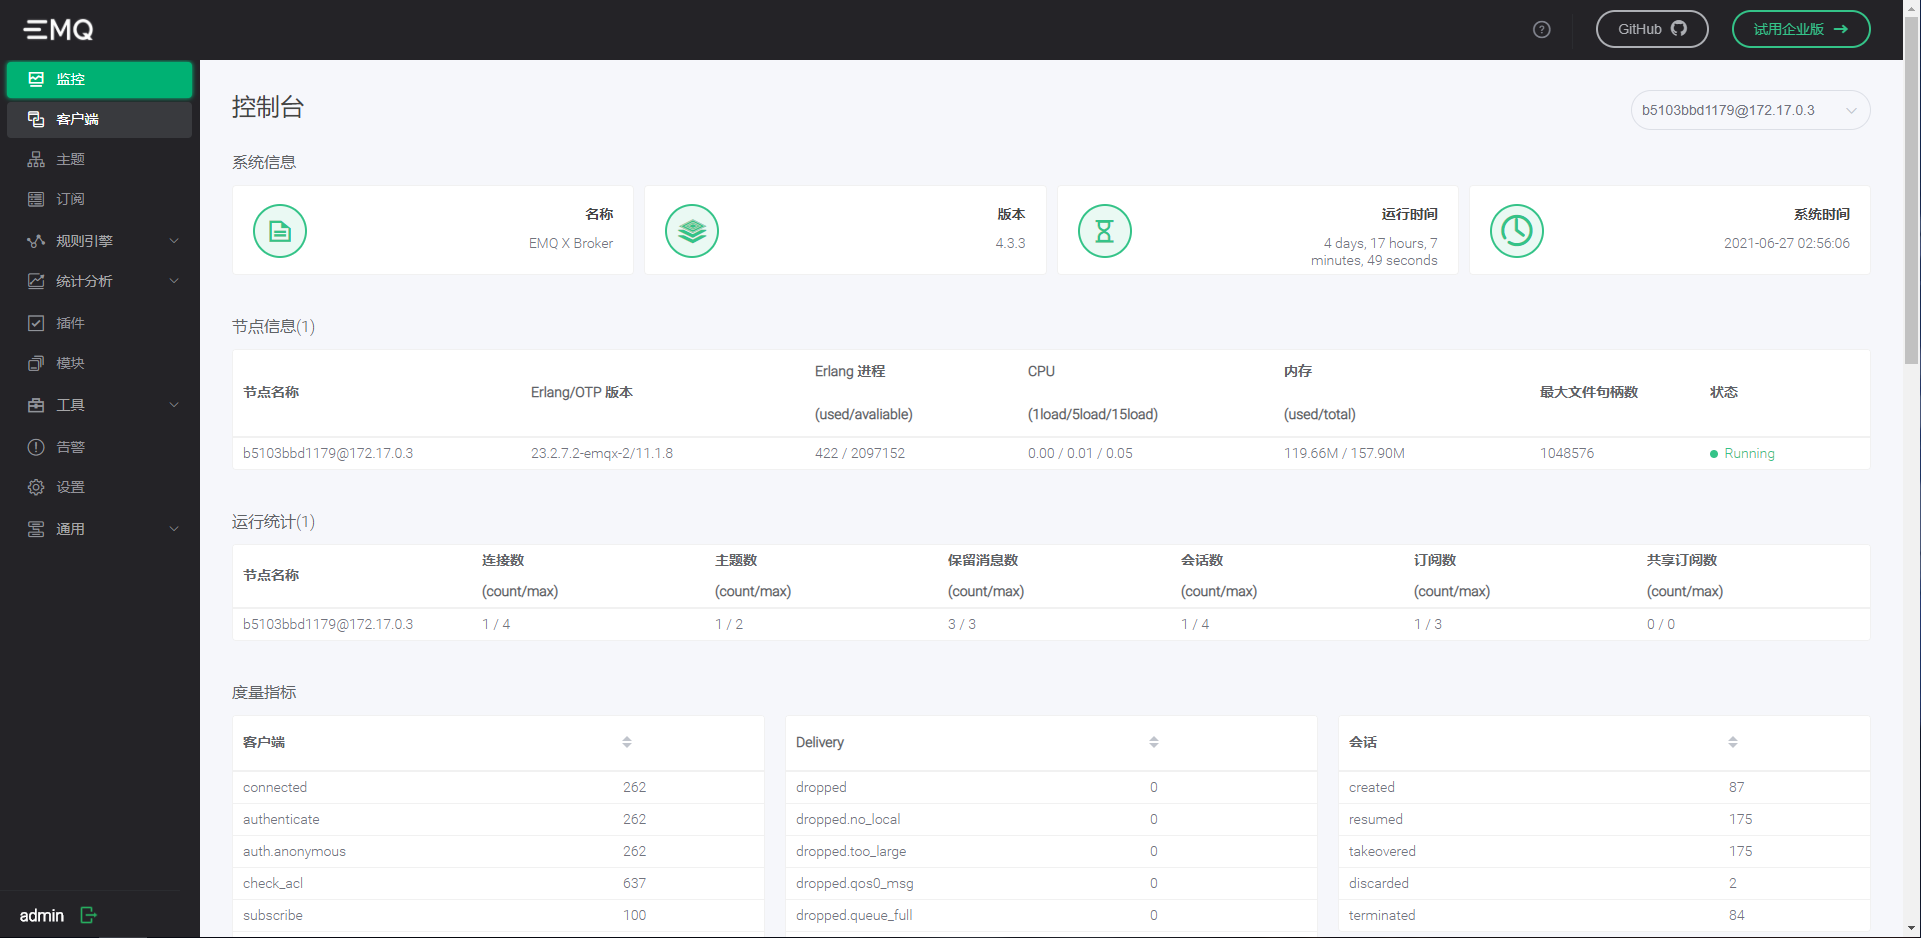
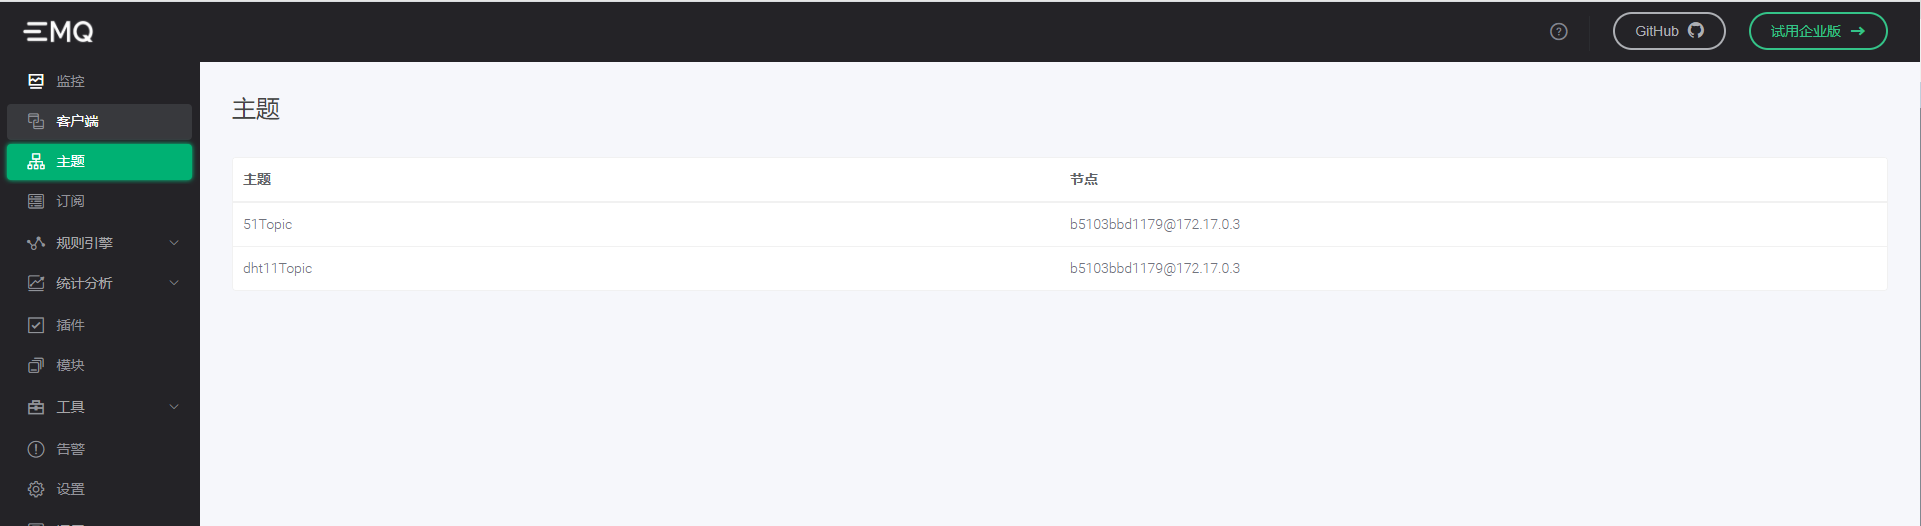
访问服务器的18083端口,可以看到如下页面表示部署成功(账号:admin,密码:public)
6.2、ESP8266连接MQTT服务端
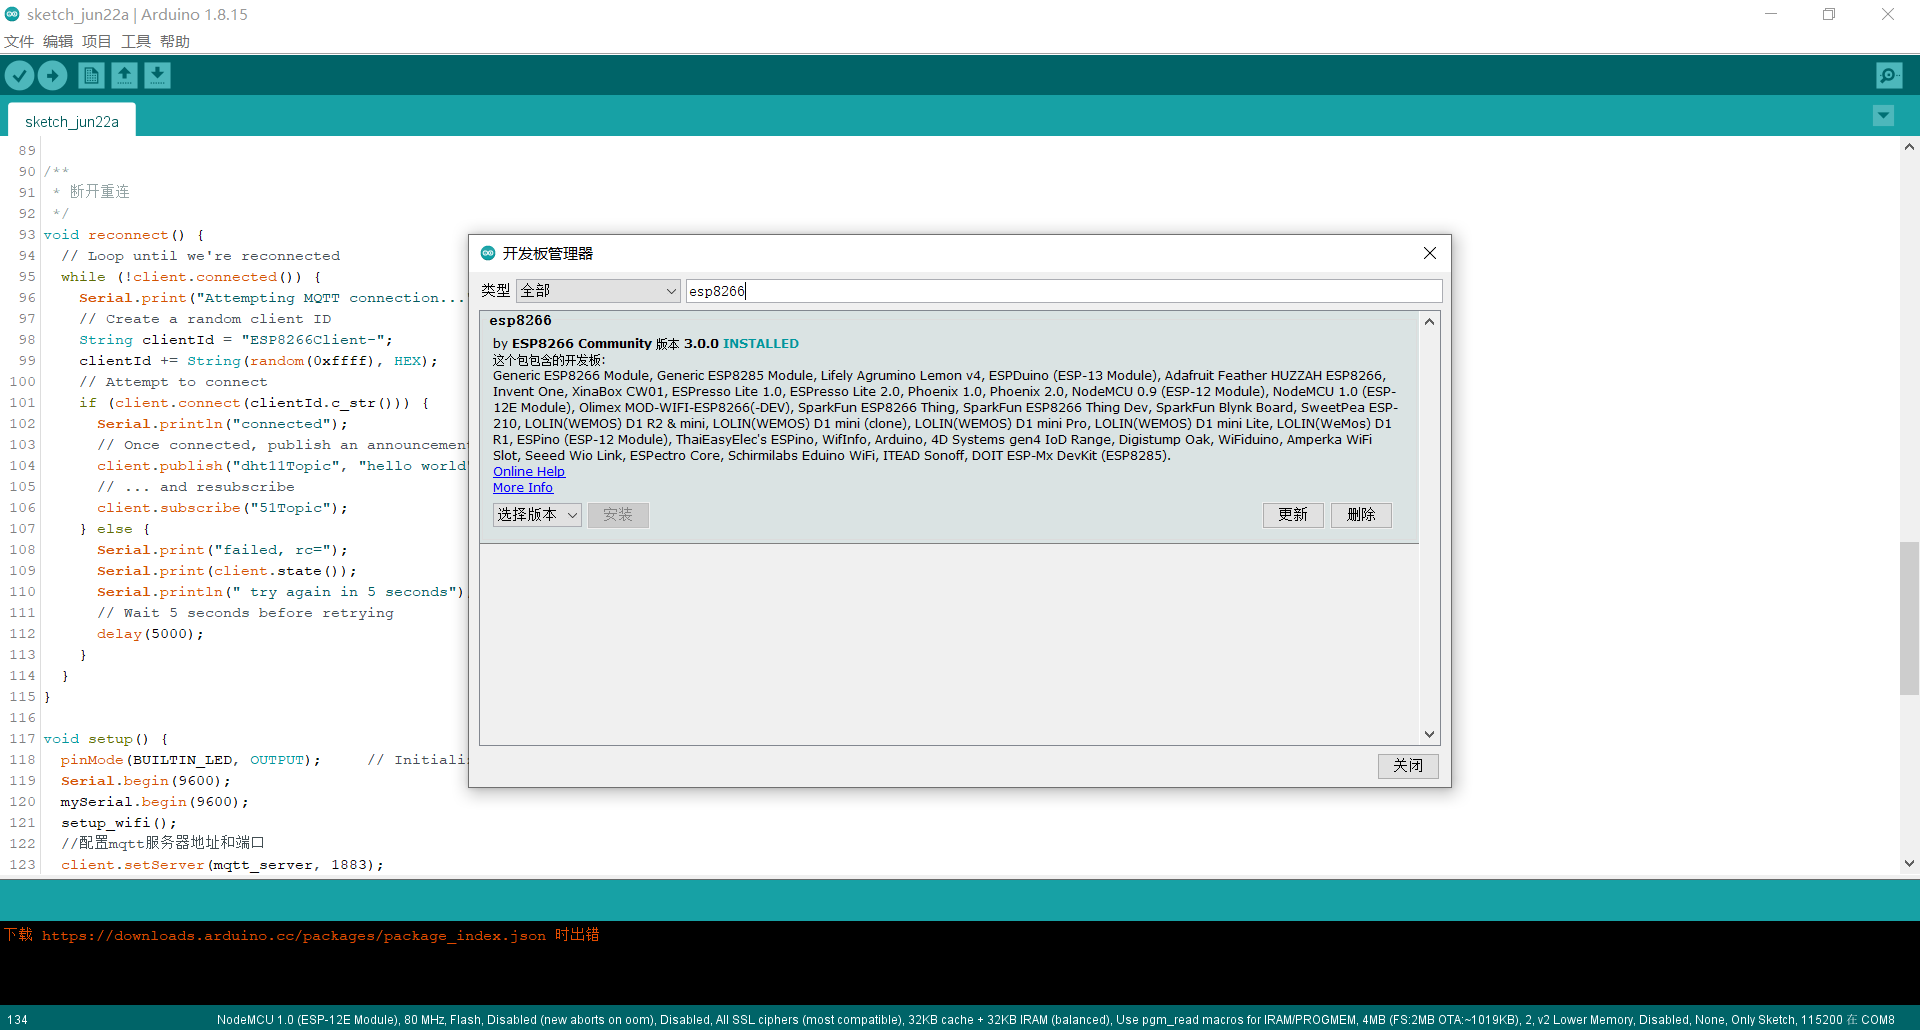
6.2.1、arduino中先下载esp12e的相关组件库。
在工具栏>工具>开发板>开发板管理器>搜索esp8266下载相关库(本文博客链接中有详细教程)。
6.2.2、导入其它库
导入相关第三方库(项目中有)。
然后工具栏>项目>加载库>添加.ZIP库将下列库添加。

6.2.3、代码
esp8266首先要先连上互联网,才能进行MQTT通信。所以esp8266首先要先连接WiFi,然后进行MQTT相关推送和订阅信息。
使用dht11模块直接读取DHT11模块的温湿度信息,然后使用pubsubclient模块进行MQTT通信。
arduino项目源代码如下
#include <ESP8266WiFi.h>
#include <SoftwareSerial.h>
#include <PubSubClient.h>
#include <dht11.h>//引入DHT11库

SoftwareSerial mySerial(13, 12); // RX, TX

/********************###定义###********************/
dht11 DHT11;//定义传感器类型
#define DHT11PIN 2//定义传感器连接引脚。此处的PIN2在NodeMcu8266开发板上对应的引脚是D4

/********************###子函数###********************/
double Fahrenheit(double celsius)
{
  return 1.8 * celsius + 32; //摄氏温度度转化为华氏温度
}

double Kelvin(double celsius)
{
  return celsius + 273.15; //摄氏温度转化为开氏温度
}

// Update these with values suitable for your network.

const char* ssid = "1122";//wifi账号
const char* password = "11111111";//wifi秘密
const char* mqtt_server = "159.75.88.181";//mqtt服务器

WiFiClient espClient;
PubSubClient client(espClient);
long lastMsg = 0;
char msg[50];
int value = 0;

void setup_wifi() {

  delay(10);
  // We start by connecting to a WiFi network
  Serial.println();
  Serial.print("Connecting to ");
  Serial.println(ssid);

  WiFi.begin(ssid, password);

  while (WiFi.status() != WL_CONNECTED) {
    delay(500);
    Serial.print(".");
  }

  randomSeed(micros());

  Serial.println("");
  Serial.println("WiFi connected");
  Serial.println("IP address: ");
  Serial.println(WiFi.localIP());
}

/**
 * 消息回调
 */
void callback(char* topic, byte* payload, unsigned int length) {
  Serial.print((char)payload[0]);

}

/**
 * 断开重连
 */
void reconnect() {
  // Loop until we're reconnected
  while (!client.connected()) {
    Serial.print("Attempting MQTT connection...");
    // Create a random client ID
    String clientId = "ESP8266Client-";
    clientId += String(random(0xffff), HEX);
    // Attempt to connect
    if (client.connect(clientId.c_str())) {
      Serial.println("connected");
      // Once connected, publish an announcement...
      client.publish("dht11Topic", "hello world");
      // ... and resubscribe
      client.subscribe("51Topic");
    } else {
      Serial.print("failed, rc=");
      Serial.print(client.state());
      Serial.println(" try again in 5 seconds");
      // Wait 5 seconds before retrying
      delay(5000);
    }
  }
}

void setup() {
  pinMode(BUILTIN_LED, OUTPUT);     // Initialize the BUILTIN_LED pin as an output
  Serial.begin(9600);
  mySerial.begin(9600);
  setup_wifi();
  //配置mqtt服务器地址和端口
  client.setServer(mqtt_server, 1883);
  //设置订阅消息回调
  client.setCallback(callback);
}

void loop() {
  //重连机制
  if (!client.connected()) {
    reconnect();
  }
  //不断监听信息
  client.loop();

  long now = millis();
  if (now - lastMsg > 5000) {
    DHT11.read(DHT11PIN); //更新传感器所有信息

    //每5s发布一次信息
    lastMsg = now;
    ++value;
    snprintf (msg, 50, "temperature: %f,humidity: %f", (float)DHT11.temperature, (float)DHT11.humidity);
//    Serial.print("Publish message: ");
//    Serial.println(msg);
    client.publish("dht11Topic", msg);
  }
}
6.3、单片机实现
开启串口中断,然后单片机RXD,TXD和esp8266相连接,则可以直接将8266的串口信息直接获取到。
然后在串口中断中直接设置相关指令的对应操作实现。
下列代码仅供操作,可能不同单片机的不同引脚不同。
#include<reg52.h>
typedef unsigned char u8;
typedef unsigned int u16;
sbit LED = P2^3;
sbit MOTO = P1^0;
u8 dat;
void Init(void)
{
	TMOD = 0x20;
	TL1 = 0xfd;
	TH1 = 0xfd;
	TR1 = 1;
	REN=1;
	SM0=0;
	SM1=1;
	EA = 1;
	ES=1;
}

void main()
{
    Init();
    while(1);
}

void InterruptUART() interrupt 4
{
      RI = 0;
      dat = SBUF;
	  {
         if(dat=='o')
		 {
			 LED =0;
		 }
		 if(dat=='f')
		 {
		     LED =1;
		 }
		 if (dat == 'a')
			 MOTO = 1;
		 if (dat == 'b')
			 MOTO = 0;
	  }
}
6.4、HTTP服务实现
封装一个HTTP服务屏蔽MQTT的服务调用,让APP直接发送HTTP请求就可操作硬件。
其中核心类MqttChannel对MQTT协议进行封装。内部维护一个订阅信息Map,当有新信息推送时,修改该Map的信息即可。
package cn.wen233.iocdemo.infrustructure.util;

import cn.wen233.iocdemo.domain.enums.LedState;
import cn.wen233.iocdemo.domain.enums.MotorState;
import org.eclipse.paho.client.mqttv3.*;
import org.eclipse.paho.client.mqttv3.persist.MemoryPersistence;
import org.slf4j.Logger;
import org.slf4j.LoggerFactory;

import java.nio.charset.StandardCharsets;
import java.text.SimpleDateFormat;
import java.util.*;
import java.util.concurrent.CompletableFuture;

/**
 * mqtt协议处理工具类
 *
 * @author wenei
 * @date 2021-06-23 10:08
 */
public class MqttChannel implements AutoCloseable {

    private static final Logger log = LoggerFactory.getLogger(MqttChannel.class);

    /**
     * 客户机id
     */
    private static final String clientId = "http-consumer";

    /**
     * 服务质量
     */
    private static final int qos = 1;

    private static String ip = IocUtil.getBean(MQTTProperties.class).getIp();

    private static int port = IocUtil.getBean(MQTTProperties.class).getPort();

    private static final String serviceUrl = String.format("tcp://%s:%d", ip, port);

    private static final Map<String, String> topicMap = new HashMap<>();

    /**
     * 默认订阅的主题
     */
    private static final List<String> defaultSubscribeTopic = Collections.singletonList("dht11Topic");

    private static final Map<String, String> defaultTopicStatus = new HashMap<>();

    static {
        final String topic = "51Topic";
        defaultTopicStatus.put(topic, LedState.OFF.getCommand());
        defaultTopicStatus.put(topic, MotorState.OFF.getCommand());
    }

    private static MqttClient mqttClient = null;

    static {
        // 内存存储
        MemoryPersistence persistence = new MemoryPersistence();
        // 创建客户端
        try {
            mqttClient = new MqttClient(serviceUrl, clientId, persistence);
            // 创建链接参数
            MqttConnectOptions connOpts = new MqttConnectOptions();
            // 在重新启动和重新连接时记住状态
            connOpts.setCleanSession(false);
            // 设置连接的用户名
//            connOpts.setUserName(userName);
//            connOpts.setPassword(password.toCharArray());
            // 建立连接
            mqttClient.connect(connOpts);
            // 设置回调函数
            mqttClient.setCallback(new MqttCallback() {

                @Override
                public void connectionLost(Throwable cause) {
                    log.info("失去连接");
                }

                @Override
                public void messageArrived(String topic, MqttMessage message) throws Exception {
                    log.info("Time: {}, Topic:{}, Message:{}",
                            new SimpleDateFormat("yyyy-MM-dd HH:mm:ss").format(new Date()), topic, message);
                    topicMap.put(topic, new String(message.getPayload()));
                }

                @Override
                public void deliveryComplete(IMqttDeliveryToken token) {
                    log.info("更新订阅:" + token.isComplete());
                }

            });
            // 默认订阅的主题
            defaultSubscribeTopic.forEach(x -> {
                try {
                    mqttClient.subscribe(x, qos);
                } catch (MqttException e) {
                    e.printStackTrace();
                }
                topicMap.put(x, "temperature:-99.00000, humidity:-99.00000");
            });
            // 默认51控制主题状态设定
            defaultTopicStatus.forEach(MqttChannel::publish);
        } catch (MqttException mqttException) {
            mqttException.printStackTrace();
        }
    }

    /**
     * 异步调用推送方法
     */
    public static void asyncPublish(String topic, String sendData) {
        CompletableFuture.supplyAsync(() -> {
            publish(topic, sendData);
            return null;
        });
    }

    public static void publish(String topic, String sendData) {
        try {
            // 创建消息
            MqttMessage message = new MqttMessage(sendData.getBytes(StandardCharsets.UTF_8));
            // 设置消息的服务质量
            message.setQos(qos);
            // 发布消息
            mqttClient.publish(topic, message);
            log.info("向 {} 的 {} 主题发送:{}", serviceUrl, topic, sendData);
        } catch (MqttPersistenceException e) {
            e.printStackTrace();
        } catch (MqttSecurityException e) {
            e.printStackTrace();
        } catch (MqttException e) {
            e.printStackTrace();
        }

    }

    public static String subscribe(String topic) {
        return topicMap.get(topic);
    }

    @Override
    public void close() throws Exception {
        mqttClient.disconnect();
        mqttClient.close();
    }
}
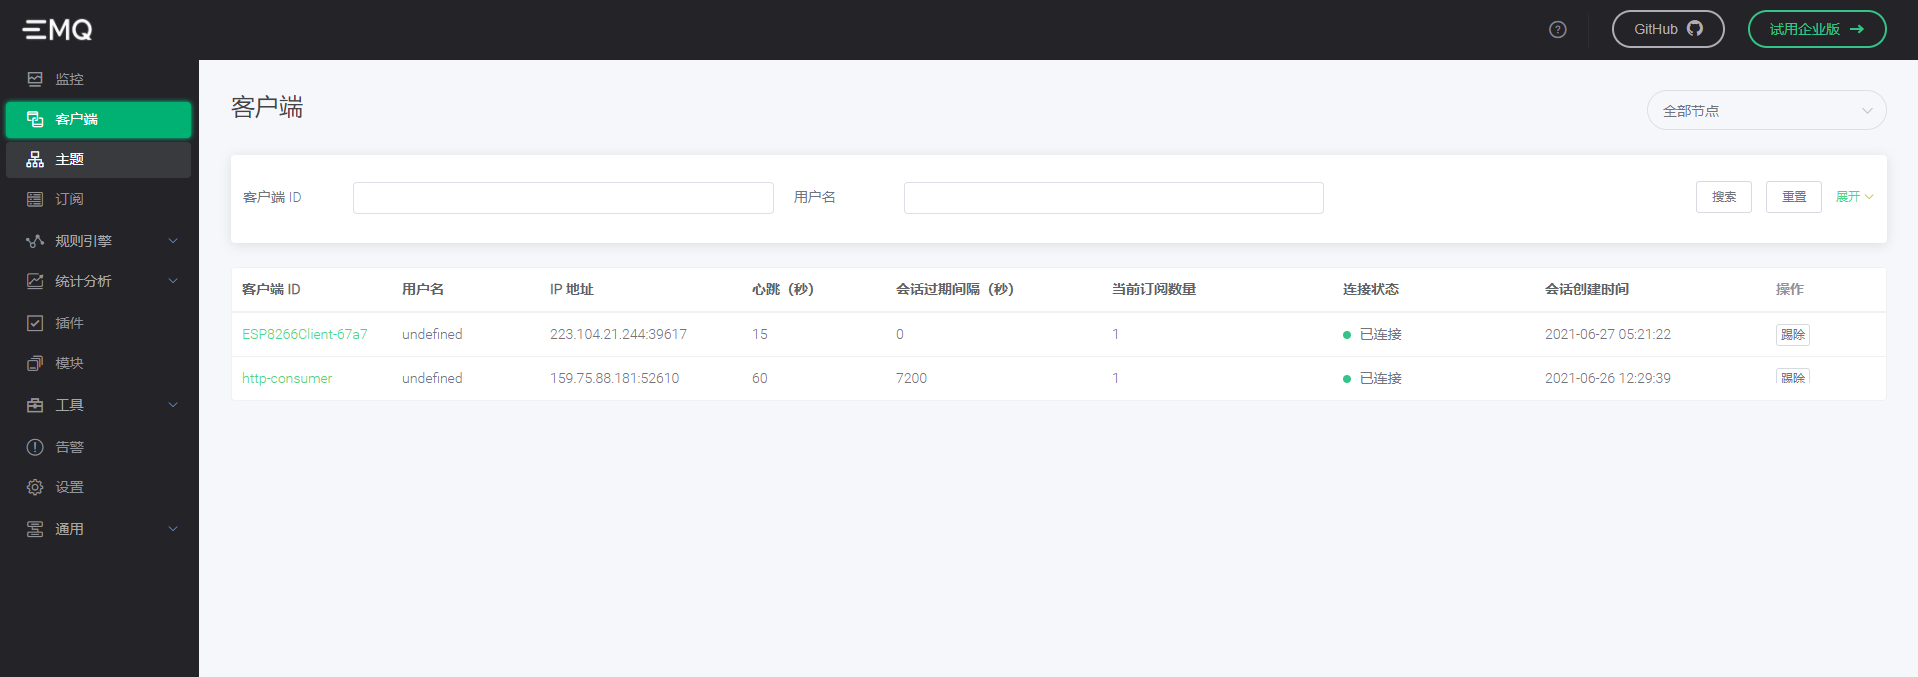
运行成功后如下则已经将MQTT信息推送出去了。
然后将该SpringBoot应用打包,部署到云服务器上(以便于后续App发送Http请求)。
将上述6.1 6.2 6.3的esp8266和51单片机连接,然后供电,等待连接WiFi。连接上WiFi后该http服务就可以直接控制单片机。
6.5、App实现
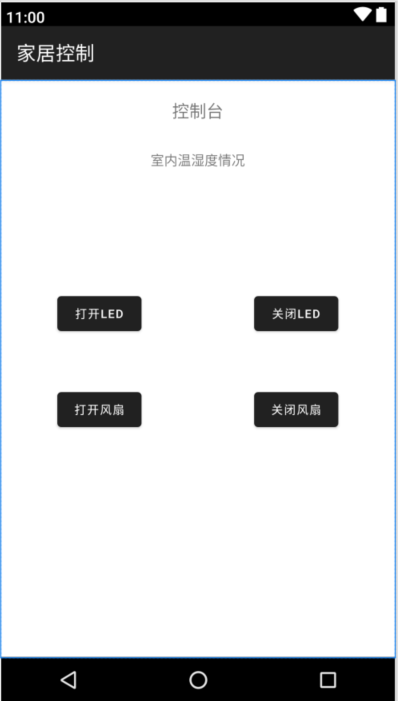
App页面如下(项目路径不要有中文)
接收相关温湿度信息并实时显示,然后控制相关LED和风扇状态。
7、系统测试
将单片机和esp8266的程序都烧录进去后,在云服务器上部署MQTT服务器,并设置esp8266的相关WiFi和服务器信息。
然后启用http服务,将有如下信息
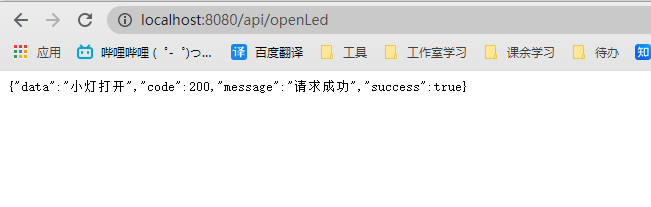
调用相关HTTP接口即可操作单片机

8、系统回顾
该系统实质上是一个esp8266作为一个MQTT客户端连接外网MQTT服务器的系统。
连接完成后,51单片机的串口可与MQTT的主题透明传输。即可将主题的收到的信息完整的再发送到单片机上。
所以如果需要再次开发的话,只需要修改单片机和HTTP服务中发送的相关操作指令即可。
9、项目地址
本项目使用到的所有源代码如下:
Gitee项目地址
好用别忘点个赞鸭
最后
以上就是执着手套最近收集整理的关于物联网之智能家居系统设计和实现的全部内容,更多相关物联网之智能家居系统设计和实现内容请搜索靠谱客的其他文章。


发表评论 取消回复