ADC:analogy-digital converter 模拟-数字转换器。
首先可以参考这篇文章,对ADC采样有个正确的认识。https://blog.csdn.net/euxnijuoh/article/details/81066739
在ADC的初始化过程中,有两个很有意思的参数:
  hadc.Init.ContinuousConvMode = DISABLE;
  hadc.Init.DiscontinuousConvMode = ENABLE;
按照字面意思,我们会认为如果选择相反的设定的话,这两个功能不就是完全相同的吗?然鹅,实际上并不是这样的。下面我们从代码入手,结合寄存器描述来看一下:
  /* Configuration of ADC:                                                    */
  /*  - Resolution                                                            */
  /*  - Data alignment                                                        */
  /*  - Scan direction                                                        */
  /*  - External trigger to start conversion                                  */
  /*  - External trigger polarity                                             */
  /*  - Continuous conversion mode                                            */
  /*  - DMA continuous request                                                */
  /*  - Overrun                                                               */
  /*  - AutoDelay feature                                                     */
  /*  - Discontinuous mode                                                    */
  hadc->Instance->CFGR1 &= ~(ADC_CFGR1_ALIGN   |
                             ADC_CFGR1_SCANDIR |
                             ADC_CFGR1_EXTSEL  |
                             ADC_CFGR1_EXTEN   |
                             ADC_CFGR1_CONT    |
                             ADC_CFGR1_DMACFG  |
                             ADC_CFGR1_OVRMOD  |
                             ADC_CFGR1_AUTDLY  |
                             ADC_CFGR1_AUTOFF  |
                             ADC_CFGR1_DISCEN   );

  hadc->Instance->CFGR1 |= (hadc->Init.DataAlign                             |
                            ADC_SCANDIR(hadc->Init.ScanConvMode)             |
                            ADC_CONTINUOUS((uint32_t)hadc->Init.ContinuousConvMode)    |
                            ADC_DMACONTREQ((uint32_t)hadc->Init.DMAContinuousRequests) |
                            hadc->Init.Overrun                               |
                            __HAL_ADC_CFGR1_AutoDelay(hadc->Init.LowPowerAutoWait) |
                            __HAL_ADC_CFGR1_AUTOFF(hadc->Init.LowPowerAutoPowerOff));

  /* Enable external trigger if trigger selection is different of software  */
  /* start.                                                                 */
  /* Note: This configuration keeps the hardware feature of parameter       */
  /*       ExternalTrigConvEdge "trigger edge none" equivalent to           */
  /*       software start.                                                  */
  if (hadc->Init.ExternalTrigConv != ADC_SOFTWARE_START)
  {
    hadc->Instance->CFGR1 |= hadc->Init.ExternalTrigConv |
                             hadc->Init.ExternalTrigConvEdge;
  }

  /* Enable discontinuous mode only if continuous mode is disabled */
  if (hadc->Init.DiscontinuousConvMode == ENABLE)
  {
    if (hadc->Init.ContinuousConvMode == DISABLE)
    {
      /* Enable the selected ADC group regular discontinuous mode */
      hadc->Instance->CFGR1 |= (ADC_CFGR1_DISCEN);
    }
    else
    {
      /* ADC regular group discontinuous was intended to be enabled,        */
      /* but ADC regular group modes continuous and sequencer discontinuous */
      /* cannot be enabled simultaneously.                                  */

      /* Update ADC state machine to error */
      SET_BIT(hadc->State, HAL_ADC_STATE_ERROR_CONFIG);

      /* Set ADC error code to ADC peripheral internal error */
      SET_BIT(hadc->ErrorCode, HAL_ADC_ERROR_INTERNAL);
    }
  }
上 面 是 stm32l0xx_hal_adc.c 文 件 中 HAL_StatusTypeDef HAL_ADC_Init(ADC_HandleTypeDef* hadc);函数的定义,这个函数中对配置寄存器ADC configuration register 1 (ADC_CFGR1)进行了设置。从上面的代码中可以看到:
hadc->Instance->CFGR1 &= ~(ADC_CFGR1_ALIGN |
ADC_CFGR1_SCANDIR | ADC_CFGR1_EXTSEL | ADC_CFGR1_EXTEN | ADC_CFGR1_CONT | ADC_CFGR1_DMACFG | ADC_CFGR1_OVRMOD | ADC_CFGR1_AUTDLY | ADC_CFGR1_AUTOFF | ADC_CFGR1_DISCEN );
首先清除了bit16,即ADC_CFGR1_DISCEN 。
从spec上看,此处的定义在CFGR1寄存器中表述如下:
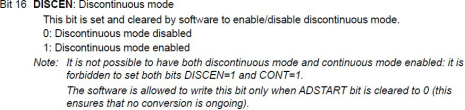
可以看到如果设定为0的情况下是关闭了非连续模式。但是并没有打开连续采样模 式。接着往下看代码
hadc->Instance->CFGR1 |= (hadc->Init.DataAlign		| ADC_SCANDIR(hadc->Init.ScanConvMode)	| ADC_CONTINUOUS((uint32_t)hadc->Init.ContinuousConvMode) | ADC_DMACONTREQ((uint32_t)hadc->Init.DMAContinuousRequests) | hadc->Init.Overrun	|
    HAL_ADC_CFGR1_AutoDelay(hadc->Init.LowPowerAutoWait) |
    HAL_ADC_CFGR1_AUTOFF(hadc->Init.LowPowerAutoPowerOff));
此处对ContinuousConvMode这个参数进行了解读和设置,设置部分的代码如下:
/**
*@brief Enable ADC continuous conversion mode.
*@param _CONTINUOUS_MODE_ Continuous mode.
*@retval None
*/
#define ADC_CONTINUOUS(_CONTINUOUS_MODE_) ((_CONTINUOUS_MODE_) << 13U)
可以看出是对bit13进行了设置,而对这个寄存器的描述在spec中表述如下:

从以上描述中可以看出,这个位是单次转换还是连续直到被清除。也就是这样的设置 跟是否连续设置是没有关系的。是两个完全不同的寄存器的设置。但是两处的描述中 都明确提示不能同时设置两个寄存器为1。
接着往下看,
/* Enable discontinuous mode only if continuous mode is disabled */ if (hadc->Init.DiscontinuousConvMode == ENABLE)
{
if (hadc->Init.ContinuousConvMode == DISABLE)
{
/* Enable the selected ADC group regular discontinuous mode */ hadc->Instance->CFGR1 |= (ADC_CFGR1_DISCEN);
}
else
{
/* ADC regular group discontinuous was intended to be enabled,	*/
/* but ADC regular group modes continuous and sequencer discontinuous */
/* cannot be enabled simultaneously.	*/

/* Update ADC state machine to error */
SET_BIT(hadc->State,   HAL_ADC_STATE_ERROR_CONFIG);

/* Set ADC error code to ADC peripheral internal error */ SET_BIT(hadc->ErrorCode,   HAL_ADC_ERROR_INTERNAL);
}
}
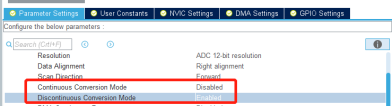
上面的代码有意思的是,你不能够在cubeMX同时设置如下两个参数,但是如果你采 用人工手写代码的方式可以同时enable这两个参数,这时候就走到上面代码的else 分支中,会设定错误状态。
如何使用ADC获取正确的值呢?
首先在使用前,对ADC进行一下校准:
HAL_ADCEx_Calibration_Start(&hadc, ADC_SINGLE_ENDED);
for (i = 0; i < 10; i++) {
		  HAL_ADC_Start(&hadc);
		  HAL_ADC_PollForConversion(&hadc, 10);

		  if(HAL_IS_BIT_SET(HAL_ADC_GetState(&hadc), HAL_ADC_STATE_REG_EOC)) {
			  ADC_Buf[i] = HAL_ADC_GetValue(&hadc);
		  }
	  }
最后
以上就是鳗鱼帽子最近收集整理的关于单片机入门---ADC采样的全部内容,更多相关单片机入门---ADC采样内容请搜索靠谱客的其他文章。


发表评论 取消回复