文章目录
- 前言
- 一、图像的解析,和使用
- 二、基本原理:
- 1、使用imread()函数读取图像:
- 2、分配内存空间:
- 3、检测人脸:
- 4、画出人脸区域:
- 5、五个参数:
- 三、人脸识别具体操作
- 总结:
- 参考来源
前言
opencv图像人脸识别,使用libfacedetection库对图像进行人脸识别
一、图像的解析,和使用
参考:
https://blog.csdn.net/ivan_9/article/details/113336452
https://blog.csdn.net/ivan_9/article/details/113177480
二、基本原理:
1、使用imread()函数读取图像:
Mat src;
src = imread("D:\Myfile\素材照片\opencv素材照片\7.jpg");  //导入需要识别的图像
2、分配内存空间:
//pBuffer用来检测人脸
	unsigned char* pBuffer = new unsigned char[DETECT_BUFFER_SIZE];  //multiple threads
	//是多线程时,要分配内存空间
	if (!pBuffer) { //如果无法分配内存,就返回could not alloc buffer!
		cout << "could not alloc buffer!" << endl;
		return 0;
	}
3、检测人脸:
int* pResults = NULL; //用来检测人脸
pResults = facedetect_cnn(pBuffer, (unsigned char*)(src.ptr(0)), src.cols, src.rows, src.step);
4、画出人脸区域:
for (int i = 0; i < (pResults ? (*pResults) : 0); i++) {
		//如果pResult为NULL,即pResult没有检测到人脸,就返回0,for循环结束
		short* p = ((short*)(pResults + 1)) + (142 * i);
		//p指针用来指向
		int confidence = p[0];
		int x = p[1];
		int y = p[2];
		int w = p[3];
		int h = p[4];
		//显示脸的分数。其范围为[0-100]
		char sScore[256];
		snprintf(sScore, 256, "%d", confidence);
		putText(dst, sScore, Point(x, y - 3), FONT_HERSHEY_SIMPLEX, 0.5, Scalar(0, 255, 0), 1);
		//计算文本字符串的宽度和高度。
		//把脸用矩形画出来
		rectangle(dst, Rect(x, y, w, h), Scalar(0, 255, 0), 2);
		//画五个不同颜色的面部标志
		circle(dst, Point(p[5], p[5 + 1]), 1, Scalar(255, 0, 0), 2);
		circle(dst, Point(p[5 + 2], p[5 + 3]), 1, Scalar(0, 0, 255), 2);
		circle(dst, Point(p[5 + 4], p[5 + 5]), 1, Scalar(0, 255, 0), 2);
		circle(dst, Point(p[5 + 6], p[5 + 7]), 1, Scalar(255, 0, 255), 2);
		circle(dst, Point(p[5 + 8], p[5 + 9]), 1, Scalar(0, 255, 255), 2);
	}
5、五个参数:
int confidence = p[0];
confidence参数表示识别率达到多大
int x = p[1];
int y = p[2];
x,y表示识别出来的人像在整张图片中的位置,即左上角的位置为(x,y)
int w = p[3];
int h = p[4];
w,h表示识别出来的人像的宽和长是多大
例:可以使用confidence参数来取消画小于90识别率的人像:
if (confidence < 90) {
	cout << "这张图像识别率小于90%!!!nn";
	continue;
}
三、人脸识别具体操作
代码块
#include <iostream>
#include <opencv2/opencv.hpp>
#include <facedetectcnn.h>
#define DETECT_BUFFER_SIZE 0x20000 //定义缓冲区大小
#define FACEDETECTION_EXPORT

using namespace std;
using namespace cv;
int main() {
	Mat src, dst;
	src = imread("D:\Myfile\素材照片\opencv素材照片\7.jpg");  //导入需要识别的图像
	if (!src.data) {	//若不存在就返回 could not load your image!
		cout << "could not load your image!" << endl;
		return 0;
	}
	//pBuffer用来检测人脸
	unsigned char* pBuffer = new unsigned char[DETECT_BUFFER_SIZE];  //multiple threads
	//是多线程时,要分配内存空间
	if (!pBuffer) { //如果无法分配内存,就返回could not alloc buffer!
		cout << "could not alloc buffer!" << endl;
		return 0;
	}
	dst = src.clone();	//将src原图像复制给dst
	TickMeter myClock;	//计时器
	myClock.start();
	int* pResults = NULL; //用来检测人脸
	pResults = facedetect_cnn(pBuffer, (unsigned char*)(src.ptr(0)), src.cols, src.rows, src.step);
	//利用facedetect_cnn函数来获取人脸,用于存储人脸检测结果的缓冲存储器!其大小必须为0x20000字节
	//facedetect_cnn函数识别的图像必须为BGR三通道的图像,而非rgb图像
	myClock.stop();
	cout << myClock.getTimeSec() << "s" << endl;	//输出检测人脸耗费时长
	for (int i = 0; i < (pResults ? (*pResults) : 0); i++) {
		//如果pResult为NULL,即pResult没有检测到人脸,就返回0,for循环结束
		short* p = ((short*)(pResults + 1)) + (142 * i);
		//p指针用来指向
		int confidence = p[0];
		int x = p[1];
		int y = p[2];
		int w = p[3];
		int h = p[4];
		//显示脸的分数。其范围为[0-100]
		char sScore[256];
		snprintf(sScore, 256, "%d", confidence);
		/*从给定位置加载数据,转换为字符串等价版本,并将结果写入各种池。
			1) 写结果到 stdout 。2) 写结果到文件流 stream 。3) 写结果到字符串 buffer 。
			4) 写结果到字符串 buffer 。至多写 buf_size - 1 个字符。产生的字符串会以空字符终止,除非 buf_size 为零。
			若buf_size为零,则不写入任何内容,且buffer可以是空指针,然而依旧计算返回值(会写入的字符数,不包含空终止符)并返回。
			若调用 sprintf 或 snprintf 导致在重叠的对象间发生复制,则行为未定义。
			(例如 sprintf(buf, "%s text", buf); )*/
		putText(dst, sScore, Point(x, y - 3), FONT_HERSHEY_SIMPLEX, 0.5, Scalar(0, 255, 0), 1);
		//计算文本字符串的宽度和高度。
		//把脸用矩形画出来
		rectangle(dst, Rect(x, y, w, h), Scalar(0, 255, 0), 2);
		//画五个不同颜色的面部标志
		circle(dst, Point(p[5], p[5 + 1]), 1, Scalar(255, 0, 0), 2);
		circle(dst, Point(p[5 + 2], p[5 + 3]), 1, Scalar(0, 0, 255), 2);
		circle(dst, Point(p[5 + 4], p[5 + 5]), 1, Scalar(0, 255, 0), 2);
		circle(dst, Point(p[5 + 6], p[5 + 7]), 1, Scalar(255, 0, 255), 2);
		circle(dst, Point(p[5 + 8], p[5 + 9]), 1, Scalar(0, 255, 255), 2);
		//circle()绘制简单或粗椭圆弧或填充椭圆扇区。
		/*
		Point类的实例可以与C结构、CvPoint和CvPoint2D32f互换。
		还有一个cast操作符将点坐标转换为指定的类型。
		从浮点坐标到整数坐标的转换是通过舍入完成的。
		通常,转换对每个坐标都使用此操作。
		*/
	}

	namedWindow("output_detect_image", WINDOW_AUTOSIZE);
	imshow("output_detect_image", dst);	//输出识别后的图像

	waitKey(0);
	return 0;
}
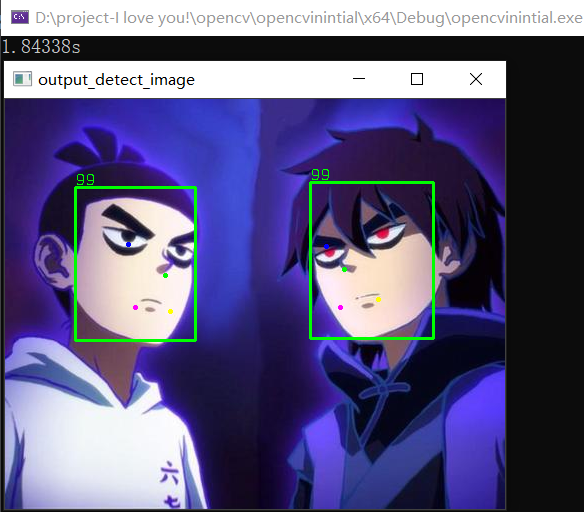
运行结果:
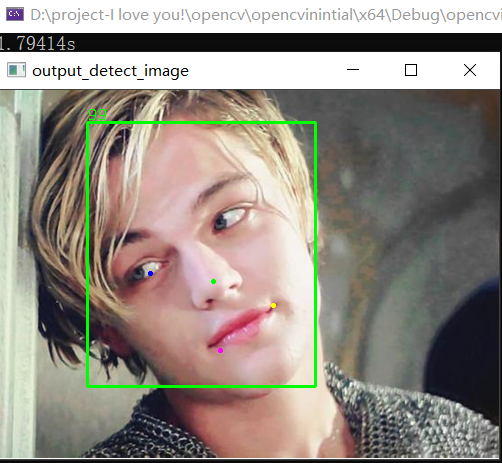
我们换一张图片,看看这个帅男人:
总结:
本文讲述了使用libfacedetection库的opencv图像人脸识别,并画点标出
参考来源
https://github.com/ShiqiYu/libfacedetection#cnn-based-face-detection-on-windows
如有疑问,请留言!
如有错误,敬请指教!
最后
以上就是生动奇迹最近收集整理的关于opencv图像人脸识别前言一、图像的解析,和使用二、基本原理:三、人脸识别具体操作总结:参考来源的全部内容,更多相关opencv图像人脸识别前言一、图像内容请搜索靠谱客的其他文章。
本图文内容来源于网友提供,作为学习参考使用,或来自网络收集整理,版权属于原作者所有。


发表评论 取消回复