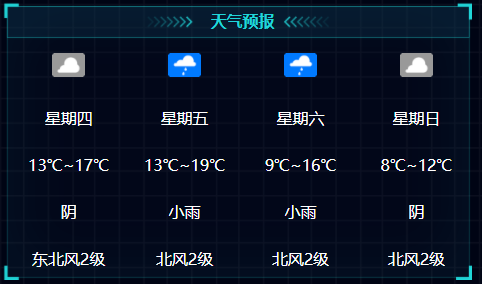
做大屏项目的时候,在项目中遇到要展示天气预报。没有写过,以为很难。在百度了很多之后,自己摸索写出来了。
效果:
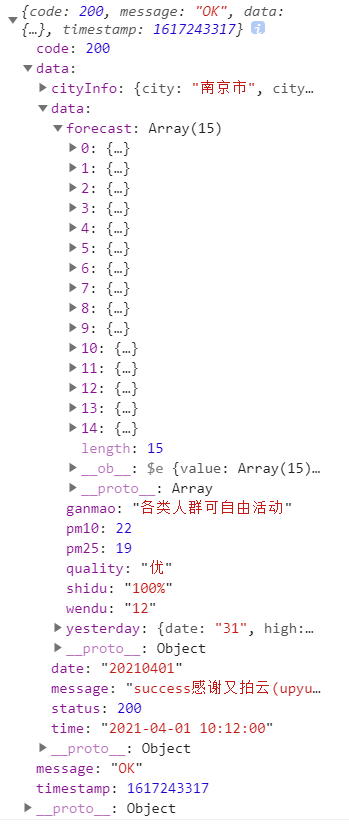
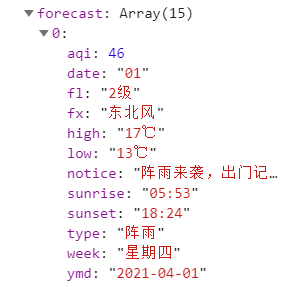
后台返的数据,拿自己要的数据就行:

代码:
<template>
<div >
 <div class="headText">天气预报</div>
     <div class="weather main_envir" v-loading="loading">
      <div class="crb-tit">
        <div
          class="wea_box"
          v-for="(item, i) in this.tianqi"
          :key="i"
          v-show="i < 4"
        >
          <p>
          //img这一块,src是http的,直接引入就行。其中有两个图片没有找到,从ui那里切图过来,引入就行
            <img
              src="./images/duoyunzhuanyin.png"
              alt="" v-if="item.type == '多云转阴'"
            />
            <img
              src="http://api.map.baidu.com/images/weather/day/yin.png"
              alt="" v-if="item.type == '阴'"
            />
            <img
              src="http://api.map.baidu.com/images/weather/day/leizhenyu.png"
              alt="" v-if="item.type == '雷阵雨'"
            />
            <img
              src="http://api.map.baidu.com/images/weather/day/xiaoyu.png"
              alt="" v-if="item.type == '小雨' || item.type == '小雨转阴' || item.type == '阴转小雨'"
            />
            <img
              src="http://api.map.baidu.com/images/weather/day/zhongyu.png"
              alt="" v-if="item.type == '中雨'"
            />
            <img
              src="http://api.map.baidu.com/images/weather/day/dayu.png"
              alt="" v-if="item.type == '大雨'"
            />
            <img
              src="http://api.map.baidu.com/images/weather/day/zhenyu.png"
              alt="" v-if="item.type == '阵雨'"
            />
            <img
              src="http://api.map.baidu.com/images/weather/day/baoyu.png"
              alt="" v-if="item.type == '暴雨'"
            />
            <img
              src="http://api.map.baidu.com/images/weather/day/baoxue.png"
              alt="" v-if="item.type == '暴雪'"
            />
            <img
              src="http://api.map.baidu.com/images/weather/day/xiaoxue.png"
              alt="" v-if="item.type == '小雪'"
            />
            <img
              src="http://api.map.baidu.com/images/weather/day/zhongxue.png"
              alt="" v-if="item.type == '中雪'"
            />
            <img
              src="http://api.map.baidu.com/images/weather/day/daxue.png"
              alt="" v-if="item.type == '大雪'"
            />
            <img
              src="http://api.map.baidu.com/images/weather/day/yujiaxue.png"
              alt="" v-if="item.type == '雨夹雪' || item.type == '多云转雨夹雪'"
            />
            <img
              src="http://api.map.baidu.com/images/weather/day/zhenxue.png"
              alt="" v-if="item.type == '阵雪'"
            />
            <img
              src="http://api.map.baidu.com/images/weather/day/qing.png"
              alt="" v-if="item.type == '晴'"
            />
            <img
              src="./images/qingzhuanduoyun.png"
              alt="" v-if="item.type == '晴转多云'"
            />
            <img
              src="http://api.map.baidu.com/images/weather/day/duoyun.png"
              alt="" v-if="item.type == '多云'"
            />
          </p>
          <p>{{ item.week }}</p>
          <p>{{ item.low }}~{{ item.high }}</p>
          <p>{{ item.type }}</p>
          <p>{{ item.fx}}{{item.fl}}</p>
        </div>
      </div>
    </div>
</div>
</template>
<script>
//我把axios封装了,所以直接引入就行。可以按自己的方式写
import {wheather} from '@/api/weather'
//这三行代码要先在项目里下载包,搜一下elementResizeDetectorMaker,就会有对应的文章教你怎么下载
      var erd = elementResizeDetectorMaker();
    var erdUltraFast = elementResizeDetectorMaker({
        strategy: "scroll",
    });

export default {
  name: '',
  components: {},
  props: {},
  data () {
    return {
    //zoom用来调节页面,不同的分辨率,页面随之缩放
       zoomNum: window.screen.width / 1920,
                isRouterAlive: true,
                tianqi: [],//准备的数组用来接数据
    }
  },
  provide() {
            return {
                reload: this.reload,
            };
        },
        watch: {
            $route: function (to, from) {
                document.body.scrollTop = 0;
                document.documentElement.scrollTop = 0;
            },
            changeMuli: function (to, from) {
                console.log(to, from);
            },
        },
  created () {},
  mounted () {
       this.wheather()
  },
  methods: {
     reload() {
                this.isRouterAlive = false;
                this.$nextTick(() => (this.isRouterAlive = true));
            },
     async  wheather(){
          this.loading = true;
      const data = await wheather({city: "南京",})
       this.tianqi = data.data.data.forecast;
  data.data.data.forecast.forEach((item)=>{//这里说一下,因为返的字段温度前面有中文,我只要数字的温度,所以要截取一下。循环数组,截取对应字段,空格分割转数组取第二项
    item.high = item.high.split(" ")[1];
    item.low = item.low.split(" ")[1];
  })
        this.loading = false;
    },
  }
}
</script>
<style type="text/css">
 .main_envir {
    width: 100%;
    height: 330px;
  }

  .main_envir .crb-tit .wea_box {
    float: left;
    color: #fff;
    width: 25%;
    text-align: center;
    /*margin-left: 1%;*/
    margin-top: 10px;
    font-size: 20px;
  }


  .main_envir .crb-tit .wea_box p {
    text-align: center;
    line-height: 3;
  }
  .main_envir .crb-tit .wea_box p:first-child {
    min-height: 59px;
  }

  .el-loading-mask {
    background-color: transparent !important;
  }
</style>
最后
以上就是霸气白昼最近收集整理的关于纯vue+天气预报,不借助插件,大屏数据化展示的全部内容,更多相关纯vue+天气预报内容请搜索靠谱客的其他文章。
本图文内容来源于网友提供,作为学习参考使用,或来自网络收集整理,版权属于原作者所有。


发表评论 取消回复