前言
为什么三角形是实时渲染的首选多边形?因为它们具有以下理想的特性:
- 三角形是最简单的多边形类型。少于三个顶点就没法组成一个多边形。
- 三角形始终是平面的。任何具有四个或更多顶点的多边形都没有这个属性,因为前三个顶点定义了一个平面,第四个顶点可能位于该平面的上方或下方。
- 三角形在大多数类型的变换下仍然是三角形,包括仿射变换和透视投影。
- 几乎所有商业图形加速硬件都是围绕三角形光栅化设计的。
绘制线框三角形
上篇文章我们实现了画线功能,现在可以轻而易举的画一个三角形了。
// 引用EasyX图形库头文件
#include <graphics.h>
#include <conio.h>
//glm数学相关头文件
#include <glm/glm.hpp>
#include <glm/gtc/matrix_transform.hpp>
#include <glm/gtc/type_ptr.hpp>
#include <iostream>
#include <vector>
void DrawLine1(glm::vec2 P0, glm::vec2 P1, COLORREF color)
{
float a = (P1.y - P0.y) / (P1.x - P0.x);
float b = P0.y - a * P0.x;
for (int x=P0.x;x<P1.x;x++)
{
int y = a * x + b;
putpixel(x, y, color);
}
}
void DrawLine2(glm::vec2 P0, glm::vec2 P1, COLORREF color)
{
float a = (P1.y - P0.y) / (P1.x - P0.x);
float y = P0.y;
for (int x = P0.x;x < P1.x;x++)
{
putpixel(x, y, color);
y = y + a;
}
}
void DrawLine3(glm::vec2 P0, glm::vec2 P1, COLORREF color)
{
if (P0.x > P1.x)
{
std::swap(P0, P1);
}
float a = (P1.y - P0.y) / (P1.x - P0.x);
float y = P0.y;
for (int x = P0.x;x < P1.x;x++)
{
putpixel(x, y, color);
y = y + a;
}
}
void DrawLine4(glm::vec2 P0, glm::vec2 P1, COLORREF color)
{
if (P0.y > P1.y)
{
std::swap(P0, P1);
}
float a = (P1.x - P0.x) / (P1.y - P0.y);
float x = P0.x;
for (int y = P0.y;y < P1.y;y++)
{
putpixel(x, y, color);
x = x + a;
}
}
void DrawLine5(glm::vec2 P0, glm::vec2 P1, COLORREF color)
{
float dx = P1.x - P0.x;
float dy = P1.y - P0.y;
if (glm::abs(dx) > glm::abs(dy))
{
if (P0.x > P1.x)
{
std::swap(P0, P1);
}
float a = dy / dx;
float y = P0.y;
for (int x = P0.x;x < P1.x;x++)
{
putpixel(x, y, color);
y = y + a;
}
}
else
{
if (P0.y > P1.y)
{
std::swap(P0, P1);
}
float a = dx / dy;
float x = P0.x;
for (int y = P0.y;y < P1.y;y++)
{
putpixel(x, y, color);
x = x + a;
}
}
}
std::vector<float> Interpolate(float i0, float d0, float i1, float d1)
{
std::vector<float> values;
if (glm::abs(i0 - i1)<=1e-6)
{
values.push_back(d0);
return values;
}
float a = (d1 - d0) / (i1 - i0);
float d = d0;
for (int i = i0;i < i1;i++)
{
values.push_back(d);
d = d + a;
}
return values;
}
void DrawLine(glm::vec2 P0, glm::vec2 P1, COLORREF color)
{
if (glm::abs(P1.x-P0.x) > glm::abs(P1.y-P0.y))
{
if (P0.x > P1.x)
{
std::swap(P0, P1);
}
std::vector<float> ys = Interpolate(P0.x,P0.y,P1.x,P1.y);
for (int x = P0.x;x < P1.x;x++)
{
putpixel(x, ys[x-P0.x], color);
}
}
else
{
if (P0.y > P1.y)
{
std::swap(P0, P1);
}
std::vector<float> xs = Interpolate(P0.y, P0.x, P1.y, P1.x);
for (int y = P0.y;y < P1.y;y++)
{
putpixel(xs[y - P0.y], y, color);
}
}
}
void DrawWireframeTriangle(glm::vec2 P0, glm::vec2 P1, glm::vec2 P2, COLORREF color)
{
DrawLine(P0, P1, color);
DrawLine(P1, P2, color);
DrawLine(P2, P0, color);
}
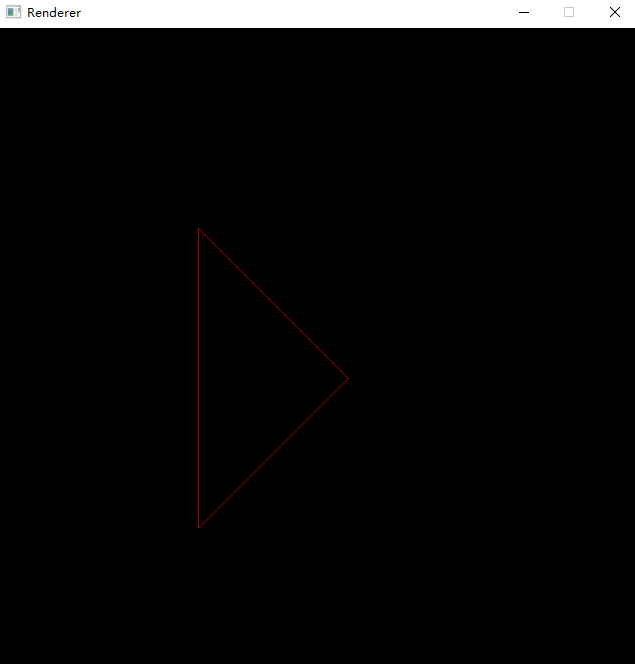
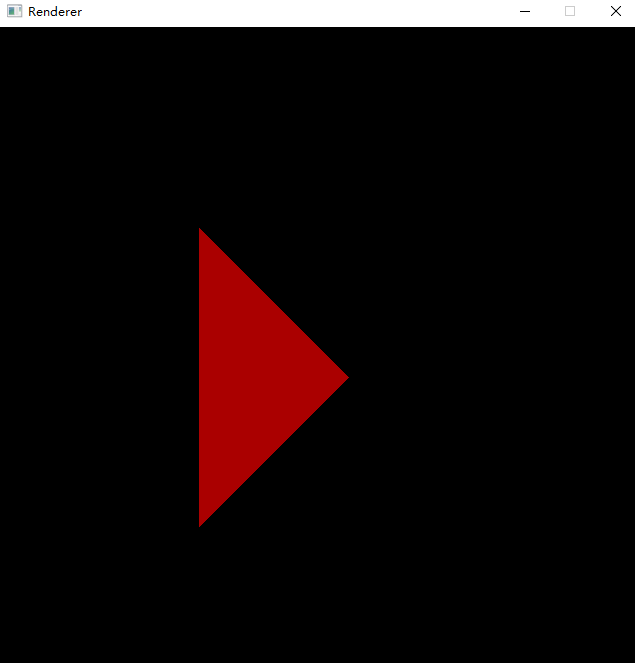
int main()
{
initgraph(640, 640); // 创建绘图窗口,大小为 640x480 像素
glm::vec2 P0(200, 200);
glm::vec2 P1(200, 500);
glm::vec2 P2(350, 350);
DrawWireframeTriangle(P0, P1, P2, RED);
_getch(); // 按任意键继续
closegraph(); // 关闭绘图窗口
return 0;
}
绘制填充三角形
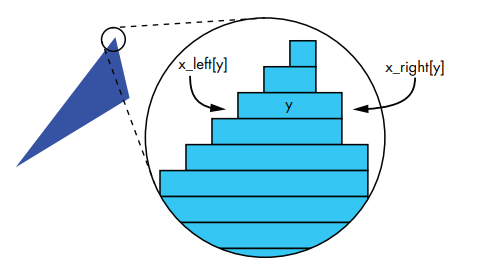
其实填充三角形也很简单,我们只需要找到三角形左边边的x_left坐标和三角形右边边的x_right坐标,然后从三角形底部到顶部画线式填充就可以了。
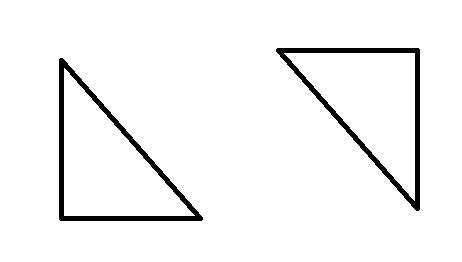
当然这里三角形会有两种情况,一种就是下图所示,这种情况是比较简单的,因为这个时候是最左边的边直接对应最右边的边。
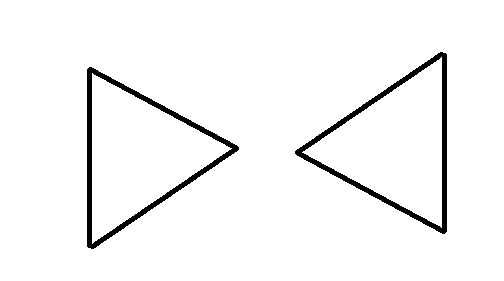
还有一种情况是如下图所示,这种情况就复杂一点,因为这个时候是一条边对应两条边了,当然我们可以把它从中间切一刀,分成第一种情况。
具体实现可以看代码和注释
// 引用EasyX图形库头文件
#include <graphics.h>
#include <conio.h>
//glm数学相关头文件
#include <glm/glm.hpp>
#include <glm/gtc/matrix_transform.hpp>
#include <glm/gtc/type_ptr.hpp>

#include <iostream>
#include <vector>


void DrawLine1(glm::vec2 P0, glm::vec2 P1, COLORREF color)
{
	float a = (P1.y - P0.y) / (P1.x - P0.x);
	float b = P0.y - a * P0.x;
	for (int x=P0.x;x<P1.x;x++)
	{
		int y = a * x + b;
		putpixel(x, y, color);
	}
}

void DrawLine2(glm::vec2 P0, glm::vec2 P1, COLORREF color)
{
	float a = (P1.y - P0.y) / (P1.x - P0.x);
	float y = P0.y;
	for (int x = P0.x;x < P1.x;x++)
	{
		putpixel(x, y, color);
		y = y + a;
	}
}

void DrawLine3(glm::vec2 P0, glm::vec2 P1, COLORREF color)
{
	if (P0.x > P1.x)
	{
		std::swap(P0, P1);
	}
	float a = (P1.y - P0.y) / (P1.x - P0.x);
	float y = P0.y;
	for (int x = P0.x;x < P1.x;x++)
	{
		putpixel(x, y, color);
		y = y + a;
	}
}

void DrawLine4(glm::vec2 P0, glm::vec2 P1, COLORREF color)
{
	if (P0.y > P1.y)
	{
		std::swap(P0, P1);
	}
	float a = (P1.x - P0.x) / (P1.y - P0.y);
	float x = P0.x;
	for (int y = P0.y;y < P1.y;y++)
	{
		putpixel(x, y, color);
		x = x + a;
	}
}

void DrawLine5(glm::vec2 P0, glm::vec2 P1, COLORREF color)
{
	float dx = P1.x - P0.x;
	float dy = P1.y - P0.y;
	if (glm::abs(dx) > glm::abs(dy))
	{
		if (P0.x > P1.x)
		{
			std::swap(P0, P1);
		}
		float a = dy / dx;
		float y = P0.y;
		for (int x = P0.x;x < P1.x;x++)
		{
			putpixel(x, y, color);
			y = y + a;
		}
	}
	else
	{
		if (P0.y > P1.y)
		{
			std::swap(P0, P1);
		}
		float a = dx / dy;
		float x = P0.x;
		for (int y = P0.y;y < P1.y;y++)
		{
			putpixel(x, y, color);
			x = x + a;
		}
	}

}

std::vector<float> Interpolate(float i0, float d0, float i1, float d1)
{
	std::vector<float> values;
	if (glm::abs(i0 - i1)<1e-6)
	{
		values.push_back(d0);
		return values;
	}
	float a = (d1 - d0) / (i1 - i0);
	float d = d0;
	for (int i = i0;i < i1;i++)
	{
		values.push_back(d);
		d = d + a;
	}
	return values;
}

void DrawLine(glm::vec2 P0, glm::vec2 P1, COLORREF color)
{
	if (glm::abs(P1.x-P0.x) > glm::abs(P1.y-P0.y))
	{
		if (P0.x > P1.x)
		{
			std::swap(P0, P1);
		}
		std::vector<float> ys = Interpolate(P0.x,P0.y,P1.x,P1.y);
		for (int x = P0.x;x < P1.x;x++)
		{
			putpixel(x, ys[x-P0.x], color);
		}
	}
	else
	{
		if (P0.y > P1.y)
		{
			std::swap(P0, P1);
		}
		std::vector<float> xs = Interpolate(P0.y, P0.x, P1.y, P1.x);
		for (int y = P0.y;y < P1.y;y++)
		{
			putpixel(xs[y - P0.y], y, color);
		}
	}

}

void DrawWireframeTriangle(glm::vec2 P0, glm::vec2 P1, glm::vec2 P2, COLORREF color)
{
	DrawLine(P0, P1, color);
	DrawLine(P1, P2, color);
	DrawLine(P2, P0, color);
}

void DrawFilledTriangle(glm::vec2 P0, glm::vec2 P1, glm::vec2 P2, COLORREF color)
{
	//排序顶点 P0.y <= P1.y <= P2.y
	if (P1.y < P0.y) { std::swap(P1, P0); }
	if (P2.y < P0.y) { std::swap(P2, P0); }
	if (P2.y < P1.y) { std::swap(P2, P1); }

// 				   P2 |
// 	                  |
// 					  |   P1
// 					  |  /
// 					  | /
// 				   P0 |/

	//P0P1边x坐标数组
	std::vector<float> x01 = Interpolate(P0.y, P0.x, P1.y, P1.x);
	//P1P2边x坐标数组
	std::vector<float> x12 = Interpolate(P1.y, P1.x, P2.y, P2.x);
	//P0P2边x坐标数组
	std::vector<float> x02 = Interpolate(P0.y, P0.x, P2.y, P2.x);

	//【注意】去掉重复坐标,P0P1和P1P2重复了P1
	//x01.pop_back();
	//x012=x01+x12 x012代表P0P1和P1P2两条边的x坐标数组
	x01.insert(x01.end(), x12.begin(), x12.end());
	std::vector<float> x012(x01);

	float m = glm::floor(x012.size() / 2);
	std::vector<float> x_left;
	std::vector<float> x_right;
//	      第一种情况
// 		  P2 |
// 	         |
// 			 |   P1
// 			 |  /
// 			 | /
// 		  P0 |/
	if (x02[m] < x012[m])
	{
		x_left = x02;
		x_right = x012;
	}
//	      第二种情况
// 		    /| P2
// 	       / |
// 	   p1 /  |
// 		  	 |
// 		    |
// 		    | P0
	else
	{
		x_left = x012;
		x_right = x02;
	}
	//从上到下,从左到右填充
	for (int y = P0.y;y < P2.y;y++)
	{
		for (int x = x_left[y - P0.y];x < x_right[y - P0.y];x++)
		{
			putpixel(x, y, color);
		}
	}
}

int main()
{
	initgraph(640, 640);	// 创建绘图窗口,大小为 640x480 像素

	glm::vec2 P0(200, 200);
	glm::vec2 P1(200, 500);
	glm::vec2 P2(350, 350);

	DrawFilledTriangle(P0, P1, P2, RED);

	_getch();				// 按任意键继续
	closegraph();			// 关闭绘图窗口
	return 0;
}
结果
结尾
如果你遇到了问题可以在评论区告诉我哦
光栅化渲染器:填充三角形欢迎去我的个人网站留言
项目地址
最后
以上就是美满小熊猫最近收集整理的关于光栅化渲染器:填充三角形前言绘制线框三角形绘制填充三角形结尾的全部内容,更多相关光栅化渲染器内容请搜索靠谱客的其他文章。
本图文内容来源于网友提供,作为学习参考使用,或来自网络收集整理,版权属于原作者所有。


发表评论 取消回复