一 . spring的DI
依赖注入,一句话总结 :给属性赋值 ;一个类中的属性都可以采用springDI的方式进行赋值,但是并不是所有的属性都适合赋值;
1. 利用set给属性赋值
示例:
(1)当前两个对象 Person和Student
--Person
package cn.labelnet.di.set;

public class Person {

}
--Student
package cn.labelnet.di.set;

import java.util.List;
import java.util.Map;
import java.util.Set;

public class Student {
	private Integer id;
	private String sName;
	private String sPass;
	private List stus;
	private Map maps;
	private Set sets;


	public Integer getId() {
		return id;
	}
	public void setId(Integer id) {
		this.id = id;
	}
	public String getSName() {
		return sName;
	}
	public void setSName(String name) {
		sName = name;
	}
	public String getSPass() {
		return sPass;
	}
	public void setSPass(String pass) {
		sPass = pass;
	}
	public List getStus() {
		return stus;
	}
	public void setStus(List stus) {
		this.stus = stus;
	}
	public Map<String, String> getMaps() {
		return maps;
	}
	public void setMaps(Map<String, String> maps) {
		this.maps = maps;
	}
	public Set getSets() {
		return sets;
	}
	public void setSets(Set sets) {
		this.sets = sets;
	}

}
(2)bean配置和赋值
<?xml version="1.0" encoding="UTF-8"?>
<beans xmlns="http://www.springframework.org/schema/beans"
	xmlns:xsi="http://www.w3.org/2001/XMLSchema-instance"
	xsi:schemaLocation="http://www.springframework.org/schema/beans
           http://www.springframework.org/schema/beans/spring-beans-2.5.xsd">

	<bean id="student" class="cn.labelnet.di.set.Student">

		<property name="id" value="1"></property>

		<property name="maps">

			<map>
				<entry key="m1">
					<value>yuan</value>
				</entry>
				<entry key="m2">
				    <value>zhuo</value>
				</entry>
				<entry key="m3">
				    <value>ming</value>
				</entry>
			</map>

		</property>

		<property name="sets">

		    <set>
		       <value>h1</value>
		       <value>h2</value>
		       <ref bean="persion"/>
		       <value>h4</value>
		    </set>

		</property>

		<property name="SName">
			<value>LABELNET</value>
		</property>

		<property name="SPass">
		    <value>MMMMMMMM</value>
		</property>

		<property name="stus">
		     <list>
		       <ref bean="persion"/>
		       <ref bean="persion"/>
		     </list>
		</property>

	</bean>


	<bean id="persion" class="cn.labelnet.di.set.Person"></bean>
</beans>
1)引用类型 使用ref
2)属性 使用 property
3)list集合 list
4)set集合 set
5)map集合使用 map , entry
6)普通类型使用 value
2. 利用构造函数给属性赋值
1)如果Spring的配置文件中的bean中没有<constructor-arg>元素,则调用默认的构造函数;2)如果Spring的配置文件中的bean中有<constructor-arg>元素,则该元素确定唯一的构造函数
index 代表 参数的位置 ,从0开始
type 指的是参数的类型
value 给基本类型赋值
ref 给引用类型赋值
示例:
(1)实现类 Student
public class Person {

	private String name;
	private Integer age;
	private Student student;

	public Person(String name,Integer age,Student student) {
		this.name=name;
		this.age=age;
		this.student=student;
	}

	public String getName() {
		return name;
	}

	public void setName(String name) {
		this.name = name;
	}

	public Integer getAge() {
		return age;
	}

	public void setAge(Integer age) {
		this.age = age;
	}

	public Student getStudent() {
		return student;
	}

	public void setStudent(Student student) {
		this.student = student;
	}
}
public class Student {
public void hi(){
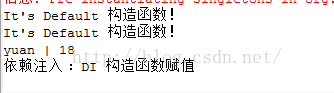
System.out.println("依赖注入 :DI 构造函数赋值");
}
}
<?xml version="1.0" encoding="UTF-8"?>
<beans xmlns="http://www.springframework.org/schema/beans"
       xmlns:xsi="http://www.w3.org/2001/XMLSchema-instance"
       xsi:schemaLocation="http://www.springframework.org/schema/beans
           http://www.springframework.org/schema/beans/spring-beans-2.5.xsd">

     <bean id="person_con" class="cn.labelnet.di.constructor.Person">
          <constructor-arg index="0" type="java.lang.String" value="yuan"></constructor-arg>
          <constructor-arg index="1" type="java.lang.Integer" value="18"></constructor-arg>
          <constructor-arg index="2" type="cn.labelnet.di.constructor.Student" ref="student_con"></constructor-arg>
     </bean>


     <bean id="student_con" class="cn.labelnet.di.constructor.Student"></bean>

</beans>
(4)测试
public class SpringInit {

	public final static ApplicationContext context;

    static{
    	context=new ClassPathXmlApplicationContext("ApplicationContext.xml");
    }

}
public class TestDIConstructor extends SpringInit{
@Test
public void testDICons(){
Person person=(Person) context.getBean("person_con");
System.out.println(person.getName()+" | "+person.getAge());
Student s = person.getStudent();
s.hi();
}
}(5)结果
二. SpringIOC和DI的意义
实现了完全的面相接口编程
示例:person : child man oldman
描述:person接口,有个sayhi方法,使得child,man,oldman均实现person接口和sayhi方法
(1)Person接口
public interface Person {
	void sayHi();
}
(2)ChildPerson实现
public class ChildPerson implements Person {

	private String name;
	private Integer age;
     public String getName() {
		return name;
	}

	public void setName(String name) {
		this.name = name;
	}

	public Integer getAge() {
		return age;
	}
	public void setAge(Integer age) {
		this.age = age;
	}
	public void sayHi(){
    	 System.out.println("小孩子:"+this.name+this.age);
     }
}
package cn.labelnet.implement;

public class ManPerson implements Person{

	private String name;
	private Integer age;

	  public void sayHi(){
		  System.out.println("Man :"+this.name+this.age);
	     }
	  public String getName() {
			return name;
		}


		public void setName(String name) {
			this.name = name;
		}


		public Integer getAge() {
			return age;
		}


		public void setAge(Integer age) {
			this.age = age;
		}

}
(4)OldManPerson实现
package cn.labelnet.implement;

public class OldmanPerson implements Person {

	private String name;
	private Integer age;

	public void sayHi() {
		System.out.println("OldMan:" + this.name + this.age);
	}

	public String getName() {
		return name;
	}

	public void setName(String name) {
		this.name = name;
	}

	public Integer getAge() {
		return age;
	}

	public void setAge(Integer age) {
		this.age = age;
	}

}
(5)PersonManager实现
package cn.labelnet.implement;

public class PersonManager {

	private Person person;

	public Person getPerson() {
		return person;
	}

	public void setPerson(Person person) {
		this.person = person;
	}


	public void say(){
		person.sayHi();
	}

}
<?xml version="1.0" encoding="UTF-8"?>
<beans xmlns="http://www.springframework.org/schema/beans"
	xmlns:xsi="http://www.w3.org/2001/XMLSchema-instance"
	xsi:schemaLocation="http://www.springframework.org/schema/beans
           http://www.springframework.org/schema/beans/spring-beans-2.5.xsd">

	<bean id="child_person_impl" class="cn.labelnet.implement.ChildPerson">
		<property name="name" value="Child"></property>
		<property name="age" value="18"></property>
	</bean>

	<bean id="man_person_impl" class="cn.labelnet.implement.ManPerson">
		<property name="name" value="Man"></property>
		<property name="age" value="19"></property>

	</bean>

	<bean id="oldman_person_impl" class="cn.labelnet.implement.OldmanPerson">
		<property name="name" value="OldMan"></property>
		<property name="age" value="19"></property>
	</bean>

	<bean id="person_manager"  class="cn.labelnet.implement.PersonManager">

	   <property name="person" ref="child_person_impl"></property>

	 </bean>

</beans>
(7)测试
传统的测试方法 :
Person per=new ChildPerson();
		PersonManager manager=new PersonManager();
		manager.setPerson(per);
		manager.say();
public class TestImplement extends SpringInit{

	@Test
	public void testImlp(){


		PersonManager manager=(PersonManager) context.getBean("person_manager");
		manager.say();
	}

}
三.Demo下载
http://download.csdn.net/detail/lablenet/9377346
最后
以上就是眯眯眼吐司最近收集整理的关于Spring -Spring的 DI - 依赖注入的 使用学习一 . spring的DI 的全部内容,更多相关Spring内容请搜索靠谱客的其他文章。
本图文内容来源于网友提供,作为学习参考使用,或来自网络收集整理,版权属于原作者所有。


发表评论 取消回复