我是靠谱客的博主 朴素抽屉,这篇文章主要介绍Sipeed MAIX Dock K210开箱试用凑下字数废话不多说,拍两张开发板照片给大佬们过下目简介也有了,照片也看过了,接下来再不来点干货怕是过不去了总结,现在分享给大家,希望可以做个参考。
凑下字数
这两年人工智能是发展的热火朝天,咱也不能落伍,无意之间发现了勘智 K210这款芯片,价格便宜但是性能不俗,主频400MHz,还能再超频,双核,自带KPU,甚是强大,截两张官方datasheet关于这个芯片的简介,大家来感受下
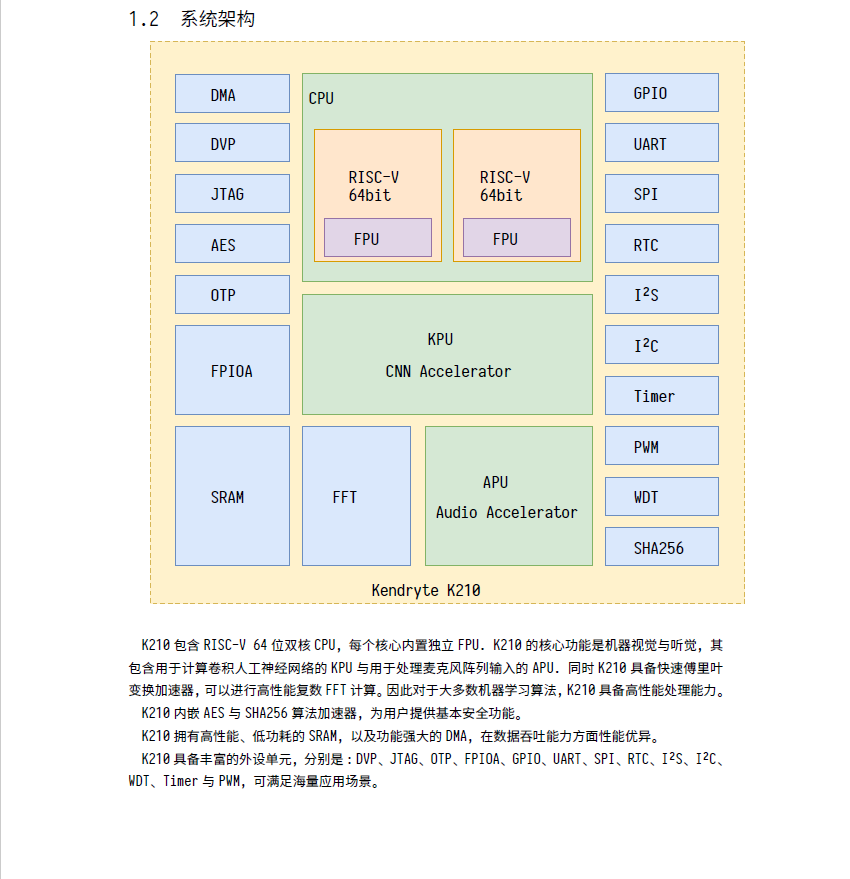
不知道大家有没有被震撼到,这玩意真能这么牛

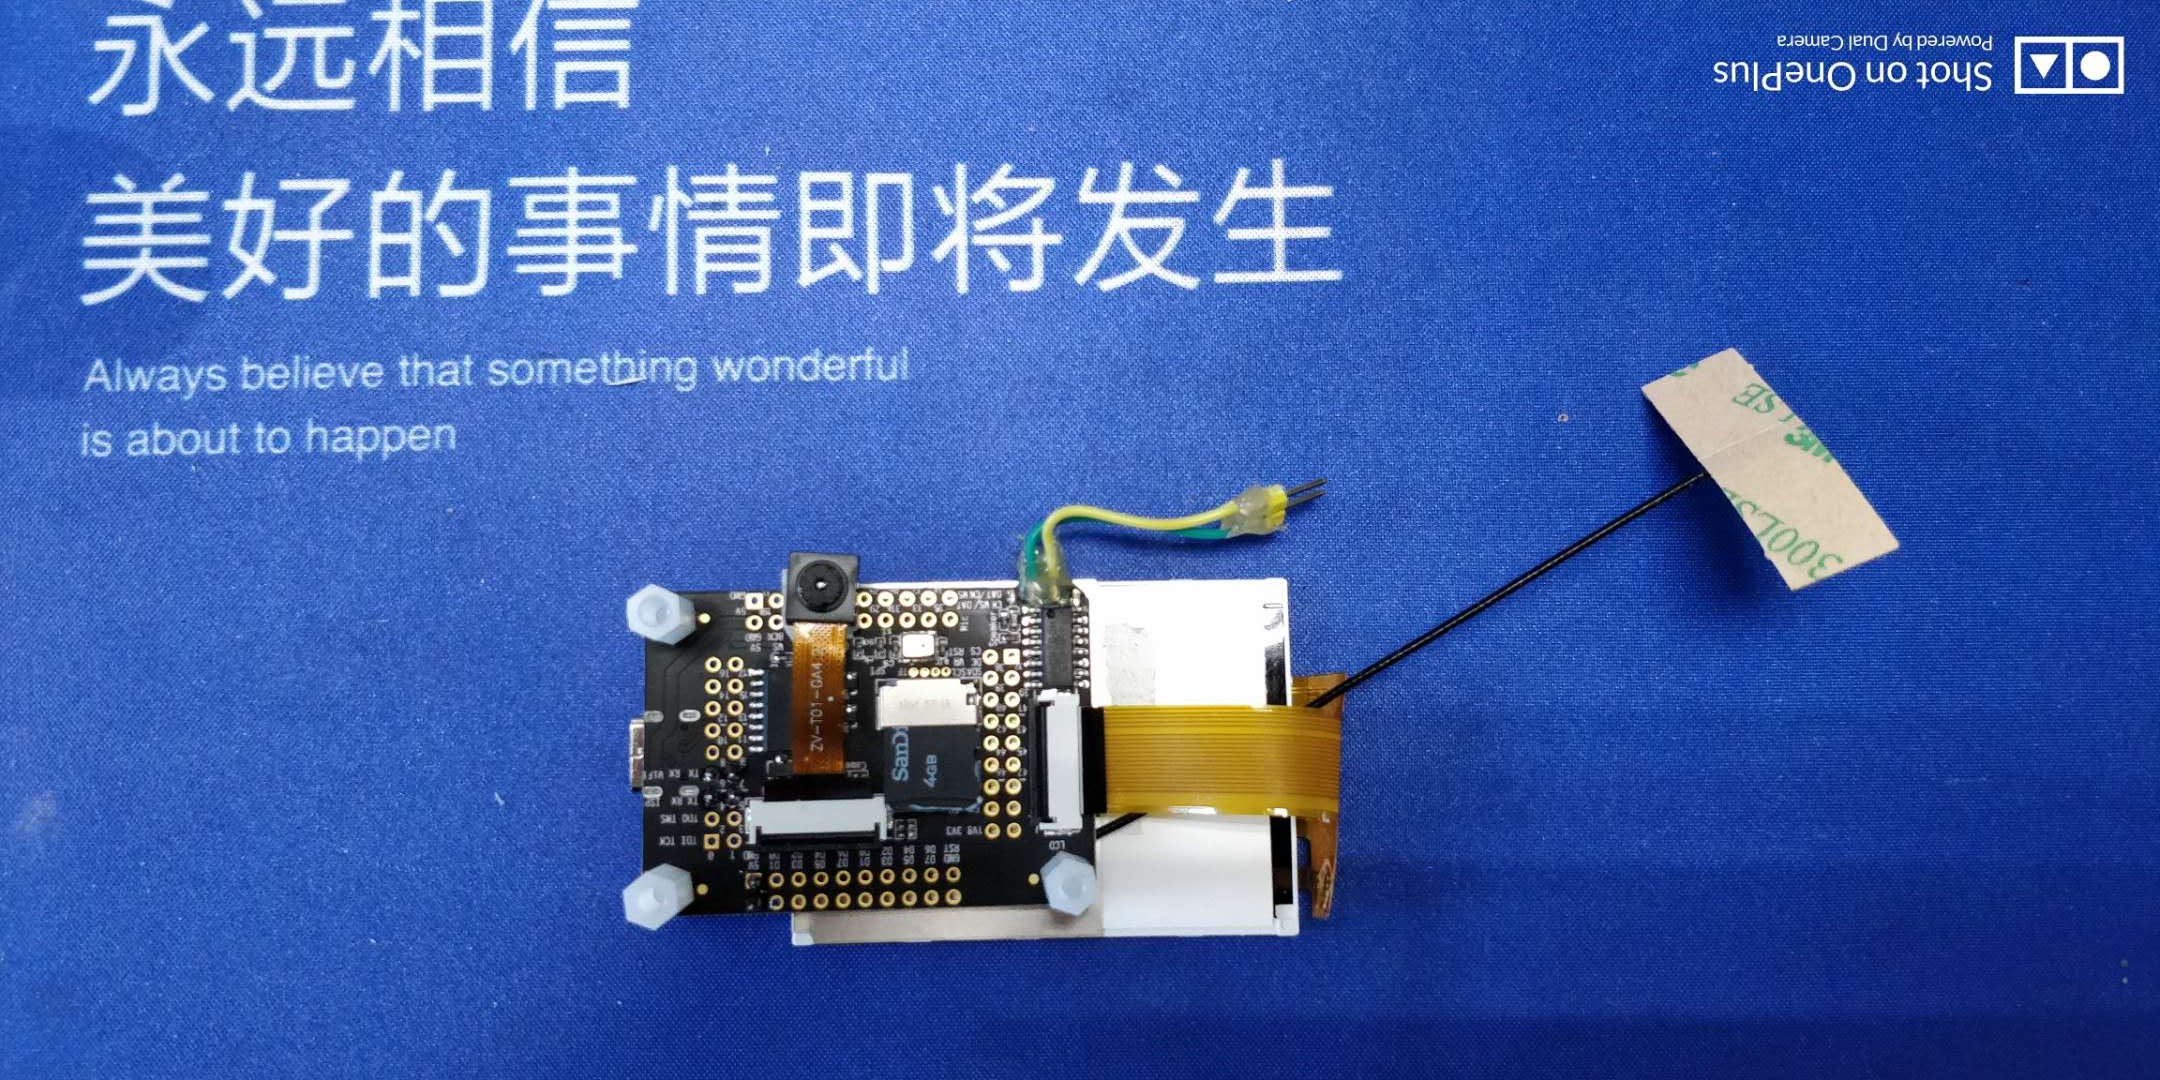
废话不多说,拍两张开发板照片给大佬们过下目
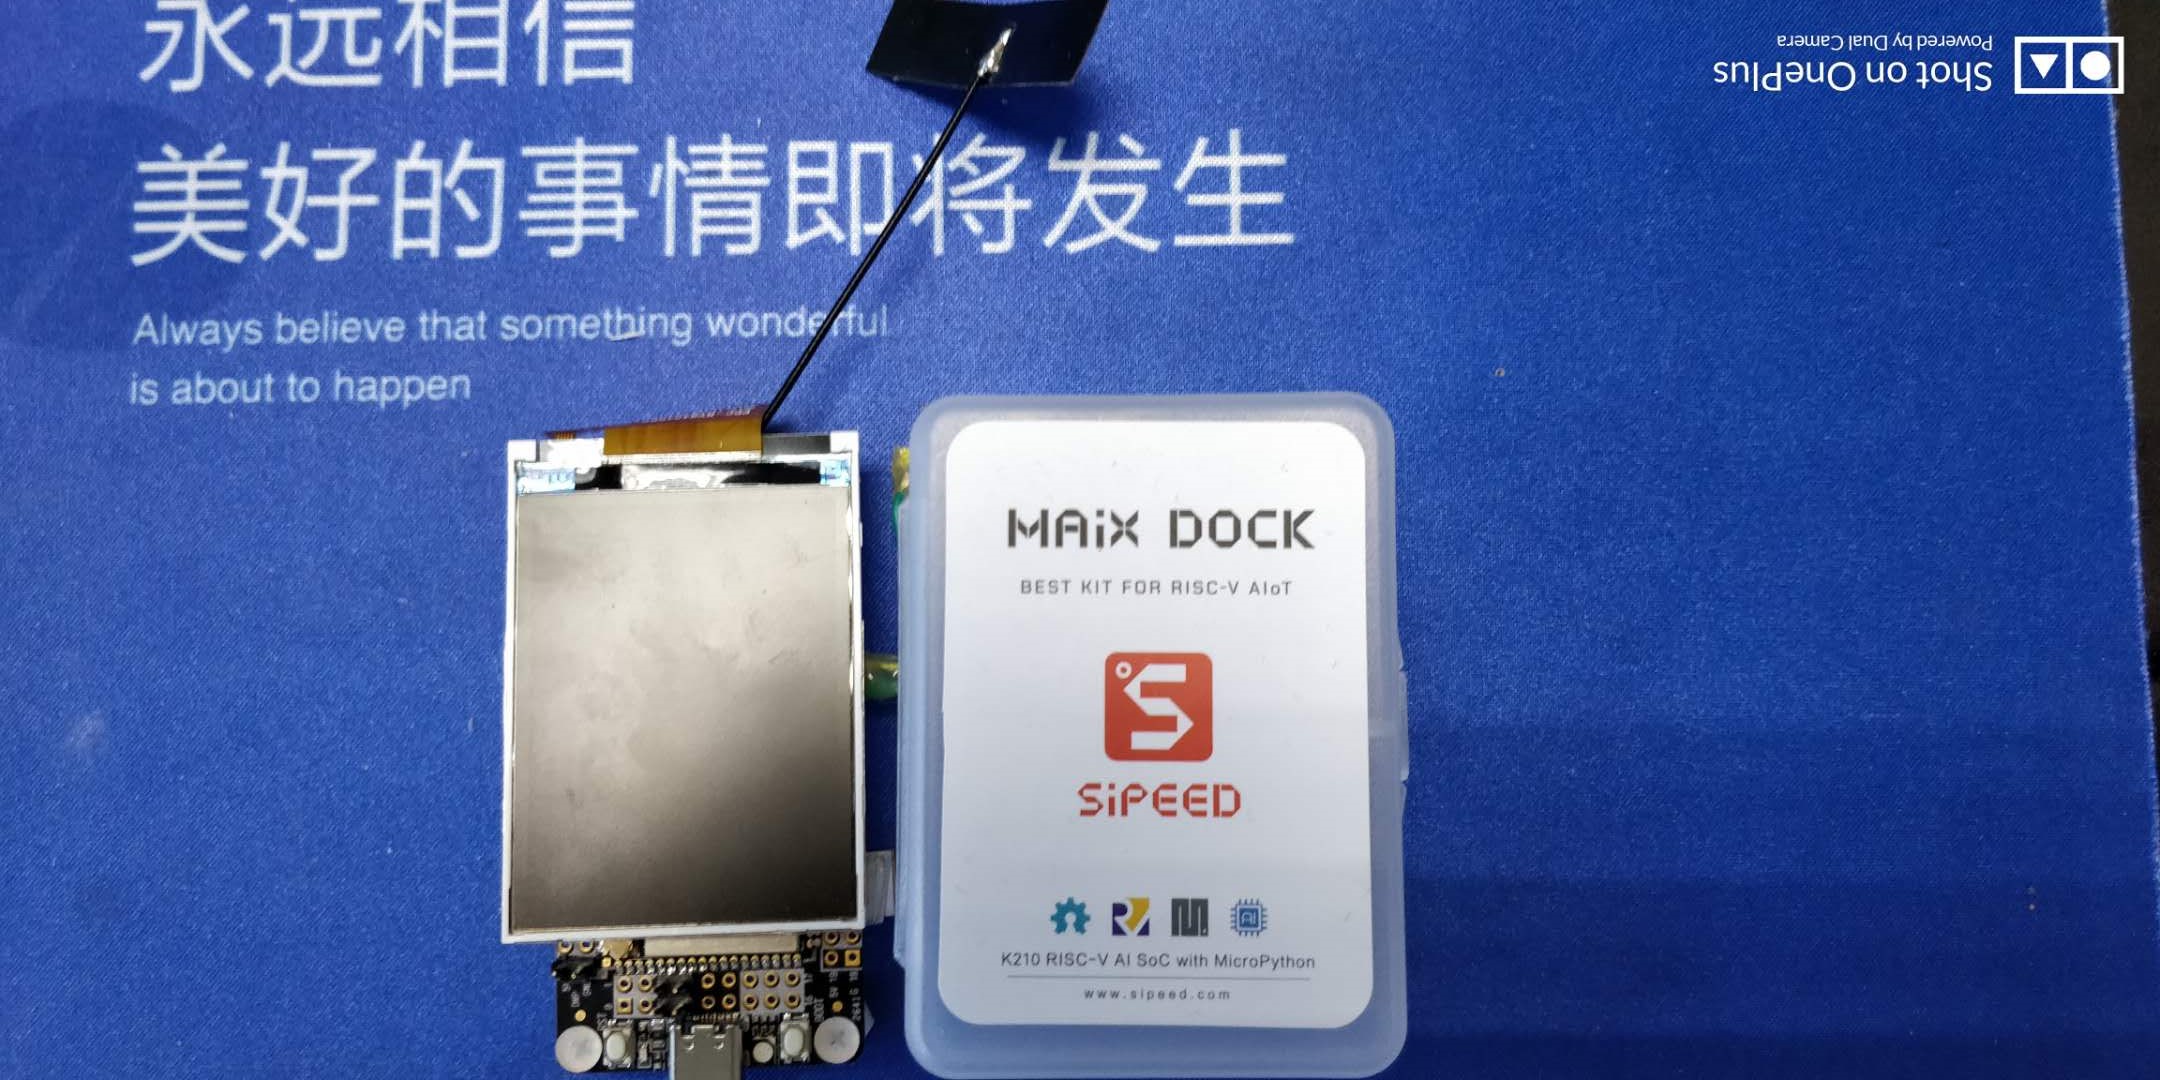
图片背景是某米的鼠标垫,这个广告打的,某总是不是要打点钱过来
这个是被我改造过的,把屏幕黏在了开发板的模块上,不得不说买开发板送的那个小盒子我还是挺喜欢的
简介也有了,照片也看过了,接下来再不来点干货怕是过不去了
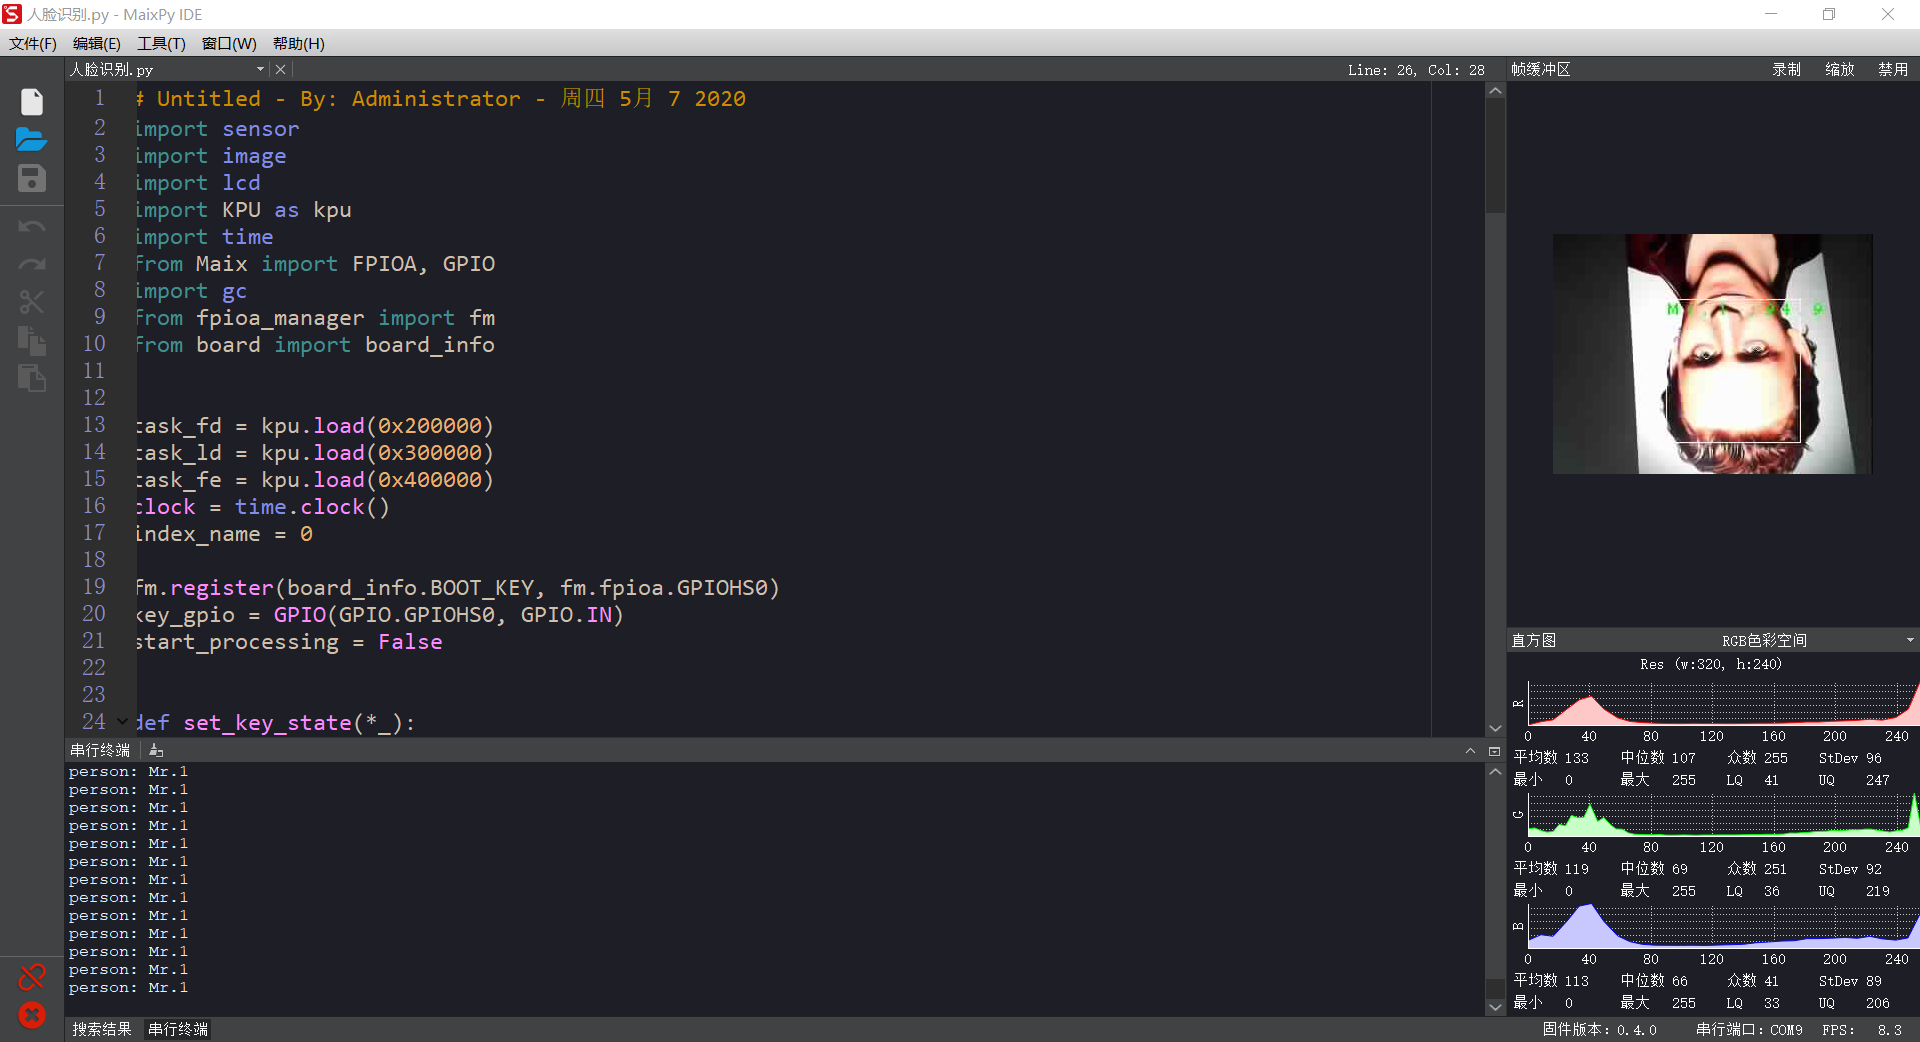
好了接下来我们按照官方的教程先跑一个人脸识别,贴下源码
关于源码和教程在官方的网站和gothub都可以找到,等会我会贴出来
# Untitled - By: Administrator - 周四 5月 7 2020
import sensor
import image
import lcd
import KPU as kpu
import time
from Maix import FPIOA, GPIO
import gc
from fpioa_manager import fm
from board import board_info


task_fd = kpu.load(0x200000)
task_ld = kpu.load(0x300000)
task_fe = kpu.load(0x400000)
clock = time.clock()
index_name = 0

fm.register(board_info.BOOT_KEY, fm.fpioa.GPIOHS0)
key_gpio = GPIO(GPIO.GPIOHS0, GPIO.IN)
start_processing = False


def set_key_state(*_):
    global start_processing
    start_processing = True


key_gpio.irq(set_key_state, GPIO.IRQ_RISING, GPIO.WAKEUP_NOT_SUPPORT)

lcd.init()
lcd.rotation(2)
sensor.reset()
sensor.set_pixformat(sensor.RGB565)
sensor.set_framesize(sensor.QVGA)
sensor.set_hmirror(1)
sensor.set_vflip(1)
sensor.run(1)
anchor = (1.889, 2.5245, 2.9465, 3.94056, 3.99987, 5.3658, 5.155437,
          6.92275, 6.718375, 9.01025)  # anchor for face detect
dst_point = [(44, 59), (84, 59), (64, 82), (47, 105),
             (81, 105)]  # standard face key point position
a = kpu.init_yolo2(task_fd, 0.5, 0.3, 5, anchor)
img_lcd = image.Image()
img_face = image.Image(size=(128, 128))
a = img_face.pix_to_ai()
record_ftr = []
record_ftrs = []
names = ['Mr.1', 'Mr.2', 'Mr.3', 'Mr.4', 'Mr.5',
         'Mr.6', 'Mr.7', 'Mr.8', 'Mr.9', 'Mr.10']

while(1):
    img = sensor.snapshot()
    clock.tick()
    code = kpu.run_yolo2(task_fd, img)
    if code:
        #print(code)
        for i in code:
            # Cut face and resize to 128x128
            a = img.draw_rectangle(i.rect())
            face_cut = img.cut(i.x(), i.y(), i.w(), i.h())
            face_cut_128 = face_cut.resize(128, 128)
            a = face_cut_128.pix_to_ai()
            #a = img.draw_image(face_cut_128, (0,0))
            # Landmark for face 5 points
            fmap = kpu.forward(task_ld, face_cut_128)
            plist = fmap[:]
            le = (i.x()+int(plist[0]*i.w() - 10), i.y()+int(plist[1]*i.h()))
            re = (i.x()+int(plist[2]*i.w()), i.y()+int(plist[3]*i.h()))
            nose = (i.x()+int(plist[4]*i.w()), i.y()+int(plist[5]*i.h()))
            lm = (i.x()+int(plist[6]*i.w()), i.y()+int(plist[7]*i.h()))
            rm = (i.x()+int(plist[8]*i.w()), i.y()+int(plist[9]*i.h()))
            a = img.draw_circle(le[0], le[1], 4)
            a = img.draw_circle(re[0], re[1], 4)
            a = img.draw_circle(nose[0], nose[1], 4)
            a = img.draw_circle(lm[0], lm[1], 4)
            a = img.draw_circle(rm[0], rm[1], 4)
            # align face to standard position
            src_point = [le, re, nose, lm, rm]
            T = image.get_affine_transform(src_point, dst_point)
            a = image.warp_affine_ai(img, img_face, T)
            a = img_face.ai_to_pix()
            #a = img.draw_image(img_face, (128,0))
            del(face_cut_128)
            # calculate face feature vector
            fmap = kpu.forward(task_fe, img_face)
            feature = kpu.face_encode(fmap[:])
            #print(feature)
            reg_flag = False
            scores = []
            for j in range(len(record_ftrs)):
                score = kpu.face_compare(record_ftrs[j], feature)
                scores.append(score)
            max_score = 0
            index = 0
            for k in range(len(scores)):
                if max_score < scores[k]:
                    max_score = scores[k]
                    index = k
            if max_score > 85:
                a = img.draw_string(i.x(), i.y(), ("%s :%2.1f" % (
                    names[index], max_score)), color=(0, 255, 0), scale=2)
                print("person: " + names[index])
            else:
                a = img.draw_string(i.x(), i.y(), ("X :%2.1f" % (
                    max_score)), color=(255, 0, 0), scale=2)
            if start_processing:
                record_ftr = feature
                record_ftrs.append(record_ftr)
                print("append person: " + names[index_name])
                index_name += 1
                start_processing = False

            break
    fps = clock.fps()
    # print("%2.1f fps" % fps)
    a = lcd.display(img)
    gc.collect()
    # kpu.memtest()

#a = kpu.deinit(task_fe)
#a = kpu.deinit(task_ld)
#a = kpu.deinit(task_fd)
用官方提供的IDE跑起来试下,下面是效果展示

官方资源地址
例程
工具
官方github
总结
K210的可玩性还是挺高的,随着AI的发展这种低功耗低成本的方案需求肯定会越来越多,美中不足的是K210这个芯片的内存有点小,刨去AI部分用掉的留给用户的并不多,希望能再不就的将来K210能够衍生出更多的系列来供大家使用
更多精彩内容欢迎关注小熊嵌入式

最后
以上就是朴素抽屉最近收集整理的关于Sipeed MAIX Dock K210开箱试用凑下字数废话不多说,拍两张开发板照片给大佬们过下目简介也有了,照片也看过了,接下来再不来点干货怕是过不去了总结的全部内容,更多相关Sipeed内容请搜索靠谱客的其他文章。
本图文内容来源于网友提供,作为学习参考使用,或来自网络收集整理,版权属于原作者所有。


发表评论 取消回复