1.关闭防火墙及selinux
[root@qht131 ~]# systemctl status firewalld.service                             â— firewalld.service - firewalld - dynamic firewall daemon
   Loaded: loaded (/usr/lib/systemd/system/firewalld.service; enabled; vendor preset: enabled)
   Active: active (running) since Wed 2018-12-19 16:15:31 CST; 16h ago
     Docs: man:firewalld(1)
 Main PID: 610 (firewalld)
   CGroup: /system.slice/firewalld.service
           └─610 /usr/bin/python -Es /usr/sbin/firewalld --nofork --nopid

Dec 19 16:15:29 localhost.localdomain systemd[1]: Starting firewalld - dynami...
Dec 19 16:15:31 localhost.localdomain systemd[1]: Started firewalld - dynamic...
Hint: Some lines were ellipsized, use -l to show in full.
[root@qht131 ~]# systemctl stop firewalld
[root@qht131 ~]# systemctl status firewalld.service
â— firewalld.service - firewalld - dynamic firewall daemon
   Loaded: loaded (/usr/lib/systemd/system/firewalld.service; enabled; vendor preset: enabled)
   Active: inactive (dead) since Thu 2018-12-20 08:33:53 CST; 2s ago
     Docs: man:firewalld(1)
  Process: 610 ExecStart=/usr/sbin/firewalld --nofork --nopid $FIREWALLD_ARGS (code=exited, status=0/SUCCESS)
 Main PID: 610 (code=exited, status=0/SUCCESS)

Dec 19 16:15:29 localhost.localdomain systemd[1]: Starting firewalld - dynami...
Dec 19 16:15:31 localhost.localdomain systemd[1]: Started firewalld - dynamic...
Dec 20 08:33:52 qht131 systemd[1]: Stopping firewalld - dynamic firewall da.....
Dec 20 08:33:53 qht131 systemd[1]: Stopped firewalld - dynamic firewall daemon.
Hint: Some lines were ellipsized, use -l to show in full.
将SELINUX=enforcing修改为disabled
[root@qht131 ~]# more /etc/selinux/config

# This file controls the state of SELinux on the system.
# SELINUX= can take one of these three values:
#     enforcing - SELinux security policy is enforced.
#     permissive - SELinux prints warnings instead of enforcing.
#     disabled - No SELinux policy is loaded.
SELINUX=enforcing
# SELINUXTYPE= can take one of three two values:
#     targeted - Targeted processes are protected,
#     minimum - Modification of targeted policy. Only selected processes are pro
tected.
#     mls - Multi Level Security protection.
SELINUXTYPE=targeted
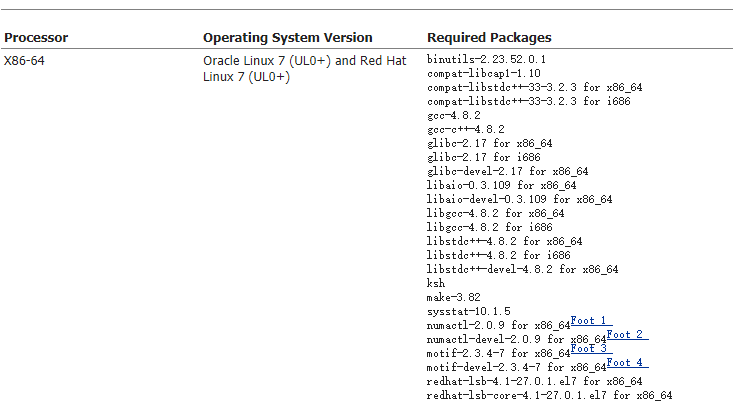
2.通过yum安装所需要的包
[root@localhost database]# yum -y install binutils libaio-devel compat-libcap1 gcc gcc-c++ glibcglibc.i686 glibc-devel glibc.i686 ksh libaio libaio.i686 libaio-devellibaio-devel.i686 libgcc libgcc.i686 libstdc++ libstdc++-devellibstdc++-devel.i686 compat-libstdc++-33 compat-libstdc++-33.i686 libXilibXi.i686 libXtst libXtst.i686 make sysstat unixODBC unixODBC-devel xterm3.创建用户及文件目录:
[root@qht131 ~]# groupadd dba
[root@qht131 ~]# groupadd oinstall
[root@qht131 ~]# useradd -g dba -G oinstall oracle
[root@qht131 ~]# mkdir -p /u01/app/oracle/product/12201
[root@qht131 ~]$ mkdir -p /u01/oradata/orcl

[root@qht131 ~]# chown -R oracle.oinstall /u01
[root@qht131 ~]# passwd oracle
Changing password for user oracle.
New password:
BAD PASSWORD: The password is shorter than 8 characters
Retype new password:
passwd: all authentication tokens updated successfully.
4.配置Oracle环境变量
[oracle@qht131 ~]$ vi .bash_profile
PATH=$PATH:$HOME/.local/bin:$HOME/bin

export PATH

ORACLE_BASE=/u01/app/oracle
ORACLE_HOME=/u01/app/oracle/product/12201
ORACLE_SID=orcl
OADMIN=$ORACLE_BASE/admin/$ORACLE_SID
ORACLE_TERM=vt100
BDUMP=$OADMIN/bdump
UDUMP=$OADMIN/udump
TERM=vt100
TNS_ADMIN=$ORACLE_HOME/network/admin
NLS_LANG=AMERICAN_AMERICA.WE8MSWIN1252

export ORACLE_BASE
export ORACLE_HOME
export ORACLE_SID
export OADMIN
export ODATA
export OARCH
export OSCRIPTS
export ORACLE_TERM
export BDUMP
export UDUMP
export TERM
export TNS_ADMIN
export NLS_LANG

# Set PATH variable with Oracle and Veritas NetBackup Parameters:
PATH=.:$HOME:$ORACLE_HOME/bin:/bin:/usr/ccs/bin:/usr/bin:/usr:/usr/local/bin:/usr/sbin:/usr/openv/netbackup/bin:$ORACLE_HOME/OPatch
export PATH

# Set LD_LIBRARY_PATH variable
LD_LIBRARY_PATH=/u01/app/oracle/product/12201/lib:/u01/app/oracle/product/12201/ctx/lib:/usr/openwin/lib:/usr/dt/lib:/usr/ccs/lib:/usr/lib:/usr/ucblib:
export LD_LIBRARY_PATH

# Set CLASSPATH variable
CLASSPATH=$ORACLE_HOME/JRE/lib:$ORACLE_HOME/jlib:$ORACLE_HOME/network/jlib:$ORACLE_HOME/rdbms/jlib:$ORACLE_HOME/assistants/jlib:$ORACLE_HOME/owm/jlib
export CLASSPATH

unset USERNAME
5.修改/etc/sysctl.conf配置文件
[root@qht131 ~]# cat /etc/sysctl.conf
# sysctl settings are defined through files in
# /usr/lib/sysctl.d/, /run/sysctl.d/, and /etc/sysctl.d/.
#
# Vendors settings live in /usr/lib/sysctl.d/.
# To override a whole file, create a new file with the same in
# /etc/sysctl.d/ and put new settings there. To override
# only specific settings, add a file with a lexically later
# name in /etc/sysctl.d/ and put new settings there.
#
# For more information, see sysctl.conf(5) and sysctl.d(5).
fs.aio-max-nr = 1048576

fs.file-max = 6815744

kernel.shmall = 2097152

kernel.shmmax = 4294967295

kernel.shmmni = 4096

kernel.sem = 250 32000 100 128

net.ipv4.ip_local_port_range = 9000 65500

net.core.rmem_default = 262144

net.core.rmem_max = 4194304

net.core.wmem_default = 262144

net.core.wmem_max = 1048576
[root@qht131 ~]# /sbin/sysctl -p
fs.aio-max-nr = 1048576
fs.file-max = 6815744
kernel.shmall = 2097152
kernel.shmmax = 4294967295
kernel.shmmni = 4096
kernel.sem = 250 32000 100 128
net.ipv4.ip_local_port_range = 9000 65500
net.core.rmem_default = 262144
net.core.rmem_max = 4194304
net.core.wmem_default = 262144
net.core.wmem_max = 1048576
6.修改/etc/security/limits.conf
[root@qht131 ~]# cat /etc/security/limits.conf

oracle soft nproc 2047
oracle hard nproc 16384
oracle soft nofile 1024
oracle hard nofile 65536
oracle soft stack 10240
oracle hard  stack   32768
open files 65536
max user processes 270336
7.修改/etc/pam.d/login ,在末尾增加session required pam_limits.so和session required /lib64/security/pam_limits.so
[root@qht131 ~]# cat /etc/pam.d/login
#%PAM-1.0
auth [user_unknown=ignore success=ok ignore=ignore default=bad] pam_securetty.so
auth       substack     system-auth
auth       include      postlogin
account    required     pam_nologin.so
account    include      system-auth
password   include      system-auth
# pam_selinux.so close should be the first session rule
session    required     pam_selinux.so close
session    required     pam_loginuid.so
session    optional     pam_console.so
# pam_selinux.so open should only be followed by sessions to be executed in the user context
session    required     pam_selinux.so open
session    required     pam_namespace.so
session    optional     pam_keyinit.so force revoke
session    include      system-auth
session    include      postlogin
-session   optional     pam_ck_connector.so

session    required     pam_limits.so
session    required     /lib64/security/pam_limits.so
/etc/security/limits.d/20-nproc.conf第一行普通用户的进程限制注释掉,添加一行
[root@qht131 ~]# cat /etc/security/limits.d/20-nproc.conf
# Default limit for number of user's processes to prevent
# accidental fork bombs.
# See rhbz #432903 for reasoning.

#*          soft    nproc     4096
*       -       nproc   16384
root       soft    nproc     unlimited
8.开始安装软件,第一次安装用图形界面的方式安装,更能了解安装的过程
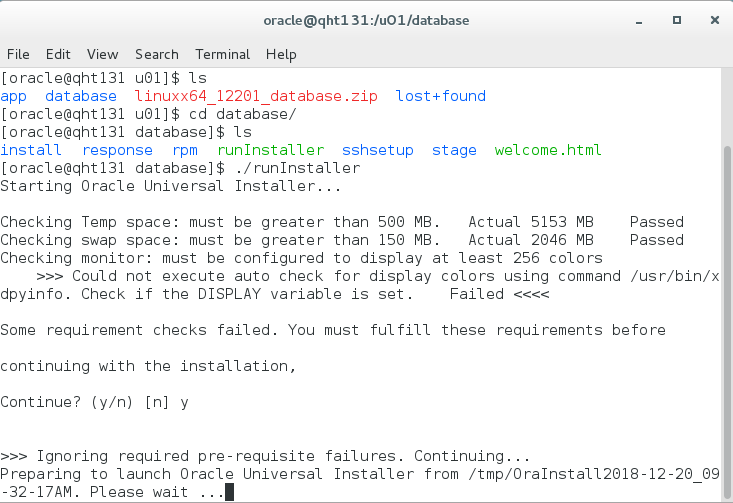
这个错误通过这样解决:
1切换到root用户
[root@localhost bin]# ./xhost +
access control disabled, clients can connect from any host
2切换到oracle用户
[oracle@localhost ~]$ DISPLAY=:0.0;export DISPLAY
[oracle@localhost ~]$ echo $DISPLAY
再次执行runInstaller就可以了!
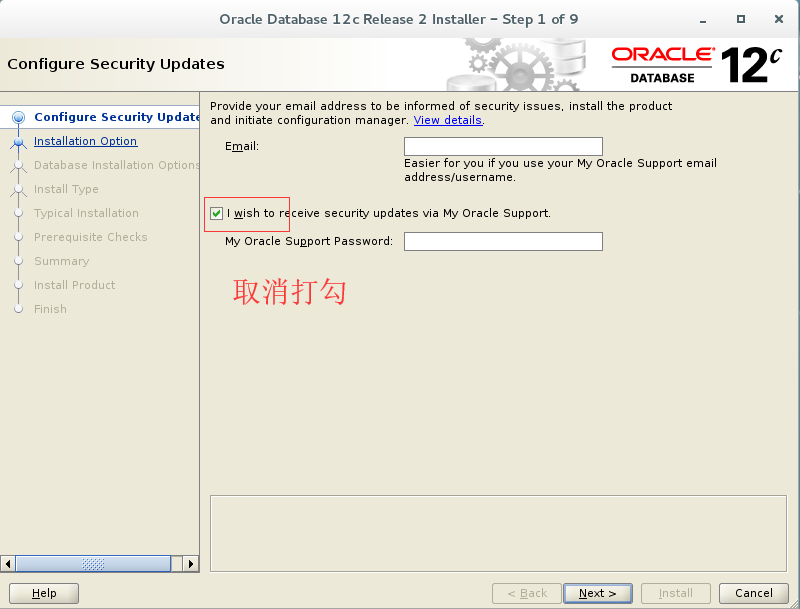
1)出现图形界面
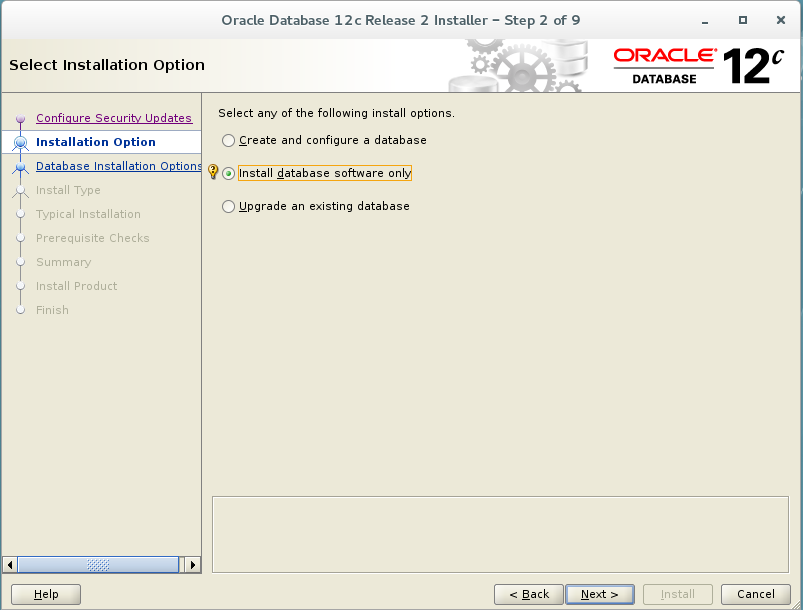
2)只安装软件,数据库稍后再安装
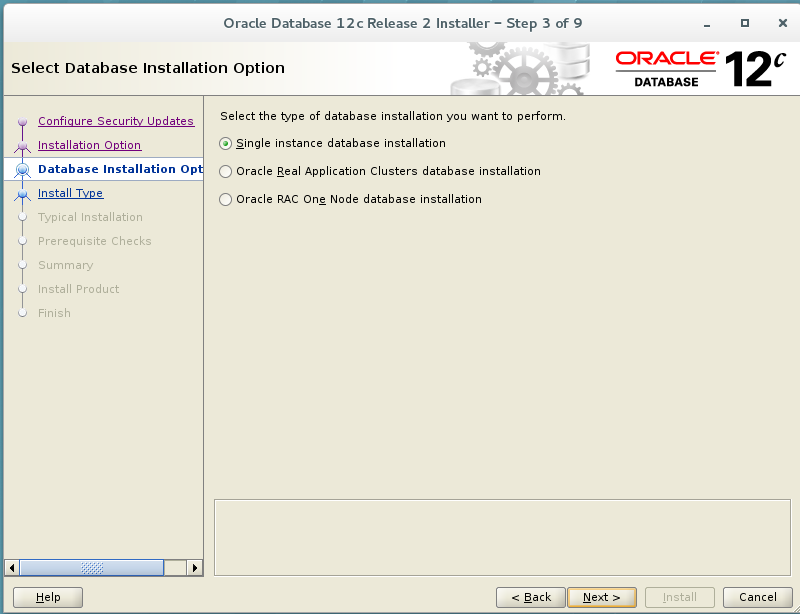
3)默认单实例数据库
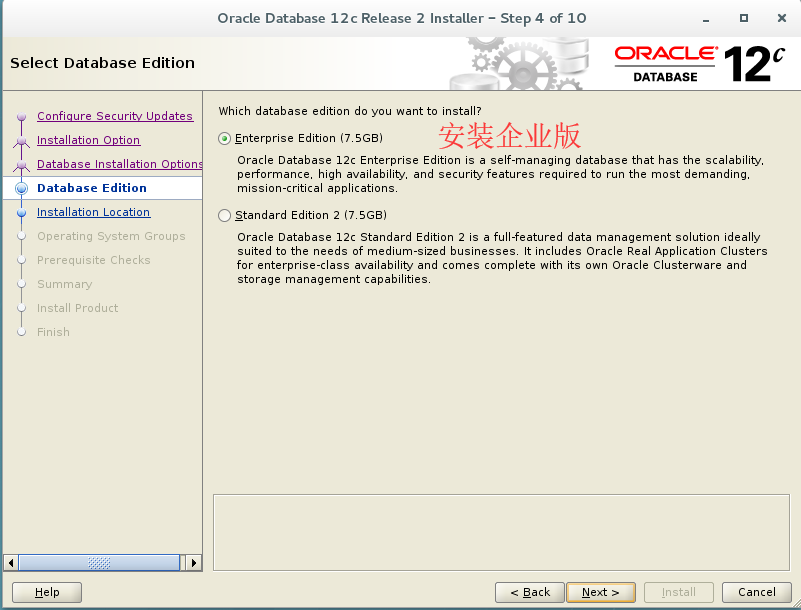
4)默认选择企业版
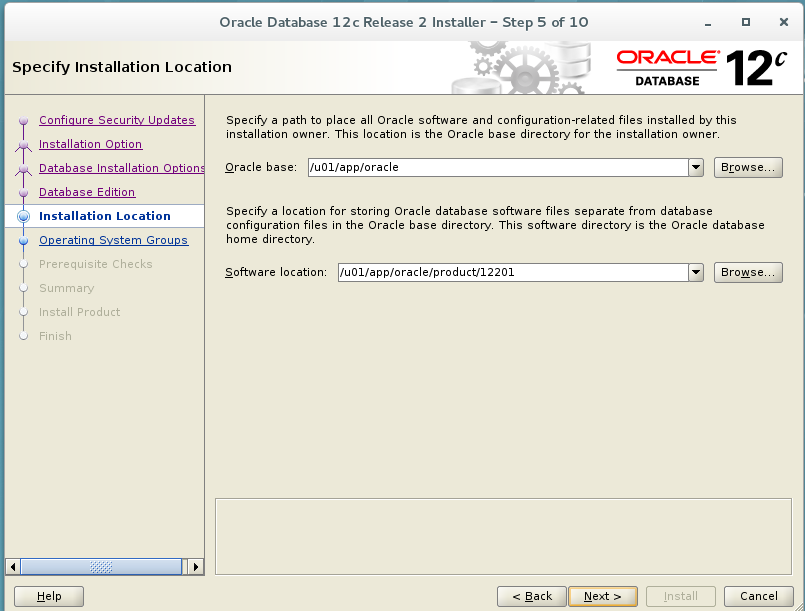
5)检查一下ORACLE_HOME和ORACLE_BASE是否正确
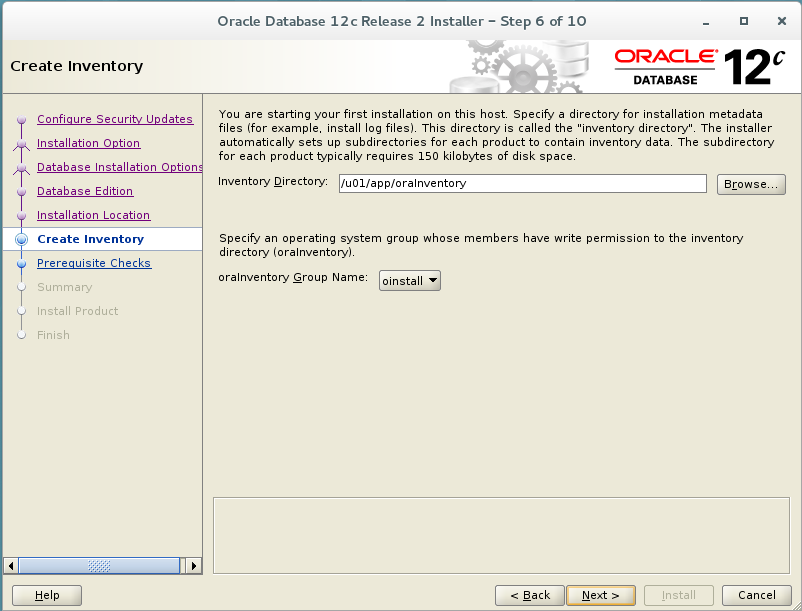
6)建立产品清单并指定对此清单有权限的用户组
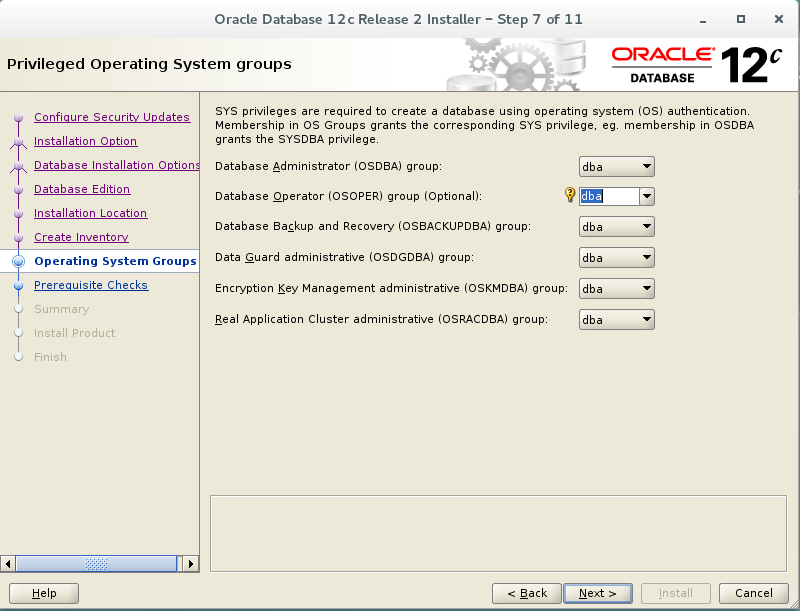
7)选择对数据库有操作权限的用户组
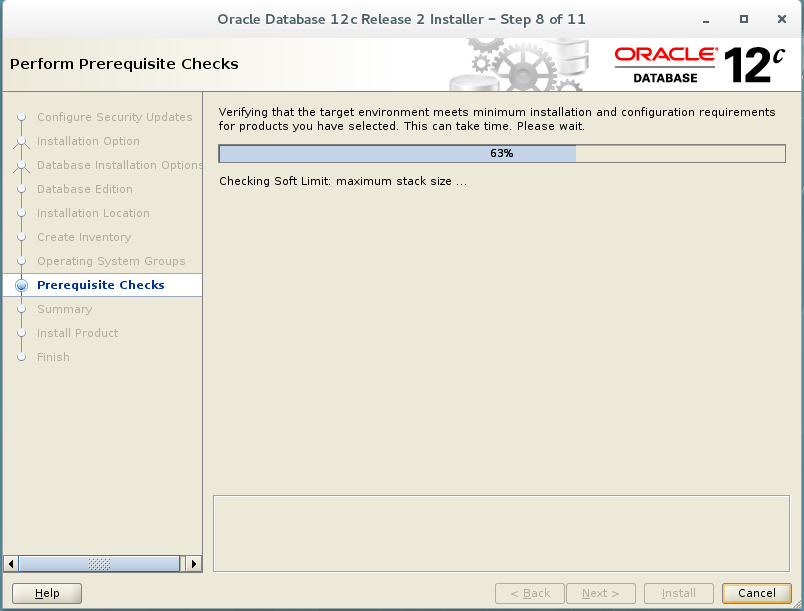
8)安装前的检查
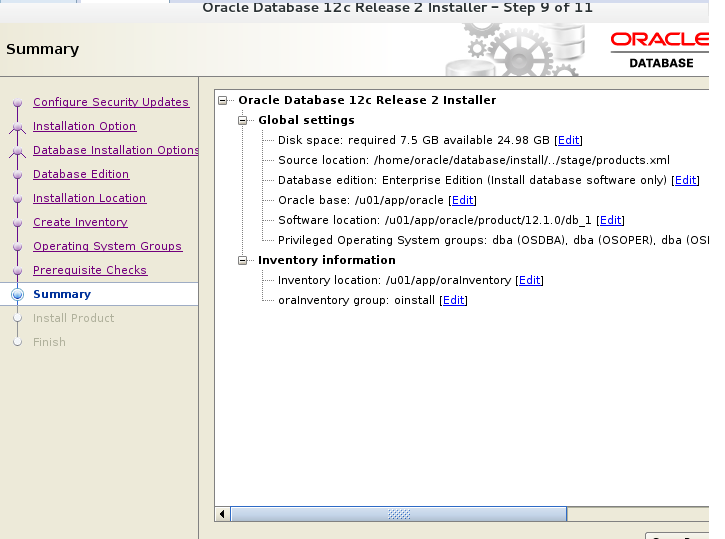
9)前置检验通过,展示概要信息,点击install
10)开始安装

11)安装到95%是提示,如下图所示,对提示中的.sh文件在root用户下执行
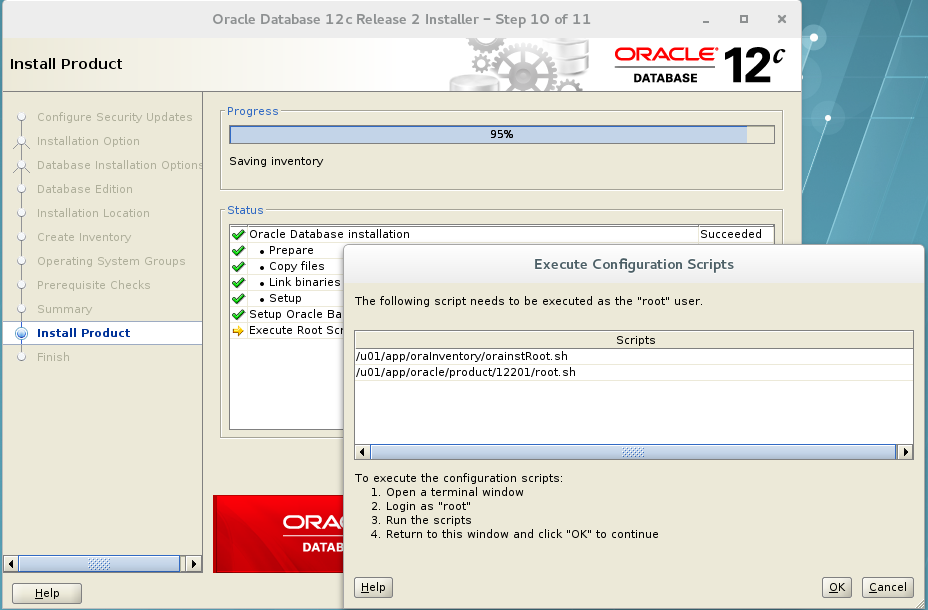
执行root.sh时比10g,11g多了一个是否安装TFA的提示,这里默认否。
[root@qht131 ~]# sh /u01/app/oraInventory/orainstRoot.sh
Changing permissions of /u01/app/oraInventory.
Adding read,write permissions for group.
Removing read,write,execute permissions for world.

Changing groupname of /u01/app/oraInventory to oinstall.
The execution of the script is complete.


[root@qht131 ~]# sh /u01/app/oracle/product/12201/root.sh
Performing root user operation.

The following environment variables are set as:
    ORACLE_OWNER= oracle
    ORACLE_HOME=  /u01/app/oracle/product/12201

Enter the full pathname of the local bin directory: [/usr/local/bin]:
   Copying dbhome to /usr/local/bin ...
   Copying oraenv to /usr/local/bin ...
   Copying coraenv to /usr/local/bin ...


Creating /etc/oratab file...
Entries will be added to the /etc/oratab file as needed by
Database Configuration Assistant when a database is created
Finished running generic part of root script.
Now product-specific root actions will be performed.
Do you want to setup Oracle Trace File Analyzer (TFA) now ? yes|[no] :

Oracle Trace File Analyzer (TFA - User Mode) is available at :
    /u01/app/oracle/product/12201/suptools/tfa/release/tfa_home/bin/tfactl

OR

Oracle Trace File Analyzer (TFA - Daemon Mode) can be installed by running this script :
    /u01/app/oracle/product/12201/suptools/tfa/release/tfa_home/install/roottfa.sh
12)点击OK,完成安装。
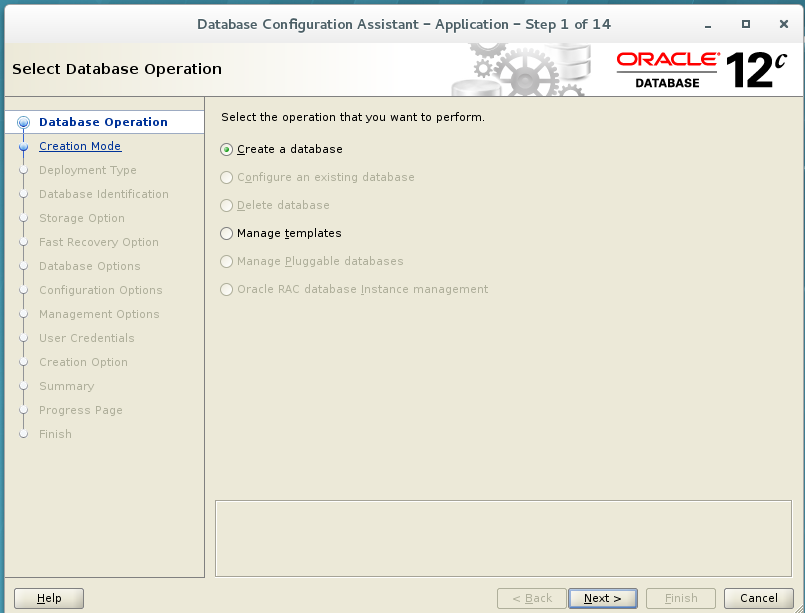
9.执行dbca安装数据库
1)出现图形界面,create a database
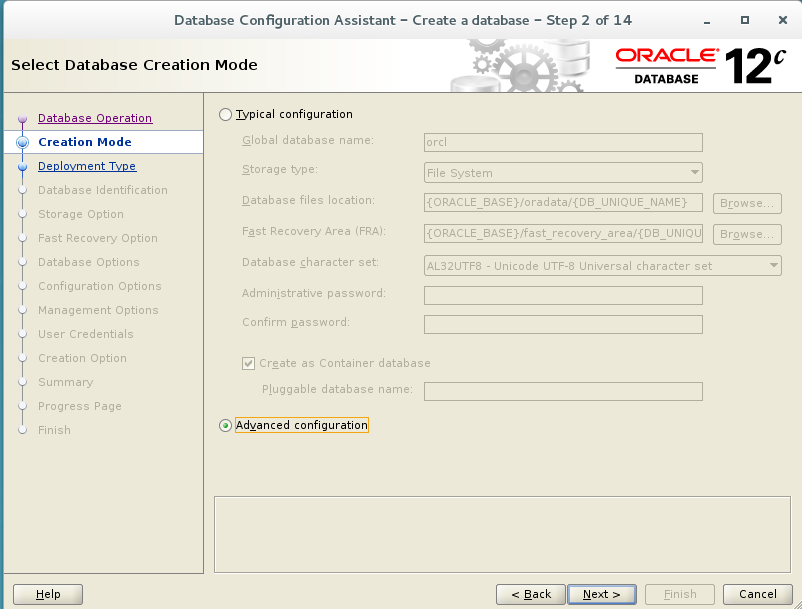
2)选择高级模式,手动建库
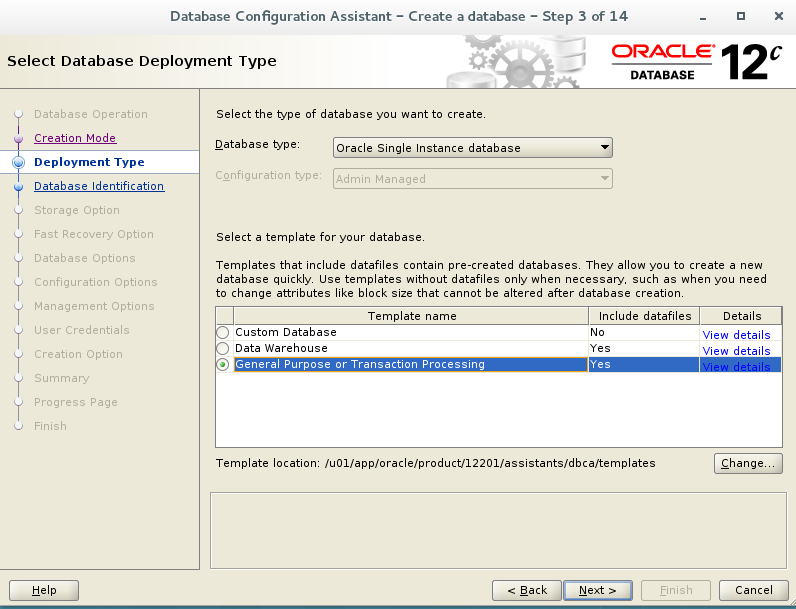
3)选择一般用途或事务处理
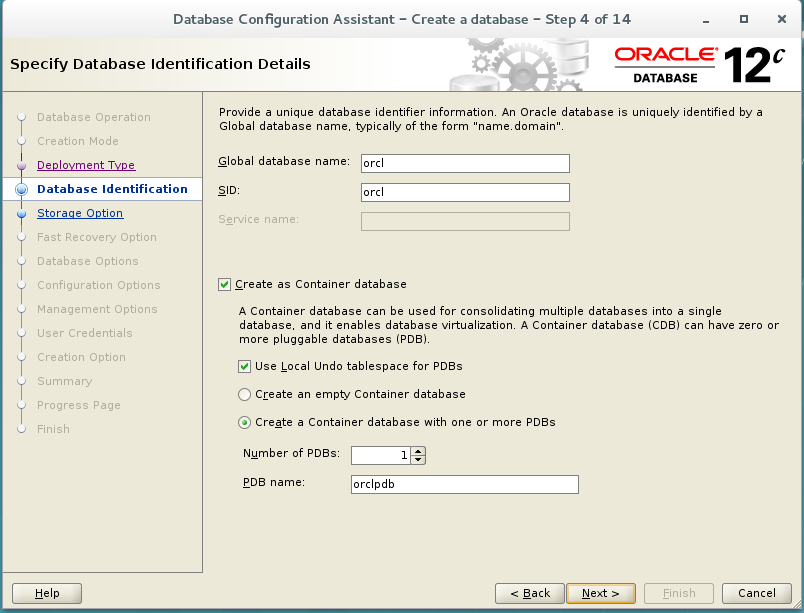
4)指定全局数据库,sid以及PBD名
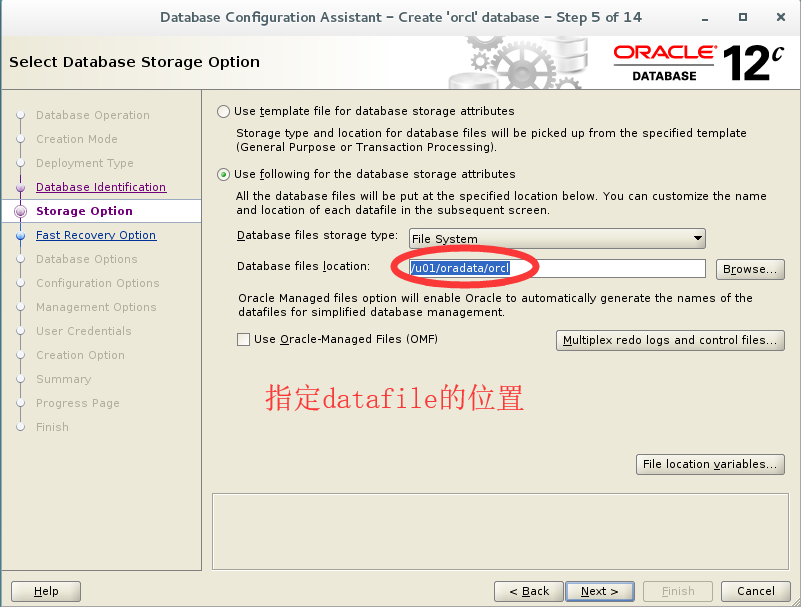
5)指定datafile的位置
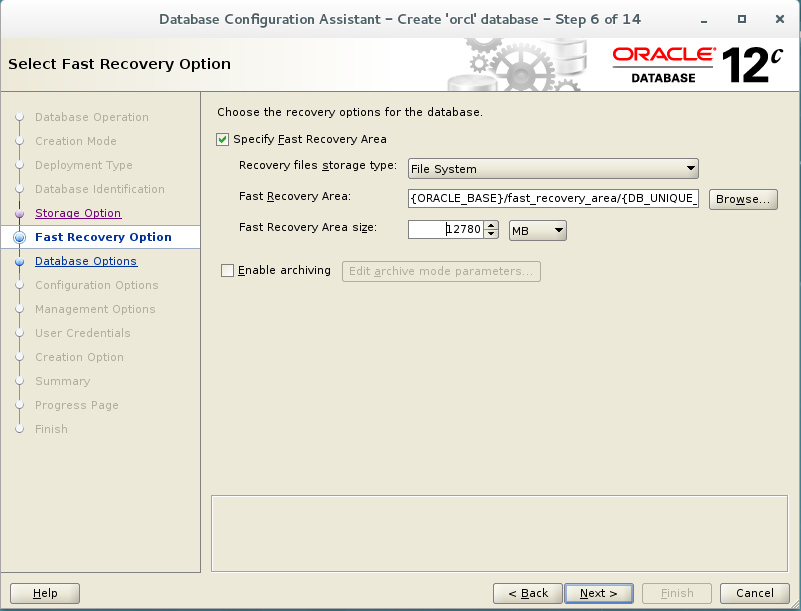
6)指定fast recovery area的位置和大小,归档暂不开启
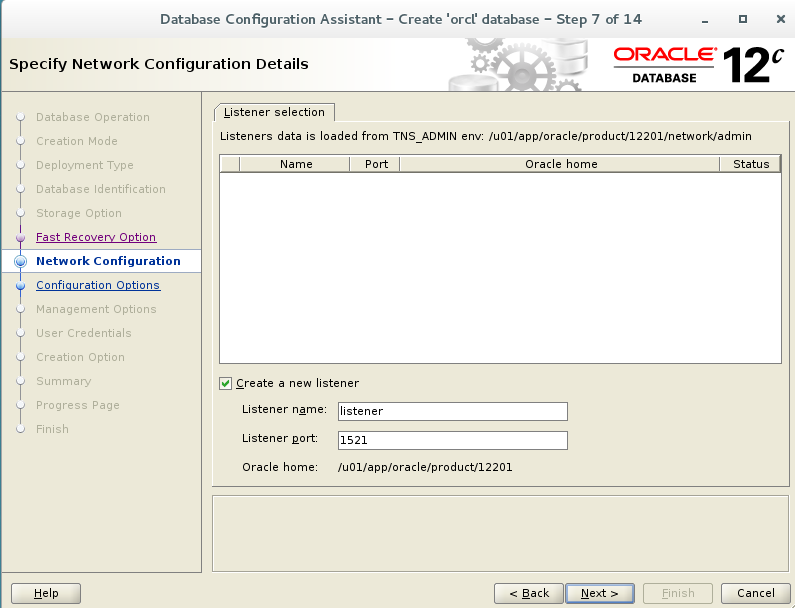
7)配置监听
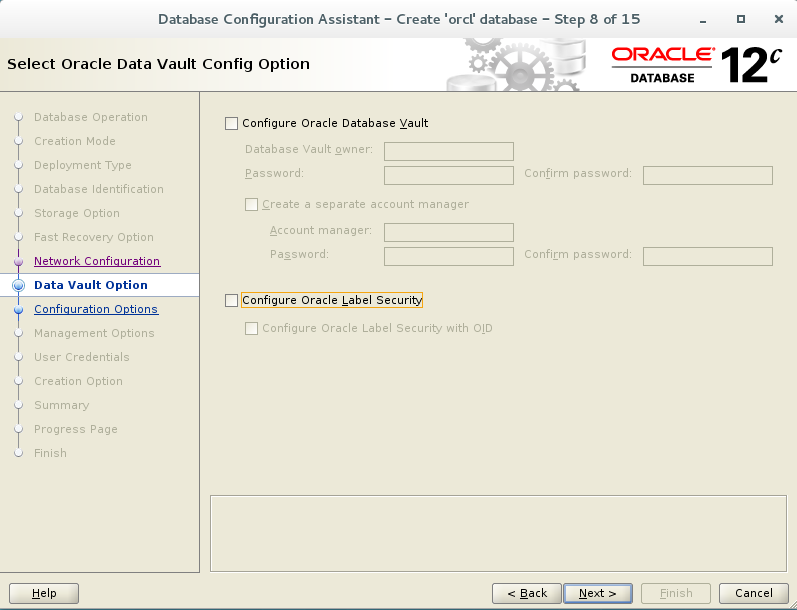
8)data vault安全控制选项,暂不开启
9)sga,pga自动管理,虚拟机的内存只有2G

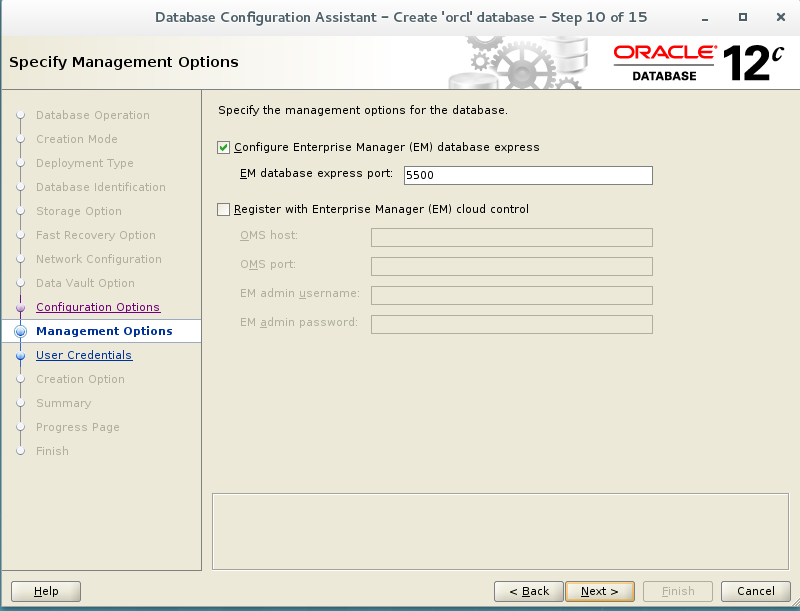
10)EM的端口默认为5500
11)指定管理员密码,由于我设的比较简单,所以出现DBT-06208的提示/
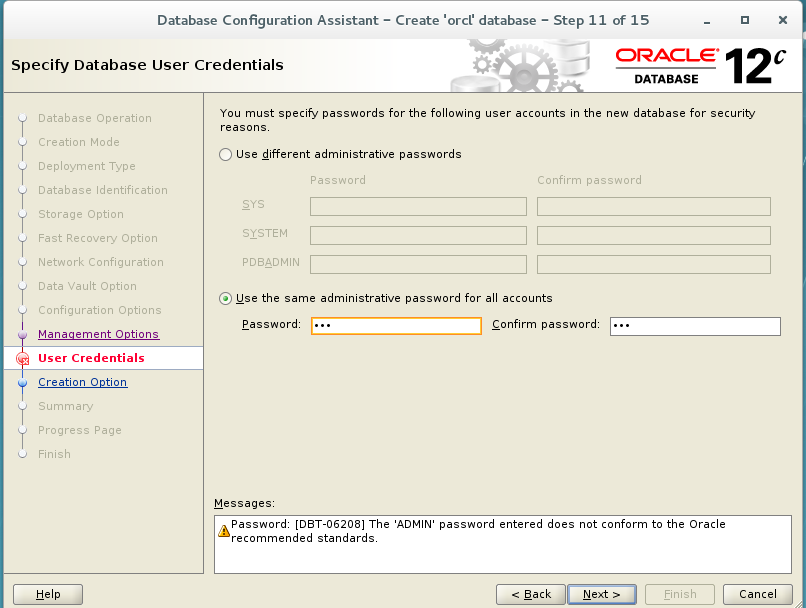
[WARNING][DBT-06208] The 'SYSTEM' password entered does not conform to the Oraclerecommended standards.
CAUSE:
a.Oracle recommends that the password entered should be at least 8 characters inlength, contain at least 1 uppercase character, 1 lower case character and 1digit [0-9].
b.Thepassword entered is a keyword that Oracle does not recommend to be used aspassword
ACTION: Specify a strong password. Ifrequired refer Oracle documentation for guidelines.

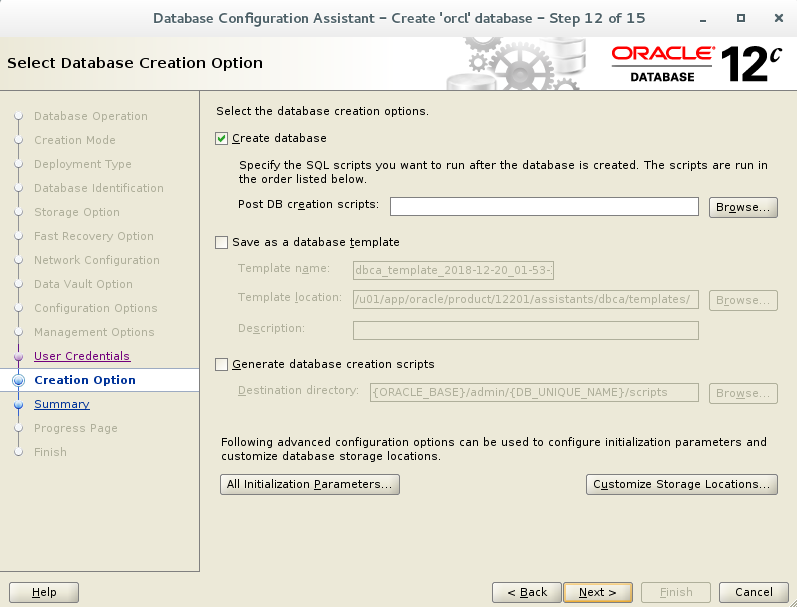
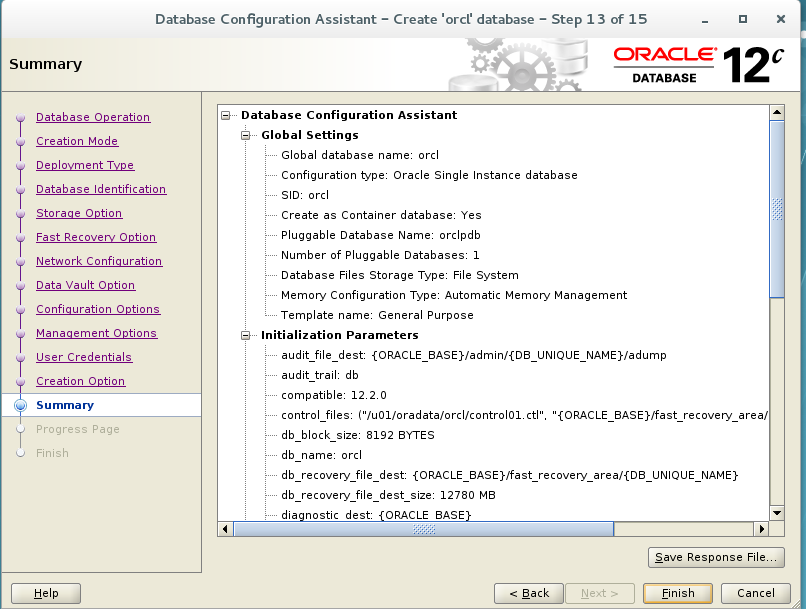
12)创建数据库,显示概要文件
13)开始安装数据库

14)安装成功
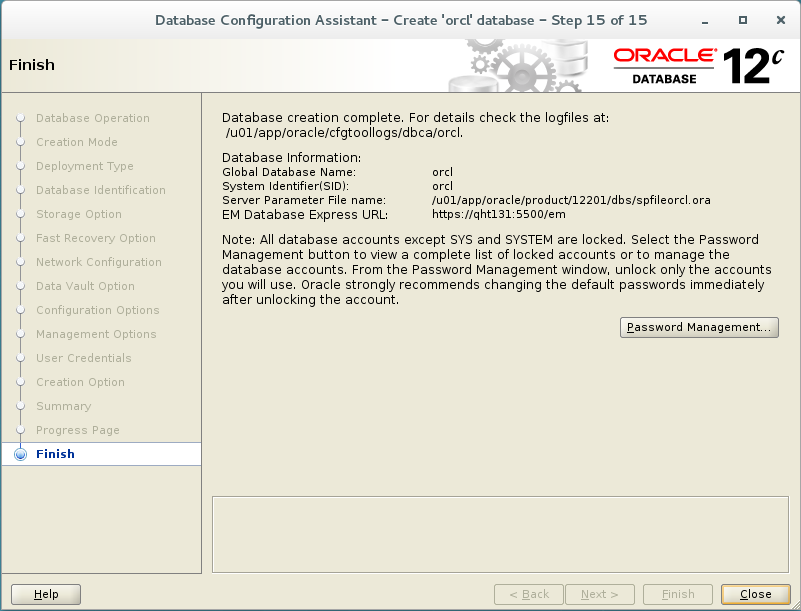
尝试连接数据库
[oracle@qht131 ~]$ sqlplus / as sysdba

SQL*Plus: Release 12.2.0.1.0 Production on Thu Dec 20 15:45:03 2018

Copyright (c) 1982, 2016, Oracle.  All rights reserved.


Connected to:
Oracle Database 12c Enterprise Edition Release 12.2.0.1.0 - 64bit Production

SQL> show sga;

Total System Global Area  838860800 bytes
Fixed Size                  8798312 bytes
Variable Size             578817944 bytes
Database Buffers          247463936 bytes
Redo Buffers                3780608 bytes
最后
以上就是小巧大门最近收集整理的关于linux redhat7.3 安装oracle12c的全部内容,更多相关linux内容请搜索靠谱客的其他文章。


发表评论 取消回复