API:
approxPolyDP( //减少多边形轮廓点数
InputArray curve //一般是由图像的轮廓点组成的点集
OutputArray approxCurve //表示输出的多边形点集
double epsilon //主要表示输出的精度,就是两个轮廓点之间最大距离数,5,6,7,,8,,,,,
bool closed) //表示输出的多边形是否封闭
轮廓周围绘制矩形-API:
cv::boundingRect(InputArray points)
得到轮廓周围最小矩形左上交点坐标和右下角点坐标,绘制一个矩形
cv::minAreaRect(InputArray points)
得到一个旋转的矩形,返回旋转矩形
轮廓周围绘制圆和椭圆-API:
cv::minEnclosingCircle(//得到最小区域圆形
InputArray points,
Point2f& center, // 圆心位置
float& radius)// 圆的半径
cv::fitEllipse(InputArray points)得到最小椭圆
Point_类不用多言,里面两个成员变量x,y。Point_<int>就是Point2i,也是Point,Point_<float>就是Point2f,Point_<double>就是Point2d。
RotatedRect该类表示平面上的旋转矩形,有三个属性:
- 矩形中心点(质心)
- 边长(长和宽)
- 旋转角度
实验步骤:

代码:
#include <opencv2/opencv.hpp>
#include <iostream>
#include <math.h>
using namespace std;
using namespace cv;
Mat src, gray_src, drawImg;
int threshold_v = 170;
int threshold_max = 255;
const char* output_win = "rectangle-demo";
RNG rng(12345);
void Contours_Callback(int, void*);
int main(int argc, char** argv) {
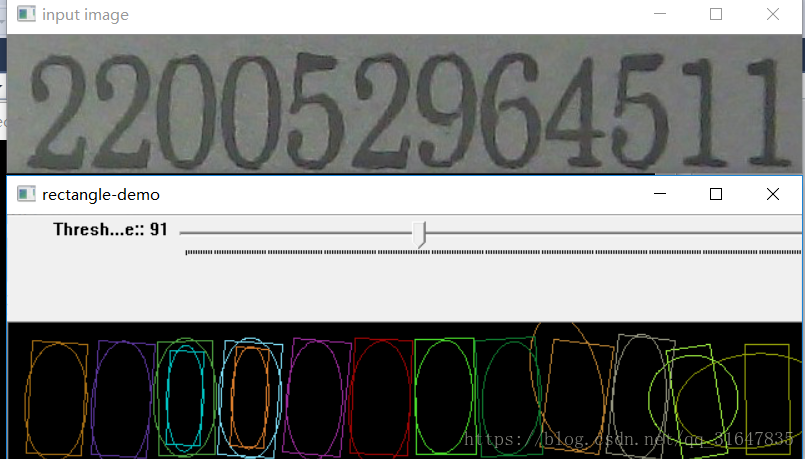
src = imread("test1.jpg");
if (!src.data) {
printf("could not load image...n");
return -1;
}
cvtColor(src, gray_src, CV_BGR2GRAY);
blur(gray_src, gray_src, Size(3, 3), Point(-1, -1));
const char* source_win = "input image";
namedWindow(source_win, CV_WINDOW_AUTOSIZE);
namedWindow(output_win, CV_WINDOW_AUTOSIZE);
imshow(source_win, src);
createTrackbar("Threshold Value:", output_win, &threshold_v, threshold_max, Contours_Callback);
Contours_Callback(0, 0);
waitKey(0);
return 0;
}
void Contours_Callback(int, void*) {
Mat binary_output;
vector<vector<Point>> contours;
vector<Vec4i> hierachy;
threshold(gray_src, binary_output, threshold_v, threshold_max, THRESH_BINARY);
//imshow("binary image", binary_output);
findContours(binary_output, contours, hierachy, RETR_TREE, CHAIN_APPROX_SIMPLE, Point(-1, -1));
vector<vector<Point>> contours_ploy(contours.size());
vector<Rect> ploy_rects(contours.size());
vector<Point2f> ccs(contours.size());
vector<float> radius(contours.size());
vector<RotatedRect> minRects(contours.size());
vector<RotatedRect> myellipse(contours.size());
for (size_t i = 0; i < contours.size(); i++) {
approxPolyDP(Mat(contours[i]), contours_ploy[i], 3, true);
ploy_rects[i] = boundingRect(contours_ploy[i]);
minEnclosingCircle(contours_ploy[i], ccs[i], radius[i]);
if (contours_ploy[i].size() > 5) {
myellipse[i] = fitEllipse(contours_ploy[i]);
minRects[i] = minAreaRect(contours_ploy[i]);
}
}
// draw it
drawImg = Mat::zeros(src.size(), src.type());
Point2f pts[4];
for (size_t t = 0; t < contours.size(); t++) {
Scalar color = Scalar(rng.uniform(0, 255), rng.uniform(0, 255), rng.uniform(0, 255));
//rectangle(drawImg, ploy_rects[t], color, 2, 8);
//circle(drawImg, ccs[t], radius[t], color, 2, 8);
if (contours_ploy[t].size() > 5) {
ellipse(drawImg, myellipse[t], color, 1, 8);
minRects[t].points(pts);
for (int r = 0; r < 4; r++) {
line(drawImg, pts[r], pts[(r + 1) % 4], color, 1, 8);
}
}
}
imshow(output_win, drawImg);
return;
}
最后
以上就是风中大山最近收集整理的关于opencv笔记三十一(轮廓周围绘制矩形框和圆形框) API: 实验步骤:的全部内容,更多相关opencv笔记三十一(轮廓周围绘制矩形框和圆形框) API内容请搜索靠谱客的其他文章。
本图文内容来源于网友提供,作为学习参考使用,或来自网络收集整理,版权属于原作者所有。


发表评论 取消回复