
ClickHouse 简介
ClickHouse 是一个面向列的数据库管理系统 (DBMS),用于查询的在线分析处理 (OLAP)。
Clickhouse 特点
真正的面向列的数据库管理系统
在真正的面向列的 DBMS 中,没有额外的数据与值一起存储。除此之外,这意味着必须支持常量长度值,以避免将它们的长度“数字”存储在值旁边。例如,十亿个 UInt8 类型的值应该消耗大约 1 GB 未压缩,否则这会严重影响 CPU 使用。即使在未压缩的情况下,也必须紧凑地存储数据(没有任何“垃圾”),因为解压缩的速度(CPU 使用率)主要取决于未压缩的数据量。
ClickHouse 是一个数据库管理系统,而不是单个数据库。ClickHouse 允许在运行时创建表和数据库、加载数据和运行查询,而无需重新配置和重新启动服务器。数据压缩
在磁盘空间和 CPU 消耗之间具有不同权衡的高效通用压缩编解码器之外,ClickHouse 还为特定类型的数据提供专门的编解码器,这使 ClickHouse 能够与更多的小众数据库竞争并胜过更多的小众数据库,如时间序列数据库。数据的磁盘存储
保持数据按主键物理排序可以以低延迟(不到几十毫秒)提取特定值或值范围的数据。一些面向列的 DBMS(例如 SAP HANA 和 Google PowerDrill)只能在 RAM 中工作。这种方法鼓励分配比实时分析所需的更大的硬件预算。
ClickHouse 设计用于普通硬盘驱动器,这意味着每 GB 数据存储的成本很低,但如果可用,也可以充分利用 SSD 和额外的 RAM。多核并行处理
大型查询自然并行化,占用当前服务器上可用的所有必要资源。多台服务器上的分布式处理
在 ClickHouse 中,数据可以驻留在不同的分片上。每个分片可以是一组用于容错的副本。所有分片都用于并行运行查询,对用户透明。SQL 支持
ClickHouse 支持基于 SQL 的声明式查询语言,该语言在许多情况下与 ANSI SQL 标准相同。
支持的查询包括 GROUP BY、ORDER BY、FROM 中的子查询、JOIN 子句、IN 运算符、窗口函数和标量子查询。矢量计算引擎
数据不仅按列存储,还通过向量(列的一部分)进行处理,从而实现高 CPU 效率。实时数据更新
ClickHouse 支持带有主键的表。为了快速对主键的范围执行查询,使用合并树对数据进行增量排序。因此,数据可以不断添加到表中。摄取新数据时不会锁定。一级索引
通过主键对数据进行物理排序可以以低延迟(不到几十毫秒)为其特定值或值范围提取数据。二级索引
与其他数据库管理系统不同,ClickHouse 中的二级索引不指向特定的行或行范围。相反,它们让数据库提前知道某些数据部分中的所有行都不会匹配查询过滤条件并且根本不读取它们,因此它们被称为数据跳过索引。适合在线查询
大多数 OLAP 数据库管理系统并不针对具有亚秒级延迟的在线查询。在替代系统中,几十秒甚至几分钟的报告构建时间通常被认为是可以接受的。有时甚至需要更多的力量来离线准备报告
在 ClickHouse 中,低延迟意味着可以在加载用户界面页面的同时毫不延迟地处理查询,而无需尝试提前准备答案。换句话说,在线。支持近似计算
ClickHouse 提供了多种方式来交换性能的准确性:
用于近似计算不同值、中位数和分位数的聚合函数。
基于部分(样本)数据运行查询并获得近似结果。在这种情况下,从磁盘中检索的数据按比例减少。
为有限数量的随机密钥而不是所有密钥运行聚合。在数据中密钥分布的特定条件下,这提供了相当准确的结果,同时使用了更少的资源。自适应连接算法
ClickHouse 自适应选择如何 JOIN 多个表,通过宁愿散列连接算法,并回落至合并连接算法,如果有一个以上的大表。数据复制和数据完整性支持
ClickHouse 使用异步多主复制。在写入任何可用的副本后,所有剩余的副本都会在后台检索它们的副本。系统在不同的副本上维护相同的数据。大多数故障后的恢复是自动执行的,或者在复杂情况下半自动执行。基于角色的访问控制
ClickHouse 使用 SQL 查询实现用户帐户管理,并允许基于角色的访问控制配置,类似于 ANSI SQL 标准和流行的关系数据库管理系统中的配置。
更多功能参考官方文档:https://clickhouse.com/docs/en/introduction/performance/#
Clickhouse 持久化配置
这里数据持久化使用 NFS 进行持久化数据
安装 NFS
#这里我使用单独服务器进行演示,实际上顺便使用一台服务器安装nfs都可以 (建议和kubernetes集群分开,找单独一台机器)
[root@nfs ~]# yum install nfs-utils -y rpcbind

#接下来设置nfs存储目录
[root@nfs ~]# mkdir /data/k8s-volume
[root@nfs ~]# chmod 755 /data/k8s-volume/

#编辑nfs配置文件
[root@nfs ~]# cat /etc/exports
/data/k8s-volume  *(rw,no_root_squash,sync)

#存储目录,*允许所有人连接,rw读写权限,sync文件同时写入硬盘及内存,no_root_squash 使用者root用户自动修改为普通用户
接下来启动rpcbind
[root@nfs ~]# systemctl start rpcbind
[root@nfs ~]# systemctl enable rpcbind
[root@nfs ~]# systemctl status rpcbind
● rpcbind.service - RPC bind service
   Loaded: loaded (/usr/lib/systemd/system/rpcbind.service; enabled; vendor preset: enabled)
   Active: active (running) since 四 2019-12-19 18:44:29 CST; 11min ago
 Main PID: 3126 (rpcbind)
   CGroup: /system.slice/rpcbind.service
           └─3126 /sbin/rpcbind -w

#由于nfs需要向rpcbind进行注册,所以我们需要优先启动rpcbind

#启动NFS
[root@nfs ~]# systemctl restart nfs
[root@nfs ~]# systemctl enable nfs
[root@nfs ~]# systemctl status nfs
● nfs-server.service - NFS server and services
   Loaded: loaded (/usr/lib/systemd/system/nfs-server.service; enabled; vendor preset: disabled)
  Drop-In: /run/systemd/generator/nfs-server.service.d
           └─order-with-mounts.conf
   Active: active (exited) since 四 2019-12-19 18:44:30 CST; 13min ago
 Main PID: 3199 (code=exited, status=0/SUCCESS)
   CGroup: /system.slice/nfs-server.service

#检查rpcbind及nfs是否正常
[root@nfs ~]# rpcinfo |grep nfs
    100003    3    tcp       0.0.0.0.8.1            nfs        superuser
    100003    4    tcp       0.0.0.0.8.1            nfs        superuser
    100227    3    tcp       0.0.0.0.8.1            nfs_acl    superuser
    100003    3    udp       0.0.0.0.8.1            nfs        superuser
    100003    4    udp       0.0.0.0.8.1            nfs        superuser
    100227    3    udp       0.0.0.0.8.1            nfs_acl    superuser
    100003    3    tcp6      ::.8.1                 nfs        superuser
    100003    4    tcp6      ::.8.1                 nfs        superuser
    100227    3    tcp6      ::.8.1                 nfs_acl    superuser
    100003    3    udp6      ::.8.1                 nfs        superuser
    100003    4    udp6      ::.8.1                 nfs        superuser
    100227    3    udp6      ::.8.1                 nfs_acl    superuser

#查看nfs目录挂载权限
[root@nfs ~]# cat /var/lib/nfs/etab
/data/k8s-volume   *(rw,sync,wdelay,hide,nocrossmnt,secure,no_root_squash,no_all_squash,no_subtree_check,secure_locks,acl,no_pnfs,anonuid=65534,anongid=65534,sec=sys,rw,secure,no_root_squash,no_all_squash)

#检查挂载是否正常
[root@nfs ~]# showmount -e 127.0.0.1
Export list for 127.0.0.1:
/data/k8s-volume *
创建 nfs client本次 nfs 服务器地址 192.168.31.101 数据存储目录 /data/k8s-volume
kind: Deployment
apiVersion: apps/v1
metadata:
  name: nfs-client-provisioner
spec:
  replicas: 1
  selector:
    matchLabels:
      app: nfs-client-provisioner
  strategy:
    type: Recreate
  template:
    metadata:
      labels:
        app: nfs-client-provisioner
    spec:
      serviceAccountName: nfs-client-provisioner
      containers:
        - name: nfs-client-provisioner
          image: quay.io/external_storage/nfs-client-provisioner:latest
          volumeMounts:
            - name: nfs-client-root
              mountPath: /persistentvolumes
          env:
            - name: PROVISIONER_NAME
              value: fuseim.pri/ifs
            - name: NFS_SERVER
              value: 192.168.31.101           #nfs server 地址
            - name: NFS_PATH
              value: /data/k8s-volume     #nfs共享目录
      volumes:
        - name: nfs-client-root
          nfs:
            server: 192.168.31.101
            path: /data/k8s-volume
接下来我们还需要创建一个 serveraccount,用于将 nfs-client-provisioner 中的 ServiceAccount 绑定到一个 nfs-client-provisioner-runner 的 ClusterRole。而该 ClusterRole 声明了一些权限,其中就包括了对 persistentvolumes 的增删改查,所以我们就可以利用 ServiceAccount 来自动创建 PV
apiVersion: v1
kind: ServiceAccount
metadata:
  name: nfs-client-provisioner
---
kind: ClusterRole
apiVersion: rbac.authorization.k8s.io/v1
metadata:
  name: nfs-client-provisioner-runner
rules:
  - apiGroups: [""]
    resources: ["persistentvolumes"]
    verbs: ["get", "list", "watch", "create", "delete"]
  - apiGroups: [""]
    resources: ["persistentvolumeclaims"]
    verbs: ["get", "list", "watch", "update"]
  - apiGroups: ["storage.k8s.io"]
    resources: ["storageclasses"]
    verbs: ["get", "list", "watch"]
  - apiGroups: [""]
    resources: ["events"]
    verbs: ["list", "watch", "create", "update", "patch"]
  - apiGroups: [""]
    resources: ["endpoints"]
    verbs: ["create", "delete", "get", "list", "watch", "patch", "update"]
---
kind: ClusterRoleBinding
apiVersion: rbac.authorization.k8s.io/v1
metadata:
  name: run-nfs-client-provisioner
subjects:
  - kind: ServiceAccount
    name: nfs-client-provisioner
    namespace: default
roleRef:
  kind: ClusterRole
  name: nfs-client-provisioner-runner
  apiGroup: rbac.authorization.k8s.io
检查 pod 是否 ok
[root@k8s-01 nfs]# kubectl  get pod
NAME                                      READY   STATUS    RESTARTS   AGE
nfs-client-provisioner-7995946c89-n7bsc   1/1     Running   0          13m
创建 storageclass这里我们声明了一个名为 managed-nfs-storage 的 Storageclass 对象
apiVersion: storage.k8s.io/v1
kind: StorageClass
metadata:
  name: managed-nfs-storage
provisioner: fuseim.pri/ifs # or choose another name, must match deployment's env PROVISIONER_NAME'
检查状态:
[root@k8s-01 nfs]# kubectl  get storageclasses.storage.k8s.io
NAME                  PROVISIONER      RECLAIMPOLICY   VOLUMEBINDINGMODE   ALLOWVOLUMEEXPANSION   AGE
managed-nfs-storage   fuseim.pri/ifs   Delete          Immediate           false                  104d
为 clickhouse 创建 pvc
首先需要创建一个 namespace,放 ck 相关
$ kubectl create ns testpvc yaml 文件如下
apiVersion: v1
kind: PersistentVolumeClaim
metadata:
  name: clickhouse-pvc
  namespace: test
spec:
  resources:
    requests:
      storage: 10Gi                         #数据大小
  accessModes:
  - ReadWriteMany                            # pvc数据访问类型
  storageClassName: "managed-nfs-storage"    #storageclass 名称
检查状态:
[root@k8s-01 clickhouse]# kubectl  get pvc -n test
NAME             STATUS   VOLUME                                     CAPACITY   ACCESS MODES   STORAGECLASS          AGE
clickhouse-pvc   Bound    pvc-ee8a47fc-a196-459f-aca4-143a8af58bf3   10Gi       RWX            managed-nfs-storage   25s
Clickhouse 安装
由于我们这里需要对users.xml配置进行修改,做一下配置参数跳转,我这里将users.xml下载下来修改后使用 configmap 进行挂载
#这里可以直接下载我的配置,或者是启动ck在复制users.xml拷贝下来修改
wget https://d.frps.cn/file/kubernetes/clickhouse/users.xml

[root@k8s-01 clickhouse]# kubectl create cm -n test clickhouse-users --from-file=users.xml   #不做配置持久化可以跳过
configmap/clickhouse-users created
[root@k8s-01 clickhouse]# kubectl get cm -n test
NAME               DATA   AGE
clickhouse-users   1      5s
clickhouse yaml 文件如下
apiVersion: apps/v1
kind: Deployment
metadata:
  labels:
    app: clickhouse
  name: clickhouse
  namespace: test
spec:
  replicas: 1
  revisionHistoryLimit: 10
  selector:
    matchLabels:
      app: clickhouse
  template:
    metadata:
      labels:
        app: clickhouse
    spec:
      containers:
      - image: clickhouse/clickhouse-server
        imagePullPolicy: IfNotPresent
        name: clickhouse
        ports:
        - containerPort: 8123
          protocol: TCP
        resources:
          limits:
            cpu: 1048m
            memory: 2Gi
          requests:
            cpu: 1048m
            memory: 2Gi
        volumeMounts:
        - mountPath: /var/lib/clickhouse
          name: clickhouse-volume
        - mountPath: /etc/clickhouse-server/users.xml
          subPath: users.xml
          name: clickhouse-users
      volumes:
      - name: clickhouse-users
        configMap:
          name: clickhouse-users
          defaultMode: 511
      - name: clickhouse-volume
        persistentVolumeClaim:
          claimName: clickhouse-pvc
      restartPolicy: Always
      terminationGracePeriodSeconds: 30
---
apiVersion: v1
kind: Service
metadata:
  name: clickhouse
  namespace: test
spec:
  ports:
  - port: 8123
    protocol: TCP
    targetPort: 8123
  selector:
    app: clickhouse
  type: ClusterIP
检查服务是否正常
Events:
  Type    Reason     Age        From               Message
  ----    ------     ----       ----               -------
  Normal  Scheduled  <unknown>  default-scheduler  Successfully assigned test/clickhouse-bd6cb4f4b-8b6lx to k8s-02
  Normal  Pulling    6m17s      kubelet, k8s-02    Pulling image "clickhouse/clickhouse-server"
  Normal  Pulled     4m25s      kubelet, k8s-02    Successfully pulled image "clickhouse/clickhouse-server"
  Normal  Created    4m20s      kubelet, k8s-02    Created container clickhouse
  Normal  Started    4m17s      kubelet, k8s-02    Started container clickhouse
检查 pod svc 状态
[root@k8s-01 clickhouse]# kubectl  get pod -n test
NAME                         READY   STATUS    RESTARTS   AGE
clickhouse-bd6cb4f4b-8b6lx   1/1     Running   0          7m4s

[root@k8s-01 clickhouse]# kubectl  get svc -n test
NAME         TYPE        CLUSTER-IP      EXTERNAL-IP   PORT(S)    AGE
clickhouse   ClusterIP   10.100.88.207   <none>        8123/TCP   7m23s
pod 内部调用测试
[root@k8s-01 clickhouse]# kubectl exec -it -n test clickhouse-bd6cb4f4b-8b6lx bash     #进入到容器
kubectl exec [POD] [COMMAND] is DEPRECATED and will be removed in a future version. Use kubectl kubectl exec [POD] -- [COMMAND] instead.
root@clickhouse-bd6cb4f4b-8b6lx:/# clickhouse-client                          #连接客户端
ClickHouse client version 21.12.3.32 (official build).
Connecting to localhost:9000 as user default.
Connected to ClickHouse server version 21.12.3 revision 54452.

clickhouse-bd6cb4f4b-8b6lx :) show databases;                     #查看数据库

SHOW DATABASES

Query id: d89a782e-2fb5-47e8-a4e0-1ab3aa038bdf

┌─name───────────────┐
│ INFORMATION_SCHEMA │
│ default            │
│ information_schema │
│ system             │
└────────────────────┘

4 rows in set. Elapsed: 0.003 sec.

clickhouse-bd6cb4f4b-8b6lx :) create database abcdocker                 #创建测试库

CREATE DATABASE abcdocker

Query id: 3a7aa992-9fe1-49fe-bc54-f537e0f4a104

Ok.

0 rows in set. Elapsed: 3.353 sec.

clickhouse-bd6cb4f4b-8b6lx :) show databases;

SHOW DATABASES

Query id: c53996ba-19de-4ffa-aa7f-2f3c305d5af5

┌─name───────────────┐
│ INFORMATION_SCHEMA │
│ abcdocker          │
│ default            │
│ information_schema │
│ system             │
└────────────────────┘

5 rows in set. Elapsed: 0.006 sec.

clickhouse-bd6cb4f4b-8b6lx :) use abcdocker;

USE abcdocker

Query id: e8302401-e922-4677-9ce3-28c263d162b1

Ok.

0 rows in set. Elapsed: 0.002 sec.

clickhouse-bd6cb4f4b-8b6lx :) show tables

SHOW TABLES

Query id: 29b3ec6d-6486-41f5-a526-28e80ea17107

Ok.

0 rows in set. Elapsed: 0.003 sec.

clickhouse-bd6cb4f4b-8b6lx :)
接下来我们创建一个 Telnet 容器,测试直接使用 svc name 访问容器是否正常
$ kubectl run -n test --generator=run-pod/v1 -i --tty busybox --image=busybox --restart=Never -- sh
/ # telnet clickhouse 8123
Connected to clickhouse

#如果不在同一个命名空间就需要使用clickhouse.test.svc.cluster.local
外部访问 Clickhouse
k8s 内部调用我们采用的是 svc name,外部可以通过 nodeport 实现
#svc 外部yaml如下
apiVersion: v1
kind: Service
metadata:
  name: clickhouse-node
  namespace: test
spec:
  ports:
  - port: 8123
    protocol: TCP
    targetPort: 8123
  selector:
    app: clickhouse
  type: NodePort

[root@k8s-01 clickhouse]# kubectl  get svc -n test
NAME              TYPE        CLUSTER-IP      EXTERNAL-IP   PORT(S)          AGE
clickhouse        ClusterIP   10.100.88.207   <none>        8123/TCP         33m
clickhouse-node   NodePort    10.99.147.187   <none>        8123:32445/TCP   8s

#如果用的阿里云托管可以直接使用阿里云LoadBalancer
apiVersion: v1
kind: Service
metadata:
  annotations:
    service.beta.kubernetes.io/alibaba-cloud-loadbalancer-id: "xxxx"
    service.beta.kubernetes.io/alibaba-cloud-loadbalancer-force-override-listeners: "true"
  name: clickhouse-ck
  namespace: test
spec:
  ports:
  - port: 8123
    protocol: TCP
    targetPort: 8123
  selector:
    app: clickhouse
  type: LoadBalancer
首先需要下载 Windows 工具
https://d.frps.cn/file/kubernetes/clickhouse/dbeaver-ce-7.1.4-x86_64-setup.exe
接下来连接 ck,查看我们创建的库是否存在 (安装下载的软件包)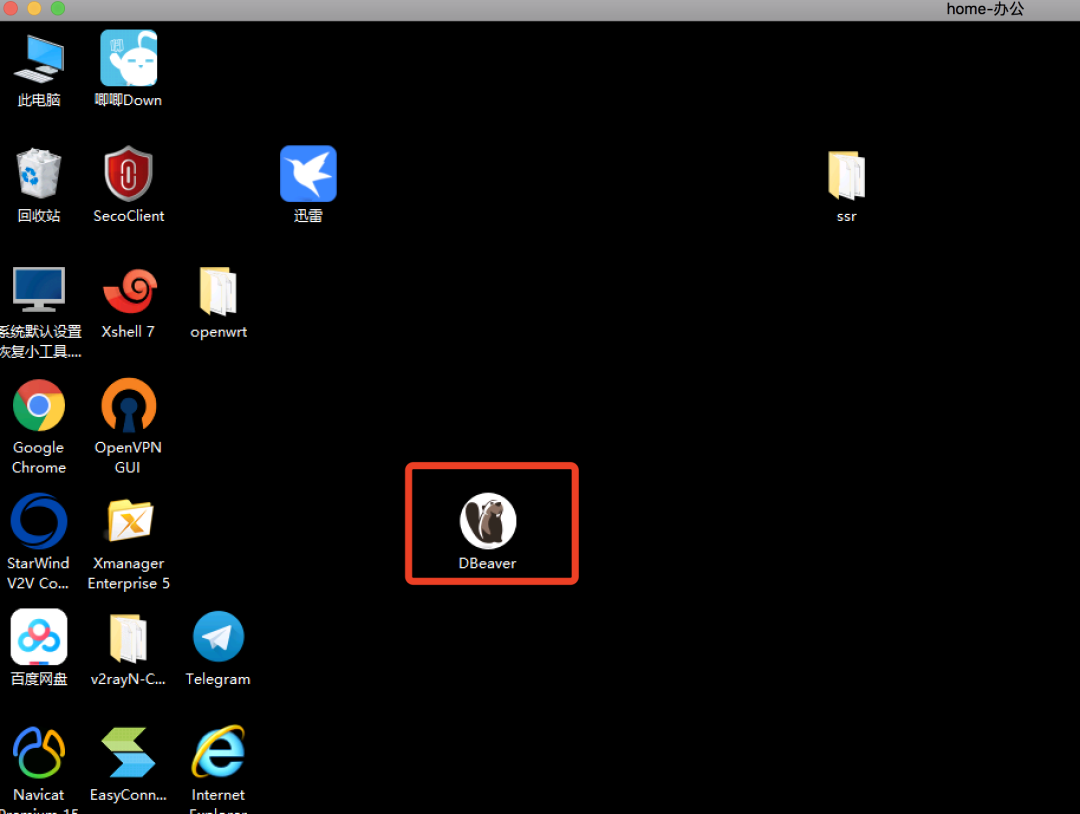
添加 clickhouse 连接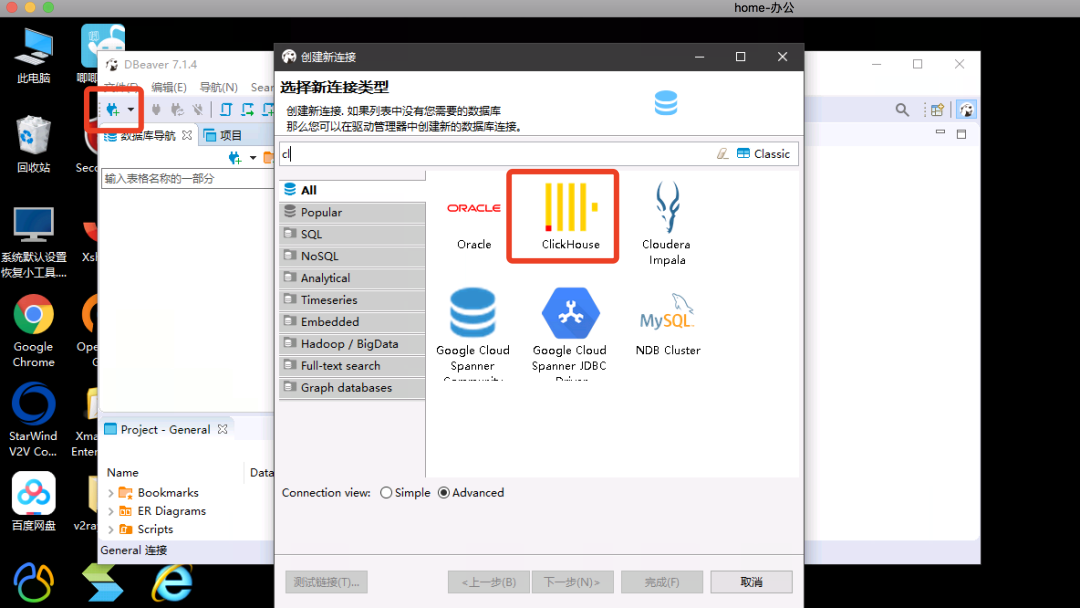
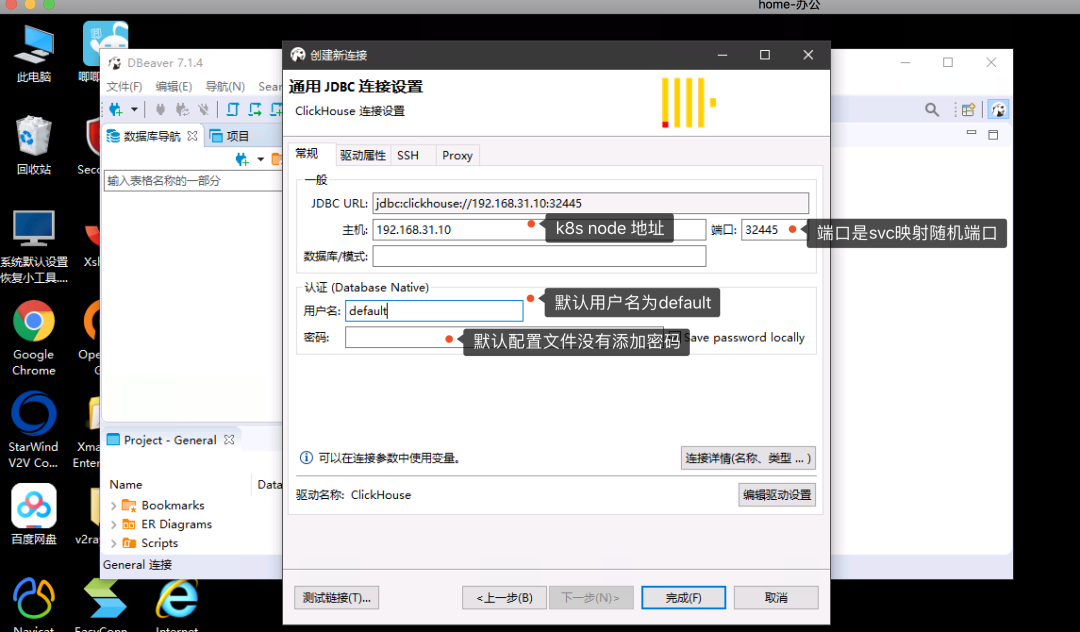
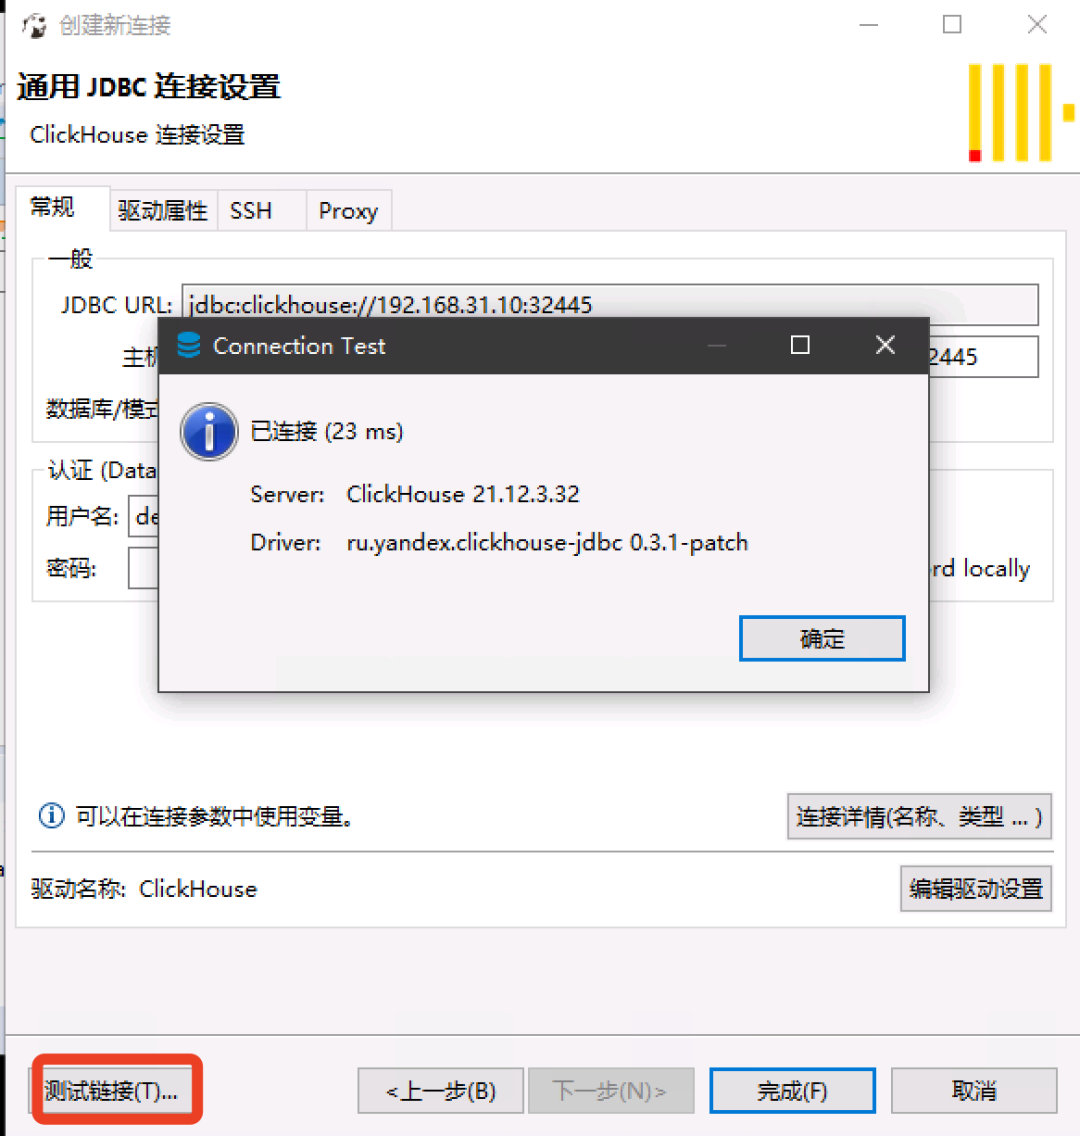
这里已经可以看到我们创建的库,里面只是一个空库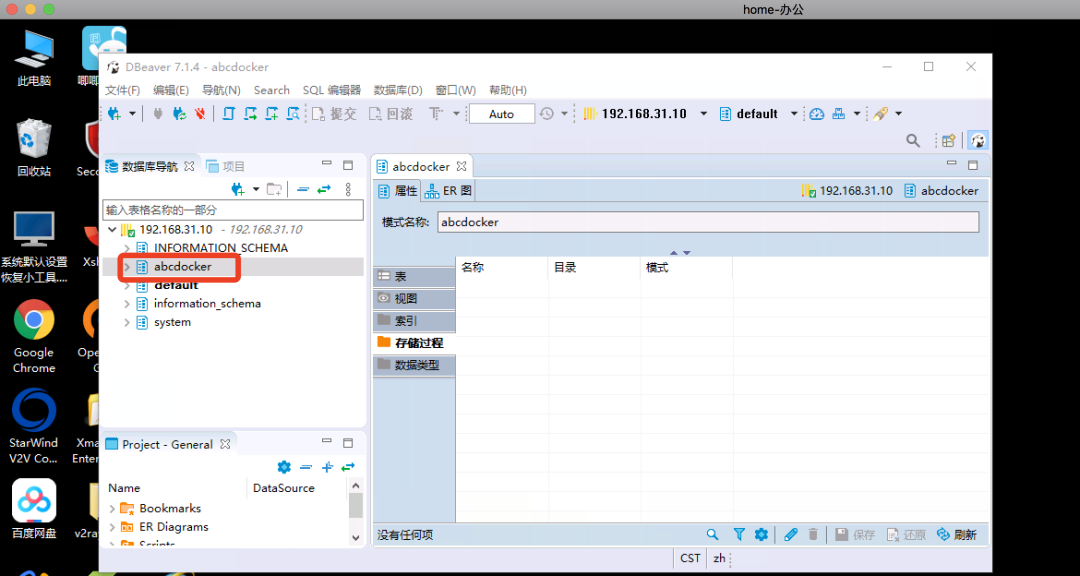
如果我们需要给 ck 设置密码,需要修改我们挂载的 configmap 即可
root@clickhouse-bd6cb4f4b-8b6lx:/etc/clickhouse-server# cat users.xml |grep pass
            <!-- See also the files in users.d directory where the password can be overridden.
                 If you want to specify password in plaintext (not recommended), place it in 'password' element.
                 Example: <password>qwerty</password>.
                 If you want to specify SHA256, place it in 'password_sha256_hex' element.
                 Example: <password_sha256_hex>65e84be33532fb784c48129675f9eff3a682b27168c0ea744b2cf58ee02337c5</password_sha256_hex>
                 If you want to specify double SHA1, place it in 'password_double_sha1_hex' element.
                 Example: <password_double_sha1_hex>e395796d6546b1b65db9d665cd43f0e858dd4303</password_double_sha1_hex>
                  place 'kerberos' element instead of 'password' (and similar) elements.
                 How to generate decent password:
                 In first line will be password and in second - corresponding SHA256.
                 In first line will be password and in second - corresponding double SHA1.
            <password></password>     #设置免密参数
Related posts:
Kubernetes 1.14 二进制集群安装 [1]
Prometheus Operator 持久化存储 [2]
持久化存储 StorageClass [3]
CentOS 7 ETCD 集群配置大全 [4]
引用链接
[1]
Kubernetes 1.14 二进制集群安装 : https://i4t.com/4253.html
[2]Prometheus Operator 持久化存储 : https://i4t.com/4586.html
[3]持久化存储 StorageClass : https://i4t.com/4475.html
[4]CentOS 7 ETCD 集群配置大全 : https://i4t.com/4403.html
原文链接:https://i4t.com/5245.html


你可能还喜欢
点击下方图片即可阅读


云原生是一种信仰 ????
关注公众号
后台回复◉k8s◉获取史上最方便快捷的 Kubernetes 高可用部署工具,只需一条命令,连 ssh 都不需要!


点击 "阅读原文" 获取更好的阅读体验!
发现朋友圈变“安静”了吗?

最后
以上就是小巧豌豆最近收集整理的关于Clickhouse 在云原生场景下的部署和使用的全部内容,更多相关Clickhouse内容请搜索靠谱客的其他文章。


发表评论 取消回复