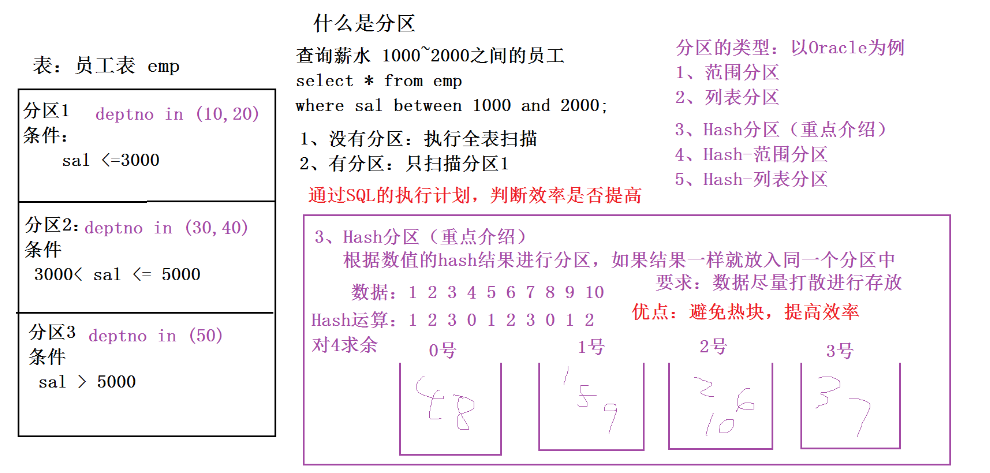
MR的分区:根据Map的输出<key2 value2>进行分区
(*)默认情况下,MR的输出只有一个分区(一个分区就是一个文件)
(*)自定义分区:按照员工的部门号进行分区
MyPartitionMapper.java
package com.partition;

import org.apache.hadoop.io.IntWritable;
import org.apache.hadoop.io.LongWritable;
import org.apache.hadoop.io.Text;
import org.apache.hadoop.mapreduce.Mapper;

import java.io.IOException;
//                                                                 k2 部门号  v2 员工
public class MyPartitionMapper extends Mapper<LongWritable, Text, IntWritable,Emp> {
    @Override
    protected void map(LongWritable key1, Text value1, Context context) throws IOException, InterruptedException {
        // 数据:7654,MARTIN,SALESMAN,7698,1981/9/28,1250,1400,30
        String data = value1.toString();

        //分词
        String[] words = data.split(",");

        //生成员工对象
        Emp emp = new Emp();
        emp.setEmpno(Integer.parseInt(words[0]));
        emp.setEname(words[1]);
        emp.setJob(words[2]);
        emp.setMgr(Integer.parseInt(words[3]));
        emp.setHiredate(words[4]);
        emp.setSal(Integer.parseInt(words[5]));
        emp.setComm(Integer.parseInt(words[6]));
        emp.setDeptno(Integer.parseInt(words[7]));

        //输出员工对象  k2:部门号  v2:员工对象
        context.write(new IntWritable(emp.getDeptno()), emp);
    }
}
MyPartitionReducer.java
package com.partition;

import org.apache.hadoop.io.IntWritable;
import org.apache.hadoop.mapreduce.Reducer;

import java.io.IOException;

//就是同一个部门的员工
public class MyPartitionReducer extends Reducer<IntWritable, Emp, IntWritable, Emp> {
    @Override
    protected void reduce(IntWritable k3, Iterable<Emp> v3,Context context) throws IOException, InterruptedException {
        // 直接输出
        for(Emp e:v3){
            context.write(k3, e);
        }
    }
}
MyPartitioner.java
package com.partition;

import org.apache.hadoop.io.IntWritable;
import org.apache.hadoop.mapreduce.Partitioner;
//自定义的分区规则:按照部门号进行分区            k2 部门号  v2  员工对象
public class MyPartitioner extends Partitioner<IntWritable,Emp> {
    /**
     *
     * @param intWritable k2
     * @param emp v2
     * @param numTask  分区的个数
     * @return
     */
    @Override
    public int getPartition(IntWritable intWritable, Emp emp, int numTask) {
        // 建立我们的分区规则
        // 得到该员工的部门号
        int deptNo = emp.getDeptno();
        if(deptNo == 10){
            // 放入一号分区
            return 1 % numTask;
        }else if(deptNo == 20){
            // 放入二号分区
            return 2 % numTask;
        }else {
            // 30号部门,放入零号分区
            return 3 % numTask;
        }
    }
}
MyPartitionerMain.java
package com.partition;

import org.apache.hadoop.fs.Path;
import org.apache.hadoop.io.IntWritable;
import org.apache.hadoop.mapreduce.Job;
import org.apache.hadoop.mapreduce.lib.input.FileInputFormat;
import org.apache.hadoop.mapreduce.lib.output.FileOutputFormat;

public class MyPartitionerMain {
    public static void main(String[] args) throws Exception {
        Job job = Job.getInstance();
        job.setJarByClass(MyPartitionerMain.class);

        job.setMapperClass(MyPartitionMapper.class);
        job.setMapOutputKeyClass(IntWritable.class); //k2 是部门号
        job.setMapOutputValueClass(Emp.class);  // v2输出就是员工对象

        //加入分区规则
        job.setPartitionerClass(MyPartitioner.class);
        //指定分区的个数
        job.setNumReduceTasks(3);

        job.setReducerClass(MyPartitionReducer.class);
        job.setOutputKeyClass(IntWritable.class);
        job.setOutputValueClass(Emp.class);

        FileInputFormat.setInputPaths(job, new Path(args[0]));
        FileOutputFormat.setOutputPath(job, new Path(args[1]));

        job.waitForCompletion(true);
    }
}
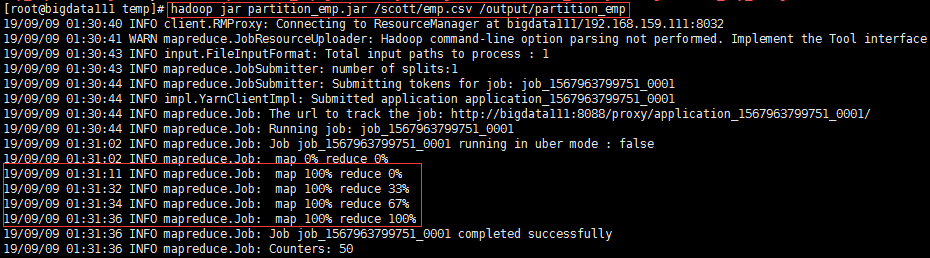
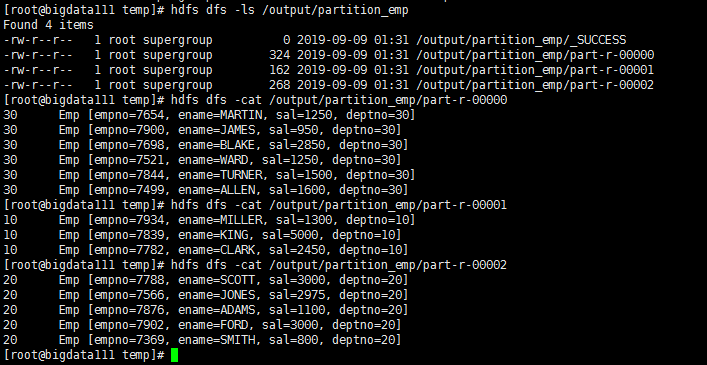
运行结果:
最后
以上就是鲤鱼橘子最近收集整理的关于MapReducer——分区(7)的全部内容,更多相关MapReducer——分区(7)内容请搜索靠谱客的其他文章。
本图文内容来源于网友提供,作为学习参考使用,或来自网络收集整理,版权属于原作者所有。


发表评论 取消回复