1. 前言
最近在学习mysql 的相关内容, 于是考虑使用 python 去连接他, 学习一下之后发现, 使用python 去连接mysql, 真的好方便啊。
2. 基本流程
我们这里使用 3 种途径来连接 mysql, 分别是 connector, mysqldb, torndb
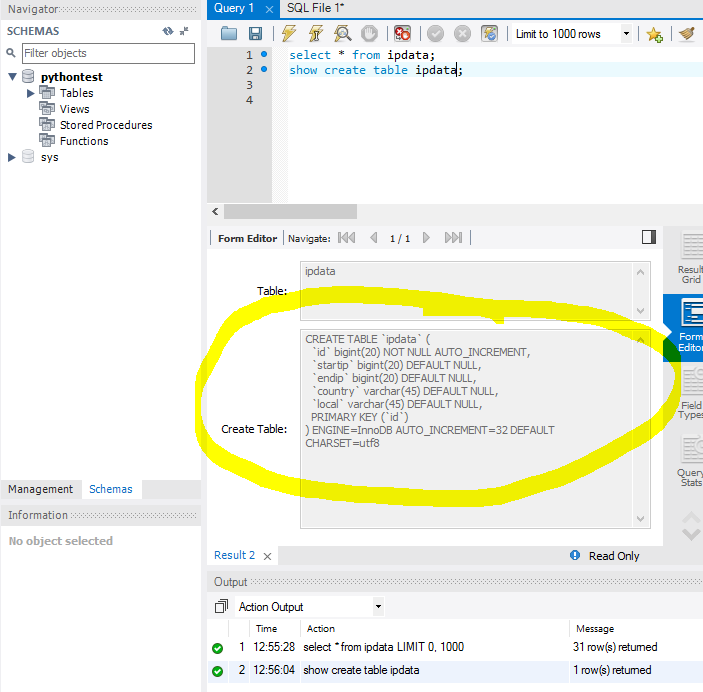
ps: 我们这里选用的数据库表的格式为:

ps: 图中的这个软件是 mysql workbench, 当然我们也可以使用 cmd控制台, 不过这个界面看上去更加直观一些, 嘻嘻嘻
2.1 mysql connectors
2.1.1 安装配置
- 首先进入 https://www.mysql.com/products/connector/ 页面, 选择相应版本的 python driver 下载安装, 我们这里选用的是 x64, python 2.7 版本的 msi installer, 链接: http://dev.mysql.com/get/Downloads/Connector-Python/mysql-connector-python-2.1.3-py2.7-winx64.msi
2.1.2 查询
from __future__ import print_function
sql = ('select * from ipdata limit 10')
# mysql-connector
print('mysql-connector'.center(50, '='))
from mysql import connector
cnx = connector.Connect(host="127.0.0.1", user="root", password="zhyh2010", database="pythontest", charset = "utf8")
cnx.autocommit = True
db0 = cnx.cursor()
db0.execute(sql)
for row in db0:
print(*row)
2.1.3 插入数据
sql = 'insert into `ipdata` (`startip`, `endip`, `country`, `local`) values (20, 21, "china", "happy")'
sql_tmp = 'insert into `ipdata` (`startip`, `endip`, `country`, `local`) values (%s, %s, %s, %s)'
values = [(21, 22, "china", "roman")]
print('mysql-connector'.center(50, '='))
from mysql import connector
cnx = connector.Connect(host="127.0.0.1", user="root", password="zhyh2010", database="pythontest", charset = "utf8")
cnx.autocommit = True
db0 = cnx.cursor()
print db0.execute(sql)
print db0.executemany(sql_tmp, values)
2.2 mysqldb
2.2.1 安装配置
- 首先进入 https://sourceforge.net/projects/mysql-python/ 下载相应的 mysqldb版本, 链接: https://sourceforge.net/projects/mysql-python/files/latest/download
2.2.2 查询数据库
#Mysqldb
print('Mysqldb'.center(50, "="))
import MySQLdb
def connect_mysql(db_host='127.0.0.1', user = "root",
passwd = "zhyh2010", db = "pythontest", charset="utf8"):
conn = MySQLdb.connect(host=db_host, user = user, passwd=passwd, db=db, charset=charset)
conn.autocommit(True)
return conn.cursor()
db1 = connect_mysql()
db1.execute(sql)
for row in db1:
print(*row)
2.2.3 查询数据
sql = 'insert into `ipdata` (`startip`, `endip`, `country`, `local`) values (20, 21, "china", "happy")'
sql_tmp = 'insert into `ipdata` (`startip`, `endip`, `country`, `local`) values (%s, %s, %s, %s)'
values = [(21, 22, "china", "roman")]
#Mysqldb
print('Mysqldb'.center(50, "="))
import MySQLdb
def connect_mysql(db_host='127.0.0.1', user = "root",
passwd = "zhyh2010", db = "pythontest", charset="utf8"):
conn = MySQLdb.connect(host=db_host, user = user, passwd=passwd, db=db, charset=charset)
conn.autocommit(True)
return conn.cursor()
db1 = connect_mysql()
print db1.execute(sql), db1.lastrowid
print db1.executemany(sql_tmp, values), db1.lastrowid
2.3 torndb
2.3.1 安装配置
- torndb 的主页是: https://pypi.python.org/pypi/torndb, 不过我们这里直接采用 pip 安装:
- `pip install torndb`
2.3.2 查询数据库
#torndb
print('torndb1'.center(50, '='))
import torndb
import simplejson as json
db2 = torndb.Connection(
host="127.0.0.1",
database="pythontest",
user="root",
password="zhyh2010",
charset="utf8"
)
rows = db2.query(sql)
for row in rows:
print(json.dumps(row, ensure_ascii=False))
# print('torndb2'.center(50, '='))
# row = db2.get(sql)
# print(json.dumps(row, ensure_ascii=False))
print('torndb3'.center(50, '='))
row = db2.get('select * from ipdata limit 1')
print(json.dumps(row, ensure_ascii=False))
2.3.3 插入数据
sql = 'insert into `ipdata` (`startip`, `endip`, `country`, `local`) values (20, 21, "china", "happy")'
sql_tmp = 'insert into `ipdata` (`startip`, `endip`, `country`, `local`) values (%s, %s, %s, %s)'
values = [(21, 22, "china", "roman")]
print('torndb1'.center(50, '='))
import torndb
import simplejson as json
db2 = torndb.Connection(
host="127.0.0.1",
database="pythontest",
user="root",
password="zhyh2010",
charset="utf8"
)
print db2.insert(sql)
print db2.insertmany(sql_tmp, values)
3. 小结
- 以上3种方式, 都可以方便的实现数据库操作
- 他们有着相同的流程:
最后
以上就是时尚小猫咪最近收集整理的关于python 2.7.11 + windows 10 连接 mysql学习记录1. 前言2. 基本流程3. 小结的全部内容,更多相关python内容请搜索靠谱客的其他文章。
本图文内容来源于网友提供,作为学习参考使用,或来自网络收集整理,版权属于原作者所有。


发表评论 取消回复