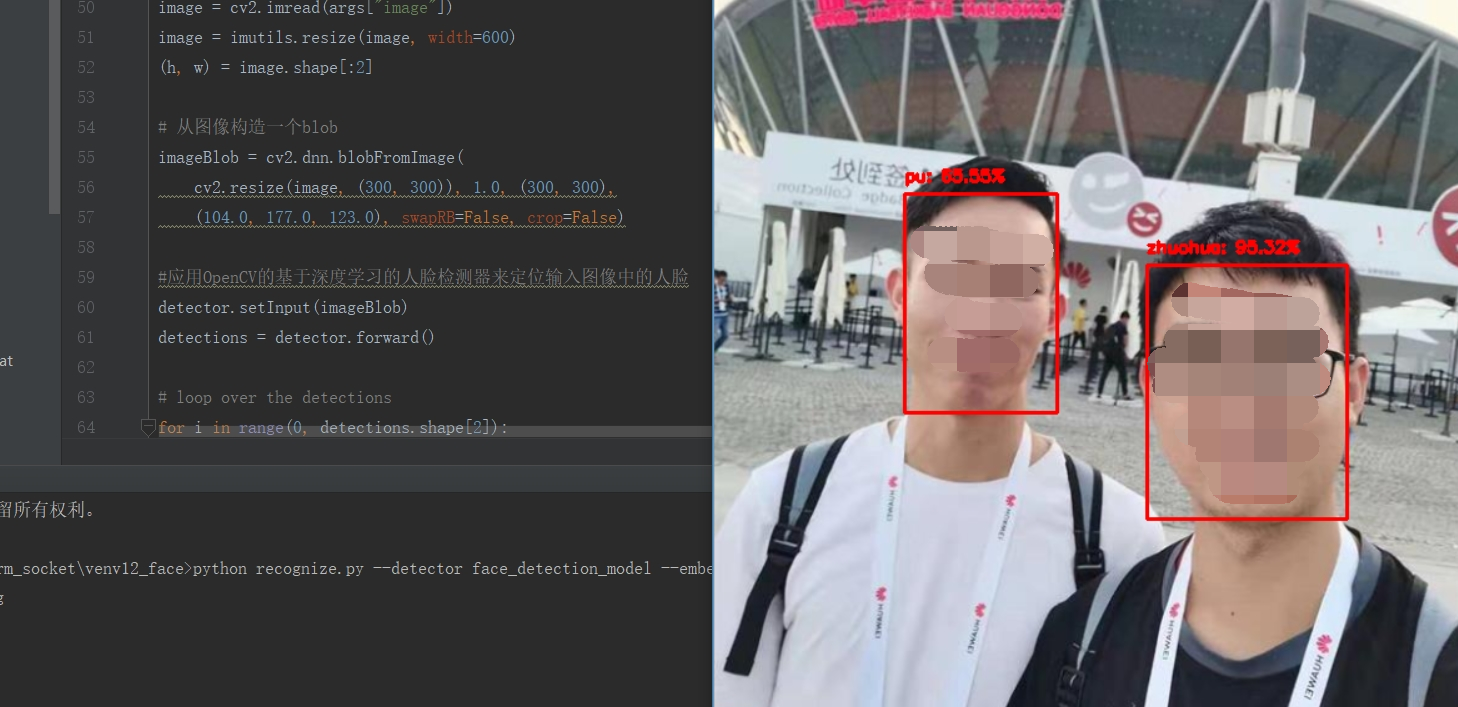
准备工作
1)测试集的一张图片
疑惑
1)我们的六个命令行参数解析 :
- - image :输入图像的路径。我们将尝试识别此图像中的面部。
- - detector :OpenCV深度学习人脸探测器的路径。我们将使用此模型来 检测图像中面部ROI的位置。
- - embedding-model :OpenCV深度学习面嵌入模型的路径。我们将使用此模型从面部ROI中提取128-D面部嵌入 - 我们将数据提供给识别器。
- - recognizer :识别器模型的路径。我们在步骤#2中训练了我们的SVM识别器 。这实际上 决定了一张脸是谁。
- - le :标签编码器的路径。这包含我们的脸部标签,如 'adrian' 或 'trisha' 。
- - confidence :过滤弱脸检测的可选阈值。
一定要研究这些命令行参数 - 了解两个深度学习模型和SVM模型之间的区别非常重要。
2)现在我们已经处理了导入和命令行参数,让我们将三个模型从磁盘加载到内存中:
| 25 26 27 28 29 30 31 32 33 34 35 36 37 38 | # load our serialized face detector from disk print("[INFO] loading face detector...") protoPath = os.path.sep.join([args["detector"], "deploy.prototxt"]) modelPath = os.path.sep.join([args["detector"], "res10_300x300_ssd_iter_140000.caffemodel"]) detector = cv2.dnn.readNetFromCaffe(protoPath, modelPath)
# load our serialized face embedding model from disk print("[INFO] loading face recognizer...") embedder = cv2.dnn.readNetFromTorch(args["embedding_model"])
# load the actual face recognition model along with the label encoder recognizer = pickle.loads(open(args["recognizer"], "rb").read()) le = pickle.loads(open(args["le"], "rb").read()) |
我们在这个块中加载了三个模型。存在冗余的风险,我想明确提醒你模型之间的差异:
- 探测器 :预先训练的Caffe DL模型,用于探测人脸在图像中的位置(第27-30行)。
- embedder :预训练的 Torch DL模型,用于计算我们的128-D面嵌入(第34行)。
- 识别器 :我们的线性SVM人脸识别模型(第37行)。我们在第2步训练了这个模型 。
1和2都是 预先训练的,这意味着它们是由OpenCV按原样提供给你的。它们被埋在GitHub上的OpenCV项目中,但为了方便起见,我将它们包含在今天帖子的 “下载”部分中。我还按照我们将它们用于识别OpenCV面部的顺序对模型进行编号。
我们还加载了标签编码器,其中包含我们模型可识别的人员的姓名(第38行)。
3)现在让我们加载我们的图像并 检测面部:
| 40 41 42 43 44 45 46 47 48 49 50 51 52 53 54 | # load the image, resize it to have a width of 600 pixels (while # maintaining the aspect ratio), and then grab the image dimensions image = cv2.imread(args["image"]) image = imutils.resize(image, width=600) (h, w) = image.shape[:2]
# construct a blob from the image imageBlob = cv2.dnn.blobFromImage( cv2.resize(image, (300, 300)), 1.0, (300, 300), (104.0, 177.0, 123.0), swapRB=False, crop=False)
# apply OpenCV's deep learning-based face detector to localize # faces in the input image detector.setInput(imageBlob) detections = detector.forward() |
在这里,我们:
- 将图像加载到内存中并构造一个blob(第42-49行)。了解 cv2 。dnn 。 这里是blobFromImage。
- 通过我们的探测器定位图像中的面 (第53和54行)。
鉴于我们的新 检测 ,让我们识别图像中的面孔。但首先我们需要过滤弱 检测 并提取 面部 投资回报率:
| 56 57 58 59 60 61 62 63 64 65 66 67 68 69 70 71 72 73 74 75 | # loop over the detections for i in range(0, detections.shape[2]): # extract the confidence (i.e., probability) associated with the # prediction confidence = detections[0, 0, i, 2]
# filter out weak detections if confidence > args["confidence"]: # compute the (x, y)-coordinates of the bounding box for the # face box = detections[0, 0, i, 3:7] * np.array([w, h, w, h]) (startX, startY, endX, endY) = box.astype("int")
# extract the face ROI face = image[startY:endY, startX:endX] (fH, fW) = face.shape[:2]
# ensure the face width and height are sufficiently large if fW < 20 or fH < 20: continue |
将从步骤#1中识别出此块 。我将在此再解释一下:
- 我们遍历所有的 检测 在 57号线和提取 信心 每对 60号线。
- 然后我们将置信度 与命令行args 字典中包含的最小概率检测阈值 进行比较 ,确保计算出的概率大于最小概率(第63行)。
- 从那里,我们提取 面部 ROI(第66-70行)以及确保其空间尺寸足够大(第74和75行)。
4)识别面部 ROI 的名称 只需几个步骤:
| 77 78 79 80 81 82 83 84 85 86 87 88 89 | # construct a blob for the face ROI, then pass the blob # through our face embedding model to obtain the 128-d # quantification of the face faceBlob = cv2.dnn.blobFromImage(face, 1.0 / 255, (96, 96), (0, 0, 0), swapRB=True, crop=False) embedder.setInput(faceBlob) vec = embedder.forward()
# perform classification to recognize the face preds = recognizer.predict_proba(vec)[0] j = np.argmax(preds) proba = preds[j] name = le.classes_[j] |
首先,我们构造一个faceBlob (来自 面部 ROI)并将其传递 给 嵌入器 以生成描述面部的128-D向量(第80-83行)
然后,我们 通过我们的SVM识别器模型(第86行)传递 vec,其结果是我们对面对ROI的人的预测 。
我们采用最高概率指数(第87行)并查询我们的标签编码器以找到 名称 (第89行)。在两者之间,我在第88行提取概率 。
注意: 你可以通过对概率应用额外的阈值测试来进一步滤除弱脸识别。例如,如果proba < T (其中 T 是你定义的变量),则插入 可以提供额外的过滤层,以确保较少的假阳性面部识别。
5)现在,让我们显示OpenCV人脸识别结果:
| 91 92 93 94 95 96 97 98 99 100 101 102 | # draw the bounding box of the face along with the associated # probability text = "{}: {:.2f}%".format(name, proba * 100) y = startY - 10 if startY - 10 > 10 else startY + 10 cv2.rectangle(image, (startX, startY), (endX, endY), (0, 0, 255), 2) cv2.putText(image, text, (startX, y), cv2.FONT_HERSHEY_SIMPLEX, 0.45, (0, 0, 255), 2)
# show the output image cv2.imshow("Image", image) cv2.waitKey(0) |
对于我们在循环中识别的每个面孔(包括“未知”)人:
- 我们 在第93行构造一个 包含名称和概率的 文本字符串 。
- 然后我们在脸部周围画一个矩形并将文本放在盒子上方(第94-98行)。
然后我们最终在屏幕上显示结果,直到按下一个键(第101和102行)。
是时候使用OpenCV识别图像中的面部了!
效果:

解释:这里识别了两个用户,一个是我朋友:zhuohua;一个是我自己:pu
之前采集了几个朋友的脸部的图片进行训练,其中包括zhuohua,在识别会识别出来的;
源代码:
# python recognize.py --detector face_detection_model --embedding-model openface_nn4.small2.v1.t7 --recognizer output/recognizer.pickle  --le output/le.pickle --image images/pu.jpg

# import the necessary packages
import numpy as np
import argparse
import imutils
import pickle
import cv2
import os
import time

# 构造参数解析器并解析参数
ap = argparse.ArgumentParser()
ap.add_argument("-i", "--image", required=True,
	help="path to input image")
ap.add_argument("-d", "--detector", required=True,
	help="path to OpenCV's deep learning face detector")
ap.add_argument("-m", "--embedding-model", required=True,
	help="path to OpenCV's deep learning face embedding model")
ap.add_argument("-r", "--recognizer", required=True,
	help="path to model trained to recognize faces")
ap.add_argument("-l", "--le", required=True,
	help="path to label encoder")
ap.add_argument("-c", "--confidence", type=float, default=0.5,
	help="minimum probability to filter weak detections")
args = vars(ap.parse_args())

# 从磁盘加载我们的序列化面部检测器
print("[INFO] loading face detector...")
protoPath = os.path.sep.join([args["detector"], "deploy.prototxt"])
modelPath = os.path.sep.join([args["detector"],
	"res10_300x300_ssd_iter_140000.caffemodel"])
detector = cv2.dnn.readNetFromCaffe(protoPath, modelPath)

# 从磁盘加载我们的序列化面嵌入模型
print("[INFO] loading face recognizer...")
embedder = cv2.dnn.readNetFromTorch(args["embedding_model"])

# 加载实际的人脸识别模型和标签编码器
recognizer = pickle.loads(open(args["recognizer"], "rb").read())
le = pickle.loads(open(args["le"], "rb").read())

# 加载图像,将其大小调整为宽度为600像素(同时保持纵横比),然后抓取图像尺寸
image = cv2.imread(args["image"])
image = imutils.resize(image, width=600)
(h, w) = image.shape[:2]

# 从图像构造一个blob
imageBlob = cv2.dnn.blobFromImage(
	cv2.resize(image, (300, 300)), 1.0, (300, 300),
	(104.0, 177.0, 123.0), swapRB=False, crop=False)

#应用OpenCV的基于深度学习的人脸检测器来定位输入图像中的人脸
detector.setInput(imageBlob)
detections = detector.forward()

# loop over the detections
for i in range(0, detections.shape[2]):
	# 提取与预测相关的置信度(即概率)
	confidence = detections[0, 0, i, 2]

	# 过滤弱检测
	if confidence > args["confidence"]:
		# 计算面部边界框的(x,y)坐标
		box = detections[0, 0, i, 3:7] * np.array([w, h, w, h])
		(startX, startY, endX, endY) = box.astype("int")

		# 提取面部投资回报率
		face = image[startY:endY, startX:endX]
		(fH, fW) = face.shape[:2]

		# 确保面部宽度和高度足够大
		if fW < 20 or fH < 20:
			continue

		#为面部ROI构造一个blob,然后通过我们的面部嵌入模型传递blob以获得面部的128-d量化
		faceBlob = cv2.dnn.blobFromImage(face, 1.0 / 255, (96, 96),
			(0, 0, 0), swapRB=True, crop=False)
		embedder.setInput(faceBlob)
		vec = embedder.forward()

		# 执行分类以识别面部
		preds = recognizer.predict_proba(vec)[0]
		j = np.argmax(preds)
		proba = preds[j]
		name = le.classes_[j]

		# 绘制面部的边界框以及相关的概率
		text = "{}: {:.2f}%".format(name, proba * 100)
		y = startY - 10 if startY - 10 > 10 else startY + 10
		cv2.rectangle(image, (startX, startY), (endX, endY),
			(0, 0, 255), 2)
		cv2.putText(image, text, (startX, y),
			cv2.FONT_HERSHEY_SIMPLEX, 0.45, (0, 0, 255), 2)

# 显示输出图像
cv2.imshow("Image", image)
cv2.waitKey(0)
在命令行终端执行命令,来执行此程序:
python recognize.py --detector face_detection_model --embedding-model openface_nn4.small2.v1.t7 --recognizer output/recognizer.pickle --le output/le.pickle --image images/pu.jpg
希望对你有帮助。
最后
以上就是怕孤独八宝粥最近收集整理的关于使用OpenCV进行人脸识别--(5)进行人脸识别--图片的全部内容,更多相关使用OpenCV进行人脸识别--(5)进行人脸识别--图片内容请搜索靠谱客的其他文章。


发表评论 取消回复