小实验目录
树莓派科学小实验
001 点亮第一盏LED灯
002 点亮LED灯组
003_开关控制LED灯
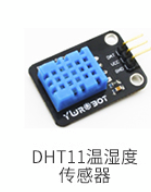
004_获取温湿度
提示:写完文章后,目录可以自动生成,如何生成可参考右边的帮助文档
目录
- 小实验目录
- 前言
- 一、实验部件
- 1 实验元器件
- 2 连接的GPIO针脚
- 二、 DHT11 和 单片机或树莓派通信的过程
- 三、代码部分
- 1 DHT11的实际工作代码
- 2 外层调用代码
- 四、 代码分析
- 1) 在主函数中:
- 2) 对DTH11.py 的分析
- 总结:
前言
在这个实验中将接触到时钟信号,高低电平的接收。字节转换
提示:以下是本篇文章正文内容,下面案例可供参考
一、实验部件
1 实验元器件

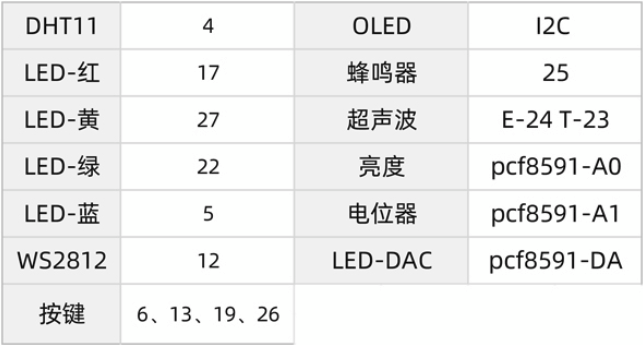
2 连接的GPIO针脚
使用的针脚:4,17,27,19
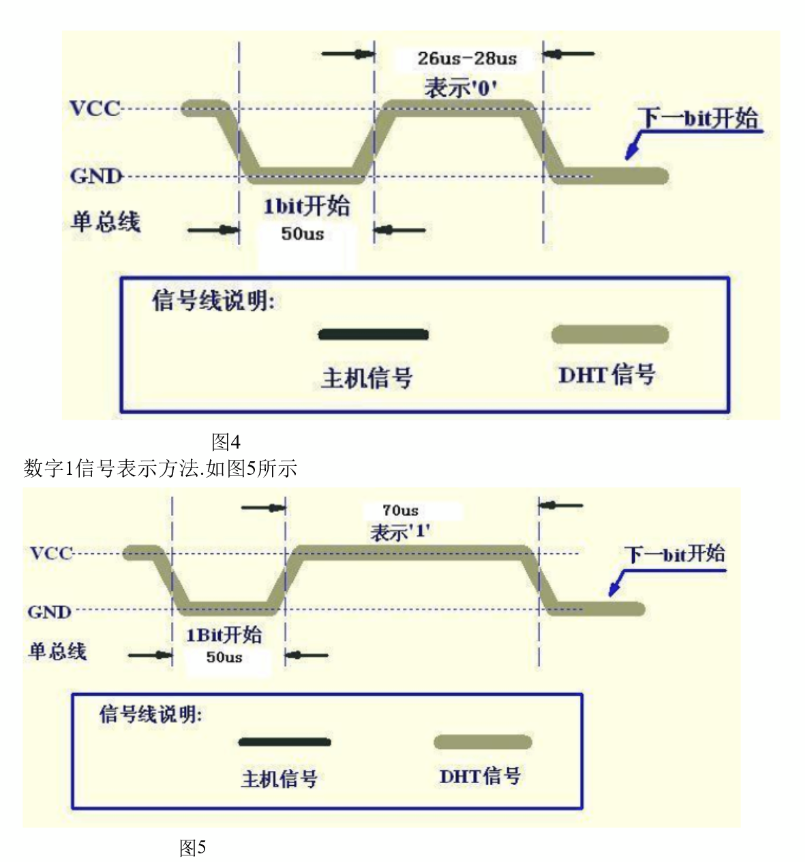
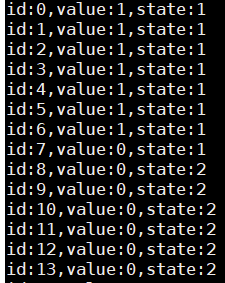
二、 DHT11 和 单片机或树莓派通信的过程
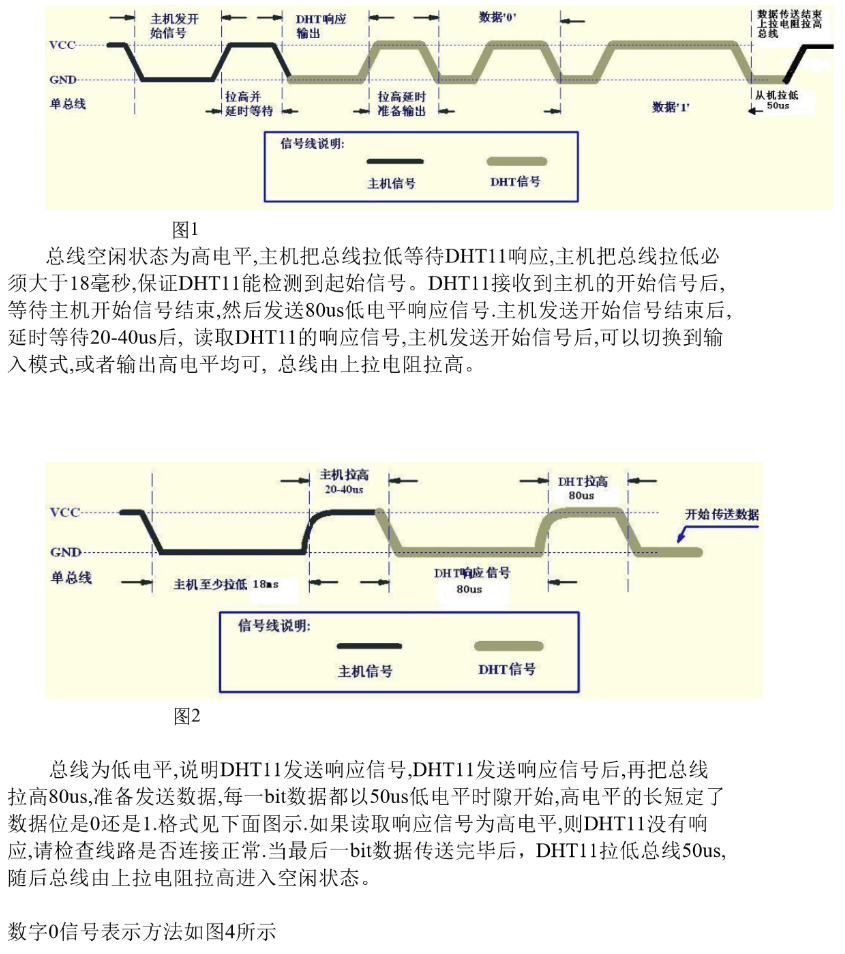
由于python无法控制us的时钟的精度,所以在实际收取时会出现无法获取或获取信号不完整的现象。但是基本原理如图下。
三、代码部分
在这里引用了github上的开源项目:https://github.com/szazo/DHT11_Python
1 DHT11的实际工作代码
# -*- coding: utf-8 -*-
"""
#这个是对DHT11的类,将完成传感器的初始化,获取值,以及将值转换为10进制并返回,文章参考了:https://github.com/szazo/DHT11_Python
version = '0.0.1'
make day=2022-01-26
"""
__docformat__ = "restructuredtext en"
__all__ = []
__license__ = "MIT license"
import time
import RPi.GPIO as GPIO
import RPi
# 定义显示类用来显示和输出
class DHT11Result:
'DHT11 返回从DHT11.read()中读取的值'
ERR_NO_ERROR = 0
ERR_MISSING_DATA = 1
ERR_CRC = 2
error_code = ERR_NO_ERROR
temperature = -1
humidity = -1
def __init__(self, error_code, temperature, humidity):
self.error_code = error_code
self.temperature = temperature
self.humidity = humidity
def is_valid(self):
return self.error_code == DHT11Result.ERR_NO_ERROR
# 定义探头初始化和获取的类
class DHT11:
__pin = 0 #定义Pin的值
def __init__(self, pin):
self.__pin = pin
def __send_and_sleep(self, output, sleep):
'''
设定发送的电平值和休眠的时间
:param output: 电平值
:param sleep: 休眠时间
:return:
'''
GPIO.output(self.__pin, output)
time.sleep(sleep)
def __collect_input(self):
'''
这部分完成了对输入数据的采集
'''
unchanged_count = 0
max_unchanged_count = 100
last=-1
data=[]
while True:
curent=GPIO.input(self.__pin)
data.append(curent)
if last != curent:
unchanged_count=0
last=curent
else:
unchanged_count+=1
if unchanged_count>max_unchanged_count:
break
return data
def __parse_data_pull_up_lengths(self, data):
'''
这部分完成了对数据的初步处理
'''
STATE_INIT_PULL_DOWN = 1
STATE_INIT_PULL_UP = 2
STATE_DATA_FIRST_PULL_DOWN = 3
STATE_DATA_PULL_UP = 4
STATE_DATA_PULL_DOWN = 5
state = STATE_INIT_PULL_DOWN
lengths = [] # will contain the lengths of data pull up periods
current_length = 0 # will contain the length of the previous period
for i in range(len(data)):
current = data[i]
current_length += 1
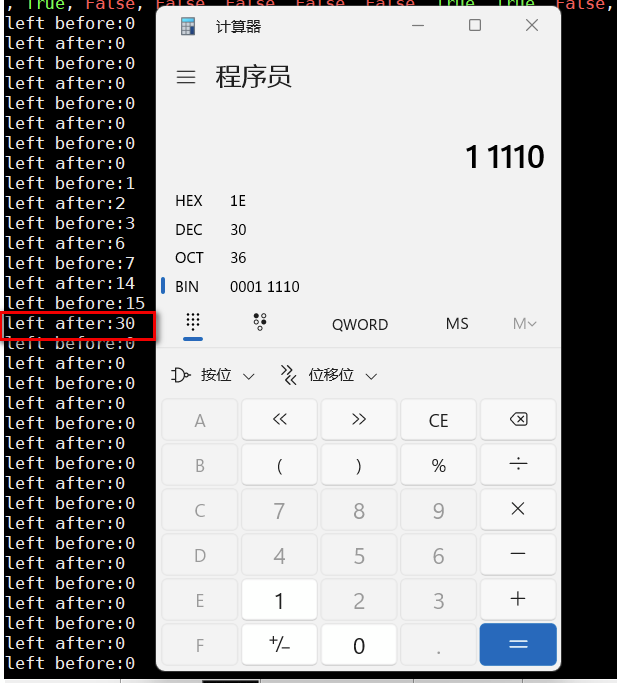
print(f"id:{i},value:{current},state:{state}")
if state == STATE_INIT_PULL_DOWN:
if current == RPi.GPIO.LOW:
# ok, we got the initial pull down
state = STATE_INIT_PULL_UP
continue
else:
continue
if state == STATE_INIT_PULL_UP:
if current == RPi.GPIO.HIGH:
# ok, we got the initial pull up
state = STATE_DATA_FIRST_PULL_DOWN
continue
else:
continue
if state == STATE_DATA_FIRST_PULL_DOWN:
if current == RPi.GPIO.LOW:
# we have the initial pull down, the next will be the data pull up
state = STATE_DATA_PULL_UP
continue
else:
continue
if state == STATE_DATA_PULL_UP:
if current == RPi.GPIO.HIGH:
# data pulled up, the length of this pull up will determine whether it is 0 or 1
current_length = 0
state = STATE_DATA_PULL_DOWN
continue
else:
continue
if state == STATE_DATA_PULL_DOWN:
if current == RPi.GPIO.LOW:
# pulled down, we store the length of the previous pull up period
lengths.append(current_length)
state = STATE_DATA_PULL_UP
continue
else:
continue
return lengths
def __calculate_bits(self, pull_up_lengths):
'''
这部分完成了对数据的整形
'''
# find shortest and longest period
shortest_pull_up = 1000
longest_pull_up = 0
for i in range(0, len(pull_up_lengths)):
length = pull_up_lengths[i]
if length < shortest_pull_up:
shortest_pull_up = length
if length > longest_pull_up:
longest_pull_up = length
# use the halfway to determine whether the period it is long or short
halfway = shortest_pull_up + (longest_pull_up - shortest_pull_up) / 2
bits = []
for i in range(0, len(pull_up_lengths)):
bit = False
if pull_up_lengths[i] > halfway:
bit = True
bits.append(bit)
return bits
def __bits_to_bytes(self, bits):
'''
bit转bytes
'''
the_bytes = []
byte = 0
for i in range(0, len(bits)):
print(f"left before:{byte}")
byte = byte << 1
print(f"left after:{byte}")
if (bits[i]):
byte = byte | 1
else:
byte = byte | 0
if ((i + 1) % 8 == 0):
the_bytes.append(byte)
byte = 0
print(f"the_bytes:{the_bytes}")
return the_bytes
def __calculate_checksum(self, the_bytes):
return the_bytes[0] + the_bytes[1] + the_bytes[2] + the_bytes[3] & 255
def read(self):
'''
读取数据
'''
RPi.GPIO.setup(self.__pin, RPi.GPIO.OUT)
# send initial high
self.__send_and_sleep(RPi.GPIO.HIGH, 0.05)
# pull down to low
self.__send_and_sleep(RPi.GPIO.LOW, 0.02)
# change to input using pull up
RPi.GPIO.setup(self.__pin, RPi.GPIO.IN, RPi.GPIO.PUD_UP)
# collect data into an array
data = self.__collect_input()
# parse lengths of all data pull up periods
pull_up_lengths = self.__parse_data_pull_up_lengths(data)
# if bit count mismatch, return error (4 byte data + 1 byte checksum)
if len(pull_up_lengths) != 40:
return DHT11Result(DHT11Result.ERR_MISSING_DATA, 0, 0)
# calculate bits from lengths of the pull up periods
bits = self.__calculate_bits(pull_up_lengths)
# we have the bits, calculate bytes
the_bytes = self.__bits_to_bytes(bits)
# calculate checksum and check
checksum = self.__calculate_checksum(the_bytes)
if the_bytes[4] != checksum:
return DHT11Result(DHT11Result.ERR_CRC, 0, 0)
# ok, we have valid data
# The meaning of the return sensor values
# the_bytes[0]: humidity int
# the_bytes[1]: humidity decimal
# the_bytes[2]: temperature int
# the_bytes[3]: temperature decimal
temperature = the_bytes[2] + float(the_bytes[3]) / 10
humidity = the_bytes[0] + float(the_bytes[1]) / 10
return DHT11Result(DHT11Result.ERR_NO_ERROR, temperature, humidity)
2 外层调用代码
# -*- coding: utf-8 -*-
"""
#这个实验完成了使用DHT11来读取温度和相对湿度
author = "Derek Tian"
version = '0.0.1'
make day=2022-01-25
"""
__docformat__ = "restructuredtext en"

__all__ = []

__license__ = "MIT license"

import time

import RPi.GPIO as GPIO
import DHT11 as dht11
import time
import datetime

# initialize GPIO
GPIO.setwarnings(True)
GPIO.setmode(GPIO.BCM)
# read data using pin 14
instance = dht11.DHT11(pin=4)

try:
    while True:
        result = instance.read()
        if result.is_valid():
            print("Last valid input: " + str(datetime.datetime.now()))

            print("Temperature: %-3.1f C" % result.temperature)
            print("Humidity: %-3.1f %%" % result.humidity)

        time.sleep(6)

except KeyboardInterrupt:
    print("Cleanup")
    GPIO.cleanup()
四、 代码分析
1) 在主函数中:
在这里使用的RPi.GPIO的库,来直接操作GPIO
import RPi.GPIO as GPIO
设定使用BCM方式操作GPIO,设定DHT11 连接的针脚为4并初始化DHT11的工作类
GPIO.setwarnings(True)
GPIO.setmode(GPIO.BCM)
# read data using pin 14
instance = dht11.DHT11(pin=4)
使用循环来获取值:
 while True:
        result = instance.read()
        if result.is_valid():
            print("Last valid input: " + str(datetime.datetime.now()))

            print("Temperature: %-3.1f C" % result.temperature)
            print("Humidity: %-3.1f %%" % result.humidity)
2) 对DTH11.py 的分析
(1) 定义发送信号的函数,在这里同时定义了休眠时间(这个是关键,因为这是使用软件在模拟PWM的数字方式),因为需要多次调用,所以抽象为独立函数
 def __send_and_sleep(self, output, sleep):
        GPIO.output(self.__pin, output)
        time.sleep(sleep)
(2)__collect_input() 函数,接收采集到的数值
 def __collect_input(self):
        '''
         这部分完成了对输入数据的采集
        '''
        unchanged_count = 0
        max_unchanged_count = 100

        last=-1
        data=[]
        while True:
            curent=GPIO.input(self.__pin)

            data.append(curent)
            if last != curent:
                unchanged_count=0
                last=curent

            else:
                unchanged_count+=1
                if unchanged_count>max_unchanged_count:
                    break

        return data
通过循环来接收信号采集到数字值,并设定读取失败的最大次数为100次。采集到的是0 or 1的数字信号
可以通过添加print打印并显示出来
 (3)__parse_data_pull_up_lengths函数完成了对原始数据采集的类型整理
程序的关键是定义了5个状态
        STATE_INIT_PULL_DOWN = 1 #发送前的前置低电平
        STATE_INIT_PULL_UP = 2  #发送前的前置高电平,这里将告诉主机准备接收
        STATE_DATA_FIRST_PULL_DOWN = 3  # 发送低电平标志数据准备发送
        STATE_DATA_PULL_UP = 4  #发送数据
        STATE_DATA_PULL_DOWN = 5  #数据发送结束
通过循环处理接收到的数据包,挑出其中有效数据帧存储,下面是对于每一个bit值得处理输出:
当数据状态转换为“STATE_DATA_PULL_UP”并且新的bit位为高电平时,将初始化
 if state == STATE_DATA_PULL_UP:
                if current == RPi.GPIO.HIGH:
                    # data pulled up, the length of this pull up will determine whether it is 0 or 1
                    current_length = 0
                    state = STATE_DATA_PULL_DOWN
                    continue
                else:
                    continue
当数据状态为“STATE_DATA_PULL_DOWN”并且新的bit位为低电平值时,将count的值写入list中
            if state == STATE_DATA_PULL_DOWN:
                if current == RPi.GPIO.LOW:
                    # pulled down, we store the length of the previous pull up period
                    lengths.append(current_length)
                    state = STATE_DATA_PULL_UP
                    continue
                else:
                    continue
最终返回的值:
 (4)__calculate_bits函数完成了将数值从count值准换为二进制的工作,在这里作者采用了中间值来判断的方式。
设定初始的上下边界,0,1000.由于最大接收的字节有效bit不可能超过1000,所以这里设定为1000(个人因为比较浪费)
        shortest_pull_up = 1000
        longest_pull_up = 0
通过找出上下边界,计算中间值
 for i in range(0, len(pull_up_lengths)):
            length = pull_up_lengths[i]
            print(f"length:{length}|shortest_pull_up:{shortest_pull_up}|longest_pull_up:{longest_pull_up}")
            if length < shortest_pull_up:
                shortest_pull_up = length
            if length > longest_pull_up:
                longest_pull_up = length

        # use the halfway to determine whether the period it is long or short
        halfway = shortest_pull_up + (longest_pull_up - shortest_pull_up) / 2

根据中间值判断来生成二进制list
 for i in range(0, len(pull_up_lengths)):
            bit = False
            if pull_up_lengths[i] > halfway:
                bit = True
            bits.append(bit)

(5)__bits_to_bytes 通过按位计算来获取采集到的值:
在这里,作者通过对bit位的左移操作来完成了2进制对10进制的转换。对bit位的连续左移到第8个bit位时,数值将是10进制的值。
 for i in range(0, len(bits)):
            print(f"left before:{byte}")
            byte = byte << 1
            print(f"left after:{byte}")
            if (bits[i]):
                byte = byte | 1
            else:
                byte = byte | 0
            if ((i + 1) % 8 == 0):
                the_bytes.append(byte)
(6)__calculate_checksum 将生成的4位数值写入一个数组,这里就不多说了。
red()的读取过程
在函数初始化中,第一步是设定PIN针脚的工作方向:(输出、输入),这里设定为输出,用于激活DHT11模块
RPi.GPIO.setup(self.__pin, RPi.GPIO.OUT)
调用 ”__send_and_sleep”函数来对针脚进行控制
输出一个高电平,并休眠0.05秒,激活DHT11模块
self.__send_and_sleep(RPi.GPIO.HIGH, 0.05)
输出一个低电平,并休眠0.02秒,准备接收DHT11模块的输出值
self.__send_and_sleep(RPi.GPIO.LOW, 0.02)
在休眠0.02秒后,将PIN针脚转为输入模式,并设定高电平为信号采集位
RPi.GPIO.setup(self.__pin, RPi.GPIO.IN, RPi.GPIO.PUD_UP)
接收PIN的输入
data = self.__collect_input()
调用函数对接收到的数据帧进行状态转换
pull_up_lengths = self.__parse_data_pull_up_lengths(data)
生成4个8字节的byte的数据和1个8byte的效验位数据,
 if len(pull_up_lengths) != 40:
            return DHT11Result(DHT11Result.ERR_MISSING_DATA, 0, 0)
实际上这个效验位数据就是前4个byte数据的总和。
最后的63就是效验位

# calculate bits from lengths of the pull up periods
bits = self.__calculate_bits(pull_up_lengths)
    # we have the bits, calculate bytes
    the_bytes = self.__bits_to_bytes(bits)

    # calculate checksum and check
    checksum = self.__calculate_checksum(the_bytes)
    if the_bytes[4] != checksum:
        return DHT11Result(DHT11Result.ERR_CRC, 0, 0)

    # ok, we have valid data

    # The meaning of the return sensor values
    # the_bytes[0]: humidity int
    # the_bytes[1]: humidity decimal
    # the_bytes[2]: temperature int
    # the_bytes[3]: temperature decimal

    temperature = the_bytes[2] + float(the_bytes[3]) / 10
    humidity = the_bytes[0] + float(the_bytes[1]) / 10

    return DHT11Result(DHT11Result.ERR_NO_ERROR, temperature, humidity)
修改代码,在最外层调用函数中添加按键处理和LED灯显示(按下时点亮,有数据时点亮)
# -*- coding: utf-8 -*-
"""
#这个实验完成了使用DHT11来读取温度和相对湿度
author = "Derek Tian"
version = '0.0.1'
make day=2022-01-25
"""
__docformat__ = "restructuredtext en"

__all__ = []

__license__ = "MIT license"

import time
from signal import pause

import RPi.GPIO as GPIO
import DHT11 as dht11
import time
import datetime
from  gpiozero import LED,Button

# initialize GPIO
GPIO.setwarnings(True)
GPIO.setmode(GPIO.BCM)
# read data using pin 14
instance = dht11.DHT11(pin=4)

button=Button(19)
red=LED(17)
yellow=LED(27)
bl=LED(5)
bl.off()
def getValue():
    red.on()
    result = instance.read()
    if result.is_valid():
        print("Last valid input: " + str(datetime.datetime.now()))
        print("Temperature: %-3.1f C" % result.temperature)
        print("Humidity: %-3.1f %%" % result.humidity)
        yellow.on()
    else:
        yellow.off()
        print("not get value !!!!")

def fGetValue():
    red.off()
    yellow.off()


if __name__=='__main__':
 try:
    button.when_pressed = getValue
    button.when_released = fGetValue

    pause()
    # while True:
    #     result = instance.read()
    #     if result.is_valid():
    #         print("Last valid input: " + str(datetime.datetime.now()))
    #
    #         print("Temperature: %-3.1f C" % result.temperature)
    #         print("Humidity: %-3.1f %%" % result.humidity)
    #
    #     time.sleep(6)

 except KeyboardInterrupt:
     print("Cleanup")
     GPIO.cleanup()
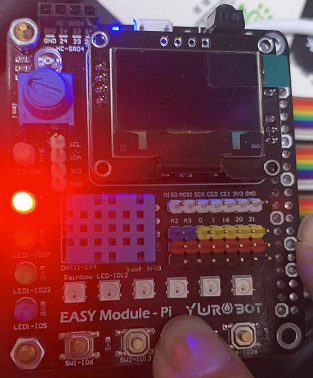
最终效果:
按下按键后红灯点亮,通过成功获取数值(黄色灯点亮):

按下按键后红色灯点亮,获取数值失败,黄色灯没有点亮:

总结:
对于DHT11来说,获取信号的时钟信息时非常关键的,如果无法正确获取到时钟是无法获取值或激活传感器的。而python对于这种需要us来控制的代码不太擅长,如果使用c或golang比较好。
最后
以上就是如意小馒头最近收集整理的关于树莓派科学小实验4B--04_温湿度传感器小实验目录前言一、实验部件二、 DHT11 和 单片机或树莓派通信的过程三、代码部分四、 代码分析总结:的全部内容,更多相关树莓派科学小实验4B--04_温湿度传感器小实验目录前言一、实验部件二、内容请搜索靠谱客的其他文章。


发表评论 取消回复