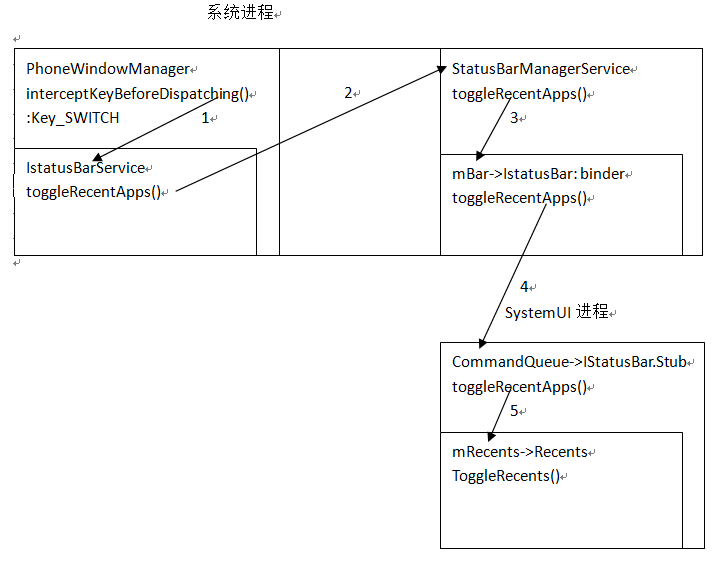
Android的SystemUI应用,为用户提供查看最近使用应用的列表,当用户点击Switch按键时,PhoneWindowManager会拦截此次key事件,拦截后调用StatusBarManagerService 接口,StatusBarManagerService通过调用mBar(SystemUI 注册到StatusBarManagerService的Binder对象)通知SystemUI启动RecentsActivity显示最近使用应用的列表。
启动的大概流程图如下:
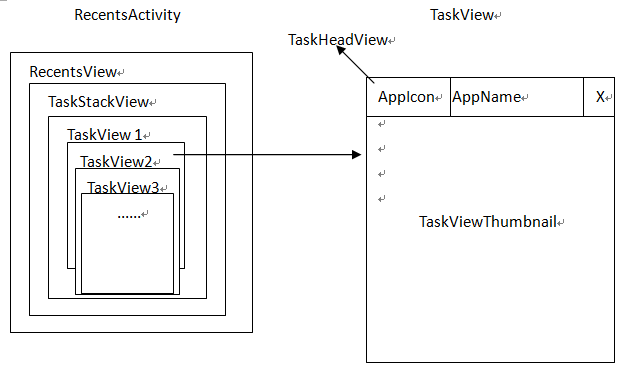
Recents的UI结构图
接下来就按照流程图简单的分析一下RecentsActivity的启动流程:
step1拦截key_Switch事件:
在key事件分发之前,会调用PhoneWindowManager的interceptKeyBeforeDispatching函数优先处理key事件.
public long interceptKeyBeforeDispatching(WindowState win, KeyEvent event, int policyFlags) {
} else if (keyCode == KeyEvent.KEYCODE_APP_SWITCH) {
if (!keyguardOn) {
if (down && repeatCount == 0) {
preloadRecentApps();//预加载流程自行分析
} else if (!down) {
toggleRecentApps();
}
}
return -1;
}
preloadRecentApps();主要是预加载流程,和启动流程关键点基本一致,感兴趣自行分析。
当收到swith事件,不是down事件时调用toggleRecentApps函数:
step 2 toggleRecentApps函数
private void toggleRecentApps() {
mPreloadedRecentApps = false; // preloading no longer needs to be canceled
try {
IStatusBarService statusbar = getStatusBarService();
if (statusbar != null) {
statusbar.toggleRecentApps();
}
}
这里直接调用StatusBarManagerService的toggleRecentApps函数。
step 3 StatusBarManagerService .toggleRecentApps()
public void toggleRecentApps() {
if (mBar != null) {
try {
mBar.toggleRecentApps();
} catch (RemoteException ex) {}
}
}
mBar 是SystemUI启动的时候,在BaseStatusBar Start函数中通过调用StatusBarManagerService 的registerStatusBar函数注册过来的如下:
mCommandQueue = new CommandQueue(this, iconList);
mBarService.registerStatusBar(mCommandQueue, iconList, switches, binders);
mBar 是一个(IStatusBar)binder代理对象,他的本地对象就是运行在SystemUI的mCommandQueue对象。
这样StatusBarManagerService 就通过mBar进程间调用调用到mCommandQueue的toggleRecentApps函数。
step 4 mCommandQueue. toggleRecentApps
public void toggleRecentApps() {
synchronized (mList) {
mHandler.removeMessages(MSG_TOGGLE_RECENT_APPS);
mHandler.obtainMessage(MSG_TOGGLE_RECENT_APPS, 0, 0, null).sendToTarget();
}
}
这个函数只是发送了一个消息到主线程消息队列。最后处理该消息的代码如下:
mCallbacks.toggleRecentApps();
mCallbacks 是BaseStatusBar 在step3中初始化CommandQueue时传入this对象。
BaseStatusBar 又发送消息到消息队列。最后处理该消息的是BaseStatusBar 的toggleRecents函数。
Step5 BaseStatusBar. toggleRecents
protected void toggleRecents() {
if (mRecents != null) {
sendCloseSystemWindows(mContext, SYSTEM_DIALOG_REASON_RECENT_APPS);
mRecents.toggleRecents(mDisplay, mLayoutDirection, getStatusBarView());
}
}
mRecents 是Recents类对象他继承自SystemUI,在系统启动的时候,SystemServer会调用startSystemUi函数启动SystemUI应用的SystemUIService服务,
在SystemUIService 的的onCreate函数中会调用
SystemUIApplication 的startServicesIfNeeded,
在这个函数中会启动会实例化多个继承自SystemUI的类,并调用他们的Start函数,其中就包括Recents的start函数。
在Start函数中,调用putComponent(RecentsComponent.class, this);把Recents对象保存到了SystemUI的mComponents中。
BaseStatusBar中的mRecents成员变量也就是从里面取出来的。
Step6 Recents. toggleRecents
public void toggleRecents(Display display, int layoutDirection, View statusBarView) {
if (mUseAlternateRecents) {
mAlternateRecents.onToggleRecents(statusBarView);
return;
}
......
}
mUseAlternateRecents 默认为真,mAlternateRecents.onToggleRecents(statusBarView);该函数直接调用了toggleRecentsActivity
step7 AlternateRecentsComponent. toggleRecentsActivity
void toggleRecentsActivity() {
ActivityManager.RunningTaskInfo topTask = getTopMostTask();
AtomicBoolean isTopTaskHome = new AtomicBoolean();
if (isRecentsTopMost(topTask, isTopTaskHome)) {
Intent intent = new Intent(ACTION_TOGGLE_RECENTS_ACTIVITY);
intent.setPackage(mContext.getPackageName());
intent.addFlags(Intent.FLAG_RECEIVER_REGISTERED_ONLY_BEFORE_BOOT |
Intent.FLAG_RECEIVER_FOREGROUND);
mContext.sendBroadcastAsUser(intent, UserHandle.CURRENT);
mLastToggleTime = System.currentTimeMillis();
return;
} else {
startRecentsActivity(topTask, isTopTaskHome.get());
}
}
这个函数主要是首先判断当前界面是不是RecentsActivity
如果是就发送一个广播,关闭RecentsActivity.广播肯定是RecentsActivity接收了,接收后调用退出动画,退出完成后调用RecentsActivity的finish函数。
如果不是则调用startRecentsActivity启动RecentsActivity。
RecentsActivity启动:界面的展示离不开数据,从界面上看,RecentsActivity至少需要应用名称,图片,以及截图,接下来看RecentsActivity数据的获取流程:
Step8 在RecentsActivity的onStart函数中有调用updateRecentsTasks来更新获取界面显示的数据。
void updateRecentsTasks(Intent launchIntent) {
……
RecentsTaskLoader loader = RecentsTaskLoader.getInstance();
SpaceNode root = loader.reload(this,
Constants.Values.RecentsTaskLoader.PreloadFirstTasksCount,
mConfig.launchedFromHome);
ArrayList<TaskStack> stacks = root.getStacks();
if (!stacks.isEmpty()) {
mRecentsView.setTaskStacks(root.getStacks());
}
……
if (mConfig.launchedWithNoRecentTasks) {
if (mEmptyView == null) {
mEmptyView = mEmptyViewStub.inflate();
}
mEmptyView.setVisibility(View.VISIBLE);
mRecentsView.setSearchBarVisibility(View.GONE);
} else {
if (mEmptyView != null) {
mEmptyView.setVisibility(View.GONE);
}
if (mRecentsView.hasSearchBar()) {
mRecentsView.setSearchBarVisibility(View.VISIBLE);
} else {
addSearchBarAppWidgetView();
}
}
mScrimViews.prepareEnterRecentsAnimation();
}
这个函数主要就是
1 调用RecentsTaskLoader的reload函数获取相关最近使用应用的相关信息。
2 调用mRecentsView.setTaskStacks,把获得的TaskStack设置到RecentsView中创建UI结构图中的TaskStackView
3 如果没有最近使用的信息则显示空的提示信息。这一步比较简单只是设置View的显示隐藏。
Step9 RecentsTaskLoader.reload函数
先看一下RecentsTaskLoader构造函数中初始化的几个重要的类和变量
1 mSystemServicesProxy = new SystemServicesProxy(context);
SystemServicesProxy 这个类主要承接了RecentsActivity和系统服务的交互,包含获取最近任务列表,启动制定任务所在的应用等等。
2 mLoadQueue = new TaskResourceLoadQueue();一个队列主要用于缓存任务
3 mApplicationIconCache = new DrawableLruCache(iconCacheSize);
mThumbnailCache = new BitmapLruCache(thumbnailCacheSize);
mActivityLabelCache = new StringLruCache(100);
三个缓存,主要用于缓存应用图标,名称,截屏。
4 mLoader = new TaskResourceLoader(mLoadQueue, mApplicationIconCache, mThumbnailCache, mDefaultThumbnail, mDefaultApplicationIcon);
TaskResourceLoader 继承自Runnable 他的构造函数中启动了一个HandlerThread,在他的Run函数中一直循环从mLoadQueue中读取任务并获取任务所对应的截图,并缓存到mThumbnailCache中,然后通知TaskView加载截图并显示。
public SpaceNode reload(Context context, int preloadCount, boolean isTopTaskHome) {
ArrayList<Task.TaskKey> taskKeys = new ArrayList<Task.TaskKey>();
ArrayList<Task> tasksToLoad = new ArrayList<Task>();
TaskStack stack = getTaskStack(mSystemServicesProxy, context.getResources(),
-1, preloadCount, true, isTopTaskHome, taskKeys, tasksToLoad);
SpaceNode root = new SpaceNode();
root.setStack(stack);
mLoader.start(context);
mLoadQueue.addTasks(tasksToLoad);
mPackageMonitor.setTasks(taskKeys);
return root;
}
这个函数首先通过调用getTaskStack获取最近最近任务堆栈,在getTaskStack中是通过mSystemServicesProxy找到ActivityManagerService获取最近使用的应用列表,然后获取应用列表中的应用的启动图片,以及名称等数据保存到数据类Task中,在吧所有的Task添加到TaskStack中返回。然后启动装载应用截图线程,并把所有的Task加入到mLoadQueue中。
Step10 mRecentsView.setTaskStacks
public void setTaskStacks(ArrayList<TaskStack> stacks) {
int childCount = getChildCount();
for (int i = childCount - 1; i >= 0; i--) {
View v = getChildAt(i);
if (v != mSearchBar) {
removeViewAt(i);
}
}
mStacks = stacks;
int numStacks = mStacks.size();
for (int i = 0; i < numStacks; i++) {
TaskStack stack = mStacks.get(i);
TaskStackView stackView = new TaskStackView(getContext(), stack);
stackView.setCallbacks(this);
if (mConfig.debugModeEnabled) {
stackView.setDebugOverlay(mDebugOverlay);
}
addView(stackView);
}
mAlreadyLaunchingTask = false;
}
这个函数先移除RecentsView中的所有子View然后把获取的Taskstack保存到mStacks中,然后创建TaskStackView 视图,并把视图中要显示的TaskStack保存到TaskStackView中。
最后把创建的TaskStackView视图作为子View添加到RecentsView中。
到此装载过程完成。
当RecentsActivity中ViewRootImpl对所有的View进程一次Measure ,过程中。会调用TaskStackView的onMeasure函数,在onMeasure函数中会调用到TaskView的synchronizeStackViewsWithModel函数。
Step11 TaskView. synchronizeStackViewsWithModel
这个函数比较长就不贴代码了,主要完成两个工作,
1 创建UI结构图中的TaskView并作为子View添加到TaskStackView中。
2 为TaskView计算在TaskStackView中的坐标并做一个TaskViewTransform平移动画。(这部分代码就不详细分析了)
在这个函数中就是通过调用tv = mViewPool.pickUpViewFromPool(task, task);来创建TaskView
mViewPool = new ViewPool
V pickUpViewFromPool(T preferredData, T prepareData) {
V v = null;
boolean isNewView = false;
if (mPool.isEmpty()) {
v = mViewCreator.createView(mContext);
isNewView = true;
}
……
mViewCreator.prepareViewToLeavePool(v, prepareData, isNewView);
return v;
}
从ViewPool的构造函数可以知道mViewCreator 就是TaskStackView
TaskStackView的createView就是创建了一个TaskView
在调用TaskStackView的prepareViewToLeavePool函数
Step12 TaskStackView.prepareViewToLeavePool函数
public void prepareViewToLeavePool(TaskView tv, Task task, boolean isNewView) {
tv.onTaskBound(task);
……
RecentsTaskLoader.getInstance().loadTaskData(task);
tv.setClipViewInStack(true);
if (isNewView) {
addView(tv, insertIndex);
tv.setTouchEnabled(true);
tv.setCallbacks(this);
} else {
attachViewToParent(tv, insertIndex, tv.getLayoutParams());
}
}
首先调用TaskView的onTaskBound函数,这个函数主要就是设置TaskView所关联的Task,也就是说所要显示的应用,然后设置TaskView为Task的成员变量mCb,而mCb主要用来通知刷新的。然后把创建的TaskView添加到TaskStackView中。
然后调用RecentsTaskLoader.getInstance().loadTaskData(task)函数
Step13 RecentsTaskLoader. loadTaskData
public void loadTaskData(Task t) {
Drawable applicationIcon = mApplicationIconCache.getAndInvalidateIfModified(t.key);
Bitmap thumbnail = mThumbnailCache.getAndInvalidateIfModified(t.key);
boolean requiresLoad = (applicationIcon == null) || (thumbnail == null);
applicationIcon = applicationIcon != null ? applicationIcon : mDefaultApplicationIcon;
if (requiresLoad) {
mLoadQueue.addTask(t);
}
t.notifyTaskDataLoaded(thumbnail == mDefaultThumbnail ? null : thumbnail, applicationIcon);
}
这个函数主要是判断当前Task的应用启动图标和截图是否已经在mApplicationIconCache中缓存。
如果没有缓存,则把Task加入到等待加载截图的队列mLoadQueue中,前面也介绍过这个队列TaskResourceLoader的run函数会一直从mLoadQueue 读取Task去获取其对应的应用截图和启动图标。
Step14 TaskResourceLoader.run
public void run() {
while (true) {
if (mCancelled) {
……
} else {
SystemServicesProxy ssp = mSystemServicesProxy;
final Task t = mLoadQueue.nextTask();
if (t != null) {
Drawable cachedIcon = mApplicationIconCache.get(t.key);
Bitmap cachedThumbnail = mThumbnailCache.get(t.key);
if (cachedIcon == null) {
cachedIcon = getTaskDescriptionIcon(t.key, t.icon, t.iconFilename, ssp,
mContext.getResources());
if (cachedIcon == null) {
ActivityInfo info = ssp.getActivityInfo(t.key.baseIntent.getComponent(),
t.key.userId);
if (info != null) {
cachedIcon = ssp.getActivityIcon(info, t.key.userId);
}
}
if (cachedIcon == null) {
cachedIcon = mDefaultApplicationIcon;
}
mApplicationIconCache.put(t.key, cachedIcon);
}
if (cachedThumbnail == null) {
cachedThumbnail = ssp.getTaskThumbnail(t.key.id);
if (cachedThumbnail != null) {
cachedThumbnail.setHasAlpha(false);
} else {
cachedThumbnail = mDefaultThumbnail;
}
mThumbnailCache.put(t.key, cachedThumbnail);
}
if (!mCancelled) {
final Drawable newIcon = cachedIcon;
final Bitmap newThumbnail = cachedThumbnail == mDefaultThumbnail
? null : cachedThumbnail;
mMainThreadHandler.post(new Runnable() {
@Override
public void run() {
t.notifyTaskDataLoaded(newThumbnail, newIcon);
}
});
}
}
……
}
}
}
}
这个函数比较好分析,首先从缓存中查看对应的Task的应用启动图标和截图是否已经存在,如果不存在就去获取,获取过程都是调用的系统接口,自行查看。
获取完成后缓存,然后往主线程发送一个消息,去执行t.notifyTaskDataLoaded(newThumbnail, newIcon);函数。
Step15 Task. notifyTaskDataLoaded
public void notifyTaskDataLoaded(Bitmap thumbnail, Drawable applicationIcon) {
this.applicationIcon = applicationIcon;
this.thumbnail = thumbnail;
if (mCb != null) {
mCb.onTaskDataLoaded();
}
}
这个函数就是保存获取的应用启动图标和应用截图,然后调用mCb. onTaskDataLoaded函数。
在step12中为TaskView关联要显示的Task后,还把TaskView设置为Task的mCb
TaskView的onTaskDataLoaded函数大家就知道了,把刚刚装载的应用启动图标和截图设置到TaskView对应的View中显示出来。
到此RecentsActivity的启动过程就分析完了。
欢迎关注个人微信公众号,定期更新个人工作心得

最后
以上就是兴奋网络最近收集整理的关于RecentsTask分析Android5.0的全部内容,更多相关RecentsTask分析Android5内容请搜索靠谱客的其他文章。


发表评论 取消回复