文章目录
- TensorFlow 是什么
- TensorFlow架构
- Graph
- tf.constant
本文tensorflow 版本1.12(先介绍1.x的版本,后面再学2.x的版本)
TensorFlow 是什么
TensorFlow 是一个开源的、基于 Python 的机器学习框架,它由 Google 开发,并在图形分类、音频处理、推荐系统和自然语言处理等场景下有着丰富的应用,是目前最热门的机器学习框架。
TensorFlow架构
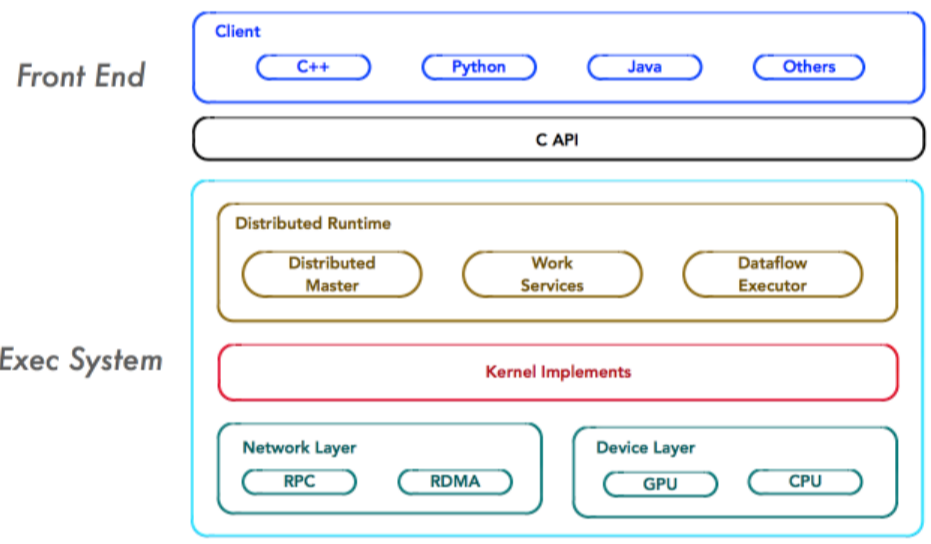
(图片来源于网上,侵删)
前端:编程模型、构造计算图、Python、C++、JAVA
后端:运行计算图、C++
Graph
上面简单介绍一下Tensorflow,这个大家在网上都能查到,就不多说了,下面抓紧介绍Tensorflow的基本概念。
图(Graph):描述计算的过程,可以通过tensorboard图形化流程结果
在tensorflow程序中,系统会自动维护一个默认的计算图,下面代码展现如何定义或者获取:
import tensorflow as tf  # tf是tensorflow别名
g1 = tf.Graph()  # 声明图
g2 = tf.get_default_graph()  # 获取当前默认的图

a = tf.constant([1.0, 2.0], name='a')  # 定义一个常量使用tf.constant方法
g3 = a.graph  # 通过a.graph可以查看张量所属的计算图,如果没有特别指定,则属于当前默认的计算图

print(g1, 'n', g2, 'n', g3)
输出结果:
<tensorflow.python.framework.ops.Graph object at 0x000001F6F2BCAEF0>
 <tensorflow.python.framework.ops.Graph object at 0x000001F6F29F8C18>
 <tensorflow.python.framework.ops.Graph object at 0x000001F6F29F8C18>
其中,tf.constant(创建常量的api),后文会介绍。
我们接着用下面这个例子展示如何声明和交叉使用多个Graph:
import tensorflow as tf

# 如果不加下面这段,会出现 The TensorFlow library wasn’t compiled to use SSE instructions, but these are available on your machine and could speed up CPU computations 警告
import os
os.environ['TF_CPP_MIN_LOG_LEVEL'] = '2'

g1 = tf.Graph()
with g1.as_default():  # 声明图的作用域
    # 在计算图g1中定义常量'v1',并设置初始值为1.0。
    v1 = tf.constant(1.0, name="v1")

g2 = tf.Graph()
with g2.as_default():
    # 在计算图g2中定义常量'v2',并设置初始值微2.0。
    v2= tf.constant(2.0, name="v2")

with tf.Session(graph=g2) as sess:
    list = tf.import_graph_def(g1.as_graph_def(), return_elements=["v1:0"], name = '')
    print(sess.run(list[0] + v2))
输出结果为:3.0
我们再看一个例子:
import tensorflow as tf

import os
os.environ['TF_CPP_MIN_LOG_LEVEL'] = '2'

g1 = tf.Graph()
with g1.as_default():
    # 在计算图g1中定义变量'v',并设置初始值为0。
    v = tf.get_variable('v', initializer=tf.zeros_initializer()(shape=[1]))

g2 = tf.Graph()
with g2.as_default():
    # 在计算图g2中定义变量'v',并设置初始值微1。
    v = tf.get_variable('v', initializer=tf.ones_initializer()(shape=[1]))

# 在计算图g1中读取变量'v'的取值
with tf.Session(graph=g1) as sess:
    tf.global_variables_initializer().run()
    with tf.variable_scope('', reuse=True):
        # 在计算图g1中,变量'v'的取值应该为0,下一行代码会输出[0.]。
        print(sess.run(tf.get_variable('v')))

# 在计算图g2中读取变量'v'的取值
with tf.Session(graph=g2) as sess:
    tf.global_variables_initializer().run()
    with tf.variable_scope('', reuse=True):
        # 在计算图g2中,变量'v'的取值应该为1,下一行代码会输出[1.]。
        print(sess.run(tf.get_variable('v')))
我们可以发现tensorflow可以通过tf.Graph函数生成新的计算图。不同计算图上的张量和运算都不会共享。
接着我们介绍 Graph如何保存pb和从pb恢复Graph
pb:是MetaGraph的protocol buffer格式的文件,MetaGraph包括计算图,数据流,以及相关的变量和输入输出
保存pb的好处就是使用场景是实现创建模型与使用模型的解耦,使得创建模型与使用模型的解耦,使得前向推导inference代码统一。另外的好处就是保存为pb的时候,模型的变量会变成固定的,导致模型的大小会大大减小。
保存pb:
g1 = tf.Graph()

tf.train.write_graph(g1.as_graph_def(), '.', 'graph.pb', False)
从pb中恢复Graph:
with tf.gfile.FastGFile("graph.pb", 'rb') as f:
    graph_def = tf.GraphDef()
    graph_def.ParseFromString(f.read())
    tf.import_graph_def(graph_def, name='')

sess = tf.Session()
cl_tensor = sess.graph.get_tensor_by_name("cl:0")
cl = sess.run(cl_tensor)
tensorflow中的计算图不仅可以用来隔离张量和计算,它还提供了管理张量和计算的机制。计算图可以通过tf.Graph.device函数来指定运行计算的设备,下面代码指定在GPU上运行加法计算:
g=tf.Graph()
# 指定计算运行的设备。
with g.device('/gpu:0'):
    result=a+b
tf.constant
补充说明一下,tf.constant(创建常量),函数原型如下:
tf.constant(
    value,
    dtype=None,
    shape=None,
    name='Const',
    verify_shape=False
)
第一个参数value是必须的,可以是一个数值,也可以是一个列表.
如果为查看结果必须创建一个会话session,并用取值函数eval()来查看创建的tensor的值(Session: 在会话(Session)的上下文(Context)中执行计算图。):
sess=tf.Session()
with sess.as_default():
    print(tensor.eval())
输出:1
而如果value是一个列表:
tensor=tf.constant([2, 4])
sess=tf.Session()
with sess.as_default():
    print( tensor.eval())
输出:[2 4]
后面四个参数可写可不写,第二个参数表示数据类型,一般可以是tf.float32, tf.float64等:
tensor=tf.constant([1, 2], dtype=tf.float32)
sess=tf.Session()
with sess.as_default():
    print(tensor.eval())
结果是: [1. 2.]
值得注意的数据类型相比之前发生了改变(float32),不是1 2,而是1.2。
第三个参数表示张量的“形状”,即维数以及每一维的大小。如果指定了第三个参数,当第一个参数value是数字时,张量的所有元素都会用该数字填充:
tensor=tf.constant(1, shape=[2, 3])
sess=tf.Session()
with sess.as_default():
    print(tensor.eval())
结果是: [[1 1 1]
[1 1 1]]
可以看到是一个二维张量,第一维大小为2, 第二维大小为3,全用数字1填充。
而当第一个参数value是一个列表时,注意列表的长度必须小于等于第三个参数shape的大小(即各维大小的乘积),否则会报错:
tensor=tf.constant([1, 2, 3, 4, 5, 6, 7], shape=[2, 3])
Traceback (most recent call last): File "<pyshell#68>", line 1, in <module> tensor=tf.constant([1, 2, 3, 4, 5, 6, 7], shape=[2, 3]) ValueError: Too many elements provided. Needed at most 6, but received 7
这是因为函数会生成一个shape大小的张量,然后用value这个列表中的值一一填充shape中的元素。这里列表大小为7,而shape大小为2*3=6,无法正确填充,所以发生了错误。
而如果列表大小小于shape大小,则会用列表的最后一项元素填充剩余的张量元素:
tensor=tf.constant([1, 2], shape=[1, 4, 3])
sess=tf.Session()
with sess.as_default():
    print(tensor.eval())
结果是: [[[1 2 2]
[2 2 2]
[2 2 2]
[2 2 2]]]
第四个参数name可以是任何内容,主要是字符串就行。
不输入任何内容时:
tensor=tf.constant([1, 2])
print(tensor)
Tensor(“Const_16:0”, shape=(2,), dtype=int32)
作为对比:
tensor=tf.constant([1, 2], name="jiayu")
print(tensor)
Tensor(“jiayu_1:0”, shape=(2,), dtype=int32)
第五个参数verify_shape默认为False,如果修改为True的话表示检查value的形状与shape是否相符,如果不符会报错。
tensor=tf.constant([[1, 2, 3], [4, 5, 6]], shape=[2, 3], verify_shape=True)
以上代码value与shape都是两行三列,检查结果正确。而下面的代码会报错:
tensor=tf.constant([1, 2], shape=[3, 2], verify_shape=True)
参考:
https://blog.csdn.net/csdn_jiayu/article/details/82155224
https://www.cnblogs.com/hypnus-ly/p/8040951.html
本篇文章到这里就结束啦,如果喜欢的话,多多支持,欢迎关注!

最后
以上就是霸气小蝴蝶最近收集整理的关于Tensorflow 学习-图的概念的全部内容,更多相关Tensorflow内容请搜索靠谱客的其他文章。


发表评论 取消回复