nginx——开发一个模块的简要步骤
本文主要介绍基于nginx开发一个模块的基本工作。主要分为以下几个部分:
1、nginx模块的基本数据结构
2、搭建http的过滤器功能
3、新增模块的编译和运行
1、模块基本数据结构
ngx_module.h里定义了一个模块的结构(包括回调和属性) 。
struct ngx_module_s {
    ngx_uint_t            ctx_index;
    ngx_uint_t            index;

    char                 *name;

    ngx_uint_t            spare0;
    ngx_uint_t            spare1;

    ngx_uint_t            version;
    const char           *signature;

    void                 *ctx;
    ngx_command_t        *commands;
    ngx_uint_t            type;

    ngx_int_t           (*init_master)(ngx_log_t *log);

    ngx_int_t           (*init_module)(ngx_cycle_t *cycle);

    ngx_int_t           (*init_process)(ngx_cycle_t *cycle);
    ngx_int_t           (*init_thread)(ngx_cycle_t *cycle);
    void                (*exit_thread)(ngx_cycle_t *cycle);
    void                (*exit_process)(ngx_cycle_t *cycle);

    void                (*exit_master)(ngx_cycle_t *cycle);

    uintptr_t             spare_hook0;
    uintptr_t             spare_hook1;
    uintptr_t             spare_hook2;
    uintptr_t             spare_hook3;
    uintptr_t             spare_hook4;
    uintptr_t             spare_hook5;
    uintptr_t             spare_hook6;
    uintptr_t             spare_hook7;
};
这里主要介绍两个成员。
(1)init_master:回调函数,进程启动时执行。
(2)ctx:指向一个结构体,主要用于解析conf文件里的属性。具体的结构体由上层去实现,因此是个void*类型。module结构体的封装可参考ngx_http_core_module.c中的ngx_http_core_module,其中ngx_http_core_module及其ctx封装如下:
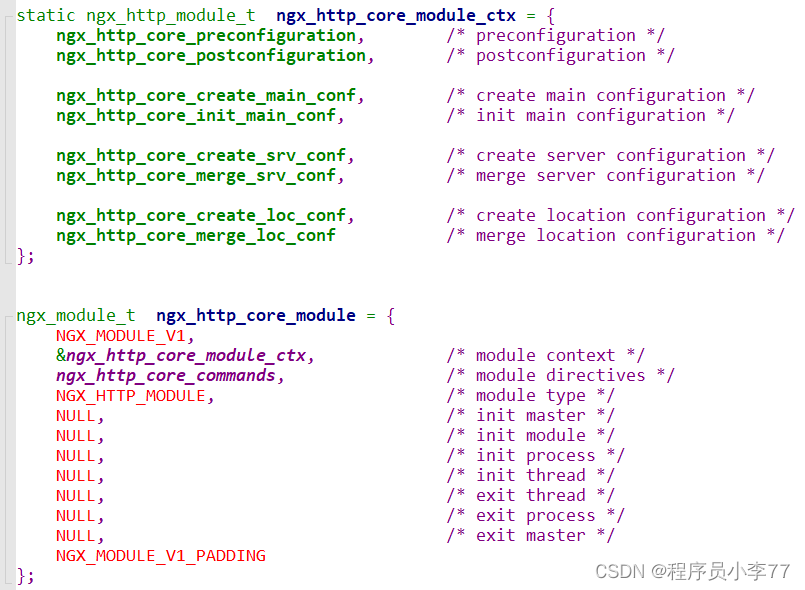
http_module和ngx_module之间的关系:
包含关系:ngx_module内部留了一块空间(void *ctx)给其上层去实现上层应用的module,就比如http_module、event_module。http_module的ctx的内容如下:
typedef struct {
    ngx_int_t   (*preconfiguration)(ngx_conf_t *cf);
    ngx_int_t   (*postconfiguration)(ngx_conf_t *cf);

    void       *(*create_main_conf)(ngx_conf_t *cf);
    char       *(*init_main_conf)(ngx_conf_t *cf, void *conf);

    void       *(*create_srv_conf)(ngx_conf_t *cf);
    char       *(*merge_srv_conf)(ngx_conf_t *cf, void *prev, void *conf);

    void       *(*create_loc_conf)(ngx_conf_t *cf);
    char       *(*merge_loc_conf)(ngx_conf_t *cf, void *prev, void *conf);
} ngx_http_module_t;
nginx的module的属性,大多都是通过conf文件来配置的,而代码主要来做的事情就是去解析这些conf文件。
ngx_http_config.h定义了http模块的conf文件的作用域,比如:
NGX_HTTP_MAIN_CONF:配置文件中整个http块有有效
NGX_HTTP_SRV_CONF:在server块有效
NGX_HTTP_LOC_CONF:在location块有效
2、搭建http的过滤器filter功能
当收到http请求时,nginx会由多个模块共同生成http响应进行处理,其中,过滤模块就是对响应进行加工,比如修改body或者修改header。
nginx通过全局链表来串起各个模块对Header的过滤处理:
ngx_http_top_header_filter:一个全局变量,指向header的过滤器函数的链表头结点。nginx在对响应进行filter处理的时候,会遍历这个链表所指向的函数结点。
下面附上代码:
该demo通过编写http过滤器模块,对响应消息的body和header进行了小修改;同时读取配置文件中的add_prefix配置项,来判断是否要进行修改。
(ngx_http_prefix_filter_module.c)
#include <ngx_config.h>
#include <ngx_core.h>
#include <ngx_http.h>

ngx_module_t ngx_http_prefix_filter_module;
static ngx_int_t ngx_http_prefix_filter_init(ngx_conf_t *cf);
static ngx_int_t ngx_http_prefix_filter_header_filter(ngx_http_request_t *r);
static ngx_int_t ngx_http_prefix_filter_body_filter(ngx_http_request_t *r, ngx_chain_t *in);

static ngx_str_t test_header_str = ngx_string("<H2> lxn <h2>");

static ngx_http_output_header_filter_pt  ngx_http_next_header_filter; //保存了前一个filter模块的处理函数
static ngx_http_output_body_filter_pt    ngx_http_next_body_filter; //保存了前一个filter模块的处理函数

typedef struct {
    ngx_int_t already_add_prefix; // 是否需要进行修改,用于heder和body的filter函数同步状态
} ngx_http_prefix_filter_resp_ctx_t; // 模块上下文信息,用于在模块的多次回调中同步数据

typedef struct {
	ngx_flag_t enable;
} ngx_http_prefix_filter_conf_t; // 自定义的用于存储配置变量的结构体

static ngx_command_t ngx_http_prefix_filter_commands[] = {
	{
		ngx_string("add_prefix"),
		NGX_HTTP_MAIN_CONF|NGX_HTTP_SRV_CONF|NGX_HTTP_LOC_CONF|NGX_HTTP_LMT_CONF|NGX_CONF_FLAG, // 指定这个配置项的属性
		ngx_conf_set_flag_slot, // nginx提供的一个用于设置NGX_CONF_FLAG类型的配置项的通用函数
		NGX_HTTP_LOC_CONF_OFFSET,
		offsetof(ngx_http_prefix_filter_conf_t, enable), // 该配置项在上层的数据结构体中的位置偏移
		NULL
	},
	ngx_null_command
};

// 模块自定义的header过滤函数:用于修改conten-length
static ngx_int_t ngx_http_prefix_filter_header_filter(ngx_http_request_t *r)
{
	ngx_http_prefix_filter_conf_t *my_ccf = ngx_http_get_module_loc_conf(r, ngx_http_prefix_filter_module);
	ngx_http_prefix_filter_resp_ctx_t *resp_ctx = NULL;

	if (!my_ccf || my_ccf->enable == 0) {
		return ngx_http_next_header_filter(r);
	}

	resp_ctx = ngx_pcalloc(r->pool, sizeof(ngx_http_prefix_filter_resp_ctx_t));
	if (resp_ctx == NULL) {
		return NGX_ERROR;
	}
	resp_ctx->already_add_prefix = 0;
	ngx_http_set_ctx(r, resp_ctx, ngx_http_prefix_filter_module); // 设置上下文,当符合修改条件时,将标志位置一,即通知body filter也修改

	if (r->headers_out.content_type.len >= sizeof("text/html") - 1
		&& ngx_strncasecmp(r->headers_out.content_type.data, (u_char*)"text/html", sizeof("text/html")-1) == 0) {
		resp_ctx->already_add_prefix = 1;
		if (r->headers_out.content_length_n > 0) {
			r->headers_out.content_length_n += test_header_str.len;
        }
    }

	return ngx_http_next_header_filter(r);
}

// 模块自定义的body过滤函数:用于修改body的内容
static ngx_int_t ngx_http_prefix_filter_body_filter(ngx_http_request_t *r, ngx_chain_t *chain)
{
	ngx_http_prefix_filter_conf_t *my_ccf = ngx_http_get_module_loc_conf(r, ngx_http_prefix_filter_module);
	ngx_http_prefix_filter_resp_ctx_t *resp_ctx = NULL;
	ngx_buf_t *buffer = NULL;
	ngx_chain_t *cl = NULL;

	if (!my_ccf || my_ccf->enable == 0) {
		return ngx_http_next_body_filter(r, chain); //继续执行下一个模块的函数
	}

	resp_ctx= ngx_http_get_module_ctx(r, ngx_http_prefix_filter_module); // 取出上下文,以判断是否要进行修改
	if (!resp_ctx || resp_ctx->already_add_prefix == 0) {
		return ngx_http_next_body_filter(r, chain);
	}

	buffer = ngx_create_temp_buf(r->pool, test_header_str.len); // 创建一块buf
	cl = ngx_alloc_chain_link(r->pool); //从request中的chain链表分配并获得一块空间(头插法)

	buffer->start = buffer->pos = test_header_str.data;
	buffer->last = buffer->pos + test_header_str.len;

	// nginx在发送数据的时候,是一块一块send的,每一块数据都存储在ngx_buf_t中,并由ngx_chain_t来串成链式结构
	cl->buf = buffer;
	cl->next = chain;

	return ngx_http_next_body_filter(r, cl); //继续执行下一个模块的函数
}

// 对全局的过滤器回调函数指针进行链表头插法,将本module自己实现的header过滤函数和body过滤函数插入到链表中
static ngx_int_t ngx_http_prefix_filter_init(ngx_conf_t *cf) {

	ngx_http_next_header_filter = ngx_http_top_header_filter;
	ngx_http_top_header_filter = ngx_http_prefix_filter_header_filter;

	ngx_http_next_body_filter = ngx_http_top_body_filter;
	ngx_http_top_body_filter = ngx_http_prefix_filter_body_filter;

	return NGX_OK;
}

static void *ngx_http_prefix_filter_create_conf(ngx_conf_t *cf) {

	ngx_http_prefix_filter_conf_t *conf = ngx_pcalloc(cf->pool, sizeof(ngx_http_prefix_filter_conf_t));
	if (conf == NULL) {
		return NULL;
	}

	conf->enable = NGX_CONF_UNSET;

	return conf;
}


static char *ngx_http_prefix_filter_merge_conf(ngx_conf_t *cf, void *parent, void *child) {
	ngx_http_prefix_filter_conf_t *prev = (ngx_http_prefix_filter_conf_t*)parent;
	ngx_http_prefix_filter_conf_t *conf = (ngx_http_prefix_filter_conf_t*)child;

	// 宏(用于设置第一个值):如果第一个有设置,则优先用第一个,否则看第二个有无设置,如果都没设置,则使用缺省值(最后一个)
	ngx_conf_merge_value(conf->enable, prev->enable, 0);

	return NGX_CONF_OK;
}

static ngx_http_module_t ngx_http_prefix_filter_module_ctx = {
	NULL,
	ngx_http_prefix_filter_init, // s所有的conf都解析完的时候执行
	NULL,
	NULL,
	NULL,
	NULL,
	ngx_http_prefix_filter_create_conf, // 创建一块空间来存储command里的参数值
	ngx_http_prefix_filter_merge_conf
};

// 在开始的时候初始化就载入: preinit_modules
ngx_module_t ngx_http_prefix_filter_module = {
	NGX_MODULE_V1,
	&ngx_http_prefix_filter_module_ctx, // void *ctx,这里提供了一块空间去指向对应模块类型的上下文
	ngx_http_prefix_filter_commands,
	NGX_HTTP_MODULE, // module的类型,关系到ctx结构体的类型.比如http类型的module,对应就使用ngx_http_module_t类型的ctx;再比如除了http类型的模块以外,还有event类型的模块,用户自己开发的模块等
	NULL,
	NULL,
	NULL,
	NULL,
	NULL,
	NULL,
	NULL,
	NGX_MODULE_V1_PADDING
};
3、新增模块的编译
在我们编写好新模块的代码后,nginx编译时要如何加载这个模块?
这就需要我们为这个新模块编写config文件,文件内容如下:
ngx_addon_name=ngx_http_prefix_filter_module
HTTP_FILTER_MODULES="$HTTP_FILTER_MODULES ngx_http_prefix_filter_module"
NGX_ADDON_SRCS="$NGX_ADDON_SRCS $ngx_addon_dir/ngx_http_prefix_filter_module.c"
主要内容为:
(1)设置模块的名称;
(2)由于这个模块是http过滤器模块,所以变量HTTP_FILTER_MODULES中要添加这个模块;
(3)源码添加该模块的c文件。
在编译前的configure阶段,configure命令要加入--add-module选项来添加模块的config文件的路径。
#!/bin/bash
set -u
set -e

cd `dirname $0`
CUR_DIR=$PWD
./configure --prefix=/root/output/nginx --add-module=$CUR_DIR/src/mymodules/prefix_filter
make && make install
4、配置文件
由于我们在新模块中选择读取了配置项“add_prefix”,并以此来判断是否要filter响应。所以配置文件中可以通过修改add_prefix来决定是否开启我们新模块的filter功能。
worker_processes  1;

events {
    worker_connections  1024;
}

http {
    server {
        listen       8888;
        server_name  localhost;

        location / {
            root   html;
            add_prefix on;
        }
    }
}
最后
以上就是寒冷大山最近收集整理的关于【nginx】开发一个模块的简要步骤nginx——开发一个模块的简要步骤的全部内容,更多相关【nginx】开发一个模块内容请搜索靠谱客的其他文章。


发表评论 取消回复