文章目录
- 通知传值简介:
- 基本步骤
- 步骤一:建立“通知中心”
- 步骤二:发送信息
- 步骤三:接收消息(也就是“通知中心”的处理信息事件)
- 步骤四:移除通知(一定要写)
- 完整代码
- 效果图
通知传值简介:
在通知接收方需要注册通知,并指定接收到通知后进行的操作;而在通知发送方则在需要传递数据时发送通知就OK了。通知的操作都是通过NSNotificationCenter来完成的。
但是要注意的三点是:
- 要想能够接收到通知进行处理,必须先注册通知。
- 在注册通知的页面消毁时一定要移除已经注册的通知,否则会造成内存泄漏
- 注册的接收通知的名称必须和发送通知的名称保持一致才能接收到,否则无法接收到发出的通知
适用场景:
- 一般用于已经通过push的方式进入到子页面,在从子页面返回主页面的时候(子页面会释放掉内存),需要在主页面中使用子页面中的数据,这是就可以利用通知反向传值。
- 但是也可以用于通过push进入子页面时向子页面传递数据,这时就可以用通知进行正向传值。
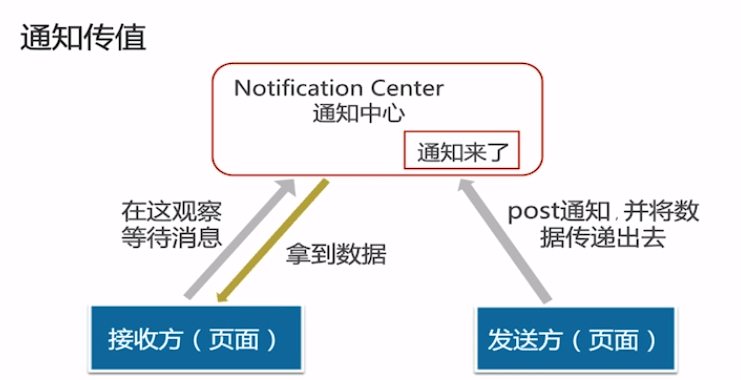
先用一幅图来大致说明一下两个界面与“通知中心”的关系
拿两个界面来解释一下:分别是注册界面和登陆界面,注册界面需要把已注册的信息传到登陆界面。首先,我们要建立一个“通知中心”来作“媒介”传递这个信息,然后我们的注册页面需要把这些信息发给通知中心,然后 通知中心将信息传递给一直在“观察等待消息”的登陆界面。
基本步骤
步骤一:建立“通知中心”
使用到的方法:
写到界面一(登陆界面):
[[NSNotificationCenter defaultCenter]addObserver:self selector:@selector(notiReceived::)name:@"TransDataNoti" object: nil];
步骤二:发送信息
写到界面二(注册界面):
//发送通知回传数据,回传的数据格式自定义,这里定义为dictionary类型
[[NSNotificationCenter defaultCenter] postNotificationName:@"TransDataNoti" object:nil userInfo:@{@"content":_textField.text}];
步骤三:接收消息(也就是“通知中心”的处理信息事件)
写到界面一(登陆界面):
-(void) notiReceived:(NSNotification*)sender {
    self.textField.text = sender.userInfo[@"content"];
}
步骤四:移除通知(一定要写)
写到界面一(登陆界面)
-(void) dealloc {
    //移除所有
    [[NSNotificationCenter defaultCenter] removeObserver:self];
    //移除某一个
    //[[NSNotificationCenter defaultCenter] removeObserver:self name:@"TransDataNoti" object:nil];
}
完整代码
//FirstViewController.m
#import "FirstViewController.h"
#import "SecondViewController.h"
@interface FirstViewController ()

@property (strong, nonatomic) UITextField *textField;
@property (strong, nonatomic) UIButton *button;

@end

@implementation FirstViewController

- (void)viewDidLoad {
    [super viewDidLoad];
    // Do any additional setup after loading the view.
    self.view.backgroundColor = [UIColor whiteColor];
    self.title = @"主界面";

    _textField = [[UITextField alloc] init];
    _textField.textColor = [UIColor whiteColor];
    _textField.textAlignment = NSTextAlignmentCenter;
    _textField.backgroundColor = [UIColor blackColor];
    _textField.frame = CGRectMake(100, 100, 200, 60);
    [self.view addSubview:_textField];

    _button = [UIButton buttonWithType:UIButtonTypeCustom];
    [_button setTitle:@"跳转到子界面" forState:UIControlStateNormal];
    [_button setTitleColor:[UIColor blueColor] forState:UIControlStateNormal];
    [_button addTarget:self action:@selector(btnClicked:) forControlEvents:UIControlEventTouchUpInside];
    _button.frame = CGRectMake(100, 300, 200, 60);
    [self.view addSubview:_button];

    //注册通知,用于接收通知,接受通知的名称必须和发送通知的名称一致才能收到,否则无法接受到发出的通知
    [[NSNotificationCenter defaultCenter] addObserver:self selector:@selector(notiReceived:) name:@"TransDataNoti" object:nil];
}

-(void) dealloc {
    //移除所有
    [[NSNotificationCenter defaultCenter] removeObserver:self];
    //移除某一个
    //[[NSNotificationCenter defaultCenter] removeObserver:self name:@"TransDataNoti" object:nil];
}
//用于接收通知,解析内容进行处理
-(void) notiReceived:(NSNotification*)sender {
    self.textField.text = sender.userInfo[@"content"];
}
-(void) btnClicked:(UIButton *)btn {
    SecondViewController* second = [[SecondViewController alloc] init];
    [self.navigationController pushViewController:second animated:YES];
}
@end
//SecondViewController.m
#import "SecondViewController.h"

@interface SecondViewController ()

@property (strong, nonatomic) UITextField *textField;
@property (strong, nonatomic) UIButton *button;
@property (strong, nonatomic) NSString* content;
@end

@implementation SecondViewController

- (void)viewDidLoad {
    [super viewDidLoad];
    // Do any additional setup after loading the view.
    self.view.backgroundColor = [UIColor whiteColor];
    self.title = @"子界面";

    _textField = [[UITextField alloc] init];
    _textField.textColor = [UIColor whiteColor];
    _textField.textAlignment = NSTextAlignmentCenter;
    _textField.backgroundColor = [UIColor blackColor];
    _textField.frame = CGRectMake(100, 100, 200, 60);
    [self.view addSubview:_textField];

    _button = [UIButton buttonWithType:UIButtonTypeCustom];
    [_button setTitle:@"跳转到主界面" forState:UIControlStateNormal];
    [_button setTitleColor:[UIColor blueColor] forState:UIControlStateNormal];
    [_button addTarget:self action:@selector(btnClicked:) forControlEvents:UIControlEventTouchUpInside];
    _button.frame = CGRectMake(100, 300, 200, 60);
    [self.view addSubview:_button];
}

-(void) btnClicked:(UIButton*) button {
     //发送通知回传数据,回传的数据格式自定义,这里定义为dictionary类型
    [[NSNotificationCenter defaultCenter] postNotificationName:@"TransDataNoti" object:nil userInfo:@{@"content":_textField.text}];
    [self.navigationController popViewControllerAnimated:YES];
}
@end
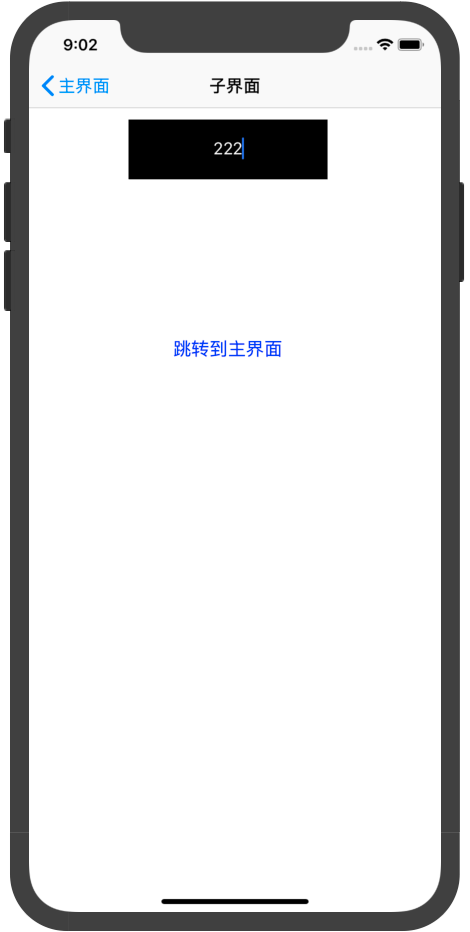
效果图

最后
以上就是飞快海燕最近收集整理的关于【iOS开发】——通知传值通知传值简介:基本步骤完整代码效果图的全部内容,更多相关【iOS开发】——通知传值通知传值简介内容请搜索靠谱客的其他文章。
本图文内容来源于网友提供,作为学习参考使用,或来自网络收集整理,版权属于原作者所有。


![[iOS开发]通知传值](https://www.shuijiaxian.com/files_image/reation/bcimg19.png)


发表评论 取消回复